1
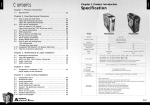
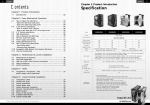
CAUTION
Before installing Thermaltake Bigwater 850 GT Liquid Cooling System, we
strongly suggest you to read the manual thoroughly and make sure all
components are included in the package. Please do follow the installation
guide step-by-step. Improper installation may cause serious damage to the
system as well as to the water cooling unit. Thermaltake will not responsible
for any damages due to incorrect installation and incorrect usage of this
product.
VORSICHT
Bevor Sie das Thermaltake Bigwater 850 GT Flüssigkeitskühlungssystem
installieren, empfehlen wir Ihnen dringend, das Handbuch zu lesen und sicher
zu stellen, dass alle Komponenten im Paket enthalten sind. Bitte folgen Sie
der Installationsanleitung Schritt für Schritt. Eine nicht sachgerechte
Installation kann zu ernsthaften Beschädigungen des Systems sowie der
Wasserkühlungseinheit führen. Thermaltake ist nicht verantwortlich für
Beschädigungen aufgrund von unsachgemäßer Installation und falscher
Nutzung dieses Produkts.
ATTENTION
Avant d'installer le système de refroidissement liquide Thermaltake BigWater
850 GT, nous vous recommandons fortement de lire le manuel entièrement et
de vous assurer que tous les composants soient inclus dans l'emballage.
Veuillez suivre le guide d'installation étape par étape. Une mauvaise
installation peut provoquer de sérieux dégâts au système ainsi qu'à l'unité de
refroidissement par eau. Thermaltake ne sera pas responsable de tous
dommages dus à une mauvaise installation et une mauvaise utilisation de ce
produit.
PRECAUCIONES
Antes de instalar el sistema de refrigeración líquida Thermaltake Bigwater 850
GT, le recomendamos encarecidamente que lea todo el manual y asegúrese
de que todos los componentes se incluyen en el paquete. Siga la guía de
instalación paso a paso. Una instalación inadecuada puede producir daños
serios al sistema además de a la unidad de refrigeración por agua.
Thermaltake no se responsabiliza de los daños causados por una instalación
incorrecta y el uso incorrecto de este producto.
33
ATTENZIONE
Prima di installare il sistema di raffreddamento a liquido Thermaltake Bigwater
850 GT, si raccomanda di leggere in modo approfondito il manuale e
assicurarsi che tutti i componenti siano inclusi nella confezione. Seguire
dettagliatamente la guida di installazione. L’installazione non corretta
potrebbe causare seri danni al sistema, nonché all’unità di raffreddamento
dell’acqua. Thermaltake non sarà responsabile di alcun danno dovuto a
installazione non corretta e utilizzo non appropriato del presente prodotto.
CUIDADO
Antes de instalar o sistema de refrigeração líquida Thermaltake Bigwater 850
GT, recomendamos que leia cuidadosamente o manual e se certifique que
todos os componente estão incluídos no pacote. Siga o guia de instalação
passo a passo. A instalação indevida pode causar danos graves ao sistema,
assim como à unidade refrigeradora a água. Thermaltake não ser
responsabiliza por quaisquer danos devidos à instalação incorrecta e
utilização indevida deste produto.
ΠΡΟΣΟΧΗ
Πριν από την εγκατάσταση του Συστήματος Υγρόψυξης Thermaltake Bigwater
850 GT, σας συνιστούμε ανεπιφύλαχτα να διαβάσετε το εγχειρίδιο σχολαστικά κ
αι να βεβαιωθείτε ότι όλα τα στοιχεία περιλαμβάνονται μέσα στη συσκευασία. Εφ
αρμόστε τον οδηγό εγκατάστασης βήμα-βήμα. Η εσφαλμένη εγκατάσταση ενδέχε
ται να προκαλέσει σοβαρή βλάβη στο σύστημα καθώς και στη μονάδα υδρόψυξη
ς. Η Thermaltake δε θα φέρει καμία ευθύνη για βλάβες λόγω εσφαλμένης εγκατ
άστασης και εσφαλμένης χρήσης του συγκεκριμένου προϊόντος.
警告
在安裝曜越Bigwater 850 GT水冷散熱系統前,我們強烈的建議您先閱讀說明書與
檢查包裝內的零件是否齊全。請參照說明書來組裝Bigwater 850 GT。錯誤的安裝
方式可能會損害到您的電腦系統以及Bigwater 850 GT。若因錯誤的安裝方式和錯
誤使用方式而損害到您的電腦系統以及Bigwater 850 GT,曜越科技將不負任何賠
償責任。
警告
在安装曜越Bigwater 850 GT水冷散热系统前,我们强烈的建议您先阅读说明书与
检查包装内的零件是否齐全。请参照说明书来组装Bigwater 850 GT。错误的安装
方式可能会损害到您的计算机系统以及Bigwater 850 GT。若因错误的安装方式和
错误使用方式而损害到您的计算机系统以及Bigwater 850 GT,曜越科技将不负任
何赔偿责任。
34
Specification
注意
Thermaltake Bigwater 850 GT 液体冷却システムを取り付ける前に、このマニュ
アルをよく読み、付属品がパッケージにすべて含まれていることを確認する必
要があります。取り付けは、ガイドの指示に従い1段階ずつ行ってください。不
適切な取り付けは、システムとウォーター水冷装置のひどく損傷につながりま
す。Thermaltakeは本製品の誤った取り付けと不適切な使用による損傷に責任を
負いません。
Dimension
Weight
0.965(kg)
Dimension
75(L) x 70(W) x 75(H) mm Bearing
Ceramic bearing
Maximum Capacity
500 L/ hr
Rated Voltage
DC 12V
Pump
ВНИМАНИЕ!
Перед установкой системы водяного охлаждения Thermaltake Bigwater
850 GT настоятельно рекомендуется внимательно прочитать руководство
и проверить комплектацию системы. Обязательно выполняйте указания п
о установке пошагово. Неправильная установка может привести к серьезн
ому повреждению системы, а также блока водяного охлаждения. Компани
я Thermaltake не несет ответственности за любые убытки, понесенные в р
езультате неправильной установки и использования данного изделия.
DİKKAT
Thermaltake Bigwater 850 GT Sıvı Soğutmalı Sistemi’ni kurmadan önce, kı
lavuzu ayrıntılı bir şekilde okumanız ve tüm bileşenlerin pakette yer aldığından
emin olmanız şiddetle tavsiye edilir. Lütfen kurulum kılavuzunu adım adım
takip edin. Kurulumun yanlış yapılması, su soğutmalı birimin yanı sıra
sistemde de ciddi hasara neden olabilir. Thermaltake, bu ürünün yanlış
kurulumu ve yanlış kullanımından doğacak herhangi bir hasar için sorumluluk
kabul etmez.
ข้ อ ควรระวั ง
ก่ อ นที ่ จ ะติ ด ตั ้ ง Thermaltake Bigwater 850 GT พร้ อ มระบบระบาย
ความร้ อ นด้ ว ยน้ ำ เราขอแนะนำเป็ น อย่ า งยิ ่ ง ให้ ค ุ ณ อ่ า นคู ่ ม ื อ ให้ ล ะเอี ย ด
ถี ่ ถ ้ ว น และตรวจสอบว่ า มี ส ่ ว นประกอบทั ้ ง หมดอยู ่ ใ นชุ ด ผลิ ต ภั ณ ฑ์
ครบถ้ ว นแล้ ว กรุ ณ าทำตามขั ้ น ตอนต่ า ง ๆ ในคู ่ ม ื อ การตั ้ ง ที ล ะขั ้ น ตอน
การติ ด ตั ้ ง ที ่ ไ ม่ เ หมาะสมอาจก่ อ ให้ เ กิ ด ความเสี ย หายขั ้ น ร้ า ยแรงต่ อ ระบบ
ของเครื ่ อ งและระบบระบายความร้ อ นได้ Thermaltake จะไม่ ร ั บ ผิ ด ชอบ
ใด ๆ ทั ้ ง สิ ้ น ต่ อ ความเสี ย หายอั น เนื ่ อ งมาจากการติ ด ตั ้ ง และการใช้ ง าน
ผลิ ต ภั ณ ฑ์ ท ี ่ ไ ม่ ถ ู ก ต้ อ ง
160 mm(L) X 148mm(W) X 85mm(H)
2U Bay Drives
Liquid Tank
Water Block
Input current
600 mA
Connector
4 pin
Noise
16 dBA
Life time
80,000 hr (MTBF) Dimension
130.2 (L) x 107.2(W) x 51.5(H) mm
Capacity
330 c.c
Material
POM (Cover & Connector) ,Copper (Base)
Dimension
68mm(L) X 64mm(W) X 41mm(H)
Tubing & Hoes Clip
For 9.5mm ID (3/8”) tubing
Weight
114(g)
AMD FM1/AM3+/AM3/AM2+/AM2
Application
Intel LGA 2011/1366/1156/1155/775
Dimension
Radiator
Fan
273(L) x 120(W) x 28(H) mm
Material
Aluminum
Tube Design
Aluminum, Dimple
Fin Design
Aluminum, Louvered
Tubing & Hose Clip
For 9.5mm ID (3/8”) tubing
Fan Dimension
120(L) x 120(W) x 25(H) mm
Fan Speed
1000 ~ 2000 RPM
Noise
20 ~ 28 dB
Fan Connector
4 pin
Dimension
9.5mm ID(3/8”) tube
Material
Green UV
Capacity
1000 c.c
Major Material Ingredient
Propylene Glycol
Tube
Coolant
35
36
EN
EN
3
2
Components check
Lock
B
A
CPU Waterblock x 1
Grease x 1
F
E
D
C
B
Keep lock device of LGA775 Clip (D)/
LGA1155/LGA1156/LGA1366 Clip
(F) in pre-installed position.
Apply a thin layer of Thermal
Grease (B) on the CPU.
LGA775 Clip x 2
Screw x 4
G
Push-pin position
4
For LGA1155/1156
AMD Clip x 2
Place the assembled waterblock on the processor, and then
push the lock devices until hearing an "click" sound.
Tip: Push the lock devices diagonally to press the forces evenly.
For LGA1366
LGA1155/LGA1156/LGA1366 Clip x 2
H
J
I
Hose Clip x 8
K
AMD Installation
2
1
Refill Bottle x 1
1000 c.c. Coolant x 1
Water Tube 400cm x 1
C
Male Quickconn
Connector x 2
Secure the AMD Clip (E)
on the base of
Waterblock (A) with
screws (C).
E
Installation steps
Caution:
A
Please pay attention to the following,
1. DO NOT open the cover of liquid tank when system is on.
2. When replacing the coolant, open the tank cover after 30 minutes of
system off.
3. In addition to filling the first coolant, make sure the system turns off
every time when refilling the coolant.
B
Apply a thin layer of Thermal
Grease (B) on the CPU.
3
Place the assembled waterblock on the processor.
2-1 Step 1 Install Waterblock onto CPU
LGA775/LGA1155/LGA1156/LGA1366 Installation
1
C
4
Secure the LGA775 Clip (D)/ LGA1155/LGA1156/LGA1366
Clip (F) on the base of CPU Waterblock (A) with Screw (C).
A
37
Align both side of the clips on the retention frame's tap, and then
turn clockwise at the same time until both clips are secure tightly
on the taps.
D or F
38
EN
EN
2-2 Step 2. Install Water tube
2-3 Step 3. Connect the Quickconn connector
1
2
Connect the Quickconn connector.
Connect the 4-pin connector
of pump and fan to power supply.
A
B
A
2-4 Step 4. Fill Coolant
A type (connection for waterblock and radiator)
1
2
3
4
1
Insert the Hose Clip (G) through the Water Tube (J).
Open the cover of liquid
tank.
Fill the tank up with
coolant.
Turn on the PC power
switch.
2
5
6
7
Liquid level will decrease
when you power on the
system, please keep
filling coolant until the
tank is filled up.
8
Connect the tube to the waterblock
or radiator. Use pliers to tighten the
Hose Clips (G).
3
Please determine the length by yourself.
Then cut the tubing accordingly.
Please make sure liquid
is flowing continuously
and smoothly within the
tube.
Close the cover of
liquid tank.
Adjust the fan speed.
Turn off the PC power
switch.
9
B type (connection for quickconn connector)
Insert the Hose Clip (G) and
Quickconn Connector (K) through the tube.
Use pliers to tighten the Hose Clip (G).
Caution:
1. If bubbles are forming within the tubing , you may tap the tube gently to remove them until all are gone.
2. After installation is completed, please ensure there are no bent tubings.
39
40
EN
DE
2-5 Step 5. Power on the system
Komponentenüberprüfung
Turn on the PC power switch.
A
Fett x1
CPU-Wasserblock x 1
2-6 Step 6. Schedule Maintenance
F
E
D
C
B
LGA775 Clip x 2
Schrauben x4
G
Push-pin position
Water Tank
Please regular check for water level within the
water tank. If the liquid level is below the low level,
please follow the installation step 4 on manual to
refill the coolant.(We strongly recommend
checking the water level once a month.)
For LGA1155/1156
AMD Clip x 2
For LGA1366
LGA1155/LGA1156/LGA1366 Clip x 2
H
J
I
Schlauch-Clips x 8
K
Tubing
Tubing within the system must not be bent.
Replace tubing if necessary.
1000 ccm
Kühlflüssigkeit x 1
Nachfüllflasche x 1
Wasserschlauch
400 cm x 1
Schnellanschluss x 2
Installationsschritte
VORSICHT
Q&A
Q:I'm running low on coolant.What's happening and what can I do?
A:The performance coolant included with main unit contains water based material so it is
subject to natural evaporation. It is normal for the coolant to decrease depending on the
usage or surrounding environment. For best performance, we highly recommend
replacing the coolant every 6 month.
Q:How often do I have to refill the system?
A:Depending on the usage or surrounding environment, we strongly recommend
checking the liquid level once a month to ensure optimal performance. If the liquid level is
below the low level, please follow the installation step 4 to refill the coolant.
Bitte achten Sie auf das Folgende:
1. Öffnen Sie nicht die Abdeckung des Flüssigkeitstanks, solange das System eingeschaltet ist.
2. Wenn Sie das Kühlmittel ersetzen möchten, öffnen Sie die Tankabdeckung 30 Minuten nachdem das
System abgeschaltet wurde.
3. Stellen Sie zusätzlich zum Befüllen mit dem ersten Kühlmittel sicher, dass sich das System jedes Mal
beim Nachfüllen des Kühlmittels abschaltet.
2-1 Schritt 1.Wasserblock auf CPU installieren
LGA775/LGA1155/LGA1156/LGA1366 Installation
1
C
Sichern Sie den Clip LGA775
(D)/LGA1155/LGA1156/LGA1366 Clip (F) auf der Basis des
CPU-Kühlers (A) mit Schraube (C).
A
41
D or F
42
DE
DE
3
2
2-2 Schritt 2. Wasserleitung installieren
Lock
B
A
B
Belassen Sie die Sperrvorrichtung
von LGA775 Clip (D)/LGA
1155/LGA1156/LGA1366 Clip (F) in
der vorinstallierten Position.
Bringen Sie eine dünne Schicht
Thermalpaste (B) die CPU auf.
A
4
Setzen Sie den montierten Wasserblock auf den Prozessor und
drücken Sie dann die Sperrvorrichtungen bis Sie ein "Klick"Geräusch hören.
Tipp: Drücken Sie diagonal auf die Sperrvorrichtungen, um
gleichmäßig Druck auszuüben.
A-Typ (Verbindung für Wasserblock und Kühler)
1
Führen Sie den Schlauch-Clip (G) durch den Wasserschlauch (J) ein.
AMD Installation
2
1
C
B
2
Sichern Sie den AMD
Clip (E) mit Schrauben
(C) auf der Basis des
Wasserblocks (A).
E
A
Verbinden Sie den Schlauch zum Wasserblock
oder Kühler. Benutzen Sie eine Zange, um die
Schlauch-Clips festzuziehen (G).
Bringen Sie eine dünne Schicht
Thermalpaste (B) die CPU auf.
3
3
Bitte ermitteln Sie die Länge selbst. Dann schneiden
Sie die Leitung entsprechend zu.
Platzieren Sie den zusammengebauten Wasserblock
auf dem Prozessor.
B-Typ (Verbindung für Schnellanschluss)
4
Richten Sie beide Seiten der Clips auf dem Zapfen des
Halterahmens aus, drehen Sie dann gleichzeitig im
Uhrzeigersinn, bis beide Clips fest auf den Zapfen sitzen.
43
Bringen Sie den Schlauch-Clip (G) und den
Schnellanschluss (K) durch den Schlauch ein.
Benutzen Sie eine Zange, um den SchlauchClip (G) zu befestigen.
44
DE
DE
2-3 Schritt 3. Verbinden Sie den Schnellanschluss
2-5 Schritt 5. Schalten Sie das System ein
2
1
Schalten Sie den PC ein.
Verbinden Sie den 4-poligen Anschluss der
Pumpe und des Lüfters mit der Stromzufuhr.
Verbinden Sie den Schnellanschluss.
2-6 Schritt 6. Wartungsterminplan
2-4 Schritt 4. Kühlflüssigkeit einfüllen
1
Öffnen Sie die Abdeckung
des Flüssigkeitstanks.
5
Bitte stellen Sie sicher,
dass die Flüssigkeit
kontinuierlich und
reibungslos in der
Röhre fließt.
9
2
Füllen Sie den Tank
mit Kühlflüssigkeit.
6
Schließen Sie die
Abdeckung des
Flüssigkeitstanks.
Wassertank
3
4
Schalten Sie den PC ein.
Der Flüssigkeitsstand wird sich
verringern, nachdem das System
eingeschaltet wurde; füllen Sie
bitte weiter Kühlmittel ein,
bis der Tank voll ist.
7
Leitung
Die Schläuche innerhalb des Systems dürfen
nicht geknickt sein. Ersetzen Sie Schläuche
wenn notwendig.
8
Einstellen der
Schalten Sie den PC aus.
Ventilatorgeschwindigkeit.
VORSICHT
1. Sollten sich Blasen in der Röhre bilden, können
Sie leicht mit dem Finger dagegen schnippen, bis
alle Blasen verschwunden sind.
2. Nach Abschluss der Installation überprüfen Sie
bitte, dass es keine abgeknickten Röhren
irgendwo gibt.
45
Überpüfen Sie regelmäßig den Wasserstand im
Wassertank. Wenn der Füllstand unter dem
unteren Niveau ist, folgen Sie bitte
Installationsschritt 4 im Handbuch, um das
Kühlmittel nachzufüllen. (Wir empfehlen die
Überprüfung der Wasserstand einmal im Monat.)
Q&A
(Fragen & Antworten)
F: Ich habe nur noch wenig Kühlmittel. Was ist passiert und was kann ich tun?
A: Das Leistungskühlmittel enthält auf Wasser basierendes Material; es unterliegt damit
natürlicher Verdampfung. Es ist normal für das Kühlmittel, dass es je nach Gebrauch
oder Umgebung weniger wird. Für beste Leistung empfehlen wir, die Kühlflüssigkeit alle 6
Monate zu ersetzen.
F: Wie oft muss ich das System nachfüllen?
A: In Abhängigkeit vom Gebrauch oder der Umgebung empfehlen wir dringend, den
Flüssigkeitsstand einmal im Monat zu überprüfen, um eine optimale Leistung sicher zu
stellen. Sollte der Flüssigkeitsstand unter die untere Marke sinken, folgen Sie bitte dem
Installationsschritt 4, um Kühlflüssigkeit aufzufüllen.
46