1
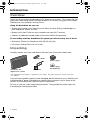
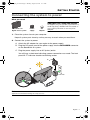
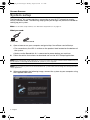
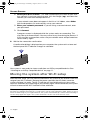
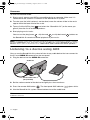
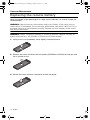
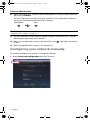
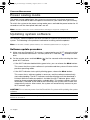
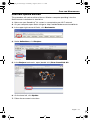
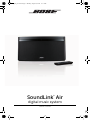
Whippet_OG.book Page 1 Monday, August 6, 2012 11:11 AM
®
SoundLink Air
digital music system
Owner’s Guide
Whippet_OG.book Page 2 Monday, August 6, 2012 11:11 AM
SAFETY INFORMATION
Please read this owner’s guide
Please take the time to follow the instructions in this owner’s guide carefully. It will help you to set up and operate your
system properly and enjoy its advanced features. Please save this owner’s guide for future reference.
The lightning flash with arrowhead symbol within an equilateral triangle alerts the user to the presence of
uninsulated, dangerous voltage within the system enclosure that may be of sufficient magnitude to constitute a
risk of electric shock.
The exclamation point within an equilateral triangle, as marked on the system, is intended to alert the user to the
presence of important operating and maintenance instructions in this owner’s guide.
WARNING: This product contains magnets which can be harmful to pacemaker wearers.
WARNING: Contains small parts which may be a choking hazard. Not suitable for children under age 3.
WARNING:
• To reduce the risk of fire or electrical shock, do not expose the product to rain or moisture.
• Do not expose this apparatus to dripping or splashing, and do not place objects filled with liquids, such as
vases, on or near the apparatus. As with any electronic products, use care not to spill liquids into any part of
the system. Liquids can cause a failure and/or a fire hazard.
• Keep the remote control battery away from children. It may cause a fire or chemical burn if mishandled. Do
not recharge, disassemble, heat above 100ºC (212ºF), or incinerate. Dispose of used batteries promptly.
Replace only with a battery of the correct type and model number.
• Danger of explosion if battery is incorrectly replaced. Replace only with an agency-approved (e.g., UL)
CR2032 or DL2032 3-volt lithium battery.
• Do not place any naked flame sources, such as lighted candles, on or near the apparatus.
CAUTION: Make no modifications to the system or accessories. Unauthorized alterations may compromise
safety, regulatory compliance, and system performance.
CAUTION: Operate this product within the temperature range of –4ºF to 113ºF (–20ºC to 45ºC).
Please complete and retain for your records:
The serial number can be found on the bottom panel.
Serial number ________________________________________
Purchase date ________________________________________
2 – English
Whippet_OG.book Page 3 Monday, August 6, 2012 11:11 AM
SAFETY INFORMATION
Note:
• Where the mains plug or appliance coupler is used as the disconnect device, such disconnect device shall
remain readily operable.
• The product must be used indoors. It is neither designed nor tested for use outdoors, in recreation vehicles,
or on boats.
• This product is intended to be used only with the power supply provided.
• The product label is located on the bottom of the product.
Bose Corporation hereby declares that this product is in compliance with the essential requirements and other
relevant provisions of Directive 1999/5/EC and all other applicable EU directive requirements. The complete
Declaration of Conformity can be found at www.Bose.com/compliance.
Please dispose of used batteries properly, following local regulations. Do not incinerate.
Important Safety Instructions
1. Read these instructions.
2. Keep these instructions.
3. Heed all warnings.
4. Follow all instructions.
5. Do not use this apparatus near water.
6. Clean only with a dry cloth.
7. Do not block any ventilation openings. Install in accordance with the manufacturer’s instructions.
8. Do not install near any heat sources, such as radiators, heat registers, stoves, or other apparatus (including
amplifiers) that produce heat.
9. Protect the power cord from being walked on or pinched, particularly at plugs, convenience receptacles, and
the point where they exit from the apparatus.
10. Use only attachments/accessories specified by the manufacturer.
11. Unplug this apparatus during lightning storms or when unused for long periods of time.
12. Refer all servicing to qualified service personnel. Servicing is required when the apparatus has been damaged in any
way, such as power supply cord or plug is damaged, liquid has been spilled or objects have fallen into the apparatus,
the apparatus has been exposed to rain or moisture, does not operate normally, or has been dropped.
Information about products that generate electrical noise
U.S.A. only
This equipment has been tested and found to comply with the limits for a Class B digital device, pursuant to Part 15 of
the FCC rules. These limits are designed to provide reasonable protection against harmful interference in a residential
installation. This equipment generates, uses, and can radiate radio frequency energy and, if not installed and used in
accordance with the instructions, may cause harmful interference to radio communications. However, this is no guarantee
that interference will not occur in a particular installation. If this equipment does cause harmful interference to radio or
television reception, which can be determined by turning the equipment off and on, you are encouraged to try to correct the
interference by one or more of the following measures:
• Reorient or relocate the receiving antenna.
• Increase the separation between the equipment and receiver.
• Connect the equipment to an outlet on a different circuit than the one to which the receiver is connected.
• Consult the dealer or an experienced radio/TV technician for help.
English – 3
Whippet_OG.book Page 4 Monday, August 6, 2012 11:11 AM
SAFETY INFORMATION
Canada
These devices comply with FCC and Industry Canada RF radiation exposure limits set forth for general population. This
device complies with Industry Canada license-exempt RSS standards. Operation is subject to the following two conditions:
(1) This device may not cause interference, and (2) this device must accept any interference, including interference that
may cause undesired operation of the device.
Output power: 12 dBuV/m at 3m @ 2.45 GHz
U.S.A. and Canada
This equipment complies with FCC and Industry Canada radiation exposure limits set forth for an uncontrolled
environment. This equipment should be installed and operated with a minimum distance of 20 cm between radiator and
your body. This transmitter must not be co-located or operating in conjunction with any other antenna or transmitter.
FCC WARNING
Changes or modifications not expressly approved by Bose Corporation could void the user’s authority to operate this
equipment.
Names and Contents of Toxic or Hazardous Substances or Elements
Toxic or Hazardous Substances and Elements
Part Name
Lead (Pb) Mercury (Hg) Cadmium (Cd) Hexavalent (CR(VI)) Polybrominated Biphenyl (PBB) Polybrominated diphenylether (PBDE)
PCBs
X
0
0
0
0
Metal parts
X
0
0
0
0
0
0
Plastic parts
0
0
0
0
0
0
Speakers
X
0
0
0
0
0
Cables
X
0
0
0
0
0
0: Indicates that this toxic or hazardous substance contained in all of the homogeneous materials for this part is below the limit requirement in SJ/T 11363-2006.
X: Indicates that this toxic or hazardous substance contained in at least one of the homogeneous materials used for this part is above the limit requirement
in SJ/T 11363-2006.
The SoundLink® Air digital music system works with iPod touch, iPhone, and iPad devices with
iOS 4.3.3 or later, and computers running iTunes 10.2.2 or later.
SoundLink is a registered trademark of Bose Corporation in the U.S. and other countries.
AirPlay, the AirPlay logo, iPad, iPhone, iPod Touch, iTunes, Mac, Bonjour, and Safari are trademarks of Apple Inc.,
registered in the U.S. and other countries.
Wi-Fi is a trademark of the Wi-Fi Alliance.
©2012 Bose Corporation. No part of this work may be reproduced, modified, distributed, or otherwise used
without written permission.
4 – English
Whippet_OG.book Page 5 Monday, August 6, 2012 11:11 AM
CONTENTS
INTRODUCTION
6
Overview . . . . . . . . . . . . . . . . . . . . . . . . . . . . . . . . . . . . . . . . . . . . . . . . . . . . . .
Unpacking . . . . . . . . . . . . . . . . . . . . . . . . . . . . . . . . . . . . . . . . . . . . . . . . . . . .
GETTING STARTED
6
6
7
Connecting the system to power . . . . . . . . . . . . . . . . . . . . . . . . . . . . . . . . . . .
System setup . . . . . . . . . . . . . . . . . . . . . . . . . . . . . . . . . . . . . . . . . . . . . . . . . .
Moving the system after Wi-Fi setup . . . . . . . . . . . . . . . . . . . . . . . . . . . . . . . .
OPERATION
7
8
10
11
Power on/off . . . . . . . . . . . . . . . . . . . . . . . . . . . . . . . . . . . . . . . . . . . . . . . . . . .
Controlling the volume . . . . . . . . . . . . . . . . . . . . . . . . . . . . . . . . . . . . . . . . . . .
Listening to an AirPlay compatible device . . . . . . . . . . . . . . . . . . . . . . . . . . . .
Listening to a device using AUX . . . . . . . . . . . . . . . . . . . . . . . . . . . . . . . . . . . .
CARE AND MAINTENANCE
11
11
11
12
13
Troubleshooting . . . . . . . . . . . . . . . . . . . . . . . . . . . . . . . . . . . . . . . . . . . . . . . .
Contacting Customer Service . . . . . . . . . . . . . . . . . . . . . . . . . . . . . . . . . . . . .
Replacing the remote battery . . . . . . . . . . . . . . . . . . . . . . . . . . . . . . . . . . . . . .
Alternate setup method . . . . . . . . . . . . . . . . . . . . . . . . . . . . . . . . . . . . . . . . . .
Configuring your network manually . . . . . . . . . . . . . . . . . . . . . . . . . . . . . . . . .
Turning on/off Wi-Fi® capability . . . . . . . . . . . . . . . . . . . . . . . . . . . . . . . . . . .
Power saving mode . . . . . . . . . . . . . . . . . . . . . . . . . . . . . . . . . . . . . . . . . . . . .
Updating system software . . . . . . . . . . . . . . . . . . . . . . . . . . . . . . . . . . . . . . . .
Software update procedure . . . . . . . . . . . . . . . . . . . . . . . . . . . . . . . . . . . . .
Alternate update method . . . . . . . . . . . . . . . . . . . . . . . . . . . . . . . . . . . . . . .
Optional battery (not included) . . . . . . . . . . . . . . . . . . . . . . . . . . . . . . . . . . . . .
Performing a factory reset . . . . . . . . . . . . . . . . . . . . . . . . . . . . . . . . . . . . . . . .
Limited warranty information . . . . . . . . . . . . . . . . . . . . . . . . . . . . . . . . . . . . . .
Technical information . . . . . . . . . . . . . . . . . . . . . . . . . . . . . . . . . . . . . . . . . . . .
13
13
14
15
16
17
18
18
18
19
20
22
22
22
English – 5
Whippet_OG.book Page 6 Monday, August 6, 2012 11:11 AM
INTRODUCTION
Overview
Thank you for purchasing the SoundLink Air® digital music system. This system lets you
enjoy clear, room-filling sound, streamed wirelessly via AirPlay using your iPad, iPhone,
iPod touch or any computer running iTunes.
Using the SoundLink Air you can:
• Stream your favorite music from the music library or other AirPlay enabled apps on
your iPod touch, iPhone, or iPad.
• Stream music from iTunes on your computer over your Wi-Fi network.
• Connect an additional analog audio source to the AUDIO IN connector.
To use AirPlay with the SoundLink Air system you will need any one of these:
• iPod touch, iPhone, or iPad device with iOS 4.3.3 or later
• PC or Mac running iTunes 10.2.2 or later
Unpacking
Carefully unpack the carton and confirm that you have all the parts shown here:
Remote control
Power supply
Power supply
AC adapter(s)*
SoundLink® Air
digital music system
USB cable
*The appropriate AC adapter is supplied for your region. The plastic bag may contain more than
one adapter.
If any part of the product appears to be damaged, do not attempt to use it. Contact your
authorized Bose® dealer immediately or contact Bose customer service. Refer to the
contact list enclosed in the carton for contact information.
Be sure to save the carton and packing materials. They provide the safest means for
transporting or storing the product.
6 – English
Whippet_OG.book Page 7 Monday, August 6, 2012 11:11 AM
GETTING STARTED
Connecting the system to power
What you need:
SoundLink® Air
digital music system
Power
supply
AC
adapter
CAUTION: FOR CHINA AND KOREA –
An adaptor for your system is provided in a
small bag that is labeled with the name of
your country. Be sure to use only that
adapter.
1. Place the system close to your computer.
Keep all system parts close by so they are easy to reach when you need them.
2. Connect the system to power:
A. Attach the AC adapter for your region to the power supply.
B. Plug the DC power cord on the power supply into the DC POWER connector
on the SoundLink Air system.
C. Plug the power supply into an AC (mains) outlet.
You will hear a short tone indicating a power connection was made. The front
panel Wi-Fi® indicator should start blinking amber.
A
B
C
Note: DO NOT connect the USB cable at this time. You will be prompted to do this by the Wi-Fi setup
application downloaded during the setup process.
English – 7
Whippet_OG.book Page 8 Monday, August 6, 2012 11:11 AM
GETTING STARTED
System setup
The SoundLink® Air system requires a connection to your Wi-Fi® network to receive
AirPlay streamed audio. The following steps guide you through the preferred method for
setting up your system.
Note: For another setup method, see “Alternate setup method” on page 15.
What you need:
USB cable
Remote control
1. Open a browser on your computer and go to http://www.Bose.com/wifisetup.
• For convenience, the URL is written on the product label located on the bottom of
the system.
• Make sure the SoundLink Air is connected to power before you continue.
2. Follow the online instructions to download and run the Wi-Fi Setup Application.
Note: After starting the setup application, you may be asked to install a software driver. Make sure you
do this before connecting the SoundLink Air system to your computer.
Note: Do not remove power from the SoundLink Air system while downloading and running the Wi-Fi
setup application.
3. When prompted by the following image, connect the system to your computer using
the supplied USB cable.
8 – English
Whippet_OG.book Page 9 Monday, August 6, 2012 11:11 AM
GETTING STARTED
A. Plug the large connector of the provided USB cable into a USB port on your
computer.
B. Plug the other end into the SETUP connector on the SoundLink® Air system.
B
USB cable
(supplied)
A
Note: The SETUP connector is used only for system setup functions.
This connector can not be use to play audio from any device.
4. In the setup window, enter the requested information
A. Speaker name - This field displays the system name “Bose SoundLink Air.”
We recommend that you select the Speaker name and change it to something
that helps you identify it better, such as “Living Room SoundLink Air.” This
is the name that will appear in the list of available devices on your AirPlay
compatible device.
A
B
C
D
English – 9
Whippet_OG.book Page 10 Monday, August 6, 2012 11:11 AM
GETTING STARTED
B. Select your Wi-Fi network - This field should display the name of your wireless network. If you have more than one, click the triangle (
) and select the
network you want from the drop-down list.
If your network name does not appear in the list or it is hidden, select Other
from the drop-down list and manually set up your network
C. Enter your network password - If you are using a secured network, enter
your password.
D. Click Connect.
A progress screen is displayed while the system works on connecting. This
may take up to three minutes. You may cancel at any time during the process. If
it fails to make a connection, make sure your network name and password are
correct and try again.
5. Wait for the connection confirmation:
A confirmation dialog is displayed on your computer, the system emits a tone and
the front panel Wi-Fi indicator changes to solid blue.
Your system is now ready to stream audio from an AirPlay compatible device. See
“Listening to an AirPlay compatible device” on page 11.
Moving the system after Wi-Fi setup
After the initial setup, you can move the SoundLink Air system to any location within the
range of your Wi-Fi network. Remove the power cord from the AC outlet, move the
system and plug it in again. The Wi-Fi indicator will start blinking blue as the system
works on automatically connecting to your network again. When connected, the system
will emit a tone and the Wi-Fi indicator will be solid blue.
Note: If you change anything in your Wi-Fi network, or move the system to a location where it is within
the range of a different Wi-Fi network, you will need to run the setup application again. When you move
it back to within range of your original network, the system will automatically connect without needing to
run the setup application again. The system remembers the last four Wi-Fi networks used.
10 – English
Whippet_OG.book Page 11 Monday, August 6, 2012 11:11 AM
OPERATION
Power on/off
To turn the system on
There are two ways to turn the system on
• On the remote, press the power button.
• On your iPad, iPhone, iPod touch or computer running iTunes, start streaming
AirPlay audio.
When the system turns on, the Wi-Fi indicator changes from dim blue to bright blue,
indicating that your system has a Wi-Fi connection.
To turn the system off
On the remote, press the power button to turn the system off.
The Wi-Fi indicator will change to a dim blue. This indicates that the system is
maintaining the connection to your Wi-Fi network while it is off.
Note: After 20 minutes of no activity, the system automatically turns off. If there is no Wi-Fi connection
when the 20-minute time-out occurs, the system automatically switches to the Power Saving mode
(see “Power saving mode” on page 18). When turning the system on from this mode, you will experience a slight delay before hearing audio.
Controlling the volume
Volume controls are located on the remote and on the right-hand side of the speaker.
You can also use the volume controls on your AirPlay compatible device.
• To increase the volume, press plus (+) ; to decrease, press minus (–)
• To silence the speaker, press mute. Press again to unmute. When muted, the
front panel mute icon glows white
Note: The front panel indicator for the selected source (
or AUX) blinks with every button press to
verify the command.
Listening to an AirPlay compatible device
After connecting to your wireless router, the SoundLink® Air digital music system is ready
to stream AirPlay audio at any time. If an AUX source is connected and playing when you
begin streaming audio from your AirPlay compatible device, that source stops and you
will hear the AirPlay audio stream.
English – 11
Whippet_OG.book Page 12 Monday, August 6, 2012 11:11 AM
OPERATION
To listen to streamed audio:
1. Start a music app on your AirPlay compatible device or computer. Make sure it is
connected to the same Wi-Fi network as the SoundLink Air system.
2. To make sure the initial volume is not too loud, move the volume slider in the music
app to within the lower third of the scale.
3. Tap or click the AirPlay icon
and select the “SoundLink Air” (or the name you
gave it) from the list of available speakers.
4. Start playing music tracks.
You can use the play/pause
, skip forward
, or skip backward
the SoundLink Air remote to control playback of your music.
buttons on
Note: To remotely control iTunes using the SoundLink Air remote, you will need to change a setting in
the iTunes Preferences menu. Start iTunes and open the Edit menu. Select Preferences and click on
Devices. Click to place a checkmark next to “Allow iTunes audio control from remote speakers.”
Listening to a device using AUX
You can use the SoundLink Air system to listen to any audio device that can connect to
the 3.5 mm AUDIO IN connector on the rear panel.
1. Plug the device into the AUDIO IN connector.
AUDIO IN
Stereo audio cable
(not provided)
2. Set the volume control of the device to slightly less than maximum.
3. Press the remote AUX button
. The front panel AUX indicator (
) glows white.
4. Use the SoundLink Air system volume buttons to set the audio level.
Note: The SoundLink Air remote does not control any functions on an AUX device connected to the
AUDIO IN connector.
12 – English
Whippet_OG.book Page 13 Monday, August 6, 2012 11:11 AM
CARE
AND
MAINTENANCE
Troubleshooting
Problem
What to do
System cannot
connect to my
network
• Make sure your network password is correct.
• Move the system closer to the wireless router.
• Stop any other audio or video streaming.
• Close the setup application, disconnect the system from your computer and AC power, and start the setup again. Refer to “Getting
Started” on page 7.
• If you continue to experience Wi-Fi® connection problems, contact
Bose customer service.
System audio is
dropping out
• Point the system in a different direction, or move it a few feet to a
new location.
• Move the system away from possible sources of interference,
such as microwaves and cordless phones.
• Move the system closer to the wireless router.
• Stop any other audio or video streaming.
No sound
• Make sure system has power (AC or optional battery).
• Make sure the system has a Wi-Fi connection.
• Make sure the system and the AirPlay compatible device are connected to the same network.
• Make sure your AirPlay compatible device is playing and the volume
is turned up.
• Make sure the system is not muted.
• Increase the system volume.
• Remove power (AC or optional battery) for one minute and then
reapply it.
• If using the optional battery, make sure it is adequately charged.
• Perform a factory reset (page 22).
The Wi-Fi indicator • System error. Contact Bose customer service.
is flashing red
Contacting Customer Service
For questions about the SoundLink® Air system, contact your local Bose® dealer.
To contact Bose directly, see the contact list on the Quick Start Guide.
English – 13
Whippet_OG.book Page 14 Monday, August 6, 2012 11:11 AM
CARE AND MAINTENANCE
Replacing the remote battery
When the remote stops operating or its range seems reduced, it is time to change the
remote battery.
WARNING: Keep the remote control battery away from children. It may cause a fire or
chemical burn if mishandled. Do not recharge, disassemble, heat above 100ºC (212ºF), or
incinerate. Dispose of used batteries promptly. Replace only with a battery of the correct
type and model number.
WARNING: Danger of explosion if battery is incorrectly replaced. Replace only with an
agency-approved (e.g., UL) CR2032 or DL2032 3-volt lithium battery.
1. Using a coin, turn the battery cover slightly counterclockwise.
2. Remove the cover and insert the new battery (CR2032 or DL2032) flat side up, with
the + symbol in view.
3. Reseat the cover and turn it clockwise to lock into place.
14 – English
Whippet_OG.book Page 15 Monday, August 6, 2012 11:11 AM
CARE AND MAINTENANCE
Alternate setup method
Using this method you can set up your SoundLink® Air System by first joining its own
built-in Wi-Fi® network and then connecting to your home Wi-Fi network.
Note: Before you start, disconnect power and any cables from your SoundLink Air system.
1.
Place your SoundLink Air system in a location where you want to use it.
2.
Bring your iPod touch, iPad, iPhone or laptop computer to the same location.
3.
Connect the SoundLink Air system to power.
DC POWER
4.
Press and hold the Reset button on the bottom of the SoundLink Air System for at
least two seconds until the Wi-Fi indicator turns solid amber.
Amber
Bottom panel
5.
Wait until you hear an audio tone (in approximately 30 seconds). Then, continue.
6.
On your iPod touch, iPad, iPhone or laptop computer, turn on Wi-Fi and join the
“Bose SoundLink Air Network.”
7.
Open a browser and type: http://192.168.1.1 in the address field.
The setup window is displayed on your screen.
English – 15
Whippet_OG.book Page 16 Monday, August 6, 2012 11:11 AM
CARE AND MAINTENANCE
8.
Select your home Wi-Fi network from the drop-down list, enter your password and
tap (or click) Connect.
The Wi-Fi indicator may briefly blink blue and then turn on solid blue to indicate a
successful connection to your home Wi-Fi network.
Blinking Blue
Blue
Note: Before you continue, it is recommended to check for any available software updates. See
“Updating system software” on page 18.
9.
On your iPod touch, iPad, iPhone or laptop computer, return to the Wi-Fi control
panel and join your home Wi-Fi network.
10. Start a music application, tap (or click) the AirPlay icon (
to 30%.
), and adjust the volume
11. Select the SoundLink Air system in the speaker list.
Configuring your network manually
To manually configure your network or change the settings:
1. Select Advanced Configuration from the File menu.
16 – English
Whippet_OG.book Page 17 Monday, August 6, 2012 11:11 AM
CARE AND MAINTENANCE
2. Enter or change the settings.
• DHCP – Sets the IP assignment to either Automatic or Static
• IP Address – Host IP address
• Subnet Mask – Subnet within the IP address for your network
• Gateway IP – IP address of a router that serves as an access point for another
router
• DNS #1 IP – IP address for your #1 Domain Name Server
• DNS #2 IP – IP address for your #2 Domain Name Server
• Proxy Server – Address used for making an indirect network connection
• Proxy Port – Specifies the port to connect to the proxy
3. Click Save. A progress dialog is displayed followed by a confirmation dialog box.
4. Click Close.
Turning on/off Wi-Fi® capability
Your SoundLink® Air has built-in Wi-Fi capability that enables wireless connectivity and
AirPlay. If you would like to turn off Wi-Fi, press and hold the Play/Pause button on the
remote for five seconds until the Wi-Fi indicator turns off.
To turn on Wi-Fi, press and hold the Play/Pause button on the remote for five seconds
until the Wi-Fi indicator starts blinking.
English – 17
Whippet_OG.book Page 18 Monday, August 6, 2012 11:11 AM
CARE AND MAINTENANCE
Power saving mode
The power saving mode allows the system to consume only a minimum amount of
power. It can be used to reduce the power consumed in your home while you are away.
To switch the system to the power saving mode, press and hold the power button for 10
seconds or until the front panel indicators are off.
Note: The Wi-Fi connection is discontinued when switching to the power saving mode.
Updating system software
Occasionally, software updates become available to improve the performance of your
system. The following is the preferred method for installing software updates.
Note: For another software update method, see “Alternate update method” on page 19.
Software update procedure
1. Make sure your SoundLink® Air system is connected to your Wi-Fi® network and that
there is an Internet connection. The front panel Wi-Fi indicator ( ) should be solid
blue.
2. On the remote, press and hold Mute (
panel Wi-Fi indicator.
) for five seconds while watching the front
• If the Wi-Fi indicator double-blinks green twice, you can release the Mute button.
This means that the system software is up to date and the system will return to the
previous operating mode.
• If the Wi-Fi indicator starts quickly blinking green, release the Mute button:
This means that a software update is necessary and the software automatically
starts downloading. The Wi-Fi indicator continues blinking until the download is
finished. While the software update is installed, the Wi-Fi indicator glows solid
green for three seconds followed by a double blink. This pattern repeats until the
installation is finished. At the end of the installation, the system emits a tone and
automatically restarts. After restart, the system will automatically connect to your
Wi-Fi network again.
CAUTION: Do not remove power from the SoundLink Air system while updating the system
software.
Note: If the Wi-Fi indicator starts blinking red, a system error has occurred. Contact Bose Customer
Service for assistance.
18 – English
Whippet_OG.book Page 19 Monday, August 6, 2012 11:11 AM
CARE AND MAINTENANCE
Alternate update method
This procedure will work on either a Mac or Windows computer providing it has the
Safari browser installed on its hard drive.
1. Make sure your SoundLink® Air system is connected to your Wi-Fi network.
2. On your computer, open Safari and go to: http://worldwide.bose.com/soundlinkair
3. In the upper right corner of Safari, click Bookmarks.
4. Under Collections, click Bonjour.
5. In the Bonjour bookmarks, open (double-click) Bose SoundLink Air.
6. On the lower left, click Update.
7. Follow the onscreen instructions.
English – 19
Whippet_OG.book Page 20 Monday, August 6, 2012 11:11 AM
CARE AND MAINTENANCE
Optional battery (not included)
You can purchase a battery to add portability to your SoudLink® Air system. Contact
your local authorized Bose® dealer or visit www.Bose.com for assistance. To contact
Bose by phone, refer to the contact list on the Quick Start Guide.
To install the battery, follow the instructions included with the battery.
WARNING: Only use a genuine battery from Bose or an authorized Bose dealer. Bose
cannot warrant the safety and compatibility or assure the operability of batteries from other
manufacturers for use in operating the SoundLink Air digital music system.
CAUTION: The battery needs to be fully charged before using the Wi-Fi setup application
or performing a system update when running on battery power. These functions will fail if the
battery has insufficient power.
Note: After 20 minutes of no activity when on battery power, the system automatically switches to
standby and does not maintain a Wi-Fi connection. Press any system button to turn power on again.
Battery status indicator
The battery status indicator on the front panel tells you when you need to charge the
battery.
Flashing red: ...... 20% or less of full
charge remaining
(charging needed)
A fully charged battery provides approximately three hours of use if the SoundLink Air
system is set to maximum volume. However, the rate of battery discharge varies with the
type of music played and the volume setting. You can extend the battery operating time
significantly by lowering the volume.
20 – English
Whippet_OG.book Page 21 Monday, August 6, 2012 11:11 AM
CARE AND MAINTENANCE
Manual battery check
The battery indicator is normally off to conserve battery power. To check the charge
level, press and hold the remote Power button
and observe the indicator color.
Green: ................ 70% or more of full charge
Amber: ............... 20% to 70% of full charge
Flashing red: ...... 20% or less (charging needed)
Note: The battery should be replaced if the battery status indicator remains yellow after 10 hours of
charging or the amount of time you can operate on battery power decreases significantly.
Battery protection mode
If the battery is not being charged and the SoundLink® Air system is unused for
more than 14 days, it enters battery protection mode to preserve battery power.
To reactivate your SoundLink Air system, connect the power supply to the
system and charge the battery.
Charging the battery
To charge the battery, plug the power supply into a live AC outlet and plug the
cord into the DC POWER connector on the back panel of the SoundLink Air
system. Recommended charging time is 10 hours. The battery indicator will
turn off when the battery is fully charged.
Amber: ....... Battery charging
Off: ............. Charging cycle done
Packing the power supply for traveling
Wind the cord into the groove around the top of the power supply. Slide the small round
ball along the cord as needed to press it into the channel.
English – 21
Whippet_OG.book Page 22 Monday, August 6, 2012 11:11 AM
CARE AND MAINTENANCE
Performing a factory reset
A factory reset clears all source, volume, and network settings from the
SoundLink Air system and returns it to its original factory settings.
To reset your system, press and hold the Reset button on the bottom panel for 10
seconds.
When reset is complete the Wi-Fi indicator will blink amber.
To reconnect with your Wi-Fi network, run the Wi-Fi setup application again.
Limited warranty information
Your SoundLink® Air system is covered by a limited warranty. Details of the limited
warranty are provided on the product registration card that is included in the carton.
Please refer to the card for instructions on how to obtain warranty service and register
your product. Failure to register will not affect your limited warranty rights.
Technical information
Power supply rating: Input: 100-240V
50-60Hz, 1.3A
Output: 20V
, 2A
Size and weight:
22 – English
63/4"H x 121/16"W x 41/16"D (17.5 cm x 30.7 cm x 10.3 cm)
4.67 lb (2.4 kg)
Whippet_OG.book Page 23 Monday, August 6, 2012 11:11 AM
CARE AND MAINTENANCE
English – 23
Whippet_OG.book Page 24 Monday, August 6, 2012 11:11 AM
©2012 Bose Corporation, The Mountain,
Framingham, MA 01701-9168 USA
AM352050 Rev.00