1
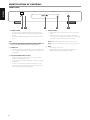
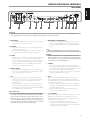
NEDERLANDS
Owner’s Manual
SVENSKA
DEUTSCH
ITALIANO
ESPAÑOL
FRANÇAIS
Direct Digital DAC
ENGLISH
M51
РУССКИЙ
®
IMPORTANT SAFETY INSTRUCTIONS
ENGLISH
SAVE THESE INSTRUCTIONS FOR LATER USE.
FOLLOW ALL WARNINGS AND INSTRUCTIONS MARKED ON THE
AUDIO EQUIPMENT.
FRANÇAIS
ESPAÑOL
ITALIANO
DEUTSCH
NEDERLANDS
SVENSKA
1 Read instructions - All the safety and operating instructions should be
read before the product is operated.
2 Retain instructions - The safety and operating instructions should be
retained for future reference.
3 Heed Warnings - All warnings on the product and in the operating
instructions should be adhered to.
4 Follow Instructions - All operating and use instructions should be
followed.
5Cleaning - Unplug this product from the wall outlet before cleaning.
Do not use liquid cleaners or aerosol cleaners. Clean only with a dry
cloth.
6Attachments - Do not use attachments not recommended by the
product manufacturer as they may cause hazards.
7 Water and Moisture - Do not use this product near water-for example,
near a bath tub, wash bowl, kitchen sink, or laundry tub; in a wet
basement; or near a swimming pool; and the like.
8Accessories - Do not place this product on an unstable cart, stand,
tripod, bracket, or table. The product may fall, causing serious injury to
a child or adult, and serious damage to the product. Use only with a
cart, stand, tripod, bracket, or table recommended by the manufacturer,
or sold with the product. Any mounting of the product should follow
the manufacturer’s instructions, and should use a mounting accessory
recommended by the manufacturer.
9
A product and cart combination should be moved with
care. Quick stops, excessive force, and uneven surfaces may
cause the product and cart combination to overturn.
10Ventilation - Slots and openings in the cabinet are provided for
ventilation and to ensure reliable operation of the product and to
protect it from overheating, and these openings must not be blocked
or covered. The openings should never be blocked by placing the
product on a bed, sofa, rug, or other similar surface. This product should
not be placed in a built-in installation such as a bookcase or rack unless
proper ventilation is provided or the manufacturer’s instructions have
been adhered to.
11 Power Sources - This product should be operated only from the type of
power source indicated on the marking label. If you are not sure of the
type of power supply to your home, consult your product dealer or local
power company. The primary method of isolating the amplifier from
the mains supply is to disconnect the mains plug. Ensure that the mains
plug remains accessible at all times. Unplug the AC power cord from the
AC outlet if the unit will not be used for several months or more.
12 Grounding or Polarization - This product may be equipped with a
polarized alternating current line plug (a plug having one blade wider
than the other). This plug will fit into the power outlet only one way.
This is a safety feature. If you are unable to insert the plug fully into the
outlet, try reversing the plug. If the plug should still fail to fit, contact
your electrician to replace your obsolete outlet. Do not defeat the safety
purpose of the polarized plug.
13 Power Cord Protection - Power supply cords should be routed so that
they are not likely to be walked on or pinched by items placed upon or
against them, paying particular attention to cords at plugs, convenience
receptacles, and the point where they exit from the product.
РУССКИЙ
2
14 Outdoor Antenna Grounding - If an outside antenna or cable system
is connected to the product, be sure the antenna or cable system is
grounded so as to provide some protection against voltage surges
and built-up static charges. Article 810 of the National Electrical Code,
ANSI/NFPA 70, provides information with regard to proper grounding
of the mast and supporting structure, grounding of the lead-in wire
to an antenna discharge unit, size of grounding conductors, location
of antenna discharge unit, connection to grounding electrodes, and
requirements for the grounding electrode.
NOTE TO CATV SYSTEM INSTALLER
This reminder is provided to call the CATV system installer’s attention to Section
820-40 of the NEC which provides guidelines for proper grounding and, in
particular, specifies that the cable ground shall be connected to the grounding
system of the building, as close to the point of cable entry as practical.
15Lightning - For added protection for this product during a lightning
storm, or when it is left unattended and unused for long periods of
time, unplug it from the wall outlet and disconnect the antenna or
cable system. This will prevent damage to the product due to lightning
and power line surges.
16 Power Lines - An outside antenna system should not be located in the
vicinity of overhead power lines or other electric light or power circuits,
or where it can fall into such power lines or circuits. When installing an
outside antenna system, extreme care should be taken to keep from
touching such power lines or circuits as contact with them might be
fatal.
17Overloading - Do not overload wall outlets, extension cords, or
integral convenience receptacles as this can result in a risk of fire or
electric shock.
18 Object and Liquid Entry - Never push objects of any kind into this
product through openings as they may touch dangerous voltage points
or short-out parts that could result in a fire or electric shock. Never spill
liquid of any kind on the product.
WARNING: THE APPARATUS SHOULD NOT BE EXPOSED TO
DRIPPING OR SPLASHING, AND OBJECTS FILLED WITH LIQUIDS,
SUCH AS VASES, SHOULD NOT BE PLACED ON THE APPARATUS.
AS WITH ANY ELECTRONIC PRODUCTS, USE CARE NOT TO SPILL
LIQUIDS INTO ANY PART OF THE SYSTEM. LIQUIDS CAN CAUSE A
FAILURE AND/OR A FIRE HAZARD.
FRANÇAIS
THE EXCLAMATION POINT WITHIN AN EQUILATERAL TRIANGLE IS
INTENDED TO ALERT THE USER TO THE PRESENCE OF IMPORTANT
OPERATING AND MAINTENANCE (SERVICING) INSTRUCTIONS IN
THE LITERATURE ACCOMPANYING THE APPLIANCE.
ESPAÑOL
When the power supply cord or plug is damaged.
If liquid has been spilled, or objects have fallen into the product.
If the product has been exposed to rain or water.
If the product does not operate normally by following the operating
instructions. Adjust only those controls that are covered by the
operating instructions as an improper adjustment of other controls
may result in damage and will often require extensive work by a
qualified technician to restore the product to its normal operation.
e) If the product has been dropped or damaged in any way.
f) when the product exhibits a distinct change in performance-this
indicates a need for service.
20 Replacement Parts - When replacement parts are required, be
sure the service technician has used replacement parts specified
by the manufacturer or have the same characteristics as the
original part. Unauthorized substitutions may result in fire, electric
shock, or other hazards.
21 Safety Check - Upon completion of any service or repairs to this
product, ask the service technician to perform safety checks to
determine that the product is in proper operating condition.
22 Wall or Ceiling Mounting - The product should be mounted to a wall
or ceiling only as recommended by the manufacturer.
23Heat - The product should be situated away from heat sources such as
radiators, heat registers, stoves or other products (including amplifiers)
that produce heat.
24Headphones - Excessive sound pressure form earphones and
headphones can cause hearing loss.
25 Battery Disposal - When disposing of used batteries, please comply
with governmental regulations or environmental public instruction’s
rules that apply in your country or area. Batteries (battery pack or
batteries installed) must not be exposed to excessive heat such as
sunshine, fire or the like.
CAUTION
Changes or modifications to this equipment not expressly approved by
NAD Electronics for compliance could void the user’s authority to operate
this equipment.
CAUTION REGARDING PLACEMENT
To maintain proper ventilation, be sure to leave a space around the unit
(from the largest outer dimensions including projections) that is equal to or
greater than shown below.
Left and Right Panels: 10 cm
Rear Panel: 10 cm
Top Panel: 10 cm
WARNING
TO REDUCE THE RISK OF FIRE OR ELECTRIC SHOCK, DO NOT EXPOSE THIS
PRODUCT TO RAIN OR MOISTURE.
РУССКИЙ
SVENSKA
NEDERLANDS
CAUTION
TO PREVENT ELECTRIC SHOCK, MATCH WIDE BLADE OF PLUG TO WIDE SLOT,
FULLY INSERT.
ITALIANO
a)
b)
c)
d)
THE LIGHTNING FLASH WITH ARROWHEAD SYMBOL, WITHIN
AN EQUILATERAL TRIANGLE, IS INTENDED TO ALERT THE USER
TO THE PRESENCE OF UNINSULATED “DANGEROUS VOLTAGE”
WITHIN THE PRODUCT’S ENCLOSURE THAT MAYBE OF
SUFFICIENT MAGNITUDE TO CONSTITUTE A RISK OF ELECTRIC
SHOCK TO PERSONS.
DEUTSCH
19 Damage Requiring Service - Unplug this product from the wall outlet
and refer servicing to qualified service personnel under the following
conditions:
ENGLISH
IMPORTANT SAFETY INSTRUCTIONS
3
IMPORTANT SAFETY INSTRUCTIONS
ENGLISH
NOTES ON ENVIRONMENTAL PROTECTION
At the end of its useful life, this product must not be disposed
of with regular household waste but must be returned to a
collection point for the recycling of electrical and electronic
equipment. The symbol on the product, user’s manual and
packaging, point this out.
FRANÇAIS
The materials can be reused in accordance with their markings. Through
re-use, recycling of raw materials or other forms of recycling of old
products, you are making an important contribution to the protection of
our environment. Your local administrative office can advise you of the
responsible waste disposal point.
ESPAÑOL
INFORMATION ABOUT COLLECTION AND DISPOSAL OF
WASTE BATTERIES (DIRECTIVE 2006/66/EC OF THE EUROPEAN
PARLIAMENT AND THE COUNCIL OF EUROPEAN UNION) (FOR
EUROPEAN CUSTOMERS ONLY)
Batteries bearing any of these symbols indicate
that they should be treated as “separate collection”
and not as municipal waste. It is encouraged that
necessary measures are implemented to maximize
the separate collection of waste batteries and
to minimize the disposal of batteries as mixed
municipal waste.
ITALIANO
End-users are exhorted not to dispose waste
batteries as unsorted municipal waste. In order to
achieve a high level of recycling waste batteries, discard waste batteries
separately and properly through an accessible collection point in your
vicinity. For more information about collection and recycling of waste
batteries, please contact your local municipality, your waste disposal service
or the point of sale where you purchased the items.
DEUTSCH
By ensuring compliance and conformance to proper disposal of waste
batteries, potential hazardous effects on human health is prevented and
the negative impact of batteries and waste batteries on the environment
is minimized, thus contributing to the protection, preservation and quality
improvement of the environment.
NEDERLANDS
RECORD YOUR MODEL NUMBER (NOW, WHILE YOU CAN SEE IT)
The model and serial number of your new M51 are located on the back of
the cabinet. For your future convenience, we suggest that you record these
numbers here:
Model no:. . . . . . . . . . . . . . . . . . . . . . . . . . . . . . . . . . . . . . Serial no.: . . . . . . . . . . . . . . . . . . . . . . . . . . . . . . . . . . . . . .
SVENSKA
РУССКИЙ
NAD is a trademark of NAD Electronics International, a division of Lenbrook Industries Limited
Copyright 2011, NAD Electronics International, a division of Lenbrook Industries Limited
4
INTRODUCTION
As with all our products, NAD’s “Music First” design philosophy guided
the M51 design that it can confidently promise you both state-of-the-art
technology and audiophile-quality music listening for years to come.
We encourage you to take a few minutes now to read right through this
manual. Investing a little time here at the outset might save you a good
deal of time later, and is by far the best way to ensure that you make the
most of your investment in the M51.
SAVE THE PACKAGING
Please save the box and all of the packaging in which your M51 arrived.
Should you move or otherwise need to transport your M51, this is by far the
safest container in which to do so. We’ve seen too many otherwise perfect
components damaged in transit for lack of a proper shipping carton, so
please: Save that box!
FRANÇAIS
M51 Direct Digital DAC is another excellent product that exemplifies NAD’s
unique Direct Digital technology. The M51 uses a very powerful processing
engine that operates at much higher speed and with much greater
accuracy than typical D-to-A converters. Running at 108 MHz, the M51
resamples the incoming PCM (pulse code modulated) signal and converts
it to PWM (pulse width modulation) with a sampling rate of 844 kHz. The
conversion process from PCM to PWM completely eliminates any jitter
present at the incoming signal. And because of M51’s very high speed clock
and mathematical precision of its reconstruction filters of M51, the resulting
audio signal is totally free of digital artifacts like ringing.
WHAT’S IN THE BOX
Packed with your M51 you will find
Masters Series Accessories box containing the following
• Two detachable mains power cord
• M50 remote control with 2 AA batteries
• M51 Quick Start Guide sheet
CHOOSING A LOCATION
Choose a location that is well ventilated (with at least several inches to both
sides and behind), and that will provide a clear line of sight, within 25 feet/8
meters, between the M51’s front panel and your primary listening/viewing
position - this will ensure reliable infrared remote control communications.
ESPAÑOL
THANK YOU FOR CHOOSING NAD.
ENGLISH
GETTING STARTED
ITALIANO
One more thing: We urge you to register your M51 ownership on the NAD
Worldwide Web site:
http://NADelectronics.com/salon
For warranty information contact your local distributor.
РУССКИЙ
SVENSKA
NEDERLANDS
DEUTSCH
NAD SHALL NOT BE HELD LIABLE FOR ANY TECHNICAL OR USER
INTERFACE DISCREPANCIES IN THIS MANUAL.THE M51 OWNER’S
MANUAL MAY BE SUBJECT TO CHANGE WITHOUT PRIOR NOTICE.
CHECK OUT THE NAD WEBSITE FOR THE LATEST VERSION OF THE
M51 OWNER’S MANUAL.
5
IDENTIFICATION OF CONTROLS
FRONT PANEL
ENGLISH
M51
direct digital DAC
input
© NAD M51
FRANÇAIS
1
2
ESPAÑOL
1 STANDBY BUTTON
• Press this button to switch ON the M51 from standby mode. The
Standby LED indicator will turn from amber to blue and illuminate
the VFD.
• Pressing the STANDBY button again turns the unit back to standby
mode.
NOTE
In order to turn ON the M51 from standby mode or back to standby
mode, the rear panel POWER switch must be in the ON position.
ITALIANO
2 STANDBY LED
• This indicator will light up amber when the M51 is at standby mode.
• When the M51 is powered up from standby mode, this indicator will
illuminate blue.
DEUTSCH
3 VACUUM FLUORESCENT DISPLAY (VFD)
• Display visual information about the current Source. Information
supplied is generated by the Source.
• Provide also visual information about M51’s other functions, settings
and indicators.
• “Unlock” is shown among the information displayed if no source
input is connected to the particular Source. If a connected source is
detected, the sampling rate will be displayed.
NEDERLANDS
SVENSKA
РУССКИЙ
6
3
4
5
4 REMOTE SENSOR
• Point the M50 remote control at the remote sensor and press the
buttons.
• Do not expose the remote sensor of the M51 to a strong light
source such as direct sunlight or illumination. If you do so, you may
not be able to operate the M51 with the remote control.
Distance: About 23ft (7m) from the front of the remote sensor.
Angle: About 30o in each direction of the front of the remote sensor.
5INPUT
• Select through active Sources.
• Toggle this button to select through the following sources AES/EBU, Coaxial, Optical, USB, HDMI 1 and HDMI 2.
IDENTIFICATION OF CONTROLS
2 CHANNEL AUDIO OUT
R BALANCED
DIGITAL AUDIO INPUT
ENGLISH
REAR PANEL
100-240V ~ 50/60Hz
L BALANCED
L
IR IN
POWER
ON
RS 232
R
UNBALANCED
AES/EBU
COAXIAL
OPTICAL
USB
HDMI 1
HDMI 2
HDMI VIDEO OUT
+12V
TRIGGER IN
UPGRADE
1
2
3
4
5
6
7
8
9
10
11
FRANÇAIS
© NAD M51
12
5USB
• Using Type A to Type B cable connector (not supplied), interface
computer audio to this asynchronous Type B USB input to directly
stream 24/192 content from your PC, MAC or NAS (networkattached storage).
• In order to stream your computer audio via M51, the “NAD USB
Audio driver” that can be downloaded from the NAD website must
be installed. For more information, refer to the NAD USB AUDIO item
in the USING THE M51 – OTHER FEATURES.
IMPORTANT NOTICE
The use of the NAD USB Audio driver downloaded through the NAD site
is done at the customer’s own discretion and risk. The customer will be
solely responsible for any damage to his/her computer system or loss of
data arising out of or in connection with the use of this software driver.
In no event shall NAD be liable for any direct, indirect, incidental, special,
exemplary, or consequential damages including negligence or otherwise
arising in any way out of the use of this software driver.
7UPGRADE
• M51 may need a software update to be in step with the latest
technology trends. Check with your authorized NAD distributors for
future software updates. Only authorized NAD distributors or service
centers are allowed to implement a software update.
• Connect to this input a USB memory stick containing the software
update. Use USB adaptor when necessary.
8 RS 232
NAD is a certified partner of AMX and Crestron and fully supports
these external devices. Check out the NAD website for information
about AMX and Crestron compatibility with NAD. See your NAD audio
specialist for more information.
• Connect this interface using RS-232 serial cable (not supplied) to
any Windows compatible PC to allow remote control of the M51 via
compatible external controllers.
• Refer to the NAD website for information about RS232 Protocol
documents and PC interface program.
9 +12V TRIGGER IN
With this input triggered by a 12V DC supply, the M51 can be switched
ON remotely from standby mode by compatible devices such as
amplifiers, preamplifiers, receivers, etc. If the 12V DC supply is cut off,
the M51 will return to standby mode.
• Connect this +12V Trigger input to the remote device’s
corresponding +12V DC output jack using a mono cable with
3.5mm male plug. The controlling device must be equipped with a
+12V trigger output to use this feature.
ITALIANO
DEUTSCH
4 COAXIAL, OPTICAL
• Connect COAXIAL and/or OPTICAL to corresponding S/PDIF output
of sources such as CD, DVD or BD players, digital cable box, digital
tuners and other applicable components.
WARNING
Before connecting and disconnecting any HDMI cables, both the M51
and the ancillary source must be powered OFF and unplugged from the
AC outlet. Failure to observe this practice may cause permanent damage
to all equipment connected via HDMI sockets.
NEDERLANDS
3AES/EBU
• Digital audio stream from professional audio sources like SACD/CD
Players or processors can be connected to this XLR connector.
• For high-end sources with higher sampling rates like 176kHz and
192kHz, it is highly recommended that such sources be interfaced
with the AES/EBU IN connector. The AES/EBU IN is well suited to
handle such sources with high sampling rate.
NOTE
HDMI 1-2 and HDMI VIDEO OUT function only as direct pass through.
SVENSKA
2BALANCED
• Connect these XLR connectors to the corresponding XLR input of
professional audio amplifiers.
• Ensure that proper pin configurations are followed – Pin 1: Ground,
Pin 2: Positive (signal live) and Pin 3: Negative (signal return).
6 HDMI (HDMI 1,2; HDMI VIDEO OUT)
• Connect HDMI 1-2 inputs to the HDMI OUT connectors of source
components such as BD/DVD player or HDTV satellite/cable box.
• Connect the HDMI VIDEO OUT to a HDTV or projector with HDMI
input.
РУССКИЙ
1UNBALANCED
• Use a twin RCA-to-RCA lead to connect these sockets to the left and
right analog input of a receiver or amplifier.
ESPAÑOL
ATTENTION!
Please make sure that the M51 is powered off or unplugged from the mains power source before making any connections. It is also advisable to power
down or unplug all associated components while making or breaking any signal or AC power connections.
7
IDENTIFICATION OF CONTROLS
REAR PANEL
ENGLISH
10 IR IN
• This input is connected to the output of an IR (infrared) repeater
(Xantech or similar) or the IR output of another component to allow
control of the M51 from a remote location.
FRANÇAIS
11POWER
• Supply the AC mains power to the M51.
• When the POWER switch is set to ON position, the M51 goes to
standby mode as shown by the amber status condition of the
Standby LED. Press the front panel Standby button or remote
control’s [ON] button to switch ON the M51 from standby mode.
• If you intend not to use the M51 for long periods of time (such as
when on vacation), switch off the POWER switch.
• With POWER switched off, neither the front panel Standby button
nor remote control’s [ON] button can activate the M51.
ESPAÑOL
ITALIANO
12 AC MAINS INPUT
• The M51 comes supplied with two separate detachable mains
power cord. Select applicable mains power cord pertinent to your
region’s requirement.
• Before connecting the plug to the mains powers source, connect
firmly first the other end to M51’s AC Mains input socket.
• Always disconnect the mains power plug from the mains power
source first, before disconnecting the other end from the M51’s AC
Mains input socket.
DEUTSCH
NEDERLANDS
SVENSKA
РУССКИЙ
8
IDENTIFICATION OF CONTROLS
ENGLISH
M50 REMOTE CONTROL
1ON: Switch ON M51 from standby mode.
OFF: Switch M51 to standby mode.
1
6VOL 5/6: Increase or decrease loudness level. If “Volume Setup” is set to “Fixed” setting,
[VOL 5/6] will have no effect and effectively disabled.
MUTE: Temporarily mutes audio output or restores audio from mute mode. If “Volume Setup” is set
to “Fixed” setting, [MUTE] will have no effect and effectively disabled.
7 CD PLAYER CONTROL (use with compatible NAD CD Player models)
The control buttons below are applicable only to specific NAD CD Players. Check the owner’s
manual of your NAD model for control button compatibility.
RPT: Repeat track, file or whole disc.
RAND: Play tracks/files in random order.
[k]: Open or close disc tray.
[g]: Stop playback.
[;]: Pause playback temporarily.
[0]: Go to next track or file.
[9]: Go to the beginning of current or previous track or file.
[7/8]: Not applicable for current NAD CD Player models.
[4]: Start playback.
0 to 9 number buttons: Direct-entry of track or file number.
CO AX
USB
HDM I
2
OPT
3
SETUP
EQ
POL AR.
4
DIM
DISP
MENU
CD
5
NET W
ENTER
USB
1
ESPAÑOL
5CD: Command a compatible NAD CD Player to switch to CD mode.
USB 1, 2: Command a compatible NAD CD Player to switch to USB mode.
D/F/A/S: Navigate or select through menu items, options or lists.
ENTER: Confirm selected option, item or menu.
HDM I
1
USB
2
VO LUME
6
MUTE
RPT
RAND
ITALIANO
4DIM: Reduce or restore VFD brightness (5 levels of brightness).
DISPLAY: Use in renaming a Source.
AES/
EBU
2
7
1
2
3
4
5
6
7
8
9
0
DEUTSCH
3SETUP: Bring up Volume Setup menu.
POLAR.: Bring up Polarity settings menu.
FRANÇAIS
2 AES/EBU, HDMI 1, COAX, USB, HDMI 2, OPT: Select source input.
The following M50 Remote Control buttons are not applicable for M51 Direct Digital DAC.
[EQ], [MENU], [NETW]
SVENSKA
Release the corresponding buttons above as soon as the blue transmit LED flashed twice.
РУССКИЙ
NEDERLANDS
IMPORTANT NOTICE ABOUT M50 REMOTE CONTROL
The M50 remote control can be used for either M51 Direct Digital DAC or M50 Digital Music Player.
By undertaking the following steps, the M50 remote control can be defaulted for use by either M51
or M50.
• For M50: Press and hold “5” and “0” at the same time until the remote control’s blue transmit LED
flashes twice.
• For M51: Press and hold “5” and “1” at the same time until the remote control’s blue transmit LED
flashes twice.
9
USING THE M51
OTHER FEATURES
ENGLISH
NAD USB AUDIO
POLARITY
In order to stream your computer audio via M51, ensure that the Sound or
Audio device setting of your computer is set to “NAD Audio 2.0 Output”.
Allow compensation for recordings that have reversed polarity.
Positive: A positive sine wave at the input remains positive at the
output. Polarity is defaulted to “Positive” setting.
Reversed: A positive sine wave at the input is negative (inverted) or
reversed at the output.
FRANÇAIS
A NAD USB Audio driver can be downloaded via the NAD website link
http://nadelectronics.com/products/masters-series/M51-DirectDigital-DAC. Download “NAD USB Audio driver” from the “Manuals/
Downloads” tab. Install this NAD USB Audio driver to your computer by
following the instructions provided.
MINIMUM PC SYSTEM REQUIREMENT
Microsoft Windows XP Service Pack 2 or higher, Microsoft Windows 7
ESPAÑOL
FOR MAC USERS
Minimum Mac OS X Snow Leopard (version 10.6) and later versions already
include “NAD USB Audio” driver. Update your Mac OS if you cannot locate
NAD USB Audio driver.
ITALIANO
IMPORTANT NOTICE
The use of the NAD USB Audio driver downloaded through the NAD site
is done at the customer’s own discretion and risk. The customer will be
solely responsible for any damage to his/her computer system or loss of
data arising out of or in connection with the use of this software driver.
In no event shall NAD be liable for any direct, indirect, incidental, special,
exemplary, or consequential damages including negligence or otherwise
arising in any way out of the use of this software driver.
VOLUME SETUP
The M51 VOLUME control function is dependent upon the “Volume Setup”
menu setting. “Volume” can either be set to “Fixed” or “Variable”. Press
[SETUP] button to launch “Volume Setup” menu. From “Volume Setup”
menu, press [ENTER] or [S] to bring up “Fixed” or “Variable” settings.
DEUTSCH
Fixed
If “Volume” is set to “Fixed”, audio output level is fixed and the M51’s
Volume Control is bypassed.
• Press [D/F] to set a desired preset dB level. Confirm setting by
pressing [ENTER] or [S]. Thereafter, audio output from M51 can be
adjusted by using the volume control of the separate amplifier the
M51 is linked into.
• If “Volume Setup” is set to “Fixed”, remote control’s [VOL 5/6] will
have no effect and effectively disabled.
NEDERLANDS
Variable
• When set to “Variable”, the Volume level is directly adjustable using
the remote control’s [VOL 5/6] button. Correspondingly, audio
output from M51 can be adjusted by using the volume control of
the separate amplifier the M51 is linked into.
SVENSKA
РУССКИЙ
10
RENAMING A SOURCE INPUT
A particular source input can be renamed according to your preference.
You can use up to 16 characters in renaming a source input. Below is
the procedure on how to rename a source input. Note that all buttons
mentioned below are with reference to the remote control.
Example: Rename “HDMI 1” to “BD PLAYER”.
1 Press [HDMI 1] button to go to HDMI 1 source. “HDMI 1” is shown in the
upper section of the VFD.
2 Then, press and hold [DISP] button until “HDMI 1” is shown in the upper
section of the VFD and with “H” flashing.
3 Within 5 seconds, toggle the [D/F] buttons to select the first character
(“B” from the alphabetical list). The ranges of characters available are A-Z,
a-z, _ (space) and 0-9.
4 Press [S] or [ENTER] to select the character and at the same time move
on to the next character. Press [A] to return to the previous character.
Repeat steps 3 and 4 for each character in sequence.
5 Complete the renaming process by pressing the [DISP] button again to
save the new Source input name.
NOTES
The renaming process will be automatically terminated if no button
is pressed within 5 seconds. Any renamed characters at the time of
termination will be not saved.
REFERENCE
No USB audio.
POSSIBLE CAUSES
POSSIBLE SOLUTIONS
• NAD USB Audio is not installed in your PC.
• Download NAD USB Audio driver from NAD
website and install to your PC.
• Sound or Audio device setting of your PC or
Mac is not set to “NAD Audio 2.0 Output”.
• Set your PC or Mac Audio or Sound device
setting to “NAD Audio 2.0 Output”.
• No music files being played back from your PC
or Mac.
• Playback a music file from your computer.
• Mac OS not updated to include NAD USB Audio.
• Download latest update for your Mac OS.
• “Volume Setup” is set to “Fixed”.
• Set “Volume Setup” to “Variable.
Cannot power ON the M51.
• Rear panel POWER switched off.
• Set to “ON” the rear panel POWER switch
and then press front panel Standby button.
VFD is dim.
• Low brightness level of VFD is selected.
• Toggle [DIM] button until desired
brightness level.
M51 does not respond to remote control
commands.
• Batteries are flat or incorrectly inserted.
• Check batteries.
• Infrared receiver (IR) window of M51 or IR
transmitter of the remote control is obstructed.
• Check IR windows and ensure clear line-ofsight from remote to M51.
• M51 front panel is in very bright sunlight or
ambient light.
• Reduce sunlight/room lighting.
• Remote control is set to M50 Digital Music
Player remote control codes.
• Switch remote control codes to M51 Direct
Digital DAC. Press and hold “5” and “1” at the
same time until the remote control’s blue
transmit LED flashes twice.
Remote control’s [VOL 5/6] no function.
FRANÇAIS
CONDITION
ENGLISH
TROUBLESHOOTING
ITALIANO
ESPAÑOL
Remote control’s [MUTE] no function.
RESTORING M51 TO ITS FACTORY DEFAULT SETTINGS
SETUP
V1.xx
DEUTSCH
1 Press and hold front panel [INPUT] button.
2 Set to ON the rear panel POWER switch while still holding on to [INPUT] button.
3 VFD illuminates. Release [INPUT] button. VFD will show
VFD TEST
RESET
NEDERLANDS
“VFD TEST” is flashing. V1.xx stands for the software version.
4 Within 3 seconds, press front panel Standby button and “RESET” will now flash.
5 M51 will go to reset mode with the VFD showing “Factory Reset..”.
РУССКИЙ
SVENSKA
The M51 is now reset and will automatically shut down.
11
REFERENCE
SPECIFICATIONS
ENGLISH
OVERALL SPECIFICATIONS
Rated distortion (THD+N with AES 17 filter)
<0.0005% (ref. 1 kHz 0 dBFS)
<0.002% (ref. 1 kHz -60 dBFS)
FRANÇAIS
IM distortion
<0.0001%
Signal-to-noise ratio
< -123 dB (ref. 0 dBFS 2V out)
Channel separation
> -115 dB (ref. 0 dBFS Volume -1dB)
Sample rate
32 kHz to 192 kHz (USB and digital S/PDIF)
Frequency response
±0.5 dB (ref. 20 Hz – 96 kHz @ 192 KHz sample rate)
Output level
2V (ref. input 0dBFS)
POWER CONSUMPTION
ESPAÑOL
AC Supply
100-240V AC ~ 50/60Hz
Standby power
<0.5W
Idle power
16W
INPUT/OUTPUT TERMINALS
INPUT
AES/EBU
Coaxial
ITALIANO
Optical
HDMI x 2
USB Audio Class 2.0
OUTPUT
HDMI VIDEO OUT (pass through)
DEUTSCH
Analog Unbalanced
47 ohms
Analog Balanced
110 ohms
DIMENSION AND WEIGHT
Unit Dimensions (W x H x D)
435 x 78 x 296 mm (Gross)*
17 ¹/₈ x 3 ¹/₈ x 11 ¹ ¹/₁₆ inches
NEDERLANDS
Net Weight
5.8 kg (12.8 lbs)
Shipping Weight
9.8 kg (21.6 lbs)
* - Gross dimensions include feet, extended buttons and rear panel terminals.
Specifications are subject to change without notice.
For updated documentation and features, please log onto www.NADelectronics.com for the latest information about M51.
SVENSKA
РУССКИЙ
12
13
РУССКИЙ
SVENSKA
NEDERLANDS
DEUTSCH
ITALIANO
ESPAÑOL
FRANÇAIS
ENGLISH
www.NADelectronics.com
©2012 NAD ELECTRONICS INTERNATIONAL
A DIVISION OF LENBROOK INDUSTRIES LIMITED
All rights reserved. NAD and the NAD logo are trademarks of NAD Electronics International, a division of Lenbrook Industries Limited.
No part of this publication may be reproduced, stored or transmitted in any form without the written permission of NAD Electronics International.
M51_eng_OM_v08 - 05/12