1
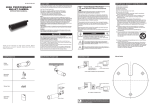
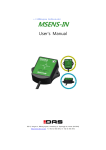
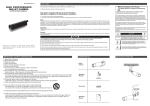
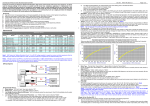
MegaMount™ supports USB3.0 Super-Speed. Data transfer speed (reading and writing) of MegaMount™ can be affected by the performance (RPM) of HDD. The data transfer speed of 7,200RPM HDD is rather faster than 5,200RPM HDD. (W) 78mm x (H) 135mm x (D) 16mm / 68g(w/o HDD) MegaMount™, USB3.0 cable, portable pouch, Manual Size/Weight Package contents OS HDD Interface USB power MegaMount™ 2.5 inch SATA I, II, III HDD/SSD (Max 9.5mm thickness HDD) USB 3.0 Super Speed (Max 5Gbps), USB2.0 compatible. (USB3.0 Max speed is available when it’s connected with USB3.0 host device.) All Operation Systems recognizing USB storage device Power MegaMount™ supports USB3.0 Super Speed data transfer (Max 5Gbps). When disconnecting MegaMount™ from PC, please use ‘Safely Remove Hardware’ of Windows. If you disconnect USB cable during data transfer, data loss may occur. Please pay attention to it. Model Name Specification (4) Back cover: Screw-less type back cover for simple HDD installation. (3) USB Port: 5 pin Mini-B type USB3.0 port connecting to desktop or laptop. (Compatible with USB2.0 devices also) (2) MODE button: changes the mode of MegaMount™. One pressing changes each mode (HDD → ISO1 → ISO2 → ISO3) in order. (1) LED Indicator light: shows the current mode of MegaMount™. MegaMount™ supports 3 independent ODDs (CD, DVD or BD rom drive). MegaMount™ supports iso image file of CD, DVD and BD and works like virtual CD, DVD and BD rom drive. Please don’t place any magnetic material around MegaMount™. It may damage the data of HDD installed in MegaMount™. Also, don’t drop or cause any hard impact to MegaMount™. The data of HDD in MegaMount™ can be damaged easily by magnetic material or strong impact. It is always advisable to back up important data. MegaMount™ is compatible with SATA Type 2.5” HDD. The product doesn’t include a HDD. Users have to purchase and ® install their own 2.5” HDD (SATA for Laptop). DIGITUS cannot take any responsibility to any HDD failures and malfunction. Users would need to contact the HDD manufacturers in relation to any HDD malfunction and after sales services of HDD. Please read the following instructions carefully before using. Precautions before use DA-74003 User Manual MEGAMOUNT™ USB 3.0 STORAGE ENCLOSURE Each part and function (3) Close the back panel by pushing up according to the arrow direction. MegaMount™ supports screw-less HDD installation. (2) Install a 2.5” SATA HDD as below picture. (1) Open the back cover by pushing down slightly according to the arrow direction. HDD Installation In case ISO folder includes 2 more iso files on it, it recognizes only first ISO file automatically according to the sorting order (Number > Alphabet > Symbol) In case there’s no iso file in ISO folder, blue LED next to the folder name blinks and move to next ISO folder automatically. Folder names which include ‘iso’ file should be ‘_iso1, _iso2, _iso3’. Don’t forget to locate the under-bar “_” in from of each folder name. (Capital or small) Ex) ‘_iSO1’ = ‘_ISO1’ = ‘_iso1’ (9) Others are same with the usage of normal external HDD. (8) Copy and move your favorite ISO file in each folder. (7) Create each folder (_iso1, _iso2, _iso3) on the root of internal HDD. (6) Check the file system of HDD (Only NTFS available) (5) Install HDD in MegaMount™ and connect to PC with USB3.0 cable. For the perfect virtual CD feature, MegaMount™ supports only NTFS file system. Default file system of most HDDs is NTFS. If your HDD has other file system, please change it into NTFS file system via the process of HDD Initialization. Caution: Usage of Virtual ODD (4) Connect MegaMount™ and your Desktop or Laptop with the official USB3.0 cable in the package. It’s also compatible with USB2.0, but in that case, the data transfer speed is dramatically slowed down and it may not supply enough power. The insufficient power supply can cause malfunction to MegaMount™. (2) Your PC can’t recognize the HDD installed in MegaMount™ because it’s initialized only by Software. (1) Select [Control Panel] → [Administrative Tools], then open up [Computer Management], then go to [Disk Management] According to the factory default of HDD (manufacturer), some HDD can be used in MegaMount™ directly without this process of HDD initialization. HDD in MegaMount™ should be initialized, partitioned and formatted first for common usage (Reading and writing) via your OS. Below instructions are for Windows 7. (Windows XP and Vista are also similar – Refer to below instruction!) HDD Initialization Abruptly removing storage devices or external hardware from your PC can damage to the device and result in loss of data. So, it’s recommended to get in the habit of safely removing your external hardware via “Safely Remove Hardware” of your PC. Safe HDD Connection / Disconnection If users delete or damage iso file in the ISO folders, virtual CD function of MegaMount™ doesn’t work. So, be carefully not to delete iso file on each ISO folder. MegaMount™ can be used as a normal USB3.0 external HDD. Press ‘MODE’ button on the front panel of MegaMount™ and move to ‘HDD’ (LED next to HDD turns on). USE as an external HDD. (6) Now, you can begin the partitioning and formatting process on the Hard Disk. Right-click on the driver’s space details (below picture) and select “New Simple Volume…” or “New Partition...”. (5) [Initialize Disk] is completed, then the Hard Disk displays “Online”. In case over 2TB capacity HDD, please select ‘GPT’ to use all capacity. Caution: (4) Select “MBR” in the menu of [Initialize Disk] and press “OK” Please be careful not to initialize the used or existing HDD which includes any valuable DATA on it. Caution: (3) Right-click on the external hard drive and select [Initialize Disk] to begin the partitioning and formatting process. ► Yes, first copy and move the OS file (iso) to one of ISO folders (_iso1, _iso2 or _iso3). Then, press ‘MODE’ button on MegaMount™ and locate it to the ISO folder which include OS (iso) file and then, remove MegaMount™ safely via ‘Safely Remove Hardware”. Connect MegaMount™ to PC and turn on PC. Select ‘ISO MegaMount™ CDROM’ device in the selection widow of ‘CMOS BIOS’ or ‘Boot Device’.(According to CMOS type, it may show ‘USB CD-ROM’ as device name). (1) Is it possible to install OS via MegaMount™? Q&A (7) “New Simple Volume Wizard” comes up giving you some selections about the new partition. In the first tab select the partition type. The usual is primary. Click ‘Next’ and set the partition size. Set the max size if you want all the space to be allocated to a single partition or smaller size if you want to create more partitions. ► You need to check your HDD in MegaMount™ for errors. Please do “Disk-check’ in external HDD mode and fix the disk errors. Then, try it again. (6) I tried, but I can’t change the ‘Mode’ (HDD->iSO1-.iSO2>iSO3) even though pressing ‘MODE’ button. What should I do? ► To solve this kind of recognition issues, the best way is to do Un-mount/Mount process of MegaMount™. Please disconnect and connect MegaMount™ to PC. (5) I copy and move an iso file in ‘_iso’ folder under external HDD mode, but, it doesn’t recognize ISO folder and ISO mode, even though I change the modes by pressing ‘Mode’ button on the front. What should I do? ► If there’s no iso file in ISO folder (_iso1, _iso2, _iso3), blue LED next to the folder name blinks and move to next ISO folder automatically. If there’s no iso file on each ISO folders, MegaMount™ moves and turns back to ‘HDD’ mode. (4) If ‘_iso1’ and ‘_iso3’ includes iso file on them, but there’s no iso file in ‘_iso2’ folder? What happen? ► Copy and move DVD/BD iso file (you want to watch) to one of ISO folders(_iso1, _iso2 or _iso3). Then, press ‘MODE’ button and locate to the ISO folder which includes DVD/BD iso file. Run ‘Media Player’ program like PowerDVD and play it. (3) How to play and watch DVD/Blu-ray title? ► There’s no limitation on 2.5” HDD capacity, but there’s a limit on the depth of 2.5” HDD. MegaMount™ can install and use standard 9.5mm depth (thick) 2.5” HDD only. In case of 12.5mm thick HDD, it can’t be installed and used. (2) Is there any limitation on 2.5” HDD Capacity?