1
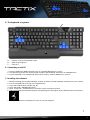
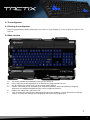
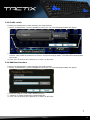
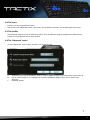
Manual Table of contents 1. Features (keyboard) 2. Features (software) 3. Specifications (keyboard) 4. Package contents 5. The keyboard at a glance 6. Connecting to the PC 7. Installing the software 8. The configurator 8.1 Starting the configurator 8.2 Main window 8.3 Programming the keys 8.3.1 Button assignment 8.3.2 Macro manager 8.3.3 Mouse functions 8.3.4 Internet functions 8.3.5 Office functions 8.3.6 Media functions 8.3.7 Additional commands 8.3.8 Profile switch 8.3.9 Additional functions 8.4 The layers 8.5 The profiles 8.6 The “Advanced“ menu 3 3 3 3 4 4 4 5 5 5 6 6 7 7 8 8 9 9 10 10 11 11 11 Dear customer! Congratulations for purchasing one premium quality SHARKOON product. For a long life time and to take full advantage of this product we recommend that you read this manual completely. Have a good time with our product! SHARKOON Technologies tactix 2 1. Features (keyboard) • Compact gaming keyboard • 8 swappable gaming keys • Additional customization software Connection USB Cable length 150 cm Number of keys 107 Dimensions (LxWxH) 431x136x24 mm Weight 603 g 2. Features (software) • • • • • Special customization software for games and other applications (e.g. Photoshop, Windows, browser etc.) N-key rollover support for up to 18 keys Fully programmable keys Supports 10 different profiles with 3 layers each Programmable keys can record: macros, macro loops, media functions, internet functions, keystrokes, mouse functions, delay time etc. 3. Specifications (keyboard) Input power (DC) 5V Operating life cycles of keys 10 million Operating temperature 0°C ~ +50°C Storage temperature -22°C ~ +65°C 4. Package contents • Tactix gaming keyboard • 8 rubberized keys • CD with customization software and PDF manual Note: If you are missing any of the items listed above, please contact our customer service immediately: [email protected] (Germany and Europe) [email protected] (international). tactix 3 5. The keyboard at a glance A B B C A – English or German keyboard layout B – Special gaming keys C – Palm rest 6. Connecting to the PC 1. Plug the keyboard’s USB connector into an available USB port on your PC. 2. The operating system will automatically recognize the keyboard and install all needed drivers. 3. If your keyboard is not recognized, disconnect it and try another USB port on your PC. 7. Installing the software 1. Before installing the included software, remove all other installed keyboard software from your system. 2. Put the included Tools CD into your CD/DVD drive. 3. Open the CD/DVD drive’s folder (e.g. D:). 4. Open the folder “SHARKOON Tactix“. 5. Start “Tactix.exe“ and follow the instructions of the installation wizard. 6. After completing the installation process the following icon will appear on your desktop and in the task bar: 7. Double click (left mouse button) this icon, to start the program. tactix 4 8. The configurator 8.1 Starting the configurator Start the application by double-clicking the actual icon on your desktop or via the respective symbol in the task bar. 8.2 Main window E A B C D F A – B – C – D – E– F– The Tactix provides three different layers per key (see 8.4). Every single key on the keyboard can be individually programmed (see 8.3). Via this button the current layer can be reset to factory default. Profiles: The Tactix can be assigned up to ten different profiles. With every different program/ application an individual keyboard layout can be configured (see 8.5). Invokes the “Advanced” menu (see 8.6). “OK” transfers the settings to the keyboard and closes the window; “Cancel” discards the settings; “Apply” transfers the settings to the keyboard, and leaves the window open. tactix 5 8.3 Programming the keys Every single key of the keyboard can be programmed individually, please proceed as follows: 1. Select the key you wish to program by left-clicking it in the configurator with the mouse. The following dropdown menu will open up: A B C D E F G H I J K A – B – C – D – E– F– G – H – I – J– K – Assigns the key as another key (8.3.1). Assigns the key a macro (see 8.3.2). Assigns the key a mouse function (8.3.3). Assigns the key an Internet function (8.3.4). Assigns the key an Office function (8.3.5). Assigns the key a Media function (8.3.6). Assigns the key additional commands (8.3.7). Defines the key as switch between different profiles (8.3.8). Runs a program (8.3.9). Discards already assigned functions. Deactivates the key. 2. Select the desired function. 3. The function will be assigned to a key. 4. The programmed key will be highlighted in white: 8.3.1 Button assignment Each key can be assigned any other key function using the configurator: 1. Select “Single key” from the dropdown menu (see 8.3). The following window will appear: 2. Press the key, which will then be assigned to the selected key. 3. Click “OK” to confirm your selection or “Cancel” to discard it. tactix 6 8.3.2 Macro manager Each key can be assigned a macro using the configurator: 1. Select “Macro” from the dropdown menu (see 8.3). The following window will appear: 2. Define the macro. 3. Click “OK” to confirm your selection or “Cancel” to discard it. 8.3.3 Mouse functions Each key can be assigned a mouse function using the configurator: 1. Select “Mouse Button” from the dropdown menu (see 8.3). The following window will appear: 2. Select the desired mouse button/function, which shall be assigned to the selected key. 3. Click “OK” to confirm your selection or “Cancel” to discard it. tactix 7 8.3.4 Internet functions Each key can be assigned an Internet function using the configurator: 1. Select “Internet Hot Keys” from the dropdown menu (see 8.3). The following window will appear: 2. Select the desired Internet function. 8.3.5 Office functions Each key can be assigned an Office function using the configurator: 1. Select “Office Hot Keys” from the dropdown menu (see 8.3). The following window will appear: 2. Select the desired Office function. tactix 8 8.3.6 Media functions Each key can be assigned a media function using the configurator: 1. Select “Media Hot Keys” from the dropdown menu (see 8.3). The following window will appear: 2. Select the desired media function. 8.3.7 Additional commands Each key can be assigned an additional command using the configurator: 1. Select “Additional Commands” from the dropdown menu (see 8.3). The following window will appear: 2. Select the desired command. tactix 9 8.3.8 Profile switch Each key can be defined as switch between the single profiles: 1. Select “Profile Switch” from the dropdown menu (see 8.3). The following window will appear: 2. Select the desired profile and layer, which will be activated after pressing the key, using the arrow buttons. Click inside the check box in front of “On Screen Display (OSD)”, the OSD will be displayed on the screen. 3. Click “OK” to confirm your selection or “Cancel” to discard it. 8.3.9 Additional functions Each key can be defined as switch between the single profiles: 1. Select “Profile Switch” from the dropdown menu (see 8.3). The following window will appear: 2. Enter the program name under “Shortcut Name”. 3. “Browse” to select the desired, installed program. 4. Click “OK” to confirm your selection or “Cancel” to discard it. tactix 10 8.4 The layers Each key can be assigned three layers. These layers are independent from each other, so that different functions can be defined for each layer. 8.5 The profiles The keyboard supports up to ten different profiles. Thus for different programs/applications different key functions can be defined and saved as profile. 8.6 The “Advanced“ menu Via the “Advanced” menu further functions can be configured. A B C A – Selection of the key combination, which is used to toggle through the media players listed under B. B – List of media programs, the configurator supports (Windows Media Player, iTunes, Real Player, Winamp). C – Software update. tactix 11 Legal disclaimer For potential loss of data, especially due to inappropriate handling, SHARKOON assumes no liability. All named products and descriptions are trademarks and/or registered trademarks of the respective manufacturers and are accepted as protected. As a continuing policy of product improvement at SHARKOON, the design and specifications are subject to change without prior notice. National product specifications may vary. The legal rights of the enclosed software belong to the respective owner. Please observe the license terms of the manufacturer before using the software. All rights reserved especially (also in extracts) for translation, reprinting, reproduction by copying or other technical means. Infringements will lead to compensation. All rights reserved especially in case of assignation of patent or utility patent. Means of delivery and technical modifications reserved. Disposal of your old product Your product is designed and manufactured with high quality materials and components, which can be recycled and reused. When this crossed-out wheeled bin symbol is attached to a product, it means the product is covered by the European Directive 2002/96/EC. Please be informed about the local separate collection system for electrical and electronic products. Please act according to your local rules and do not dispose of your old products with your normal household waste. The correct disposal of your old product will help prevent potential negative consequences to the environment and human health. © SHARKOON Technologies 2012 www.sharkoon.com tactix 12