1
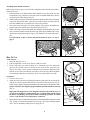
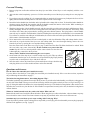
Attaching basket handle to basket...
Fig. E
Before using the deep fryer, you will need to attach the basket handle to the basket.
Follow these steps:
1.Hold the basket in one hand and the basket handle in your other hand. You will
be placing the pegs, which are at the ends of the two basket handle bars, into the
two holes in the basket bracket (Fig. E).
2. While holding the pegs near the peg holes, tilt the handle inward before attempting
to place the pegs in their holes. (You will not be able to fit the second peg into its
hole if the handle bars are positioned too close to the bracket.)
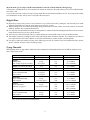
3.Next, place one of the pegs in one of the peg holes. Then squeeze the handle bars
together and fit the opposite peg in the other peg hole (Fig. F).
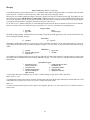
4. While continuing to squeeze the handle bars together and keeping the pegs in the
holes, rotate the handle towards the basket rim, allowing the handle bars to snap
into the tabs on the basket bracket (Fig. G). The handle is now in the locked position.
For instructions on how to insert and position basket in fryer, see step 3,
page 5.
Peg
hole
Basket
bracket
Peg
Handle bar
Handle
Fig. F
Handle bars
Peg
Peg hole
Tabs
Fig. G
How To Use
To fill with oil...
1.Open the deep fryer cover.
2. If the frying basket is in the fryer, remove it and set it aside.
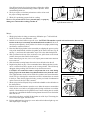
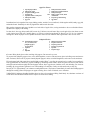
3. Fill the removable pot with cooking oil or shortening up to the maximum
oil level line (MAX) which is located on the inside of the removable pot
(Fig. H). Use eight, 8-ounce cups of cooking oil or four pounds of shortening. The
amount of oil in the removable pot must always be between the MIN and MAX
level markings inside the removable pot. Never exceed the MAX level mark.
MAX
MIN
To preheat...
1. Close the fryer cover.
2. Attach the cord to the unit by aligning the magnetic plug end of the cord assembly
with the two electrical pins located in the recessed area of the fryer base (Fig. I).
When properly aligned, the plug will magnetically attach itself to the appliance. For
proper connection, the magnetic plug end must be parallel with the countertop
(Fig. J).
Important: The magnetic cord was designed to detach easily from the fryer. As
a result, if it is bumped or touched during use, it could possibly detach causing
the unit to stop heating. Avoid contact with cord during operation. If contact
occurs, verify that the cord is still properly connected.
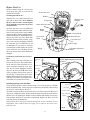
3. Plug cord into a 120vAC electrical wall outlet only. Turn the adjustable temperature control
(Fig. A, Page 3) to the desired temperature (see page 7 for proper cooking temperatures). The recommended setting for most frying is 375°.
4
Fig. H
Electrical pins
Recessed
area
Magnetic
plug end
Fig. I