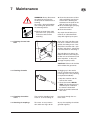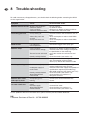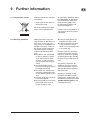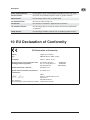
1
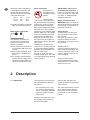
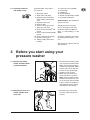
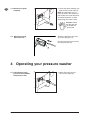
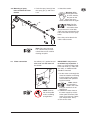
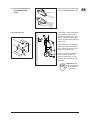
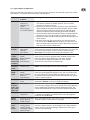
Nilfisk E 130.2 Nilfisk E 140.2 Nilfisk E 145.2 User Manual Copyright © 2011 Nilfisk, Division of Nilfisk-Advance A/S Index 1 2 3 4 5 6 7 8 9 10 Safety precautions and warnings .............................................3 Description ...............................................................................4 Before you start using your pressure washer ...........................5 Operating your pressure washer ..............................................6 Fields of Application and Working Methods.............................................................10 After using your pressure washer ...........................................12 Maintenance ...........................................................................13 Trouble Shooting ....................................................................14 Further information .................................................................15 EC Declaration of Conformity .................................................17 1 Safety Precautions and Warnings Symbols used to mark instructions Before starting up your high-pressure washer for the first time, this instruction manual must be read through carefully. Save the instructions for later use. Safety instructions marked with this symbol must be observed to prevent danger to persons. Do not let children or people who have not read the instruction manual operate the machine. Before starting up your machine please check it carefully for any defects. If you find any, do not start up your machine and contact your Nilfisk distributor. Especially check: The insulation of the electric cable should be faultless and without any cracks. If the electric cable is damaged, an authorized Nilfisk distributor should replace it. WARNING! High pressure jets can be dangerous. Never direct the water jet at persons, pets, live electrical equipment or the machine itself. Never try to clean clothes or footwear on yourself or other persons. Hold the spray lance firmly with both hands. The spray lance is affected by a thrust of up to 16.4 N during operation. The operator and anyone in the immediate vicinity of the site of cleaning should take action to protect themselves from being struck by debris dislodged during operation. Wear goggles during operation. This symbol is used to mark safety instructions that must be observed to prevent damage to the machine and its performance. This symbol indicates tips and instructions to simplify work and to ensure a safe operation. Never use the machine in an environment where there could be a danger of explosion. If any doubt arises, please contact the local authorities. It is not allowed to clean asbestos-containing surfaces with high pressure. This high pressure washer must not be used at temperatures below 0°C. Never let any persons stay under the product when stored on the wall. WARNING! Inadequate extension cables can be dangerous. Cables on drums should always be completely unwinded to prevent the cable from overheating. 3 Extension cables should be of a watertight construction and comply with the below-mentioned requirements for length and cable dimensions. 1.0 mm² 1.5 mm² 2.5 mm² max. max. max. 12.5 m 20 m 30 m Cable connections should be kept dry and off the ground. Mains power connection The following should be observed when connecting the high pressure washer to the electric installation: Only connect the machine to an installation with earth connection. The electric installation shall be made by a certified electrician. It is strongly recommended that the electric supply to this machine should include a residual current device (GFCI). Water connection Connection to the public mains according to regulations. This high pressure washer is only allowed to be connected with the drinking water mains, when an appropriate backflow preventer has been installed, Type BA according to EN 1717. The backflow preventer can be ordered under number 106411177. The length of the hose between the backflow preventer and the high pressure washer must be at least 10 metres to absorb possible pressure peaks (min diameter ½ inch). Operation by suction (for example from a rainwater vessel) is carried out without backflow preventer. Recommended suction set: 126411387. As soon as water has flown through the BA valve, this water is not considered to be drinking water any more. IMPORTANT! Only use water without any impurities. If there is a risk of running sands in the inlet water (i.e. from your own well), an additional filter should be mounted. Repair and maintenance WARNING! Always remove the electric plug from the socket before carrying out maintenance work on the machine. Safety devices Locking device on spray gun (7a) (see foldout at the end of this manual): The spray gun features a locking device. When the pawl is activated, the spray gun cannot be operated. Thermal sensor: A thermal sensor protects the motor against overloading. The machine will restart after a few minutes when the thermal sensor has cooled. Pressure safety device An integrated hydraulic safety valve protects the system from excessive pressure. 2 Description 2.1 Application This high-pressure washer has been developed for domestic use within: Only use the high-pressure washer for purposes described in this manual. - Car, motorbike, boat, caravan, trailer, patio/drive/flagstones, woodwork, brickwork, barbecue, garden furniture, lawn mower The safety precautions must be observed to prevent damage to the machine, the surface to be cleaned or severe personal injuries. Section 5 describes the use of the high-pressure washer for vaious cleaning jobs. 4 2.2 Operation elements and model survey See illustration at the end of this manual. 1 Start/stop switch 2 Water inlet (with filter) 3 High pressure connection (only models without hose reel) 4 High pressure hose 5 Electric cable 6 Click & Clean spray lance 7 Spray gun with lock 8 Click & Clean Tornado® PR nozzle 9 Click & Clean Powerspeed® nozzle 10 Click & Clean foam sprayer 11 Nozzle cleaning tool 12 Trolley handle (telescopic handle) 13 14 15 16 17 18 Hose reel (not standard) Hose hook Model tag Quick coupling Button for telescopic handle Turnable cable hook Specifications: See model tag (15) of machine. Sound pressure level measures in accordance with ISO 3744 EEC directive 2000/14/ EEC: LpA = 69,9 dB(A), LWA = 84 dB(A). Hand/arm vibrations measured according to ISO 5349 is < 2.5 m/s2. We reserve the right to alter the specifications. 3 Before you start using your pressure washer 3.1 Mounting of trolley handle and hose hook (standard models) 1. Push down the trolley handle (12) over the two metal tubes. Make sure that the handle is mounted as illustrated. Mount screws with nuts (make sure that the screws go through handle as well as tube). 2. Mount the hose hook (14) on the machine (2 screws). Note: the hose hook can be mounted on the front as well as on the back. Front position is to be used if the product is used together with a special wall hook for wall storage. 3.2 Mounting of hose reel handle (models with hose reel) 1. Click the hose reel handle on to the trolley handle (no screws). 5 3.3 Mounting of quick coupling 1. Screw the quick coupling (16) tight on to the water inlet (2). Note: The inlet filter must always be fitted in the water inlet pipe to filter out sand, limestone and other impurities as these will damage the pump valves. Caution: Failure to fit the filter will invalidate the guarantee. 3.4 Mounting of high pressure hose Attach the high pressure hose (4) to the spray gun (7). De h the high pressure hose by pressing the pawl (A). 4 Operating your pressure washer 4.1 Connection of high pressure hose (models without hose reel) 6 1. Mount the high pressure hose on the outlet (3). 4.2 Mounting of spray lance and Click & Clean nozzles 1. Push the spray lance (6) into the spray gun (7) and screw it on. 2. Attach the nozzle. Warning: When attaching the Click & Clean nozzles, the pawl on the side of the spray lance should come out again. Note: The Tornado® PR nozzle and the foam sprayer feature a swivel lock, which must be positioned in the hole in the Click & Clean spray lance. Press the pawl to detach the Click & Clean nozzle. Note: The spray lance (6) has a built-in low pressure nozzle that can be used for flushing away dirt. 4.3 Water connection An ordinary 1/2" garden hose of min. 10 m and max. 25 m will be suitable. NOTE: Connection to the public mains according to regulations. IMPORTANT! Only use water without any impurities. If there is a risk of running sands in the inlet water (i.e. from your own well), an additional filter should be mounted. 1. Let the water run through the water hose before connecting it to the machine to prevent sand and dirt from penetrating the machine. Note: Check that the filter is fitted in the water inlet pipe and that it is not clogged up. 2. Connect the water hose to the water supply by means of the quick connector (inlet water, max. pressure: 10 bar, max. temperature: 50°C). 3. Turn on the water. 7 4.4 Telescopic handle The machine features a telescopic handle. To raise or lower the handle, press the knob and move the handle upwards or downwards. When a click is heard, the handle is in right position. 4.5 Start and stop of the machine (when connected to a water supply) The spray lance is affected by a thrust during operation - therefore always hold it firmly with both hands. IMPORTANT: Point the nozzle at the ground. 1. Check that the machine is in upright position. NOTE: Do not place the machine in high grass! 2. Release the trigger lock. 3. Activate the trigger of the spray gun and let the water run until all air has escaped from the water hose. 4. Turn the start/stop switch (1) to position "I". 5. Activate the trigger of the spray gun. Always adjust the distance and thus the pressure of the nozzle to the surface, which is to be cleaned. 4.6 Start the machine (when connected to open containers (suction mode)) The washer can take in water from a rain water tank as an example. The hose for the water supply must not be too long, approx. 5 m. Make sure that the water tank is not placed on a lower level than the machine. 1. Place the other end of the water hose in the water tank. 8 Do not cover the machine during operation. Note: If the machine is left or not used for 5 minutes, it must be switched off on the start/stop switch "O" (1): 1. Turn the start/stop switch to position "O". 2. Disconnect the electrical plug from the socket. 3. Shut off the water supply and activate the trigger to relieve the machine of pressure. 4. Lock the spray gun. When releasing the trigger of the spray gun, the machine automatically stops. The machine will start again when you re-activate the spray gun. Use an external filter if the water contains impurities. 2. Turn the start/stop switch to position "I". 3. Activate the trigger of the spray gun and let the water run, until the air has escaped from the water hose and the pump. 4. Mount spray lance and nozzle. 4.7 Pressure regulation on the TORNADO® PRnozzle The pressure can be regulated on the TORNADO® PR nozzle. High pressure (JTRYK ,AVTRYK Low pressure 4.8 Stationary use If mounting a special wall hook (not standard), the pressure washer can be used as a stationary solution meaning that it can be operated while hanging on the wall. A B C D Only mount the wall hook on a sturdy wall. Adjust the length of the screws and size of rawlplugs to the type of wall. On the wall hook garden/rim brush (a) foam sprayer (b), Click & Clean brush (c) and Click & Clean nozzles (d) can be stored. Important: The bearing capacity of the wall hook is max. 30 kg. 9 5 Fields of application and working methods 5.1 General Efficient high presure cleaning is achieved by following a few guidelines, combined with your own personal experience of specific cleaning tasks. Accessories and detergents, when correctly chosen, can increase the efficiency of your pressure washer. Here is some basic information about cleaning. 5.1.1 Detergent and foam Foam or detergent should be applied onto dry surfaces so that the chemical product is in direct contact with the dirt. Detergents are applied from bottom to top, for example on a car bodywork, in order to avoid "super clean" areas, where the detergent collects in higher concentration and streams downwards. Let the detergent work for several minutes before rinsing but never let it dry on the surface being cleaned. Note: It is important that the detergents do not dry up. Otherwise the surfac that has to be cleaned can be damaged. 5.1.2 Mechanical effect In order to break down tough layers of dirt, additional mechanical effect may be required. Special wash brushes offer this supplementary effect that cuts through dirt (especially by car washing). 10 5.2 Typical fields of application Below you will find a description of a lot of cleaning tasks which can be solved by a pressure washer from Nilfisk in association with accessories and detergents. Task Accessories ‘Click Cleaning method & Clean’ Car Car nozzle, auto brush, underchassis nozzle, Foam sprayer, Car Combi Cleaner 1. Apply Car Combi Cleaner with the foam sprayer. Always start from the bottom and work upwards. Let Car Combi Cleaner act for at least 5 min. 2. Wash the car with the car nozzle, which has been optimized for quick and gentle cleaning of enamelled surfaces (the jet is wider and not so sharp). Start at the front of the car and work backwards to avoid water from penetrating by the door mouldings. 3. Use the brush for removal of traffic film which is not removed by the nozzle. If the car is very dirty, apply Car Combi Cleaner again. 4. Attach the undercarriage nozzle and clean undercarriage and wheel arches. 5. Remove water from the surface of the car with the scraper on the car brush. Make sure that all grains of sand etc. have been removed before using the scraper. Wipe with a wash leather where the scraper cannot reach. Rims, aluminium Rim brush, auto nozzle, atomizer, Alu Cleaner Apply Alu Cleaner with an automizer. Let it act for approx. 5 min. and wash with the rim brush. For steel rims, use Car Combi Cleaner. Use the foam sprayer and wash with rim brush. Be careful! The high pressure jet may damage the tyres. Flagstones, concrete floors and other hard surfaces Powerspeed® nozzle, Stone & Wood Cleaner, Patio Cleaner Wash towards outlets or the like. On surfaces with moss or algae you may start by applying Stone & Wood Cleaner with the foam sprayer. Wash before the soap dries. Another more effective and quicker method is to use the Patio Cleaner. Thus you will also avoid splashes. Garden furniture, wood Wood Cleaner Garden brush Apply Wood Cleaner and wash before the soap dries. NOTE: Use the garden brush to clean off the dirt. Brickwork, Powerspeed® Wood nozzle, work Stone & Wood Cleaner, Patio Cleaner Gutter Same method as for flagstones, but be careful - bad joints and wood may be damaged by high pressure. You may choose only to use the Tornado® nozzle. Adjust the distance (pressure) to the quality of the joints and the wood. Patio Cleaner can also be used on vertical surfaces. Underchassis spray Wash the gutter with the nozzle. Always wash towards lance downpipes. Beware not to spray under the roofing. Cleaning Tube cleaner of drain pipes, outlets, down pipes etc. Push the tube cleaner approx. ½ m (to mark) into a tube or drain and activate the trigger of the spray handle. The nozzle opening turning backwards will pull the cleaner through the tube. The nozzle will break down the „plug“ and flush the dirt backwards. Rust, paint Water/sandblasting equipment Mount the water/sand blasting equipment and rust and paint is efficiently and quickly removed. Beware not to damage the surface to be sandblasted. Greenhouse Tornado® PR nozzle Wash with high pressure and maybe a brush. You may use Stone brush, Stone & & Wood Cleaner to remove moss and algae. Wood Cleaner Garden tools, lawn mover Tornado® PR nozzle, Powerspeed® nozzle, multiangle adaptor, Metal Cleaner Rinse the worst dirt off with the nozzle. Apply Metal Cleaner with the foam sprayer and let it act for approx. 5 min. Wash with the nozzle. You may use the multiangle adaptor for hard to get at areas to avoid splashing. 11 6 After using your pressure washer 6.1 Storing the washer The machine should be stored in a frost-free room! Pump, hose and accessories should always be emptied of water prior to storing as follows: 1. Stop the machine (turn the start/stop switch (1) to position “O” and detach water hose and accessory. 2. Restart the machine and activate the trigger. Let the machine run until no more water runs through the spray gun. 6.2 Winding up of electric cable and high pressure hose To avoid accidents, the electric cable and the high pressure hose should always be winded 3. Stop the machine, unplug and wind up hose and cable. 4. Place spray handle, nozzles and other accessories in the holders of the machine. Should the machine by mistake be frozen, it will be necessary to check it for damage. NEVER START-UP A FROZEN MACHINE. Frost damages are not covered by the guarantee! carefully up. 1. Wind up the electric cable on the appropriate hooks. Builtin clip for good holding (1). The lower hook can be turned to release the electric cable. 2. The high pressure washer comes in two models: A) with hook for storage of high pressure hose (14) - B) with a hose reel (13). 6.3 Storage of accessories f d b a+f 12 a e c The standard accessories (spray gun (f), spray lance (a), nozzles (b) foam sprayer (c)) can be stored on the pressure washer. The nozzle cleaning tool (d) and a Click & Clean brush (e) can also be stored on the product. 7 Maintenance WARNING! Always disconnect the electrical plug from the socket prior to maintenance or cleaning. To ensure a long and problem free working life, please take the following advice: Wash out water hose, high pressure hose, spray lance and accessories before mounting. 7.1 Cleaning of water inlet filter Clean the connectors of dust and sand. Make sure that no sand or dirt is blocking the movement of the pawl on the Click & Clean spray lance. Rinse the detergent spraying attachment after use. Clean the nozzles. Any repair should always be made in an authorized workshop with original spare parts. Clean the water inlet filter regularly once a month or more frequently according to use. Carefully loosen the filter with a pair of pliers and clean it. Check that it is intact before re-mounting it. The inlet filter must always be fitted inside the water inlet pipe to filter out sand, limestone and other impurities, as they will damage the pump valves. CAUTION: Failure to fit the filter will invalidate the guarantee. 7.2 Cleaning of nozzle A clogging up in the nozzle causes a pump pressure which is too high. This is why cleaning is required immediately. 1. Stop the machine and disconnect the nozzle. 2. Clean the nozzle. IMPORTANT: The cleaning tool (11) should only be used when the nozzle is detached! 3. Flush the nozzle backwards with water. 7.3 Cleaning of machine vents The machine should be kept clean so as to let cooling air pass freely through the machine vents. 7.4 Greasing of couplings To ensure an easy connection and that o-rings do not dry up, the couplings should be greased regularly. 13 8 Trouble-shooting To avoid unnecessary disappointments, you should check the following before contacting the Nilfisk service organization: Symptom Cause Recommended action Machine refuses to start Machine not plugged in Defective socket Fuse has blown Defective extension cable Plug in machine. Try another socket. Replace fuse. Switch off other machines. Try without the extension cable. Fluctuating pressure Check that hoses and connections are airtight. Clean and replace or refer to local Nilfisk distributor Clean and replace or refer to local Nilfisk distributor. Pump sucking air Valves dirty, worn out or stuck Pump seals worn out Motor busses Low voltage or low temperature Activate the trigger of the spray gun. Machine stops Fuse has blown Incorrect mains voltage Replace fuse. Switch off other machines. Check that the mains voltage corresponds to specification on the model tag. Leave the washer for 5 minutes to cool down. Clean the nozzle (see section 7.2) Thermal sensor activated Nozzle partially blocked Fuse blows Fuse too small Change to an installation higher than the amp. consumption of the machine. You may try without the extension cable. Machine pulsating Air in inlet hose/pump Nozzle partially blocked Water filter blocked Hose kinked Allow machine to run with open trigger until regular working pressure resumes. Check that the water supply corresponds to specifications required (see model tag) NB! Avoid using long, thin hoses (min. 1/2") Clean the nozzle (see section 7.2) Clean the filter (see section 7.1) Straighten out hose. Machine often starts and stops by itself Pump/spray gun is leaking Contact your nearest Nilfisk Service Centre. Machine starts, but no water comes out Pump/hoses or accessory frozen No water supply Water filter blocked Nozzle blocked Wait for pump/hoses or accessory to thaw. Inadequate supply of mains water Connect inlet water. Clean the filter (see section 7.1) Clean the nozzle (see section 7.2) In case problems other than the above occur, please contact your local Nilfisk distributor. UK: Customer Services at Penrith - 01768 868995 14 9 Further information 9.1 Recycling the washer Make the old cleaner unusable immediately. 1. Unplug the cleaner and cut the electric cable. Do not discard electrical appliances with household waste. 9.2 Warranty conditions Nilfisk guarantees high pressure washers for domestic use for 2 years. If your high pressure washer or accessories are handed in for repair, a copy of the receipt must be enclosed. Guarantee repairs are being made on the following conditions: z that defects are attributable to flaws or defects in materials or workmanship. (wear and tear as well as misuse are not covered by the guarantee). z that the directions of this instruction manual have been thoroughly observed. z that repair has not been carried out or attempted by other than Nilfisk-trained service staff. z that only original accessories have been applied. z that the product has not been exposed to abuse such as knocks, bumps or frost. As specified in European Directive 2002/96/EC on old electrical and electronic appliances, used electrical goods must be collected separately and recycled ecologically. Contact your local authorities or your nearest dealer for further information. z that only water without any impurities has been used. z that the high pressure washer has not been used for rental nor used commercially in any other way. Repairs under this guarantee include replacement of defective parts, exclusive of packing and postage/carriage. Besides, we refer to your national law of sale. The machine should be forwarded to one of the service centres of the Nilfisk organisation with description/specification of the fault. Repairs not covered by the guarantee conditions will be invoiced. (I.e. malfunctions due to Causes mentioned in section Troubleshooting Chart of the instruction manual). 15 9.3 Accessories Only use original accessories. Click & Clean Car nozzle Special nozzle for enameled surfaces. Optimal distance: 30 - 50 cm. Click & Clean Undershassis nozzle 90° angled special nozzle for undercarriage and wheel arches. Integrated guide shoes. Click & Clean Multiangle adaptor Adjusted in angles from 0° - 90° for better working posture and cleaning of hard to get at places as for instance barrels or the underside of the lawn mower. Fits all nozzles. Click & Clean Brushes For cars and other surfaces. Available in more shapes. Extension hose 7 m extension hose increasing the working range. Underchassis spray lance Special spray lance for washing your car underneath. Drain & Tube cleaner 15 m long tube cleaner for the cleaning of tubes and drains. Water-sandblasting equipment For removal of paint and rust. Sand available from do-it-yourself shops. Patio Plus Equipment for quick cleaning of patio/drive/flagstones. Garden brush Rotating brush for cleaning of wooden surfaces. Rim brush Rotating brush for cleaning of wheel rims. Wall hook For suspension of your high pressure washer on the wall. Rotary brush For cleaning vehicles and other surfaces. Water suction kit For removal of large amounts of water from e.g. garden pounds. 16 Detergents Stone & Wood Cleaner For flagstones, brick- and woodwork. Suitable for moss and algae. Plastic Cleaner For plastic and synthetic materials such as garden furniture. Metal Cleaner For cleaning of metal such as garden tools. Car Combi Cleaner For cars etc. With rinsing wax. Alu Cleaner For surfaces of aluminium. Applied with an atomizer. Oil & Grease Cleaner For cleaning of grease and oil on motors for instance. Applied with an atomizer. Wood Cleaner For cleaning of wooden surfaces incl. of wooden garden furniture. 10 EU Declaration of Conformity EU Declaration of Conformity Product: High Pressure Washer Type: Nilfisk E 130.2, E 140.2, E 145.2 Description: 230 V 1~, 50 Hz - IP X5 The design of the unit corresponds to the following pertinent regulations: EC Machine Directive EC Low-voltage Directive EC EMV Directive Applied harmonised standards: EN 60335-2-79 Applied national standards and technical specifications: IEC 60335-2-79 2006/42/EC 2006/95/EC 2004/108/EC Nilfisk Division of Nilfisk-Advance A/S Industrivej 1 DK-9560 Hadsund Anton Sørensen General Manager, Technical Operations EAPC Hadsund, 01.10.2010 17 www.nilfisk.com