1
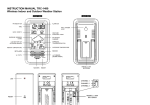
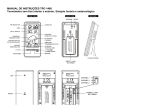
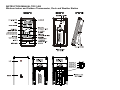
INSTRUCTION MANUAL TRC-1480
Wireless Indoor and Outdoor Thermometer, Clock and Weather Station
SET / ALARM
SNOOZE
+ / CHANNEL / ALARM ON-OFF
OUTDOOR TEMPERATURE
WIRLESS TRANSMISSION ICON
RF SENSOR CHANNEL
WEATHER FORECAST ICONS
ALARM ON
REAR VIEW
MAX / MIN
RESET
INSERT 2 X AAA BATTERIES
SIDE VIEW
FOLDING STAND
OUTDOOR TEMPERATURE
SENSOR
LED
RESET
STAND
INSERT 2 X AA BATTERIES
CHANNEL 1
CHANNEL 2
CHANNEL 3
QUICK START GUIDE
1. Slide the battery cover at the rear of your indoor unit open.
2. Insert 2 x AAA batteries in the battery compartment; observe correct polarity (+/-) as printed inside
the battery compartment.
3.
Replace the battery cover. After a few seconds the LCD shows default time, calendar and current
indoor temperature and starts to search for the outdoor temperature signal.
4.
Insert 2 x AAA batteries in the outdoor sensor. The outdoor temperature will be displayed with
“CH1” shown on the lower line of the LCD. Your indoor unit is synchronized with the outdoor
sensor on Channel 1; the outdoor temperature is displayed.
Please note:
Your outdoor sensor has a transmission range of 30m with no obstructions. The actual transmission
format or “24 Hr” time format. When selecting “12 Hr”, the AM / PM icon will be displayed.
5.
Press SET / ALM SET again, the time digits change to “00”, press +/- to select your time zone.
6.
Press SET / ALM SET again, the time digits “0:00” show and the hour digits start flashing. Press
+/- to set the hours.
7.
Press SET / ALM SET again, the minute digits start flashing. Press +/- button to set the minutes.
8.
Press SET / ALM SET to return to normal mode, or wait 30 seconds for the unit to return
automatically.
SET ALARM
Press SET / ALM SET, the time digits change to the alarm time digits “AM 7:00 AL”. Press and hold
SET / ALM SET for 2 seconds, the hour digits start flashing. Press +/- to set your desired alarm time
hour.
Press SET / ALM SET again, the alarm minute digits start flashing. Press +/- to set the alarm minutes.
Press SET / ALM SET again, time digits change to “05” and start flashing. Press +/- to set the snooze
duration between 1 and 20 minutes.
Press SET / ALM SET to return to normal mode, or wait 30 seconds for the unit to return
automatically.
TURN ALARM ON OR OFF
Press SET / ALM SET to display the alarm time. When the alarm time is displayed, press + to turn on /
off the daily alarm. When the alarm function is turned on, the
minute digits.
icon appears between the hour and
SNOOZE FUNCTION
When your alarm turns on, the clock sounds a beep to wake you up. The
1) Press SNOOZE to stop the alarm temporarily, the
again after 5 minutes.
icon starts flashing.
icon keeps flashing. The alarm will beep
maximum values; the unit will start recording and displaying updated data again.
When minimum indoor/outdoor temperature and humidity are displayed, press and hold MIN to clear
the minimum values; the unit will start recording and displaying updated data again.
USE INSTRUCTIONS FOR THE WEATHER STATION
There are four types of weather display on your weather station:
SUNNY
SUNNY AND CLOUDY
CLOUDY
RAINY
Please note: For better use of your weather station, place it in a location with air circulation, e.g. close
to an open window. Placing it in an air-conditioned environment will affect its accuracy.
After your weather station is powered up, it will take around 24 hours to stabilize. The weather icons
on the display give reference to the next 6-12 hours weather conditions. It may not match with the
TROUBLESHOOTING
1.
In case your indoor unit shows irrelevant information or digits, it may be affected by electrostatic
discharge or interferences from other devices. Press RESET on the rear of the unit. Your unit will
be reset to the factory settings (time and calendar) and you need to set time and calendar again.
2.
In case the outdoor temperature shows “--“:
2.1 Press + / CHANNEL (ALM On-Off) to display the correct channel, “CH1” is your default
channel;
2.2 If the outdoor temperature shows “CH1”, press and hold + / CHANNEL (ALM ON-OFF) for 2
seconds. The outdoor temperature will be displayed in approx 1 minute;
2.3 If above procedures do not work, repeat 2.2), bring in the outdoor sensor and press RESET
on the outdoor sensor.
Please note: If you observe a “Low Battery” icon on the lower left side of the LCD (which means your
outdoor sensor has a low battery level), replace the batteries of the sensor.
CARE AND MAINTENANCE
1.
2.
3.
4.
Do not expose the unit to extreme temperatures, water or direct sunlight.
Avoid contact with corrosive materials.
Do not subject the unit to excessive force, dust or humidity.
Do not open the casing or tamper with components of the unit.
SPECIFICATIONS
Indoor Temperature Range
Outdoor Temperature Range
Out of Range Display
Outdoor Temperature Interval
Temperature Resolution
Alarm Duration
Transmission Frequency
Transmission Distance
-10°C to +50°C (+14.2°F to +122°F)
-50°C to + 70°C (-58°F to +158°F)
Temperature: HH.H / LL.L
1 minute
0.1°C
2 minutes
433Mhz
Up to 30 meters (no obstructions)
ALL RIGHTS RESERVED
COPYRIGHT DENVER ELECTRONICS A/S
WWW.DENVER-ELECTRONICS.COM