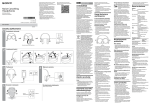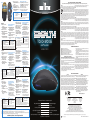
1
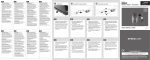
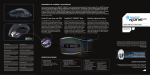
LED
1
3
2
6
4
7
5
1 Touch = Select / Interact
Double-Touch & Hold = Grab /
Highlight
2 Touch = Command Menu
3 Swipe Forward = Scroll Up
Swipe Backward = Scroll Down
Double-Touch & Hold = Quick
Scroll Up / Down
Pick up for Presenter mode
• Swipe Left = Page Back / Previous Slide
• Swipe Right = Page Forward / Next Slide 4 Power/Reset = Press to Turn On / Off
5 Slot = USB Receiver Storage
6 Cover = Battery Compartment
7 Laser: Do not stare into beam or view
directly with optical instruments.
WASTE ELECTRICAL & ELECTRONIC EQUIPMENT
LED Indication
LED Indication
Blue High power level
Off
Sleep mode or no power*
Red Low power level: < 2.2V
Rapid blinking Pairing with computer
On Ready for use
Slow blinking Successful connection
* After 90 seconds without use, the mouse enters Sleep mode. Move or touch it to wake it up. After
1 hour without use, the mouse turns off. Press Power/Reset to re-activate it.
Español
Deutsch
1Berühren = Auswählen /
Interagieren
Zweimal antippen & halten =
Verschieben / Markieren
2Berühren = Kontextmenü
3 Wischbewegung nach oben =
Hochscrollen
Wischbewegung nach unten =
Herunterscrollen
Zweimal antippen & halten =
Schnell hoch-/herunterscrollen
Maus aufnehmen: Wechsel
in Presentermodus
• Wischbewegung nach links =
Zur vorherigen Seite/Folie
• Wischbewegung nach rechts =
Zur nächsten Seite/Folie 4 Power/Reset = Drücken zum Ein-/
Ausschalten
5Slot = Staufach für USB-Empfänger
6Abdeckung = Akkufach
7Laser: Schauen Sie nicht direkt in
den Laser.
LED Bedeutung
LED Bedeutung
Blau Hoher Akkuladezustand
Schnelles Verbindungsaufbau
Rot Niedriger Akkuladezustand < 2,2 V Blinken mit PC
An Betriebsbereit
Langsames Verbindung mit PC
Aus
Leerer Akku oder Sleep-Modus*
Blinken
erfolgreich
* Wird die Maus über 90 Sekunden lang nicht genutzt, wechselt sie in den Sleep-Modus.
Bewegen oder berühren Sie sie, um sie zu reaktivieren. Wird die Maus 1 Stunde lang
nicht genutzt, schaltet sie sich ab. Drücken Sie Power/Reset, um sie zu reaktivieren.
1Un toque = Elegir / Interactuar
Toque dos veces y mantenga
presionado = Arrastrar / Seleccionar
2Un toque = Menú emergente
3 Deslice hacia adelante =
Desplazamiento hacia arriba
Deslice hacia atrás =
Desplazamiento había abajo
Toque dos veces y mantenga
presionado = Desplazamiento
rápido
Levante el ratón: Para activar
el modo presentador
• Deslice hacia la izquierda = Regresa
a la página/diapositiva anterior
• Deslice hacia la derecha = Avanza
a la página/diapositiva siguiente 4Encendido/Reinicio = Presione
para Encender/Apagar
5Ranura = Guarde aquí el Receptor USB
6Tapa = Compartimento de las baterías
7Laser: No mire fijamente el haz o vea
directamente con instrumentos ópticos.
LED Indicación
LED Indicación
Azul Nivel de energía alto
Parpadeo Emparejamiento con la Rojo Nivel de energía bajo < 2.2V
rápido
computadora
Encendido Listo para usarse
Parpadeo Conexión exitosa
Apagado Sin energía o en modo de espera* lento
* Después de 90 segundos en desuso, el ratón cambiará al modo de espera. Mueva o toque
para activarlo nuevamente. Después de 1 hora en desuso, el ratón se apagará. Presione el
botón de Encendido para reactivarlo.
Polski
1Dotyk = Wybór / Interakcja
Podniesienie myszy:
Podwójny dotyk & Przytrzymanie = Uruchomienie trybu prezentacji
1Toucher = Sélectionner / Interagir Enlevez la souris: Changer au Uchwyt / Podświetlenie
• Przesunięcie w lewo = Strona do
mode Présentateur
Toucher deux fois = Déplacer /
tyłu / Poprzedni Slajd
2Dotyk = Menu kontekstowe
• Glissement vers le gauche =
Marquer
• Przesunięcie w prawo = Strona do
3Przesunięcie do przodu =
Page/Diapositive précédente
2Toucher = Menu de contexte
przodu / Następny Slajd Przewijanie w górę
• Glissement vers la droit = Page/ Przesunięcie do tyłu =
3 Glissement vers le haut =
4Zasilanie/Reset = Wciśnij, aby
Diapositive prochaine Défilement vers le haut
Włączyć / Wyłączyć
Przewijanie w dół
4 Power/Reset = Appuyer pour
Glissement vers le bas =
Podwójny dotyk & Przytrzymanie = 5Slot = Magazynek na odbiornik USB
Activer/Désactiver
Défilement vers le bas
6Zaślepka = Komora na baterie
Szybkie przewijanie Góra / Dół
5Emplacement = Stockage du
Toucher deux fois et tenir =
7Moduł lasera: Nie należy patrzeć
récepteur USB
Défilement rapide
bezpośrednio w strumień wiązki
6Couvercle = Compartiment de batterie
lasera ani przez urządzenia ptyczne.
7Laser: Ne jamais fixer le faisceau ni le
Dioda Wskazanie
Wskazanie
regarder sans instruments optiques. Dioda Szybkie Parowanie z komputerem
Niebieska Wysoki poziom naładowania Czerwona Niski poziom naładowania: <2.2V miganie
DEL Affichage
DEL Affichage
Powolne Połączenie
Włączona Gotowa do użycia
Vide batterie ou mode
Bleue Batterie pleine Éteint
Wyłączona Brak zasilania lub tryb uśpienia*
miganie
d’économie de l’énergie*
Rouge Batterie faible
Clignotement rapide La paire avec le PC
< 2,2 V
* Po 90 sekundach bezczynności mysz przechodzi w stan uśpienia. Porusz ją lub dotknij w
Clignotement lent Connexion à l’ordinateur
Activée Prêt à l’usage
celu wybudzenia. Po godzinie bezczynności mysz wyłącza się. Wciśnij Power/Reset, aby
Français
* Après 90 secondes d’usage, la souris entre en mode d’économie de l’énergie. Bougez ou
touchez pour la réactiver. Après une heure sans usage, la souris se désactive. Appuyez
sur Power/Reset pour la réactiver.
Italiano
1Touch = selezionare
Doppio-Touch & Attesa =
trascinare / evidenziare
2Touch = menu comandi
3 Scorrere in Avanti = scorrere
verso l’alto
Scorrere indietro = scorrere verso
il basso
Doppio-Touch & Attesa =
scorrimento rapido verso l’alto e
verso il basso
Accedere alla modalità
presentazione tenendo in
mano il mouse
• Scorrere a sinistra = pagina
precedente / diapositiva precedente
• Scorrere a destra = pagina
successiva / diapositiva successiva 4 Accensione/Spegnimento =
premere per accendere / spegnere
5Slot = alloggio ricevitore USB
6Copertura = vano batterie
7Laser: Non fissare il raggio o non
osservare direttamente con strumenti
ottici.
LED Indicazione
LED Indicazione
Blu livello di potenza elevato
Lampeggio in attesa di connessione al
Rosso livello di potenza basso: <2.2V
rapido
computer
Acceso pronto per l’uso
Lampeggio connessione al computer
Spento modalità stand-by o spento*
lento
avvenuta
* Dopo 90 secondi di inutilizzo, il mouse entra in modalità stand-by. Muovere o toccare
TM
TOUCH MOUSE
and Presenter
MODEL 178013
manhattan-products.com/warranty
Работа с презентациями
(функция Presenter)
• Передвижение пальца влево =
просмотр предыдущего слайда,
страницы
• Передвижение пальца вправо =
просмотр следующего слайда,
страницы 4 Включение/Выключение
5Слот для USB ресивера
6Отсек для батареек
7Лазер: может представлять
опасность, если смотреть на него
через оптические инструменты.
l’area di tocco per riattivarlo. Dopo un’ora di inutilizzo, il mouse si spegne. Premere il
tasto Power/Reset per riattivarlo.
For specifications and Tech Support contact information, go to:
Specyfikację techniczną oraz informacje o pomocy technicznej znajdziesz na:
Spezifikationen und Kontaktinformationen des technischen Supports finden Sie auf: Per informazioni e per contatto di supporto tecnico vai a:
Para más especificaciones e información de contacto para soporte técnico, visite:
Для вопросов по технической поддержке используйте следующую контактную
Vous trouvez les spécifications et les informations de contact du support technique sur: информацию:
manhattan-products.com/en-US/products/9630
1. Todos los productos a que se refiere esta garantía, ampara su cambio físico,
sin ningún cargo para el consumidor.
2. El comercializador no tiene talleres de servicio, debido a que los productos que
se garantizan no cuentan con reparaciones, ni refacciones, ya que su garantía
es de cambio físico.
3. La garantía cubre exclusivamente aquellas partes, equipos o sub-ensambles
que hayan sido instaladas de fábrica y no incluye en ningún caso el equipo
adicional o cualesquiera que hayan sido adicionados al mismo por el usuario
o distribuidor.
Para hacer efectiva esta garantía bastará con presentar el producto al distribuidor
en el domicilio donde fue adquirido o en el domicilio de IC Intracom México, S.A. de
C.V., junto con los accesorios contenidos en su empaque, acompañado de su póliza
debidamente llenada y sellada por la casa vendedora (indispensable el sello y fecha
de compra) donde lo adquirió, o bien, la factura o ticket de compra original donde
se mencione claramente el modelo, número de serie (cuando aplique) y fecha de
adquisición. Esta garantía no es válida en los siguientes casos: Si el producto se hubiese utilizado en condiciones distintas a las normales; si el producto no ha sido operado conforme a los instructivos de uso; o si el producto ha sido alterado o tratado
de ser reparado por el consumidor o terceras personas.
REGULATORY STATEMENTS
FCC Class B
This equipment has been tested and found to comply with the limits for a Class B
digital device, pursuant to Part 15 of Federal Communications Commission (FCC)
Rules. These limits are designed to provide reasonable protection against harmful
interference in a residential installation. This equipment generates, uses and can
radiate radio frequency energy, and if not installed and used in accordance with the
instructions may cause harmful interference to radio communications. However,
there is no guarantee that interference will not occur in a particular installation. If
this equipment does cause harmful interference to radio or TV reception, which can
be determined by turning the equipment off and on, the user is encouraged to try
to correct the interference by one or more of the following measures: reorient or
relocate the receiving antenna; increase the separation between the equipment
and the receiver; connect the equipment to an outlet on a circuit different from
the receiver; or consult the dealer or an experienced radio/TV technician for help.
Русский
LED Индикационные светодиоды LED Индикационные светодиоды
Синий Максимальная мощность
Быстрое сопряжение с компьютером
Красный Низкий уровень мощности: < 2.2V мигание
Включение готово к использованию
Медленное успешное подключение
Выключениеспящий режим, отключение*
мигание
* Устройство переходит в спящий режим через 90 секунд без использования.
Прикоснитесь к нему для начала работы. По истечении 1 часа без использования
мышь отключается. Нажмите кнопку “Включение” для начала работы.
WARRANTY INFORMATION
English: For warranty information, go to :
Deutsch: Garantieinformationen finden Sie unter :
Español: Si desea obtener información sobre la garantía, visite:
Français: Pour consulter les informations sur la garantie, visitez:
Polski: Informacje dotyczące gwarancji znajdują się na stronie:
Italiano: Per informazioni sulla garanzia, accedere a:
Русский: Для получения информации о гарантии посетите страницу:
En México: Póliza de Garantía MANHATTAN – Datos del importador y responsable
ante el consumidor IC Intracom México, S.A. de C.V. • Av. Interceptor Poniente # 73,
Col. Parque Industrial La Joya, Cuautitlán Izcalli, Estado de México, C.P. 54730, México
• Tel. (55)1500-4500
La presente garantía cubre los siguientes productos contra cualquier defecto de
fabricación en sus materiales y mano de obra.
A.Garantizamos los productos de limpieza, aire comprimido y consumibles,
por 60 dias a partir de la fecha de entrega, o por el tiempo en que se agote
totalmente su contenido por su propia función de uso, lo que suceda primero.
B. Garantizamos los productos con partes móviles por 3 años.
C. Garantizamos los demás productos por 5 años (productos sin partes móviles),
bajo las siguientes condiciones:
ponownie ją włączyć.
1Прикосновение
Двойное прикосновение и
удерживание = Выделение,
перенос текста
2Прикосновение = стандартные
функции правой кнопки мыши
3 Прокрутка вверх = проведите
пальцем вверх
Прокрутка вниз = проведите
пальцем вниз
Двойное прикосновение и
удерживание = Быстрая
прокрутка вверх/вниз
Disposal of Electric and Electronic Equipment (applicable in the European Union and other European countries with separate collection systems)
English
Veuillez vous débarrasser de ce produit en Ie renvoyant à son point de vente ou au
This symbol on the product or its packaging indicates that this product shall point de ramassage local dans votre municipalité, à des fins de recyclage.
not be treated as household waste. Instead, it should be taken to an applicable Polski
collection point for the recycling of electrical and electronic equipment. Jeśli na produkcie lub jego opakowaniu umieszczono ten symbol, wówczas w czasie
By ensuring this product is disposed of correctly, you will help prevent utylizacji nie wolno wyrzucać tego produktu wraz z odpadami komunalnymi.
potential negative consequences to the environment and human health, Zgodnie z Dyrektywą Nr 2002/96/WE w sprawie zużytego sprzętu elektrycznego
which could otherwise be caused by inappropriate waste handling of i elektronicznego (WEEE), niniejszego produktu elektrycznego nie wolno usuwać
this product. If your equipment contains easily removable batteries or jako nie posortowanego odpadu komunalnego. Prosimy o usuniecie niniejszego
accumulators, dispose of these separately according to your local requirements. produktu poprzez jego zwrot do punktu zakupu lub oddanie do miejscowego koThe recycling of materials will help to conserve natural resources. For more detailed munalnego punktu zbiórki odpadów przeznaczonych do recyklingu.
information about recycling of this product, contact your local city office, your
household waste disposal service or the shop where you purchased this product. Italiano
In countries outside of the EU: To discard this product, contact your local authorities Questo simbolo sui prodotto o sulla relativa confezione indica che il prodotto non
va trattato come un rifiuto domestico. In ottemperanza alla Direttiva UE 2002/96/
and ask for the correct manner of disposal.
EC sui rifiuti di apparecchiature elettriche ed elettroniche (RAEE), questa prodotto
Deutsch
elettrico non deve essere smaltito come rifiuto municipale misto. Si prega di smaltDieses auf dem Produkt oder der Verpackung angebrachte Symbol zeigt an, dass ire il prodotto riportandolo al punto vendita o al punto di raccolta municipale locale
dieses Produkt nicht mit dem Hausmüll entsorgtwerden darf. In Übereinstimmung per un opportuno riciclaggio.
mit der Richtlinie 2002/96/EG des Europäischen Parlaments und des Rates über Elektro- und Elektronik-Altgeräte (WEEE) darf dieses Elektrogerät nicht im normalen Русский
Hausmüll oder dem Gelben Sack entsorgt werden. Wenn Sie dieses Produkt ents- Данный знак на изделии либо на его упаковке означает, что настоящий
orgen möchten, bringen Sie es bitte zur Verkaufsstelle zurück oder zum Recycling- продукт нельзя утилизировать вместе с бытовыми отходами. Вместо
Sammelpunkt Ihrer Gemeinde.
этого его следует доставить в подходящий пункт сбора для переработки
электрического и электронного оборудования. Путем правильной утилизации
Español
Este símbolo en el producto o su embalaje indica que el producto no debe продукта вы предотвращаете возможные негативные последствия для
tratarse como residuo doméstico. De conformidad con la Directiva 2002/96/CE de la человека и окружающей среды, которые могли бы наступить при ненадлежащем
UE sobre residuos de aparatos eléctricos y electrónicos (RAEE), este producto eléc- способе утилизации. Если в оборудовании применяются съемные батареи
trico no puede desecharse se con el resto de residuos no clasificados. Deshágase или аккумуляторы, их следует утилизировать отдельно в соответствии с
de este producto devolviéndolo a su punto de venta o a un punto de recolección местными требованиями. Переработка материалов помогает экономить
природные ресурсы. Для получения подробной информации об утилизации
municipal para su reciclaje.
и переработке настоящего продукта обратитесь в местное городское
Français
управление, службу утилизации отходов или в магазин, где было приобретено
Ce symbole sur Ie produit ou son emballage signifie que ce produit ne doit pas être изделие. В странах за пределами ЕС: если вы хотите избавиться от данного
traité comme un déchet ménager. Conformément à la Directive 2002/96/EC sur les изделия, обратитесь к местным властям за указаниями по процедуре
déchets d’équipements électriques et électroniques (DEEE), ce produit électrique утилизации.
ne doit en aucun cas être mis au rebut sous forme de déchet municipal non trié.
CE / R&TTE
English: This device complies with the requirements of R&TTE Directive 1999/5/EC.
The Declaration of Conformity for this product is available at:
Deutsch: Dieses Gerät enspricht der Direktive R&TTE Direktive 1999/5/EC.
Die Konformitätserklärung für dieses Produkt finden Sie unter::
Español: Este dispositivo cumple con los requerimientos de la Directiva R&TTE 1999/5/EC.
La declaración de conformidad para este producto esta disponible en:
Français: Cet appareil satisfait aux exigences de la directive R&TTE 1999/5/CE.
La Déclaration de Conformité pour ce produit est disponible à l’adresset :
Polski: Urządzenie spełnia wymagania dyrektywy R&TTE 1999/5/EC.
Deklaracja zgodności dostępna jest na stronie internetowej producenta:
Italiano: Questo dispositivo è conforme alla Direttiva 1999/5/EC R&TTE.
La dichiarazione di conformità per questo prodotto è disponibile al:
Русский: Данное устройство соответствует требованиям Директивы R&TTE
1999/5/EC. Декларацию соответствия для данного устройства вы
можете получить по адресу:
manhattan-products.com
For optimal performance, some practice required.
Die optimale Bedienung erschließt sich erst nach einiger Eingewöhnungszeit.
Se requiere práctica para un óptimo rendimiento.
Pour des performances optimales, une certaine pratique est nécessaire.
Aby uzyskać optymalną wydajność, praktyka i trening może okazać się niezbędna.
Richiede un pò di pratica per avere una resa ottimale.
Потребуется некоторое количество времени для практики, и Вы сможете управлять данным
устройством в совершенстве.
North & South America
IC INTRACOM AMERICAS
550 Commerce Blvd.
Oldsmar, FL 34677
USA
Asia & Africa
IC INTRACOM ASIA
Far Eastern Technology Center
7-F No. 125, Section 2, Da Tong Rd.
Shijr, Taipei
Taiwan, ROC
Europe
IC INTRACOM EUROPE
Löhbacher Str. 7
D-58553 Halver
Germany
All trademarks and trade names are the property of their respective owners.
Alle Marken und Markennamen sind Eigentum Ihrer jeweiligen Inhaber.
Todas las marcas y nombres comerciales son propiedad de sus respectivos dueños.
Toutes les marques et noms commerciaux sont la propriété de leurs propriétaires respectifs.
Wszystkie znaki towarowe i nazwy handlowe należą do ich właścicieli.
Tutti i marchi registrati e le dominazioni commerciali sono di proprietà dei loro rispettivi proprietari.
Все торговые марки или торговые названия являются собственностью их соответствующих владельцев.
© IC INTRACOM. All rights reserved. MANHATTAN is a trademark of IC INTRACOM, registered in the U.S. and other countries.
Printed on recycled paper.
MAN-178013-UM-ML-0812-08-0
Set It Up
1
2
3
Setting up the mouse begins with removing
the battery compartment cover on the
bottom of the mouse. Insert the 2 included
AAA batteries and replace the cover.
Next, remove the USB receiver from its
storage slot and plug it into a USB port on
your computer.
3
1
4
2
Press Power/Reset.* The blue MANHATTAN
logo on the left side of the mouse will blink
slowly to indicate the mouse is powered on.
Your operating system will automatically install the correct drivers.
* Mac users may see a Keyboard Setup Assistant window on-screen. Close the window and continue.
Deutsch
1 Entfernen Sie die Abdeckung des Batteriefachs an der Unterseite der Maus.
Legen Sie die beiden beiliegenden AAA-Batterien ein und setzen Sie die
Abdeckung wieder auf.
2 Nehmen Sie den USB-Empfänger aus seinem Staufach und schließen Sie
ihn an einen USB-Port Ihres PCs an.
3 Drücken Sie auf Power/Reset.* Das blaue MANHATTAN-Logo an der linken
Seite der Maus blinkt und zeigt so an, dass die Maus eingeschaltet ist. Ihr
Betriebssystem installiert den passenden Treiber automatisch.
* Bei Mac-Nutzern öffnet sich evtl. ein Tastatur-Einrichtungsassistent.
Schließen Sie diesen und setzen Sie den Vorgang fort.
Use as a Mouse
Use as a Presenter
4
To use as a desktop mouse, first position your fingers over the
touch-sensitive area.
10
5
Left-touch for normal left-click operations; for example, opening
files.
6
7
To use as a presenter mouse, double-touch to
begin a slide show in a PowerPoint or PDF
presentation. Note: When using the mouse in
presenter mode, make sure your finger doesn’t
cover the optical sensor on the bottom of the
mouse.
Double-touch to highlight text or grab and drag files, emails, etc.
11
Move your thumb to the right for the next slide;
move to the left for the previous slide.
8
9
12
Double-touch again to end the presentation.
Slide your fingertip up or down the top center to scroll.
5
6
Right-touch for normal right-click operations; for example,
displaying menu options.
Double-touch the top center, then move the mouse up and down
or left and right to auto-scroll. To exit, double-touch again.
2 A continuación, retire el receptor USB de su ranura y conéctelo en un
puerto USB de la computadora.
3 Presione Power/Reset.* El logo de MANHATTAN ubicado a la izquierda del
ratón parpadeará lentamente indicando que el ratón está encendido. El
sistema operativo automáticamente instalará los controladores.
* Los usuarios de Mac pueden visualizar el asistente de configuración del
teclado en la pantalla. Cierre la ventana y continúe.
4 Para utilizarse como un ratón de escritorio, coloque sus dedos sobre el
área sensitiva táctil.
5 Toque a la izquierda como si fuera un clic izquierdo; por ejemplo, para
abrir archivos.
6 Haga un doble toque para seleccionar texto o arrastrar archivos, correos, etc.
4 Zur Verwendung als Desktop-Maus, legen Sie Ihre Finger auf die Touch7 Toque a la derecha como si fuera un clic derecho; por ejemplo, para
Fläche.
desplegar un menú de opciones.
5 Berühren Sie die linke Fläche für klassische Linksklick-Funktionen, z. B.
8 Deslice su dedo hacia arriba o abajo en la parte superior central del ratón
das Öffnen von Dateien.
para desplazarse.
6 Zweimal antippen um Text zu markieren oder Objekte wie Dateien, E-Mails
9 Realice un doble toque en la parte superior central, después mueva el
o. ä. aufzunehmen und zu verschieben.
ratón en cualquier dirección para auto desplazarse. Para salir, nuevamente
7 Berühren Sie die rechte Fläche für klassische Rechtsklick-Funktionen; z. B.
realice un doble toque.
das Einblenden von Kontextmenüs.
10 Para utilizarse como un ratón de presentaciones, con su pulgar haga un
8 Bewegen Sie Ihre Fingerspitze entlang der mittleren Touch-Fläche, um
doble toque para comenzar una presentación de diapositivas en Power
nach oben oder unten zu scrollen.
9 Tippen Sie zweimal auf die mittlere Touch-Fläche und bewegen Sie dann point o PDF presentation. Nota: Cuando utilice el ratón en modo
die Maus nach oben, unten, rechts oder links, um die Autoscroll-Funktion presentación, asegúrese que su dedo no cubra el sensor óptico en la parte
inferior del ratón.
zu aktivieren. Um sie zu deaktivieren, tippen Sie erneut zweimal.
11 Deslice su pulgar a la derecha para pasar a la siguiente diapositiva; deslice
10 Zur Verwendung als Presenter-Maus, tippen Sie zweimal, um eine
a la izquierda para retroceder.
Folienpräsentation in einem PowerPoint- oder PDF-Dokument zu starten.
12 Para terminar la presentación nuevamente haga un doble toque con su
Hinweis: Wenn Sie die Maus im Presenter-Modus verwenden, achten Sie
pulgar.
darauf, dass Ihre Finger nicht den optischen Sensor an der Unterseite
Si requiere ajustar la sensibilidad del dispositivo, consulte el manual de
verdecken.
usuario de su computadora.
11 Bewegen Sie den Daumen nach rechts, um zur nächsten oder nach links,
um zur vorherigen Folie zu gelangen.
Français
12 Tippen Sie erneut zweimal, um die Präsentation zu beenden.
1 Soulevez le couvercle du compartiment batterie au verso de la souris.
Angaben zur Änderung der Mauszeiger-geschwindigkeit finden Sie im
Insérez les deux batteries AAA et replacez le couvercle.
Handbuch Ihres PCs.
2 Sortez le récepteur USB de son emplacement et branchez le à un port USB
de votre ordinateur.
Español
3 Appuyez sur Power/Reset.* Le bleu logo MANHATTAN à gauche de la
1 La configuración del ratón comienza retirando la tapa del compartimento
souris clignote pour afficher que la souris est alimentée. Votre système
de la batería en la parte inferior del ratón. Inserte las 2 baterías AAA
d’exploitation installe les pilotes correctes automatiquement.
incluidas y coloque la tapa.
* Chez les utilisateurs Mac, un assistant d’installation pour clavier pourrait
8
7
9
For sensitivity settings, if needed, refer to your
computer’s user manual.
10 12
11
7 Dotyk po lewej stronie działa, jak lewy przycisk; przykładowo wyświetlanie presentazione diapositiva in PowerPoint o PDF. Nota: quanto si usa il
menu kontekstowego.
mouse in modalità presenter, assicurarsi che le dita non coprano il
8 Przesuń palec od środka myszy w górę lub w dół, aby użyć opcji scroll.
sensore ottico posto in testa al mouse.
11 Far scorrere il pollice verso destra per la diapositiva successiva, far scorrere
9 Dotknij dwukrotnie na środek myszy, następnie przesuń mysz w górę /
verso sinistra per la diapositiva precedente.
dół lub lewo / prawo, aby użyć opcji auto-scroll. Aby wyjść, ponownie
12 Doppio-touch nuovamente alla fine della presentazione.
dotknij dwukrotnie.
Per impostazioni di sensibilità, se bisogno, fare riferimento al manuale
utente.
10 Aby użyć funkcjonalności prezentera, dotknij dwukrotnie, aby rozpocząć
prezentację w PowerPoint lub pliku PDF. Uwaga: Podczas używania trybu Русский
prezentera, należy zwrócić szczególną uwagę, aby palce nie zasłaniały
1 Вставьте 2 батарейки ААА в отсек для батареек.
sensora laserowego na spodniej części myszy.
2 Затем достаньте USB-ресивер из отсека, расположенного в нижней
11 Przesuń kciuk w prawo, aby wyświetlić następnym slajd, przesuń w lewo,
части устройства, и подключите его к USB порту вашего ПК.
aby wyświetlić poprzedni slajd.
3 Нажмите кнопку включение.* Логотип MANHATTAN начнет медленно
12
Ponownie
dotknij
dwukrotnie,
aby
zakończyć
prezentację.
10 Pour l’utilisation comme présentateur, touchez deux fois pour lancer un
мигать на левой стороне мышки синим цветом. Ваша операционная
Aby
uzyskać
informacje
na
temat
ustawień
czułości
myszy,
zapoznaj
się
z
diaporama dans une présentation PowerPoint ou PDF. Remarque: En
система автоматически установит необходимые драйвера.
instrukcją użytkownika komputera.
utilisant la souris en tant que présentateur, assurez-vous que vos doigts ne
* У пользователей Mac OS может появиться окно “Мастер установки
couvrent pas le capteur à la face inférieure de la souris.
Italiano
нового оборудования” на рабочем столе. В случае появления
11 Faites glisser votre pouce vers la droite pour la diapositive prochaine;
закройте это окно.
1 Il funzionamento del mouse inizia rimuovendo il coperchio del vano
vers la gauche pour la diapositive précédente.
batterie nella parte inferiore del mouse. Inserire le 2 batterie AAA incluse 4 Для начала работы поместите пальцы на чувствительную часть мышки.
12 Touchez deux fois à nouveau pour terminer la présentation.
e richiudere il coperchio.
5 Левое прикосновение выполняет все стандартные операции
Pour changer la sensibilité de la souris, consultez le manuel utilisateur de
2 Successivamente, rimuovere il ricevitore USB dal suo slot di memoria e
обыкновенной мыши.
votre ordinateur.
inserirlo in una porta USB del vostro computer.
6 Для выделения текста и переноса файлов используйте двойное касание.
Polski
3 Premere Power/Reset.* Il logo blu MANHATTAN sul lato sinistro del mouse 7 Правое прикосновение также выполняет все стандартные операции
lampeggerà lentamente per indicare che il mouse è acceso. Il vostro
обыкновенной мыши.
1 Konfigurację myszy należy rozpocząć od zdjęcia pokrywy komory na
8 Для прокрутки передвигайте пальцами сверху вниз по центру
baterie znajdującej się na spodniej części myszy. Do komory należy włożyć sistemo operativo installerà automaticamente i driver corretti.
* Agli utenti Mac può comparire sullo schermo una finestra di assistenza устройства.
dołączone 2 baterie typu AAA i zamknąć komorę.
di funzionamento. Chiudere la finestra e continuare.
9 Для автоматической прокрутки дважды прикоснитесь в центре верхней
2 Następnie należy wyjąć z magazynku odbiornik USB i włożyć go do
части мыши. Перемещайте мышь вверх-вниз, влево-вправо. Для
wolnego portu USB komputera.
4 Per utilizzare come desktop mouse, prima posizionare le vostre dita
выхода из режима: дважды нажмите по центру верхний части мыши.
3 Wciśnij Power/Reset.* Niebieskie logo MANHATTAN po lewej stronie myszy sull’area touch.
s’afficher. Fermez cette fenêtre et continuez.
4 Pour l’utilisation comme souris de bureau, placez vos doigts sur la surface
tactile.
5 Touchez la surface à gauche pour les fonctions clique-gauche classiques
comme ouvrir des fichiers.
6 Toucher deux fois pour marquer du texte et déplacer des objets comme
des fichiers, emails etc.
7 Touchez la surface à droite pour les fonctions clique-droit classiques
comme ouvrir des menus contextuels.
8 Faites glisser votre doigt vers le haut ou vers le bas pour le défilement.
9 Touchez le centre en haut deux fois, puis bougez la souris vers le haut, bas,
la gauche ou droite pour le défilement auto. Pour sortir, touchez le centre
en haut deux fois à nouveau.
mignie delikatnie sygnalizując, że mysz jest zasilona. System operacyjny
automatycznie zainstaluje wymagane sterowniki.
* W przypadku systemu MAC na ekranie może pojawić się Asystent
konfiguracji Klawiatury. Zamknij, okno aby kontynuować.
4 Aby użyć funkcji zwykłej myszy, po prostu połóż palce na obszarze
dotykowym myszy.
5 Dotyk po prawej stronie działa, jak prawy przycisk; przykładowo
otwieranie plików.
6 Podwójnie dotknij, aby zaznaczyć tekst lub chwyć i przeciągnij plik,
e-mail, itp.
5 Touch-sinistro per le normali operazioni di click-sinistro; per esempio per
aprire dei file.
6 Doppio-touch selezione testo, afferrare e trascinare file, e-mail, ecc.
7 Touch-destro per le normali operazioni di click-destro; per esempio per
visualizzare le opzioni di menù.
8 Far scorrere la punta del dito verso l’alto o verso il basso posizionandosi
nella parte centrale alta del mouse per scorrere.
9 Doppio-touch nella parte centrale alta, quindi spostare il mouse su e giù
o sinistro e destro per lo scorrimento automatico. Doppio-touch alla fine.
10 Da utilizzare come un presenter mouse, doppio-touch per avviare una
10 Для работы с презентациями (например, Power Point или с PDF
файлами) дважды нажмите на мышку, как показано на рисунке.
Внимание: при работе в функции Presenter, не заслоняйте пальцами
оптический сенсор мышки.
11 Передвигайте большим пальцем вправо для просмотра следующего
слайда, влево - для для предыдущего.
12 Дважды коснитесь по мышке как показано на устройстве для выходы
из режима.
Для настройки чувствительности мыши, используйте настройки
Вашем компьютере.