1
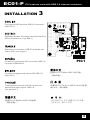
EC01-P MANUAL
PCI express card with USB 3.0 internal connector
10%
performance boost over first gen USB 3.0 solutions*
EC01-P
PCI express card with USB 3.0 internal connector
Introduction
SilverStone EC01-P is an expansion card that connects to the motherboards via a single lane PCI-E
gen 2.0 slot. Its single USB 3.0 internal connector offers output for dual front port USB 3.0 super
speed interface which enables data transfer with maximum compatibility and stability. For those
looking to use cases or drive bays that supports the new USB 3.0 internal connector standard, the
EC01-P is the quickest way to upgrade any motherboard with PCI-E gen 2.0 slot to be compatible
with the new standard.
Features
Unique 19-pin dual port USB 3.0 internal connector
PCI Express 2.0 with single lane (x1) throughput up to 5Gbit/s
Supports simultaneous operation for multiple USB 3.0/2.0/1.1 devices
Adds two external USB 3.0 SuperSpeed ports to your system
Built-in power connector for receiving extra power directly from system
Specifications
Model No.
SST-EC01-P
Form factor
Low profile single lane(X1) PCIe gen 2.0
USB 3.0 controller
NEC uPD720202
Power Requirement
5Vdc via molex 4pin power connector
USB Ports
Internal dual port USB 3.0
Transfer speed
USB 3.0(5Gbit/s), USB 2.0(480Mbit/s), USB 1.1(12Mbit/s)
Port Interface
USB3.0 (Max. 5Gbit/s) backwards compatible with USB 2.0
USB bus power output
5Vdc / unlimited current
Drive Support
Windows XP, Vista, 7(32bit/64bit)
Application
Expand chassis front IO with dual port USB 3.0
1
EC01-P
PCI express card with USB 3.0 internal connector
INSTALLATION
1
Install EC01-P onto PCIe slot of Motherboard.
(refer to PIC1)
Установите плату EC01-P в гнездо PCIe
материнской платы. (см. рисунок 1)
Installieren Sie die EC01-P im PCIe-Steckplatz
des Motherboards. (vgl. Abb. 1)
將EC01-P 安裝於主機板上的PCI-E插槽。
(請參考圖一)
Installez le EC01-P dans un emplacement PCIe
de la carte mère. (voir image 1)
将EC01-P 安装于主机板上的PCI-E插槽。
(请参考图一)
Instale el EC01-P en el zócalo PCIe de la placa
base. (consulte la IMAGEN1)
EC01-P をマザーボードのPCIeスロットにインスト
ールします。(図1.参照)
Inserisci EC01-P nello slot PCIe della scheda
madre. (fare riferimento alla PIC1)
EC01-P 을 메인보드의 PCIe 슬롯에 장착합니다.
(PIC 1 참조)
2
EC01-P
PCI express card with USB 3.0 internal connector
INSTALLATION
2
Plug Molex 4P power connecter.
(refer to PIC1)
Подсоедините 4-контактный разъем питания
Molex. (см. рисунок 1)
Schließen Sie den 4-poligen Molex-Netzstecker
an. (vgl. Abb. 1)
將4pin電源線接上EC01-P。(請參考圖一))
Branchez le cordon d'alimentation Molex 4P.
(voir image 1)
将4pin电源线接上EC01-P。(请参考图一)
Conecte el Mólex 4P en el conector depotencia.
(consulte la IMAGEN1)
Plug Molex 4P電源コネクタを接続します。
(図1.参照)
Connett il molex 4P alla presa d’alimentazione.
(fare riferimento alla PIC1)
Molex 4P 파워 커넥터를 연결합니다. (PIC 1
참조)
3
EC01-P
PCI express card with USB 3.0 internal connector
INSTALLATION
3
USB 3.0 connector
Plug internal 20P dual port USB 3.0 connector.
(refer PIC1)
4P power connecter
Schließen Sie den 20-poligen internen Dual-PortUSB 3.0-Stecker an. (vgl. Abb. 1)
Branchez le connecteur USB 3.0 à double port
interne 20P. (voir image 1)
Conecte el puerto dual 20P al conector USB 3.0.
(consulte la IMAGEN1)
PIC1
Connetti la doppia porta interna 20P USB 3.0.
(refer PIC1)
连接EC01-P 与20pin USB 3.0讯号线。
(请参考图一)
Подсоедините внутренний 20-контактный
разъем для двух портов USB 3.0.
(см. рисунок 1)
内蔵20PデュアルポートUSB 3.0コネクタを接
続します。(図1.参照)
連接EC01-P 與20pin USB 3.0訊號線。
(請參考圖一)
내부 20P 듀얼 포트 USB 3.0 커넥터를
연결합니다. (PIC 1 참조)
4
EC01-P
PCI express card with USB 3.0 internal connector
INSTALLATION
4
Install Renesas USB 3.0 host controller driver.
Установите драйвер хост-контроллера
Renesas USB 3.0.
Installieren Sie den USB 3.0-Host-ControllerTreiber von Renesas.
安裝Renesas USB 3.0 host controller驅動程式。
Installez le pilote du contrôleur hôte Renesas
USB 3.0.
安装Renesas USB 3.0 host controller驱动程序。
Instale el controlador Renesas USB 3.0.
USB 3.0ホストコントローラドライバをインストール
します。
Installa il driver Renesas USB 3.0 host controller.
Renesas USB 3.0 호스트 컨트롤러 드라이버를
설치합니다.
5
EC01-P
PCI express card with USB 3.0 internal connector
INSTALLATION
5
After above installation, you will find the
Renesas USB 3.0 host controller in the device
manager. (refer to PIC2)
После установки указанного выше драйвера
хост-контроллер Renesas USB 3.0 отобразится
в диспетчере устройств. (см. рисунок 2)
Nach der obigen Installation finden Sie den
USB 3.0-Host-Controller von Renesas im
Geräte-Manager. (vgl.Abb.2)
安裝完成後,在硬體管理員列表中可看見
Renesas USB 3.0 host controller。
(請參考圖二)
Après l'installation ci-dessus, vous trouverez
le contrôleur hôte Renesas USB 3.0 dans le
gestionnaire de périphériques. (voir image 2)
安装完成后,在硬件管理员列表中可看见
Renesas USB 3.0 host controller。
(请参考图二)
Tras la instalación anterior, encontrará el
controlador Renesas USB 3.0 en el
administrador de dispositivos.
上記インストール後、デバイスマネージャには
Renesas USB 3.0ホストコントローラが表示さ
れます。(図2.参照)
Dopo l’installazione del driver, troverai Renesas
USB 3.0 host controller in gestione periferiche.
(fare riferimento alla PIC2)
위의 설치 후, 장치관리자에서 Renesas USB 3.0
호스트 컨트롤러를 확인할 수 있습니다.
(PIC 2 참조)
6
EC01-P
PCI express card with USB 3.0 internal connector
PLEASE SEE EXAMPLE BELOW
PIC2
7
EC01-P
PCI express card with USB 3.0 internal connector
INSTALLATION
6
Plug your USB 3.0 device and enjoy the
5Gbit/s USB 3.0 super speed transfer speed.
Подключите устройство с интерфейсом USB
3.0 и передавайте данные на высокой
скорости до 5 Гбит/с через разъем USB 3.0.
Schließen Sie Ihr USB 3.0-Gerät an und
genießen die USB 3.0-Super-SpeedÜbertragungsgeschwindigkeit von 5 Gbit/s.
連接USB 3.0裝置並開始享受高速傳輸速度。
Branchez vos appareils USB 3.0 et profitez
de la super vitesse de transfert de 5Gbit/s.
连接USB 3.0装置并开始享受高速传输速度。
Conecte el dispositivo USB 3.0 y disfrutede
la transferencia de alta velocidad USB 3.0 de
5Gbit/s.
お持ちのUSB 3.0装置を接続して、5Gbit/sという
USB 3.0の超高速データ転送速度が実感できます。
Connetti pure la tua periferica USB 3.0 ed
apprezza la super velocità di trasferimento dati
di ben 5Gbit/s.
USB 3.0 장비를 연결한 후 5Gbit/s USB 3.0
초고속 전송 속도를 즐기십시요.
8
November, 2011