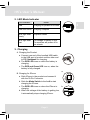
1
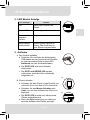
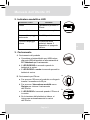
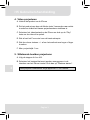
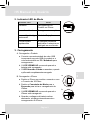
i15’s User’s Manual Care and Safety Information 1. Keep the device and packaging materials out of the reach of infants and children. 2. Avoid subjecting the power adapter and other contacts to dripping or splashing water and dry your hands before you use it. Do not place objects filled with liquids such as vases, etc. on or near the device. 3. Make sure that the used power outlet is always readily available and never hidden. In case of emergency, use the power adapter to separate the device from the power network. 4. Keep your device away from all flames such as candles and do not set them up in the vicinity of the device. 5. Keep the unit at least 10 cm away from other objects. Make sure the ventilation is not covered by newspapers, tablecloths, curtains, etc. 6. For your own safety, do not use the projector during thunderstorms or lightning. 7. Relative Humidity is 5~35°C, 80% (Max.), non-condensing. 8. The battery is integrated with the device. Do not dissemble and modify. The battery should be replaced by qualified service staff only. 9. Ensure that the ambient room temperature is within -10~55°C 10. During the operation, this product may heat lightly, which is normal. 11. Wait before using if the device has been moved from a cold location into a warm one. Any condensation that has formed may in certain circumstances destroy the device. As soon as the device has reached room temperature it can be used without risk. 12. Handle the product with care. Avoid contact with sharp objects. Keep device away from metallic objects. 13. Place the projector on a flat surface. Any collision or falling to the ground is likely to damage the product. 14. Do not drop or disassemble the product otherwise the warranty voids. Opening or removing covers may expose you to dangerous voltage or other hazards. Refer all servicing to qualified service personnel. 15. Use only the accessories supplied by the manufacturer. 16. Both product and user’s manual are subject to further improvement or supplement without further notice. 17. Avoid facing directly into the projector’s lens. I i15’s User’s Manual Sicherheitshinweise: 1. Das Gerät und das Verpackungsmaterial außerhalb der Reichweite von Kindern halten. 2. Das Netzteil nicht in Kontakt mit tropfendem oder fließendem Wasser kommen lassen und Hände vor der Benutzung abtrocknen. Keine mit Flüssigkeiten gefüllte Gegenstände, wie z.B. Vasen usw. auf oder in die Nähe des Gerätes stellen. 3. Stellen Sie sicher, dass die verwendete Steckdose immer verfügbar und niemals blockiert ist. Verwenden Sie im Notfall das Netzteil, um das Gerät vom Stromnetz zu trennen. 4. Das Gerät von Flammen, wie z.B. Kerzen fernhalten und diese nicht in der Nähe des Gerätes aufstellen. 5. Das Gerät mindestens 10 cm von anderen Gegenständen entfernt halten. Stellen Sie sicher, dass die Lüftungsschlitze nicht durch Zeitungen, Tischdecken, Vorhänge usw. blockiert werden. 6. Den Projektor zu Ihrer eigenen Sicherheit nicht während eines Gewitters oder Blitzschlages verwenden. 7. Relative Luftfeuchtigkeit liegt bei 5 bis 35°C, 80% (max.), nicht kondensierend. 8. Der Akku ist im Gerät integriert. Nicht auseinander nehmen oder ändern. Der Akku sollte nur von einer Fachkraft ausgetauscht werden. 9. Stellen Sie sicher, dass die Raumtemperatur innerhalb von -10 ist ~ 55°C liegt. 10. Dieses Produkt kann während des Betriebes etwas warm werden, was normal ist. 11. Warten Sie mit der Verwendung des Geräts etwas, wenn das es von einem kalten an einen warmen Ort gebracht wurde. Kondenswasser kann das Gerät unter bestimmten Umständen zerstören. Sobald das Gerät Raumtemperatur erreicht hat, kann es ohne Risiko verwendet werden. 12. Produkt mit Vorsicht handhaben. Kontakt mit scharfen Gegenständen vermeiden. Von Gegenständen aus Metall fernhalten. 13. Den Projektor auf eine flache Unterlage stellen. Stöße oder ein Herunterfallen auf den Boden führt wahrscheinlich zu Schäden des Produktes. 14. Das Produkt nicht fallen lassen oder auseinander nehmen, da sonst die Gewährleistung erlischt. Das Öffnen oder Entfernen von Abdeckungen kann sie gefährlichen Spannungen und anderen Risiken aussetzen. Alle Wartungsarbeiten von Fachpersonal durchführen lassen. 15. Nur vom Hersteller empfohlenes Zubehör verwenden. 16. Sowohl das Produkt als auch das Benutzerhandbuch unterliegen fortlaufenden Verbesserungen oder Ergänzungen ohne vorherige Mitteilung. 17. Nicht direkt in das Objektiv des Projektors sehen. II i15’s User’s Manual Entretien et précaustion d’emploi (FR) 1. Attention - Evitez de vous placer en face de la lentille du vidéo projecteur. 2. Evitez tout contact avec de l’eau, et gardez vos mains sèches lors de l’utilisation. 3. Assurez-vous que la température de la pièce est comprise entre -10 et 55°C 4. Le taux d’humidité relative doit être de 80% au maximum entre 5 et 35°C, sans condensation. 5. Ne pas faire tomber, frapper ou démonter cet appareil ; sinon la garantie sera annulée. Informazioni sulla cura e sulla sicurezza (IT) 1. Attenzione - Non guardare l’obiettivo in modo diretto. 2. Evitare il contatto con liquidi e utilizzare con mani asciutte. 3. Assicurarsi che la temperatura ambiente della stanza sia compresa tra -10 e 55°C 4. L’umidità relativa deve essere compresa tra 5 e 35°C, all’80% (max.), senza condensazione. 5. Non far cadere, non colpire e non smontare il dispositivo; in caso contrario la garanzia verrà annullata. Información de seguridad (ES) 1. Advertencia - Evite ponerse directamente en frente de las lentes del proyector. 2. Avite cualquier contacto con el agua. Mantenga sus manos secas durante su uso. 3. Asegúrese de que la temperatura ambiente de la sala sea de -10~55°C 4. Humedad relativa de 5~35°C, 80% (Máx.), no-condensada. 5. No caiga, golpee o desmonte el dispositivo, ya que de lo contrario se invalidaría la garantía. (AR) ﻣﻌﻠﻮﻣﺎت اﻟﺴﻼﻣﺔ واﻟﺮﻋﺎﻳﺔ . ﺗﺠﻨﺐ اﻟﺘﻌﺮض ﺑﺸﻜﻞ ﻣﺒﺎﺷﺮ ﻟﻌﺪﺳﺔ ﺟﻬﺎز اﻟﻌﺮض-ﺗﺤﺬﻳﺮ . واﻟﺤﻔﺎظ ﻋﻠﻰ ﻳﺪﻳﻚ ﺟﺎﻓﺘﻴﻦ أﺛﻨﺎء اﻻﺳﺘﺨﺪام،ﺗﺠﻨﺐ اﺗﺼﺎل اﻟﺠﻬﺎز ﺑﺎﻟﻤﺎء . درﺟﺔ ﻣﺌﻮﻳﺔ55 إﻟﻰ10 اﻟﺘﺄآﺪ ﻣﻦ أن درﺟﺔ ﺣﺮارة اﻟﻐﺮﻓﺔ اﻟﻤﺤﻴﻄﺔ ﻣﺎ ﺑﻴﻦ . ﻏﻴﺮ ﻣﻜﺜﻔﺔ،( )ﺑﺤﺪ أﻗﺼﻰ%80 ﺑﻤﺎ ﻳﻌﺎدل، درﺟﺔ35 إﻟﻰ5 أن ﺗﻜﻮن اﻟﺮﻃﻮﺑﺔ اﻟﻨﺴﺒﻴﺔ ﻣﻦ .ﻻ ﺗﺴﻘﻂ أو ﺗﺜﻘﺐ أو ﺗﻘﻮم ﺑﻔﻚ اﻟﺠﻬﺎز؛ وإﻻ ﺑﻄﻞ ﺣﻖ اﻟﻀﻤﺎن III .1 .2 .3 .4 .5 i15’s User’s Manual FCC Compliance Statement: This device complies with Part 15 of the FCC Rules. Operation is subjected to the following two conditions: (1) this device may not cause harmful interference, and (2) this device must accept any interference received, including interference that may cause undesired operation. This equipment has been tested and found to comply with limits for a Class B digital device, pursuant to Part 15 of the FCC rules. These limits are designed to provide reasonable protection against harmful interference in residential installations. This equipment generates, uses, and can radiate radio frequency energy, and if not installed and used in accordance with the instructions, may cause harmful interference to radio communications. However, there is no guarantee that interference will not occur in a particular installation. If this equipment does cause interference to radio or television equipment reception, which can be determined by turning the equipment off and on, the user is encouraged to try to correct the interference by one or more of the following measures: - Reorient or relocate the receiving antenna. - Move the equipment away from the receiver. - Plug the equipment into an outlet on a circuit different from that to which the receiver is connected. - Consult the dealer or an experienced radio/television technician for additional suggestions. You are cautioned that any change or modifications to the equipment not expressly approved by the party responsible for compliance could void your authority to operate such equipment. (EN) If the time arises to throw away your product, please recycle all the components possible. Batteries and rechargeable batteries are not to be disposed in your domestic waste! Please recycle them at your local recycling point. Together we can help to protect the environment. IV i15’s User’s Manual (DE) Wenn die Lebensdauer des Produkts zu Ende kommt, lassen Sie bitte möglichst alle Komponenten recyceln. Bitte recyceln Sie dieses Produkt ordnungsgemäß, wenn es nicht mehr verwendet werden kann. Es kann nicht als Haushaltsmüll behandelt werden. Es muss separat über die verfügbaren Rücknahme- und Sammelsysteme entsorgt werden. (FR) Si il est temps de jeter votre produit, veuillez recycler tous les composants possibles. Si ce produit est arrivé en fin de vie, veuillez s’il vous plait le recycler correctement. Il ne peut pas être traité comme les ordures ménagères. Il doit être être apporté à un point de collecte approprié pour le recyclage. (IT) Al momento di buttare via il prodotto, riciclare il maggior numero di componenti. Se questo prodotto giunge alla fine del suo ciclo di vita, lo ricicli correttamente. Non può essere trattato come rifiuto urbano. Deve essere smaltito separatamente attraverso l'appropriato sistema di reso e di raccolta. (ES) Si ha llegado la hora de deshacerse del producto, recicle todos los componentes que pueda. Si ha finalizado la vida útil de este producto, recíclelo adecuadamente. Debe deshacerse del mismo de forma separada a través de los sistemas de recogida disponibles. (AR) . اﻟﺮﺟﺎء إﻋﺎدة ﺗﺪوﻳﺮ آﺎﻓﺔ اﻷﺟﺰاء اﻟﻤﻤﻜﻨﺔ،إذا ﺣﺎن وﻗﺖ اﻟﺘﺨﻠﺺ ﻣﻦ اﻟﻤﻨﺘﺞ ﻻ ﻳﺘﻢ اﻟﺘﺨﻠﺺ ﻣﻦ اﻟﺒﻄﺎرﻳﺎت واﻟﺒﻄﺎرﻳﺎت اﻟﻘﺎﺑﻠﺔ ﻹﻋﺎدة اﻟﺸﺤﻦ ﺿﻤﻦ اﻟﻤﺨﻠﻔﺎت اﻟﻤﻨﺰﻟﻴﺔ !اﻟﺮﺟﺎء إﻋﺎدة ﺗﺪوﻳﺮهﺎ ﻟﺪى ﻣﺮآﺰ إﻋﺎدة .اﻟﺘﺪوﻳﺮ اﻟﻤﺤﻠﻲ ﻟﺪﻳﻚ .ﻣﻌﺎ ﻳﻤﻜﻨﻨﺎ اﻟﻤﺴﺎﻋﺪة ﻓﻲ ﺣﻤﺎﻳﺔ اﻟﺒﻴﺌﺔ (NL) Als het einde van de levensduur van het product is bereikt, moet u alle mogelijke componenten recyclen. Batterijen en oplaadbare batterijen mogen niet bij het huishoudelijke afval worden gegooid. Lever ze af bij uw lokale dienst voor recycling. Samen kunnen we helpen bij de bescherming van het milieu. (BPT) Se você decidir descartar o produto, faça-o de modo que seja possível a reciclagem de todos os componentes. As baterias e pilhas recarregáveis não devem ser descartadas em seu lixo doméstico! Favor reciclá-las em seu ponto de reciclagem local. Juntos, podemos ajudar a proteger o meio ambiente. V i15’s User’s Manual Product Introduction EN 1. Product Overview 30-Pin Connector Lens Focus Wheel Mode Switch Volume Toggle Switch USB Port LED Mode Indicator Projector Mode (Push Rightward for 3 seconds to turn ON or turn OFF the projection) 3S Battery Charging Mode Page 1 i15’s User’s Manual 2. LED Mode Indicator Red Mode EN LED Indicator Charging for product or iPhone Red and Green Charging complete Blue light flash slowly Projection mode Blue light flash fast The voltage of battery is low. The machine will power off in one minute. 3. Charging A. Charging the Product a. Connect one end of the bundled USB cable to the USB port of product and the other end to PC / Notebook for charging. b. The RED LED turns on when the battery is charging. c. The RED and Green LED turn on, when the battery is fully charged. a. B. Charging for iPhone a. Slide iPhone in the product and connect it with the 30-Pin Connector. b. Slide the Mode Switch to the Left to start charging the iPhone. c. The RED LED turns on when the iPhone is charging. d. When the voltage of the battery is getting low, it automatically stops charging iPhone. Page 2 b. i15’s User’s Manual 4. Project Video EN A. Connect the product and iPhone B. Turn on the product by pushing the Mode Switch to rightward for 3 seconds until the Blue projection screen is in display. C. Select the video file on iPhone and press “Play” key to play the video. D. Adjust Focus Wheel to achieve the best sharpness. E. Adjust the volume keys + /- to turn up or turn down the audio volume. F. Max. projection time: 3 hours 5. Project Still Pictures A. Follow the steps 4.A and 4.B. B. Select picture file to display in the main interface of iPhone device. Then press “start slideshow”. This projector supports any apps with TV OUT function. Page 3 i15’s User’s Manual 6. Specification Description DLP RGB LED Lumens Max. 15 lumen Resolution 640 x 360 (nHD) Aspect Ratio 16:9 Contrast Ratio 1000:1 Projection Image Size 25 cm ~ 152 cm (10” ~ 60” Diagonale) Projection Distance 49 cm ~ 292 cm LED Life 20,000 hours Focus Manual Speaker Max. 0.8 W Battery Type, Capacity Li-Polymer, 2100 mAh DC-IN 5V / 2A I/O Mini USB port, 30-pin Connector Dimensions 126 mm x 63 mm x 22 mm Weight 105 g Charging for iPhone device Can provide 80% energy for iPhone Supported iPhone Model iPhone 4, iPhone 4S Package Content iPhone Projector, USB cable, User’s Manual Page 4 EN Item Technology i15 Benutzerhandbuch Produktbeschreibung 1. Produktübersicht DE 30-Pin Anschluss Objektiv Fokus-Rad Lautstärkeeinstellung Modus-Schalter USB-Anschluss LED Modus Anzeige 3S Projektormodus (3 Sekunden lang nach rechts schieben, um die Projektion EIN oder AUS zu schalten) Akkulademodus Seite 1 i15 Benutzerhandbuch 2. LED Modus Anzeige Modus Rot Laden von Produkt oder iPhone Rot und Grün Laden abgeschlossen Blaues Licht langsam ein/aus Projektionsmodus Blaue Lampe blinkt schnell Spannung der Batterie ist niedrig. Das Gerät wird in einer Minute ausgeschaltet. DE LED Anzeige 3. Aufladen A. Das Produkt aufladen a. Schließen Sie ein Ende des beiliegenden USB Kabels an den Anschluss des Gerätes an und das andere Ende an einen PC / Notebook, um das Gerät aufzuladen. b. Die ROTE LED wird beim Aufladen aufleuchten. c. Die ROTE und GRÜNE LED werden aufleuchten, wenn der Akku vollständig aufgeladen ist. a. B. iPhone aufladen a. Schieben Sie das iPhone in das Produkt und verbinden Sie es mit dem 30-Pin Anschluss. b. Schieben Sie den Modus-Schalter nach Links, um mit dem Aufladen des iPhone zu beginnen. c. Die ROTE LED leuchtet auf, während das iPhone aufgeladen wird. d. Wenn die Batteriespannung zu niedrig ist, wird das Aufladen des iPhone gestoppt. Seite 2 b. i15 Benutzerhandbuch 4. Video projizieren DE A. Verbindung des Produktes mit dem iPhone B. Schalten Sie das Produkt ein, indem Sie den Modus-Schalter 3 Sekunden lang nach rechts drücken, bis der blaue Projektionsbildschirm zu sehen ist. C. Wählen Sie die Videodatei auf dem iPhone aus und drücken Sie auf die „Wiedergabe“ Taste, um das Video abzuspielen. D. Stellen Sie das Fokus-Rad ein, um die beste Schärfe zu erhalten. E. Stellen Sie die Lautstärketasten + /- ein, um die Audio-Lautstärke zu erhöhen oder zu verringern. F. Max. Projektionszeit: 3 Stunden 5. Fotos projizieren A. Folgen Sie den Schritten 4.A und 4.B. B. Wählen Sie die anzuzeigende Bilddatei im Hauptmenü des iPhone Gerätes aus. Drücken Sie anschließend auf „Diashow starten“. Dieser Projektor unterstützt jede App mit TV-OUT Funktion. Seite 3 i15 Benutzerhandbuch 6. Technische Daten Element Beschreibung DLP RGB LED Helligkeit Max. 15 Lumen Auflösung 640 x 360 (nHD) Seitenverhältnis 16:9 Kontrastverhältnis 1000:1 Projektionsbildgröße 25 cm ~ 152 cm (10” ~ 60” Diagonal) Projektionsabstand 49 cm ~ 292 cm LED Lebensdauer 20.000 Stunden Fokus Manuell Lautsprecher Max. 0,8 W Akkutyp, Kapazität Li-Polymer, 2100mAh DC-IN 5V/ 2A I/O Mini USB Port, 30-Pin Anschluss Abmessungen 126 mm x 63 mm x 22 mm Gewicht 105 g Aufladung von iPhone Gerät Kann 80% Energie für iPhone liefern Unterstützte iPhone Modelle iPhone 4, iPhone 4S Lieferumfang iPhone Projektor, USB Kabel, Benutzerhandbuch Seite 4 DE Technologie i15 Guide de l’utilisateur Introduction sur le produit uit 1. Vue d’ensemble du produit FR Connecteur 30 broches Lentille Roue de mise au point Interrupteur de volume Interrupteur de mode Port USB DEL indicatrice de mode 3S Mode Projection (Poussez vers la droite pendant 3 secondes pour allumer ou éteindre le projecteur). Mode chargement de la batterie Page 1 i15 Guide de l’utilisateur 2. DEL indicatrice de mode Mode Rouge Chargement de projecteur ou de l’iPhone Rouge et Verte Chargement terminé Bleue avec clignotements lents Mode Projection La lumière bleue clignote rapidement Le niveau de la batterie est faible. Le projecteur va s’éteindre dans une minute. FR Couleur de la DEL 3. Chargement A. Charger le projecteur a. Connectez une extrémité du câble USB fourni sur le le port USB du projecteur et l’autre sur le PC / Ordinateur portable pour charger le projecteur. b. La DEL ROUGE va s’allumer lorsque la batterie sera chargée. c. Les DEL rouge et verte s’allument quand la batterie est complètement chargée. a. B. Chargement pour iPhone a. Connectez l’iPhone sur le connecteur 30 broches du projecteur. b. Poussez vers la gauche l’interrupteur de mode pour commencer le chargement de l’iPhone. c. La DEL ROUGE va s’allumer lorsque l’iPhone sera chargé. d. Le rechargement de l’iPhone s’arrête automatiquement lorsque le niveau de la batterie devient faible. Page 2 b. i15 Guide de l’utilisateur 4. Projeter une vidéo A. Connectez le projecteur et l’iPhone. B. Allumez le projecteur en poussant vers la droite pendant 3 secondes l’interrupteur de mode jusqu’à ce que l’écran bleu de projection s’affiche. FR C. Sélectionnez le fichier vidéo sur votre iPhone et appuyez sur « Lecture » pour lire la vidéo. D. Tournez la roue de mise au point jusqu’à obtenir une image bien nette. E. Réglez le volume en appuyant sur les touches + / - pour augmenter ou baisser le volume. F. Temps maximum de projection : 3 heures 5. Projecter une image A. Suivez les étapes 4.A et 4.B. B. Sélectionnez l’image à afficher dans votre iPhone. Puis appuyez sur le bouton « démarrer le diaporama ». Ce projecteur supporte uniquement des applications ayant la fonction Sortie TV. Page 3 i15 Guide de l’utilisateur 6. Spécification Article Description DLP RGB LED Lumens Max. 15 lumen Résolution 640 x 360 (nHD) Format d’écran 16:9 Rapport de contraste 1000:1 Taille de l’image projetée 25 cm ~ 152 cm (Diagonale de 10” à 60”) Distance de projection 49 cm ~ 292 cm Durée de vie de la DEL 20,000 heures Mise au point Manuelle Haut-parleur Max. 0,8 W Type de batterie, Capacité Li-Polymer, 2100mAh DC-IN 5V / 2A E/S Port mini USB, connecteur 30 broches Dimensions 126 mm x 63 mm x 22 mm Poids 105 g Chargement pour iPhone Peut fournir 80% des besoins en énergie d’un iPhone Modèles d’iPhone supportés iPhone 4, iPhone 4S Contenu de la boîte iPhone Projector, câble USB, Guide de l’utilisateur Page 4 FR Technologie Manuale dell’Utente i15 Introduzione del prodotto 1. Panoramica dell prodotto IT Connettore da 30 pin Obiettivo Messa a fuoco Interruttore volume Interruttore modalità Porta USB Indicatore modalità a LED 3S Modalità proiettore (Spingere verso destra per 3 secondi per avviare o interrompere la proiezione) Modalità batteria in carica Pagina 1 Manuale dell’Utente i15 2. Indicatore modalità a LED Modalità Rosso Caricamento prodotto o iPhone Rosso e Verde Caricamento completo. Azzurro si lampeggia lentamente Modalità proiezione Luce blu lampeggio veloce La tensione della batteria è bassa. Il dispositivo si spegnerà a breve. IT Indicatore a LED 3. Caricamento A. Caricamento del prodotto a. Connettere un’estremità del cavo USB incluso alla porta USB del prodotto e l’altra estremità al PC / Notebook per il caricamento. b. Il LED ROSSSO si accende quando la batteria è in carica. c. Il LED ROSSO e verde si accende quando la batteria è carica. a. B. Caricamento per iPhone a. Far scorrere l’iPhone nel prodotto e collegarlo tramite il connettore da 30 pin. b. Far scorrere l’Interruttore modalità verso Sinistra per iniziare il caricamento dell’iPhone. c. Il LED ROSSO si accende quando l’iPhone è in carica. d. Se la tensione della batteria si riduce, si interrompe automaticamente la carica dell’iPhone. Pagina 2 b. Manuale dell’Utente i15 4. Proiettare un video A. Connettere il prodotto con l’iPhone B. Accendere il prodotto spingendo l’Interruttore modalità verso destra per 3 secondi finché non viene visualizzato lo schermo blu di proiezione. C. Selezionare il file del video sull’iPhone e premere il tasto “riproduci” per riprodurre il video.Selezionare il file del video sull’iPhone e premere il tasto “riproduci” per riprodurre il video. IT D. Regolare la rotellina della messa a fuoco per raggiungere la nitidezza ottimale. E. Regolare i tasti del volume + /- per alzare o abbassare il volume. F. Max. Durata massima della proiezione: 3 ore 5. Proiezione di immagini A. Seguire i passi 4.A e 4.B. B. Selezionare il file dell’immagine da visualizzare nell’interfaccia principale del dispositivo iPhone. Quindi premere “avvia presentazione”. Questo proiettore supporta qualsiasi app con la funzione TV OUT. Pagina 3 Manuale dell’Utente i15 6. Specifiche Articolo Descrizione LED DLP RGB Lumen Max. 15 lumen Risoluzione 640 x 360 (nHD) Proporzioni 16:9 Contrasto 1000:1 Dimensioni immagine proiezione 25 cm ~ 152 cm (10” ~ 60” in diagonale) Distanza proiezione 49 cm ~ 292 cm Durata LED 20,000 ore Messa a fuoco Manuale Altoparlante Max. 0.8 W Tipo di batteria, Capacità Polimeri di litio, 2100 mAh DC-IN 5V / 2A I/O Porta Mini USB, connettore 30 pin Dimensioni 126 mm x 63 mm x 22 mm Peso 105 g Caricamento per iPhone Fornisce l’80% dell’energia per l’iPhone Modelli iPhone supportati iPhone 4, iPhone 4S Contenuto Proiettore iPhone, cavo USB, Manuale dell’Utente Pagina 4 IT Tecnologia Usuario i15’s Manual Presentación del Producto 1. Vista General del Producto ES Conector de 30 pines Lentes Rueda de enfoque Interruptor de volumen Puerto USB Interruptor de modo Indicador LED de modo Modo del Proyector (Presione durante 3 seg. a la dcha. para apagar o encender la proyección) 3S Modo de carga de batería Página 1 Usuario i15’s Manual 2. Indicador LED de Modo Indicador LED Modo Rojo Cargando el producto o el iPhone Rojo y Verde Carga completa Azul parpadeando lentamente Modo proyección La luz azul parpadea rápidamente El voltaje de la batería sea bajo. El dispositivo se apagará en un minuto. 3. Carga ES A. Carga del producto a. Conecte un extremo del cable USB suministrado al puerto USB del producto, conectando el otro al Ordenador/Portátil para que se cargue. b. La LED Roja se enciende cuando se está cargando la batería. c. Las LED roja y verde se encienden cuando la batería está completamente cargada. a. B. Carga para el iPhone a. Deslice el iPhone en el producto y conéctelo al conector de 30 pines. b. Deslice el Interruptor de modo a la izquierda para iniciar la carga del iPhone. c. La LED Roja se enciende cuando el iPhone se está cargando. d. Cuando el voltaje de la batería sea bajo, dejará automáticamente de cargar el iPhone. Página 2 b. Usuario i15’s Manual 4. Proyección de Vídeo A. Conecte el producto al iPhone. B. Encienda el producto presionando el Interruptor de Modo a la derecha durante 3 segundos hasta que la pantalla de proyección azul se encienda. C. Seleccione el vídeo en el iPhone y pulse la tecla “Reproducer” para que se reproduzca el vídeo. D. Ajuste la rueda de engoque para obtener la mejor definición. E. Ajuste las teclas de volumen + /- para subir o bajar el volumen del audio. ES F. La duración máxima de proyección es de 3 horas. 5. Proyección de imágenes A. Siga los pasos 4.A y 4.B. B. Seleccione la imagen que desee visualizar en la interfaz principal del iPhone. Pulse “Iniciar pase de diapositivas” aviso. Este proyector admite cualquier aplicación con la función Salida de TV. Página 3 Usuario i15’s Manual 6. Especificaciones Elemento Descripción DLP RGB LED Lumens Máx. 15 lumens Resolución 640 x 360 (nHD) Relación de aspecto 16:9 Relación de contraste 1000:1 Tamaño de la imagen proyectada 25 cm ~ 152 cm (10” ~ 60” Diagonal) Distancia de proyección 49 cm ~ 292 cm Vida útil de la LED 20.000 horas Enfoque Manual Altavoces Máx. 0,8 W Capacidad y tipo de batería Li-Polymer, 2100mAh Entrada CC 5V / 2A I/O Puerto mini USB, conector de 30 clavijas Dimensiones 126 mm x 63 mm x 22 mm Peso 105 g Carga del iPhone Ofrece un 80% de energía al iPhone Modelo compatible de iPhone iPhone 4, iPhone 4S Contenidos del paquete Proyecto para iPhone, cable USB, Usuario Manual Página 4 ES Technología i15دﻟﻴﻞ اﻟﻤﺴﺘﺨﺪم ﻣﻘﺪﻣﺔ اﻟﻤﻨﺘﺞ .1ﻧﺒﺬة ﻋﻦ اﻟﻤﻨﺘﺞ ﻣﻮﺻﻞ ﻳﺤﺘﻮي ﻋﻠﻰ 30دﺑﻮﺳًﺎ ﻋﺠﻠﺔ اﻟﺘﺮآﻴﺰ ﻣﻔﺘﺎح ﺿﺒﻂ اﻟﺼﻮت ﻋﺪﺳﺔ AR ﻣﻨﻔﺬ USB ﻣﺆﺷﺮ وﺿﻊ اﻟﻤﺼﺒﺎح وﺿﻊ ﺟﻬﺎز اﻟﻌﺮض )ادﻓﻊ اﻟﺰر ﺟﻬﺔ اﻟﻴﻤﻴﻦ ن ﻟﺘﺸﻐﻴﻞ أو ﻟﻤﺪة 3ﺛﻮا ٍ ﻹٌﻳﻘﺎف ﺗﺸﻐﻴﻞ اﻟﻌﺮض( 3S وﺿﻊ ﺷﺤﻦ اﻟﺒﻄﺎرﻳﺔ ﺻﻔﺤﺔ 1 ﻣﻔﺘﺎح اﻟﻮﺿﻊ i15دﻟﻴﻞ اﻟﻤﺴﺘﺨﺪم .2ﻣﺆﺷﺮ وﺿﻊ اﻟﻤﺼﺒﺎح اﻟﻮﺿﻊ ﻣﺆﺷﺮ اﻟﻤﺼﺒﺎح أﺣﻤﺮ ﺷﺤﻦ اﻟﻤﻨﺘﺞ أو هﺎﺗﻒ iPhone أﺣﻤﺮ وأﺧﻀﺮ اآﺘﻤﻞ اﻟﺸﺤﻦ اﻟﻀﻮء اﻷزرق ﻟﻠﺘﺸﻐﻴﻞ/إﻳﻘﺎف اﻟﺘﺸﻐﻴﻞ اﻟﺒﻄﻲء وﺿﻊ اﻟﻌﺮض ﺳﺮﻋﺔ وﻣﻴﺾ ﻣﺼﺒﺎح ﺟﻬﺪ اﻟﺒﻄﺎرﻳﺔ ﻣﻨﺨﻔﺾ .ﺳﻴﺘﻢ إﻳﻘﺎف ﺗﺸﻐﻴﻞ اﻵﻟﺔ ﺧﻼل دﻗﻴﻘﺔ واﺣﺪة. اﻟﻀﻮء اﻷزرق .3اﻟﺸﺤﻦ أ .ﺷﺤﻦ اﻟﻤﻨﺘﺞ AR أ .وﺻﻞ أﺣﺪ ﻃﺮﻓﻲ ﺣﺰﻣﺔ آﺒﻞ USBﺑﻤﻨﻔﺬ USBاﻟﻤﻮﺟﻮد ﺑﺎﻟﻤﻨﺘﺞ واﻟﻄﺮف اﻵﺧﺮ ﺑﺠﻬﺎز آﻤﺒﻴﻮﺗﺮ ﺷﺨﺼﻲ/آﻤﺒﻴﻮﺗﺮ ﻣﺤﻤﻮل ﻟﺘﻨﻔﻴﺬ ﻋﻤﻠﻴﺔ اﻟﺸﺤﻦ. ب .ﻳﺘﻢ ﺗﺸﻐﻴﻞ اﻟﻤﺼﺒﺎح اﻷﺣﻤﺮ ﻋﻨﺪ ﺷﺤﻦ اﻟﺒﻄﺎرﻳﺔ. ﺟـ .ﻳﺘﻢ ﺗﺸﻐﻴﻞ اﻟﻤﺼﺒﺎح اﻷﺣﻤﺮ واﻷﺧﻀﺮ ﻋﻨﺪ اآﺘﻤﺎل ﺷﺤﻦ اﻟﺒﻄﺎرﻳﺔ ﺑﺎﻟﻜﺎﻣﻞ. a. ب .اﻟﺸﺤﻦ ﻣﻦ أﺟﻞ هﺎﺗﻒ iPhone أ .ﻗﻢ ﺑﺰﻟﻖ هﺎﺗﻒ iPhoneﻓﻲ اﻟﻤﻨﺘﺞ ووﺻﻠﻪ ﺑﻤﻮﺻﻞ اﻟﺬي ﻳﺤﺘﻮي ﻋﻠﻰ 30دﺑﻮﺳًﺎ. ب .ﻗﻢ ﺑﺰﻟﻖ ﻣﻔﺘﺎح اﻟﻮﺿﻊ ﺟﻬﺔ اﻟﻴﺴﺎر ﻟﺒﺪء ﺷﺤﻦ هﺎﺗﻒ .iPhone ﺟـ .ﻳﺘﻢ ﺗﺸﻐﻴﻞ اﻟﻤﺼﺒﺎح اﻷﺣﻤﺮ ﻋﻨﺪ ﺷﺤﻦ هﺎﺗﻒ .iPhone د .ﻋﻨﺪﻣﺎ ﻳﻨﺨﻔﺾ ﺟﻬﺪ اﻟﺒﻄﺎرﻳﺔ ،ﺗﺘﻮﻗﻒ ﺗﻠﻘﺎﺋﻴًﺎ ﻋﻦ ﺷﺤﻦ ﺟﻬﺎز .iPhone ﺻﻔﺤﺔ 2 b. i15دﻟﻴﻞ اﻟﻤﺴﺘﺨﺪم .4ﻓﻴﺪﻳﻮ اﻟﻌﺮض أ .وﺻﻞ اﻟﻤﻨﺘﺞ وهﺎﺗﻒ iPhone ب .ﺷﻐﻞ اﻟﻤﻨﺘﺞ ﺑﺎﻟﻀﻐﻂ ﻋﻠﻰ ﻣﻔﺘﺎح اﻟﻮﺿﻊ ﺟﻬﺔ اﻟﻴﻤﻦ ﻟﻤﺪة 3ﺛﻮاﻧﻲ ﺣﺘﻰ ﺗﺼﺒﺢ ﺷﺎﺷﺔ اﻟﻌﺮض اﻟﺰرﻗﺎء ﻣﻮﺟﻮدة ﻓﻲ اﻟﻌﺮض. ﺟـ .ﺣﺪد ﻣﻠﻒ اﻟﻔﻴﺪﻳﻮ اﻟﻤﻮﺟﻮد ﻋﻠﻰ اﻟﻬﺎﺗﻒ iPhoneواﺿﻐﻂ ﻋﻠﻰ اﻟﻤﻔﺘﺎح "ﺗﺸﻐﻴﻞ" ﻟﺘﺸﻐﻴﻞ اﻟﻔﻴﺪﻳﻮ. د .اﺿﺒﻂ ﻋﺠﻠﺔ اﻟﺘﺮآﻴﺰ ﻟﺘﺤﻘﻴﻖ أﻓﻀﻞ ﻣﺴﺘﻮى ﻟﻠﺤﺪة. هـ .اﺿﺒﻂ ﻣﻔﺘﺎﺣﻲ + /-اﻟﺼﻮت ﻟﺮﻓﻊ أو ﻟﺨﻔﺾ ﻣﺴﺘﻮى اﻟﺼﻮت. و .آﺤﺪ أﻗﺼﻰ .اﻹﺳﻘﺎط اﻟﻮﻗﺖ 3 :ﺳﺎﻋﺎت .5ﻋﺮض اﻟﺼﻮر اﻟﺜﺎﺑﺘﺔ أ .اﺗﺒﻊ اﻟﺨﻄﻮﺗﻴﻦ .4أ و.4ب ﻳﺪﻋﻢ هﺬا اﻟﻌﺎرض أي ﺗﻄﺒﻴﻘﺎت ﻣﻊ وﻇﻴﻔﺔ ﺧﺮج اﻟﺘﻠﻔﺰﻳﻮن. ﺻﻔﺤﺔ 3 AR ب .ﺣﺪد ﻣﻠﻒ اﻟﺼﻮرة اﻟﻤﺮاد ﻋﺮﺿﻬﺎ ﻓﻲ اﻟﻮاﺟﻬﺔ اﻟﺮﺋﻴﺴﻴﺔ ﻟﺠﻬﺎز .iPhoneﺛﻢ اﺿﻐﻂ ﻋﻠﻰ "ﺑﺪء ﻋﺮض اﻟﺸﺮاﺋﺢ". i15دﻟﻴﻞ اﻟﻤﺴﺘﺨﺪم .6اﻟﻤﻮاﺻﻔﺎت اﻟﻮﺻﻒ اﻟﻌﻨﺼﺮ اﻟﺘﻜﻨﻮﻟﻮﺟﻴﺎ ﻣﺼﺒﺎح اﻟﻤﻌﺎﻟﺠﺔ اﻟﺮﻗﻤﻴﺔ ﻟﻠﻀﻮء اﻷﺣﻤﺮ واﻷﺧﻀﺮ واﻷزرق اﻹﺿﺎءة ﺣﺪ أﻗﺼﻰ ) 15وﺣﺪة ﺗﺪﻓﻖ اﻟﻀﻮء( اﻟﺪﻗﺔ ) 640 × 360دﻗﺔ ﻋﺮض ﻋﺎﻟﻴﺔ( ﻧﺴﺒﺔ اﻟﻄﻮل إﻟﻰ اﻻرﺗﻔﺎع 16:9 ﻧﺴﺒﺔ اﻟﺘﺒﺎﻳﻦ 1000:1 ﺣﺠﻢ ﺻﻮرة اﻟﻌﺮض 25ﺳﻢ ~ 152ﺳﻢ ) 60 ~ 10ﺑﻮﺻﺔ ﻗﻄﺮي( ﻣﺴﺎﻓﺔ اﻟﻌﺮض 49ﺳﻢ م ~ 292س ﻋﻤﺮ اﻟﻤﺼﺒﺎح اﻻﻓﺘﺮاﺿﻲ 20,000ﺳﺎﻋﺔ اﻟﺘﺮآﻴﺰ ﻳﺪوي AR اﻟﺴﻤﺎﻋﺔ ﺣﺪ أﻗﺼﻰ 0.8وات ﻧﻮع اﻟﺒﻄﺎرﻳﺔ ،ﺳﻌﺘﻬﺎ ﻟﻲ -ﺑﻮﻟﻴﻤﺮ 2100 ،ﻣﻠﻲ أﻣﺒﻴﺮ ﻓﻲ اﻟﺴﺎﻋﺔ دﺧﻞ اﻟﺘﻴﺎر اﻟﻤﺴﺘﻤﺮ 5ﻓﻮﻟﺖ 2/أﻣﺒﻴﺮ دﺧﻞ/ﺧﺮج اﻟﺤﺪ اﻷدﻧﻰ ﻟﻤﻨﻔﺬ ،USBﻣﻮﺻﻞ ﻳﺤﺘﻮي ﻋﻠﻰ 30دﺑﻮﺳًﺎ اﻷﺑﻌﺎد 22 x 63 x 126ﻣﻠﻢ اﻟﻮزن 105ﺟﺮام اﻟﺸﺤﻦ ﻟﺠﻬﺎز iPhone ﻳﻤﻜﻨﻪ ﺗﻮﻓﻴﺮ %80ﻃﺎﻗﺔ ﻟﻬﺎﺗﻒ iPhone ﻃﺮاز iPhoneاﻟﻤﺪﻋﻮم iPhone 4S ،iPhone 4 ﻣﺤﺘﻮى اﻟﺤﺰﻣﺔ ﺟﻬﺎز ﻋﺮض ،iPhoneآﺒﻞ ،USBدﻟﻴﻞ اﻟﻤﺴﺘﺨﺪم ﺻﻔﺤﺔ 4 i15 Gebruikershandleiding Product Introductie 1. Product overzicht 30-Pin Aansluiter Focus Wiel Volume Toggle toets NL Lens Modus toets USB Poort LED modus indicatie 3S Projector modus (Druk voor 3 seconden naar rechts om de projectie AAN of UIT te zetten) Batterij oplaad modus Pagina 1 i15 Gebruikershandleiding 2. LED modus indicatie LED Indicatie Rood Modus Opladen voor product of iPhone Rood en Groen Opladen voltooid Blauw licht gaat langzaam aan/uit Projectie modus Blauw licht flasht snel Het voltage van de batterij is laag. Het apparaat schakelt een minuut later uit. 3. Opladen A. Het product opladen a. Verbind een uiteind van de gebundelde USB kabel met de USB poort van het product en het andere uiteinde met PC / Notebook voor opladen. NL b. De RODE LED gaat aan wanneer de batterij oplaadt. c. De RODE en Groene LED gaan aan, wanneer de batterij geheel is opgeladen. a. B. iPhone opladen a. Schuif de iPhone in het product en verbind het met de 30-Pin aansluiter. b. Schuif de Modus toets naar Links om te beginnen met het opladen van de iPhone. c. De RODE LED gaat aan wanneer de iPhone oplaadt. d. Wanneer het voltage van de batterij laag wordt, stop het vanzelf met het opladen van de iPhone. Pagina 2 b. i15 Gebruikershandleiding 4. Video projecteren A. Verbind het product en de iPhone B. Zet het product aan door de Modus toets 3 seconden naar rechts te schuiven totdat het blauwe projectiescherm zichtbaar is. C. Selecteer het videobestand op de iPhone en druk op de “Play” toets om de video af te spelen. D. Stel af met het Focus wiel voor de beste scherpte. E. Stel de volume toetsen + /- af om het audiovolume hoger of lager te zetten. F. Max. projectietijd: 3 uur 5. Stilstaande beelden projecteren A. Volg de stappen 4.A en 4.B. NL B. Selecteer het bestand dat moet worden weergegeven in de interface van het iPhone toestel. Druk dan op “Diashow starten”. Deze projector ondersteunt enige apps met TV UIT functie. Pagina 3 i15 Gebruikershandleiding 6. Specificatie Item Omschrijving DLP RGB LED Lumens Max. 15 lumen Resolutie 640 x 360 (nHD) Aspect Ratio 16:9 Contrast Ratio 1000:1 Projectie beeldgrootte 25 cm ~ 152 cm (10” ~ 60” Diagonaal) Projectie afstand 49 cm ~ 292 cm LED levensduur 20.000 uur Focus Handmatig Speaker Max. 0,8 W Batterij type, Capaciteit Li-Polymeer, 2100mAh DC-IN 5V / 2A I/O Mini USB poort, 30-pinnen aansluiting. Afmetingen 126 mm x 63 mm x 22 mm Gewicht 105 g Opladen voor iPhone toestel Kan 80% energie leveren voor iPhone Ondersteund iPhone model iPhone 4, iPhone 4S Inhoud verpakking iPhone Projector, USB kabel, Gebruikershandleiding Pagina 4 NL Technologie i15 Manual do Usuário Introdução do Produto 1. Vista Geral do Produto Conector de 30-Pinos BPT Lente Roda de Foco Comutador Alternador de Volume Comutador de Modo Porta USB Indicador de Modo LED Mode Indicator 3S Modo Projetor (Empurre para a direita por 3 segundos para LIGAR ou DESLIGAR a projeção) Modo de Carregamento de Bateria Página 1 i15 Manual do Usuário 2. Indicador LED do Modo Indicador LED Modo Vermelho Carregamento de Produto ou iPhone Vermelho e Verde Carregamento completo Luz azul liga/desliga lentamente Modo de Projeção Luz azul pisca rapidamente A voltagem da bateria está baixa. A máquina se desligará em um minuto. 3. Carregamento A. Carregando o Produto a. Conecte uma extremidade do cabo USB incorporado na porta USB do produto e a outra extremidade no PC / Notebook para carregamento. b. O LED VERMELHO se acende quando a bateria está carregando. a. B. Carregando o iPhone a. Deslize o iPhone no produto e conecte-o com o Conector de 30-Pinos. b. Deslize o Comutador de Modo para a Esquerda para iniciar o carregamento do iPhone. c. O LED VERMELHO se acende quando o iPhone está carregando. d. Quando a voltagem da bateria estiver abaixando, ela pára automaticamente o carregamento do iPhone. Página 2 b. BPT c. O LED Vermelho e Verde se acendem, quando a pilha está completamente carregada. i15 Manual do Usuário 4. Projetar Vídeo A. Conectar o produto e o iPhone B. Ligar o produto empurrando o Comutador de Modo para a direita por 3 segundos até que a tela de projeção Azul apareça. C. Selecionar o arquivo de vídeo no iPhone e pressionar a tecla “Reproduzir” para reproduzir o vídeo. D. Ajustar a Roda de Foco para obter a melhor nitidez. E. Ajustar as teclas de volume + /- para aumentar ou reduzir o volume do áudio. F. Tempo de projeção máx.: 3 horas 5. Projetar Imagens Fixas A. Seguir os passos 4.A e 4.B. B. Selecionar o arquivo de imagem para exibir a interface principal do dispositivo iPhone. Em seguida pressione “iniciar a presentação de diapositivas”. BPT Este projetor suporta qualquer app com função Saída de TV. Página 3 i15 Manual do Usuário 6. Especificação Item Descrição DLP RGB LED Lúmens Máx. 15 lúmens Resolução 640 x 360 (nHD) Relação de Aspecto 16:9 Relação de Contraste 1000:1 Tamanho da Imagem de Projeção 25 cm ~ 152 cm (10” - 60” Diagonal) Distância de Projeção 49 cm ~ 292 cm Vida de LED 20,000 horas Foco Manual Alto-Falante Máx. 0.8 W Tipo de Bateria, Capacidade Li-Polymer, 2100mAh ENTRADA-DC 5V / 2A I/O Porta Mini USB, Conector de 30 pinos Dimensões 126 mm x 63 mm x 22 mm Peso 105 g Carregamento para dispositivo iPhone Pode proporcionar 80% de energia para iPhone Modelo de iPhone Suportado iPhone 4, iPhone 4S Conteúdo do Pacote Projetor para iPhone, Cabo USB, Manual do Usuário Página 4 BPT Tecnologia You can copy or delete the pictures and video documents of iPhone device through connecting the projector to compouter. 1. 2. 3. Connect the projector and iPhone device. Connect the included USB cable to both the projector and a 2.0 USB port on your computer. Slide the power switch to the left; the following picture will appear; Step 1 Step 3 Step 2 Step 4 EN Manage Document Sie können die Bilder und Videos auf dem iPhone kopieren oder löschen, indem Sie den Projektor mit dem Computer verbinden. 1. 2. 3. Verbinden Sie den Projektor und das iPhone. Verbinden Sie das beiliegende Kabel sowohl mit dem Projektor als auch mit einem 2.0 USB Port an Ihrem Computer. Schieben Sie den Ein/Aus‐Schalter nach links; das folgende Fenster wird angezeigt. Schritt 1 Schritt 3 Schritt 2 Schritt 4 DE Dokument verwalten