1
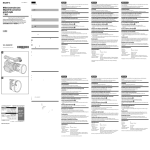
User’s Manual Care and Safety Information 1. Keep the device and packaging materials out of the reach of infants and children. 2. Avoid subjecting the power adapter and other contacts to dripping or splashing water and dry your hands before you use it. Do not place objects filled with liquids such as vases, etc. on or near the device. 3. Make sure that the used power outlet is always readily available and never hidden. In case of emergency, use the power adapter to separate the device from the power network. 4. Keep your device away from all flames such as candles and do not set them up in the vicinity of the device. 5. Keep the unit at least 10 cm away from other objects. Make sure the ventilation is not covered by newspapers, tablecloths, curtains, etc. 6. For your own safety, do not use the projector during thunderstorms or lightning. 7. Relative Humidity is 5~35°C, 80% (Max.), non-condensing. 8. The battery is integrated with the device. Do not dissemble and modify. The battery should be replaced by qualified service staff only. 9. Ensure that the ambient room temperature is within -10~55°C 10. During the operation, this product may heat lightly, which is normal. 11. Wait before using if the device has been moved from a cold location into a warm one. Any condensation that has formed may in certain circumstances destroy the device. As soon as the device has reached room temperature it can be used without risk. 12. Handle the product with care. Avoid contact with sharp objects. Keep device away from metallic objects. 13. Place the projector on a flat surface. Any collision or falling to the ground is likely to damage the product. 14. Do not drop or disassemble the product otherwise the warranty voids. Opening or removing covers may expose you to dangerous voltage or other hazards. Refer all servicing to qualified service personnel. 15. Use only the accessories supplied by the manufacturer. 16. Both product and user’s manual are subject to further improvement or supplement without further notice. 17. Avoid facing directly into the projector’s lens. I User’s Manual Sicherheitshinweise: 1. Das Gerät und das Verpackungsmaterial außerhalb der Reichweite von Kindern halten. 2. Das Netzteil nicht in Kontakt mit tropfendem oder fließendem Wasser kommen lassen und Hände vor der Benutzung abtrocknen. Keine mit Flüssigkeiten gefüllte Gegenstände, wie z.B. Vasen usw. auf oder in die Nähe des Gerätes stellen. 3. Stellen Sie sicher, dass die verwendete Steckdose immer verfügbar und niemals blockiert ist. Verwenden Sie im Notfall das Netzteil, um das Gerät vom Stromnetz zu trennen. 4. Das Gerät von Flammen, wie z.B. Kerzen fernhalten und diese nicht in der Nähe des Gerätes aufstellen. 5. Das Gerät mindestens 10 cm von anderen Gegenständen entfernt halten. Stellen Sie sicher, dass die Lüftungsschlitze nicht durch Zeitungen, Tischdecken, Vorhänge usw. blockiert werden. 6. Den Projektor zu Ihrer eigenen Sicherheit nicht während eines Gewitters oder Blitzschlages verwenden. 7. Relative Luftfeuchtigkeit liegt bei 5 bis 35°C, 80% (max.), nicht kondensierend. 8. Der Akku ist im Gerät integriert. Nicht auseinander nehmen oder ändern. Der Akku sollte nur von einer Fachkraft ausgetauscht werden. 9. Stellen Sie sicher, dass die Raumtemperatur innerhalb von -10 ist ~ 55°C liegt. 10. Dieses Produkt kann während des Betriebes etwas warm werden, was normal ist. 11. Warten Sie mit der Verwendung des Geräts etwas, wenn das es von einem kalten an einen warmen Ort gebracht wurde. Kondenswasser kann das Gerät unter bestimmten Umständen zerstören. Sobald das Gerät Raumtemperatur erreicht hat, kann es ohne Risiko verwendet werden. 12. Produkt mit Vorsicht handhaben. Kontakt mit scharfen Gegenständen vermeiden. Von Gegenständen aus Metall fernhalten. 13. Den Projektor auf eine flache Unterlage stellen. Stöße oder ein Herunterfallen auf den Boden führt wahrscheinlich zu Schäden des Produktes. 14. Das Produkt nicht fallen lassen oder auseinander nehmen, da sonst die Gewährleistung erlischt. Das Öffnen oder Entfernen von Abdeckungen kann sie gefährlichen Spannungen und anderen Risiken aussetzen. Alle Wartungsarbeiten von Fachpersonal durchführen lassen. 15. Nur vom Hersteller empfohlenes Zubehör verwenden. 16. Sowohl das Produkt als auch das Benutzerhandbuch unterliegen fortlaufenden Verbesserungen oder Ergänzungen ohne vorherige Mitteilung. 17. Nicht direkt in das Objektiv des Projektors sehen. II User’s Manual Entretien et précaustion d’emploi (FR) 1. Attention - Evitez de vous placer en face de la lentille du vidéo projecteur. 2. Evitez tout contact avec de l’eau, et gardez vos mains sèches lors de l’utilisation. 3. Assurez-vous que la température de la pièce est comprise entre -10 et 55°C 4. Le taux d’humidité relative doit être de 80% au maximum entre 5 et 35°C, sans condensation. 5. Ne pas faire tomber, frapper ou démonter cet appareil ; sinon la garantie sera annulée. Informazioni sulla cura e sulla sicurezza (IT) 1. Attenzione - Non guardare l’obiettivo in modo diretto. 2. Evitare il contatto con liquidi e utilizzare con mani asciutte. 3. Assicurarsi che la temperatura ambiente della stanza sia compresa tra -10 e 55°C ° 4. L’umidità relativa deve essere compresa tra 5 e 35 C, all’80% (max.), senza condensazione. 5. Non far cadere, non colpire e non smontare il dispositivo; in caso contrario la garanzia verrà annullata. Información de seguridad (ES) 1. Advertencia - Evite ponerse directamente en frente de las lentes del proyector. 2. Avite cualquier contacto con el agua. Mantenga sus manos secas durante su uso. 3. Asegúrese de que la temperatura ambiente de la sala sea de -10~55°C 4. Humedad relativa de 5~35°C, 80% (Máx.), no-condensada. 5. No caiga, golpee o desmonte el dispositivo, ya que de lo contrario se invalidaría la garantía. (AR) ﻣﻌﻠﻮﻣﺎت اﻟﺴﻼﻣﺔ واﻟﺮﻋﺎﻳﺔ . ﺗﺠﻨﺐ اﻟﺘﻌﺮض ﺑﺸﻜﻞ ﻣﺒﺎﺷﺮ ﻟﻌﺪﺳﺔ ﺟﻬﺎز اﻟﻌﺮض-ﺗﺤﺬﻳﺮ . واﻟﺤﻔﺎظ ﻋﻠﻰ ﻳﺪﻳﻚ ﺟﺎﻓﺘﻴﻦ أﺛﻨﺎء اﻻﺳﺘﺨﺪام،ﺗﺠﻨﺐ اﺗﺼﺎل اﻟﺠﻬﺎز ﺑﺎﻟﻤﺎء . درﺟﺔ ﻣﺌﻮﻳﺔ55 إﻟﻰ10 اﻟﺘﺄآﺪ ﻣﻦ أن درﺟﺔ ﺣﺮارة اﻟﻐﺮﻓﺔ اﻟﻤﺤﻴﻄﺔ ﻣﺎ ﺑﻴﻦ ﻏﻴﺮ،( )ﺑﺤﺪ أﻗﺼﻰ%80 ﺑﻤﺎ ﻳﻌﺎدل، درﺟﺔ35 إﻟﻰ5 أن ﺗﻜﻮن اﻟﺮﻃﻮﺑﺔ اﻟﻨﺴﺒﻴﺔ ﻣﻦ .ﻣﻜﺜﻔﺔ .ﻻ ﺗﺴﻘﻂ أو ﺗﺜﻘﺐ أو ﺗﻘﻮم ﺑﻔﻚ اﻟﺠﻬﺎز؛ وإﻻ ﺑﻄﻞ ﺣﻖ اﻟﻀﻤﺎن III .1 .2 .3 .4 .5 User’s Manual FCC Compliance Statement: This device complies with Part 15 of the FCC Rules. Operation is subjected to the following two conditions: (1) this device may not cause harmful interference, and (2) this device must accept any interference received, including interference that may cause undesired operation. This equipment has been tested and found to comply with limits for a Class B digital device, pursuant to Part 15 of the FCC rules. These limits are designed to provide reasonable protection against harmful interference in residential installations. This equipment generates, uses, and can radiate radio frequency energy, and if not installed and used in accordance with the instructions, may cause harmful interference to radio communications. However, there is no guarantee that interference will not occur in a particular installation. If this equipment does cause interference to radio or television equipment reception, which can be determined by turning the equipment off and on, the user is encouraged to try to correct the interference by one or more of the following measures: - Reorient or relocate the receiving antenna. - Move the equipment away from the receiver. - Plug the equipment into an outlet on a circuit different from that to which the receiver is connected. - Consult the dealer or an experienced radio/television technician for additional suggestions. You are cautioned that any change or modifications to the equipment not expressly approved by the party responsible for compliance could void your authority to operate such equipment. (EN) If the time arises to throw away your product, please recycle all the components possible. Batteries and rechargeable batteries are not to be disposed in your domestic waste! Please recycle them at your local recycling point. Together we can help to protect the environment. IV User’s Manual (DE) Wenn die Lebensdauer des Produkts zu Ende kommt, lassen Sie bitte möglichst alle Komponenten recyceln. Bitte recyceln Sie dieses Produkt ordnungsgemäß, wenn es nicht mehr verwendet werden kann. Es kann nicht als Haushaltsmüll behandelt werden. Es muss separat über die verfügbaren Rücknahme- und Sammelsysteme entsorgt werden. (FR) Si il est temps de jeter votre produit, veuillez recycler tous les composants possibles. Si ce produit est arrivé en fin de vie, veuillez s’il vous plait le recycler correctement. Il ne peut pas être traité comme les ordures ménagères. Il doit être être apporté à un point de collecte approprié pour le recyclage. (IT) Al momento di buttare via il prodotto, riciclare il maggior numero di componenti. Se questo prodotto giunge alla fine del suo ciclo di vita, lo ricicli correttamente. Non può essere trattato come rifiuto urbano. Deve essere smaltito separatamente attraverso l'appropriato sistema di reso e di raccolta. (ES) Si ha llegado la hora de deshacerse del producto, recicle todos los componentes que pueda. Si ha finalizado la vida útil de este producto, recíclelo adecuadamente. Debe deshacerse del mismo de forma separada a través de los sistemas de recogida disponibles. (AR) . اﻟﺮﺟﺎء إﻋﺎدة ﺗﺪوﻳﺮ آﺎﻓﺔ اﻷﺟﺰاء اﻟﻤﻤﻜﻨﺔ،إذا ﺣﺎن وﻗﺖ اﻟﺘﺨﻠﺺ ﻣﻦ اﻟﻤﻨﺘﺞ ﻻ ﻳﺘﻢ اﻟﺘﺨﻠﺺ ﻣﻦ اﻟﺒﻄﺎرﻳﺎت واﻟﺒﻄﺎرﻳﺎت اﻟﻘﺎﺑﻠﺔ ﻹﻋﺎدة اﻟﺸﺤﻦ ﺿﻤﻦ اﻟﻤﺨﻠﻔﺎت اﻟﻤﻨﺰﻟﻴﺔ !اﻟﺮﺟﺎء إﻋﺎدة ﺗﺪوﻳﺮهﺎ ﻟﺪى ﻣﺮآﺰ إﻋﺎدة .اﻟﺘﺪوﻳﺮ اﻟﻤﺤﻠﻲ ﻟﺪﻳﻚ .ﻣﻌًﺎ ﻳﻤﻜﻨﻨﺎ اﻟﻤﺴﺎﻋﺪة ﻓﻲ ﺣﻤﺎﻳﺔ اﻟﺒﻴﺌﺔ (NL) Als het einde van de levensduur van het product is bereikt, moet u alle mogelijke componenten recyclen. Batterijen en oplaadbare batterijen mogen niet bij het huishoudelijke afval worden gegooid. Lever ze af bij uw lokale dienst voor recycling. Samen kunnen we helpen bij de bescherming van het milieu. (BPT) Se você decidir descartar o produto, faça-o de modo que seja possível a reciclagem de todos os componentes. As baterias e pilhas recarregáveis não devem ser descartadas em seu lixo doméstico! Favor reciclá-las em seu ponto de reciclagem local. Juntos, podemos ajudar a proteger o meio ambiente. V User’s Manual EN Product Overview LED Indicator Focus Wheel Power/Mode Switch Speaker USB Charging Port Projector Lens iPhone Connector Projection Mode (Push rightward for 2 seconds to turn ON or turn OFF the projection) iPhone Charging Mode 1 User’s Manual Charging the product EN 1. Connect one end of the bundled USB cable to the USB port of the product and the other end to PC / Notebook or iPhone USB power adapter for charging. * The Product can be fully charged around 2 hrs from empty. 2. or Charging for iPhone 1. Connect the iPhone to the product. 2. Slide the Mode switch to the left to start charging for iPhone. LED Mode Indicators LED Status Indication 3 white LEDs stay on Power capacity is between 80% to 100% 2 white LEDs stay on Power capacity is between 45% to 80% 1 white LED stays on Power capacity is between 10% to 45% 1 white LED blinks Power capacity is below 10% LED Marquee Product is being charged LED blinks (From 3 to 1 LEDs depends on product‘s power capacity status) Charging for iPhone 2 User’s Manual EN Turning on/off the projector Push the power / mode switch rightward for 2 seconds to turn ON or turn OFF the projector. 2S Adjusting the Focus Adjust the focus by using the focus wheel to get a sharper and clear picture. Projecting photos and videos via iPhone native app 1. Select the “Photos” manually icon on iPhone main menu. 2. Choose the photo or video you want to project. * Photos can only be projected as a slideshow. * The speaker only support for video playing not for audio playing. 3 User’s Manual 1. Download and install ShowU app from iPhone App Store. 2. Connect the product to iPhone. 3. Launch the app from your iPhone. The app will automatically be projected on a big screen. 4. “ShowU” app enables the product of the following applications: (1) Images Project the images from iPhone Photos with zoom in and rotation. EN Projecting with dedicated free app “ShowU” ShowU (2) Web Browser Project web pages from iPhone. (3) Live Projection Real-time projection from iPhone built-in Camera. Other Recommended Apps List Presentation Viewer Pointer Webout Ducati Challenge Free 4 User’s Manual EN Product specifications Item Description Optical Technology LCoS Light Source RGB LED Resolution 960 x 540 Pixels (Q1080p) Luminous Flux 12 effective lumens (7 Peak lumens) Projection Image Size 13 cm ~127 cm (5” ~ 50” Diagonal) Internal Speaker Mono Operating System iOS4, iOS5 Projection Source iPhone 3GS, iPhone 4, iPhone 4S Power Input / Output 5V / 1A Battery Type Embedded 950 mAh, Li-polymer battery Battery Life Projection mode: 100 min iPhone charging mode: 30% iPhone battery capacity Power Consumption Projection mode: 3W iPhone charging mode: 5W Operation Temperature 5 °C ~ 35 °C Dimension (L x W x H) 60 x 47 x 17.5 mm Weight 80 g Package Content Pico Projector, Pouch, User‘s Manual, USB cable * All specifications are subject to change without notice. 5 Troubleshooting Symptom Check Point The projector can not turn on. Ensure the battery is fully charged. The projecting image is too dark. * Use the Projector in a darker environment. * Decrease the size of projecting image. The projecting image is too blurry. Adjust the focus by using focus wheel. The projector can turn on, but the image can not be projected. Ensure the App is equipped with TV-out function. The temperature of the projector’s surface is warm. It is normal for this projector to generate moderate heat during normal operation. When connecting the iPhone to the projector and see the error message displayed in iPhone screen as below. If your iPhone is covered with a protective case, it may cause a bad connection between iPhone and the projector. Please remove the protective case and connect it again. 6 EN User’s Manual Benutzerhandbuch Produktübersicht DE LED Anzeige Fokusrad Ein/Aus/ModusSchalter Lautsprecher USB Ladeanschluss Projektor-Objektiv iPhone Anschluss Projektionsmodus (2 Sekunden lang nach rechts schieben, um die Projektion EIN oder AUS zu schalten) iPhone Lademodus 1 Benutzerhandbuch Das Produkt aufladen 1. DE Schließen Sie ein Ende des beiliegenden USB-Kabels an den USB-Anschluss des Produktes und das andere Ende an den PC/Notebook oder iPhone USB-Netzteil an. * Das Produkt kann in etwa 2 Stunden aufgeladen werden, wenn der Akku leer ist. 2. oder Laden des iPhone 1. Verbinden Sie das iPhone mit dem Produkt. 2. Schieben Sie den Modusschalter nach links, um das iPhone aufzuladen. LED Modusanzeigen LED Status 3 weiße LEDs leuchten Anzeige Ladestand liegt zwischen 80% und 100% 2 weiße LEDs leuchten Ladestand liegt zwischen 45% und 80% 1 weiße LED leuchtet Ladestand liegt zwischen 10% und 45% 1 weiße LED blinkt Ladestand beträgt weniger als 10% LED Fortlaufend Produkt wird aufgeladen LED blinkt (Je nach Ladestand blinken 3 bis 1 LED) Laden für iPhone 2 Benutzerhandbuch Den Projektor ein/ausschalten DE Schieben Sie den Ein/Aus/Modus-Schalter 2 Sekunden lang nach rechts, um den Projektor EIN oder AUS zu schalten. 2S Einstellen des Fokus Stellen Sie den Fokus ein, indem Sie das Fokusrad drehen, um ein schärferes und klareres Bild zu erhalten. Fotos und Videos über iPhone App projizieren 1. Wählen Sie “Fotos” aus dem iPhone Menü. 2. Wählen Sie das Foto oder Video aus, das Sie projizieren möchten. * Fotos können nur als Diashow projiziert werden. * Der interne Lautsprecher funktioniert nur im Videowiedergabemodus. 3 Benutzerhandbuch 1. Laden Sie ShowU aus dem iPhone App Store herunter und installieren Sie es. 2. Verbinden Sie das Produkt mit dem iPhone. 3. Führen Sie die App auf dem iPhone aus. 4. Mit der “ShowU” App kann das Produkt wie folgt eingesetzt werden: (1) Bilder Projektion der Bilder von iPhone Fotos mit Zoom und Drehung. ShowU (2) Web Browser Projektion von Webseiten vom iPhone. (3) Live-Projektion Echtzeitprojektion von der iPhone Kamera. Liste anderer empfohlener Apps Presentation Viewer Pointer Webout Ducati Challenge Free 4 DE Projektion mit der gratis App “ShowU” Benutzerhandbuch Technische Daten Element Beschreibung DE Optische Technologie LCoS Lichtquelle RGB LED Auflösung 960 x 540 Pixel (Q1080p) Helligkeit 12 Lumen effektiv (7 Lumen Spitze) Projektionsgröße (diagonal) 13 cm ~127 cm (5” ~ 50”) Projektionsabstand 17 cm ~167 cm (7” ~ 66”) Interner Lautsprecher Ja Projektionsquelle iPhone 3GS, iPhone 4, iPhone 4S Strom Eingang/Ausgang 5V / 1A Akkutyp Integrierter 950 mAh, Li-Polymer Akku Batterielaufzeit Projektionsmodus: 100 Min. iPhone Lademodus: 30% iPhone Stromverbrauch Projektionsmodus: 3W iPhone Lademodus: 5W Betriebstemperatur 5 °C ~ 35 °C Abmessungen (L x B x H) 60 x 47 x 17,5 mm Gewicht 80 g Lieferumfang Pico Projektor, Tasche, Benutzerhandbuch, USB-Kabel * Änderungen der technischen Daten vorbehalten. 5 Benutzerhandbuch Fehlerbehebung Prüfpunkt Stellen Sie sicher, dass der Akku voll aufgeladen ist. Das projizierte Bild ist zu dunkel. * Verwenden Sie den Projektor in einer dunkleren Umgebung. * Verringern Sie die Größe des projizierten Bildes. Das projizierte Bild ist zu verschwommen. Stellen Sie den Fokus über das Fokusrad ein. Der Projektor kann eingeschaltet, aber das Bild nicht projiziert werden. Stellen Sie sicher, dass die App über eine TV-Out Funktion verfügt. Die Oberfläche des Projektors Während des Betriebes des ist warm. Projektors ist es normal, wenn er sich etwas erwärmt. Beim Anschluss des iPhone an den Projektor wird die folgende Meldung auf dem iPhone Display angezeigt. Wenn Ihr iPhone in einer Schutzhülle steckt, kann dies zu einer schlechten Verbindung zwischen dem iPhone und dem Projektor führen. Bitte entfernen Sie die Schutzhülle und schließen Sie es wieder an. 6 DE Symptom Der Projektor kann nicht eingeschaltet werden. Guide de l’utilisateur Aperçu Témoin LED Molette de mise au point FR Bouton marche/arrêt Haut-parleur Port recharge USB Lentille du projecteur Connecteur iPhone Mode de Projection (Faites glisser vers la droite pendant 2 secondes pour allumer ou éteindre le projecteur) Mode recharge iPhone 1 Guide de l’utilisateur Recharger le produit 1. 2. ou Chargeur iPhone 1. Connectez l’iPhone au produit. 2. Poussez l’interrupteur de mode vers la droite pour commencer la recharge. Témoins lumineux Statut LED Indication 3 LEDs blanches constantes La batterie est entre 80% et 100% 2 LEDs blanches constantes La batterie est entre 45% et 80% 1 LED blanche constante La batterie est entre 10% et 45% 1 LED blanche clignotante La batterie est en dessous de 10% Panneau LEDs Le produit est en charge LEDs clignotantes (de 3 à 1 LED(s) en fonction de la batterie restante) iPhone en cours de chargement 2 FR Connectez l’une des extrémités du câble USB fourni au port USB du produit et l’autre à l’ordinateur de bureau / portable ou à l’adaptateur électrique USB de l’iPhone pour charger. * Le produit peut être pleinement chargé en environ deux heures. Guide de l’utilisateur Allumer/éteindre le projecteur Faites glisser vers la droite pendant 2 secondes pour allumer ou éteindre le projecteur. FR 2S Mettre au point Ajustez la mise au point en utilisant la molette de mise au point pour obtenir une image plus nette et claire. Projection des photos et des vidéos par l'intermédiaire de l’application native iPhone 1. Sélectionnez manuellement l'option « Photos » l’icône sur le menu principal de l’iPhone. 2. Choisissez la photo ou la vidéo que vous voulez projeter. * Les photos ne peuvent être projetées que sous forme de diaporama. * Le haut-parleur n’est compatible qu’avec la lecture vidéo et non pas audio. 3 Guide de l’utilisateur Projection avec l’App libre dédiée « ShowU » ShowU (2) Navigateur Web Projeter des pages Web depuis l’iPhone. (3) Projection live Projection en temps réel depuis l’appareil photo intégré de l’iPhone. Liste des autres Apps recommandées Presentation Viewer Pointer Webout Ducati Challenge Free 4 FR 1. Téléchargez et installez l’App ShowU depuis l'App Store de l’iPhone. 2. Connectez le produit à l’iPhone. 3. Lancez l’application à partir de votre iPhone. L’application sera automatiquement projetée sur grand écran. 4. L’App « ShowU » permet au produit les applications suivantes: (1) Images Projeter les images à partir de photos iPhone avec zoom et rotation. Guide de l’utilisateur Spécifications produit Élément Description Technologie optique LCoS Source lumineuse LED RVB FR Résolution 960 x 540 Pixels (Q1080p) Flux lumineux 12 lumens effectif (7 lumens en pic) Taille de l’image projetée 13 cm ~127 cm (diagonale 5” ~ 50”) Haut-parleur interne Mono Système d’exploitation iOS4, iOS5 Source de projection iPhone 3GS, iPhone 4, iPhone 4S Alimentation entrée/sortie 5V / 1A Type de batterie 950 mAh intégrée, batterie Li-polymère Autonomie Mode projection : 100 min Mode charge iPhone : 30% de la capacité de la batterie iPhone Consommation électrique Mode projection : 3W Mode charge iPhone : 5W Température de fonctionnement 5 °C ~ 35 °C Dimensions (L x l x H) 60 x 47 x 17.5 mm Poids 80 g Contenu de la boîte Projecteur Pico, Sachet, Guide de l’utilisateur, câble USB * Toutes les spécifications sont sujettes à changement sans préavis. 5 Guide de l’utilisateur Dépannage Point à vérifier Vérifiez que la batterie est bien chargée. L’image projetée est trop sombre. * Utilisez le projecteur dans un environnement plus sombre. * Diminuez la taille de l’image projetée. L’image projetée est trop floue. Ajustez la mise au point en utilisant la molette de mise au point. Le projecteur s’allume mais aucune image n’est projetée. Assurez-vous de l’App est équipée de la fonction sortie TV (TV-out). La température à la surface du projecteur est élevée. Il est normal pour ce projecteur à produire modérément de la chaleur durant le fonctionnement normal. Lors de la connexion de l’iPhone sur le projecteur, le message d’erreur suivant s’affiche sur l’écran iPhone. Si votre iPhone est recouvert d’un étui de protection, il peut causer une mauvaise connexion entre l’iPhone et le projecteur. Veuillez essayer d’enlever l’étui de protection et de connecter à nouveau le téléphone. 6 FR Symptôme Le projecteur ne peut pas démarrer. Manuale utente Panoramica del prodotto Indicatore LED Ghiera messa a fuoco IT Interruttore accensione-spegni mento/Modalità Altoparlante Presa ricarica USB Obiettivo proiettore Connettore iPhone Modalità di proiezione (Premere verso destra per 2 secondi per attivare (ON) o disattivare (OFF) la proiezione) Modalità ricarica iPhone 1 Manuale utente Ricaricare il prodotto 1. Collegare una estremità del cavo USB in dotazione alla porta USB del prodotto e l’altra estremità all’adattatore USB del PC / Notebook o iPhone USB per la ricarica. * Per ricaricare il prodotto completamente da scarico sono necessarie 2 ore circa. 2. IT o Ricarica per iPhone 1. Collegare l’iPhone al prodotto. 2. Far scorrere l’interruttore Modalità verso sinistra per iniziare a ricaricare l’iPhone. Indicatore LED modalità Stato LED 3 LED bianchi accesi Indicazione Autonomia tra 80% e 100% 2 LED bianchi accesi Autonomia tra 45% e 80% 1 LED bianco acceso Autonomia tra 10% e 45% 1 LED bianco lampeggiante Autonomia inferiore al 10% Cornice LED Ricarica prodotto LED lampeggiante (Da 3 a 1 LED in relazione alla autonomia del prodotto) Ricarica per iPhone 2 Manuale utente Accensione/spegnimento del proiettore Spostare l’interruttore di accensione / modalità verso destra per 2 secondi per accendere (ON) o per spegnere (OFF) il proiettore. 2S Regolazione della messa a fuoco IT Regolare la messa a fuoco agendo sulla relativa ghiera per avere immagini più nitide e chiare. Proiezione di foto e video utilizzando la app nativa di iPhone 1. Selezionare a mano l’icona “Foto” dal menu principale dell’iPhone. 2. Selezionare la foto o il video da proiettare. * Le foto possono essere proiettate solo come presentazione. * L’altoparlante supporta soltanto la proiezione di video, non quella dell’audio. 3 Manuale utente Proiezione con la app dedicata gratuita “ShowU” ShowU IT 1. Scaricare e installare la app ShowU app dall’App Store per iPhone. 2. Collegare il prodotto all’iPhone. 3. Avviare la app dall’iPhone. La app viene proiettata automaticamente sul grande schermo. 4. La app “ShowU” abilita le seguenti applicazioni sul prodotto: (1) Immagini Proietta le immagini da iPhone Foto con ingrandimento e rotazione. (2) Browser per web Proietta la pagine web dall’iPhone. (3) Proiezione dal vivo Proiezione dal vivo dalla fotocamera integrata dell’iPhone. Elenco di altre app consigliate Presentation Viewer Pointer Webout Ducati Challenge Free 4 Manuale utente Specifiche del prodotto Elemento Tecnologia dell’ottica Descrizione LCoS IT Sorgente luminosa LED RGB Risoluzione 960 x 540 Pixel (Q1080p) Flusso luminoso 12 lumen effettivi (7 lumen di picco) Dimensioni immagini proiettate Da 13 cm a 127 cm (da 5” a 50” diagonale) Altoparlante interno Mono Sistema operativo iOS4, iOS5 Origine della proiezione iPhone 3GS, iPhone 4, iPhone 4S Entrada de alimentação / saída 5V / 1A Tipo di batteria Batteria integrata da 950 mAh ai polimeri di litio Autonomia della batteria Modalità proiezione: 100 min Modalità ricarica iPhone: 30% dell’autonomia della batteria dell’iPhone Assorbimento Modalità proiezione: 3W Modalità ricarica iPhone: 5W Temperatura di funzionamento 5 °C ~ 35 °C Dimensioni (L x P x H) 60 x 47 x 17.5 mm Peso 80 g Contenuto della Proiettore Pico, custodia, manuale confezione utente, cavo USB * Tutte le specifiche sono soggette a modifiche senza preavviso. 5 Manuale utente Risoluzione dei problemi Controllo Verificare che la batteria sia completamente carica. L’immagine proiettata risulta troppo scura. * Usare il proiettore in un ambiente più scuro. * Ridurre le dimensioni dell’immagine proiettata. L’immagine proiettata risulta troppo sfocata. Regolare la messa a fuoco utilizzando la ghiera per la messa a fuoco. Il proiettore si accende, ma non è possibile proiettare l’immagine. Verificare che la App sia dotata della funzione TV-out. La superficie del proiettore è calda. È normale che questo proiettore generi una moderata quantità di calore durante il funzionamento normale. Quando si collega l’iPhone al proiettore si riceve un messaggio di errore simile a quello visualizzato nello schermo dell’iPhone riportato sotto. Se l’iPhone è coperto da una custodia, la connessione tra iPhone e proiettore potrebbe non essere ottimale. Rimuovere la custodia e collegarlo di nuovo. 6 IT Problema Il proiettore non si accende. Manual del usuario Presentación del producto Indicador LED Rueda de enfoque Interruptor de encendido/modo Altavoces ES Puerto de carga USB Lentes del proyector Conector para iPhone Modo de proyección (Presione hacia delante durante 2 segundos para activar o desactivar la proyección) Modo de carga para iPhone 1 Manual del usuario Carga del producto 1. Conecte uno de los extremos del cable USB suministrado en el puerto USB del dispositivo y el otro al ordenador / portátil o adaptador USB para iPhone para su carga. * Puede cargar el dispositivo por completo en alrededor de 2 horas. 2. o ES Carga del iPhone 1. Conecte el iPhone en el dispositivo. 2. Deslice el interruptor de Modo hacia la izquierda para iniciar la carga del iPhone. Indicadores de Modo LED Estado de la LED Indicación 3 LEDs blancas encendidas fijas Capacidad de la potencia está entre el 80% al 100% 2 LEDs blancas encendidas fijas Capacidad de la potencia está entre el 45% al 80% 1 LED blanca encendida fija Capacidad de la potencia está entre el 10% al 45% 1 LED parpadeante Capacidad de la potencia está por debajo del 10% LED del dosel Se está cargando el dispositivo LED parpadea (De 1 a 3 LEDs dependiendo de la capacidad de potencia eléctrica del dispositivo) Carga Del iPhone 2 Manual del usuario Encendido y apagado del proyector Pulse el interruptor de encendido / modo hacia la derecha durante 2 segundos para encender o apagar el proyector. 2S Ajuste del enfoque ES Ajuste el enfoque utilizando la rueda del enfoque para obtener una imagen más clara y nítida. Proyección de fotos y vídeos a través de la app nativa de iPhone 1. Seleccione manualmente el icono “Photos” en el menú prinicpal del iPhone. 2. Seleccione la foto o vídeo que desee proyectar. * Fotos que solo pueden proyectarse como un pase de diapositiva. * Los altavoces solo admiten la reproducción de vídeo, no la reproducción de audio. 3 Manual del usuario Proyección con la app gratis dedicada “ShowU” 1. Descarga e instale la app ShowU del App store de iPhone. 2. Conecte el dispositivo al iPhone. 3. Ejecute la app en su iPhone. La app se proyectará automáticamente en la gran pantalla. 4. La app “ShowU” posibilita que el dispositivo realice las siguientes aplicaciones: (1) Imágenes Proyección de imágenes desde las fotos del iPhone con zoom y rotación. ShowU ES (2) Navegación Web Projección de páginas web desde iPhone. (3) Proyección en directo Proyección en tiempo real desde la cámara integrada del iPhone. Otra lista de Apps recomendadas Presentation Viewer Pointer Webout Ducati Challenge Free 4 Manual del usuario Especificaciones de producto Elemento Descripción Technología óptica LCoS Fuente de luz LED RGB ES Resolución 960 x 540 Píxeles (Q1080p) Flux Luminoso 12 lúmenes efectivos (7 lúmenes máx.) Tamaño de la imagen proyectada 13 cm ~127 cm (5” ~ 50” Diagonal) Altavoz interno Mono Sistema operativo iOS4, iOS5 Fuente de la proyección iPhone 3GS, iPhone 4, iPhone 4S Entrada / Salida de potencia 5V / 1A Tipo de batería Batería integrada Li-polymer de 950 mAh Vida útil de la batería Modo proyección: 100 min Modo de carga del iPhone: 30% de la capacidad de la batería del iPhone Consumo de potencia Modo de proyección: 3W Modo de carga del iPhone: 5W Temperatura de funcionamiento 5 °C ~ 35 °C Dimensiones (L x A x P) 60 x 47 x 17.5 mm Peso 80 g Contenido del paquete Proyector Pico, Bolsa, Manual del usuario, cable USB * Todas las especificaciones están sujetas a cambio sin previo aviso. 5 Manual del usuario Resolución de problemas Punto de comprobación Asegúrese de que la batería esté cargada. La imagen proyectada es demasiado oscura. * Utilice el proyector en un ambiente más oscuro. * Disminuya el tamaño de la imagen proyectada. La imagen proyectada se ve muy borrosa. Ajuste el enfoque utilizando la rueda de enfoque. Se puede encender el proyector, pero la imagen no se puede proyectar. Asegúrese de que la App esté equipada con la función de salida de TV. La temperatura de la superficie del proyector es alta. Es normal que este proyector genere un calor moderado durante su funcionamiento normal. Cuando conecte el iPhone al proyector y visualice el mensaje de error en la pantalla del iPhone como se ve a continuación. Si cubre su iPhone con una carcasa protectora, puede causar una mala conexión entre el iPhone y el proyector. Extraiga la carcasa protectora y conéctelo de nuevo. 6 ES Síntomas No se puede encender el proyector. دﻟﻴﻞ اﻟﻤﺴﺘﺨﺪم ﻧﻈﺮة ﻋﺎﻣﺔ ﻋﻠﻰ اﻟﻤﻨﺘﺞ ﻣﺆﺷﺮ اﻟﻤﺼﺒﺎح ﻋﺠﻠﺔ اﻟﺘﺮآﻴﺰ ﻣﻔﺘﺎح اﻟﻄﺎﻗﺔ/اﻟﻮﺿﻊ اﻟﺴﻤﺎﻋﺔ ﻣﻨﻔﺬ ﺷﺤﻦ USB AR ﻣﻮﺻﻞ iPhone ﻋﺪﺳﺔ ﺟﻬﺎز اﻟﻌﺮض وﺿﻊ اﻟﻌﺮض )اﺿﻐﻂ ﻟﻸﻣﺎم ﻟﻤﺪة ﺛﺎﻧﻴﺘﻴﻦ ﻟﺘﺸﻐﻴﻞ أو ﻹﻳﻘﺎف ﺗﺸﻐﻴﻞ اﻟﻌﺮض( وﺿﻊ ﺷﺤﻦ ﺟﻬﺎز iPhone 1 دﻟﻴﻞ اﻟﻤﺴﺘﺨﺪم ﺷﺤﻦ اﻟﻤﻨﺘﺞ 1. وﺻﻞ أﺣﺪ ﻃﺮﻓﻲ آﺒﻞ USBاﻟﻤﺘﻮﻓﺮ ﻓﻲ اﻟﺤﺰﻣﺔ ﺑﻤﻨﻔﺬ USBاﻟﻤﻮﺟﻮد ﻓﻲ اﻟﻤﻨﺘﺞ واﻟﻄﺮف اﻵﺧﺮ ﺑﺠﻬﺎز اﻟﻜﻤﺒﻴﻮﺗﺮ اﻟﺸﺨﺼﻲ/اﻟﻜﻤﺒﻴﻮﺗﺮ اﻟﻤﺤﻤﻮل أو ﻣﺤﻮل ﻃﺎﻗﺔ USBﻟﺠﻬﺎز iPhoneﻟﻠﻘﻴﺎم ﺑﺎﻟﺸﺤﻦ. * ﻳﻤﻜﻦ ﺷﺤﻦ اﻟﻤﻨﺘﺞ ﺑﺎﻟﻜﺎﻣﻞ ﻓﻲ ﺣﻮاﻟﻲ ﺳﺎﻋﺘﻴﻦ إذا آﺎن ﻓﺎرﻏًﺎ. 2. أو ﺷﺤﻦ ﺟﻬﺎز iPhone -1وﺻﻞ ﺟﻬﺎز iPhoneﺑﺎﻟﻤﻨﺘﺞ. -2ﺣﺮك ﻣﻔﺘﺎح اﻟﻮﺿﻊ إﻟﻰ اﻟﻴﺴﺎر ﻟﺒﺪء ﺷﺤﻦ ﺟﻬﺎز .iPhone AR ﻣﺆﺷﺮات وﺿﻊ اﻟﻤﺼﺒﺎح اﻟﺘﻮﺿﻴﺢ ﺣﺎﻟﺔ اﻟﻤﺼﺒﺎح 3ﻣﺼﺎﺑﻴﺢ ﺑﻴﻀﺎء ﻻ ﺗﺰال ﻓﻲ وﺿﻊ اﻟﺘﺸﻐﻴﻞ ﻗﺪرة اﻟﻄﺎﻗﺔ ﺑﻴﻦ %80إﻟﻰ %100 2ﻣﺼﺎﺑﻴﺢ ﺑﻴﻀﺎء ﻻ ﺗﺰال ﻓﻲ وﺿﻊ اﻟﺘﺸﻐﻴﻞ ﻗﺪرة اﻟﻄﺎﻗﺔ ﺑﻴﻦ %45إﻟﻰ %80 ﻣﺼﺒﺎح واﺣﺪ أﺑﻴﺾ ﻻ ﻳﺰال ﻓﻲ وﺿﻊ اﻟﺘﺸﻐﻴﻞ ﻗﺪرة اﻟﻄﺎﻗﺔ ﺑﻴﻦ %10إﻟﻰ %45 ﻣﺼﺒﺎح واﺣﺪ أﺑﻴﺾ ﻳﻮﻣﺾ ﻗﺪرة اﻟﻄﺎﻗﺔ أﻗﻞ ﻣﻦ %10 اﺳﺘﻤﺮار وﻣﻴﺾ اﻟﻤﺼﺒﺎح ﺟﺎري ﺷﺤﻦ اﻟﻤﻨﺘﺞ اﻟﻤﺼﺒﺎح ﻳﻮﻣﺾ ﺷﺤﻦ ﺟﻬﺎز iPhone )ﻣﻦ 3إﻟﻰ 1ﻣﺼﺒﺎح ﻳﻌﺘﻤﺪ ﻋﻠﻰ ﺣﺎﻟﺔ ﻗﺪرة ﻃﺎﻗﺔ اﻟﻤﻨﺘﺞ( 2 دﻟﻴﻞ اﻟﻤﺴﺘﺨﺪم ﺗﺸﻐﻴﻞ/إﻳﻘﺎف ﺗﺸﻐﻴﻞ ﺟﻬﺎز اﻟﻌﺮض اﺿﻐﻂ ﻋﻠﻰ ﻣﻔﺘﺎح اﻟﻄﺎﻗﺔ/اﻟﻮﺿﻊ ﻟﻸﻣﺎم ﻟﻤﺪة ﺛﺎﻧﻴﺘﻴﻦ ﻟﺘﺸﻐﻴﻞ أو ﻹﻳﻘﺎف ﺗﺸﻐﻴﻞ ﺟﻬﺎز اﻟﻌﺮض. 2S ﺿﺒﻂ اﻟﺘﺮآﻴﺰ ﻋﺮض اﻟﺼﻮر واﻟﻔﻴﺪﻳﻮ ﺑﺎﺳﺘﺨﺪام اﻟﺘﻄﺒﻴﻖ اﻷﺻﻠﻲ ﻟﺠﻬﺎز iPhone -1ﺣﺪد أﻳﻘﻮﻧﺔ "اﻟﺼﻮر" ﻳﺪوﻳًﺎ ﻋﻠﻰ اﻟﻘﺎﺋﻤﺔ اﻟﺮﺋﻴﺴﻴﺔ ﻟﺠﻬﺎز .iPhone -2اﺧﺘﺮ اﻟﺼﻮرة أو اﻟﻔﻴﺪﻳﻮ اﻟﺘﻲ ﺗﺮﻳﺪ ﻋﺮﺿﻪ. * ﻳﻤﻜﻦ ﻋﺮض اﻟﺼﻮر ﻓﻘﻂ ﺑﻄﺮﻳﻘﺔ ﻋﺮض اﻟﺸﺮاﺋﺢ. * ﺗﺪﻋﻢ اﻟﺴﻤﺎﻋﺎت ﻓﻘﻂ ﺗﺸﻐﻴﻞ اﻟﻔﻴﺪﻳﻮ وﻟﻴﺲ ﺗﺸﻐﻴﻞ اﻟﺼﻮت. 3 AR اﺿﺒﻂ اﻟﺘﺮآﻴﺰ ﺑﺎﺳﺘﺨﺪام ﻋﺠﻠﺔ اﻟﺘﺮآﻴﺰ ﻟﻠﺤﺼﻮل ﻋﻠﻰ ﺻﻮرة واﺿﺤﺔ وأآﺜﺮ ﺣﺪة. دﻟﻴﻞ اﻟﻤﺴﺘﺨﺪم ﻋﺮض ﺑﺎﺳﺘﺨﺪام ﺗﻄﺒﻴﻖ ﻣﺠﺎﻧﻲ ﻣﺨﺼﺺ ""ShowU -1 -2 -3 -4 ﻗﻢ ﺑﺘﻨﺰﻳﻞ وﺗﺜﺒﻴﺖ ﺗﻄﺒﻴﻖ ShowUﻣﻦ ﻣﺘﺠﺮ ﺗﻄﺒﻴﻘﺎت .iPhone وﺻﻞ اﻟﻤﻨﺘﺞ ﺑﺠﻬﺎز .iPhone ﺷﻐﻞ اﻟﺘﻄﺒﻴﻖ ﻣﻦ ﻋﻠﻰ ﺟﻬﺎز .iPhoneﺳﻴﺘﻢ ﻋﺮض اﻟﺘﻄﺒﻴﻖ ﺗﻠﻘﺎﺋﻴًﺎ ﻓﻲ ﺻﻮرة آﺒﻴﺮة. ﻳﻤﻜﻦ ﺗﻄﺒﻴﻖ " "ShowUاﻟﻤﻨﺘﺞ ﻣﻦ اﻟﺘﻄﺒﻴﻘﺎت اﻟﺘﺎﻟﻴﺔ: )Images (1 اﻋﺮض اﻟﺼﻮر ﻣﻦ iPhone Photosﺑﺎﺳﺘﺨﺪام اﻟﺘﻜﺒﻴﺮ واﻟﺘﺪوﻳﺮ. )Web Browser (2 اﻋﺮض ﺻﻔﺤﺎت اﻟﻮﻳﺐ ﻣﻦ .iPhone )Live Projection (3 ﻗﻢ ﺑﺎﻟﻌﺮض اﻟﻤﺒﺎﺷﺮ ﻣﻦ اﻟﻜﺎﻣﻴﺮا اﻟﻤﺪﻣﺠﺔ ﺑﺠﻬﺎز .iPhone ShowU ﻗﺎﺋﻤﺔ اﻟﺘﻄﺒﻴﻘﺎت اﻷﺧﺮى اﻟﻤﻮﺻﻰ ﺑﻬﺎ AR Pointer Presentation Viewer Ducati Challenge Free Webout 4 دﻟﻴﻞ اﻟﻤﺴﺘﺨﺪم ﻣﻮاﺻﻔﺎت اﻟﻤﻨﺘﺞ اﻟﻌﻨﺼﺮ ﺗﻜﻨﻮﻟﻮﺟﻴﺎ ﺑﺼﺮﻳﺔ LCoS ﻣﺼﺪر اﻟﻀﻮء ﻣﺼﺒﺎح RGB اﻟﺪﻗﺔ 540×960ﺑﻜﺴﻞ )اﻟﺠﻮدة 1080ﺑﻜﺴﻞ( اﻷﺿﺎءة اﻟﻤﺴﺘﺨﺪﻣﺔ ﻻ ﺣﺎ ﻓﻌﺎ ً 12ﻣﺼﺒﺎ ً ) 7ﻣﺼﺎﺑﻴﺢ ﺑﺈﺿﺎءة ﻋﺎﻟﻴﺔ( ﺣﺠﻢ ﺻﻮرة اﻟﻌﺮض 13ﺳﻢ إﻟﻰ 127ﺳﻢ ) 5ﺑﻮﺻﺔ إﻟﻰ 50ﺑﻮﺻﺔ ﻧﺼﻒ ﻗﻄﺮﻳﺔ( اﻟﺴﻤﺎﻋﺔ اﻟﺪاﺧﻠﻴﺔ أﺣﺎدﻳﺔ ﻧﻈﺎم اﻟﺘﺸﻐﻴﻞ iOS4, iOS5 ﻣﺼﺪر اﻟﻌﺮض iPhone 3GS, iPhone 4, iPhone 4S دﺧﻞ/ﺧﺮج اﻟﻄﺎﻗﺔ 5ﻓﻮﻟﺖ 1/أﻣﺒﻴﺮ ﻧﻮع اﻟﺒﻄﺎرﻳﺔ ﺑﻄﺎرﻳﺔ ﻟﻲ ﺑﻮﻟﻴﻤﺮ ﻣﺪﻣﺠﺔ 950ﻣﻠﻲ أﻣﺒﻴﺮ ﻓﻲ اﻟﺴﺎﻋﺔ اﻟﻌﻤﺮ اﻻﻓﺘﺮاﺿﻲ ﻟﻠﺒﻄﺎرﻳﺔ وﺿﻊ اﻟﻌﺮض 100 :دﻗﻴﻘﺔ وﺿﻊ ﺷﺤﻦ %30 :iPhoneﺳﻌﺔ ﺑﻄﺎرﻳﺔ ﺟﻬﺎز iPhone اﺳﺘﻬﻼك اﻟﻄﺎﻗﺔ وﺿﻊ اﻟﻌﺮض 3 :وات وﺿﻊ ﺷﺤﻦ ﺟﻬﺎز 5 :iPhoneوات درﺟﺔ ﺣﺮارة اﻟﺘﺸﻐﻴﻞ 5 °C ~ 35 °C اﻷﺑﻌﺎد )اﻟﻄﻮل × اﻟﻌﺮض × اﻻرﺗﻔﺎع( 17.5 × 47 × 60ﻣﻠﻢ اﻟﻮزن 80ﺟﺮام ﺟﻬﺎز ﻋﺮض ﺑﻴﻜﻮ ،ﺟﺮاب ،دﻟﻴﻞ ﻣﺴﺘﺨﺪم ،آﺒﻞ USB ﻣﺤﺘﻮﻳﺎت اﻟﺤﺰﻣﺔ * ﺗﺨﻀﻊ آﺎﻓﺔ اﻟﻤﻮاﺻﻔﺎت ﻟﻠﺘﻐﻴﺮ دون إﺧﻄﺎر. 5 AR اﻟﻮﺻﻒ دﻟﻴﻞ اﻟﻤﺴﺘﺨﺪم اآﺘﺸﺎف اﻟﻤﺸﺎآﻞ وﺣﻠﻬﺎ ﻧﻘﻄﺔ اﻟﺘﺤﻘﻖ اﻟﻤﺸﻜﻠﺔ ﺗﻌﺬر ﺗﺸﻐﻴﻞ ﺟﻬﺎز اﻟﻌﺮض. ﺗﺄآﺪ ﻣﻦ ﺗﻤﺎم ﺷﺤﻦ اﻟﺒﻄﺎرﻳﺔ ﺑﺎﻟﻜﺎﻣﻞ. اﻟﺼﻮرة اﻟﻤﻌﺮوﺿﺔ ﻣﻈﻠﻤﺔ ﻟﻠﻐﺎﻳﺔ. * اﺳﺘﺨﺪم ﺟﻬﺎز اﻟﻌﺮض ﻓﻲ ﺑﻴﺌﺔ أآﺜﺮ ﻇﻼﻣًﺎ. * ﻗﻠﻞ ﺣﺠﻢ اﻟﺼﻮرة اﻟﻤﻌﺮوﺿﺔ. AR اﻟﺼﻮرة اﻟﻤﻌﺮوﺿﺔ ﺑﺎهﺘﺔ ﻟﻠﻐﺎﻳﺔ. اﺿﺒﻂ اﻟﺘﺮآﻴﺰ ﺑﺎﺳﺘﺨﺪام ﻋﺠﻠﺔ اﻟﺘﺮآﻴﺰ. ﻳﻤﻜﻦ ﺗﺸﻐﻴﻞ ﺟﻬﺎز اﻟﻌﺮض ﻣﻊ ﺗﻌﺬر ﻋﺮض اﻟﺼﻮرة. ﺗﺄآﺪ ﻣﻦ ﺗﺰوﻳﺪ اﻟﺘﻄﺒﻴﻖ ﺑﻮﻇﻴﻔﺔ ﺧﺮج اﻟﺘﻠﻔﺰﻳﻮن. درﺟﺔ ﺣﺮارة ﺳﻄﺢ ﺟﻬﺎز اﻟﻌﺮض داﻓﺌﺔ. ﻣﻦ اﻟﻤﻌﺘﺎد ﻟﺠﻬﺎز اﻟﻌﺮض هﺬا ﺗﻮﻟﻴﺪ ﺣﺮارة ﻣﻌﺘﺪﻟﺔ أﺛﻨﺎء اﻟﺘﺸﻐﻴﻞ اﻟﻤﻌﺘﺎد. ﻋﻨﺪ ﺗﻮﺻﻴﻞ ﺟﻬﺎز iPhoneﺑﺠﻬﺎز اﻟﻌﺮض وﺗﺮى رﺳﺎﻟﺔ ﺑﻮﺟﻮد ﺧﻄﺄ ﻣﻌﺮوﺿﺔ ﻋﻠﻰ ﺷﺎﺷﺔ ﺟﻬﺎز iPhoneآﻤﺎ ﻣﻮﺿﺢ ﺑﺎﻷﺳﻔﻞ. إذا ﺗﻢ ﺗﻐﻄﻴﺔ ﺟﻬﺎز iPhoneاﻟﺨﺎص ﺑﻚ ﺑﺤﺎﻓﻈﺔ ﻟﻠﺤﻤﺎﻳﺔ ،ﻓﻘﺪ ﻳﺆدي ذﻟﻚ إﻟﻰ اﻻﺗﺼﺎل اﻟﺴﻴﺊ ﺑﻴﻦ ﺟﻬﺎز iPhoneوﺟﻬﺎز اﻟﻌﺮض. ﻳﺮﺟﻰ إزاﻟﺔ ﺣﺎﻓﻈﺔ اﻟﺤﻤﺎﻳﺔ وﺗﻮﺻﻴﻠﻪ ﻣﺮة أﺧﺮى. 6 Handleiding Aan de slag Onderdelen van de projector LED indicatie Focus wiel Power/Modus schakelaar Luidspreker USB oplaadpoort Projector lens iPhone aansluiting NL Projectie modus (Schuif naar rechts voor 2 seconden om de projectie AAN of UIT te zetten.) iPhone Oplaadmodus 1 Handleiding Het product opladen 1. Verbind een eind van het metgeleverte USB kobel aan de USB poort van het product en het andere eind aan de PC / Notebook of iPhone USB voedingsadaptor voor opladen. * Het product kan circa 2 uur geheel opgeladen worden als het bijna leeg is. 2. of Opladen voor iPhone NL 1. Verbind de iPhone met het product. 2. Schuif de Modus schakelaar naar links om te beginnen met het opladen van de iPhone. LED Modus Indicaties LED Stand Indicatie 3 witte LED’s aan Voedingscapaciteit is tussen 80% tot 100% 2 witte LED’s aan Voedingscapaciteit is tussen 45% tot 80% 1 witte LED’s aan Voedingscapaciteit is tussen 10% tot 45% 1 witte LED’s knippert Voedingscapaciteit minder dan 10% LED's Lopen Product wordt opgeladen LED knippert (Van 3 tot 1 LEDs, hangt af van voedings capaciteit status) Opladen voor iPhone 2 Handleiding De projector aan/uit schakelen Schuif de power / modus schakelaar naar rechts voor 2 seconden om de projector AAN of UIT te zetten. 2S Focus instellen De focus instellen gebruik van het focus wiel voor een scherper en duidelijker beeld. Foto’s en video’s projecteren via iPhone native app NL 1. Selecteer het “Foto’s” handmatig icoon in het iPhone hoofdmenu. 2. Kies de foto of video die u wilt projecteren. * Foto’s kunnen alleen als diashow worden geprojecteerd. * De luidspreker ondersteunt alleen video afspelen, niet audio. 3 Handleiding Projecteren met de gratis app “ShowU” 1. Download en installeer de ShowU app van de iPhone App winkel. 2. Verbind het product met de iPhone. 3. Start de app via uw iPhone op. De app wordt automatisch op een groot scherm geprojecteerd. 4. Met de “ShowU” app kunnen de volgende applicaties van het product gebruikt worden: (1) Afbeeldingen: Project eert de afbeeldingen van iPhone foto’s met zoom in and rotation. ShowU (2) Webbrowser Projecteert webpagina’s van de iPhone. (3) Live projectie Real-time projectie via de ingebouwde camera van de iPhone. Presentation Viewer Pointer Webout Ducati Challenge Free 4 NL Andere aanbevolen Apps Lijst Handleiding Product specificaties Item Omschrijving Optische technologie LCoS Lichtbron RGB LED Resolutie 960 x 540 Pixels (Q1080p) Luminous Flux 12 effectieve lumens (7 Peak lumens) Projectie beeldgrootte 13 cm ~127 cm (5” ~ 50” Diagonaal) Interne luidspreker Mono Besturingssysteem iOS4, iOS5 iPhone 3GS, iPhone 4, iPhone 4S Voeding Invoer/uitvoer 5V / 1A Batterijtype Ingebouwde 950 mAh, Li-polymeer batterij Batterij levensduur Projectiemodus: 100 min iPhone oplaadmodus: 30% iPhone batterij capaciteit Voedingsverbruik Projectiemodus: 3W iPhone oplaadmodus: 5W Gebruikstemparatuur 5 °C ~ 35 °C NL Projectiebron Afmetingen (L x W x H) 60 x 47 x 17.5 mm Gewicht 80 g Inhound verpakking Pico projector, zakje, handleiding, USB kabel * Alle specificaties zijn onderhevig aan verandering zonder voorafgaande mededeling. 5 Handleiding Problemen oplossen Symptoom Controlepunt De projector kan niet aangezet worden. Controleer of de batterij geheel is opgeladen. Het geprojecteerd beeld is te donker. * Gebruik de projector in een omgeving die donkerder is. * Verklein de grootte van de afbeelding. De projector kan aangezet worden maar het beeld wordt niet geprojecteerd. Controleer of de App voorzien is van de tv-uit functie. De temperatuur van het oppervlak van de projector is warm. Het is normal voor deze projector om een beetje warmte te genereren tijdens het projecteren. Wanneer de iPhone is verbonden met de projector wordt de volgende onderstaande foutmelding weergegeven in het iPhone scherm. Als uw iPhone is bedekt met een beschermhoesje, kan het een slechte verbinding tussen de iPhone en de projector veroorzaken. Verwijder het beschermhoesje en verbind opnieuw. 6 NL Het geprojecteerde beeld is te Stel de focus in met het focus wiel. wazig. Manual do Usuário Visão Geral do Produto Indicador LED Roda de Focalização Comutador de Energia/Modo Alto-falante Porta de Carregamento USB Lente do Projetor Conector de iPhone BPT Modo de Projeção (Empurre para a direita por 2 segundos para LIGAR ou DESLIGAR a projeção) Modo de Carregamento do iPhone 1 Manual do Usuário Carregando o produto Conecte uma extremidade do cabo incorporado USB na porta USB do produto e a outra extremidade ao PC / Notebook ou adaptador de energia USB do iPhone para o carregamento. * O Produto pode ser carregado completamente aproximadamente em 2 horas a partir do estado vazio. 1. 2. ou Carregando o iPhone 1. Conecte o iPhone ao produto. 2. Deslize o comutador de Modo para a esquerda para começar o carregamento do iPhone. Estado do LED Indicação 3 LEDs brancos acesos Capacidade de energia está entre 80% a 100% 2 LEDs brancos acesos Capacidade de energia está entre 45% a 80% 1 LED branco aceso Capacidade de energia está entre 10% a 45% 1 LED branco piscante Capacidade de energia está abaixo de 10% Letreiro de LED Produto está sendo carregado LED piscante (De 3 a 1 LEDs dependendo do estado de capacidade do produto) Carregamento de iPhone 2 BPT Indicadores LED de Modo Manual do Usuário Ligando/desligando o projetor Empurre o comutador de energia/modo para a direita por 2 segundos para LIGAR ou DESLIGAR o projetor. 2S Ajustando o Foco Ajuste o foco usando a roda de focalização para obter uma imagem mais nítida e clara. Projetando as fotos e vídeos através do aplicatovo original do iPhone BPT 1. Selecione manualmente o ícone “Fotos” no menu principal do iPhone. 2. Escolha a foto ou vídeo que você deseja projetar. * Fotos podem ser projetados somente como uma presentação de diapositivas. * O alto-falante somente suporta reprodução de vídeo e não suporta reprodução de áudio. 3 Manual do Usuário Projetando com aplicativo dedicado gratuito “ShowU” 1. Descarregue e instale o app ShowU da Loja de App iPhone. 2. Conecte o produto ao iPhone. 3. Inicie o aplicativo a partir do seu iPhone. O aplicativo será projetado automaticamente sobre uma tela grande. 4. Aplicativo “ShowU” permite ativar as seguintes aplicações do produto: (1) Imagens Projeta as imagens a partir do iPhone Photos com ampliação e rotação. ShowU (2) Navegador de Web Projeta páginas de web a partir do iPhone. (3) Projeção Ao Vivo Projeção em tempo real a partir da Câmera embutida do iPhone. Lista de Outros Apps Recomendados Pointer Webout Ducati Challenge Free BPT Presentation Viewer 4 Manual do Usuário Especificações do produto Item Descrição Tecnologia Óptica LcoS Fonte de Luz RGB LED Resolução 960 x 540 Pixels (Q1080p) Fluxo Luminoso 12 lúmens efetivos (7 lúmens de Pico) Tamanho da Imagem de Projeção 13 cm ~127 cm (5” ~ 50” Diagonal) Alto-Falante Interno Mono Sistema Operacional iOS4, iOS5 BPT Fonte de Projeção iPhone 3GS, iPhone 4, iPhone 4S Entrada / Saída de Energia 5V / 1A Tipo de Bateria Bateria 950 mAh incorporada, polímero-Li Vida da Bateria Modo de Projeção: 100 min Modo de carregamento do iPhone: 30% capacidade dabateria do iPhone Consumo de Energia Modo de projeção: 3W Modo de carregamento do iPhone : 5W Temperatura de Operação 5 °C ~ 35 °C Dimensão (C x L x A) 60 x 47 x 17.5 mm Peso 80 g Conteúdo do Pacote Pico Projetor, Bolsa, Manual do Usuário, Cabo USB * Todas as especificações estão sujeitas à mudanças sem aviso. 5 Manual do Usuário Resolução de Problemas Ponto de Verificação Assegure-se de que a bateria esteja completamente carregada. A imagem de projeção é muito escura. * Use o Projetor em um ambiente mais escuro. * Reduza o tamanho da imagem de projeção. A imagem de projeção está muito indistinta. Ajuste o foco usando a roda de focalização. O projetor pode ser ligado, mas a imagem não pode ser projetada. Assegure-se de que o App esteja equipado com a função de saída de TV. A temperatura da superfície do projetor está quente. É normal que este projetor gere calor moderado durante a operação normal. Ao conectar o iPhone ao projetor e ver a mensagem de erro mostrado na tela abaixo do iPhone. Se o seu iPhone estiver coberto por uma caixa protetiva, ela poderá causar uma conexão ruim entre o iPhone e o projetor. Remova a caixa protetiva e conecte-o novamente. 6 BPT Sintoma O projetor não consegue ser ligado. 使用者手冊 產品概要 LED 指示燈 對焦轉盤 電源/模式開關 喇叭 USB 充電連接埠 投影機鏡頭 iPhone 連接器 投影模式 (向右推 2 秒鐘,即可開啟 或關閉投影功能) TC iPhone 充電模式 1 使用者手冊 為產品充電 將隨附的 USB 纜線其中一端連接到 產品的 USB 連接埠,然後將纜線的 另外一端連接到個人電腦/筆記型電 腦或 iPhone USB 電源供應器,即 可為產品充電。 * 本產品從完全沒電到充飽電力,大 約需要 2 小時。 1. 2. 或 為iPhone充電 1. 將 iPhone 連接到本產品。 2. 將模式開關滑動到左邊,即可開 始為 iPhone 充電。 LED模式指示燈 LED 狀態 說明 電力介於 80%到 100%之間 2 個白色 LED 恆亮 電力介於 45%到 80%之間 1 個白色 LED 恆亮 電力介於 10%到 45%之間 1 個白色 LED 閃爍 電力低於 10% LED 跑馬燈 產品正在充電 LED 閃爍 (從 3 到 1 個 LED,依產品的電 力而定) 正在為 iPhone 充電 2 TC 3 個白色 LED 恆亮 使用者手冊 開啟/關閉投影機 將電源/模式開關向右推 2 秒鐘,即 可開啟或關閉投影機。 2S 調整焦點 利用對焦轉盤調整焦點,可以讓圖 片更加清晰銳利。 透過iPhone原生型應用程式投影相片及視訊 1. 手動選擇 iPhone 主選單上的「相片」圖示。 2. 選擇您想要投影的相片或視訊。 * 相片只能以投影片進行投影。 * 喇叭僅支援視訊播放,不支援音訊播放。 TC 3 使用者手冊 透過專用的免費應用程式「ShowU」進行投影 1. 從 iPhone App Store 下載並安裝 ShowU 應用程式。 2. 將本產品連接到 iPhone。 3. 從您的 iPhone 啟動此應用程式。此應用程式將自動投 影在大螢幕上。 4. 「ShowU」應用程式可以讓本產品使用下列應用程式: (1) 影像 利用放大及旋轉功能投影 iPhone 相片中的影像。 ShowU (2) 網頁瀏覽器 投影 iPhone 中的網頁。 (3) 即時投影 透過 iPhone 的內建相機進行即時投影。 其他推薦的應用程式清單 Pointer Webout Ducati Challenge Free 4 TC Presentation Viewer 使用者手冊 產品規格 項目 光學技術 說明 LCoS 光源 RGB LED 解析度 960 x 540 像素(Q1080p) 光通量 12 有效流明 (7 峰值流明) 投影影像尺寸 13 公分 ~ 127 公分(對角線 5 吋~ 50 吋) 內部喇叭 單聲道 作業系統 iOS4, iOS5 投影來源 iPhone 3GS, iPhone 4, iPhone 4S 電源輸入/輸出 5V / 1A 電池類型 內嵌式 950 mAh,鋰聚合物電池 電池壽命 投影模式:100 分鐘 耗電量 投影模式:3W iPhone 充電模式:30%的 iPhone 電力 iPhone 充電模式:5W TC 作業溫度 5 °C ~ 35 °C 尺寸(長 x 寬 x 高) 60 x 47 x 17.5 公釐 重量 80 克 包裝內容 微型投影機、包裝袋、使用者手冊、USB 纜線 * 所有規格如有變更,恕不另行通知。 5 使用者手冊 疑難排解 徵兆 無法開啟投影機。 投影的影像太暗。 檢查點 請確認電池是否已充飽電力。 * 請在較暗的環境中使用投影機。 * 請縮小投影影像的尺寸。 投影的影像太模糊。 請利用對焦轉盤調整焦點。 可以開啟投影機,但是無法投 請確認應用程式是否具備 TV-out 功 影影像。 能。 投影機表面很熱。 投影機在正常運作期間會產生些微 熱氣,此為正常現象。 將 iPhone 連接到投影機時, 如果您的 iPhone 包覆保護殼,可能 iPhone 螢幕上顯示如下所示的 會導致 iPhone 和投影機之間的連接 錯誤訊息。 不正確。 請將保護殼取下,然後再次連接 iPhone 和投影機。 TC 6 使用说明 产品简介 LED 指示灯 聚焦轮 电源/模式开关 扬声器 USB 充电接口 投影镜头 iPhone 连接器 投影模式 (向右推动 2 秒,以打开或 关闭投影功能) iPhone 充电模式 SC 1 使用说明 产品充电 将捆在一起的 USB 电缆的一端连接 至产品的 USB 端口,并将另一端连 接 至 电 脑 / 笔 记 本 电 脑 或 iPhone USB 电源适配器,以为产品充电。 * 在无电量的情况下,大约充电 2 个小时,即可为产品充满电量。 1. 2. 或 iPhone充电 1. 将 iPhone 连接至产品。 2. 向 左 滑 动 模 式 开 关 , 开 始 为 iPhone 充电。 LED模式指示灯 LED 状态 功率容量介于 80%至 100%之间 2 个 LED 白色指示灯保持亮起 功率容量介于 45%至 80%之间 1 个 LED 白色指示灯保持亮起 功率容量介于 10%至 45%之间 1 个 LED 白色指示灯闪烁 功率容量低于 10% LED 跑马灯 产品正在充电 LED 指示灯闪烁 为 iPhone 充电 (3 个至 1 个 LED 指示灯闪烁, 具体取决于产品的功率容量状 态) 2 SC 指示 3 个 LED 白色指示灯保持亮起 使用说明 打开/关闭投影机 向右滑动电源/模式开关 2 秒,打开 或关闭投影机。 2S 调节焦点 使用聚焦轮调节焦点,以获取更清 晰的照片。 通过iPhone本地应用程序投影照片和视频 1. 手动选择 iPhone 主菜单上的“照片”图标。 2. 选择您希望投影的照片或视频。 * 只能以幻灯片放映的方式投影照片。 * 扬声器仅支持视频播放,而不支持音频播放。 SC 3 使用说明 通过专用的免费应用程序“ShowU”实现投影功能 1. 从 iPhone 应用程序商店中下载并安装 ShowU 应用程 序。 2. 将产品连接至 iPhone。 3. 从您的 iPhone 中启动应用程序。将自动在大屏幕上投 影该应用程序。 4. “ShowU”应用程序支持产品用于如下领域: (1) 图片 借助缩放和旋转功能, 投影 iPhone 相片库中的照片。 ShowU (2) 网络浏览器 投影 iPhone 中的网页。 (3) 实时投影 从 iPhone 内置的相机中实时投影。 其他推荐的应用程序清单 Pointer Webout Ducati Challenge Free SC Presentation Viewer 4 使用说明 产品规格 项目 描述 光学技术 LCoS 光源 RGB LED 分辨率 960 x 540 像素(Q1080p) 光通量 12 有效光通量 (7 光通量峰值) 投影图像尺寸 13 厘米~127 厘米(5” ~50”对角线) 内部扬声器 单声道 操作系统 iOS4、iOS5 投影光源 iPhone 3 代、iPhone 4 代、iPhone 4 电源输入/输出 5V/1A 电池类型 嵌入式 950 mAh 聚合物锂离子电池 电池寿命 投影模式:100 min iPhone 充电模式:30%的 iPhone 电量 功耗 投影模式:3W iPhone 充电模式:5W 运行温度 5 °C ~ 35 °C 尺寸(长 x 宽 x 高) 60 x 47 x 17.5 毫米 SC 重量 80 克 包装内容 微型投影机、包装袋、使用说明、USB 线缆 * 所有规格都可能不时变更,恕不另行通知。 5 使用说明 检修 故障 投影机无法开启。 投影图片太黑。 检查点 确保电池的电量充足。 * 在更黑暗的环境中使用投影机。 * 减小投影图片的尺寸。 投影图片过于模糊。 通过使用聚焦轮,从而调整焦点。 投影机可以开启,但是无法投 确保应用程序具有电视输出功能。 影图片。 投影机的表面发热。 在正常操作期间,投影机会产生适度 的热量,这很正常。 在将 iPhone 连接至投影机的时 如果您的 iPhone 配有保护罩,那么 候,看到 iPhone 屏幕上显示了 可能会导致 iPhone 和投影机出现接 如下错误信息。 触不良的情况。 SC 请拆下保护罩,并重新连接。 6