1
FUNCTIONAL DESCRIPTION
CAUTION:
• Always be sure that the tool is switched off and
unplugged before adjusting or checking function on the
tool.
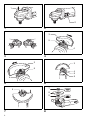
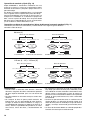
Shaft lock (Fig. 1)
CAUTION:
• Never actuate the shaft lock when the spindle is moving. The tool may be damaged.
Press the shaft lock to prevent spindle rotation when
installing or removing accessories.
Switch action (Fig. 2)
CAUTION:
• Before plugging in the tool, always check to see that
the slide switch actuates properly and returns to the
“OFF” position when the rear of the slide switch is
depressed.
To start the tool, slide the slide switch toward the “I (ON)”
position. For continuous operation, press the front of the
slide switch to lock it.
To stop the tool, press the rear of the slide switch, then
slide it toward the “O (OFF)” position.
ASSEMBLY
CAUTION:
• Always be sure that the tool is switched off and
unplugged before carrying out any work on the tool.
Installing side grip (handle) (Fig. 3)
CAUTION:
• Always be sure that the side grip is installed securely
before operation.
Screw the side grip securely on the position of the tool as
shown in the figure.
Installing or removing wheel guard
(For depressed center wheel, multi disc /
abrasive cut-off wheel, diamond wheel)
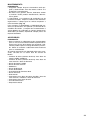
For tool with locking screw type wheel guard
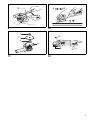
(Fig. 4 & 5)
Installing or removing depressed center grinding
wheel/Multi-disc (accessory)
Mount the inner flange onto the spindle. Fit the wheel/
disc on the inner flange and screw the lock nut onto the
spindle. (Fig. 8)
To tighten the lock nut, press the shaft lock firmly so that
the spindle cannot revolve, then use the lock nut wrench
and securely tighten clockwise.
To remove the wheel, follow the installation procedure in
reverse. (Fig. 9)
OPERATION
WARNING:
• It should never be necessary to force the tool. The
weight of the tool applies adequate pressure. Forcing
and excessive pressure could cause dangerous wheel
breakage.
• ALWAYS replace wheel if tool is dropped while grinding.
• NEVER bang or hit grinding disc or wheel onto work.
• Avoid bouncing and snagging the wheel, especially
when working corners, sharp edges etc. This can
cause loss of control and kickback.
• NEVER use tool with wood cutting blades and other
sawblades. Such blades when used on a grinder frequently kick and cause loss of control leading to personal injury.
CAUTION:
• After operation, always switch off the tool and wait until
the wheel has come to a complete stop before putting
the tool down.
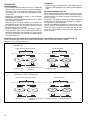
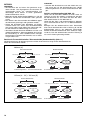
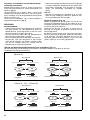
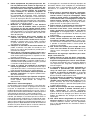
Grinding and sanding operation (Fig. 10)
ALWAYS hold the tool firmly with one hand on housing
and the other on the side handle. Turn the tool on and
then apply the wheel or disc to the workpiece.
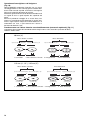
In general, keep the edge of the wheel or disc at an angle
of about 15 degrees to the workpiece surface.
During the break-in period with a new wheel, do not work
the grinder in the B direction or it will cut into the workpiece. Once the edge of the wheel has been rounded off
by use, the wheel may be worked in both A and B direction.
CAUTION:
• The wheel guard must be fitted on the tool so that the
closed side of the guard always points toward the operator.
Mount the wheel guard with the protrusion on the wheel
guard band aligned with the notch on the bearing box.
Then rotate the wheel guard around 180 degrees. Be
sure to tighten the screw securely.
To remove wheel guard, follow the installation procedure
in reverse.
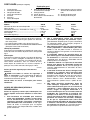
For tool with clamp lever type wheel guard
(Fig. 6 & 7)
Pull the lever in the direction of the arrow after loosening
the screw. Mount the wheel guard with the protrusion on
the wheel guard band aligned with the notch on the bearing box. Then rotate the wheel guard around 180°. Fasten it with the screw after pulling lever in the direction of
the arrow for the working purpose. The setting angle of
the wheel guard can be adjusted with the lever.
To remove wheel guard, follow the installation procedure
in reverse.
7