1
P4263FP
Installing the Mounting Bracket (cont’d)
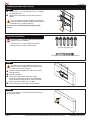
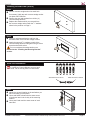
Locking and Leveling Screw Installation
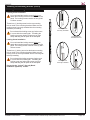
Leveling Screw Installation
You must install the leveling screws before you
attach the mounting bracket to the back of the flat
panel. The leveling screws consists of two (2) M6
x 250mm screws.
Thread one (1) leveling screw into the top mounting
hole on each of the mounting brackets. Make sure the
leveling screw is securely threaded into the mounting
tab before proceeding.
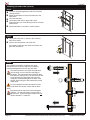
Do not thread the leveling screw any further once
it is even with the mounting tab. Threading the
leveling screw any further will prevent you from
safely attaching the flat panel to the wall plate.
Leveling Screw
Correctly Threaded
Leveling Screw
Threaded Too Far
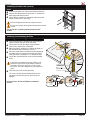
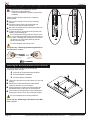
Locking Screw Installation
You must install the locking screws before you
attach the mounting bracket to the back of the flat
panel. The locking screws consists of two (2) M6 x
250mm screws.
Thread one (1) locking screw into the bottom mounting
hole on each of the mounting brackets. Make sure the
locking screw is securely threaded into the mounting tab
before proceeding.
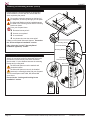
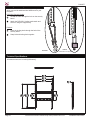
Do not thread the locking screw any further once
it is even with the mounting tab. Threading the
locking screw any further will prevent you from
safely attaching the flat panel to the wall plate.
Locking Screw
Correctly Threaded
Proceed to the “Lock-It™ Security Barrel
Installation (Optional)” section.
Installation Instructions
Visit the Premier Mounts website at http://www.premiermounts.com
Locking Screw
Threaded Too Far
Page 13