1
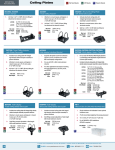
Installation and Assembly:
Shelf Bracket for Media Device
Model: DSX200
A
Parts List
A
B
C
D
E
F
G
H
Description
shelf
right vertical support
left vertical support
adjustment bracket
M5 x 16 phillips screw
M5 x 25 mm phillips screw
1/4-20 x 1/2 round phillips screw
safety belt
C
Qty.
1
1
1
2
8
2
4
1
Part #
124-1941
124-1944
124-1943
124-1945
520-1189
520-9543
510-9108
170-8039-1
D
E
B
F
G
H
1
Secure two adjustment brackets (D) to shelf (A) using four 1/4-20 x 1/2 round phillips screws (G).
USE BACK MOUNTING HOLES
USE BACK MOUNTING HOLES
G
A
G
D
A
High Shelf Position
Low Shelf Position
1 of 5
D
ISSUED: 01-05-10 SHEET #: 125-9094-3 03-01-10
Attaching to Wall Plate
2
Hook right and left vertical supports (B and C) onto wall plate (not supplied) and secure using two
M5 x 25 mm phillips screws (F).
NOTE: Don’t fully tighten M5 x 25 mm phillips screws (F) until after Step 3
Wall Plate
(Not supplied)
C
B
F
3
Secure adjustment brackets (D) to right and left vertical supports (B and C) using eight M5 x 16 mm phillips screws (E).
Position right and left vertical supports (B and C) in desired location then tighten M5 x 25 mm phillips screws (F).
C
D
Wall Plate
(Not supplied)
B
C
E
F
F
E
Wall Plate
(Not supplied)
B
D
Low Shelf Position
High Shelf Position
2 of 5
ISSUED: 01-05-10 SHEET #: 125-9094-3 03-01-10
Attaching Safety Belt
4
Select slot in tray as shown in fig 4.1.
Remove backing and attach one clear strip through slot and around edge of tray as shown in fig. 4.2.
Repeat for other slot on other side of tray.
NOTE: This material prevents fraying or cutting of the belt.
Fig. 4.2
Fig. 4.1
5
CLEAR STRIPS
SLOT
FRONT LIP
Take one belt and hold it so that the tri-bar belt clip is facing as illustrated. Feed belt up through the slot you have chosen.
Remember, belt only goes through outside slot. Now feed belt through belt clip as shown.
Repeat on other side of tray using other belt.
A
H
1
6
TRI-BAR BELT CLIP
2
3
Continue by sliding on one belt guide and tri-bar clip on each side of the buckle. Refer to drawing below.
TOP
BOTTOM
NOTE: Teeth face down
3 of 5
ISSUED: 01-05-10 SHEET #: 125-9094-3 03-01-10
Pull end of safety belt (H) out of bottom buckle slot and back down through top buckle slot.
NOTE: Do not tighten safety belt (H).
Bottom buckle slot
Top buckle slot
4
5
BELT GUIDE
BELT GUIDE
NOTE: To attach screen to wall plate, spacers may be needed. Refer to wall mount instructions for use of spacers.
6
Tighten safety belt (H) by pulling on loose end of safety belt.
H
4 of 5
ISSUED: 01-05-10 SHEET #: 125-9094-3 03-01-10
7
Make sure that attachment brackets (not included) are at desired tilt before installing to wall plate (not included).
Measure display hole pattern before securing display to wall plate (not included).
Large Mounting Hole Pattern
Vertical brackets Outside
If display mounting pattern is larger than distance between vertical
supports of shelf mount brackets, position attachment brackets on
outside with ratchet handles facing outward as shown in Fig 7.1.
RATCHET HANDLE
ATTACHMENT BRACKETS
Fig. 7.1
18.65"
VERTICAL BRACKETS
Small Mounting Hole Pattern
Vertical brackets inside
If display mounting holes are smaller than distance between vertical
supports of shelf mount brackets, position attachment brackets on
inside with ratchet handles facing inward as shown in Fig 7.2.
RATCHET HANDLE
ATTACHMENT BRACKETS
Fig. 7.2
18.65"
VERTICAL BRACKETS
Same Mounting Hole Pattern
Vertical brackets inside and Outside
NOTE: Shelf will be offset to the right or left in this orientation.
If display mounting holes are equal to distance between vertical
supports of shelf mount brackets, position attachment brackets on
right or left side of shelf mount brackets with ratchet handles facing
outward as shown in Fig 7.3.
NOTE: Vertical brackets can be mounted on right or left side of shelf
as shown in light gray.
RATCHET HANDLE
ATTACHMENT BRACKETS
Fig. 7.3
VERTICAL BRACKETS
5 of 5
ISSUED: 01-05-10 SHEET #: 125-9094-3 03-01-10
© 2010, Peerless Industries, Inc. All rights reserved.
All other brand and product names are trademarks or
registered trademarks of their respective owners.