1
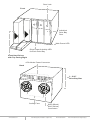
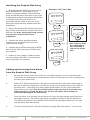
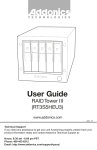
T E C H N O L O G I E S
User Guide
Snap-In Disk Array
(AESN5DA35)
www.addonics.com
v6.1.11
Technical Support
If you need any assistance to get your unit functioning properly, please have your
product information ready and contact Addonics Technical Support at:
Hours: 8:30 am - 6:00 pm PST
Phone: 408-453-6212
Email: http://www.addonics.com/support/query/
Door Lock
Front
Individual
Drive Bay
Door
Main Power LED
Drive Power & Activity LED
for Each Drive Bay
Insert Hard Drives
with Top Facing Right
4-Pin Molex Power Connector
Back
3 - 5.25”
Drive Bay Size
Cooling Fans
www.addonics.com
SATA (Black)
SAS (Yellow)
Connectors
Technical Support (M-F 8:30am - 6:00pm PST)
Phone: 408-453-6212
Email: www.addonics.com/support/query/
Installing the Snap-In Disk Array
1. Slide the Snap-In Disk Array into a set of
three standard 5.25” drive bays on your
system or storage chassis. Orient the Disk
Array so that the drive door open to the right
in horizontal mount or swing open downward
in vertical mount. Be sure there is no
metal tabs on the inside of any one of the
three drive bays that may interfere with the
installation.
Standard 5.25” Drive Bay
2. Secure the Snap-In Disk Array to the drive
bay on both sides with the screws that come
with the unit. Note: using other long screws
may interfere with the hard drive
installation.
3. Connect the two 4-pin Molex power
connectors on the Disk Array unit to the
system power supply
Use a plier to shift
the metal tabs to
face vertically or
remove the metal
tabs
4. Connect the 4 SATA connectors to SATA
host or the 4 SAS connector to SAS host in
your system
5. Power on your system. Check to make
sure the main power LED is lit and that the
two cooling fans are spinning.
Adding and removing hard drives
from the Snap-In Disk Array
1.
Be sure the lock on each drive door is in an unlock position. If not, use the key that
comes with the Disk Array to unlock the drive door. Pull on the door lever to swing open
the drive door all the way.
2.
Slide a 3.5” SATA hard drive into the drive slot with the drive connector side facing in.
Be sure to orient the hard drive correctly as shown in the yellow label on the inside of
the drive door – with drive door swing open at the bottom, the top of the hard drive
should face to the right. The drive should slide all the way into the slot with very
little resistance. Forcing the drive into the slot will cause drive damage or
permanent damage to the Disk Array.
3.
Once the drive is all the way into the drive slot, close the door all the way till the drive
door latch securely. This will engage power and data connection with the hard drive.
The LED lit for the drive slot should lit if the Disk Array already powered on. You may
lock the drive door with the key
4.
To remove the hard drive from the Disk Array, simply follow the step 2 – 3 in reverse.
www.addonics.com
Technical Support (M-F 8:30am - 6:00pm PST)
Phone: 408-453-6212
Email: www.addonics.com/support/query/
CONTACT US
www.addonics.com
Phone:
Fax:
Email:
408-573-8580
408-573-8588
http://www.addonics.com/sales/query/