Transcript
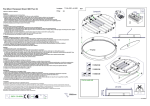
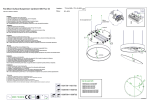
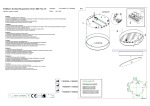
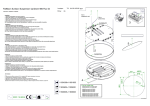
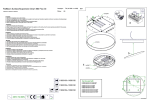
Lamptype :
Flat Moon Recessed ø680 Fluo GI
T16 (4x 24W) + TC-L (2x 24W)
MAP
2
Fitting :
G5 + 2G11
118502XX-118552XX-118562XX
Installatie
1. Schroef de lampplaat vast op de inbouwframe.
2. Breng de voedingskabel door de lampplaat en sluit die aan op de aansluitklem.
3. Breng het toestel in het inbouwgat. Schroef de vijzen terug aan van zodra het toestel volledig in het inbouwgat zit.
Regel de hoogte van de inbouwframe zodat de onderste rand van de frame gelijk komt met het toekomstig of
bestaand plafondoppervlak door de schroeven lichtjes te lossen.Bij de juiste possionering span de schroeven terug vast.
Indien van toepassing bepleister rond de inbouwframe tot de onderste rand van de frame gelijk komt met het plafond oppervlak.
4. Breng de lampen in het toestel, overeenkomstig het toestelvermogen.
5. Neem de polycarbonaat en breng die schuin in het toestel.
1
Installation
1. Screw the lampunit onto the recessed frame.
2. Bring the power feed through the lamp plate and connect it to the connecting terminal.
3. Place the appliance in the recessed opening. Tighten the screws when the appliance is fully in the recessed opening.
Adjust the height of the recessed frame so the lower edge of the frame is level with the future or existing ceiling surface by lightly unscrewing the screws.
Tighten the screws again when correctly positioned.
If applicable, plaster around the recessed frame until the bottom edge of the frame is level with the ceiling surface.
4. Insert bulbs into the unit, making certain to respect the unit’s maximum power rating.
5. Take the polycarbonate disc and place it slanted in the appliance.
A
Dim
Dim
L
A
N
2
1
Installation
1. Revissez éclairage de la plaque au cadre de montage .
2. Introduisez le câble d'alimentation au travers de l'embase de la lampe et raccordez-le au bornier de connexion.
3. Insérez l'appareil dans l'orifice d'encastrement du plafond. Resserrez les vis dès que l'appareil est entièrement inséré dans l'orifice d'encastrement.
Réglez la hauteur de la structure encastrée de telle sorte que son rebord inférieur arrive à fleur du futur plafond ou du
plafond existant, en dévissant légèrement les vis. Lorsque la structure est correctement positionnée, revissez les vis à fond.
S'il y a lieu, replafonnez autour de la structure d'encastrement jusqu'à ce que son bord inférieur affleure parfaitement la surface du plafond.
4. Introduisez les lampes dans l’appareil conformément à sa puissance.
5. Prenez le disque en polycarbonate et introduisez-le de biais dans l'appareil.
Montage
1. Schrauben Sie die Leuchte an der Einbaurahmen .
2. Das Stromkabel durch die Lampenplatte führen und an die Anschlussklemme anschließen.
3. Die Leuchte in die Einbauöffnung einsetzen. Die Schrauben wieder anziehen sobald die Leuchte vollständig in der Einbauöffnung steckt.
Die Höhe des Einbaurahmens so einstellen, dass der untere Rand des Rahmens plan mit der künftigen oder vorhandenen Deckenuntersicht abschließt.
Dazu die Schrauben etwas lösen. Ist die richtige Positionierung erreicht, die Schrauben wieder anziehen.
Falls zutreffend: Die Decke rund um den Einbaurahmen verputzen, bis dessen unterer Rand eine Ebene mit der Deckenuntersicht bildet.
4. Setzen Sie Lampen in die Leuchte ein, die mit der Leistung der Leuchte übereinstimmen.
5. Die Polycarbonatscheibe nehmen und schräg in die Leuchte einsetzen.
5
Instalación
1. Tornillo de la lámpara de la placa de montaje a la estructura.
2. Introduzca el cable de alimentación a través de la placa de la lámpara y conéctelo al borne de conexión.
3. Introduzca el aparato en el orificio de empotramiento. Apriete los tornillos cuando el aparato esté correctamente posicionado en el orificio de
empotramiento.Regule la altura del marco de empotramiento de forma que el borde inferior del marco esté al mismo nivel que la superficie del techo,
futuro o existente, aflojando ligeramente los tornillos. Una vez posicionado correctamente, vuelva a apretar los tornillos.
Si fuese necesario, enfosque el marco de empotramiento hasta que el borde inferior del marco esté al mismo nivel que la superficie del techo.
4. Coloque las bombillas de la potencia adecuada en el aparato.
5. Coloque el disco de policarbonato inclinado en el aparato.
Installazione
1. Avvitare la lampada piastra di montaggio al telaio.
2. Inserire il cavo di alimentazione nella piastra della lampada e collegarlo con il terminale.
3. Inserire l'apparecchio nell'apertura incorporata. Riavvitare le viti appena l'apparecchio è posizionato completamente nell'apertura incorporata.
Regolare l'altezza del telaio incorporato in modo che il bordo inferiore del telaio sia a filo con la superficie del soffitto futuro
o preesistente svitando leggermente le viti. Quando è posizionato correttamente riavvitare le viti.
Se necessario dare una mano di intonaco intorno al telaio incorporato finché il bordo inferiore del telaio non sia a filo con la superficie del soffitto.
4. Collocare la lampada nell’apparecchio, e che sia conforme alla potenza dello stesso.
5. Prendere il disco di policarbonato e inserirlo trasversalmente nell'apparecchio.
4
11850209
Ø682mm
1-10V
230V / 50-60Hz
11855209
11856209
0.5 m
elec.
Push
DALI
Can be used with
Ø 770mm
160mm
Установка
1. Привинтите ламповую пластину к ламповому кольцу.
2. Протяните кабель питания через ламповую пластину и подсоедините его к клеммам.
3. Установите устройство в монтажном отверстии. Завинтите гайки так, чтобы устройство было полностью утоплено в монтажном отверстии.
Отрегулируйте высоту монтажной рамы так, чтобы нижний край рамы был вровень с существующей или планируемой поверхностью потолка,
вращая винты в соответствующую сторону. После завершения регулировки положения затяните винты.
Если требуется, заштукатурьте потолок у края монтажной рамы так, чтобы рама шла вровень с поверхностью потолка.
4. Вставьте лампу, соответствующую мощности устройства
5.Возьмите поликарбонатный диск и вставьте его косо в устройство.
3
V0-09/03/2011