Transcript
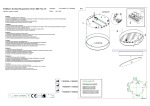
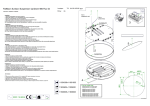
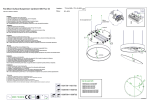
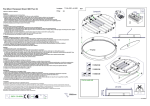
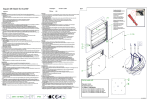
FlatMoon Surface/Suspension Down 980 Fluo GI
Lamptype :
118301XX-118351XX-118361XX
Fitting :
T16 (4x 39W + 4x 24W)
MAP
G5
Lampplate
1
Installatie
1. Schroef de lampplaat vast op de lampring.
2. Breng de voedingskabel door de lampplaat en bevestig de het toestel aan het plafond, gebruik de hiervoor voorziene schroefopeningen.
3. Sluit de voedingsdraden aan de aansluitklem
4. Breng de lampen in het toestel, overeenkomstig het toestelvermogen.
5. Neem de polycarbonaat en breng die schuin in het toestel.
Dim
Dim
2
L
A
N
3
Installation
1. Screw the lampunit onto the lampring.
2. Bring the power feed through the lamp plate and Fasten the appliance to the ceiling. Use the screw openings provided for this purpose.
3. Connect the power wires to the connecting terminal.
4. Insert bulbs into the unit, making certain to respect the unit’s maximum power rating.
5. Take the polycarbonate disc and place it slanted in the appliance.
1
Installation
1. Vissez la plaque à la lumière de la lampe anneau .
2. Introduisez le câble d'alimentation au travers de l'embase de la lampe et raccordez-le au bornier de connexion.
3. Raccordez le câble d'alimentation au bornier de connexion.
4. Introduisez les lampes dans l’appareil conformément à sa puissance.
5. Prenez le disque en polycarbonate et introduisez-le de biais dans l'appareil.
Montage
1. Schrauben Sie die Platte an die Glühbirne Ring .
2. Das Stromkabel durch die Lampenplatte führen und an die Anschlussklemme anschließen.
3. Die Adern des Anschlusskabels an die Anschlussklemme anschließen.
4. Setzen Sie Lampen in die Leuchte ein, die mit der Leistung der Leuchte übereinstimmen.
5. Die Polycarbonatscheibe nehmen und schräg in die Leuchte einsetzen.
Lampring
Instalación
1. Tornillo de la placa al anillo bombilla
2. Introduzca el cable de alimentación a través de la placa de la lámpara y conéctelo al borne de conexión.
3. Conecte los cables de alimentación al borne de conexión.
4. Coloque las bombillas de la potencia adecuada en el aparato.
5. Coloque el disco de policarbonato inclinado en el aparato.
5
Installazione
1. Avvitare la piastra per l'anello di lampadina.
2. Inserire il cavo di alimentazione nella piastra della lampada e collegarlo con il terminale.
3. Collegare i fili dell'alimentazione con il terminale.
4. Collocare la lampada nell’apparecchio, e che sia conforme alla potenza dello stesso.
5. Prendere il disco di policarbonato e inserirlo trasversalmente nell'apparecchio.
4
Установка
1. Привинтите ламповую пластину к ламповому кольцу.
2. Протяните кабель питания через ламповую пластину и подсоедините его к клеммам.
3. Подсоедините провода питания к клеммам .
4. Вставьте лампу, соответствующую мощности устройства
5.Возьмите поликарбонатный диск и вставьте его косо в устройство.
(4x39W)
(4X24W)
400
n
Can be used with
20
Push
230V / 50-60Hz
F
DALI
11835109+11835132
11836109+11836132
11839909 Power feed 4m 3x0.75
11839932 Power feed 4m 3x0.75
11839809 Power feed 4m 5x0.75
11839832 Power feed 4m 5x0.75
WhStr
BlStr
WhStr
BlStr
11839709 Power feed recessed 4m 3x0.75 WhStr
11839732 Power feed recessed 4m 3x0.75 BlStr
11839609 Power feed recessed 4m 5x0.75 WhStr
11839632 Power feed recessed 4m 5x0.75 BlStr
400
1-10V
7,5
n9
11340409 Suspension set 4m (3cable) WhStr
11340432 Suspension set 4m (3cable) BlStr
n1
11830109+11830132
410
6
0.5 m
elec.
V0/11-03-2011