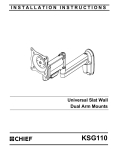
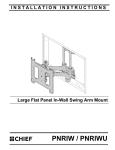
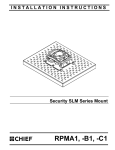
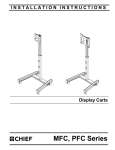
1
INSTALLATION INSTRUCTIONS
Instrucciones de instalación
Installationsanleitung
Instruções de Instalação
Istruzioni di installazione
Installatie-instructies
Instructions d´installation
Projector Lock
Spanish Product Description
German Product Description
Portuguese Product Description
Italian Product Description
Dutch Product Description
French Product Description
PL2
PL2
Installation Instructions
DISCLAIMER
CSAV, Inc., and its affiliated corporations and subsidiaries
(collectively, "CSAV"), intend to make this manual accurate and
complete. However, CSAV makes no claim that the information
contained herein covers all details, conditions or variations, nor
does it provide for every possible contingency in connection
with the installation or use of this product. The information
contained in this document is subject to change without notice
or obligation of any kind. CSAV makes no representation of
warranty, expressed or implied, regarding the information
contained herein. CSAV assumes no responsibility for
accuracy, completeness or sufficiency of the information
contained in this document.
IMPORTANT WARNINGS AND
CAUTIONS!
WARNING: A WARNING alerts you to the possibility of
WICHTIGE WARN- und
VORSICHTSHINWEISE!
WARNUNG: Ein WARNHINWEIS macht auf mögliche
schwere oder tödliche Verletzungen aufmerksam, die bei
Nichtbefolgung der Anweisungen eintreten können.
VORSICHT: Ein VORSICHTSHINWEIS macht auf Schäden
oder mögliche Zerstörung des Geräts aufmerksam, die bei
Nichtbefolgung der Anweisungen eintreten können.
WARNUNG: Falls nicht alle Anweisungen gelesen und gut
verstanden werden, kann dies zu schweren
Körperverletzungen, Schaden an den Geräten führen und die
Werksgarantie nichtig machen! Der Monteur ist dafür
verantwortlich, dass alle Komponenten unter Einhaltung der
mitgelieferten Anweisungen korrekt zusammengebaut und
eingebaut werden.
serious injury or death if you do not follow the instructions.
CAUTION: A CAUTION alerts you to the possibility of
ADVERTÊNCIAS e AVISOS
IMPORTANTES!
damage or destruction of equipment if you do not follow the
corresponding instructions.
WARNING: Failure to read, thoroughly understand, and
follow all instructions can result in serious personal injury,
damage to equipment, or voiding of factory warranty! It is the
installer’s responsibility to make sure all components are
properly assembled and installed using the instructions
provided.
y PRECAUCIONES
IMPORTANTES!
ADVERTÊNCIA: Os alertas de ADVERTÊNCIA avisam-no
para a possibilidade de ocorrência de graves lesões ou
morte no caso de incumprimento das instruções.
AVISO: Os alertas de AVISO avisam-no para a possibilidade
de danos ou destruição do equipamento no caso de
incumprimento das instruções.
iAVISOS
AVISO: Un AVISO llama su atención sobre la posibilidad de
sufrir lesiones de gravedad o incluso mortales si no sigue las
instrucciones.
PRECAUCIÓN: Una nota de PRECAUCIÓN llama su
atención sobre la posibilidad de dañar o destruir el equipo si
no sigue las instrucciones.
AVISO: Si no lee, comprende perfectamente y sigue todas
las instrucciones, podría causar daños graves daños
personales y materiales o anular la garantía de fábrica. El
instalador es el responsable de asegurarse de que todos los
componentes están correctamente montados e instalados
siguiendo las instrucciones indicadas.
2
ADVERTÊNCIA: Se não ler, compreender completamente e
seguir todas as instruções podem ocorrer graves lesões
pessoais, danos no equipamento e a garantia de fábrica
pode ser anulada! É da responsabilidade do instalador
certificar-se de que todos os componentes são
correctamente montados e instalados de acordo com as
instruções fornecidas.
AVVERTENZE e PRECAUZIONI
IMPORTANTI!
AVVERTENZA: Un'AVVERTENZA mette in guardia in merito
alla possibilità di gravi infortuni, anche letali, qualora non si
osservino le istruzioni.
ATTENZIONE: Un'ATTENZIONE indica la possibilità di gravi
danni all'attrezzatura qualora non ci si attiene alle istruzioni al
riguardo.
Installation Instructions
AVVERTENZA: La mancata comprensione e ottemperanza
alle istruzioni fornite può provocare gravi lesioni personali,
danni all'apparecchiatura o annullare la garanzia fornita dal
produttore. Spetta all'installatore verificare che tutti i
componenti siano assemblati correttamente e installati
secondo le istruzioni fornite.
BELANGRIJKE AANWIJZINGEN en
WAARSCHUWINGEN!
WAARSCHUWING: Een WAARSCHUWING vestigt uw
aandacht op de mogelijkheid van ernstig of dodelijk letsel als
u de instructies niet opvolgt.
VOORZICHTIG: De aanwijzing VOORZICHTIG vestigt uw
aandacht op de mogelijkheid van beschadiging of
onherstelbare beschadiging van de apparatuur als u de
betreffende instructies niet opvolgt.
WAARSCHUWING: Door niet alle instructies te lezen,
volledig te begrijpen en op te volgen, riskeert u ernstig
persoonlijk letsel, beschadiging van de apparatuur en het
vervallen van de fabrieksgarantie. Degene die het product
PL2
installeert is ervoor verantwoordelijk dat alle onderdelen aan
de hand van de meegeleverde handleiding op de juiste wijze
worden samengebouwd en gemonteerd.
IMPORTANTS AVERTISSEMENTS et
PRÉCAUTIONS!
ADVERTISSEMENT: Un ADVERTISSEMENT vous met en
garde contre les possibilités de blessures graves ou de
danger de mort si vous ne suivez pas les instructions.
PRÉCAUTION: Une PRÉCAUTION vous met en garde
contre les possibilités d´endommagements et de destruction
de l´équipement si vous ne suivez pas les instructions
correspondantes.
ADVERTISSEMENT: Le manque de la lecture, de la
compréhension et du respect total de toutes les instructions,
peut entraîner des blessures corporelles graves,
endommager l'équipement ou annuler la garantie d'usine. Il
incombe à l'installateur de s'assurer que tous les composants
sont correctement assemblés et installés à l'aide des
instructions fournies.
DIMENSIONS
3
PL2
Installation Instructions
LEGEND
Tighten Fastener
Optional
Apretar elemento de fijación
Opcional
Befestigungsteil festziehen
Optional
Apertar fixador
Opcional
Serrare il fissaggio
Opzionale
Bevestiging vastdraaien
Optie
Serrez les fixations
En option
Phillips Screwdriver
Lock
Destornillador Phillips
Fijar
Kreuzschlitzschraubendreher
Sichern
Chave de fendas Phillips
Fixar
Cacciavite a stella
Bloccare
Kruiskopschroevendraaier
Vergrendelen
Tournevis à pointe cruciforme
Verrouiller
By Hand
Remove
A mano
Quitar
Von Hand
Entfernen
Com a mão
Remover
A mano
Rimuovere
Met de hand
Verwijderen
À la main
Retirez
TOOLS REQUIRED FOR INSTALLATION
#2
PARTS
A (1)
C (2)
4
D (2)
M3
B (1)
E (2)
#8 (4mm)
F (2)
Installation Instructions
PL2
INSTALLATION
WARNING: Use of screws that are too long may result in
SECURITY COVERS FOR INTERFACE
damage to internal components of projector, and use of
screws that are too short may allow projector to fall. Failure
to use screws of proper length may result in serious personal
injury or damage to equipment!
WARNING: Failure to adequately support projector may
allow projector to fall, resulting in serious personal injury or
damage to equipment! Place projector and interface on
secure surface or take other actions to ensure projector does
not fall during installation of security covers!
1.
Remove projector and interface from RPA mount and place
on secure surface.
NOTE: If desired, entire projector mount assembly may be
removed by disconnecting at top or bottom of extension
column.
4.
Install security cover (C), washer (E, if required), washer (D,
if required), and screw. (See Figure 1)
NOTE: Screw hole in cover (C) is off center and may be rotated
as required to provide adequate clearance to interface.
IMPORTANT ! : If using washers (D and/or E) then longer
screw may be necessary. Screw MUST engage threaded hole
in projector a distance equal to or greater than the diameter of
the screw (See Figure 2)! Longer screw(s) not included.
NOTE: Projector, interface, RPA mount, and extension column
not included.
2.
Remove one screw attaching interface to projector (See
Figure 1).
2
4
> "X"
D
0.38" (9.7mm)
E
"X"
C
5
0.25" (6.4mm)
Figure 2
5.
Install padlock through holes in cover (C) (See Figure 1).
NOTE: Padlock not included.
6.
If desired, repeat steps 2-5 for second cover (C).
7.
Reinstall projector and interface to RPA mount. See
instructions included with interface.
NOTE: If projector mount assembly was disconnected at top or
bottom of extension column, then accomplish the
following:
Figure 1
3.
•
Reinstall projector mount assembly as required.
See instructions included with mount and/or
extension column.
•
Verify and/or adjust projector image as required.
See instructions included with projector.
Determine washer requirements using following table:
IF diameter of screw removed in
step 2 is:
THEN use washer(s):
M3 or smaller
D and E
M4
E
M5 or larger
No washer required
5
PL2
Installation Instructions
SECURITY ENCLOSURE FOR MOUNT
NOTE: Projector not shown in Figures 3-6 for clarity.
1.
If cables exit extension column below RPA mount, then
route cables to left side of mount as shown (See Figure 3).
4.
Slide enclosure (B) partially into enclosure (A) (See Figure
4).
5.
Lift cables into opening in enclosure (B), then slide
enclosure (B) fully into enclosure (A) (See Figure 5).
A
2
B
A
5
Figure 5
6.
Insert key (F) into lock in enclosure (A) (See Figure 6).
Rotate 1/4 turn to secure enclosure (A) to enclosure (B).
NOTE: If key (F) will not rotate, ensure key (F) is fully inserted
into lock, and that locking slots in enclosures (A, B) are
aligned.
1
Figure 3
2.
3.
Align thumb nut slots in enclosure (A) with thumb nuts on
interface (See Figure 3). Lower enclosure (A) into place.
Ensure open end of enclosure (A) faces toward cables (if
applicable).
A
Slide enclosure (A) towards center of mount and lock into
position beneath interface thumb nuts (See Figure 4).
3
F
6
A
Figure 6
B
4
Figure 4
6
Installation Instructions
PL2
7
PL2
Installation Instructions
USA/International
Europe
Asia Pacific
8807-000052
2006 Chief Manufacturing
www.chiefmfg.com
07/06
A
P
F
A
P
F
A
8401 Eagle Creek Parkway, Savage, MN 55378
800.582.6480 / 952.894.6280
877.894.6918 / 952.894.6918
Fellenoord 130 5611 ZB EINDHOVEN, The Netherlands
31 (0)40 2668620
31 (0)40 2668615
Room 30I, Block D, Lily YinDu International Building
LuoGang, BuJi Town, Shenzhen, CHINA. Post Code: 518112
P +86-755-8996 9226 ; 8996 9236 ; 8996 9220
F +86-755-8996 9217