1
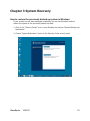
ViewSonic
®
ViewBook Pro
- User Guide
- Guide de l’utilisateur
- Bedienungsanleitung
- Guía del usuario
- Pyководство пользователя
- Οδηγός χρηστών
- 사용자 안내서
- 使用手冊(繁中)
Model No. : VS13060
Compliance Information
CE Conformity for European Countries
The device complies with the EMC Directive 2004/108/EC and Low
Voltage Directive 2006/95/EC.
Following information is only for EU-member states:
The mark shown to the right is in compliance with the Waste Electrical
and Electronic Equipment Directive 2002/96/EC (WEEE).
The mark indicates the requirement NOT to dispose the equipment as
unsorted municipal waste, but use the return and collection systems
according to local law.
If the batteries, accumulators and button cells included with this
equipment, display the chemical symbol Hg, Cd, or Pb, then it means
that the battery has a heavy metal content of more than 0.0005%
Mercury, or more than 0.002% Cadmium, or more than 0.004% Lead.
R&TTE Compliance Statement This wireless module device complies with the Essential Requirements of the
R&TTE Directive of the European Union (1999/5/EC). This equipment meets
the following conformance standards:
ETSI EN 300 328
EN 301 489-01
EN 301 489-17
Notified Countries: Germany, UK, Netherlands, Belgium, Sweden, Denmark,
Finland, France, Italy, Spain, Austria, Ireland, Portugal, Greece, Luxembourg,
Estonia, Latvia, Lithuania, Czech Republic, Slovakia, Slovenia, Hungary,
Poland and Malta.
ViewSonic
VNB131
Important Safety Instructions
1.
DO NOT press or touch the LCD Screen. DO NOT place the notebook PC
with small items, they may scratch LCD Screen or enter the notebook PC.
2.
DO NOT expose the notebook PC to dirty or dusty environments. Keep
the environment clean and dry.
3.
DO NOT place the notebook PC on uneven or unstable work surface.
4.
DO NOT place or drop objects on the top of the notebook PC. DO NOT
shove any foreign objects into the notebook PC. DO NOT cover the LCD
Screen strongly.
5.
DO NOT expose the notebook PC to strong magnetic or electrical fields;
DO NOT place the floppy disk near or on the notebook PC, that may
cause a loss of data on the floppy disk.
6.
DO NOT leave the notebook PC facing the sun as it can damage the LCD
Screen, especially when in the car.
7.
SAFE TEMPERATURE: This notebook PC should only be used in
environments with ambient temperatures between 5°C (41°F) and
35°C(95°F).
8.
DO NOT expose the notebook PC to or use near liquids, rain, or moisture.
9.
Caution: risk of explosion if battery is replaced by an incorrect type.
Dispose of used batteries according to the instructions.
10. DO NOT throw the notebook PC in municipal waste. Check local
regulations for disposal of electronic products. Please recycle the Battery
Pack, and check with your Local Authority or retailer for recycling advice.
11. The notebook PC and the Adapter may produce some heat during
operation or charging. DO NOT leave the notebook PC on your lap or
any part of your body in order to prevent discomfort or injury from heat
exposure.
12. INPUT RATING: Refer to the rating label on the notebook PC and be sure
that the Power Adapter complies with the rating. Only use accessories
specified by the manufacturer.
13. Check the connections between the main unit and attachments before
turning on the notebook PC.
14. DO NOT use the notebook PC while eating food, avoid dirtying the
notebook PC.
ViewSonic
VNB131
ii
15. DO NOT insert anything into the notebook PC that may result in short
circuit or damage the circuit.
16. Power off the notebook PC, if you want to install or remove some external
devices, which do not support hot-plug.
17. Disconnect the notebook PC from the electrical outlet and remove any
installed batteries before cleaning the notebook PC. Keep the notebook
PC and its accessories away from children.
18. DO NOT disassemble the notebook PC, only a certified service technician
should perform repairs on your computer.
19. Only use Battery Packs approved by the manufacturer or else damage
may occur.
20. The notebook PC has apertures to disperse heat. DO NOT place the
notebook PC on soft objects (e.g.: bed, sofa, your lap), or else the
notebook PC may become hot and the system may halt.
ViewSonic
VNB131
iii
Declaration of RoHS Compliance
This product has been designed and manufactured in compliance with Directive
2002/95/EC of the European Parliament and the Council on restriction of the
use of certain hazardous substances in electrical and electronic equipment
(RoHS Directive) and is deemed to comply with the maximum concentration
values issued by the European Technical Adaptation Committee (TAC) as
shown below:
Substance
Proposed Maximum
Concentration
Actual
Concentration
Lead (Pb)
0,1%
< 0,1%
Mercury (Hg)
0,1%
< 0,1%
Cadmium (Cd)
0,01%
< 0,01%
Hexavalent Chromium (Cr6+)
0,1%
< 0,1%
Polybrominated biphenyls (PBB)
0,1%
< 0,1%
Polybrominated diphenyl ethers (PBDE)
0,1%
< 0,1%
Certain components of products as stated above are exempted under the
Annex of the RoHS Directives as noted below:
Examples of exempted components are:
1.Mercury in compact fluorescent lamps not exceeding 5 mg per lamp and in
other lamps not specifically mentioned in the Annex of RoHS Directive.
2.Lead in glass of cathode ray tubes, electronic components, fluorescent tubes,
and electronic ceramic parts (e.g. piezoelectronic devices).
3.Lead in high temperature type solders (i.e. lead-based alloys containing 85%
by weight or more lead).
4.Lead as an allotting element in steel containing up to 0.35% lead by weight,
aluminium containing up to 0.4% lead by weight and as a cooper alloy
containing up to 4% lead by weight.
ViewSonic
VNB131
iv
Copyright Information
Copyright © ViewSonic® Corporation, 2010. All rights reserved.
Microsoft®, Windows®, Windows NT®, and the Windows® logo are registered
trademarks of Microsoft® Corporation in the United States and other countries.
ViewSonic®, the three birds logo, OnView®, ViewMatch™, and ViewMeter® are
registered trademarks of ViewSonic® Corporation.
Intel®, Pentium®, and Atom™ are registered trademarks of Intel Corporation.
Disclaimer: ViewSonic® Corporation shall not be liable for technical or editorial
errors or omissions contained herein; nor for incidental or consequential
damages resulting from furnishing this material, or the performance or use of
this product.
In the interest of continuing product improvement, ViewSonic® Corporation
reserves the right to change product specifications without notice. Information in
this document may change without notice.
No part of this document may be copied, reproduced, or transmitted by any
means, for any purpose without prior written permission from ViewSonic®
Corporation.
Product Registration
To meet your future needs, and to receive any additional product information as
it becomes available, please register your product on the Internet at:
www.viewsonic.com. The ViewSonic® Wizard CD-ROM also provides an
opportunity for you to print the registration form, which you may mail or fax to
ViewSonic®.
For Your Records
Product Name:
Model Number:
Document Number:
Serial Number:
Purchase Date:
VNB131
ViewSonic NoteBook
VS13060
VNB131-1_UG_ENG Rev. 1C 03-10-10
Product disposal at end of product life
ViewSonic® is concerned about the preservation of our environment. Please
dispose of this product properly at the end of its useful life. For the recycling
information, please refer to our website:
1. USA: www.viewsonic.com/company/green/recycle-program/
2. Europe: www.viewsoniceurope.com/uk/support/recycling-information/
3. Taiwan: recycle.epa.gov.tw
ViewSonic
VNB131
Table of Contents
Chapter 1 Introduction.......................................................................... 1
1.1
1.2
1.3
1.4
Package Checklist.................................................................................................1
Specifications.......................................................................................................2
Knowing the Parts................................................................................................3
Top view..........................................................................................................3
Base view.........................................................................................................5
Left view..........................................................................................................7
Right view........................................................................................................7
Notebook usage...................................................................................................8
Battery usage...................................................................................................8
Installing the battery.........................................................................................8
Removing the battery........................................................................................9
Connecting to the AC power supply....................................................................9
Startup..........................................................................................................10
Shutdown.......................................................................................................10
Indicators.......................................................................................................11
Touchpad.......................................................................................................12
Touchpad basics.............................................................................................12
Multi-Finger Touchpad.....................................................................................13
Using the keyboard.........................................................................................15
Lock keys and embedded numeric keypad........................................................15
Windows keys.................................................................................................16
Hotkeys..........................................................................................................16
Chapter 2 BIOS Setup Utility................................................................17
2.1
2.2
2.3
2.4
2.5
When to Use BIOS Setup....................................................................................17
How to Run BIOS Setup......................................................................................17
Control Keys.......................................................................................................17
Boot Device Priority............................................................................................18
BIOS Menu........................................................................................................18
2.5.1 Main Menu . ..........................................................................................18
2.5.2 Advanced Settings..................................................................................19
2.5.3 Security Settings....................................................................................19
2.5.4 Boot Settings.........................................................................................20
2.5.5 Exit Settings...........................................................................................21
Chapter 3 System Recovery.................................................................22
How to restore the previously backed up system in Windows......................................22
Restore the backed up system under DOS mode........................................................25
Rescue the data under DOS mode.............................................................................28
Troubleshooting...................................................................................31
ViewSonic
VNB131
Chapter 1 Introduction
1.1 Package Checklist
Thank you for choosing ViewSonic ViewBook Pro.
Please check if the packaging or any of the below listed accessories are damaged or
missing, in which case please contact with ViewSonic local representative office.
•
•
•
•
•
•
ViewBook Pro notebook computer
Power Cord
Power Adapter
Quick Start Guide
ViewSonic User Guide CD Wizard
System Recovery Disc or Driver disc (recovery disc comes with models bundled with
an operating system only)
• Lithium-lon Battery
• Screen Wiping Cloth
* The items listed above are for reference only, and are subject to change without notice. * Depending on the model you purchased, the actual appearance of your notebook may vary from that
shown in this manual. ViewSonic
VNB131
1.2 Specifications
CPU
- INTEL® CoreTM 2 Duo Processor ULV SU7300
Chipset
- Intel® GS45/40+ICH9M
LCD Screen
- 34cm/13.3” WXGA color TFT-LCD with LED Backlight
- Resolution: 1280*800 pixels
Power Management
- ACPI V3.0
- S0, S3, S4, S5 support
System Memory
- DDR2 667/800MHz (Single Channel)
- DDR2 SO-DIMM slot supports up to 2GB (one slot)
Mass Storage
- Support SATA HDD
- 6.35cm/2.5” 9.5mm HDD
User Interface
- 7 in 1 Card Reader (supports MS/MS Pro/MS Duo/SD/miniSD/
MMC/RSMMC)
Note: MS Duo, miniSD, RSMMC, MS Pro require an adapter
- 2 x 4-pin USB2.0 Ports
- 1 x VGA Port
- 1 x HDMI Port
- 1 x CD-ROM/Second battery/Module (Optional)
- 1 x Express card Slot
- 1 x MIC
- 1 x Line Out
- 1 x RJ45 Port
- 1 x DC-In Port
Audio
- Azalia Codec supports 2.1 channel output
- Built-in audio connector and mic connector
Digital Camera
- Build-in 1.3 megapixels camera
Ethernet LAN
- 10/100Mbps Fast Ethernet Support
Wireless LAN
- Mini PCI-E interface, supports 802.11b/g/n
Bluetooth
- Bluetooth™ v2.1+EDR
Battery
- 6 cells Li-Ion battery pack, 10.8V/47.52Wh, supports an
additional 3-cell Li Ion Battery Pack (Optional)
Dimensions
- 322 x 239 x 17~25 mm
- 12.68 x 9.41 x 0.67~1 inch
Weight
- Less than 1.5 kg/3.30 lbs (including 3 cell Li-Ion battery pack)
ViewSonic
VNB131
1.3 Knowing the Parts
After having checked the package and installed your ViewBook Pro, let’s get familiar
with its parts.
Top view
1
1
2
3
4
5
9
8
ViewSonic
6
1
VNB131
7
NO.
Item
1
Built-in Camera
2
Display screen
3
4
5
6
7
Description
The built-in camera allows you to snap a photo or create a video chat or
video conference with just a click.
Also called Liquid-Crystal Display (LCD), displays computer output.
Pressing power button turns your notebook on and off. Pressing the antiPower and
theft lock button activates the ViewSensor; if anyone attempts moving your
hard disk
ViewBook Pro, the notebook will sound an alarm; to unlock your notebook
locking button or deactivate the alarm you must input your password or use the fingerprint
scanner.
Keyboard
Touchpad
Fingerprint sensor
Click buttons (left
and right)
8
Status indicators
9
Palmrest
ViewSonic
A full-size keyboard with dedicated Windows® keys.
Touch-sensitive pointing device which functions like a computer mouse.
Collects and recognizes fingerprint information. (Optional)
The left and right buttons function like the left and right mouse buttons.
Light-Emitting Diodes (LEDs) that light up to show the status of the
computer’s functions and components.
Comfortable support area for your hands when you use the computer.
VNB131
Base view
ViewSonic
VNB131
NO.
Item
1
Battery Pack
2
Battery Lock Manual
3
Fan Outlets
4
Speakers
5
CD-ROM locking
knob
6
Battery Lock Spring
ViewSonic
Description
The battery pack is automatically charged when your ViewBook Pro is
connected to an AC power source. It maintains power to your ViewBook Pro
when AC power is not connected. This allows for use of ViewBook Pro when
AC power outlet is not available. Battery time varies with the way you use
your ViewBook Pro. The battery pack cannot be disassembled and must be
purchased as a single unit.
The manual battery lock is used to keep the battery pack secured. Move the
manual lock to the unlocked position to insert or remove the battery pack.
Move the manual lock to the locked position after inserting the battery pack.
These are vents for the fan to dissipate heat from the computer’s internal
components. Do not block or place the computer in such a position that you
inadvertently allow the outlets to become blocked.
Left and right speakers deliver stereo audio output.
Place your ViewBook Pro up side down, use a flat tool like a screwdriver or a
coin to whirl the knob clockwise, the knob will unlock the bay. Now you can
pull out the Super Multi Drive and install the Secondary Battery Pack or an
expansion module.
The spring battery lock keeps the battery pack secured. When the battery pack
is inserted, the spring battery lock will automatically lock. When removing the
battery pack, this spring lock must be retained in the unlocked position.
VNB131
Left view
NO.
Item
Description
1
DC-in jack
Connects an AC adapter to ViewBook Pro.
2
Ethernet (RJ-45) port Connects to an Ethernet 10/100-based network.
3
Fan Outlets
4
VGA port
Connects to a display device. (e.g., external monitor, LCD projector).
5
HDMI port
Connects to multimedia devices of HDMI protocol.
6
PCI Express slot
7
Memory Card
Reader
Here PCI Express expansion cards can be inserted.
The memory card reader offers the fastest and most convenient method to
transfer pictures, music and data between your netbook and devices using
flash memory cards such as digital cameras, MP3 players, mobile phones,
and PDAs. (Optional).
These are vents for the fan to dissipate heat from the computer’s internal
components. Do not block or place the computer in such a position that you
inadvertently allow the outlets to become blocked.
Right view
NO.
Item
1
Tray release
2
3
4
5
Open- tray button
Super Multi Drive
USB 2.0 ports
Microphone-in jack
Headphones / speaker /
line-out jack
6
ViewSonic
VNB131
Description
Use a sharp tool like a paper clip to push the button inside the tray
release hole to open Super Multi Drive tray when ViewBook Pro cannot be turned on due to unavailability of electricity or in case a Super
Multi Drive is not responding for a long time to pressing the opentray button.
Press this button to open the Super Multi Drive tray.
Plays and records CD or DVD discs. (Optional).
Connects to USB 2.0 devices. (e.g., USB mouse, USB camera).
Accepts input from external microphones.
Connects to audio line-out devices. (e.g., speakers, headphones).
1.4 Notebook usage
Battery usage
ViewBook Pro has two sources of power supply – the battery and the power adapter.
Before turning on your ViewBook Pro, please install the battery or connect the power
adapter.
Installing the battery
1. Turn ViewBook Pro up side down and place it on a flat surface;
2.Gently push the battery lock into unlocked position;
3. Slide the battery into its slot. When doing so make sure the battery goes exactly
along its slides. The battery should be able to get on its place smoothly, don’t force
it into its position if you have difficulties installing it, or you may damage your ViewBook Pro or the battery.
4.Having pushed the battery to the end you will hear a click sound. Then push the
battery lockers into the locked position.
When using your ViewBook Pro for the first time, we suggest connecting the power adapter
and allowing for the battery to charge for at least 8 hours. Please note that the battery will
reach its best condition only after several charge/discharge cycles.
The battery charging normally starts once the battery charge drops below 98%. First the
master battery is charged. Once it is full, the secondary (optional) battery is charged. The
discharge process is opposite – the secondary battery is used first and once it is empty the
master battery takes over.
ViewSonic
VNB131
Removing the battery
1. Shut down your ViewBook Pro and disconnect external devices and the power
adapter;
2.Turn ViewBook Pro up side down and place it on a flat surface;
3.Push the battery locks into the unlocked position.
4.Pulling the spring battery lock into the unlock position, remove the battery.
5.The battery should be able to get out of its placement smoothly, don’t force it out of
its position if you have difficulties removing it, or you may damage your ViewBook
Pro or the battery.
Please don’t remove the battery when your netbook is undergoing POST (at startup), or it may
destroy the data on your HDD or cause other problems.
Connecting to the AC power supply
1. Connect the power cord to the power adapter;
2.Connect the power cord to the AC power outlet;
3.Push the DC power connector of the power adapter into the power jack in your
ViewBook Pro.
ViewBook Pro is supplied with DC power of +19V @ 65W and the power adapter can accept
AC 110~240V, 50~60HZ outputting +19V, 3.42A.
ViewSonic
VNB131
Startup
1. Open the lid of your ViewBook Pro.
Please don’t force the lid to open beyond its extreme position, or it may damage the lid hinge.
Please don’t carry the open ViewBook Pro by holding it by its lid.
2. Press power button to start.
1
Shutdown
1. When using Microsoft Windows, click on “Shutdown” item in “Start” menu to shut
down the operating system.
2.You can also short-press the Power button to shutdown your ViewBook Pro.
3.If your OS is not responding, so you cannot shutdown or restart your computer the
normal way, do the long-press on the Power button for about 6 seconds until your
ViewBook Pro turns off (cold power off). Please note that this should be used only
when your OS is not responding and there is no other way to shutdown or restart,
as doing the cold power off may result in a data loss.
ViewSonic
VNB131
10
Indicators
ViewBook Pro has several easy-to-read status indicators.
Icon
Function
Power and hard
disk locking
1
Description
When the system is turned on, the white LED on the Power button glows
continuously.
When ViewBook Pro is off, the white LED on the Power button is off.
White LED hint: Press the hard disk locking button to lock your ViewBook
Pro, the white LED on the Power button will start pulsating. If you move your
ViewBook Pro from its place while it is in the locked mode, a loud alarm will
sound and it will go on until you scan your fingerprint or log into Windows with
your the password.
HDD
A blinking HDD LED suggests an HDD activity (data is being read or written).
Wireless LAN
Indicates the status of wireless LAN communication.
Num Lock
Lights up when Num Lock is activated.
DC-IN
When the battery is charging, the DC socket LED is fading in and out in
green color; once the battery has been charged, the DC socket LED glows
continuously in green color. When ViewBook Pro is in Sleep mode the DC socket
LED would be pulsating in white color.
Caps Lock
Once Caps Lock is on, the LED on the Caps Lock button would be glowing.
ViewSonic
VNB131
11
Touchpad
The built-in touchpad is a pointing device that senses movement on its surface. The
cursor responds as you move your finger across the surface of the touchpad.
Touchpad basics
The following items show you how to use the touchpad:
• Move your finger across the touchpad (1) to move the cursor on the display (2).
• Move your finger up or down across the right edge of the touchpad (5) to scroll.
• Press the left (3) and right (4) buttons located beneath the touchpad to perform
selection and execution functions. These two buttons are similar to the left and right
buttons of a mouse. Tapping on the touchpad is the same as clicking the left button.
Function
Left button (3)
Execute
Quickly click twice.
Select
Click once.
Drag
Click and hold, then use
finger on the touchpad
to drag the cursor.
Access context menu
Right button (4)
Main touchpad (1)
Tap twice (at the same speed as double
clicking a mouse button).
Tap once.
Tap twice (at the same speed as double
clicking a mouse button), rest your
finger on the touchpad on the second
tap and drag the cursor.
Click once.
When using the touchpad, keep it — and your fingers — dry and clean. The touchpad is
sensitive to finger movement, hence, the lighter the touch, the better the response. Tapping
harder will not increase the touchpad’s responsiveness.
ViewSonic
VNB131
12
Multi-Finger Touchpad
Start the whole new experience
Scroll
ViewSonic
VNB131
13
ViewSonic
Zoom
Rotate
Flick
Press
VNB131
14
Using the keyboard
The keyboard has full-sized keys and an embedded numeric keypad, separate cursors,
lock keys, Windows key, Application key, function and special keys.
Lock keys and embedded numeric keypad
The keyboard has three lock keys which you can toggle on and off.
Lock key
Caps Lock
Num Lock
<Fn>+<Ins Numlk>
Scroll Lock
<Fn>+<Del ScrLK>
Description
When Caps Lock is on, all alphabetic characters typed appear in uppercase.
When Num Lock is on, the embedded numeric keypad is activated. Use this
mode when you need to do a lot of numeric data entry. A better solution
would be to connect an external keypad.
When Scroll Lock is on, the screen moves one line up or down when you
press the up or down arrow keys respectively. Scroll Lock does not work
with some applications.
The embedded numeric keypad functions like a desktop PC standard keyboard’s
numeric keypad. The numbers are indicated by small numeric characters located on the
upper right corner of the keycaps. To simplify the keyboard legend, cursor-control key
symbols are not printed on the keys.
Desired access
Num Lock on
Num Lock off
Number keys on embedded keypad Type numbers in a normal manner.
Hold <Fn> while typing letters on Type the letters in a normal
Main keyboard keys
embedded keypad.
manner.
ViewSonic
VNB131
15
Windows keys
The keyboard has two keys that perform Windows-specific functions.
Key
Windows key
Description
Pressed alone, this key has the same effect as clicking on the Windows Start button,
it launches the Start menu. It can also be used with other keys to provide a variety of
functions:
< >:Open or close the Start menu
< >+<D>:Display the desktop
<
>+<E>:Open Windows Explorer
<
>+<L>:Lock your computer or switch users <
<
>+<F>:Search for a file or folder
>+<R>:Open the Run dialog box
Application key This key has the same effect as clicking the right mouse button: it opens the
application’s context menu.
Hotkeys
The computer employs hotkeys or key combinations to access most of the computer’s
controls like screen brightness, sound volume, etc.
To use a hotkey, press and hold the <Fn> key before pressing the other key in the
hotkey combination.
Hotkey
<Fn>+<ESC>
<Fn>+<F1>
<Fn>+<F3>
<Fn>+<F4>
<Fn>+<F5>
<Fn>+<F6>
<Fn>+<F7>
Function
Sleep
Wireless LAN
Touchpad
LCD screen
Brightness down
Brightness up
Display toggle
<Fn>+<F8> Speaker toggle
<Fn>+<F9> Volume up
<Fn>+<F10> Volume down
ViewSonic
VNB131
Description
Puts ViewBook Pro in Sleep mode.
Enables or disables the wireless network connection.
Turns the touchpad on and off.
Turns the LCD screen on and off.
Decreases the screen brightness.
Increases the screen brightness.
Switches display output between the display screen, external
monitor or projector (if connected), or sets ViewBook Pro to output
the signal to both the display screen and the external display/
projector.
Turns the speakers on and off.
Increases the sound volume.
Decreases the sound volume.
16
Chapter 2 BIOS Setup Utility
2.1 When to Use BIOS Setup?
You may need to run the BIOS Setup when:
An error message appears on the screen during the system boot and you are requested
to run SETUP.
You want to change the default settings for customized features.
You want to reload the default BIOS settings.
2.2 How to Run BIOS Setup?
To run the BIOS Setup Utility, turn on your ViewBook Pro and press the <F2> key
during the POST procedure.
If the message disappears before you respond and you still wish to enter Setup,
either restart the system by turning it OFF and ON, or try to restart by simultaneously
pressing <Ctrl>+<Alt>+<Delete> keys.
Be noted that the screen snaps and setting options in this chapter are for your references only.
The actual setting screens and options on your ViewBook Pro may be different because of
BIOS updates.
2.3 Control Keys
Press F1 to call a small help window that describes the appropriate keys to use and the
possible selections for a highlighted item.
Please check the following table for the function description of each control key.
Control Key(s)
←/→
↑/↓
+/ <Enter>
<ESC>
<F1>
<F9>
<F10>
<PGDN>
<HOME>
<PGUP>
<END>
ViewSonic
Function Description
Moves cursor left or right to select Screens
Moves cursor up or down to select items
Changes an option for the selected items
Brings up the selected screen
When in the Main Menu - Quits and not saves the changes your have made
into CMOS
When in the Status Page Setup Menu or the Option Page Setup Menu – Exits
the current page and returns to the Main Menu
Calls the general help
Loads the Optimal Default settings
Saves the configuration changes and exits setup
Goes to a next page
Goes to the top of the screen
Goes to the previous page
Goes to the bottom of the screen
VNB131
17
2.4 Boot Device Priority
After you press the Power button of your
ViewBook Pro to turn it on, you will see the
following inscription:
Press F2 for system Utilities Press F10 for Boot Menu
Press “F10” key and ViewBook Pro will show
you the boot options.
Boot Menu
1.SATA CD:TSST CORP CDRW/DVD
3.SATA HDD:WDC WD2500BEVT-22ZCT0-(PM)
<Enter Setup>
The menu will be different depending on the storage devices installed or connected.
2.5 BIOS Menu
You can set up your ViewBook Pro’s BIOS according to your needs using the BIOS
setup utility.
2.5.1Main Menu
Phoenix SecureCore(tm) Setup Utility
Main
Advanced
System Time
System Date
Security
Boot
Exit
[08:45:04]
[08/06/2009]
► SATA Port 1 [WDC WD2500BEVT-22ZCTO-(PM)]
SATA Port 2
[None]
CPU Type:
System Menory:
Extended Memory:
Intel(R) Celeron(R) M CPU [email protected]
640KB
1024MB
PCB Version:
EC Version:
BIOS Version:
B
GS45AFGA[2009.06.18]
GS45A01K[2009.06.29]
F1 Help ↑↓ Select Item
-/+ Change Values
F9 Setup Defaults
Esc Exit ←→ Select Menu
Enter Select ► Sub-Menu F10 Save and Exit
• System time
This item sets the time you specify (usually the current time) in the format of [Hour],
[Minute] and [Second].
• System date
This item sets the date you specify (usually the current date) in the format of [Month],
[Date], and [Year].
• System Memory
Displays the auto-detected system memory.
ViewSonic
VNB131
18
2.5.2Advanced Settings
Phoenix SecureCore(tm) Setup Utility
Main
Advanced
Summary screen:
Boot-time Diagnostic Screen:
SATA Mode Selection:
Security
Boot
Exit
Item Specific Help
[Disable]
[Disbale]
[IDE]
Dispaly system configuration
on boot
F1 Help ↑↓ Select Item
-/+ Change Values
F9 Setup Defaults
Esc Exit ←→ Select Menu
Enter Select ► Sub-Menu F10 Save and Exit
• Summary Screen
Sets if the system configuration should be displayed during boot.
• Boot-time Diagnostic Screen
Sets if the diagnostic screen should be displayed during boot.
• SATA Mode Selection
Determines how SATA controller(s) operate.
2.5.3Security Settings
Phoenix SecureCore(tm) Setup Utility
Main
Advanced
Security
Set Supervisor Password : [Disable]
Password on boot:
[Disbale]
Set Harddisk Password
[Enter]
Boot
Exit
Item Specific Help
Supervisor Password controls
access to the setup utility
F1 Help ↑↓ Select Item
-/+ Change Values
F9 Setup Defaults
Esc Exit ←→ Select Menu
Enter Select ► Sub-Menu F10 Save and Exit
• Set Supervisor Password
Supervisor Password controls access to the setup utility.
• Password on boot
Enables password entry on boot.
• Set Harddisk Password
Harddisk Password controls access to the Harddisk and the setup utility.
ViewSonic
VNB131
19
2.5.4 Boot Settings
Phoenix SecureCore(tm) Setup Utility
Main
Advanced
Security
Boot
Boot priority Order:
1: SATA CD:
2: USB CDROM:
3: SATA HDD: WDC WD2500BEVT-22ZCTO-(PM)
4: USB KEY
5: USB FDC:
6: USB ZIP:
7: USB HDD:
8: Excluded from boot order:
: USB LS120:
: PCI SCSI:
: PCI BEV:
: Other USB:
: PCI:
: Legacy Network Card
: Legacy Network Card
: Legacy
: 1394 CDROM:
Exit
Item Specific Help
UP and Down arrows select a
device <+> and <-> moves the
device up or down <x> exclude
or include the device to boot.
F1 Help ↑↓ Select Item
-/+ Change Values
F9 Setup Defaults
Esc Exit ←→ Select Menu
Enter Select ► Sub-Menu F10 Save and Exit
• Boot Priority Order
Use UP and Down arrows to select devices. Use <+> and <-> keys to move devices
up or down in the boot priority list.
• Excluded from boot order
Press <x> to exclude or include the device from the boot list. Use the UP and Down
arrows to select a device and the <+> and <-> keys to move the device up or
down.
ViewSonic
VNB131
20
2.5.5 Exit Settings
Phoenix SecureCore(tm) Setup Utility
Main
Advanced
Exit Saving Changes
Exit Discarding Changes
Load Setup Defaults
Discard Changes
Save Changes
Security
Boot
Exit
Item Specific Help
Exit System Setup and save
your changes to CMOS
F1 Help ↑↓ Select Item
-/+ Change Values
F9 Setup Defaults
Esc Exit ←→ Select Menu
Enter Select ► Sub-Menu F10 Save and Exit
• Exit Saving Changes : Saves the changes you have made and exits the utility.
• Exit Discard Changes : Exits the utility without saving the changes you have
made.
• Load Setup Defaults : Loads the default values for all setup items.
• Discard Changes : Abandons your changes and reloads the previous configuration
as it was before running the setup utility.
• Save Changes : Saves Setup Data to CMOS.
ViewSonic
VNB131
21
Chapter 3 System Recovery
How to restore the previously backed up system in Windows
If your system has not been damaged completely, you can use Windows mode to
restore the system to the previously backed up state.
1. Click on the “Security Center” icon on your Desktop and choose “System Backup and
Restoration”.
2. Choose “System Restoration” option in the Security Center control panel.
ViewSonic
VNB131
22
3. Click “System Restoration” button, you will see the restore points. Please choose any
of restore points which you want your system to be restored to; then click the “Next”
button.
4. As the restore point was created for the C: disk partition, there is a need to reboot
to complete the restore process. Click the “Next” button and the OS will auto reboot.
ViewSonic
VNB131
23
5. ViewBook Pro will auto restore the system after reboot, Windows will need few
minutes to complete this task.
After the system restore is complete, Windows will display the following window. Please
click the “Restart” button to finish.
ViewSonic
VNB131
24
Restore the backed up system under DOS mode
1. Press the F9 key during boot to enter the Security Center.
2. Press the F9 key to enter into security center interface if you want to restore your
system.
3. After pressing the F9 key, you will see the System Restoration and Rescue Data
options.
ViewSonic
VNB131
25
4. Click “System Restoration” and then click “Start Rescue” button.
5. Choose one of restore points to restore your OS and click “Start Rescue” button.
All files on drive C: and settings will be deleted. System recovery will format the hard disk and
restore the system to its default state.
ViewSonic
VNB131
26
6. An alert will pop up after clicking the “Start Rescue” button, please click “Ok”.
7. After the restore process is complete you will see an information window. Click on
the “Restart” button to finish.
ViewSonic
VNB131
27
Rescue the data under DOS mode
1. Click “Rescue Data” option in the security center to start the rescue.
2. Choose the files or folders to rescue and then click “Rescue Data”.
ViewSonic
VNB131
28
3. Choose the HDD partition where you would like to save the restore point to.
4. After clicking OK, the files will be backed up.
ViewSonic
VNB131
29
5. Please restart your ViewBook Pro after the backup has successfully finished.
6. After the backup has finished and the system was restarted, you can copy the
backup file to one of your external storage devices.
ViewSonic
VNB131
30
Troubleshooting
1. Where are the webcam captures stored by default?
By default webcam captures are saved to C:\Documents and Settings\All Users\
Application Data\Microsoft\WIA\{6BDD1FC6-810F-11D0-BEC7-08002BE1092F}\0001
folder.
2. How to use the embedded numeric keypad?
Press <Fn>+<Ins NumLK> to turn the Numeric Lock on, now you can use the
Embedded Numeric Keypad.
3. Why can’t I see pop-up icons when using Fn+ function key combinations, although
the functions work good?
You need to install SoftwareCenter software bundled with your ViewBook Pro.
4. The screen becomes blank while the computer is on. Why is that?
Your screen saver or power management may be active. Do one of the following to
exit from the screen saver or to resume from the Sleep or Hibernate modes:
a) Press any key;
b) Touch the touch pad;
c) Press the power button.
5. I am trying to turn on my ViewBook Pro, but nothing appears on the screen.
Please confirm the following:
a) The battery is installed;
b) The power adapter is connected to the computer and to the AC power wall outlet.
c) The computer power is on. (Press the power button again for confirmation.)
If after following these steps the screen is still blank, please contact ViewSonic
customer service.
6. Keyboard Issues: a number appears when you type a letter.
The numeric lock function is on. To disable it, press <Fn> + <Ins NumLK> key.
7. Sound issues: no sound output comes out of the speakers even when the volume is
turned up.
Please make sure that:
• The mute function is off;
• The headphone jack is not used;
• Speakers are selected as a playback device.
ViewSonic
VNB131
31
8. A Hard Disk Drive Problem: HDD doesn’t work.
Enter the BIOS Setup utility, go to Boot menu and make sure the hard disk drive is
included in the Boot Sequence.
9. ViewBook Pro does not respond.
In case the system is not responding, to turn off your ViewBook Pro, press and hold
the power button for about 6 seconds. If your ViewBook Pro still does not respond,
remove the AC adapter and the battery.
Your ViewBook Pro might have locked when it was entering Sleep mode while
performing a communication operation. You can disable the sleep timer, if you are to
leave your ViewBook Pro to download/upload files and will not be using it.
ViewSonic
VNB131
32
Customer Support
For technical support or product service, see the table below or contact your
reseller.
NOTE: You will need the product serial number.
Country/Region
Website
T = Telephone
F = FAX
Email
Australia/New Zealand
www.viewsonic.com.au
AUS= 1800 880 818
NZ= 0800 008 822
[email protected]
Canada
www.viewsonic.com
T (Toll-Free)= 1-866-463-4775
T (Toll)= 1-424-233-2533
F= 1-909-468-3757
[email protected]
Europe
www.viewsoniceurope.com
www.viewsoniceurope.com/uk/Support/Calldesk.htm
Hong Kong
www.hk.viewsonic.com
T= 852 3102 2900
[email protected]
India
www.in.viewsonic.com
T= 1800 11 9999
[email protected]
Ireland (Eire)
www.viewsoniceurope.com/
uk/
www.viewsoniceurope.com/uk/
support/call-desk/
[email protected]
Korea
www.kr.viewsonic.com
T= 080 333 2131
[email protected]
Latin America
(Argentina)
www.viewsonic.com/la/
T= 0800-4441185
[email protected]
Latin America (Chile)
www.viewsonic.com/la/
T= 1230-020-7975
[email protected]
Latin America
(Columbia)
www.viewsonic.com/la/
T= 01800-9-157235
[email protected]
Latin America
(Mexico)
www.viewsonic.com/la/
T= 001-8882328722
[email protected]
Renta y Datos, 29 SUR 721, COL. LA PAZ, 72160 PUEBLA, PUE. Tel: 01.222.891.55.77 CON 10 LINEAS
Electroser, Av Reforma No. 403Gx39 y 41, 97000 Mérida, Yucatán. Tel: 01.999.925.19.16
Other places please refer to http://www.viewsonic.com/la/soporte/index.htm#Mexico
Latin America (Peru)
www.viewsonic.com/la/
T= 0800-54565
[email protected]
Macau
www.hk.viewsonic.com
T= 853 2870 0303
[email protected]
Middle East
ap.viewsonic.com/me/
Contact your reseller
[email protected]
Puerto Rico & Virgin
Islands
www.viewsonic.com
T= 1-800-688-6688 (English)
T= 1-866-379-1304 (Spanish)
F= 1-909-468-3757
[email protected]
[email protected]
Singapore/Malaysia/
Thailand
www.ap.viewsonic.com
T= 65 6461 6044
[email protected]
South Africa
ap.viewsonic.com/za/
Contact your reseller
[email protected]
United Kingdom
www.viewsoniceurope.com/
uk/
www.viewsoniceurope.com/uk/
support/call-desk/
service_gb@viewsoniceurope.
com
United States
www.viewsonic.com
T (Toll-Free)= 1-800-688-6688
T (Toll)= 1-424-233-2530
F= 1-909-468-3757
[email protected]
ViewSonic
VNB131
33
Limited Warranty
VIEWSONIC® NOTEBOOK What the warranty covers:
ViewSonic warrants its products to be free from defects in material and workmanship during the warranty
period. If a product proves to be defective in material or workmanship during the warranty period,
ViewSonic will, at its sole option, repair or replace the product with a similar product. Replacement Product
or parts may include remanufactured or refurbished parts or components. The replacement unit will be
covered by the balance of the time remaining on the customer’s original limited warranty. ViewSonic
provides no warranty for the third-party software included with the product or installed by the customer.
How long the warranty is effective:
ViewSonic Notebook products are warranted for (1) year from the first consumer purchase for parts and
labor.
User is responsible for the back up of any data before returning the unit for service. ViewSonic is not
responsible for any data lost.
Who the warranty protects:
This warranty is valid only for the first consumer purchaser.
What the warranty does not cover:
1.
Any product on which the serial number has been defaced, modified or removed.
2.
Damage, deterioration or malfunction resulting from:
a.
Accident, misuse, neglect, fire, water, lightning, or other acts of nature, unauthorized product
modification, or failure to follow instructions supplied with the product.
b. Any damage of the product due to shipment.
c. Removal or installation of the product.
d. Causes external to the product, such as electrical power fluctuations or failure.
e. Use of supplies or parts not meeting ViewSonic’s specifications.
f. Normal wear and tear.
g. Any other cause which does not relate to a product defect.
3.
Any product exhibiting a condition commonly known as “image burn-in” which results when a static
image is displayed on the product for an extended period of time.
4.
Removal, installation, one way transportation, insurance, and set-up service charges.
How to get service:
1. For information about receiving service under warranty, contact ViewSonic Customer Support (Please
refer to Customer Support page). You will need to provide your product’s serial number.
2. To obtain warranty service, you will be required to provide (a) the original dated sales slip, (b) your
name, (c) your address, (d) a description of the problem, and (e) the serial number of the product.
3. Take or ship the product freight prepaid in the original container to an authorized ViewSonic service
center or ViewSonic.
4. For additional information or the name of the nearest ViewSonic service center, contact ViewSonic.
4.3: ViewSonic Notebook Warranty
ViewSonic
VNB131
Page 1 of 2
NB_LW01 Rev. 1a 02-11-09
34
Limitation of implied warranties:
There are no warranties, express or implied, which extend beyond the description contained herein
including the implied warranty of merchantability and fitness for a particular purpose.
Exclusion of damages:
ViewSonic’s liability is limited to the cost of repair or replacement of the product. ViewSonic shall not be
liable for:
1.
Damage to other property caused by any defects in the product, damages based upon
inconvenience, loss of use of the product, loss of time, loss of profits, loss of business opportunity,
loss of goodwill, interference with business relationships, or other commercial loss, even if advised of
the possibility of such damages.
2. Any other damages, whether incidental, consequential or otherwise.
3. Any claim against the customer by any other party.
4. Repair or attempted repair by anyone not authorized by ViewSonic.
Effect of state law:
This warranty gives you specific legal rights, and you may also have other rights which vary from state
to state. Some states do not allow limitations on implied warranties and/or do not allow the exclusion of
incidental or consequential damages, so the above limitations and exclusions may not apply to you.
Sales outside the U.S.A. and Canada:
For warranty information and service on ViewSonic products sold outside of the U.S.A. and Canada,
contact ViewSonic or your local ViewSonic dealer.
The warranty period for this product in mainland China (Hong Kong, Macao and Taiwan Excluded) is
subject to the terms and conditions of the Maintenance Guarantee Card.
For users in Europe and Russia, full details of warranty provided can be found in www.viewsoniceurope.
com under Support/Warranty Information.
4.3: ViewSonic Notebook Warranty
ViewSonic
VNB131
Page 2 of 2
NB_LW01 Rev. 1a 02-11-09
35