1
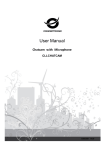
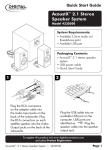
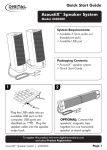
User’s Guide
ChatCam™ Webcam
Model 4310100
System Requirements:
• IBM or Compatible PC with
Windows XP/SP2/Vista / Win7
• USB port
• Tray loading CD-ROM Drive
®
®
Packaging Contents:
• Webcam
• ooVoo™ and Install CD
• Quick Start Guide
Contents
Installing the Software .............................................. 2
Installing your New Webcam ................................... 5
Capturing a Photograph .......................................... 6
Capturing a Video .................................................. 6
Setting the Webcam Options .................................... 8
Webcam Features .................................................. 11
Maintaining Your Webcam ..................................... 11
ChatCam Webcam | 4310100
Page 1
User’s Guide
Installing the Software
1
Insert the CD into the CD
drive.
Note: If the install screen does
not launch automatically, open
the folders on the CD and
double-click the setup.exe file.
DIgital Innovations, LLC | Arlington Heights, IL
2
The Micro Innovations
software install window will
appear. Select Webcam Driver
to begin the installation.
3
The InstallShield® Wizard will
guide you through the rest of
the Webcam Driver installation.
Click Next to continue.
®
Page 2
User’s Guide
ChatCam™ Webcam | 4310100
4
The software will automatically
choose a default destination
folder, or you may choose the
destination folder yourself. Click
Next to continue.
5
Click Install to begin the
installation of the Webcam
Software.
6
When the Webcam Software
has completed installation,
click Finish to exit the wizard.
Proceed to Step 7 to install the
ooVoo™ Software.
Page 3
User’s Guide
DIgital Innovations, LLC | Arlington Heights, IL
7
The Micro Innovations
software install window will still
be active on the desktop. Select
ooVoo™ Software to begin the
installation.
8
The ooVoo™ InstallShield®
Wizard screen will appear. Click
Next to begin the installation of
the ooVoo™ Software.
9
The software will automatically
choose a default destination
folder, or you may choose the
destination folder yourself. Click
Install to continue.
®
Page 4
User’s Guide
10
Follow the instructions on the
screen to create your ooVoo™
account. Use the ooVoo™
login screen to sign-in to begin
chatting with your camera.
Restart your computer after
completing the software
installation proceedures.
Installing your New Webcam
2
1
Plug in microphone cable to
microphone jack, and USB cord
into an available USB port on the
computer. USB ports are identified
as .
Mount webcam above the computer
monitor or use on your desk as a
standalone camera.
3
4
Ball Joint
Rotate the ball joint to adjust the
angle of view.
ChatCam™ Webcam | 4310100
Use the switch on the cord to adjust
the LED brightness on the webcam’s
face.
Page 5
User’s Guide
Capturing a Photograph
1
Launch VideoCap
from your desktop.
Click on Capture. Click on
Snap Shot.
After the image has been
captured, it will open in
your default photo viewing
application.
Capturing a Video
1
Launch VideoCap
from your desktop.
Click on Capture. Click on
Start Capture.
DIgital Innovations, LLC | Arlington Heights, IL
Page 6
User’s Guide
2
The very first time you are
recording video, the Set
Capture File window will
appear. Navigate to your
desired destination, choose a
file name, and click Save.
Note: This step will be skipped
if this is not your first time
capturing video.
ChatCam™ Webcam | 4310100
3
Click OK to start capturing
video.
4
To stop capturing video, click
on Capture. Click on Stop
Capture.
Page 7
User’s Guide
Setting Webcam Options
The software has many options available to personalize your settings.
DIgital Innovations, LLC | Arlington Heights, IL
1
To select or change the folder
where your videos will be
automatically saved, click
on File and then select Set
Capture File.
2
Navigate to the desired folder
and click OK. The default
folder is My Documents.
3
The Devices menu allows
you to switch between your
currently installed video, photo,
or audio capturing devices (if
applicable).
4
The Preview option allows you
to view on your screen what
the camera is currently seeing.
It is selected as a default.
Page 8
User’s Guide
Setting Webcam Options
5
The Audio Format... option
includes sound selection options
for capturing audio.
Some options may not
be available or may be
automatically selected.
6
The Effect option brings up a
screen to select various display
effects including effects, frames,
animations, and text.
The Effect options can also be
accessed by clicking the
icon on your desktop.
7
The Audio Capture Filter...
includes additional options for
capturing audio.
Some options may not
be available or may be
automatically selected.
ChatCam™ Webcam | 4310100
Page 9
User’s Guide
8
The Video Capture Filter...
includes options to set
brightness, contrast, hue, etc.
by sliding the bars or typing in a
number.
Some options may not
be available or may be
automatically selected.
9
The Video Capture Pin...
includes stream formatting
options.
Some options may not
be available or may be
automatically selected.
10
DIgital Innovations, LLC | Arlington Heights, IL
In addition to capturing videos
and pictures, the Capture menu
allows you to set a time limit
on your videos. Click Set Time
Limit.
Page 10
User’s Guide
Webcam Features
LEDs
Lens Focus
Adjust LED
Brightness
Ball Joint
Clip/Stand
Microphone Out
USB Out
Maintaining Your Webcam
Regular maintenance ensures a longer product life and minimizes the chance of
causing damage to your webcam.
• Always disconnect the webcam before cleaning it.
• Clean the lens with a lint-free cloth.
• Do not try to repair any part of this product. For technical support
please visit www.digitalinnovations.com/support.html
ChatCam™ Webcam | 4310100
Page 11