1
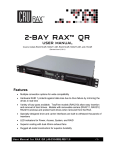
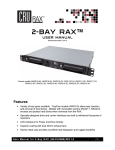
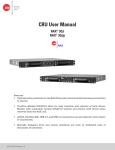
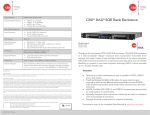
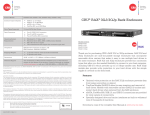
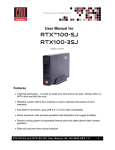
RAX™ QJ,
RAX QJp
USER MANUAL
(June 6, 2011)
Covers models RAX210-QJ, RAX210-QJp, RAX211-QJ, RAX212-QJ, RAX212-QJp, and RAX219-QJ
Features
•
Optional write-protection on RAX QJp to prevent data from being overwritten or altered
•
Multiple connection options for wide compatibility
•
Variety of bay types available. TrayFree models (RAX210) allow easy insertion and
removal of hard drives. Models with removable carriers (RAX211, RAX212) enclose and
protect hard drives when removed from the RAX.
•
Specially-designed drive and carrier interfaces are built to withstand thousands of
insertions
•
Rugged all-metal construction for superior durability
•
LED indicators for Drive Activity, Power, Drive Health, Drive Temperature, and (on RAX
QJp) Write-Protect Status
U s e r M a n u a l f o r R A X Q J a n d R A X Q J p ( A9-210-0010) REV 1.0
-1-
CRU
Table of Contents
1. Pre-Installation Steps
2
1.1 Accessories
2
1.2 Identifying Parts
3
2. Hardware Setup
3
2.1 Installing Hard Drives
3
2.2 Tips for Mounting
4
2.3 Host Connections
4
2.4 Connecting to your Computer
4
2.5 Selecting the operation mode for each bay
5
3. Encryption (RAX212 only)
5
4. Usage with Mac and Windows Operating Systems
5
4.1 Usage with Macintosh OS X
5
4.2 Usage with Windows Operating System
6
5. Frequently Asked Questions
8
6. Technical Specifications
9
1. Pre-Installation Steps
1.1 Accessories
Check the accessories with your RAX unit. Please contact CRU if any parts are missing or damaged.
The box should contain the following items:
Accessories
RAX QJ or QJp unit
Power cord
Key set
Screw kit
Quick Start Guide and warranty
information
Quantity
1
1
2
1
1
U s e r M a n u a l f o r R A X Q J a n d R A X Q J p ( A9-210-0010) REV 1.0
-2-
CRU
1.2 Identifying Parts
Take a moment to familiarize yourself with the parts of your RAX unit. This will help you to better
understand the remaining instructions.
Front View
Write-Protect Status LEDs (QJp only)
Power Switch Key Lock
Ejection Handle
Bay Access LED
Drive Temp LED
Bay Power LED
Fan LED
Drive Health LED
Mounting Bracket
Write-Protect/Read-Write Switch (QJp only)
Rear View
4cm Exhaust Fan
AC Power Inlet
USB Port
FireWire Ports
eSATA Port
2. Hardware Setup
2.1 Installing Hard Drives
RAX QJ and QJp are compatible with 3.5inch SATA hard drives.
NOTE: If any of the drives are inaccessible after
powering on the unit, try the following steps:
1. Turn off the power.
2. Remove the drive(s) in question.
3. Reinsert the drive(s).
4. Turn on the power.
2.1.1 TrayFree™ Bay Drive Installation
This section refers only to RAX210-QJ and RAX210-QJp
models.
a) Pull on the ejection handle to open the door.
b) Slide in your SATA hard drive, connector-end first.
Note: the drive’s label should be facing up.
c) Shut the door.
2.1.2 Drive Installation for RAX with removable carriers
U s e r M a n u a l f o r R A X Q J a n d R A X Q J p ( A9-210-0010) REV 1.0
-3-
CRU
*This section refers only to RAX211-QJ, RAX212-QJ, and
RAX212-QJp models.
a) Slide the drive carrier out of the RAX.
b) The carrier’s cover is held in place by a screw on the
rear of the carrier. Remove the screw then remove
the cover.
c) Slide the drive in from the front of the carrier.
d) Mate the connection on the drive with the connection on the drive carrier circuit board.
e) Flip the drive/carrier assembly over, and secure the drive in place with the provided screws.
f) Attach the Temperature Control Cooling Sensor to the top of the drive with an adhesive strip.
g) Replace the carrier cover and secure the screw on the rear of the carrier.
h) Slide the carrier into the RAX.
NOTE – A flashing red LED on the bay indicates bay fan failure. Call CRU technical support for
assistance.
2.1.3 Drive, Bay, and Frame Installation for RAX219 and models with one open bay
2-Bay RAX models can be purchased with one or both bays unpopulated. RAX219 is the “empty bay”
model of the 2-bay RAX series. For instructions on how to install your HDD, bay, or frame into these
products, please see the install guide that accompanies your particular bay.
2.2 Tips for Mounting RAX QJ or RAX QJp into a rack
•
Elevated Operating Ambient: If installed in a closed or multi-unit rack assembly, the operating
ambient temperature of the rack environment may be greater than room ambient. Insure the rack
environment does not exceed the maximum ambient temperature of 40° C.
•
Ventilation: Do not block or inhibit the air flow to the unit.
•
Mechanical Loading: Mounting of the equipment in the rack should be such that a hazardous
condition is not achieved due to uneven mechanical loading.
•
Circuit Overloading: Consideration should be given to the connection of the equipment to the
supply circuit and the effect that overloading the circuits might have on over current protection
and supply wiring. Appropriate consideration of equipment nameplate ratings should be used
when addressing this concern.
•
Reliable Earthing: Reliable earthing of rack-mounted equipment should be maintained.
Particular attention should be given to supply connections other than direct connections to the
branch circuit (e.g. use of power strips).
2.3 Host Connections
RAX QJ or QJp can connect to your computer in one of four ways (see section 1.2). Choose one of those
four cable types to use and plug it into the unit. Each bay requires its own data connection.
2.4 Connecting to your Computer
Connect the data cables to RAX and your computer. Plug in the power cord to a grounded electrical
outlet. With hard drives in the unit, turn on the power. Your RAX unit is now ready to use!
U s e r M a n u a l f o r R A X Q J a n d R A X Q J p ( A9-210-0010) REV 1.0
-4-
CRU
2.5 Selecting the operation mode for each bay (RAX210-QJp and RAX212-QJp only)
R/W (Read/Write)
RAX QJp bay will operate like a standard external hard drive,
performing standard read and write functions. The drive bay must be
set to R/W mode in order to format the hard drive.
WP (Write-Protect)
RAX QJp will protect the data already on the hard drive.
The data on the drive can be read but cannot be altered.
NOTE: When changing the mode of operation
the new setting will not take effect until the
power is cycled or a drive is removed or
added. The mode LED will then change to
indicate the new mode.
3. Encryption (RAX212-QJ and RAX212-QJp only)
RAX212 includes an internal encryption key preinstalled in each bay. After inserting any drive and
formatting it, that drive will only be readable in the RAX212 and will be fully encrypted—including the boot
sector, operating system and all files—without performance degradation. The internal key can be
overridden by inserting a different key in the front of the bay.
4. Usage with Mac and Windows Operating Systems
4.1 Usage with Mac OS X
4.1.1 Compatibility
RAX uses 3.5-inch SATA (Serial-ATA) hard drives only. RAX does not require drivers for operation under
Mac OS X. However, if you install a host card specifically to work with this product, that card may require
drivers. See your card’s user manual for instructions.
4.1.2 Formatting a drive
If you purchased your RAX pre-populated with hard drives, this step should not be necessary unless you
wish to change the format or erase the drive. To format, use Mac OS X’s Disk Utility (found in the
applications folder).
a) Click on the drive in the window to the left, then click the Erase tab in the window to the right (see
picture below).
b) Select the format type. Most users prefer Mac OS Extended with Journaling (HFS+), which is required
for compatibility with Time Machine (OS 10.5 or newer). If you need to use your RAX with both Mac and
Windows computers, select MS-DOS File System instead.
c) Enter a name for the new volume and then click “Erase” to start the process.
U s e r M a n u a l f o r R A X Q J a n d R A X Q J p ( A9-210-0010) REV 1.0
-5-
CRU
4.1.3 Mounting and unmounting volumes
If the hard drives installed in RAX are already formatted, an icon representing the
drive’s volume will appear (mount) on the desktop. You can begin using the volume
right away. If the drive is unformatted, a message will appear on the desktop saying
that the disk is unreadable. You can use OS X’s Disk Utility to easily format the drive
(see section above).
Unmount the volume before powering down the unit by dragging the volume’s icon to
the trash bin, or by selecting the volume then pressing Command-E. Disconnecting
the unit without first unmounting the volume can result in data loss.
4.1.4 Creating a Boot Drive
To activate this feature, you must first install OS X on the hard drive in your carrier. The easiest way to do
this is to clone an existing system drive using a utility such as Carbon Copy Cloner or Super Duper. Next,
go to System Preferences Æ Startup Disk. A window will list the available bootable volumes. Select the
volume from which you wish to boot. Another method is to hold down the Option key during boot up. A
screen should appear that allows you to select the volume you wish to use. This is useful if you wish to
boot from your RAX hard drive only some of the time.
4.2 Usage with Windows operating systems
4.2.1 Compatibility
RAX uses 3.5-inch SATA (Serial-ATA) hard drives only. RAX does not require drivers for operation under
Windows XP, Vista, or 7. However, if you install a host card specifically to work with this product, that
card may require drivers. See your card’s User Manual for drivers and instructions.
4.2.2 Formatting a drive
If you purchased your RAX pre-populated with a hard drive, this step should not be necessary unless you
wish to change the format or erase the drive. To format, use the Disk Management utility.
a) Right-click on My Computer, then select Manage. The Computer Management window will open.
b) In the left pane of this window, left-click on Disk Management.
c) The drive should appear in the list of Disks in the lower middle/right pane (see picture below). You
may need to scroll down to see it. If the drive is already formatted, you can identify it easily by its volume
name. If it’s unformatted, the Drive Properties Box will say “Unallocated” and you’ll need to initialize the
disk before formatting it. Initialize the disk by right-clicking the Device Properties Box and selecting
Initialize Disk.
Device
Properties
Drive
Properties
d) To format the drive, right-click the Drive Properties Box and select Format.
U s e r M a n u a l f o r R A X Q J a n d R A X Q J p ( A9-210-0010) REV 1.0
-6-
CRU
e) If you are prompted to select a partition type, select MBR for volumes 2TB or smaller, or GPT for
volumes larger than 2TB. Note: Windows XP does not support GPT or volumes larger than 2TB.
f) Click through several more windows, leaving the default settings, until you see a window that allows
selection of a file system. Choose NTFS and enter a name for the new volume. Be sure to check the box
labeled “Perform a quick format” unless you want to completely erase any data on the drive and have
time to wait. A quick format should take less than a minute, while standard formatting may take several
hours.
g) Click “Next” and then “Finish” to start the format process. When the format is complete, the Drive
Properties Box will update to show the new volume name. The new volume can now be found in My
Computer.
4.2.3 Mounting and ejecting volumes
If the hard drives attached to RAX are already formatted, you can begin
using the volume right away. When the unit is properly connected and
turned on, a window may open to allow you access to the volume. If no
window appears, you can find the volume by double-clicking “My Computer.”
Eject the RAX before powering it down by single-clicking the green arrow icon on
the task bar, then selecting “Safely remove….” Windows will indicate when it is
safe to disconnect RAX. Disconnecting the unit without first ejecting it can result in data loss.
4.2.4 Creating a Boot Drive
Some PC motherboards support booting from an external device. To activate this feature, you will need
to adjust the motherboard’s BIOS settings. Check with your motherboard’s manufacturer or owner’s
manual for details.
U s e r M a n u a l f o r R A X Q J a n d R A X Q J p ( A9-210-0010) REV 1.0
-7-
CRU
5. Frequently Asked Questions (FAQ)
Q: When I change a drive to write protect mode in my RAX QJp, I can still copy a file to the hard drive. Is
the file there?
A: No. The operating system will show the file on the drive, but when you cycle power on RAX QJp you
will see that the file is not actually there.
Q: Can I daisy-chain both bays together so I can connect to the computer with a single FireWire cable?
A: Yes. But for best performance, don’t connect other FireWire drives at the same time (unless they’re
provided a different data channel).
Q: Can I hot-swap drives with this product?
A: RAX QJ and RAX QJp support hot-swapping over USB or FireWire connections. If the eSATA/SATA
host supports this feature, the drives can be hot-swapped via eSATA. All eSATA host cards currently sold
by CRU support hot swapping. Third-party host cards may or may not support this feature. Motherboard
SATA connections often do not support hot swapping, so a discreet host card is recommended.
Q: Will this product work with hard drives larger than 2.2TB?
A: Yes, assuming the rest of your configuration (e.g. OS, BIOS, host drivers) supports large volumes,
this product is compatible with drives larger than 2.2TB.
Q: When I connect both bays of my RAX to my computer via FireWire, only one or none mount. Why?
A: FireWire devices have what's called a chip ID. The chip ID is a unique identifier for FireWire devices
and is used by the computer to send commands to a particular device on a FireWire bus. If, however, two
devices share a chip ID the computer cannot communicate with one, or sometimes both, devices.
The easiest way to fix this is to use the WiebeTech Configurator to change the chip ID on one of the
FireWire bridges. You can download the Configurator here.
Q: Why does my eSATA device appear as a Parallel SCSI device in System Profiler?
A: The "Serial ATA" tab in System Profile shows devices attached to the internal SATA bus, but not
always devices attached to an eSATA host card. Sometimes these devices will appear under the heading
"Parallel SCSI" instead. This is entirely normal and does not indicate a problem with the device or its
drivers.
Q: I've attached my RAX and can see the volume, but it shows up twice. Which one is real?
A: If you are seeing your RAX volume mounted twice, chances are the unit is connected to the computer
using both the eSATA and FireWire connections. When this is the case, the OS may attempt to mount
RAX twice resulting in two volumes appearing. Simply turn off RAX and unplug one of the connections to
resolve the problem.
For more FAQs and additional information, please visit www.cru-dataport.com or www.wiebetech.com.
WiebeTech is a brand of CRU.
U s e r M a n u a l f o r R A X Q J a n d R A X Q J p ( A9-210-0010) REV 1.0
-8-
CRU
6. Technical Specifications
Product name
RAX QJ and RAX QJp
Host Interfaces:
● eSATA
● Dual FireWire 800 (IEEE 1394b)
● USB
Drive Types Supported:
3.5-inch SATA (Serial-ATA) hard drives
Encryption:
(RAX212 model only) Full disk hardware encryption, AES 128 or 256
Power LED:
Yes, one per drive
Access LED:
Yes, one per drive
Windows XP, Vista, Windows 7
Mac OS X
Operating System Requirements:
Linux distributions that support the connection type
Cooling Fan:
2 position: On / Off
Input: 100-240VAC
Output: 220 Watts
Dual 40mm exhaust fans
External Material:
Electro-galvanized cold rolled steel
RAX QJP Weight:
15 pounds
17 pounds without drives
23 pounds with drives
429mm W x 413mm D x 44mm H
We don’t want anything to go wrong with your CRU-Dataport product.
But if it does, Technical Support is standing by and ready to help.
Contact Technical Support through cru-dataport.com/support or call
(800) 260-9800.
Power Switch:
Power Supply:
Shipping Weights:
Dimensions:
Support:
RAX and TrayFree are trademarks of CRU Acquisitions Group, LLC. Other marks are the property of their respective owners.
© 2010 CRU Acquisitions Group, LLC. All rights reserved.
Limited Product Warranty
CRU-DataPort (CRU) warrants RAX to be free of significant defects in material and workmanship for a period of two years from the
original date of purchase. CRU’s warranty is nontransferable and is limited to the original purchaser.
Limitation of Liability
The warranties set forth in this agreement replace all other warranties. CRU expressly disclaims all other warranties, including but
not limited to, the implied warranties of merchantability and fitness for a particular purpose and non-infringement of third-party rights
with respect to the documentation and hardware. No CRU dealer, agent or employee is authorized to make any modification,
extension, or addition to this warranty. In no event will CRU or its suppliers be liable for any costs of procurement of substitute
products or services, lost profits, loss of information or data, computer malfunction, or any other special, indirect, consequential, or
incidental damages arising in any way out of the sale of, use of, or inability to use any CRU product or service, even if CRU has
been advised of the possibility of such damages. In no case shall CRU’s liability exceed the actual money paid for the products at
issue. CRU reserves the right to make modifications and additions to this product without notice or taking on additional liability.
FCC Compliance Statement: “This device complies with Part 15 of the FCC rules. Operation is subject to the following two
conditions: (1) This device may not cause harmful interference, and (2) this device must accept any interference received, including
interference that may cause undesired operation.”
This equipment has been tested and found to comply with the limits for a Class A digital device, pursuant to Part 15 of the FCC
Rules. These limits are designed to provide reasonable protection against harmful interference when the equipment is operated in a
commercial environment. This equipment generates, uses, and can radiate radio frequency energy and, if not installed and used in
accordance with the instruction manual, may cause harmful interference to radio communications. Operation of this equipment in a
residential area is likely to cause harmful interference in which case the user will be required to correct the interference at this own
expense.
In the event that you experience Radio Frequency Interference, you should take the following steps to resolve the problem:
1) Ensure that the case of your attached drive is grounded.
Tested to comply
2) Use a data cable with RFI reducing ferrites on each end.
with FCC standards
3) Use a power supply with an RFI reducing ferrite approximately
5 inches from the DC plug.
FOR OFFICE OR COMMERCIAL USE
4) Reorient or relocate the receiving antenna
U s e r M a n u a l f o r R A X Q J a n d R A X Q J p ( A9-210-0010) REV 1.0
-9-