1
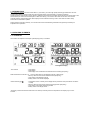
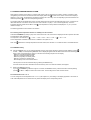
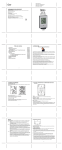
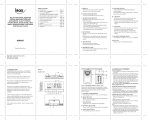
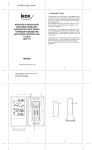
HTG79
Operating Instructions
Version 1.1
Table of contents
1. Introduction
Page x
2. Bedienelemente
2.1 LCD Anzeige
2.2 Tasten
3. Inbetriebnahme
4. Funk-Thermometer
5. Bedienung
5.1 Zeit
5.2 Thermometer mit Alarm
5.2.1 Ablesen der Temperatur von jedem Kanal
5.2.2 Min/Max Speicher
5.2.3 Messeinheit °C oder °F
5.2.4 Temperatur-Alarm
5.2.5 Komfort Zone
6. Batteriewechsel
7. Pflege des Gerätes
8. Support
9. Technische Daten Anzeigegerät
Seite x
Seite x
Seite x
Seite x
Seite x
Seite x
Seite x
Seite x
Seite x
Seite x
Seite x
Seite x
Seite x
Seite x
Seite x
Seite x
1. INTRODUCTION
Many thanks for selecting the HTG79 from IROX. In your hands, you hold a high-quality thermo/hygrometer which we have
equipped with additional functions that have above-average design and functionality in a market comparison.
These include the measurement memory where in addition to the maximum and lowest values also the time and the date of the
measurement per channel are recorded (the so-called ‘time stamp’). The max/min alarm that can be set for each of the 6
channels with the corresponding alarm status display and the individual scanning of the 5 radio sensors make it clearly
structured and calculable to operate.
Please read the instructions carefully. You will find some useful and interesting information that goes beyond merely the
explanation of its operation.
2. OPERATING ELEMENTS
2.1 LCD DISPLAY
All functions are depicted on the liquid crystal display (LCD) in 3 windows.
Full-segment display
Time window:
- Time display
- Date display
- With display of the saved data: time and date of the recording (temporary)
Radio measurement channels 1-5: - Current measurement of the selected channel (=radio sonde)
- Memory values min/max of the selected channel (temporary)
- Alarm status of the selected channel
- Battery status of the sender displayed
Interior thermo/hygro
:
- Temperature and rel. humidity of the display device (measures at the place where the device
is used)
- Memory values min/max of the interior thermo/hygrometer (temporary)
- Alarm status of the interior thermo/hygrometer
- Battery status of the display device
‘Temporary’ means that this information has to be called up manually and is then depicted on the display only for a few
seconds.
2.2 KEYS
View from front
CHANNEL / + (press briefly)
--> 1 --> 2 --> 3 --> 4 --> 5 -->
- In normal operating mode: Changes from channel to channel (
- In the various setting modes: Increases the value to be set (hold pressed for fast run through)
--> etc)
MEMORY / - (press briefly)
- In normal operating mode: Call-up of the data from the thermo/hygro memory (MAX --> MIN --> MAX --> etc.)
- In the various setting modes: Reduces the value to be set (hold pressed for fast run through)
SET
- In normal operating mode: No function
- In the time setting mode: Jumps with each press from setting element to setting element
- In the thermo/hygro alarm setting mode:
a) Press briefly: Switching on/off of the HI/LO limits
b) Hold pressed: Activating the setting mode of the alarm values and change with the + or - keys.
Close again by briefly pressing the SET key.
●-----SET----●
By pressing the CHANNEL/+ and MEMORY/- keys at the same time and holding them for approx. 3 seconds, it is possible to
change into the time setting mode.
° ALARM
- Hold pressed for 3 seconds: The setting mode of the thermo/hygro alarm is activated
SEARCH
- Hold pressed for 3 seconds: For the radio channel active on the display (CH1 … CH5, flashing), a sender search is started.
is active
This key is inactive when
CLEAR
- Hold pressed for 3 seconds: For the channel active and flashing on the display (
reset.
, CH1 .... CH5), the MAX/MIN memory is
View from behind (with battery lid opened)
Battery compartment
2 x 1.5 batteries of the size UM-3 resp. ‘AA’
°C/°F switchover
When the battery compartment is opened, you will find above the CE
label a press button with which the temperature measurement unit
displayed on the LCD can be changed from ° C to ° F and vice versa at
any time and independently of the setting on the sensor. The key can
be operated with a sharp object (paper clip, tip of a pen, etc.) (single
short pressing of the key).
3. PUTTING INTO OPERATION
1.
Put all radio sensors that you want to use into operation and place these in close proximity (1-2 metres) to the reception
device.
2.
Open the battery compartment of the display device and remove all insulation strips. If no batteries are in the device, insert
the 2 batteries (UM-3 or ‘AA’ 1.5 V) in the correct polarity.
3.
Now close the battery compartment.
4.
Directly after the activation of the batteries, all segments are displayed for a few seconds on the display. The HTG79 then
begins with the time at 0:00 and 1.1.08 and the search of available sensors on all 5 channels.
5.
Now set the time and the date and reset all Min/Max memories with the CLEAR key. This guarantees that you will be able
to read the valid MIN/MAX recordings with a valid time/date.
6.
As soon as the sensor is displayed correctly (see ‘Reception status’ in Chap., 4), you can set up the sensor in the place
where you want to effectively measure the outdoor temperature and humidity. Under the most ideal conditions, this can be
up to 30 m away. In reality, however, this is often less. In the event of problems, try out other places, and do so both for the
sensor and for the display device.
The radio sensor is weatherproof. Nevertheless, please place the sensor where possible in the dry and at any rate in the
shade.
4. RADIO THERMOMETER/HYGROMETER
The operation of the radio sensor supplied is described in the instructions which are delivered separately.
Other Irox radio sensors that are compatible with the HTG79:
3 channels (can be used on the channels, 1, 2 or 3) : HTS12C, HTS33, HTS13, HTC13
5 channels (can be used on all 5 channels)
: HTS55*
(*HTS55 is included in the scope of delivery of the HTG78 and can be used on the channels 1-5)
With the sensors with thermometer only, simply only the temperature is displayed on the HTG78.
Reception status display
The wave symbol indicates the status of the signal reception of the channel displayed.
Start search process for a sensor
Select the desired radio channel with the CHANNEL key.
Example: Channel 4 (the number 4 is flashing)
Now press and hold the SEARCH key until the wave symbol starts to flash. The device now searches for the sensor on
channel no. 4. This process can take a few minutes and is finished as soon as the wave symbol stops flashing.
We have deliberately ensured that the search channel can be individually called up per channel so that sensors that are
already logged in are not affected by subsequent enhancements.
Signal interruptions
Each sensor is read by the device once a minute. If more than 8 readings are read one after the other without data, lines
appear in the display for this channel and the HTG79 then stops any other reception attempts after this for 8 hours.
The display device starts a reception again by itself after approx. 8 hours. If the original sender is not found again, the
device starts with a new search for a new sensor on this channel.
When the signal is interrupted, you can start a new signal search at any time manually. Please, however, check the
following points beforehand:
1.
2.
whether the sensor is still in place
the batteries of the sensor and the display device. Please also replace them when a battery tester rates them as still being
sufficient! Further info on this can be found in the FAQ on www.irox.com.
Note: If the outdoor temperature drops sharply, the output of batteries that have been started is also strongly reduced. It is
therefore recommended that new batteries are always inserted in the sensor at the beginning of the winter (alkaline type or
better).
3. whether disturbances or shields are to be found in the area of the sender/receiver or the distance between the two devices
is too great.
The search processes described above for a ‘lost’ sensor do not have any influence on any other existing sensors that function
without problems.
Signal ‘collisions’
Radio signals of other devices in their environment can cause disruptions or temporary interruptions in reception. This is
not bad but could be annoying under certain circumstances. Such typical 'disruptive systems’ are radio door bells, wireless
security systems, tube screens (PC/TV), control systems, etc.
In such cases, it can also be helpful to use another channel.
5. OPERATION
5.1 TIME
The time (hh:mm) and the date are depicted in the upper information window.
-Time setting ●-----SET----●
By pressing the CHANNEL/+ and MEMORY/- keys at the same time and holding them for approx. 3 seconds, it is possible to
change to the time setting mode.
The element to be set starts flashing in the display: With the + and - keys, you can now make a setting for as long as the
element is flashing.
You can now move from setting to setting with a single brief pressing of the SET key.
The procedure of the settings is as follows:
- Date setting (year ---> month ---> day)
- Time format: 24 hours or 12 hours (AM/PM) display
- Time setting (Hour ---> Minute)
You cannot directly interrupt the setting process. You then therefore go through the entire selection of settings with the SET key
until the time of day reappears again after the minutes setting with the flashing ‘:’ In the time.
If you do not press a key in setting mode for more than 2 minutes, the settings made will be adopted and the time of day
displayed.
5.2 THERMO/HYGROMETER WITH ALARM
With regard to operation, the HTG79 is in a 'sleep mode’ when no key is pressed for more than 2 minutes. This status is then
recognised by the fact that on the left-hand side of the display neither the
symbol nor the number in the channel display is
flashing. In such a case, the operation is activated by pressing one of the 3 keys. The corresponding symbol then flashes in the
field to be operated (
or ‘CH’ with corresponding number).
The HTG79 measures the temperature and rel. humidity directly and also receives the measurements of up to a maximum of 5
IROX radio sensors. Each sensor can be set to one of the channels 1-5 (resp. 1-3 for 3-channel appliances). In the two
) the temperature currently measured is displayed in °C (or °F) and the
information windows (radio sensors CH1....5 and
relative Humidty in %.
The following operations can be made in this function:
5.2.1 Reading of the temperature and the rel. humidity from each channel
Activate the CHANNEL key briefly to jump from channel to channel. The next channel is displayed with each press of the button
and activated for other operations.
The sequence of the activation is
--> CH1 ---> CH2 --> CH3 --> CH4 --> CH5 -->
--> CH1 --> etc
This is independent of whether a radio sensor is available in the system or not.
Note: The
measurement is always depicted in the lower window; the channels 1-5 one after the other in the middle window.
5.2.2 MIN/MAX memory
a)
With the ‘MEMORY’ key you can read the Max/Min memory of the active channel by pressing it briefly (flashing symbol
or CH1 .... CH5). The corresponding MIN/MAX value is displayed together with the date and the time of the recording (‘time
stamp'). Each value will appear for approx. 4 seconds in the following sequence on the display:
- Maximum (=highest) temperature ‘MAX’
- Minimum (=lowest) temperature ‘MIN’
- Maximum (=highest) rel. humidity ‘MAX’
- Minimum (=lowest) rel. humidity ‘MIN’
- Back to display of the current measurement
The sequence can also be made manually by pressing the MEMORY key.
All values shown have been recorded since the last memory reset. If no data are available, lines appear.
b)
Reset of the MIN/MAX memory
If you hold the CLEAR key pressed for approx. 3 seconds, the MIN/MAX memory values of the active channel (flashing
or CH1 .... CH5) are reset to the current value. The recordings of the other channels remain.
symbol
5.2.3 Measurement unit °C or °F
You can change the unit of temperature from °C to ° F (see Chapter 2.2). The setting on the display appliance or the sensor is
to be made independent of one another and only affects the display of the corresponding device.
5.2.4 Temperature and humidity alarm
The alarm function is programmed individually per channel (
/ CH1.... CH5). Each alarm is defined by an upper and lower
limit of the temperature and/or the rel. humidity. If one of them is exceeded or undercut, an acoustic and optical alarm is
triggered.
Important general information about the thermo/hygro alarm:
- An alarm programmed on Channel 1 can only be triggered by the sensor 1. Each channel thus has its own alarm range.
- The temperature alarm can be set in steps of 0.5 ° C (0.9° F), the hygro alarm in steps of 1%.
- So as not to trigger any permanent alarm with minor changes around the alarm limits, the alarm trigger has a hysterisis of
0.5° C (0.9° F), respectively 1% r.H. . I.e. if an alarm has been triggered, the new measurement value must fall under the alarm
value by at least 0.5° (0.9° F), respectively 1% r.H., to switch off the active alarm automatically.
Example: An HI alarm at 24° first has to be set to inactive when it reaches 23.5° C again. This prevents the measurement
around a certain point triggering an alarm permanently.
- Only one alarm can be programmed if really only one sensor resp. one measurement is available at this point. With simple
thermo sensors you may set an alarm for the hygrometer, but this value will have no function. By all means, leave it active –
should you deactivate the hygro alarm, you will also deactivate the thermo alarm !
Should e.g. no sensor be available on Channel 4 or 5, lines appear there instead of a temperature and rel. humidity and the
programming as described above cannot be done.
Activation/deactivation of the temperature/humidity alarm
1.
Press the CHANNEL key until the desired channel display (
/ CH1.... CH5) flashes.
2.
Press and now hold the °ALARM key for approx. 3 seconds until HI--.-°C appears in the display.
3.
You can now switch on the alarm with the SET key. When set for the first time, HI 30.0 °C (HI 86.0°F) will appear with a
. The number in the triangle refers to the channel for which the alarm is active. Another pressing of the SET key
symbol
switches the alarm off again. Continue to the lower limit (LO) with the °ALARM key. An operation must be done within
approx. 6 seconds otherwise the appliance automatically jumps back into the normal display.
4.
If you want to change the value, please now hold the SET key pressed for at least 3 seconds until the alarm limit starts to
flash. With the + and – keys you can now change the limit in steps of 0.5° C (0.9°F) upwards or downwards. Continue to
the setting of the LO limit (lower limit) as well as the HI and LO limits of the rel. humidity with the SET key. If you do not
press any key in this setting for more than 2 minutes, the appliance will automatically jump back into the normal display.
5.
The setting of the lower limit of the temperature and the HI/LO limits of the rel. humidity is done in an analogous manner to
steps 3 and 4. The factory set thermo LO limit is 5° C (41° F), the hygro HI limit 70% and the hygro LO limit 35% .
6.
After the hygro LO setting, you simply move with the next step back into the normal display.
Note 1: The HI limit can be set below the LO limit or the LO above the HI respectively. The logics of the alarm activation are
retained, namely:
- Triggering of the HI alarm when the limit is exceeded bottom-up.
Example: With an alarm of 38° C, the alarm is triggered when the measurement value jumps from 36.6° C to 38.2° C.
- Triggering of the LO alarm when the threshold is undercut top-down.
Example: With an alarm of 6° C, the alarm is activated when the measurement value of 7.2° jumps to 5.5° C.
Note 2: If you want an alarm, both HI and LO limits of the thermo and (!) hygro alarms need to be set. If you only want one of
these, simply set the limits you don’t need to the extreme
Thermo: HI = 70°C or 76.8° F / LO = -50° C or -58° F
Hygro: HI = 99% / LO = 1%
Note 3: You can programme independent alarms for each channel.
Acknowledgement of an alarm
If an alarm limit is exceeded, an acoustic alarm sounds out for approx. 2 minutes and the symbols belonging to the channel (
and the HI or LO display) flash.
During the 2 minutes of acoustic alarm, the measurement value remains on the measurement value that triggered the alarm.
You have to acknowledge the alarm with any key. Until you have done so, a short ‘beep-beep’ will sound out every minute once
the 2 minutes of acoustic alarm are over.
The current measurement value is displayed again on the display after the 2 minutes have ended or manual acknowledgement
has been given; however, the symbols flash for as long as the alarm is still ‘active’ in a slightly more sedate rhythm.
Please read the note on hysterisis at the beginning of this chapter.
5.2.5 Comfort Zone
With each channel the comfort status will be displayed as per following chart:
6. CHANGE OF BATTERY
: BATTERY CHANGE DISPLAY
The batteries last for around 8-12 months. Depending on the usage of the appliance and the batteries used, this time can be
slightly shorter or longer. In order to avoid a surprising and unpleasant interruption to operations, the battery symbol appears in
the two temperature windows with the corresponding channel.
This means that batteries of the display appliance (in the IN window) or of a radio sender (in the CHx window) are becoming too
weak and need to be replaced.
To change the batteries, please note Chapter 3 (Putting into operation).
Please only use new batteries and never mix old and new batteries.
Please also remember that used batteries should not be thrown in the household rubbish bin but handed in at the designated
collection points. The environment will thank you for it!
7. CARE INSTRUCTIONS
- Do not expose the device to extreme temperatures or direct sunlight over longer periods.
- Avoid blows and shocks of any kind to the device.
- For cleaning use a dry soft cloth that you have moistened with water and a mild cleaning agent. Never use volatile substances
such as benzene, thinner, cleansing agents in spray cans etc.
- When the device is not being used store it in a dry area and out of the reach of small children.
- If the device is activated under extreme coldness it may occur that the display becomes illegible. As soon as it is returned to a
warm environment the device will function normally.
- Please keep the user’s manual and other documents delivered with the device stored carefully so that you can reference them
at a later point if necessary.
- Please use only new batteries and never mix old and new batteries.
- Please also remember that old batteries should not be disposed of with household waste but should be handed in at the
designated collection centres.
- Important: With all Irox appliances, all disposal fees in Switzerland (vRG; advance recycling fee) and in the EU (WEEE) have
been paid.
8. SUPPORT
This device is a new development of Irox Development Technology. All information was made and checked by means of a
functioning instrument. It may occur that adjustments and improvements of the device will take place that due to typographical
procedures were not able to be listed in this manual. Should you notice deviations which make it difficult for you to operate and
use the instrument you may at any time download the latest manual onto your PC free of charge at www.irox.com (please refer
to the version number of the manual).
© Irox Development Technology
9. TECHNICAL DATA (DISPLAY UNIT)
Temperature and humidity measurement
Measurement range thermometer:
Maximum range -50.0° C to +70.0° C (23.0° F to 122.0° F)
Internal sensor: -20°C to +50°C
Measurement range hygrometer:
Maximum range 1% to 99% r.H.
Radio sensor: Pursuant to the specifications of the sensor
Resolution:
0.1°C (0.2°F) / 1% r.H.
Measurement accuracy:
+/- 1°C in the range of +5°C to +40°C
+/- 2°C in the remaining range
+/- 5% r.H. in the range of 30% - 80% (at +5°C to +40°C)
+/- 7% r.H. in the range of 20% - 90% (at +5°C to +40°C)
Measurement frequency of radio sensor: once every 60 seconds
Clock
Accuracy of quartz clock:
+/- 30 seconds / month
Power:
2 pieces UM-3 or “AA” 1.5V batteries
Dimensions / Weight:
Display unit: 211g (incl. batteries); 110 x 123 x 30 mm