1
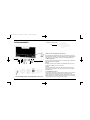
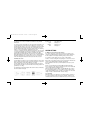
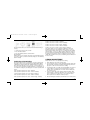
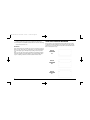
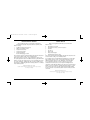
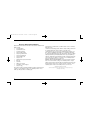
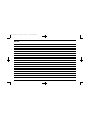
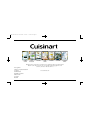
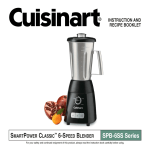
TOB-160/165/175 IB-3343E
5/23/05
12:06 PM
Page 2
INSTRUCTION AND RECIPE BOOKLET
Cuisinart Toaster Oven Broilers
®
TOB Series
TOB-160/165/175 IB-3343E
5/23/05
12:06 PM
Page 3
TABLE OF CONTENTS
Important Safeguards . . . . . . . . . . . . . . . . . . . . . . . . . . . . . .Page
Quick Reference Oven Operation . . . . . . . . . . . . . . . . . . . . .Page
Special Cord Set Instructions . . . . . . . . . . . . . . . . . . . . . . . .Page
Introduction . . . . . . . . . . . . . . . . . . . . . . . . . . . . . . . . . . . . . .Page
Features and Benefits . . . . . . . . . . . . . . . . . . . . . . . . . . . . . .Page
General Guidelines . . . . . . . . . . . . . . . . . . . . . . . . . . . . . . . .Page
1
2
3
3
4
6
Use and Care
Broil . . . . . . . . . . . . . . . . . . . . . . . . . . . . . . . . . . . . . . . . . . . .Page
Bake . . . . . . . . . . . . . . . . . . . . . . . . . . . . . . . . . . . . . . . . . . .Page
Convection Bake (Only available with select models.) . . . . .Page
Timer . . . . . . . . . . . . . . . . . . . . . . . . . . . . . . . . . . . . . . . . . . .Page
Important Notes on Oven Use . . . . . . . . . . . . . . . . . . . . . . .Page
Toast . . . . . . . . . . . . . . . . . . . . . . . . . . . . . . . . . . . . . . . . . . .Page
Browning Selection . . . . . . . . . . . . . . . . . . . . . . . . . . . . . . . .Page
6
7
7
7
7
7
8
Custom Settings
Make Selection from Custom Settings . . . . . . . . . . . . . . . . .Page 8
Stop Toasting . . . . . . . . . . . . . . . . . . . . . . . . . . . . . . . . . . . .Page 8
Important Notes on Toasting Use . . . . . . . . . . . . . . . . . . . . .Page 9
Helpful Browning Notes . . . . . . . . . . . . . . . . . . . . . . . . . . . .Page 9
4-6 Slice Button . . . . . . . . . . . . . . . . . . . . . . . . . . . . . . . . . .Page 9
Bagel Button . . . . . . . . . . . . . . . . . . . . . . . . . . . . . . . . . . . . .Page 10
Defrost Button . . . . . . . . . . . . . . . . . . . . . . . . . . . . . . . . . . . .Page 10
Reheat Button . . . . . . . . . . . . . . . . . . . . . . . . . . . . . . . . . . . .Page 11
Combination of Custom Settings . . . . . . . . . . . . . . . . . . . . .Page 11
Cleaning and Maintenance . . . . . . . . . . . . . . . . . . . . . . . . . . . . . . .Page 11
Oven Rack Position Diagrams . . . . . . . . . . . . . . . . . . . . . . . . . . . .Page 12
Recipes . . . . . . . . . . . . . . . . . . . . . . . . . . . . . . . . . . . . . . . . . . . . . . . . .Page 13
Warranty . . . . . . . . . . . . . . . . . . . . . . . . . . . . . . . . . . . . . . . . . . . . . . . .Page 23
You are about to experience the ultimate in countertop cooking convenience.
The Cuisinart® Toaster Oven Broiler sits comfortably on your kitchen counter,
performing the function of multiple appliances, while taking up the space of
only one. The state-of-the-art touchpad is extremely easy to work with, and
gives you unlimited toasting, baking and broiling options. Audible signals are
built in as convenient reminders, and everything that detaches goes right into
the dishwasher. It’s easy to Savor the Good LifeTM with Cuisinart!
IMPORTANT SAFEGUARDS
When using an electrical appliance, basic safety precautions should always
be followed:
1. Read all instructions.
2. Do not touch hot surfaces. Use handles.
3. To protect against electrical shock, do not place any part of the toaster
oven broiler in water or other liquid. See instructions for cleaning.
4. Close supervision is necessary when any appliance is used by or near
children.
5. UNPLUG FROM OUTLET WHEN NOT IN USE AND BEFORE
CLEANING. Allow to cool before cleaning or handling.
6. Do not operate any appliance with a damaged cord or plug or after the
appliance has malfunctioned or has been dropped or damaged in any
way or is not operating properly. Return the toaster oven broiler to the
nearest Cuisinart Repair Center for examination, repair or mechanical
or electrical adjustment.
7. The use of accessory attachments not recommended by Cuisinart may
cause injury.
8. Do not use outdoors.
9. Do not let cord hang over the edge of the table or countertop where it
could be pulled on inadvertently by children or pets, or touch hot surfaces
which could damage the cord.
10. Do not place toaster oven broiler on or near a hot gas or electric burner
or in a heated oven.
1
TOB-160/165/175 IB-3343E
5/23/05
12:06 PM
Page 4
11. Do not use this toaster oven broiler for anything other than its
intended purpose.
12. Extreme caution should be exercised when using containers constructed
of materials other than metal or glass in the toaster oven broiler.
13. To avoid burns, use extreme caution when removing tray or disposing of
hot grease.
14. When not in use, always unplug the unit. Do not store any materials
other than manufacturer’s recommended accessories in this oven.
15. Do not place any of the following materials in the oven: paper, cardboard,
plastic or similar products.
16. Do not cover crumb tray or any part of the oven with metal foil. This will
cause overheating of the oven.
17. Oversize foods, metal foil packages and utensils must not be inserted in
the toaster oven broiler as they may involve a risk of fire or electric shock.
18. A fire may occur if the toaster oven broiler is covered or touching flammable materials, such as curtains, draperies, and walls, when in operation.
Do not store any items on top of the appliance when in operation. Do not
operate under wall cabinets.
19. Do not clean with metal scouring pads. Pieces can break off the pad and
touch electrical parts, involving a risk of electric shock.
20. Do not attempt to dislodge food when the toaster oven broiler is plugged
into electrical outlet.
21. Warning: To avoid possibility of fire, NEVER leave toaster oven
broiler unattended during use.
22. Use recommended temperature settings for baking and roasting.
23. Do not rest cooking utensils or baking dishes on glass door.
24. Push the “Start/Stop” botton to turn off the toaster oven broiler and the
LED light turns off.
SAVE THESE INSTRUCTIONS
Please read and keep these instructions handy. These instructions will
help you to use your Cuisinart® Toaster Oven Broiler to its fullest so that
you will achieve consistent, professional results.
2
QUICK REFERENCE OVEN OPERATION
(See pages that follow for detailed instructions.)
BAKE (OR CONVECTION BAKE, Available with select models)
• Press “Bake” or “Conv Bake”
• Press “Temp”
• Press “Up” or “Down” arrow to enter temperature
• Press “Start/Stop” to start oven
BROIL OR TO P BROWN
• Press “Broil”
• Press “Start/Stop” to start oven
TOAST
• Press “Toast”
• Press “Lighter” or “Darker” arrow for Your ChoiceTM browning
• If desired, press one or more of the custom settings:
• 4-6 slice
• bagel
• defrost
• reheat - may only be combined with 4-6 slice button
• Press “Start/Stop” to begin toasting
• Ready tone will sound at end of cycle
SET CLOCK
To set:
• Press “Clock”
• Press and hold “Hour” to increase hours
• Press and hold “Min” to increase minutes
• Clock will start automatically when blinking stops
SET TIMER
To set timer, set broil or bake (or convection bake) function and then:
• Press “Timer”
• Press and hold “Hour” to increase hours
• Press and hold “Min” to increase minutes
• Timer will start automatically when blinking stops
• Timer will ring continuously at 0:00
• To clear or reset timer to 0:00, press "Timer" button two more times
TOB-160/165/175 IB-3343E
5/23/05
12:06 PM
Page 5
SPECIAL CORD SET INSTRUCTIONS
A short power supply cord is provided to reduce the risks resulting from
becoming entangled in or tripping over a longer cord.
Longer extension cords are available and may be used if care is exercised
in their use.
If a long extension cord is used, the marked electrical rating of the extension
cord must be at least as great as the electrical rating of the appliance, and
the longer cord should be arranged so that it will not drape over the countertop or tabletop where it can be tripped over or pulled on by children.
the right amount of time for toasting all your favorites.
Your ChoiceTM Browning Memory is programmed at the factory to deliver
medium toast when toasting 2 slices of standard white bread. You can easily
change to a lighter or darker setting if you prefer, but there is no need to reset
it every time. Your ChoiceTM Browning Memory will hold the browning selection
until you change it again or cancel it.
Toasting bagels or English muffins? Just press the “Bagel” button and the
toaster will add the extra time needed for these baked favorites.
NOTICE
Our oven is preset to toast 2 slices unless you change it by using one of the
custom settings. No need to worry about overtoasting, as is common with
many other toaster ovens.
This appliance has a polarized plug (one blade is wider than the other). As a
safety feature, this plug will fit in a polarized outlet only one way. If the plug
does not fit fully in the outlet, reverse the plug. If it still does not fit, contact
a qualified electrician. Do not attempt to defeat this safety feature.
Want to toast 4 to 6 slices? The unique “4-6” slice select touchpad button
adjusts the browning level you want for 4 to 6 slices. In addition, you can
combine custom settings like bagel and defrost, to get the browning results
you want.
INTRODUCTION
Your new Total Touch® Toaster Oven Broiler with Exact HeatTM has an
electronic chip that constantly monitors the temperature to give you consistent
professional results.
Congratulations on your purchase of a Cuisinart® Toaster Oven Broiler with
Exact HeatTM Sensor. It has been carefully designed to bring you years of
enjoyment. Every feature of this advanced appliance makes baking, broiling
and toasting simpler, more accurate and more convenient.
Now you have a choice of baking chicken, roasts, cakes, and more. You can
broil steaks, chops, hamburgers, and the list goes on. Just enter your oven
function and temperature selection and the oven will let you know when it is
ready. You may also use the built-in timer which lets you know when you should
check your food. This oven has a safety feature and will automatically shut off
after four hours of continuous use. Nevertheless, you should always unplug the
oven when not in use. All functions are indicated on the clock display.
FOR HOUSEHOLD USE ONLY
NOT INTENDED FOR COMMERCIAL USE
This is the only toaster oven broiler on the market that can toast to perfection.
You can toast bagels, English muffins and homemade breads without any
guesswork. The secret is Perfect Timing™ Touchpad Control. It provides just
3
TOB-160/165/175 IB-3343E
5/23/05
12:06 PM
Page 6
FEATURES AND BENEFITS
Broiling Pan and Drip Tray
12
8
10
3c
3f
9
5
1
6
3a
1a
1
3
3e
3g
5a
3b
Bake everything from stuffed mushrooms and roasted chicken to cakes and
pies. Because the Cuisinart® Toaster Oven Broiler has been designed with our
Exact HeatTM Sensor, everything comes out mouth-watering and delicious.
1a. Oven Temperature
7
2
1. Bake (or Convection Bake with select models)
Select your desired temperature and the oven will beep to let you know when
that temperature has been reached.
2. Broil
Broiling is fast and easy. The Cuisinart® Toaster Oven Broiler comes with a
broiling pan and drip tray for your convenience.
3. Toast
The “Toast” button allows toasting of a wide variety of breads and bagels.
Easily holds 4 to 6 large slices. The oven is preset to toast 2 slices of standard white bread.
3a. Touchpad Shade Control
Convection Bake function only available with select models.
4
Select from seven brownness settings memorized by the toaster oven broiler.
Combine with custom settings for toast the way you want it. Push the
“Lighter” button to make toast lighter. Push the “Darker” button to make toast
darker. Your browning selection is indicated at the bottom of the clock display
and will remain in the oven’s memory until you change it.
TOB-160/165/175 IB-3343E
5/23/05
12:06 PM
Page 7
3b. LCD Bar
4. Always EvenTM Shade Control
The row of dots grows when “Darker” button is pushed and shrinks when
“Lighter” button is selected. The LCD Bar indicates the level of brownness,
light to dark, from setting one (1) through seven (7).
Electronically monitors and adjusts the oven’s internal temperature to provide
consistent toasting results from one use to the next. Heating elements deliver
even heat for uniform browning.
3c. Custom Setting for 4-6 Slice Toasting
5. Clock
Touchpad control adjusts toasting time when you’re toasting four to six slices.
Gives you accurate browning results without overtoasting. LED indicator lights
when selected.
Time is always displayed.
3d. Custom Setting for 1-Slice Toasting
When toasting one slice, press the “Toast” button and set the browning control at a lighter setting than for 2 or 4 slices.
5a. Hour and Minute Function
Use to set clock and timer.
6. Timer
Input cooking time on the built-in timer. The timer will ring until you shut it off.
3e. Custom Setting for Bagels
7. Start/Stop Function
Touchpad control adds the right amount of time to the browning cycle for
toasting bagels. Also use for English muffins and thick bread slices. LED Indicator lights when selected.
Starts a function when pressed the first time and stops the function when
pressed the second time.
3f. Custom Setting for Defrost
Has two positions. The top position has a 50% stop feature so the rack stops
halfway out of the oven. It can be removed by lifting the front of the rack and
sliding it out.
Touchpad control defrosts and then toasts frozen bread by adding time to the
toast cycle chosen by the browning control. LED Indicator lights when selected.
3g. Custom Setting for Reheat
Touchpad control reheats without browning. LED Indicator lights
when selected.
8. Oven Rack
9. Slide-out Crumb Tray
Removes easily from the back of the toaster oven broiler so that crumbs can
be cleaned from bottom of oven.
10. Cord Storage
3h. Combination Settings
Takes up excess cord and keeps countertop neat.
The four Perfect TimingTM Custom Settings can be combined to give you the
toast you want. Press the "Toast" button and the "Bagel" button for a sliced
bagel toasted to your liking. Combine the "4-6 Slice" button, "Defrost" button
and the "Bagel" button to defrost, then toast 4 to 6 bagel halves. For English
muffins, press the "Bagel" button. See Combination of Custom Settings
section for possible combinations (page 11).
11. Easy Clean Interior
The sides of the oven have a nonstick coating, providing an easy to clean surface.
12. Broiling Pan
A broiling pan is included for your convenience. The broiling pan’s drip tray has
two positions to accommodate a variety of meats, poultry, and fish for broiling.
5
TOB-160/165/175 IB-3343E
5/23/05
12:06 PM
Page 8
Before you begin:
Place your oven on a flat surface.
Before using your oven, move it two to four inches away from the wall or
from any objects on the countertop. Do not use on heat sensitive surface.
DO NOT STORE OBJECTS ON THE TOP OF THE OVEN. IF YOU DO,
REMOVE ALL OBJECTS BEFORE YOU TURN ON YOUR OVEN. THE
EXTERIOR WALLS GET VERY HOT WHEN IN USE. KEEP OUT OF REACH
OF CHILDREN.
GENERAL GUIDELINES
Convection Baking (Only available with select models): The fan gently circulates the heat and surrounds the food to provide exceptionally even temperature. This method has been used for many years in large commercial ovens.
Because convection baking provides consistent even temperature, it may
cook faster than conventional baking. When convection baking, you generally
use a lower than normal oven temperature, about 25ºF lower than conventional (see charts and recipes), and as a result, foods come out more moist
and delicious. Convection baking can be used for roasting meats, whole
chickens, baking cakes, cookies and more.
Conventional Baking: Conventional baking can be used as you would normally use your large kitchen oven.
Broiling: Broiling can be used for beef, chicken, pork, fish and more. Also can
be used to top-brown casseroles and gratins. Caution: Aluminum foil is not
recommended for covering the drip tray. Foil is extremely dangerous when
broiling fatty foods. Grease will accumulate and may catch fire. We don’t
recommend the use of foil, but if foil is used to cover broiling pan, be sure foil
is tucked neatly around the pan and does not touch the walls or heating rods.
Never cover crumb tray.
Toasting: Always have the rack in rack position “B”, as indicated in the diagram on page 12, for even toasting. Always center your item/items in the middle of the rack.
6
WARNING: Placing the rack in the bottom position, or in the top position
with the rack upwards while toasting, may result in a fire. Refer to rack
position diagram for proper use.
Turning off the toaster oven broiler: The “Start/Stop” button, when pushed
the first time, will start the oven. When pushed the second time, during oven
operation, the “Start/Stop” button will turn off the oven. You will know the oven
is off when the LED light turns off.
USE AND CARE
Unwind the power cord. Check that the crumb tray is in place and that there
is nothing in the oven. Plug power cord into the wall outlet.
Broil:
Note: When broiling, add approximately 1/4 cup water to the bottom of the
broiling pan to reduce sizzling and splatter. Place the drip tray in the broiling
pan. Note: There are two positions for the drip tray so that foods of varying
thicknesses can be broiled. Also, the oven rack can be turned up or down
depending on the thickness of the food being broiled. In most cases the oven
rack should be in the higher position (position C – see rack position diagram
on page 12).
To broil, press the “Broil” button on the touchpad. The LED light above the
“Broil” button will turn on. The temperature will automatically set to (500˚F)
broil temperature. Press the “Start/Stop” button to begin broiling. Temperature
cannot be changed. Preheat oven for five minutes with door closed. The clock
display will indicate “BRL” for broil. After the five-minute preheat period, place
the broiling pan in the oven. Always leave door ajar when broiling. Note:
Never use glass oven dishes for broiling.
To stop broil operation, press the “Start/Stop” button.
The built-in timer can be used with this function.
See timer instructions on page 7.
TOB-160/165/175 IB-3343E
5/23/05
12:06 PM
Page 9
Bake:
To bake, press the “Bake” button. The LED light above the bake button will
turn on. The oven temperature is preset for 150°F. Press the “Temp” button
and the “Up” arrow to increase the temperature, or “Down” arrow to decrease
to your desired temperature. Note that the temperature will increase and
decrease in increments of 25ºF. The temperature will read out on the clock
display. Press the “Start/Stop” button to start the oven. When oven reaches
the selected temperature, the words “Temp Ready” will be displayed on the
clock display, and the Temperature Ready Tone will sound 5 times to let you
know the oven is ready to bake.
The built-in timer can be used with this function. See timer instructions
on this page.
Convection Bake:
(Only available with select models.)
To Convection Bake, press the “Conv Bake” button. The LED light above the
“Conv Bake” button will turn on. The oven temperature is preset for 150°F.
Press the “Temp” button and the “Up” arrow to increase the temperature or
“Down” arrow to decrease the temperature. Note that the temperature will
decrease and increase in increments of 25ºF. The temperature will read out on
the clock display. Press the “Start/Stop” button to start the oven. When oven
reaches the selected temperature, the words “Temp Ready” will be displayed
on the clock display, and the Temperature Ready Tone will sound 5 times.
The built-in timer can be used with this function. See timer instructions
on this page.
NOTE: AS A SAFETY MEASURE, THIS OVEN WILL AUTOMATICALLY
SHUT OFF AFTER FOUR HOURS OF CONTINUOUS USE. NEVERTHELESS, ALWAYS UNPLUG THE OVEN WHEN NOT IN USE AND NEVER
LEAVE THE OVEN ON WHEN UNATTENDED.
Ti m e r :
First set oven to bake, convection bake or broil as described on pages 6-7.
Once the oven has reached the proper temperature, place the item in the
center of the rack and close the door (except when broiling – keep door ajar).
Press the “Timer” button. Press and hold the “Hour” button to increase the
hours. The total maximum cook time is 4 hours. Press and hold the “Min” button to increase minutes. The set time will blink five times and then stop blinking.
Once it stops blinking, the timer is set and will begin to count down. You do not
need to press the “Timer” button again. Note: If you do press the “Start/Stop”
button and you have already started the oven, the oven will turn off .
If you set the incorrect time, press the “Timer” button once to clear the timer
to 0:00, then begin to set the correct time. If the timer has been set and is
counting down, the timer can be reset to 0:00 by pressing the “Timer” button
two times. The display will begin to blink to let you know you can enter the
correct time.
At the end of timer setting, the timer will ring continuously until it is turned off.
To stop timer ring, press “Timer” button. Pressing “Start/Stop” can turn off
both the timer and oven.
To view the temperature setting while the timer is running, press the “Temp”
button. The oven temperature will be displayed on the clock for 5 seconds.
After 5 seconds, the display will return to the timer countdown without interruption. This can only be done while using the bake or convection bake functions. It will not work with the broil function. The broil function is set to 500ºF.
Important Notes on Oven Use:
The “Bake” and “Convection Bake” features are always used with the “Temp”
selection button.
The “Broil” button only has one temperature. It is preset to 500ºF so it cannot
be used with the “Temp” button.
The timer can only be used with the bake, convection bake, or broil functions.
Toast:
To toast, make sure the oven rack is in rack position “B”, as indicated in the
diagram on page 12. If toasting two items, center them in the middle of the
rack. Four items should be evenly spaced – two in front, two in back. Close
the glass door.
Press the “Toast” button and the “Start/Stop” button to toast 2 slices of toast.
7
TOB-160/165/175 IB-3343E
5/23/05
12:06 PM
Page 10
The default is set to 2 slices of medium toast (number 4) using standard
white bread.
To select your choice of browning, press the “Toast” button and then the “Up”
arrow for darker toast or the “Down” arrow for lighter toast. You have seven
browning selection shades to choose from. Your browning selection is indicated by the black dots located at the bottom of the clock display. The row of
dots will shrink for lighter shades and grow for darker shades. The browning
number you have selected will also be displayed on the clock.
Your choice of browning selection will remain in the memory of the oven until
you change it or unplug the oven. When you unplug the oven, the browning
selection will automatically return to number 4, medium brown setting.
When toasting, the toasting time will count down on the clock display. The
timing will be different for each custom setting you choose. Keep in mind that
the timing is adjusted by the oven thermostat, so if your oven is already
warm, the toasting time will be shorter than if you start with a cold oven.
B rowning Selection:
To make lighter toast, first press the “Toast” button and then the “Down” arrow
button located to the bottom left of the toast button. Each time you press this
button, the browning selection will get lighter by one setting.
To make darker toast, press the “Up” arrow button located to the top left of
the toast button. Each time you press this button, the browning selection will
get darker by one setting.
The browning level selected will appear at the bottom of the clock window by
the numerical and LCD display.
Desired Color
Light
Medium
Dark
LCD Light Position
Setting 1 or 2
Setting 3, 4, or 5
Setting 6 or 7
CUSTOM SETTINGS
To Make Selection from Custom Settings:
If no custom settings are selected, the toaster is preset to brown 2 slices
of bread to a medium (number 4) setting. The custom settings will adjust to
the time required for achieving the browning shade you have selected.
If you desire a custom setting, select one or more of the following:
4-6 Slice - Increases toasting time for preparing four or more slices of toast.
Bagel - Adds correct amount of time to toast cycle for bagels. This button can
also be used for English muffins and thickly sliced breads.
Defrost - Will defrost, then toast your item. Adds time to the toast cycle for
defrosting.
Reheat - For reheating pretoasted bread. Will reheat without browning.
Note: To prepare one slice without overtoasting, press the “Toast” button and
choose a lighter browning setting than usual.
When choosing these custom settings, a red LED light will come on above
the selected feature button(s). You can combine as many as three of these
custom settings simultaneously to customize your toasting cycle. The reheat
setting can only be combined with the “4-6 Slice” setting.
Stop Toasting:
When the toasting cycle is finished, the oven will beep 5 times and turn off.
If you wish to stop the toasting cycle before it is finished, simply press the
“Start/Stop” button. The toaster oven broiler will cancel your toast cycle and
8
TOB-160/165/175 IB-3343E
5/23/05
12:06 PM
Page 11
hold your browning selection in memory until you change the selection or
unplug the unit. The browning selection will return to the number 4 medium
setting when the oven is unplugged.
Important Notes on Toasting Use:
The “Toast” button must be pressed first, before you can choose your custom
or browning selections.
prevent pieces from falling and baking onto the crumb tray.
This oven can be adjusted for four to six slices of toast by pressing the "4-6
Slice" button on the custom settings control panel. To prevent overtoasting of
a single slice, select the toast button and set browning control to a lighter
setting than you normally would.
The oven rack must be in rack position “B” as indicated in the diagram
on page 12.
The timer can only be used with the bake, convection bake, or broil selections.
Helpful Browning Notes:
Toasting is a combination of drying and cooking the bread. Therefore,
differences in denseness and moisture level from one bread to another can
result in varying toasting times.
For slightly dry bread or thinly sliced bread, use a lighter setting than you
normally would, as it will toast more quickly.
4-6 Slice Button:
The unique 4 to 6 Slice feature will add the right amount of time to toast 4 to
6 slices of bread at once.
1. Place 4-6 slices of bread on the center of the oven rack, 2 or 3 slices in
the front and 2 or 3 slices in the back. Close oven door.
2. Press “Toast” button.
For very fresh bread, thickly sliced bread or whole wheat bread, use a darker
setting than normal. Dense, moist bread may also require a darker setting.
3. Set the browning control: Select desired shade of browning using the
“Lighter” and “Darker” buttons located to the left of the “Toast” button.
Breads with very uneven surfaces (such as English muffins) will require a
darker toast setting. For English muffins, we suggest you use the Total
Touch® “Bagel” button on the Custom Settings panel and setting number 6.
4. Press the “4-6 Slice” button: The LED will illuminate when this feature
is selected.
Thickly cut pieces of bread (including bagels) will take longer, since more
moisture must be evaporated from the bread before toasting occurs. We
suggest you use the Total Touch® “Bagel” button which will add to the normal
toasting time. For moister breads or very thick pieces, you may need to
make the toast setting darker than you normally would. Very thick pieces
may require two cycles.
6. If you are toasting bagel halves, English muffin halves, or slices of wide
toast, you should also press the “Bagel” button.
Before toasting bagels, slice each bagel into two equal halves. Select the
“Bagel” button which adds the extra time needed for toasting most bagels.
5. If defrosting frozen bread slices, also press the “Defrost” button.
7. Press the “Start/Stop” button to start toasting.
To Stop Cycle:
When the 4-6 Slice cycle is complete, the toaster oven broiler will alert you by
beeping 5 times. If you wish to stop the cycle before it is finished, simply
press “Stop/Start” to interrupt.
When toasting raisin or other fruit breads and muffins, remove any loose fruit,
etc. from the surface of the bread before placing in the oven. This will help
9
TOB-160/165/175 IB-3343E
5/23/05
12:06 PM
Page 12
Bagel Button:
Defrost Button:
The bagel feature adds the appropriate amount of extra time to the toasting
cycle to toast your bagels at the color level selected with the Touchpad Shade
Control. The “Bagel” button is designed for the standard bagel size (3
ounces). For deli-size bagels (3-6 ounces) you may need to increase the
darkness setting on the shade control. The “Bagel” button can also be used
to toast English muffins, thick sliced breads, and thick sliced specialty Italian
or Portuguese breads which require longer toasting times than an average
slice of white bread.
The “Defrost” button is designed to first defrost and then toast the bread. The
“Defrost” button extends the toasting cycle slightly.
1. Center bagel half or halves on the oven rack. Close oven door.
2. Press “Toast” button.
3. Set the browning control: Select desired shade of browning using the
“Lighter” and ”Darker” buttons to the left of the “Toast” button.
4. Press the “Bagel” button. The LED will illuminate when this feature
is selected.
5. If defrosting frozen bagel halves, also press the “Defrost” button.
6. To defrost and toast 4 bagel halves, press the “4-6 Slice” button.
7. Press the “Start/Stop” button to start toasting.
To Stop Cycle:
When the bagel cycle is complete, the toaster oven broiler will beep 5 times.
If you wish to stop the cycle before it is finished, simply press the “Start/Stop”
button to interrupt.
10
1. Center slice(s) of bread on the oven rack. Close oven door.
2. Press toast button.
3. Set the browning control: Select desired shade of browning using the
“Lighter” and “Darker” buttons to the left of the “Toast” button.
4. Press the “Defrost” button: The LED will illuminate when this feature is
selected.
5. If you are defrosting bagel halves, English muffin halves or extra wide
toast, you should also press the Bagel button.
6. If you are toasting four slices, you should also press the "4-6 Slice"
button.
7. Press the “Start/Stop” button to start toasting.
To Stop Cycle:
When the defrost and toast cycle is complete, the toaster oven broiler will
beep 5 times. If you wish to stop the cycle before it is finished, simply press
the "Start /Stop" button to interrupt.
TOB-160/165/175 IB-3343E
5/23/05
12:06 PM
Page 13
4-6 Slice - Press Toast + 4-6 Slice + Start/Stop
4-6 Slice - Press Toast + 4-6 Slice + Defrost + Start/Stop
4-6 Slice - Press Toast + 4-6 Slice + Bagel + Start/Stop
Reheat Button:
The reheat feature allows you to reheat toasted bread without browning or
toasting.
1. Center slice(s) of bread on the oven rack.
2. Press the “Reheat” button.
3. Press the “Start/Stop” button to start the function.
To Stop Cycle:
When the reheat cycle is complete, the toaster oven broiler will beep 5 times.
If you wish to stop the cycle before it is finished, simply press the “Start/Stop”
button to interrupt.
4-6 Slice - Press Toast + 4-6 Slice + Reheat + Start/Stop
4-6 Slice - Press Toast + 4-6 Slice + Defrost + Bagel + Start/Stop
The custom settings you choose adjust the toasting time to achieve the
browning results you have selected with the shade control. If you do not
make a selection with the shade control, the oven will operate at the medium
(4) brown setting. If you choose a lighter or darker setting on the shade control, your Cuisinart® Toaster Oven Broiler with Exact HeatTM Sensor will hold
the setting in memory until you change it or unplug the toaster. The custom
settings will not remain in memory; only your browning selection will remain in
the oven’s memory.
CLEANING AND MAINTENANCE
Combination of Custom Settings
We recognize that all toast is not created equal. To help you get the browning results you want, we have developed custom settings with the ability to
combine them for better toasting results. Without making any selections at
all, the Total Touch® will toast for 2 slices of bread. If you are toasting one or
four slices of bread, bagel halves, English muffin halves, or frozen bread, you
can combine the settings for your toasting task. Here are the possible combinations:
2-Slice (no button required) - Press Toast + Start/Stop
Always allow the oven to cool completely before cleaning.
1. Always unplug the oven from the electrical outlet.
2. Do not use abrasive cleansers as they will damage the finish. Simply wipe
the exterior with a clean damp cloth and dry thoroughly. Apply the cleansing agent to a cloth, not to the toaster, before cleaning.
3. To clean interior walls, use a damp cloth and a mild liquid soap solution or
a spray solution on a sponge. Never use harsh abrasives or corrosive
products. These could damage the oven surface. Never use Brillo pads,
etc. on interior of oven.
2-Slice (no button required) - Press Toast + Reheat + Start/Stop
4. To remove crumbs, slide out the crumb tray and discard crumbs. Wipe
clean and replace. Crumb tray is dishwasher safe. To remove baked-on
grease, soak the tray in hot sudsy water or use nonabrasive cleaners.
Never operate the oven without the crumb tray in place.
2-Slice (no button required) - Press Toast + Defrost + Bagel + Start/Stop
5. Wire rack, broiling pan and drip tray are dishwasher safe. If heavily soiled,
2-Slice (no button required) - Press Toast + Defrost + Start/Stop
2- Slice (no button required) - Press Toast + Bagel + Start/Stop
11
TOB-160/165/175 IB-3343E
5/23/05
12:06 PM
Page 14
soak in hot sudsy water or use a nylon scouring pad or nylon brush.
6. Never wrap the cord around the outside of the oven. Use the cord storage
cleats on the back of the oven.
IMPORTANT:
After cooking greasy foods and after your oven has cooled, always clean top
interior of oven. If this is done on a regular basis, your oven will perform like
new. Removing the grease will help to keep toasting consistent cycle after
cycle.
All of our recipes have been tested in our kitchen and specially developed to
work in the Cuisinart® Toaster Oven Broilers. These mouth-watering recipes
are just a sampling of what the Cuisinart® Toaster Oven Broiler can do.
OVEN RACK POSITION DIAGRAMS
Each recipe gives you step-by-step directions and will even tell you what
position the oven rack should be in for best results. Please refer to the diagram below for oven rack positions. Each position is described with a letter
that is referred to in the recipe.
RACK
POSITION
“A”
RACK
POSITION
“B”
RACK
POSITION
“C”
12
TOB-160/165/175 IB-3343E
5/23/05
12:06 PM
Page 15
RECIPES
Bruschetta with Basil and Provolone
Quick Cheese Nachos
These easy to make open-faced sandwiches will impress family and friends.
Homemade nachos make a great snack or appetizer.
Serve with sour cream, guacamole and salsa if desired.
Makes 6 open-faced sandwiches
6
slices Italian bread (sliced 1⁄2 inch thick)
1
small garlic clove, minced
8
plum tomatoes, seeded and chopped (about 2 cups)
1
⁄4
cup chopped fresh basil
1
cup shredded provolone cheese
Place rack in the Cuisinart® Toaster Oven Broiler in position “B” and arrange 3
slices of bread on the rack. Press the Toast button and Browning Selection
# 4. Press the “Start/Stop” button. Remove toasted bread from oven and
reserve. Repeat with remaining bread.
Meanwhile, place a Cuisinart® Non-Stick Stainless 12 1⁄2-inch skillet over medium heat. Add garlic and cook until golden, about 30 seconds. Add tomatoes
and basil; cook until soft but not wet, about 2 minutes. Add shredded cheese
and cook until bubbly, about 30 seconds. Spread over toasted bread and
serve immediately.
Makes 2 servings
15
full-sized tortilla chips (about 2 1⁄4 ounces)
1
⁄2
cup refried beans
1
⁄4
cup jalapeño pepper slices, drained
1
⁄4
cup chopped scallions
1
⁄4
cup sliced black olives
1 1⁄2 cups shredded extra sharp cheddar cheese
Place rack in the Cuisinart® Toaster Oven Broiler in position “A” and preheat
on Broil setting. Press “Start/Stop” button. Arrange chips in an 11 x 7-inch
baking pan. Distribute remaining ingredients over the chips, as evenly as
possible, beginning with the refried beans and ending with the cheddar
cheese on the top. Place in the oven and broil until cheese is bubbly, about 4
minutes. Press “Start/Stop” button. Transfer to serving plate and serve
immediately.
Nutritional information per sandwich:
Nutritional information per serving:
Calories 160 (23% from fat) • carbo. 23g • prot. 8g • fat 4g • sat. fat 3g
chol. 10mg • sod. 285mg
Calories 624 (58% from fat) • carbo. 38g • prot. 28g • fat 40g • sat. fat 20g
chol. 89mg • sod. 1379mg
13
TOB-160/165/175 IB-3343E
5/23/05
12:06 PM
Page 16
Roasted Chicken with Garlic and Lemon
The convection bake setting easily roasts chicken to perfection.
The bake setting will also produce a succulent chicken.
Makes 4 servings
1
roasting chicken (4 lb.)
3
garlic cloves, peeled and thinly sliced
1
lemon, thinly sliced
1
⁄2
teaspoon kosher salt
1
⁄2
teaspoon coarsely ground black pepper
Place rack in the Cuisinart® Toaster Oven Broiler in position “A” and preheat
oven to 350ºF on the Convection Bake setting. Press the “Start/Stop” button.
Place the drip tray in the broiling pan in the lower position.
Remove giblets from chicken. Rinse chicken with cool water and pat dry;
place on prepared pan. Gently lift skin from chicken (do not remove) and
insert garlic and lemon slices under skin. Place any remaining garlic and
lemon slices inside cavity of chicken. Place on rack in oven and bake until
juices run clear and meat is no longer pink, about 55 min. to 1 hour. (Internal
temperature of chicken should be 170°F.) Baste occasionally with the pan
juices during the last 30 minutes of roasting. Remove from oven and transfer
to a cutting board. Press “Start/Stop” button. Let stand 15 minutes before
carving.
Directions for non-convection models: Place rack in position “A” and preheat oven to 350ºF on the “Bake” setting. Press “Start/Stop” button. Prepare
chicken as directed above. Bake until juices run clear and meat is no longer
pink, about 1 hour and 20 minutes. (Internal temperature of chicken should
be 170ºF.) Press “Start/Stop” button.
14
Broiled Lemon-Sage Chicken Breasts
This recipe is great for busy nights. Marinate the chicken in advance.
Add rice and a green salad to complete the meal.
Makes 2 servings
2
boneless, skinless chicken breast halves (about 6 – 8 ounces each)
3
tablespoons olive oil
2
tablespoons fresh lemon juice
2
tablespoons fresh sage leaves
1
small garlic clove, minced
1
⁄2
teaspoon grated lemon zest
1
⁄4
teaspoon coarsely ground black pepper
1
⁄8
teaspoon salt
Rinse chicken and pat dry. Place chicken between two sheets of plastic wrap
and flatten to an even thickness with a mallet. Place in a large plastic ziplock bag and reserve.
In a small bowl combine oil, lemon juice, sage leaves, garlic, lemon zest, pepper and salt. Pour over chicken and turn to coat pieces evenly. Seal bag and
refrigerate for several hours or overnight.
Place the Cuisinart® Toaster Oven Broiler rack in position “C” and preheat on
“Broil” setting, keeping door ajar. Press “Start/Stop” button. Place drip tray in
the broiling pan so the chicken pieces will be about 1 inch from the upper element. Add 1/4 cup water to the broiling pan and arrange chicken pieces on
the drip tray. Broil with door ajar, until chicken is beginning to cook through,
about 8 – 10 minutes. Turn chicken and continue cooking until juices run
clear and interior is no longer pink, about 8 – 10 more minutes. (Internal temperature of chicken should be 170ºF.) Press “Start/Stop” button. Serve garnished with lemon slices and fresh sage leaves, if desired.
Nutritional information per serving:
Nutritional information per serving:
Calories 725 (65% from fat) • carbo. 4g • prot. 58g • fat 53g • sat. fat 15g
chol. 244mg • sod. 464mg
Calories 294 (67% from fat) • carbo. 3g • prot. 21g • fat 22g • sat. fat 3g
chol. 51mg • sod. 194mg
TOB-160/165/175 IB-3343E
5/23/05
12:06 PM
Page 17
Cajun Pork Chops
These oven-baked pork chops have a golden brown coating.
Serve with garlic mashed potatoes and a green salad for a quick meal.
Makes 4 servings
Cooking spray
1
1 /2 teaspoons garlic powder
11/2 teaspoons paprika
1
teaspoon cayenne pepper
1
teaspoon kosher salt
1
teaspoon dried thyme
1 /2
teaspoon finely ground white pepper
1 /4
teaspoon finely ground black pepper
2 /3
cup all-purpose flour
1 /3
cup wheat germ
1 /4
cup plain bread crumbs
1 /2
cup milk (whole, reduced fat, low-fat, or fat-free)
1
large egg, beaten until frothy
4
boneless center cut loin chops, about 6 ounces each
Place Cuisinart® Toaster Oven Broiler rack in position “B” and preheat oven to
375°F on the “Bake” setting. Press “Start/Stop” button. Add 1/4 cup water to
the baking pan; place drip tray in the baking pan in the lower position and
lightly coat with cooking spray.
Combine garlic powder and next 6 ingredients in a small bowl (through black
pepper). Divide spice mixture in half and reserve each half in a flat pan (such
as a pie plate). Add the flour to one pan and mix with rest of the spices; add
the wheat germ and bread crumbs to the second pan and mix with spices. In
a third shallow pan, combine the milk and beaten egg.
Dredge each pork chop in the spiced flour mixture. Dip in the milk mixture,
then coat completely with the spiced crumb mixture. Arrange the pork chops
in a single layer on the prepared pan. Bake for 15 minutes; turn and bake
until juices run clear, about 15 minutes longer. (Internal temperature of pork
should be 160°F – pork will be juicy and tender with just a hint of pink.) Outsides of the pork chops should be golden brown. Press “Start/Stop” button.
Nutritional information per serving:
Calories 431 (31% from fat) • carbo. 13g • prot. 57g • fat 15g • sat. fat 5g
chol. 163mg • sod. 394mg
15
TOB-160/165/175 IB-3343E
5/23/05
12:06 PM
Page 18
Light Cuisinart Meat Loaf
Dijon Glazed Swordfish
This is our updated, lower fat version of a classic Cuisinart recipe.
The glaze is so simple to make, and yet the mustard and herbs
add flavor and zest.
Makes 4 servings
Cooking spray
1
pound ground turkey
1
small onion, peeled and finely chopped
1
slice day-old white bread, in quarters
1
⁄4
cup fresh parsley, chopped
11⁄2 tablespoons skim milk
1
⁄8
teaspoon salt
1
⁄4
teaspoon dried thyme
2
large egg whites
Place rack in the Cuisinart® Toaster Oven Broiler in position “A” and preheat oven to
350ºF on the “Convection Bake” setting. Press “Start/Stop” button. Coat an 81⁄2 x 41⁄2inch loaf pan lightly with cooking spray.
Combine ground turkey, onion, bread, parsley, milk, salt and thyme in a large mixing
bowl and stir to combine. Add egg whites and continue mixing until well blended. Pack
mixture into prepared pan. Bake until cooked through and no longer pink in the center,
about 45 – 50 minutes. (Internal temperature should be 165ºF.) If necessary, drain off
excess liquid that collects on top of meat halfway through cooking. Remove from oven
and let stand for 10 – 15 minutes before serving. Press “Start/Stop” button.
Directions for non-convection models: Place rack in position “A” and preheat oven
to 350ºF on the “Bake” setting. Press “Start/Stop” button. Prepare recipe as directed
above. Bake until meat is cooked through and no longer pink in the center, about 45 –
50 minutes. Press “Start/Stop” button.
Nutritional information per serving:
Calories 167 (20% from fat) • carbo. 5g • prot. 29g • fat 4g • sat. fat 1g • chol. 52mg • sod. 279mg
16
Makes 4 servings
2
tablespoons Dijon-style mustard
1
tablespoon olive oil
1
small garlic clove, minced
1
teaspoon dried oregano
1
⁄4
teaspoon salt
Cooking spray
11⁄2 pounds fresh swordfish steak, about 1 inch thick, cut into 4 pieces
In a small bowl combine mustard, oil, garlic, oregano and salt. Place rack in
the Cuisinart® Toaster Oven Broiler in position “B” and preheat the oven on
the “Broil” setting. Press the “Start/Stop” button. Place the drip tray in the
broiling pan so the fish will be about 11⁄2 to 2 inches from the upper element.
Lightly spray the broiler rack with cooking spray and add 1⁄4 cup water to the
broiling pan. Arrange swordfish steaks on drip tray and brush the top of each
steak with a thin layer of glaze. Place in the oven and leave the door ajar.
Broil, glazed side up, until top of steak is bubbly and brown, about 8 – 10
minutes (time may be shorter for thinner swordfish steaks). Turn with a spatula, brush with glaze, and broil until fish is flaky but not dry, about 5 – 7 minutes. Press “Start/Stop” button. Transfer to dinner plates and serve immediately.
Nutritional information per serving:
Calories 240 (41% from fat) • carbo.1g • prot. 34g • fat 11g • sat. fat 2g
chol. 66mg • sod. 381mg
TOB-160/165/175 IB-3343E
5/23/05
12:06 PM
Page 19
Roasted Root Ve g e t a b l e s
Baked Potatoes
®
These vegetables are easy to prepare and complement many meat dishes.
Makes 4 servings
2
tablespoons olive oil
1
⁄2
pound small red potatoes *
1
⁄2
cup peeled baby carrots
1
medium red onion, peeled, cut into 1-inch pieces
1
large yam, peeled, cut into 1⁄2-inch pieces
1
teaspoon dried rosemary
1
⁄4
teaspoon coarsely ground black pepper
1
⁄4
teaspoon kosher salt
Place rack in the Cuisinart® Toaster Oven Broiler in position “A” and preheat oven
to 450ºF on the “Convection Bake” setting. Press “Start/Stop” button. Add oil to
an 11 x 7-inch baking pan and add red potatoes, carrots and onion. Toss gently to
coat evenly with oil. Place in oven and bake for 10 minutes, stirring occasionally.
Add yam pieces and bake, stirring occasionally, until vegetables are golden brown
and soft but not mushy, about 20 more minutes. Press “Start/Stop” button. Sprinkle with rosemary, pepper and salt; toss to coat.
* Select small potatoes that are about 1 inch in diameter. If not available, cut
large potatoes into 1-inch pieces.
Directions for non-convection models: Place rack in position “A” and preheat oven to 450ºF on the “Bake” setting. Press “Start/Stop” button. Add oil to
an 11 x 7-inch baking pan and add red potatoes, carrots and onion. Toss gently to coat evenly with oil. Place in oven and bake for 10 minutes, stirring
occasionally. Add yam pieces and bake, stirring occasionally, until vegetables
are golden brown and soft but not mushy, about 25 more minutes. Press
“Start/Stop” button. Sprinkle with rosemary, pepper and salt; toss to coat.
Nutritional information per serving:
The Cuisinart Toaster Oven Broiler makes perfect baked
potatoes with a fluffy interior and a crisp, papery skin.
Makes 4 servings
4
Idaho or russet potatoes (about 8 ounces each)
Place rack in the Cuisinart® Toaster Oven Broiler in position “B” and preheat
oven to 400°F on Convection Bake setting. Press “Start/Stop” button. Meanwhile, wash and dry potatoes. Use the tines of a fork to prick potatoes in several places to allow steam to vent during baking. (Option: if you rub the skin
with about 1/4 teaspoon of vegetable or olive oil before baking, the skin will be
crisper and browner.) Place directly on rack in preheated oven and bake until
soft and easily pierced with a fork, about 45 minutes. Press “Start/Stop” button. Remove potatoes from oven and slit with a sharp knife down the center
to vent. To serve, pinch open the top to expose the flesh and fluff with a fork.
Serve topped with butter, margarine or sour cream, as desired. (Convection
baking will produce a slightly crispier skin than traditional heat.)
Variation: Substitute sweet potatoes or yams for white potatoes.
Directions for non-convection models:
Place rack in position “B” and preheat oven to 400°F on bake setting. Press
“Start/Stop” button. Bake potatoes for about 55-60 minutes, until soft and
easily pierced with a fork. Remove potatoes from oven and slit with a sharp
knife down the center to vent. Serve as desired, with butter, margarine or
sour cream.
Nutritional information per serving:
Calories 247 (0% from fat) • carbo. 57g • prot. 5g • fat 0g • sat. fat 0g
chol. 0mg • sod. 18mg
Calories 147 (43% from fat) • carbo. 19g • prot. 2g • fat 7g • sat. fat 1g • chol. 0mg • sod. 135mg
17
TOB-160/165/175 IB-3343E
5/23/05
12:06 PM
Page 20
Cuisinart Rolls
Exceptionally light texture and buttery taste make these rolls a winner.
Makes 16 rolls
6
ounces evaporated skim milk
1
package active dry yeast
11⁄2 tablespoons sugar
1
large egg, well beaten
23⁄4 cups all-purpose flour
4
ounces butter, cut into 1-inch pieces
1
teaspoon salt
cooking spray
egg glaze (1 large egg beaten with 1 teaspoon water)
In a small saucepan over medium-low heat, warm milk to 110º – 115ºF and
remove from heat. Dissolve yeast and sugar in milk; let sit until foamy, about
3 – 5 minutes. Stir in egg and reserve.
In a Cuisinart food processor fitted with the metal blade, process flour, butter
and salt until combined, about 15 – 20 seconds. With machine running, add
yeast mixture in a steady stream as fast as flour absorbs it. After dough
forms a ball, process until smooth and elastic, about 60 seconds. Place in
large plastic food storage bag. Squeeze out air, seal bag, and let rise in a
warm place until doubled in size, about 1 hour.
18
Coat an 8-inch round baking pan with vegetable oil cooking spray. Place
dough on a lightly floured surface and punch down. Divide dough into 16
pieces and shape each into a ball. Place, just touching, in prepared pan.
Cover with plastic wrap sprayed with cooking spray, and let rise in a warm
place for 45 minutes.
Meanwhile, place rack in Cuisinart® Toaster Oven Broiler in position “B” and
preheat oven to 350ºF on “Convection Bake” setting. Press “Start/Stop” button. Brush rolls with egg glaze and bake until golden brown, about 35 – 40
minutes. Rolls should sound hollow when tapped on bottom of pan. Press
“Start/Stop” button. Cool 10 minutes in pan; remove from pan and cool on
wire rack.
Directions for non-convection models: Prepare rolls as directed above.
Place rack in position “B” and preheat oven to 350ºF on “Bake” setting. Press
“Start/Stop” button. After brushing with egg glaze, bake until golden brown,
about 30 – 35 minutes. Press “Start/Stop” button. Cool as directed above.
Nutritional information per roll:
Calories 155 (41% from fat) • carbo. 19g • prot. 4g • fat 7g • sat. fat 4g
chol. 38mg • sod. 212mg
TOB-160/165/175 IB-3343E
5/23/05
12:06 PM
Page 21
Herbed Potato Galette
Garlic Bread
These golden potato slices are an elegant accompaniment
to roasted meat or poultry. The potatoes must be very thinly sliced.
Warm, toasted garlic bread will make any meal memorable.
Makes 2 servings
1
medium new potato (about 8 ounces)
2
tablespoons margarine, melted
1
⁄4
teaspoon dried rosemary
1
⁄8
teaspoon dried oregano
1
⁄8
teaspoon dried thyme
Kosher salt and pepper, to taste
Place rack in the Cuisinart® Toaster Oven Broiler in position “B” and preheat
oven to 425ºF on “Bake” setting. Press “Start/Stop” button.
Wash and dry potato; do not peel. Using a sharp knife or food processor,
slice potato paper-thin. Place in a medium bowl and toss gently with melted
butter to coat each slice. Arrange slices in an 11 x 7-inch baking pan so they
are closely overlapping. Crumble herbs and seasonings; sprinkle on top of
the potato slices. Bake until golden brown and crispy, about 20 – 25 minutes.
Press “Start/Stop” button.
Nutritional information per serving:
Calories 135 (73% from fat) • carbo. 8g • prot. 1g • fat 11g • sat. fat 2g
chol. 0mg • sod. 136mg
Makes 16 slices
4
large garlic cloves, peeled
1
ounce Parmesan cheese, cut into 1-inch pieces
1
⁄3
cup butter
1
⁄4
cup olive oil
1
⁄2
teaspoon salt
1
⁄4
teaspoon black pepper
1
loaf Italian bread (16 inches long)
Place rack in Cuisinart® Toaster Oven Broiler in position “B” and preheat oven
to 450ºF on “Bake” setting. Press “Start/Stop” button.
In a Cuisinart food processor fitted with the metal blade, process garlic until
finely chopped, about 15 seconds. Scrape bowl and add cheese; process
until finely chopped, about 30 seconds. Add butter, oil, salt and pepper;
process until smooth, about 15 seconds. Scrape bowl as necessary.
Cut bread into two 8-inch pieces; cut each piece in half lengthwise and
spread each cut side with garlic mixture. Place two pieces of prepared bread
directly on oven rack, cut side up, and bake until toasted, about 10 – 12 minutes. Remove from toaster oven with a spatula and repeat with remaining
two pieces of bread. Press “Start/Stop” button. Slice into 2-inch pieces and
serve warm.
Nutritional information per slice:
Calories 80 (90% from fat) • carbo. 1g • prot. 1g • fat 8g • sat. fat 3g
chol. 12mg • sod. 149mg
19
TOB-160/165/175 IB-3343E
5/23/05
12:06 PM
Page 22
Lemon Blueberry Loaf Cake
This delicious loaf can be served for dessert or as a quick bread.
Makes 10 servings
cooking spray
2
cups all-purpose flour
3
⁄4
cup sugar
2
teaspoons grated lemon zest
11⁄2
teaspoons baking powder
1
⁄4
teaspoon salt
2
large eggs, well beaten
1
⁄2
cup butter, melted
1
⁄2
cup low-fat 2% milk
1
cup fresh or frozen blueberries
1
⁄2
cup walnut halves, chopped
Place rack in the Cuisinart® Toaster Oven Broiler in position “A” and preheat
oven to 350ºF on “Convection Bake” setting. Press “Start/Stop” button. Lightly coat an 81⁄2 x 41⁄2-inch loaf pan with cooking spray.
20
Combine flour, sugar, zest, baking powder and salt in a large mixing bowl.
Combine eggs, butter and milk in a 2-cup liquid measure and mix to combine.
Add egg mixture to flour mixture; stir with wooden spoon until just combined;
do not overmix (batter will not be smooth). Add blueberries and walnuts; mix
until just blended (do not overmix).
Pour into prepared pan and bake until a toothpick inserted in the center
comes out clean, about 1 hour. Remove from oven and cool on wire rack for
10 minutes. Press “Start/Stop” button. Remove loaf from pan and let cool
completely on wire rack.
Directions for non-convection models: Place rack in position “A” and preheat oven to 350ºF on the “Bake” setting. Press “Start/Stop” button. Prepare
recipe as directed above and bake until a toothpick inserted in the center
comes out clean, about 1 hour and 20 minutes. Press “Start/Stop” button.
Cool as directed above.
Nutritional information per serving:
Calories 267 (37% from fat) • carbo. 37g • prot. 5g • fat 11g • sat. fat 6g
chol. 62mg • sod. 219mg
TOB-160/165/175 IB-3343E
5/23/05
12:06 PM
Page 23
Heath Bar™ Blondies
Both kids and grownups will love these bar cookies.
Makes 20 bars
Cooking spray
1
cup all-purpose flour
1
teaspoon baking powder
1
⁄4
teaspoon salt
6
tablespoons butter, softened
1
cup firmly packed light brown sugar
1
large egg
1
tablespoon milk (whole, reduced fat, low-fat or fat-free)
1
teaspoon vanilla extract
1
cup coarsely chopped Heath Bars™ (about four 1.4 ounce bars) or
1 cup HEATH® BITS O BRICKLE®
and cool completely on rack before cutting. Cut into 20 bars.
Directions for non-convection models: Place rack in position “A” and
preheat oven to 350°F on bake setting. Prepare as directed. Bake until golden
brown and toothpick inserted in the center comes out clean, about 28-30 minutes. Press “Start/Stop” button. Cool and cut as directed.
Nutritional information per bar (made with reduced fat milk):
Calories 145 (41% from fat) • carbo. 20g • prot. 1g • fat 7g • sat. fat 4g
chol. 25mg • sod. 78mg
Place rack in Cuisinart® Toaster Oven Broiler in position “A” and preheat oven
to 350°F on Convection Bake setting. Press “Start/Stop” button. Lightly coat
a 7 x 11-inch baking pan with cooking spray.
Combine flour, baking powder and salt in a small bowl; reserve.
Place butter and sugar in a medium mixing bowl. Using a Cuisinart®
SmartPower™ 7-Speed Hand Mixer, beat on speed 2 until light and fluffy,
about 30 seconds. Add egg, milk and vanilla; beat on speed 3 until well combined, about 30 seconds. Add flour mixture and beat on speed 1 until combined, about 30 seconds. Scrape bowl and add Heath® bits and mix on speed
1 until combined, about 15 - 20 seconds. Spread evenly in prepared pan and
bake until golden brown and a toothpick inserted in the center comes out
clean, about 20 – 22 minutes. Press “Start/Stop” button. Remove from oven
21
TOB-160/165/175 IB-3343E
5/23/05
12:06 PM
Page 24
Banana Whole Wheat Muffins
Oats, raisins and nuts add flavor and texture to these delicious breakfast treats.
Makes 6 muffins
1
⁄2
cup golden raisins
1
⁄2
cup old-fashioned oats
1
⁄2
cup whole wheat flour
1
teaspoon baking powder
1
⁄4
teaspoon ground cinnamon
1
⁄8
teaspoon ground allspice
1
⁄8
teaspoon baking soda
1
⁄8
teaspoon salt
1
medium banana, peeled and mashed
1
large egg
1
⁄4
cup honey
2
tablespoons canola oil
1
⁄3
cup walnuts, coarsely chopped
1
teaspoon sugar
Place rack in Cuisinart® Toaster Oven Broiler in position “B” and preheat oven
to 425ºF on “Convection Bake” setting. Press “Start/Stop” button. Line 6
muffin cups with paper liners or foil baking cups.
22
Place raisins in a small bowl and cover with hot water. Let sit for 10 minutes,
drain and reserve.
Combine oats, flour, baking powder, cinnamon, allspice, baking soda and salt
in a medium mixing bowl. Make a well in the center and reserve.
Combine banana, egg, honey and oil in a small mixing bowl and stir to combine. Add to dry ingredients and mix with a spoon just until dry ingredients
are moistened; batter will be lumpy. Add raisins and nuts; stir just to combine.
Fill prepared muffin cups with batter (fill almost to the top) and sprinkle tops
with sugar. Bake until tops are lightly browned and a toothpick inserted in the
center comes out clean, about 15 – 20 minutes. Press “Start/Stop” button.
Remove from muffin pan and cool on wire rack.
Directions for non-convection models: Place rack in position “B” and preheat oven to 425ºF on “Bake” setting. Press “Start/Stop” button. Prepare
muffins as directed above and bake until tops are lightly browned and a toothpick inserted in the center comes out clean, about 20 – 25 minutes. Press
“Start/Stop” button. Remove from muffin pan and cool on wire rack.
Nutritional information per muffin:
Calories 330 (49% from fat) • carbo. 38g • prot. 4g • fat 18g • sat. fat 2g
chol.30mg • sod.143mg
TOB-160/165/175 IB-3343E
5/23/05
12:06 PM
Page 25
WARRANTY
CUISINART® TOASTER OVEN BROILER
WITH EXACT HEATTM SENSOR
THREE-YEAR LIMITED WARRANTY
This warranty is available to consumers only. You are a consumer if you own
a Cuisinart® Toaster Oven Broiler with Exact HeatTM Sensor that was purchased at retail for personal, family, or household use. Except as otherwise
required under applicable state law, this warranty is not available to retailers
or other commercial purchasers or owners.
We warrant that your Cuisinart® Toaster Oven Broiler with Exact HeatTM Sensor will be free of defects in material or workmanship under normal home use
for three years from the date of original purchase.
We suggest that you complete and return the enclosed warranty registration
card promptly to facilitate verification of the date of original purchase. However, return of the warranty registration card is not a condition of these warranties.
If your toaster oven broiler should prove to be defective within the warranty
period, we will repair it (or, if we think it necessary, replace it) without charge
to you. To obtain warranty service, please call our Customer Service Center
toll-free at 1-800-726-0190, or write to:
Cuisinart
150 Milford Road
East Windsor, NJ 08520
To facilitate the speed and accuracy of your return, please enclose $15.00 for
shipping and handling of the product. (California residents need only supply
proof of purchase and should call 1-800-726-0190 for shipping instructions.)
Please also be sure to include a return address, daytime phone number,
description of the product defect, product serial number (stamped on bottom
of product base), and any other information pertinent to the product’s return.
Please pay by check or money order.
Your Cuisinart® Toaster Oven Broiler with Exact HeatTM Sensor has been
manufactured to strict specifications and has been designed for use with the
Cuisinart® Toaster Oven Broiler with Exact HeatTM Sensor accessories and
replacement parts. These warranties expressly exclude any defects or damages caused by accessories, replacement parts, or repair service other than
those that have been authorized by Cuisinart. These warranties do not cover
any damage caused by accident, misuse, shipment, or other than ordinary
household use. These warranties exclude all incidental or consequential
damages. Some states do not allow the exclusion or limitation of incidental or
consequential damages, so the foregoing limitation may not apply to you.
CALIFORNIA RESIDENTS ONLY
California law provides that for In-Warranty Service, California residents have
the option of returning a nonconforming product (A) to the store where it was
purchased or (B) to another retail store which sells Cuisinart® Products of the
same type. The retail store shall then decide to either repair the product,
refer the consumer to an independent repair facility, replace the product, or
refund the purchase price less the amount directly attributable to the consumer’s prior usage of the product. If either of the above two options does
not result in the appropriate relief to the consumer, the consumer may then
take the product to an independent repair facility if service or repair can be
economically accomplished. Cuisinart and not the consumer will be responsible for the reasonable cost of such service, repair, replacement, or refund for
nonconforming products under warranty.
23
TOB-160/165/175 IB-3343E
5/23/05
12:06 PM
Page 26
California residents may also, according to their preference, return nonconforming products directly to Cuisinart for repair or, if necessary, replacement
by calling our Customer Service Center toll-free at 1-800-726-0190. Cuisinart
will be responsible for the cost of the repair, replacement, and shipping and
handling for such nonconforming products under warranty.
BEFORE RETURNING YOUR CUISINART® PRODUCT
If you are experiencing problems with your Cuisinart® product, we suggest
that you call our Cuisinart Service Center at 1-800-726-0190 before returning
the product to be serviced. If servicing is needed, a Representative can confirm whether the product is under warranty and direct you to the nearest service location.
Important: If the nonconforming product is to be serviced by someone other
than Cuisinart’s Authorized Service Center, please remind the servicer to call
our Consumer Service Center at 1-800-726-0190 to ensure that the problem
is properly diagnosed, the product is serviced with the correct parts, and the
product is still under warranty.
24
TOB-160/165/175 IB-3343E
5/23/05
12:06 PM
Page 27
NOTES
25
TOB-160/165/175 IB-3343E
5/23/05
COFFEE
MAKERS
12:05 PM
Page 1
FOOD
PROCESSORS
TOASTERS
HAND
MIXERS
BLENDERS
COOKWARE
ICE CREAM
MAKERS
Cuisinart offers an extensive assortment of top quality products to make life in the
kitchen easier than ever. Try some of our other countertop appliances and
cookware, and Savor the Good LifeTM.
©2000 Cuisinart
Cuisinart® is a registered trademark
of Cuisinart
150 Milford Road
East Windsor, NJ 08520
Printed in China
00CU13357
IB-3343E
www.cuisinart.com