1
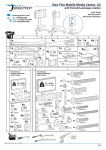
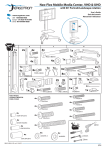
Neo-Flex Mobile Media Center, LD
with 90˚ Portrait/Landscape rotation
User's Guide
Guía del usuario
Manuel de l’utilisateur
Holds displays with the following
VESA mounting hole pattern:
• 100 x 100 mm
• 200 x 200 mm
• 200 x 300 mm
• 300 x 200 mm
• 300 x 300 mm
• 400 x 200 mm
• 400 x 300 mm
• 500 x 200 mm
25 - 50 lbs
(11.3 - 22.7 kg)
• 500 x 300 mm
• 600 x 200 mm
• 600 x 300 mm
• 200 x 400 mm
• 300 x 400 mm
• 400 x 400 mm
• 500 x 400 mm
• 600 x 400 mm
-15˚
90˚
+5˚
20"
(510 mm)
20"
-25˚
360˚
(510 mm)
Holds displays with the following
VESA mounting hole pattern:
• 75 x 75 mm
• 100 x 100 mm
• 200 x 100 mm
• 200 x 200 mm
+5˚
25 - 36 lbs
(11.3 - 16 kg)
WARNING
Stored Energy Hazard: The lift mechanism in the tower is under tension and will move up rapidly, on its own,
as soon as attached equipment is removed. For this reason, DO NOT remove equipment or make adjustments
to lift tension unless the front assembly has been moved to the highest position on the tower! Failure to
follow this instruction may result in serious personal injury and/or equipment damage!
ADVERTENCIA
Riesgo de energía almacenada: El mecanismo de elevación de la torre está bajo tensión y se moverá
rápidamente hacia arriba por sí solo si se retira el equipamiento que hay conectado al mismo. Es por ello
que NO deberá quitar equipamiento ni hacer ajustes en la tensión de elevación a menos que la estructura
delantera se haya movido antes hacia la posición más alta de la torre. No seguir estas instrucciones podría
provocar daños personales y/o materiales graves.
AVERTISSEMENT
<30 lbs
(15 kg)
<5 lbs
Danger : Le mécanisme d’élévation dans la tour est sous tension et se lève rapidement, tout seul, dès que
le matériel est retiré. Pour cette raison, NE PAS retirer votre matériel ou faire des ajustemensts à la tension
d’élévation à moins que la partie avant n’ait été mise à la position la plus élevée de la tour ! Risque de blessure
corporelle ou d’endommagement matériel en cas de non respect de cette instruction.
(2.2 kg)
13mm
15mm
14mm
888-24-073-M-02 rev. K • 02/11
1 of 16
A
B
1x
1x
Leg Mounting Hardware
4x
1
1x
1x
1x
2
Leg Cover Mounting Screws
M3.5 x 6mm
1x
8x
Shelf Mounting Hardware
1x
3
4x
M10 x 60mm
8x
4x
M3 x 37mm
2x
TM Mounting Hardware
1x
1x
2x
4x
4
2x
1x
M6x8mm
4x
4x
2x
M8 x 14mm
M4 x 16mm
400mm Extension Hardware
2x
5
4x
4x
4x
Large Display Cart Hardware
m
5.1(ID) x 10(OD) x 12m
4x
5.1(ID) x 10(OD) x 6mm
M5 x 16mm
4x
m
8.1(ID) x 16(OD) x 12m
4x
6
M6x20mm
4x
8.1(ID) x 16(OD) x 6mm
4x
4x
5.1(ID) x 10(OD) x 18mm
4x
4x
M4x20mm
M6x45mm
M4x40mm
4x
4x
M8x25mm
4x
8.1(ID) x 16(OD) x 24mm
M5x20mm
8x
4x
4x
4x
5.3(ID) x 16(OD) x 1.0mm 6.3(ID) x 14(OD) x 1.0mm
M8x50mm
M5x40mm
100x100mm VESA Plate Hardware
7
1x
4x
M5 x 10mm
25 - 36 lbs
(11.3 - 16 kg)
Power Strip Hardware
8
9
1x
4x
2x
2x
Cable Management Support Hardware
1x
1x
M5x8mm
1x
10
1x
M5x9mm
M5 x 8mm
1x
2x
2x
1x
Top Cap Hardware
1x
4x
1x
M5x8mm
4x
8x
M4 x 12mm
6x
M4 x 6mm
M6 x 14mm
6x
4x
M6 x 8mm
6mm
888-24-073-M-02 rev. K • 02/11
2 of 16
1a
1x
1x
Shipping Box
Caja de embalaje
Boîte d'expédition
15mm
b
Leg Mounting Hardware
4x
4x
2
1x
1x
Leg Cover Mounting Screws
1x
8x
M3.5 x 6mm
CAUTION: DO NOT overtighten fasteners. Overtightening may cause damage to your equipment.
Cuidado:: No sobreapriete los tornilllos, pues podría causar un daño al equipo.
Attention: ne forcez pas le serrage de la vis, cela pourrait endommager l’écran et/ou les attaches.
888-24-073-M-02 rev. K • 02/11
3 of 16
3a
Shelf Mounting Hardware
2x
2x
M3 x 37mm
b
c
Shelf Mounting Hardware
2x
M3 x 37mm
2x
6x
2x
888-24-073-M-02 rev. K • 02/11
4 of 16
4
25 - 36 lbs
(11.3 - 16 kg)
25 - 50 lbs
(11.3 - 22.7 kg)
Continue to Step 4 on page 8...
Continúe por el paso 4 en la página 8...
Suite à l'Étape 4 en page 8…
4
8 of 16
4
4x
5
6
1x
M5 x 8mm
M6 x 8mm
888-24-073-M-02 rev. K • 02/11
5 of 16
25 - 36 lbs
(11.3 - 16 kg)
75x75mm
100x100mm
7
200x100mm
1
4x
200x200mm
M4 x 6mm
1
4x
M4 x 6mm
2
4x
M4 x 6mm
3
6x
4x
M4 x 12mm
2 4x
4x
M6 x 14mm
6mm
6x
6mm
M6 x 14mm
888-24-073-M-02 rev. K • 02/11
6 of 16
8
It is important that you adjust this product according to the weight of the mounted equipment as described in the following steps. Any
time equipment is added or removed from this product, resulting in a change in the weight of the mounted load, you should repeat these
25 - 36 lbs
adjustment steps to ensure safe and optimum operation.
(11.3 - 16 kg)
Adjustments should move smoothly and easily through the full range of motion and stay where you set it. If adjustments are difficult and
do not stay in the desired position, follow the instructions to loosen or tighten the tension to create a smooth, easy adjustment motion. Depending on your product and the
adjustment, it may take several turns to notice a difference.
Es importante ajustar este producto conforme al peso del equipo montado, según se describe en los pasos siguientes. Cada vez que se agregue o quite equipo de este producto y cambie el
peso de la carga montada, deberá repetir estos ajustes para garantizar un funcionamiento seguro y óptimo.
Los movimientos de ajuste deben poder realizarse de manera suave y firme dentro de la amplitud de movimiento permitida, y mantenerse donde usted los fije. Si los ajustes son abruptos o
no permanecen en dicha posición, siga las instrucciones para aflojar o ajustar la tensión y suavizar así el movimiento. Dependiendo del producto y el ajuste, es posible que deba hacer varios
intentos hasta poder observar la diferencia .
Il est important que vous fixiez ce produit par rapport au poids du matériel installé, comme l’indiquent les étapes suivantes. À chaque fois que vous ajoutez ou que vous retirez du matériel
de ce produit, et que le poids du matériel change, répétez ces étapes d’ajustement pour garantir la sécurité et une utilisation optimale.
Les réglages doivent s'effectuer facilement et sans forcer dans toutes les positions et rester en place une fois réalisés. Si les réglages sont difficiles à effectuer et ne restent pas en position,
suivez les instructions pour desserrer ou resserrer la tension afin que les mouvements soient plus aisés. Selon le produit que vous utilisez et le réglage, il faut parfois effectuer plusieurs tours
de vis avant de remarquer une différence.
Lift – Up and down
Elevación (arriba y abajo)
Ajustement en hauteur : bas et haut
Follow these instructions to tighten or loosen tension.
Siga estas instrucciones para ajustar o aflojar la tensión.
Suivez ces instructions pour desserrer ou resserrer la tension.
Tilt – Forward and Backward
Inclinación (adelante y atrás)
Inclinaison : Avant et arrière
Follow these instructions to tighten or loosen tension.
Siga estas instrucciones para ajustar o aflojar la tensión.
Suivez ces instructions pour desserrer ou resserrer la tension.
14mm
4mm
CAUTION! The bottom
nut will turn during adjustment of the top nut;
DO NOT apply any tool to
the bottom nut. Serious
damage to the Pivot may
occur if these instructions
are not followed.
PRECAUCIÓN La tuerca inferior gira mientras se ajusta la
tuerca superior; NO aplique ninguna herramienta a la tuerca
inferior. Si no sigue estas instrucciones, pueden producirse
daños graves.
ATTENTION ! L’écrou du bas tournera pendant l’ajustement
de celui du haut ; n’utilisez AUCUN outil sur l’écrou du bas.
De graves dommages pourraient survenir dans le cas où ces
instructions ne seraient pas suivies.
9
Continue to Step 10 on page 13...
Continúe por el paso 10 en la página 13...
Suite à l'Étape 10 en page 13…
10
13 of 16
888-24-073-M-02 rev. K • 02/11
7 of 16
25 - 50 lbs
(11.3 - 22.7 kg)
4a
TM Mounting Hardware
TM Mounting Hardware
b
4x
2x
4x
4x
M8 x 14mm
M6x8mm
5
100 mm
100 mm
13mm
6
Continue to Step 6 on page 9...
Continúe por el paso 6 en la página 9...
Suite à l'Étape 6 en page 9…
9 of 16
200 mm
300 mm
400 mm
500 mm
600 mm
600 mm
500 mm
400mm Extension Hardware
400 mm
4x
300 mm
200 mm
M5 x 16mm
4x
888-24-073-M-02 rev. K • 02/11
8 of 16
25 - 50 lbs
(11.3 - 22.7 kg)
6
FIND APPROPRIATE FASTENERS FOR YOUR DISPLAY:
BUSQUE ABRAZADERAS APROPIADAS PARA LA PANTALLA:
TROUVEZ LES FIXATIONS APPROPRIÉES À VOTRE ÉCRAN :
4x
Large Display Cart Hardware
5.1(ID) x 10(OD) x 6mm
4x
M4x20mm
4x
4x
4x
M6x20mm
8.1(ID) x 16(OD) x 6mm
M4x40mm
4x
4x
5.1(ID) x 10(OD) x 18mm
4x
M6x45mm
M5x20mm
4x
8.1(ID) x 16(OD) x 24mm
4x
4x
M5x40mm
M8x25mm
4x
m
5.1(ID) x 10(OD) x 12m
4x
4x
8x
M8x50mm
m
8.1(ID) x 16(OD) x 12m
4x
5.3(ID) x 16(OD) x 1.0mm 6.3(ID) x 14(OD) x 1.0mm
Ø
M4
M5
M6
M8
M4x20mm
M5x20mm
M6x20mm
M8x25mm
Screw Diameter
Diámetro de tornillo
Diamètre de vis
Screw Length
Longitud de tornillo
Longueur de vis
20 mm
20 mm
20 mm
25 mm
6mm
6mm
6mm
6mm
6mm
IMPORTANT: To ensure screws have the minimum thread engagement in the display, tighten screws with at least six, full, 360° revolutions.
IMPORTANTE: Para asegurarse de que los tornillos tienen capturada la rosca mínima necesaria en la pantalla, apriételos con al menos seis vueltas de rosca completas (de 360º).
IMPORTANT : afin de vous assurer que les vis sont bien engagées dans l’écran, serrez-les en effectuant au moins six tours complets de 360°.
CAUTION: DO NOT overtighten fasteners. Overtightening may cause damage to your equipment.
Cuidado:: No sobreapriete los tornilllos, pues podría causar un daño al equipo.
Attention: ne forcez pas le serrage de la vis, cela pourrait endommager l’écran et/ou les attaches.
Recessed Mount
Empotrado
Encastré
M4x40mm
M5x40mm
40 mm
40 mm
M6x45mm
45 mm
M8x50mm
50 mm
18mm
24mm
12mm
12mm
888-24-073-M-02 rev. K • 02/11
9 of 16
a
25 - 50 lbs
b
100x100mm VESA Plate Hardware
4x
(11.3 - 22.7 kg)
7
M5 x 10mm
100 mm
100 mm
Use fastener chosen from Step 6.
Utilice la abrazadera elegida en el paso 6.
Utilisez la fixation choisie au cours de l’étape 6.
200 mm
y1 = y2
x < 600mm
300 mm
400 mm
500 mm
600 mm
Use fastener chosen from Step 6.
Utilice la abrazadera elegida en el paso 6.
Utilisez la fixation choisie au cours de l’étape 6.
MINIMUM THREAD ENGAGEMENT
LONGITUD MÍNIMA A ENROSCAR
ENGAGEMENT MINIMUM DES VIS
g Tighten screws with at least six, full, 360° revolutions*, but do not over tighten; over tightening
may cause damage to display and/or brackets.
*
Six full turns will ensure a minimum thread
engagement roughly equal to the diameter of the
screw. For instance, if the screw diameter is 8mm,
the minimum thread engagement is also 8mm.)
g Apriete los tornillos con al menos 6 giros
completos de 360º * , pero no los sobreapriete
pues podría dañar el monitor y/o los soportes de
montaje.
*
Seis giros completos aseguran una rosca mínima del tornillo prácticamente igual al diámetro
del tornillo. Por ejemplo, si el diámetro del tornillo
es de 8 mm., la rosca mínima deberá ser también
de 8 mm.
g Serrez la vis en réalisant au moins 6 tours
complets* de 360°. Ne serrez pas trop car cela
pourrait endommager l’écran et/ou les étriers.
tours complets permettent d’engager la vis d’à
*peu6près
la longueur de son diamètre. Par exemple,
si la vis a pour diamètre 8mm, la longueur engagée
sera également de 8 mm.
888-24-073-M-02 rev. K • 02/11
10 of 16
25 - 50 lbs
(11.3 - 22.7 kg)
TM Mounting Hardware
8a
b
2x
M4 x 16mm
c
TM Mounting Hardware
90˚
1x
a
b
888-24-073-M-02 rev. K • 02/11
11 of 16
25 - 50 lbs
(11.3 - 22.7 kg)
9
It is important that you adjust this product according to the weight of the mounted equipment as described in the following steps. Any time equipment is added or removed from this product,
resulting in a change in the weight of the mounted load, you should repeat these adjustment steps to ensure safe and optimum operation.
Adjustments should move smoothly and easily through the full range of motion and stay where you set it. If adjustments are difficult and do not stay in the desired position, follow the
instructions to loosen or tighten the tension to create a smooth, easy adjustment motion. Depending on your product and the adjustment, it may take several turns to notice a difference.
Es importante ajustar este producto conforme al peso del equipo montado, según se describe en los pasos siguientes. Cada vez que se agregue o quite equipo de este producto y cambie el peso
de la carga montada, deberá repetir estos ajustes para garantizar un funcionamiento seguro y óptimo.
Los movimientos de ajuste deben poder realizarse de manera suave y firme dentro de la amplitud de movimiento permitida, y mantenerse donde usted los fije. Si los ajustes son abruptos o
no permanecen en dicha posición, siga las instrucciones para aflojar o ajustar la tensión y suavizar así el movimiento. Dependiendo del producto y el ajuste, es posible que deba hacer varios
intentos hasta poder observar la diferencia .
Il est important que vous fixiez ce produit par rapport au poids du matériel installé, comme l’indiquent les étapes suivantes. À chaque fois que vous ajoutez ou que vous retirez du matériel de ce
produit, et que le poids du matériel change, répétez ces étapes d’ajustement pour garantir la sécurité et une utilisation optimale.
Les réglages doivent s'effectuer facilement et sans forcer dans toutes les positions et rester en place une fois réalisés. Si les réglages sont difficiles à effectuer et ne restent pas en position, suivez
les instructions pour desserrer ou resserrer la tension afin que les mouvements soient plus aisés. Selon le produit que vous utilisez et le réglage, il faut parfois effectuer plusieurs tours de vis
avant de remarquer une différence.
Lift – Up and down
Elevación (arriba y abajo)
Ajustement en hauteur : bas et haut
14mm
Follow these instructions to tighten or loosen tension.
Siga estas instrucciones para ajustar o aflojar la tensión.
Suivez ces instructions pour desserrer ou resserrer la tension.
888-24-073-M-02 rev. K • 02/11
12 of 16
10a
Power Strip Hardware
2x
b
2x
M5x9mm
c
Cable Management Support Hardware
2x
d
12
Cable Management Support Hardware
a
1x
b
1x
M5x8mm
888-24-073-M-02 rev. K • 02/11
13 of 16
c
Cable Management Support Hardware
4x
2x
NOTE: Leave enough slack in cables to
allow full range of motion.
No deje el cable excesivamente tenso
Laisser du mou dans le câble
d
Top Cap Hardware
1x
1x
M5x8mm
1x
888-24-073-M-02 rev. K • 02/11
14 of 16
3.69”
(93.7 mm)
3.2”
(80 mm)
38.4"-58.4"
(974 - 1484 mm)
38.4"-58.4"
(974 - 1484 mm)
64"
(1633 mm)
64"
(1633 mm)
9.8"
(249 mm)
9.8"
(249 mm)
16.8"
5"
9.8"
(127 mm)
5"
(127 mm)
(250 mm)
16.8"
9.8"
(427 mm)
29.4"
4.9"
(427 mm)
(746 mm)
(124 mm)
(250 mm)
17"
29.4"
4.9"
(432 mm)
(746 mm)
(124 mm)
17"
(432 mm)
22"
22"
(559 mm)
3.94”
42"
(100 mm)
3.94”
(1067 mm)
(100 mm)
(559 mm)
42"
(1067 mm)
24.6”
(625 mm)
23.6” (600 mm)
19.68” (500 mm)
15.7” (400 mm)
11.81” (300 mm)
7.87” (200 mm)
15.7”
(400 mm)
17.7”
7.87”
(450 mm)
(200 mm)
24.6”
888-24-073-M-02 rev. K • 02/11
(625 mm)
15 of 16
WARNING
CAUTION
STORED ENERGY HAZARD!
DO NOT OPEN TOWER OR REMOVE
SAFETY GUARD!
A primary mechanism within the
tower is under tension and can be
hazardous to people exposed to it
under certain extreme conditions. DO
NOT open the tower; DO NOT
attempt to service the cart/stand. DO
NOT remove safety guards or labels
designed to protect or inform of
possible hazards. Only
Ergotron-approved installers may
service or otherwise modify
cart/stand. Failure to heed this
Warning may result in serious
Personal Injury and Damage both to
the cart/stand and equipment.
TIPPING HAZARD!
DO NOT move Cart with Display in highest
position. DO NOT push Cart from front or back
of Tower. DO NOT move Cart over cords or
uneven, dirty, soft or sloping surfaces. DO
NOT move Cart by pushing on Display. Failure
to comply with this caution may result in Cart
instability leading to equipment damage or
personal injury.
WARNING
DO NOT load the Cart/Stand past
maximum weight capacity. DO NOT
mount a display larger than the
recommended size. Failure to comply
with warning may result in Cart/Stand
instability leading to equipment
damage or personal injury.
kg
TO MOVE CART
1. Push Display down to lowest position on Cart.
2. Disconnect power cord and attach to Tower.
3. Unlock casters; point casters in direction of travel.
4. Push Cart from side with hands on Tower.
822-025-00
LD: 25-50 lbs (11.3-22.7 kg)
30lbs
(15kg)
kg
kg
+30lbs
(15kg)
WARNING
TIPPING HAZARD!
DO NOT allow children on Cart / Stand.
DO NOT route electric cords or
equipment cables within reach of
children. LOCK CASTERS when Cart is
stationary. Failure to comply with this
warning may result in Cart / Stand
instability leading to equipment damage
or personal injury.
888-24-073-M-02 rev. K • 02/11
16 of 16