1
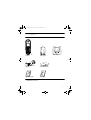
Xtra HS_VOIP841_UK.book Seite 1 Freitag, 13. Juli 2007 7:18 19
VOIP841
www.philips.com/support
EN
Telephone
WARNING Never use non-rechargeable batteries.
Xtra HS_VOIP841_UK.book Seite 2 Freitag, 13. Juli 2007 7:18 19
Xtra HS_VOIP841_UK.book Seite 1 Freitag, 13. Juli 2007 7:18 19
Table of contents
4.2
Other Skype products
9
4.3
Common terminologies
9
5
Using your phone
10
2
5.1
Call
10
Noise
3
5.2
End a call
11
1.5
Software licences
3
5.3
Answer a call
11
1.6
Conformity
3
5.4
Intercom and Conference Calls
12
1.7
Recycling and disposal
3
5.5
Skype incoming call is received during
Landline call
13
1.8
Warranty
3
6
Settings
14
2
Your phone
4
6.1
Personalize your phone’s display
14
2.1
What’s in the box
4
6.2
Personalize your phone’s sounds
14
2.2
What else will you need
4
6.3
Extra features
15
2.3
Overview of the phone
5
6.4
System settings
15
2.4
Display icons
6
7
Handset default settings
17
3
Getting started
7
8
Menu structure
18
3.1
Connect the charger
7
3.2
Insert the batteries
7
9
Technical data
19
3.3
Register the handset
7
10
Frequently asked questions
20
3.4
Turn the handset ON/OFF
8
11
Index
21
4
Skype® and Skype tools
9
12
Contact information
23
4.1
What is Skype®?
9
1
Important safety information
2
1.1
Power requirements
2
1.2
Digital security system
2
1.3
Hearing aid compatibility (HAC)
1.4
Table of contents
1
Xtra HS_VOIP841_UK.book Seite 2 Freitag, 13. Juli 2007 7:18 19
1
Important safety
•
information
•
Take time to read this user manual before you
use your Telephone. It contains important
information and notes regarding your Telephone.
1.1 Power requirements
• This product requires an electrical supply of
120 V AC for North America and 230 V AC for
Europe. Observe the electrical ratings and
other markings on the power adapters and
make sure they are appropriate for use with
the outlet supply.
• In case of power failure, the communication
can be lost as well as the date and time settings.
• The Electrical network is classified as
hazardous. The only way to power down the
charger is to unplug the power supply from the
electrical outlet. Ensure that the electrical
outlet is alway easily accessible.
! Warning
• Use only the mains adapter supplied with this
equipment. Incorrect adapter polarity or
voltage can seriously damage the unit.
• Do not allow the charging contacts or the
battery to come into contact with conductive
materials.
• Do not allow the handset to come into contact
with liquids or moisture.
• Never use any other battery than the one
delivered with the product or recommended
by Philips: risk of explosion.
• Always use the cables provided with the
product.
• Handsfree activation could suddenly increase
the volume in the earpiece to a very high level:
make sure the handset is not too close to your
ear.
• This equipment is not designed to make
emergency calls when the power fails.
2
•
•
•
•
Alternative arrangements should be made for
access to emergency services.
No Emergency Calls for Skype line. Skype is
not a replacement for your ordinary telephone
and cannot be used for emergency calling.
Do not open the handset, base unit or charger.
This could expose you to high voltages.
There is a slight chance that your product
could be damaged by an electrical storm.
Unplug the product from the power supply and
telephone socket during a storm.
Do not use the handset in an explosive hazard
area such as where there is gas leaking.
Do not use this product near intensive care
medical equipments or by persons with
pacemakers.
This product can interfere with electrical
equipment such as answering machine,
television, radio, and computers if placed too
close. Put the base unit at least one meter from
such appliances.
1.2 Digital security system
Your cordless phone uses a digital security
system to protect against false ringing,
unauthorized access, and charges to your phone
line.
There is a unique digital security code
programmed in each unit. When the base and the
handset are powered up the first time, the
handset automatically links with the base ready
for normal and secure use. If you have purchased
additional accessory handset(s), you will need to
follow the registration procedure in “Handset
Registration” in this manual to maintain intact the
digital security.
1.3 Hearing aid compatibility (HAC)
This telephone system meets FCC and Industry
Canada standards for Hearing Aid Compatibility.
Please note that this telephone works by sending
radio signals between the base unit and the
handset. These signals may interfere with some
hearing aids, causing a humming noise.
Important safety information
Xtra HS_VOIP841_UK.book Seite 3 Freitag, 13. Juli 2007 7:18 19
1.4 Noise
Electrical pulse noise is present at one time or
another. This is most intense during electrical
storms. Certain kinds of electrical equipment,
such as light dimmers, fluorescent bulbs, motors,
fans, etc., also generate pulse noise.
Because radio frequencies are susceptible to this,
you may on occasion hear pulse noise through
the base unit. This is usually only a minor
annoyance and should not be interpreted as a
defect of the unit. Humming noice, if present in
hearing aid through the handset, falls into the
same category.
1.5 Software licences
This product contains open source software
packages. An overview of these packages, the
licences and/or notices that apply to them, and
the source code for a number of these packages
are available in the on-line product
documentation, which is visible on
www.philips.com/support.
1.6 Conformity
We, Philips declare that the product is in
compliance with the essential requirements and
other relevant provisions of R&TTE Directive
1999/5/EC.
You can find the Declaration of Conformity on
www.philips.com/support.
1.7 Recycling and disposal
Disposal instructions for old products:
The WEEE directive (Waste Electrical and
Electronic Equipment Directive ; 2000/96/EC) has
been put in place to ensure that products are
recycled using best available treatment, recovery
and recycling techniques to ensure human health
and high environmental protection.
Your product is designed and manufactured with
high quality materials and components, which can
be recycled and reused.
Important safety information
Do not dispose of your old product in your
general household waste bin.
Inform yourself about the local separate
collection system for electrical and electronic
products marked by this symbol.
Use one of the following disposal options:
• Dispose of the complete product (including its
cables, plugs and accessories) in the designated
WEEE collection facilities.
• If you purchase a replacement product, hand
your complete old product back to the retailer.
The shop should accept it as required by the
WEEE directive.
Disposal instructions for batteries:
Batteries should not be disposed of with
general household waste.
Packaging information:
Philips has marked the packaging with standard
symbols designed to promote the recycling and
appropriate disposal of your eventual waste.
A financial contribution has been paid to
the associated national recovery &
recycling system.
The labeled packaging material is
recyclable.
1.8 Warranty
The warranty informations are available on
www.philips.com/support
3
Xtra HS_VOIP841_UK.book Seite 4 Freitag, 13. Juli 2007 7:18 19
2
Your phone
2.1 What’s in the box
One telephone
handset
One handset
battery cover
One charger power
adapter
Two NiMH AAA
750mAh batteries
Quick start guide
User guide
One Charger
2.2 What else will you need
• A VOIP8411B/05 base station
4
Your phone
Xtra HS_VOIP841_UK.book Seite 5 Freitag, 13. Juli 2007 7:18 19
2.3 Overview of the phone
Your phone
A Handset Indicator
Lit when call in progress.
Blink when receiving a call or new voicemail(s).
B Soft keys
Use to perform function displayed above the key.
It is displayed as text in a box (i.e Menu ) in this
guide.
C Navigation keys
Left/Right: To move the cursor or to change
selection.
Up: Shortcut to Skype Change Status menu.
To scroll up menu items or to increase
the ringer and receiver volume.
Down:Shortcut to All Calls List.
To scroll down menu items or to reduce
the ringer and receiver volume.
D End and On/Off key
To end a call or to exit menus. To power on the
handset or to enter the power menu.
E Talk and Recall key
To make and receive calls. To send flash signal for
landline calls.
F Digit keys
To enter digits and characters.
G Pound, Keylock and Pause key
To enter character # or to insert a pause. In idle
mode, press to lock the keypad or to display the
symbols matrix.
H Star and Text edit key
Short press to insert *.
Long press to enter editing mode.
I Loudspeaker
During a call, the loudspeaker can be switched
on/off.
J Mute key
To mute/un-mute the handset microphone
during a call.
K Call Tranfer/Intercom
To initiate an internal call (a second handset is
needed to inititate an internal call).
5
Xtra HS_VOIP841_UK.book Seite 6 Freitag, 13. Juli 2007 7:18 19
2.4 Display icons
Each icon gives you a visual message of what is
happening on your handset.
Signal strength
Call in progress
Speaker on
Ringer Off
New missed call
Skype network alert
Note
This icon informs you about :
- SkypeOut credit low
- SkypeIn expiry date
- VoiceMail expiry date
Handset lost link
Battery level
Line on hold
Microphone muted
New voicemail
New request waiting
Keypad locked
6
Your phone
Xtra HS_VOIP841_UK.book Seite 7 Freitag, 13. Juli 2007 7:18 19
3
Getting started
• The battery icon appears on the screen:
charging has started.
3.1 Connect the charger
1 Insert the plug of the charger power adapter
into the socket on the bottom of the charger.
2
Plug the power adapter into your power
outlet.
3.2 Insert the batteries
1 Place the two rechargeable batteries
(included) into the battery compartment.
! Warning
Verify the batteries polarity when inserting the
batteries. Incorrect polarity may damage the
product.
Slide the battery door firmly into place.
Warning
RISK OF EXPLOSION IF BATTERY IS
REPLACED BY AN INCORRECT TYPE. USE
RECOMMENDED TYPE SUPPLIED WITH THIS
PRODUCT. NEVER USE NONRECHARGEABLE BATTERIES.
2
!
3.2.1 Place the handset on the charger
Place the handset on the charger. The power
supply of the charger must be connected to the
power outlet.
Getting started
Note
Leave the handset(s) on the charger for at least
14 hours before first use.
Note
If the batteries are completely exhausted, the
product will not be able to power-on
immediately. Handset may get warm during initial
charge. This is normal.
3.2.2 Verify the battery level
The battery icon displays the current battery
level:
100% full
60% full
30% full
Empty. Require charging.
Your handset may power down shortly if it is not
charged after the battery is empty.
Note
If you are on the phone while the battery is nearly
empty, you will hear warning tones. Your call
maybe cut off shortly after the warning.
3.3 Register the handset
Registration allows communication between the
base unit and handset(s). If the handset cannot
communicate with its base, you will not be able to
make any call or use many of the functions and
features on the phone.
1 Press Reg. . Register shall be highlighted.
2 Enter the system PIN (Default: 0000). Use
Clear to correct typing errors.
3 Press Enter to confirm.
• Your handset starts searching for the base.
7
Xtra HS_VOIP841_UK.book Seite 8 Freitag, 13. Juli 2007 7:18 19
4
Press
on the base unit until the two
indications turn off.
• If registration is successful, the signal icon
displays steadily.
Tip
If registration failed, repeat the above procedure.
Note
The base can register up to 4 handsets, then the
base unit registration memory is full. If you
attempt to register an additional handset, the
registration process will be aborted. You can use
additional base units, see “Register your
handset(s) with additional base”, page 15.
3.4.2 Turn the handset OFF
1 Press and hold
for 2 seconds.
• The power menu is displayed.
2 Scroll to Switch Off. Press Select .
• The handset is switched off.
Note
The handset cannot receive any call if the power
is switched off.
3.3.1 Verify the signal strength
The signal icon
displays the link status
between the handset and the base unit.
Signal icon
: The handset and base unit are
linked. They can communicate.
No signal icon
: The handset and base unit
have lost link. They are not able to communicate.
Take your handset closer to the base unit to
reconnect the link.
If you move too far away from the base unit while
you are on the phone, you will hear warning
tones notifying you that the handset is almost out
of range - lost link. Take the handset closer to the
base unit or your call will be cut off shortly after
the warning.
Note
If your handset has lost link, you will not be able
to make or receive any call. In addition, you will
not be able to carry out many of the phone
functions and features.
3.4 Turn the handset ON/OFF
3.4.1 Turn the handset ON
Press
.
• The handset may take a few seconds to power
up.
8
Getting started
Xtra HS_VOIP841_UK.book Seite 9 Freitag, 13. Juli 2007 7:18 19
4
Skype® and Skype tools
4.1 What is Skype®?
Skype® is a little piece of software that lets you
make free Internet calls to your friends all over
the world.
! Warning
No Emergency Calls. Skype is not a replacement
for your ordinary telephone and cannot be used
for emergency calling.
4.2 Other Skype products
You can talk to anyone over the Internet for free
with Skype, and you will always be able to do that.
There are some other useful things you can do on
Skype that are not free (but they are pretty
cheap, actually).
4.3 Common terminologies
These are some of the Skype terminologies used
in this user guide.
• Outgoing call: When A calls B.
• Incoming call: When A receives a call from B.
• Missed call: When A receives a call from B
but fails to answer it.
• SkypeOut: Calling regular landline or mobile
phone from Skype.
• SkypeIn: Calling a regular number which
connects the call to a Skype account.
• Skype credit: Skype credit allows you to
purchase a number of different products and
services from Skype. Skype credit can be used
to place SkypeOut calls and purchase a SkypeIn
subscription.
Tip
All information obtained from Skype content
guideline and website. For more information, visit
skype.com.
4.2.1 SkypeOut™
SkypeOut is a cheap way to call out from Skype
to landlines and mobile phones. You can also use
SkypeOut when you are on the move, to forward
your Skype calls to any phone.
4.2.2 SkypeIn™ with free Skype
Voicemail™
SkypeIn is a number your friends can call you
from any phone. You answer in Skype. You can
get numbers in one or more of the places offered,
and receive calls in Skype from anywhere in the
world.
4.2.3 Skype Voicemail™
Skype Voicemail takes your calls when you are
busy or offline.
Skype® and Skype tools
9
Xtra HS_VOIP841_UK.book Seite 10 Freitag, 13. Juli 2007 7:18 19
5
Using your phone
5.1 Call
Your phone supports both Skype line and PSTN
landline calls. A Skype call is a call using the Skype
line. A landline call is a call using your regular
phone line.
Note
This telephone is not designed for making
emergency telephone calls when the power fails.
Alternative arrangements should be made for
access to emergency services.
Tip
Use
(Up or Down) to navigate in the menus.
5.1.1 Make a call
1 Press
for the landline.
2 Enter the phone number.
• The number is dialed out on the landline.
Note
Check the signal strength before making a call and
during a call. For details, see “Verify the signal
strength”, page 8.
5.1.2 Pre-dial
1 Enter the phone number or Skype contact
name.
Note
Press and hold
to enter alphanumeric mode
during standby. You can enter any Skype contact
name you want to call.
Tip
• Press Clear to erase a digit.
• Use Left and Right to move the cursor.
• Press and hold
to enter a pause after a
digit has been entered. P displays on the
screen.
2 Press
.
• The number is dialed out on the preferred line.
• During a call, the call timer displays the talk
time of your current call.
10
Tip
You can also use the SkypeOut Shortcut: Press
twice to call from SkypeOut. The preferred
line setting will be ignored.
5.1.3 Call from the landline
1 Enter the phone number.
2 Press Options .
3 Scroll to Landline.
4 Press Select .
• The number is dialed out.
5.1.4 Call from SkypeOut
1 Enter the phone number. The phone number
shall include +, the international calling code,
area code, and subscriber number.
Tip
To insert +: Press and hold 0.
Press Options .
Scroll to SkypeOut.
4 Press Select .
• The number is dialed out.
Note
You need to purchase Skype credit to make
SkypeOut calls. Your phone will give you an alert
when your account is low on Skype credits or
have no credits.
2
3
5.1.5 Call from the contact list
In idle mode:
1 Press Contact .
2 Scroll to the contact.
3 Press
.
• The number is dialed out on the preferred line.
Note
Using your phone
Xtra HS_VOIP841_UK.book Seite 11 Freitag, 13. Juli 2007 7:18 19
5.1.6 Redial the last number
In idle mode:
Press
twice within 1 second.
• The last number you called is dialed out using
the same line as before.
Tip
To redial the last landline number: Press
,
and then press Redial . The last number you
called using the landline will be dialed out.
5.1.7 Call from the outgoing call list
The outgoing call list stores the number(s) you
have dialed. The most recent dialed number is
stored at the top of the list.
In idle mode:
1 Press Menu .
2 Scroll to History. Press Select .
3 Scroll to Outgoing. Press Select .
4 Scroll to the number you want.
5 Press
.
• The number is dialed out using the same line
as before. For example, if you made the call
using SkypeOut, the call will be dialed out using
SkypeOut again.
OR
5 Press Options , and then select Call to dial
on the preferred line.
5.1.8 Call from the call history
Your phone stores the outgoing, incoming, and
missed calls.
In idle mode:
1 Press Menu .
2 Scroll to History. Press Select .
3 Scroll to the call list you want. Press Select .
4 Scroll to the record you want.
5 Press
.
• The number is dialed out on the preferred line.
5.2 End a call
Press
Using your phone
OR
place the handset on the charger.
• The call ends.
5.3 Answer a call
When the phone rings, press
.
• The call is established.
Notes
• Caller ID Service: Consult and subscribe from
your service provider.
• Missed Call Alert: When a call is missed, your
phone displays You have Missed Calls. Press
View for more options.
Tip
When a Skype call comes in, you can reject the
call by pressing Reject.
5.3.1 Adjust the earpiece volume
During a call press
(Up or Down) to
adjust the volume.
5.3.2 Mute / Unmute the microphone
This feature enables you to mute / unmute the
microphone. When the microphone is muted, the
other party cannot hear you.
During a call, press
to mute the
microphone.
• The caller cannot hear you, but you can still
hear his voice.
When the microphone is muted, press
to unmute the microphone.
• You can now communicate with the caller.
5.3.3 Switch handsfree ON / OFF
! Warning
Handsfree activation can suddenly increase the
volume in the earpiece to a very high level. Make
sure the handset is not too close to your hear.
The handsfree features let you talk on the phone
without holding onto the handset.
Tips
• Use the speaker to involve everyone in the
room in the conversation.
11
Xtra HS_VOIP841_UK.book Seite 12 Freitag, 13. Juli 2007 7:18 19
• Use the headset to talk privately with the
caller.
1 During a call, press
.
• The speaker is turned on. Start talking.
2 Press
again to turn off the speaker.
5.3.4 Use the headset
Note
Headset is optinonal and not provided. A headset
with 2.5mm jack and minimum 32 ohm speaker
impedance must be used. It is available from retail
store.
Plug the headset into the headset jack at the
side of your handset.
5.4 Intercom and Conference Calls
An intercom call is a call to another handset
registered on the same base unit. This function
can only be used with a multi-handset
configuration. It allows you to make free internal
calls, transfer external calls from one handset to
another and to use the conference option.
A conference call involves conversation between
other handset(s) and outside caller(s).
Note
Some of these functions could be unavailable if
the extra handset used is not a VOIP841.
Tip
Use
(Up or Down) to navigate in the menus.
5.4.1 Call another handset
An intercom call can only involve two handsets
registered on the same base unit.
In idle mode:
1 Press
.
2 Scroll to the handset you want to call.
3 Press Call .
• Wait for the other party to answer your call.
4 Press
to cancel or end the intercom call.
Tip
To customize your intercom ringer, see
“Personalize your phone’s sounds”, page 14.
12
5.4.2 Internal call during an external call
While talking on the phone on the Skype line or
landline, you can call another handset.
1 Press
during the call.
2 Scroll to the handset you want to call.
3 Press Call .
• Wait for the other party to answer your call.
To return to the external caller:
Press End during the intercom call.
• You are now connected to the external caller.
5.4.3 Call transfer
During a call in progress you can tranfer the
external call to a specific handset.
1 Press
during the call.
2 Scroll to the handset you want to call.
3 Press Call .
4 Press
after the other party answers
your call.
• The external call is now transferred to the
other handset.
5.4.4 Conference call
Conference call allows one external call to be
shared with two handsets registered on the same
base. The three people can share the
conversation. No operator subscription is
needed.
1 Press
during the call with the external
caller.
2 Scroll to the handset you want to call.
3 Press Call .
• Wait for the other party to answer your call.
4 Press Conf. .
• You are now on a 3-way conference call.
5 Press
to end the conference call.
5.4.5 During an intercom call
While talking on the intercom call, an external
incoming call from either Skype line or Landline
can be received.
Using your phone
Xtra HS_VOIP841_UK.book Seite 13 Freitag, 13. Juli 2007 7:18 19
When external incoming call is received during
intercom call, a call waiting tone will be emitted
on the earpiece of both handsets. Caller ID
information, if available will be shown on both
handsets.
1 Press End or
to end the intercom call.
• Both handsets will return to standby mode.
2 Normal incoming ring for the external call
will ring on both handsets again.
3 Press Answer to answer the call.
4 Press End or
to end the external call.
5.5 Skype incoming call is received during
Landline call
While talking on the Landline call, incoming call
from the Skype line may come in. When incoming
Skype call is received during the Landline call, a
call waiting tone can be heard on the off hook
handset. Caller ID information, if any, for the
Skype call will be shown on the handset screen.
1 Press Answer to answer the incoming Skype
call.
• The Landline call will be ended automatically.
2 Press End or
to end the Skype call.
Note
• If there is more than one handset registered to
the same base, when incoming call is received
from the Skype line while Landline is being used
by one handset, the other handsets in standby
mode will ring the incoming Skype call
normally. Caller ID information, if any, will be
shown on the handset screens. The handsets in
standby mode may Answer or Reject the Skype
incoming call by pressing the respective soft
keys.
• May also receive incoming Landline call during
a Skype call by following the above procedure;
however, incoming Landline call may not be
rejected.
Using your phone
13
Xtra HS_VOIP841_UK.book Seite 14 Freitag, 13. Juli 2007 7:18 19
4
6
Settings
5
6
Make this your handset - change the look and
sound to suit your needs and tastes. From the
display to sound, this section shows you how to
set your preference.
6.1 Personalize your phone’s display
Set the display language
This section only applies to model(s) with
multiple language support.
In idle mode:
1 Press Menu .
2 Scroll to Settings. Press Select .
3 Scroll to General. Press Select .
4 Scroll to Language. Press Select .
5 Scroll to the new setting. Press OK .
• The new setting is saved.
Set the backlit
Backlit is the background light of the screen. The
backlit turns on when you press a key on the
handset, and it turns off after the time-out period
to save power. You can set the backlit time-out
period. For example, if the time-out period is
1 minute, the backlit turns off after 1 minute from
the last key press.
In idle mode:
1 Press Menu .
2 Scroll to Settings. Press Select .
3 Scroll to Screen. Press Select .
4 Scroll to Backlight. Press Select .
5 Scroll to the new setting. Press OK .
• The new setting is saved.
Adjusting LCD contrast
Contrast is the intensity of the text and
background color displayed on the screen.
Adjusting the contrast changes the darkness of
the text and background color.
In idle mode:
1 Press Menu .
2 Scroll to Settings. Press Select .
3 Scroll to Screen. Press Select .
14
Scroll to Contrast. Press Select .
Press
(Left or Right) to adjust the
contrast.
Press OK .
• The new setting is saved.
Adjust LCD brightness
Brightness is the amount of light emitted from the
screen.
In idle mode:
1 Press Menu .
2 Scroll to Settings. Press Select .
3 Scroll to Screen. Press Select .
4 Scroll to Brightness. Press Select .
5 Press
(Left or Right) to adjust the
brightness.
6 Press OK .
• The new setting is saved.
6.2 Personalize your phone’s sounds
Set your handset's ringer melody
Your handset has 4 ringers: Skype, SkypeIn,
Landline, and Intercom. You can change the
melody of each ringer.
In idle mode:
1 Press Menu .
2 Scroll to Settings. Press Select .
3 Scroll to Tones. Press Select .
4 Scroll to Ring Tone. Press Select .
5 Scroll to the ringer you want. Press Select .
6 Scroll to the melody you want. Press OK .
• The new setting is saved.
Set your handset's ringer volume
Your handset has 5 ringer volume levels. This
setting changes the volume level of all ringers.
In idle mode:
1 Press Menu .
2 Scroll to Settings. Press Select .
3 Scroll to Tones. Press Select .
4 Scroll to Ring Volume. Press Select .
5 Press
(Up or Down) to select the volume
level.
6 Press Select
• The new setting is saved.
Settings
Xtra HS_VOIP841_UK.book Seite 15 Freitag, 13. Juli 2007 7:18 19
Set your handset's ringer style
Your handset has 5 ringer styles: Ringing,
Ascending, Ring Once, Beep Once, Off. This
setting changes the ringer type of all ringers.
In idle mode:
1 Press Menu .
2 Scroll to Settings. Press Select .
3 Scroll to Tones. Press Select .
4 Scroll to Ring Type. Press Select .
5 Scroll to the new setting. Press OK .
• The new setting is saved.
Set the notification tones
Notification tones will sound when you have a
new missed call, new voicemail or new
request(s).
In idle mode:
1 Press Menu .
2 Scroll to Settings. Press Select .
3 Scroll to Tones. Press Select .
4 Scroll to Notification. Press Select .
5 Scroll to the new setting. Press OK .
• The new setting is saved.
Set the keypad tone
Key tone is the sound you hear when you press a
key on your handset.
In idle mode:
1 Press Menu .
2 Scroll to Settings. Press Select .
3 Scroll to Tones. Press Select .
4 Scroll to Keypad Tone. Press Select .
5 Scroll to the new setting. Press OK .
• The new setting is saved.
Set the confirmation tones
Handset tones will sound upon a successful or
unsuccessful operation and upon placing the
handset on the charger.
In idle mode:
1 Press Menu .
2 Scroll to Settings. Press Select .
3 Scroll to Tones. Press Select .
4 Scroll to Confirmation. Press Select .
5 Scroll to the new setting. Press OK .
• The new setting is saved.
Settings
6.3 Extra features
Discover and explore the additional features your
phone offers! Find out how these features can
benefit you and help you make the most from
your phone.
6.3.1 Keypad lock
You can lock the keypad to prevent accidental
presses on the handset while you are carrying it
around.
Lock the keypad
In idle mode:
Press and hold
.
• The keypad is locked, and
is displayed.
Unlock the keypad
In idle mode:
1 Press Unlock .
• Press * to unlock? is displayed.
2 Press
to unlock.
• The keypad is unlocked.
6.3.2 Search missing handset(s)
In idle mode:
1 Press
on the base unit.
• All the handsets connected to this base unit
ring.
2 Press
on the base unit again to stop
paging.
• All the handsets stop ringing.
OR
2 Press any key on the handset to stop the
paging of that handset.
6.4 System settings
6.4.1 Register your handset(s) with
additional base
This section shows you how to register your
handset to additional base unit(s). If your handset
displays Unregistered, refer to “Register the
handset”, page 7.
15
Xtra HS_VOIP841_UK.book Seite 16 Freitag, 13. Juli 2007 7:18 19
In idle mode:
1 Press Menu .
2 Scroll to Settings. Press Select .
3 Scroll to Handset. Press Select .
4 Scroll to Register. Press Select .
5 Enter the system PIN (Default: 0000). Use
Clear to make corrections.
6 Press Enter to confirm.
• Your handset starts searching for the base.
7 Press
on the base unit until the two
indicators start blinking.
Note
Each handset can register up to 4 base units. After
registering to 4 base units, your handset
registration memory is full.
6.4.2 Select a base unit
You can switch your handset between different
base units if your handset has registered to these
base units. For your convenience, you can
program the handset to automatically connect to
the closest base unit. You can also program the
handset to only connect to a fixed base unit you
have specified.
Note
Your handset must be registered to the base units
you want to select beforehand.
In idle mode:
1 Press Menu .
2 Scroll to Settings. Press Select .
3 Scroll to Handset. Press Select .
4 Scroll to Select Base. Press Select .
5 Scroll to the base unit you want or select
Auto if you want your handset to
automatically connect to the closest base
unit.
6 Press Select .
• The new setting is saved.
Scroll to Handset. Press Select .
Scroll to De-register. Press Select .
5 Scroll to the handset (number) you want to
delete. Press Enter .
Tip
The handset number displays beside the word
“Skype” during standby. For example, Skype (1).
6 Enter the system PIN (Default: 0000). Use
Clear to make corrections.
7 Press Enter to confirm.
• The handset is unregistered.
3
4
6.4.4 Change the system PIN
The system PIN is used for registering, deleting
handsets, and protecting the access rights to
some of the other menus. The default system PIN
is 0000. You can personalize the PIN for greater
security.
In idle mode:
1 Press Menu .
2 Scroll to Settings. Press Select .
3 Scroll to Handset. Press Select .
4 Scroll to Change PIN. Press Select .
5 Enter the system PIN. Press Enter to
confirm. Use Clear to make corrections.
6 Enter the new system PIN. Press Enter .
7 Enter the new system PIN again for
verification. Press Enter .
• The new setting is saved.
Note
Write down your PIN and save it for future use.
If you have forgotten the PIN, call your dealer for
assistance.
6.4.3 Unregister a handset
Use one handset to unregister another handset
that shares the same base unit.
In idle mode:
1 Press Menu .
2 Scroll to Settings. Press Select .
16
Settings
Xtra HS_VOIP841_UK.book Seite 17 Freitag, 13. Juli 2007 7:18 19
7
Handset default settings
These are the factory pre-programmed settings of your phone.
General Setting
Language
Date
Date Format
Date Separator
Backlit
LCD Contrast
Preferred Line
Dial Mode
Recall
Area Code number
Skype Password
Auto Update
CID format
(if applicable)
Sound Setting
Skype Ring Melody
SkypeIn Ring Melody
Ring Volume
Ring Type
Keypad Tone
Call History Setting
All Calls List
Missed Call List
Voicemail Indicator
System Setting
PIN Code
Country
Network Setting
DHCP
Network Proxy Host
Proxy Authentication
Authentication
Password
Alternate Application
Ports
Subnet mask
Primary DNS
Default settings
Language 1
Jan 1 2006
Country 1
Country 1
1 minute
Mid Level
Always Ask
Country 1
Recall one
Empty
Empty
No
Disabled
Time Zone
Time
Time Format
Time Separator
Auto Answer
LCD Brightness
Auto Sign in
Category Number
Pause Selection
Skype User Name
Time out
VMWI indication
GMT
12:00 AM
Country 1
Country 1
OFF
Mid Level
Yes
OFF
Pause one
Empty
1 minute
Reset
Melody 2
Melody 1
Volume 3
Ringer ON
ON
Landline Ring Melody
Intercom Ring Melody
Receiver Volume
Notification Tone
Confirmation Tones
Melody 1
Melody 1
Volume 3
ON
ON
Keep all
Keep all
Reset
Incoming Call List
Outgoing Call List
Keep all
Keep all
0000
Reset
Base Selection
Auto
Enabled
Network Proxy
Option
Network Proxy Port
Authentication User
Name
Application Port
Empty
Skype default
IP address
DHCP
Default gateway
Secondary DNS
DHCP
DHCP
Auto detect
Disabled
Auto detect
Auto detect
Empty
Skype default
DHCP
DHCP
17
Xtra HS_VOIP841_UK.book Seite 18 Freitag, 13. Juli 2007 7:18 19
8
Menu structure
The table below describes the menu tree of your phone.
Reminder: Press Menu to enter the main menu.
Use
(Up or Down) to navigate the menus.
Press
to exit from any menu instantly.
Contacts
History
Status
Add Contact
Options
Call
Send voicemail
View profile
Rename
Remove
Block
Request detail
All calls
Missed calls
Incoming calls
Outgoing calls
Voicemails
New contact
Change status
My profile
Sign out
Skype
SkypeOut
Search
Services
Settings
Enter name
Skype credit
SkypeIn
Voicemail
General
Call settings
Privacy
Tones
Screen
Time & Date
Network
Handset
Information
Advanced
18
Menu structure
Xtra HS_VOIP841_UK.book Seite 19 Freitag, 13. Juli 2007 7:18 19
9
Technical data
Display
• High quality 1.5" display
• 65k colors
• 128 x 128 pixels
• Progressive LCD backlight
General telephone features
• Caller name & number identification
• Skype and Landline calls
• Skype and Landline voicemails
• Ring profiles
Contacts list and Call history list
• 500 Skype and SkypeOut contacts
• Call history list with 50 missed calls,
50 incoming calls, 20 outgoing calls
Battery
• 2 x AAA NiMH 750mAh batteries
Weight and dimensions
• Handset: 140 grams
151.7 x 28.3 x 45.7 mm (H x D x W)
Temperature range
• Operation: 0°C to +46°C
• Storage: -25°C to +70°C
Relative humidity
• Operation: Up to 95% at 40°C
• Storage: Up to 95% at 40°C
Technical data
19
Xtra HS_VOIP841_UK.book Seite 20 Freitag, 13. Juli 2007 7:18 19
10
Frequently asked questions
In this chapter you will find the most frequently
asked questions and answers about your phone.
Set up
No parking tone from the handset.
• Check the power connections of the charger.
• The handset may not be placed properly. Try
again.
• Charging contacts may be dirty. Clean contacts
with a damp cloth.
• Turn on the handset tone. See page 15.
• Switch on the handset's power. See page 8.
The handset does not switch on.
• Charge the battery: Put the handset on
charger. The battery icon is animated while
charging. After a few moments the phone will
switch on.
Product behaviour
The handset does not charge.
• Check charger connections.
• The battery may be defective. Purchase new
battery from your dealer.
• Check that the batteries are inserted correctly.
The handset warms up when making a long
call.
This is normal behavior. The handset consumes
energy while calling.
Communication is lost during a call.
• Charge the battery.
• Move closer to the basestation.
“Range” icon is flashing
• Move closer to the basestation.
• If the handset displays Unregistered, it is unregistered. Register the handset, see page 7.
No dial tone on landline.
• Check the phone and power connections.
• The handset may be out of range. Move closer
to the basestation.
• The battery capacity may be low. Charge
battery.
Sound
Handset does not ring.
Check that the handset ringer is turned on. See
page 15.
Keypad does not work.
Unlock your keypad: press Unlock and press
to unlock.
Bad audio quality (crackles, echo, etc.)
during a call
• The handset may be nearly out of range. Move
closer.
• The phone may be interfered by nearby
electrical appliance. Move the base unit to a
different location.
• The phone may be at a location with thick
walls. Move the base unit to a different
location.
Caller ID does not display
• Caller ID service may not be activated. Check
with your service provider.
• The caller's information may be withheld or is
unavailable.
Make/answer a second call does not work.
• Second call service may not be activated. The
second call service may not be available from
your telephone operator, check availability of
the service with your telephone service
provider.
• Check that the recall selection is correct.
Caller does not hear me.
Microphone may be muted: during call, press
to unmute the microphone.
20
Frequently asked questions
Xtra HS_VOIP841_UK.book Seite 21 Freitag, 13. Juli 2007 7:18 19
H
11
Index
A
Additional base, register 15
Answer a call 11
B
Backlit, set 14
Base unit, select 16
Batteries 7
Battery 19
Battery level 7
Brightness, adjust 14
Handset default settings 17
Handset ON/OFF 8
Handset, charge 7
Handsfree ON / OFF 11
Headset 12
Hearing aid compatibility (HAC) 2
I
Insert the batteries 7
Intercom 12
Internal call during an external call 12
K
Keypad lock 15
Keypad tone, set 15
C
Call another handset 12
Call from SkypeOut 10
Call from the call history 11
Call from the contact list 10
Call from the landline 10
Call from the outgoing call list 11
Call transfer 12
Charger 7
Conference Calls 12
Confirmation tones, set 15
Conformity 3
Connect the charger 7
Contact information 23
Contrast, adjust 14
D
Digital security system 2
Display icons 6
Display language, set 14
Disposal 3
During an intercom call 12
M
Make a call 10
Menu structure 18
Mute / Unmute the microphone 11
N
Noise 3
Notification tones, set 15
P
Phone, overview 5
Power requirements 2
R
Recycling 3
Redial the last number 11
Register the handset 7
Register your handset(s) with additional base 15
Ringer melody, set 14
Ringer style, set 15
Ringer volume, set 14
E
S
Earpiece volume, adjust 11
End a call 11
Search missing handset(s) 15
Signal stength, verify 8
Skype incoming call is received during Landline
call 13
Skype products 9
Skype terminologies 9
F
Frequently asked questions 20
Index
21
Xtra HS_VOIP841_UK.book Seite 22 Freitag, 13. Juli 2007 7:18 19
Skype Voicemail™ 9
Skype® and Skype tools 9
SkypeIn™ with free Skype Voicemail™ 9
SkypeOut™ 9
Software licences 3
System PIN, change 16
T
Technical data 19
U
Unregister a handset 16
W
U
What else will you need 4
What’s in the box 4
22
Index
Xtra HS_VOIP841_UK.book Seite 23 Freitag, 13. Juli 2007 7:18 19
Contact information
Web address: http://www.philips.com/support
Contact information
23
Xtra HS_VOIP841_UK.book Seite 1 Freitag, 13. Juli 2007 7:18 19
Xtra HS_VOIP841_UK.book Seite 2 Freitag, 13. Juli 2007 7:18 19
You can check and download the updated
information on the VOIP841 at the following web
address: http://www.philips.com/support
© 2007 Koninklijke Philips Electronics N.V.
All rights reserved.
Reproduction in whole or in part is prohibited without
the written consent of the copyright owner.
Document order number: 3111 285 40061
Printed in PRC