1
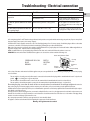
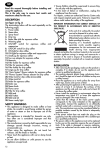
Safety Warnings
Symbols used in the present instructions
Important warnings carry these symbols. It is vitally important
to observe these warnings.
or with insufficient expertise or knowledge, unless they are
carefully supervised and instructed by a responsible person.
Children should be supervised and not allowed to play with
the appliance.
Danger!
Failure to observe this warning can be the cause of lesions from
electric shock which may endanger life.
Danger of scalding!
This appliance produces hot water, and when in use can form
steam vapour.
Take care not to come into contact with jets of hot water or
steam.
Caution!
Failure to observe this warning can be the cause of lesions or of
damage to the appliance.
Use in conformity with purpose
This appliance is designed for the preparation of coffee and for
heating beverages.
The appliance is intended solely for domestic use. It is not meant to be used in:
• rooms used as kitchens by the staff of shops, offices and
other work-places
• farmhouse holiday accommodation
• hotels, motels and other places offering hospitality • room lets
Any use other than that intended shall be considered improper
and therefore dangerous. The manufacturer is not responsible
for injuries resulting from improper use of the appliance.
Danger of scalding!
Failure to observe this warning can be the cause of scalds or
burns.
Take note:
This symbol highlights advice or information important for the
user.
Important safety warnings
Danger!
As the appliance uses electric current, the possibility of electric
shocks cannot be excluded. Therefore, please pay attention to
the following safety warnings:
• Do not touch the appliance with wet hands or feet.
• Do not touch the plug with wet hands.
• Ensure that the electric socket used is always freely accessible, so that the plug can be easily disconnected when
necessary.
• If you wish to remove the plug from the socket, hold the
plug itself. Never pull the electric cable, as this may damage it.
• To disconnect the appliance completely, remove the plug
from the electric socket.
• If the appliance breaks down, do not attempt to repair it.
Switch off the appliance, remove the plug from the socket
and contact Technical Assistance.
• If the plug or supply cable are damaged, then, in order
to avoid any possible risks, have them replaced solely by
De’Longhi Technical Assistance.
Instructions for use
Read these instructions carefully before using the appliance.
Failure to respect these instructions can be the source of lesions
and of damage to the appliance.
The manufacturer is not responsible for any damage resulting
from a failure to respect these instructions for use.
Take note:
Keep these instructions carefully. If this appliance is ever passed on to other persons, ensure that they are also given these
instructions for use.
Checking the item
After removing the packaging, check that the appliance is
intact and complete with all its accessories. Do not use the
appliance if it is obviously damaged. Contact your Authorized
Technical Assistance.
Caution:
Keep all packaging material (plastic bags, expanded polystyrene) out of the reach of children.
Installation of the appliance
Caution!
When installing the appliance, the following safety instructions must be observed:
• The appliance emits heat into the surrounding envi-
Caution:
The appliance should not be used by people (including children) with limited psychological/physical/sensory capacity,
14
Safety Warnings - Description
•
•
•
Description
A. Cover for espresso coffee water tank
B. Espresso coffee water tank
C. Water-softening filter for espresso coffee water tank
(*only certain models)
D. Extraction handle for antichlor filter
E. Antichlor filter support
F. Antichlor filter
G. Filter-holder for filter coffee
H. Permanent filter (*only certain models)
I. Opening handle
J. Water filling compartment
K. Hot plate for filter coffee
L. Jug for filter coffee
M Cup tray for espresso coffee
N. Drip-tray
O. Two-cup espresso coffee filter
P. One-cup or single-pod espresso coffee filter
Q. Espresso coffee filter-holder
R. Coffee measuring-spoon with tamper
S. Milk-frother
T. OK light for espresso or steam coffee
U. Selection knob for espresso or steam coffee
V. On/off switch for filter coffee
W. Power light for filter coffee
X. Selection light for steam function
Y. Power light for espresso coffee
Z. Selection light for espresso function
Z1. Steam knob for cappuccino
ronment. After positioning the appliance on the worksurface, check that there is a free space of at least 3 cm
between the surfaces of the appliance, both to the sides
and the rear, and a space of at least 25 cm above the coffee machine.
Any penetration of water into the machine can cause damage. Do not position the appliance near taps or washbasins.
The appliance may be damaged if the water inside it is
allowed to freeze.
Do not install the appliance in a room where the temperature is liable to drop below freezing.
Position the power cable in such a way that it is not liable
to be damaged by sharp edges or by contact with hot surfaces (for example, electric plates).
Connection of the appliance
Caution!
Ensure that the voltage of the electrical supply corresponds
to that given on the data plate attached to the bottom of the
appliance.
Only connect the appliance to a properly installed electrical
socket which has a minimum yield of 10A and is fitted with an
efficient earth.
If there is incompatibility between the plug and the socket, the
plug should be exchanged for a suitable type, and only by a
professional person.
Technical Data
Voltage:
Capacity:
Dimensions (l x h x p):
Espresso pump pressure:
Espresso boiler: Espresso tank capacity:
Filter coffee tank capacity:
Length of power cable: Weight: 15
220-240V˜50/60Hz
1750W
372 x 323 x 262 (o 370) mm
15 bar
Stainless steel
1.2 L
1.4 L
1.2 m
BCO420 = 7.15 kg
BCO410 = 6 kg
EN
Preparation of filter and espresso coffee
Antichlor filter (only in certain models)
The filter eliminates the taste of chlorine in the water. To install
the filter, proceed as follows:
• Release the container from its slot by pulling it upwards
(fig. 1).
• Remove the antichlor filter from the plastic sachet and
rinse it under a running tap (fig. 2).
• Open the container and carefully put the filter in place as
shown in fig. 2.
• Close the container (fig. 2), and reposition it in its slot,
pushing it firmly downwards.
• The antichlor filter should be replaced after 80 cycles, and at
least after every 6 months of operation.
Water-softening filter (only in certain models)
Certain models are equipped with a water-softening filter. To
install, proceed as follows:
1. Remove the filter from the packaging.
2. Rotate the calendar disc (see fig. 8) to reveal the next two
months of use.
Take note:
The filter will last the equivalent of two months if the appliance
is used normally. If, on the other hand, the machine is left unused with the filter installed, it will last for the equivalent of 3
weeks, at maximum.
3. Rinse the filter with at least 0.5 L of running water (fig.
9).
4. Immerge the filter completely in a basin of water, tipping
it to allow any air bubbles to escape (fig. 10).
5. Fill the water-tank, insert the filter in its proper slot (fig.
11) and push it firmly down.
Preparation of filter coffee
• Open the filter-holder door, rotating it towards the right
(fig. 3).
• Fill the jug to the level indicator relative to number of cups
of coffee you wish to prepare, taking care not to exceed
the MAX level (fig.4).
• Pour the water into the water-fill compartment (fig. 5).
• Position the permanent filter (if applicable), or the paper
filter, in the filter-holder (fig. 6).
• Put the ground coffee in the filter using the measuring
cup supplied, and level it off evenly (fig. 7). As a general
rule, use a level measure of coffee (approx 7 grams) for
every cup of coffee required (for example, 10 measures to
obtain 10 cups).
• Close the filter-holder door and place the jug, with cover
in place, onto the hot plate.
• Press the switch. The light on the switch itself
indicates that the filter coffee-maker is in operation.
• The coffee will begin to come out after a few seconds.
It is perfectly normal for the appliance to emit steam while the
coffee is percolating.
To keep the coffee hot after the percolation process has finished, place the jug on the hot plate and leave the machine
turned on (with the filter coffee light on): the coffee in the jug
will be kept at the right temperature.
• To turn off the machine press the
switch.
Pre-heating the coffee machine
To obtain an espresso coffee at the right temperature, you are
advised to pre-heat the machine in the following way:
1. Switch on the machine by turning the selector knob into
the
position (the relative light will come on) (fig.
12). Attach the filter-holder, complete with filter, to the
machine (fig. 14), without filling it with ground coffee.
Ensure that the pin is correctly inserted in its proper slot,
as indicated in fig 13. Use the smaller filter if you want to
make one cup of coffee, or the larger filter if you wish to
make two.
2. Position a cup under the filter-holder. Use the same cup
in which you intend to make the coffee, so that it will prewarm.
3. Wait for the OK light to come on (fig. 15) and then immediately turn the selector knob to position
(fig. 16) Let
the water come out until the OK light goes off, then stop it
by turning the selector knob to position
(fig. 12) and
empty the cup.
(It is normal for a small, harmless puff of steam to escape while
the filter-holder is being detached).
Preparation of espresso with ground coffee
1. First, pre-heat the machine and the filter-holder as described in the previous paragraph. Use the smaller filter if you
want to make one cup of coffee, or the larger filter if you
wish to make two.
2. If you only want to make one cup of coffee, fill the filter
with a level measure of ground coffee, about 7gr (fig.
Preparation of espresso coffee
Take note:
Before using for the first time, all the accessories should be washed and all the internal pipes of the appliance should be well
rinsed. Proceed as if making coffee, repeating until two tanks of
water have been emptied out. The coffee can then be prepared
in the normal way.
16
Preparation of espresso coffee and Cappuccino
17). If, on the other hand, you wish to make two coffees,
fill the filter with two scant measures of ground coffee
(about 6+6 gr.). Fill the filter with small quantities at a
time to avoid spillage of the ground coffee.
Take note:
Use pods which conform to the ESE standard. This is will
be printed on the packet with the following trademark.
The ESE standard is a system accepted by the
major pod manufacturers. It allows you to prepare an espresso coffee in a clean and simple
way.
2. Insert the small filter into the filter-holder, ensuring that
the pin is correctly inserted into the proper slot, as indicated in fig. 13.
3. Insert the pod, centring it as far as possible over the filter
(fig. 21). Always follow the instructions on the packet of
pods for correct positioning of the pod on the filter.
4. Attach the filter-holder to the machine, making sure you
rotate it fully (fig. 14).
5. Proceed as in points 5, 6 and 7 of the previous paragraph.
Caution:
To guarantee correct functioning, before refilling the filter with
ground coffee, ensure that it is free of any coffee powder residue from the previous infusion.
3. Distribute the ground coffee evenly and press it down
lightly with the tamper (fig. 18). The way in which the
ground coffee is pressed down is a very important factor in obtaining a good espresso. If you press too firmly,
the coffee will come out slowly and have a thick, darkcoloured consistency. On the other hand, if you press too
lightly, the coffee will come out too fast and will have a
thin, light-coloured consistency.
4. Remove any excess coffee from the edge of the filterholder, and attach the latter to the machine. Rotate the
hand-grip firmly to the right (fig. 14) to avoid any water
leakage.
5. Position the cup or cups under the nozzles of the filterholder (fig. 19). It is advisable to warm the cups before
making the coffee, by rinsing them with a little hot water.
6. Check that the OK light (fig. 15) is on (if it is off, wait until
it comes on), and turn the selector knob to position
(fig. 16). Once you have obtained the quantity of coffee
you want, stop the process by rotating the selector knob
to position
(fig. 12). (It is advisable not to dispense
coffee for more than 45 seconds)
7. To detach the filter-holder, rotate the hand-grip from
right to left.
To make cappuccino
1. Prepare espresso coffee as describe in the preceding paragraphs, using sufficiently large cups.
2. Turn the selector knob to position (fig. 22): the relative
light will come on.
3. Meanwhile, fill a receptacle with about 100 grams of milk
for every cappuccino that you want to prepare. The milk
should be cold, from the fridge (not hot!). When choosing
a receptacle, take note of the fact that the volume of the
milk will increase 2 or 3 times.
Take note:
You are advised to use semi-skimmed milk, at fridge temperature.
4. Posizionare il recipiente con il latte sotto il cappucci4.
Position the receptacle with the milk under the milkfrother.
5. Wait until the OK light comes on. This indicates that the
boiler has reached the ideal temperature for steam production. It is quite normal that in reaching the ideal temperature there should be some small emissions of water
and steam into the drip-tray (N).
6. Extract the milk-frother by pulling it forward and rotating
it to the left (fig. 23). Be careful not to touch the hot boiler nozzle while performing this operation. Then position
the receptacle containing the milk under the milk-frother
itself.
7. Immerse the milk-frother into the milk to the depth of a
few millimetres (fig. 24). Rotate the steam-knob at least
half a turn in an anti-clockwise direction (fig. 25). The
steam will emit from the milk-frother, giving the milk a
Danger of scalding!
To avoid splashing, never detach the filter-holder while the
machine is dispensing.
8. To dispose of used coffee, hold the filter fast while pressing it with the appropriate lever incorporated into the
hand-grip. Then turn out the grounds by turning the
filter-holder over and rapping it sharply (fig. 20).
9 . To switch off the coffee machine, turn the selector knob to
position .
Preparation of espresso using pods
1. Carry out the preheating process as described in the paragraph “PREHEATING THE COFFEE MACHINE”, ensuring that
the filter-holder is left attached to the machine. By doing
this you will obtain hotter coffee.
17
EN
Production of hot water - Cleaning
creamy appearance and increasing its volume. To obtain
creamier foam, immerse the milk-frother in the milk and
move the container slowly upwards.
8. When the volume of the milk has doubled, immerse the
milk-frother fully and continue to heat the milk. When the
required temperature is reached (ideally 60°), together
with the right density of cream, cut off the steam supply
by turning the steam knob in a clockwise direction until it
stops, and rotating the selector to position
. To turn
off the machine, turn the selector knob to position e .
9. Pour the emulsified milk into the cups containing the previously prepared espresso coffee. The cappuccino is now
ready. Add sugar to taste and, if desired, sprinkle a little
chocolate powder on the froth.
•
•
•
5. Check that the two holes indicated by arrows in fig. 27 are
not blocked. If necessary, clean them out with a pin.
6. Replace the steam nozzle, pushing it upwards quite forcefully into the steam tube.
7. Re-mount the milk-frother by screwing it upwards in an
anti-clockwise direction.
Production of hot water
1. Switch on the machine by turning the selector knob to position
(the relative light will come on) (fig. 12). Wait
until the OK light shows (fig. 15).
2. Position a receptacle under the milk-frother.
3. When the OK light comes on, position the selector knob at
(fig. 16), simultaneously turning
the steam knob in an anti-clockwise direction (fig.
25): hot water will come out of the milk-frother.
4. To stop the flow of hot water, turn the steam knob in a
clockwise direction and turn the selector knob to
(fig. 12).
A maximum output of 60 seconds is advisable.
Take note:
If you want to prepare more than one cappuccino, make
all the espresso coffees together in advance and only then
prepare the whipped cream for all the cappuccinos.
If you want to prepare some more coffee after whipping
up the milk, wait until the boiler cools down, because
otherwise the coffee will come out burnt.
To cool down the boiler, put a container under the boiler
nozzle; turn the selector knob to
(fig. 16); let the water escape until the “OK” light goes out; turn the selector
knob back to and prepare the coffee as described in
the preceding paragraphs.
You are advised not to let the steam come out for more
than 60 seconds, and not to froth up the milk more than 3
times consecutively.
Cleaning
•
•
Danger!
During the cleaning operation, never immerse the machine in water. It is an electrical appliance.
Before carrying out any cleaning of the external parts of
the appliance, switch off the machine, remove the plug
from the power socket and let the machine cool down.
Cleaning and maintenance of the espresso coffee filters
After every 300 coffees, or when the coffee comes out of the
filter-holder in drops or fails to come out completely, clean the
filter-holder and the filters in the following manner:
• Remove the filter from the filter-holder.
• Undo the top of the filter (fig. 28), unscrewing it in the
direction indicated on the top itself.
• Remove the frothing device from the container by pushing it off the top part.
• Take out the washer.
Caution:
For reasons of hygiene you are recommended to always clean
the milk-frother after use. Proceed in the following manner:
1. Allow a little steam to escape for a few seconds (see
points 2, 5, and 6 of the preceding paragraph) by turning
the steam knob (fig. 25). In this way, the milk-frother will
flush out milk that may have remained inside it. Turn off
the appliance by pressing the on/off button.
2. Grip the tube of the milk-frother firmly with one hand,
and with the other, release the milk-frother itself by turning it in a clockwise direction and unscrewing it downwards (fig. 26).
3. Remove the steam nozzle from the supply tube by pulling
it downwards.
4. Wash the milk-frother and the steam nozzle thoroughly in
warm water.
•
•
18
Rinse all the components and clean the metal filter thoroughly with hot water, scrubbing it with a brush (fig. 29).
Check that the small holes in the filter are no blocked and,
if necessary, clean them out with a pin (see fig. 30).
Replace the filter and the washer on the plastic disc, as
shown in fig. 31. Take care to insert the pin of the plastic
Cleaning - Descaling
disc into the hole of the washer indicated by the arrow in
fig. 31.
• Reinstall this assembly in the steel filter container (fig.
32), making sure that the pin is inserted into the hole of
the support itself (see the arrow in fig. 32).
• Finally, screw up the top.
The guarantee will not be valid if the cleaning procedure described above is not carried out regularly.
3. Ensure that the filter-holder is not engaged and position a
receptacle under the nozzle of the machine.
4. Turn the selector knob to
and allow about 1/4 of the
solution in the tank to flow out. Turn the steam knob from
time to time and let some of the solution escape through
the tube of the milk-frother. Then stop, turning the selector knob to
and leave the solution to act for about 5
minutes.
5. Repeat point 4 another 3 times, until the tank has been
emptied completely.
6. To eliminate the remains of the solution and the scale,
rinse out the tank thoroughly, and then refill it with clean
water (without de-scaler).
7. Turn the selector knob to
(fig. 16) and let the
water flow out until the tank is completely empty.
8. Repeat operations 6 and 7 once more.
Repairs to the machine due to problems with scale will not be
covered by the guarantee if the de-scaling procedure described
above is not carried out regularly.
Cleaning of the boiler nozzle
After about every 300 coffees, the boiler nozzle should be cleaned in the following manner:
• Ensure that the coffee machine is not hot, and that the
plug is disconnected;
• Using a screwdriver, undo the screws holding the nozzle
of the espresso boiler (fig. 33);
• Remove the boiler nozzle;
• Clean the boiler with a wet cloth (fig. 33)
• Wash the nozzle thoroughly in hot water, scrubbing it
with a brush. Check that the small holes are not blocked
and, if necessary, clean them out with a pin (fig. 30).
• Rinse the nozzle under the tap, continuing to scrub it.
• Re-mount the boiler nozzle, taking care to position it correctly on the washer.
The guarantee will not be valid if the cleaning procedure described above is not carried out regularly.
De-scaling of the filter coffee section
With time, the limestone content of the water can cause obstructions which may effect the correct functioning of the appliance. It is advisable to carry out de-scaling of the machine
after about every 40 uses. For this de-scaling procedure, use an
appropriate de-scaler for filter coffee machines, available in the
shops. If such a product is not obtainable, the operation can be
carried out in the following way:
1. Pour 4 cupfuls of water into the jug;
2. Dissolve 2 spoonfuls (about 30 grams) of citric acid in the
water (available at a chemist’s or grocer’s);
3. Put the jug on the hot plate;
4. Press the , switch, percolate the equivalent of a
cupful and then switch off the appliance;
5. Leave the solution to act for 15 minutes. Repeat operations 4 and 5 another time.
6. Switch on the machine and continue production until the
tank is completely empty.
7. Rinse out by running the appliance just using water at
least three times (3 full tanks of water).
Other cleaning operations
1. Do not use solvents or abrasive detergents to clean the
machine. A soft, wet cloth is sufficient.
2. Clean the filter-holder cup regularly, as well as the filters,
the drip-tray, and the water-tank. To empty the drip-tray,
remove the cup-stand grill, eliminate any water, and clean the tray with a cloth: then re-assemble the drip-tray.
Danger!
During the cleaning operation never immerse the machine in
water. It is an electrical appliance.
De-scaling of the espresso coffee section
It is advisable to de-scale the machine after about every 200
cups of coffee. The use of De’ Longhi de-scaler is recommended,
available from shops.
Follow the procedure below:
1. Fill the tank with the de-scaling solution, made by diluting the de-scaler with water according to the instructions on the packaging.
2. Switch on the machine by turning the selector knob to
position and wait for the OK light to come on.
Disposal
Information regarding the correct disposal of the
product, as decreed by European Directive 2002/96/
EC.
When the product reaches the end of its useful life, it must
not be disposed of together with household refuse. It can be
taken to an appropriate recycling centre provided by the local
19
EN
Disposal - Troubleshooting
authorities, or to one of the authorized dealers who provide
such a service. Separate disposal of electrical goods helps avoid
negative consequences for health and for the environment,
which can result from improper disposal. In addition, it allows
the materials of which the item is composed to be retrieved,
thus achieving an important saving of energy and resources.
In order to emphasize the obligation to dispose of electrical
items separately, the product carries the symbol of a rubbish
skip with a cross through it.
The appliance conforms to the following EC directives:
•
•
•
Low Voltage Directive 2006/95/CE and successive
amendments;
Directive EMC 2004/108/CE and successive amendments;
Materials and objects intended to come into contact with
food products conform to the prescriptions of European
Regulation 935/2004.
Troubleshooting
Problem
Possible causes
Solution
The espresso coffee no longer comes out
Lack of water in the tank
Re-fill the water-tank
The holes in the filter-holder where the coffee
emerges have become blocked
Clean out the holes of the filter-holder nozzles
The nozzle of the espresso boiler is clogged up
Carry out a cleaning procedure as described in the
paragraph “Cleaning the boiler nozzle”
The filter-holder has not been inserted properly
Connect the filter-holder correctly and turn it forcibly
downwards
The washer on the espresso boiler has lost its
elasticity
Obtain a replacement for the espresso boiler washer
from your Service Centre
The holes in the filter-holder nozzles are blocked
Clean the holes of the nozzles
The OK light for espresso is not on when one presses
the coffee supply switch
Wait for the OK light to come on
The pre-warming operation has not been done
Carry out the pre-warming procedure as indicated
in the paragraph
The cups have not been pre-warmed
Pre-warm the cups with some hot water, or leave
them for at least 20 minutes on the cup-warming
shelf on the cover
The water-tank is empty
Fill the tank
The tank is not inserted properly and the valve on its
base is not open
Press the tank lightly so as to open up the valve
on its base
The ground coffee is insufficiently tamped
Tamp down the ground coffee a bit harder (fig. 18)
The quantity of ground coffee is insufficient
Increase the quantity of ground coffee
The coffee is too coarsely ground
Only use ground coffee for espresso coffee machines
The ground coffee is not the correct type
Change the type of ground coffee
The ground coffee has been tamped too firmly
Tamp the coffee less firmly (fig. 18)
Too much ground coffee has been used
Reduce the quantity of ground coffee
The nozzle of the espresso boiler is clogged up
Carry out a cleaning operation as described in the
chapter “Cleaning the espresso boiler nozzle”
The filter is blocked
Carry out a cleaning operation as outlined in the
paragraph “Cleaning the filter”
The ground coffee is too fine or is damp
Only use ground coffee for espresso coffee machines
and ensure it is not damp
The ground coffee is not the correct type
Change the type of ground coffee powder
The espresso coffee drips from the edge
of the filter-holder instead of through
the holes
The espresso coffee is cold
High noise level from the pump
The consistency of the coffee is thin and
pale (it emerges rapidly from the spout)
The consistency of the coffee is thick and
dark (it emerges slowly from the spout)
20
Troubleshooting - Electrical connection
Problem
Possible causes
Solution
The milk does not froth when making a
cappuccino
The milk is not cold enough
Always use milk at fridge temperature
The milk-frother is dirty
Clean the small holes in the milk-frother very
carefully, particularly those indicated in fig. 27
The filter or espresso coffee has an acidic
flavour
Insufficient rinsing after the de-scaling operation
Rinse the appliance as described in the chapter
“De-scaling of the filter section” or “De-scaling of the
espresso section”
The time taken to percolate the filter coffee is getting longer
The coffee-maker filter needs de-scaling
Carry out the de-scaling procedure as described in
the paragraph “De-scaling of the filter coffee section”
Electrical connection (UK only)
Before using this appliance ensure that the voltage indicated on the product corresponds with the main voltage in your home, if you are in any doubt
about your supply contact your local electricity company.
The flexible mains lead is supplied connected to a B.S. 1363 fused plug having a fuse of 13 amp capacity. Should this plug not fit the socket outlets
in your home, it should be cut off and replaced with a suitable plug, following the procedure outlined below.
Note: Such a plug cannot be used for any other appliance and should therefore be properly disposed of and not left where children might find it and
plug it into a supply socket - with the obvious consequent danger.
N.B. We recommend the use of good quality plugs and wall sockets that can be switched off when the machine is not in use.
important: the wires in the mains lead fitted to this appliance are coloured in accordance with the following code:
Green and Yellow to Earth
green and yellow blue brown
13 amp
Fuse
earth
neutral
live
Blue to
neutral
Brown to
live
Cord Clamp
As the colours of the wires in the mains lead of this appliance may not correspond with the coloured markings identifying the terminals in your plug,
proceed as follows:
- The wire which is coloured green and yellow must be connected to the terminal in the plug which is marked with the letter E or by the earth
symbol
or coloured green or green and yellow.
- The wire which is coloured blue must be connected to the terminal which is marked with the letter N or coloured black.
- The wire which is coloured brown must be connected to the terminal which is marked with the letter L or coloured red.
When wiring the plug, ensure that all strands of wire are securely retained in each terminal. Do not forget to tighten the mains lead
clamp on the plug. If your electricity supply point has only two pin socket outlets, or if you are in doubt, consult a qualified electrician.
Should the mains lead ever require replacement, it is essential that this operation be carried out by a qualified electrician and should only be replaced
with a flexible cord of the same size.
After replacement of a fuse in the plug, the fuse cover must be refitted. If the fuse cover is lost, the plug must not be used until a replacement cover is
obtained. The colour of the correct replacement fuse cover is that of the coloured insert in the base of the fuse recess or elsewhere on the plug. Always
state this colour when ordering a replacement fuse cover.
Only 13amp replacement fuses which are asta approved to B.S. 1362 should be fitted.
This appliance conforms to the Norms EN 55014 regarding the suppression of radio interference.
Warning - this appliance must be earthed
21
EN