1
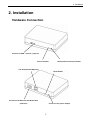
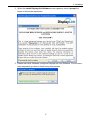
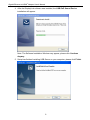
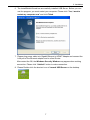
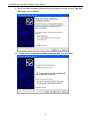
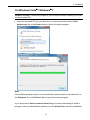
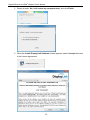
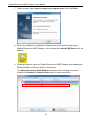
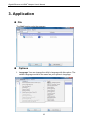
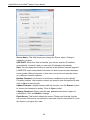
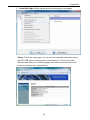
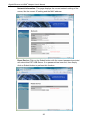
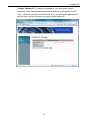
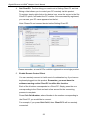
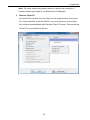
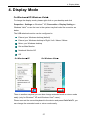
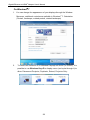
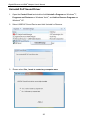
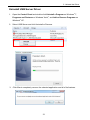
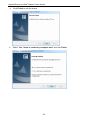
Gigabit Ethernet to HDMIAdapter User’s Manual Gigabit Ethernet to HDMI Adapter User’s Manual ABOUT THIS MANUAL This manual is designed for use with the Gigabit Ethernet to HDMI Adapter. Information in this document has been carefully checked for accuracy; however, no guarantee is given to the correctness of the contents. The information in this document is subject to change without notice. The manufacturer does not make any representations or warranties (implied or otherwise) regarding the accuracy and completeness of this document and shall in no event be liable for any loss of profit or any commercial damage, including but not limited to special, incidental, consequential, or other damage. SAFETY INSTRUCTIONS Always read the safety instructions carefully: Keep this User’s Manual for future reference Keep this equipment away from humidity If any of the following situation arises, get the equipment checked by a service technician: The equipment has been exposed to moisture. The equipment has been dropped and damaged. The equipment has obvious sign of breakage. The equipment has not been working well or you cannot get it to work according to the User’s Manual. COPYRIGHT This document contains proprietary information protected by copyright. All right are reserved. No part of this manual may be reproduced by any mechanical, electronic or other means, in any form, without prior written permission of the manufacturer. TRADEMARKS All trademarks and registered trademarks are the property of their respective owners or companies. i Table of Contents Table of Contents 1. Introduction ............................................................................................................1 Features ............................................................................................................................. 2 Package Contents .............................................................................................................. 2 System Requirements........................................................................................................ 2 LED Status ........................................................................................................................ 2 2. Installation ..............................................................................................................3 Hardware Connection ....................................................................................................... 3 Driver Installation ............................................................................................................. 4 On Windows XP ......................................................................................................... 4 On Windows Vista/ Windows 7 .............................................................................. 11 3. Application.......................................................................................................................... 16 File .................................................................................................................................. 16 Options ............................................................................................................................ 16 View ................................................................................................................................ 24 Help................................................................................................................................. 25 4. Display Mode........................................................................................................27 5. Uninstall the Driver ..............................................................................................29 6. Specifications.......................................................................................................33 7. Regulatory Compliance .......................................................................................34 FCC Conditions .............................................................................................................. 34 CE ................................................................................................................................... 34 WEEE Information ......................................................................................................... 34 ii 1. Introduction 1. Introduction The Gigabit Ethernet to HDMI Adapter enables you easily to connect monitor and projector from a computer. You may perform a high quality presentation and DVD video by high throughput of Gigabit Ethernet and have the content of your PC get access remotely. The display stations can be up 100 meters away from your computer with CAT6 cable. With this adapter; you can just use one monitor to control 4 different computers as Net KVM application. 1 Gigabit Ethernet to HDMI Adapter User’s Manual Features Compatible with Gigabit Ethernet specification. Video applications on LCD monitor or projector shared through Gigabit Ethernet port. Display remote control. Compatible with USB 1.1/2.0 specification. Support resolution up to 1080p. Input: Gigabit Ethernet interface; Output: HDMI interface. Long transmission distance up to 100 meters. Plug and play. Package Contents Gigabit Ethernet to HDMI Adapter x1 Power Adapter x1 CD (Driver and User’s Manual) x1 Quick Installation Guide x1 System Requirements Windows XP, Windows Vista 32/64 bits and Windows 7 32/64 bit LED Status LED Color Power Green Description On for connected to the power adapter Off for not connected to the power adapter Link Blue LAN activity. Blinking when there is data flow between LAN and the host computer 2 2. Installation 2. Installation Hardware Connection Connect to HDMI monitor / projector Power Indicator LINK (LAN Connection) Indicator Two downstream USB ports Reset button Connect to the Ethernet with RJ45 cable (LAN Port) Connect to the power adapter 3 Gigabit Ethernet to HDMI Adapter User’s Manual Driver Installation On Windows XP Caution: DO NOT connect the adapter to your computer before installing the driver on the provided CD. 1. Insert the provided CD into your disc drive. It is normal that the screen will flick black a couple of times during the installation. When finished, the installation screen will disappear, and you can see the screen as below. 4 2. Installation 2. When the Install DisplayLink Software screen appears, select I accept the terms in the license agreement. 3. Please wait while Windows configures DisplayLink Core Software. Your screens may temporarily go black or flash during this process. 5 Gigabit Ethernet to HDMI Adapter User’s Manual 4. After the DisplayLink software was installed, the USB PnP Sound Device installation will appear. Note: The Software Installation Window may appear, please click Continue Anyway. 5. Setup has finished installing USB Server on your computer, please click Finish . 6 2. Installation 6. The InstallShield Wizard has successfully installed USB Server. Before you can use the program, you must restart your computer. Please click “Yes, I want to restart my computer now” and click Finish. 7. Please plug power cable into Gigabit Ethernet to HDMI Adapter and connect the LAN port of the Ethernet adapter end to a free Router. After restart the OS, the Windows Security Window may appear when making connection. Please click “Unblock” button to make connection. 8. Please Double-click the shortcut icon of Launch USB Server on the desktop. 7 Gigabit Ethernet to HDMI Adapter User’s Manual 9. The Found New Hardware Wizard Window will appear, please choose” Yes, this time only” and click Next. 10. Please choose “Install the software automatically” and click Next. 8 2. Installation 11. Please click Finish to close the wizard. 9 Gigabit Ethernet to HDMI Adapter User’s Manual 12. Please click “Connect Device” when a device is selected. 13. When the device is connected, the check mark will be green. 14. When the System Settings Changes Dialog Box appear, please click “Yes” button to take the new settings effect. *Actual strings depend on your operation system. These screen shots are from Windows XP and might vary slightly for each operation system. 10 2. Installation On Windows Vista / Windows 7 Caution: DO NOT connect the adapter to your computer before installing the driver on the provided CD. 1. Insert the provided CD into your disc drive. Locate and double-click the Run autorun.exe file in the Driver folder to launch the setup program. Note: If the installer program doesn’t run automatically, please locate and double-click on the Setup.exe file in the Driver folder to launch the setup program. If you encounter a User Account Control dialog box when attempting to install a program, enter an administrator password or click Allow/Yes to start the installation. 11 Gigabit Ethernet to HDMI Adapter User’s Manual 2. Please choose “No, I will restart my computer later” and click Finish. 3. When the Install DisplayLink Software screen appears, select I accept the terms in the license agreement. 12 2. Installation 4. Please wait while Windows configures DisplayLink Graphics. Your screens may temporarily go black or flash during this process. 5. After DisplayLink software installed, the USB Server Setup installation will appear. Note: The Window Security Windows will appear, please click Install. 6. Setup has finished installing USB Server on your computer. Please click Finish. 13 Gigabit Ethernet to HDMI Adapter User’s Manual 7. Please choose “Yes, I want to restart my computer now” and click Finish. 8. When the installation is completed. Please restart your system before using Gigabit Ethernet to HDMIAdapter. You may see the Launch USB Server icon on desktop. 9. Please plug power cable into Gigabit Ethernet to HDMIAdapter and connect the Ethernet adapter’s LAN port end to a free Router. The Windows Security Alert Window will appear when making connection. Please click Unblock or Allow Access button to make connection. 14 2. Installation 10. When the device is connected, the check mark will be green. *Actual strings depend on your operation system. These screen shots are from Windows 7 and might vary slightly for each operation system. 11. If your monitor is not yet connected to the adapter, make the connection and power on your monitor. 15 Gigabit Ethernet to HDMI Adapter User’s Manual 3. Application File The Quit function exits the program. Options 1. Language: You can change the utility’s language with this option. The default language would be the same as your system’s language. 16 3. Application 2. Server Configuration: There are two way to bring up Server Configuration. You can go through Options Tab (figure 1) or Right-Click on the server icon to bring up this menu, and select Server Configuration (figure 2). (Figure 1) (Figure 2) 17 Gigabit Ethernet to HDMI Adapter User’s Manual Server Name: This field allows you change the Server name. Change it whatever you want. USE DHCP: When this field is checked, your server acquires IP address automatically. Uncheck it and you can enter IP address automatically. Note: You can apply this function to a server under different network segment. HOWEVER, some router/switch hub does not allow communication between servers under different segment. In this case, you won’t even see the server on a different network segment. Backup Firmware: this function is a fail-save mechanism for the Update Firmware function. Just browse to where you want to save the backup file and click on Save to save the file. Update Firmware: update firmware with this function. Use the Browse button to choose the firmware to update. Click on Open to start. Change Password: Simply enter the new password and enter it again for confirmation. Click on Submit to change. Reset Server: This button reboots the server. Please note that this function will not work if the server you attempt to reset has a device connected to it and the device is occupied by a user. 18 3. Application 3. Open Web Page: Brings up the server’s configuration web pages. Status: This is the main page. You can see the important information about the EST USB Server and the devices connected to it. The 4 links at the left-hand side take you to different pages with other information about this server or functions you could perform. 19 Gigabit Ethernet to HDMI Adapter User’s Manual Network Information: This page displays the current network setting of the server, like the current IP setting and the MAC address. Reset Device: Click on the Submit button with the correct password provided will reboot this EST USB Server. If no password has been set, then simply click on Submit button to perform this function. 20 3. Application Change Password: To change the password, you must enter current password, enter new password and enter it again for confirmation and the click on Submit to set the new Password. If you are setting the password for the first time, you do not have to provide current password. 21 Gigabit Ethernet to HDMI Adapter User’s Manual 4. Set Client PC: The first thing you need to do is Setting Client PC as Host. Being a Host allows you to control your PC remotely via this product. To register, simply right click on the device icon, move the cursor to the Set Client PC option, and select the PC number. Once successfully registered, you can see your PC name appeared on the list. Note: Please Do not connect device before Setting Client PC. Please remember, at most 4 PCs could be registered on one single product. 5. Enable Remote Control Client You can remotely connect to it with a set of combination key if you have a keyboard plugged into this product. Remember, you must have the software running on the Client PC to utilize this function. Each of the 4 buttons corresponds to a Client PC. Simply press the one corresponding to the Client and wait a few second for the connecting process to complete. Press Ctrl+Ctrl+Number, where Number is the number corresponding to the Client PC you would like to connect. For example, if you press Ctrl+Ctrl+2, then Client PC 2 will be remotely connected. 22 3. Application Note: The login screen may appear when you switch one computer to another, please login again to use Ethernet to DVI Adapter. 6. Remove Client PC At most 4 PCs could be set as a Client on one single product at any time. So, if you would like to set the fifth PC, you must remove a current host, this could be accomplished with Remove Client PC option. Then select the Client PC you would like to remove. 23 Gigabit Ethernet to HDMI Adapter User’s Manual View The tree view in the main dialog has two display modes: “Servers and Devices” mode and “Devices Only” mode. The default setting is “Devices Only” mode. You can toggle between these two display modes with the View option on the control menu. 24 3. Application Help 1. About: Bring up a dialog box with legal and other relative information displayed. 25 Gigabit Ethernet to HDMI Adapter User’s Manual 2. Log File: Enabling Log function allows the USB Server software to generate a log file that records data which might help software developers debug a problem. So if you want to report a bug, enable this function and repeat the steps to reproduce the bug. Once you have seen the bug happen again, you can use the Extract log file function to extract the file and send the file in for analysis. 3. Extract Log File: Clicking on this option brings up the folder where the log file is kept. 26 4. Display Mode 4. Display Mode On Windows XP/ Windows Vista To change the display mode, please right-click on your desktop and click Properties > Settings on Windows XP, Personalize > Display Setting on Windows Vista or use the icon in the system tray that looks like a monitor as below. The USB-attached monitor can be configured to: Extend your Windows desktop (default) Extend your Windows desktop to Right / Left / Above / Below Mirror your Windows desktop Set as Main Monitor Notebook Monitor Off Off On Windows XP On Windows Vista There is another way that you can also change extended mode or mirror mode easily (only for Windows XP and Windows Vista users): Please connect the second keyboard to the device and press Ctrl+Ctrl+F1, you can change the extended mode or mirror mode easily. 27 Gigabit Ethernet to HDMI Adapter User’s Manual On Windows 7 1. You can change the appearance of your displays through the Window. Moreover, additional controls are available in Windows 7: Orientation (Portrait, landscape, rotated portrait, rotated landscape) 2. To control the behavior of an attached DisplayLink device (or screen), it is possible to use Windows Key+P to display menu (and cycle through it) to allow: Disconnect Projector, Duplicate, Extend, Projector Only. 28 5. Uninstall the Driver 5. Uninstall the Driver If for any reason you want to uninstall the driver, please take these steps: Uninstall the DisplayLink Driver 1. Open the Control Panel and double-click Uninstall a Program on Windows 7, Programs and Features on Windows Vista, and Add or Remove Programs on Windows XP. 2. Select DisplayLink Graphics and click Uninstall or Remove. 3. Click Yes to confirm the removal. During the removal process a couple of DOS windows will pop up. 4. Click Yes to restart your computer and then unplug the adapter now. 29 Gigabit Ethernet to HDMI Adapter User’s Manual Uninstall PnP Sound Driver 1. Open the Control Panel and double-click Uninstall a Program on Windows 7, Programs and Features on Windows Vista, and Add or Remove Programs on Windows XP. 2. Select USB PnP Sound Device and click Uninstall or Remove. 3. Please select Yes, I want to restart my computer now. 30 5. Uninstall the Driver Uninstall USB Server Driver 1. Open the Control Panel and double-click Uninstall a Program on Windows 7, Programs and Features on Windows Vista, and Add or Remove Programs on Windows XP. 2. Select USB Server and click Uninstall or Remove. 3. Click Yes to completely remove the selected application and all of its features. 31 Gigabit Ethernet to HDMI Adapter User’s Manual 4. Click Finish to exit the wizard. 5. Select “Yes, I want to restart my computer now” and click Finish. 32 6. Specification 6. Specification Gigabit Ethernet to HDMI Adapter Function Gigabit Ethernet port 1 xRJ45 Female Connector USB Downstream Port 2 xUSB A type Female Power 1 x HDMI 1 x DC Jack(Black) Power LED 1x LED (Green) Link LED 1x LED (Blue) Video Video Resolution 1080 P Power Consumption Operating Power : 900mA Video out LED Suspend Mode Power : 810mA Housing Physical Properties Weight Dimension Plastic (ABS + PC) 230g 66.9mm(L)x30mm(W)x142.05mm(H) 33 Gigabit Ethernet to HDMI Adapter User’s Manual 7. Regulatory Compliance FCC Conditions This equipment has been tested and found to comply with Part 15 Class B of the FCC Rules. Operation is subject to the following two conditions: (1) This device may not cause harmful interference (2) This device must accept any interference received. Including interference that may cause undesired operation. CE This equipment is in compliance with the requirements of the following regulations: EN 55 022: EMC Directive 2004/08/EC (EN55022/EN55024) WEEE Information For EU (European Union) member users: According to the WEEE (Waste electrical and electronic equipment) Directive, do not dispose of this product as household waste or commercial waste. Waste electrical and electronic equipment should be appropriately collected and recycled as required by practices established for your country. For information on recycling of this product, please contact your local authorities, your household waste disposal service or the shop where you purchased the product. 34