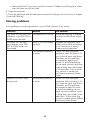
1
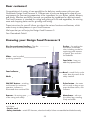
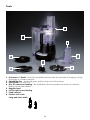
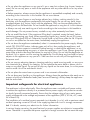
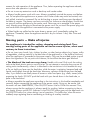
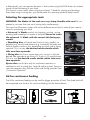
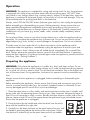
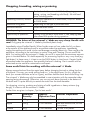
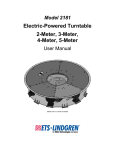
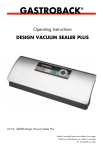
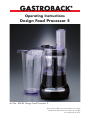
Operating Instructions
Design Food Processor S
Art.-No. 40963 Design Food Processor S
Read all provided instructions before first usage!
Model and attachments are subject to change!
For household use only!
Carefully read all provided instructions before you start running
the appliance and pay regard to the warnings mentioned in these
instructions.
Table of Contents
Knowing your Design Food Processor S............................................35
Important safeguards......................................................................37
General safety instructions............................................................37
Important safeguards for electrical appliances.................................38
Moving parts - Risk of injuries......................................................39
Technical specifications...................................................................40
Before first use...............................................................................40
Properties of the Design Food Processor S.........................................41
Safety interlocks...........................................................................41
Modes of operation......................................................................41
Selecting the appropriate tools......................................................42
Lid for continuous feeding.............................................................42
Tips for best results.........................................................................43
General......................................................................................43
Using the universal ‘s’ blade.........................................................43
Using the feed tube and cutting discs.............................................43
Operation.....................................................................................44
Preparing the appliance................................................................44
Chopping, kneading, mixing or puréering.......................................45
Processing with the universal ‘s’ blade............................................46
Grating, shredding and slicing using the cutting discs......................48
Working with the lid for continuous feeding....................................50
After processing...........................................................................52
Solving problems...........................................................................53
Care and cleaning.........................................................................54
Disassembling the appliance.........................................................54
Cleaning the appliance................................................................55
Storage.........................................................................................56
Notes for disposal..........................................................................57
Information and service...................................................................57
Warranty......................................................................................57
Index............................................................................................58
Dear customer!
Congratulations! A variety of new possibilities for delicious meals comes with your new
Gastroback Design Food Processor S. Different sets of tools are designed to meet all your
requirements for time-saving preparation of the ingredients for your dishes, salads, desserts,
and drinks. Effortless and within seconds you prepare the ingredients for delicious meals.
The Food Processor is intended for cutting and grating of fruits and vegetables, for mincing
meat and chopping herbs and for grinding and mixing.
These instructions for use will inform you about the various functions and features, which
make it easy to take pleasure in your Food Processor.
We hope that you will enjoy the Design Food Processor S.
Your Gastroback GmbH
Knowing your Design Food Processor S
Disc for continuous feeding – The disc
features direct food from food collector.
Pusher – for pushing the
food down in the feed
tube; including a scale for
measuring small amounts
of liquids, flour and similar foodstuffs.
Slider – must be pulled
up during operation.
Feed tube – here you
add the prepared food.
Food collector
Shaft
Bowl – stands firmly on the
motor base by means of the
safety interlock.
ON/OFF button – switching
on the motor for continuous
operation; indicator is
illuminated when switched ON.
Pulse button – the motor
will run only as long as you
press the button down; with
indicator.
Drawer – for storing most
of the cutting tools safely.
Motorbase – with nonslip rubber legs, standing
firmly and stable.
w/o figure:
· Power cord
· Safety interlocks – switch OFF the motor, when bowl and/or lid are not assembled and locked correctly
35
Tools
6
7
8
5
4
1
2
3
1 Universal ‘s’ blade – the work horse blade used most often for most tasks of chopping, mincing and mixing in a matter of seconds
2 Shredding disc – shreds and grates quickly to even and uniform pieces.
3 Slicing disc – for even cuts.
4 Disc for continous feeding – the sliced food will be transported over the disc for continous feeding into the food collector.
5 Regular feed
6 Lid for continuous feeding
7 Food collector
8 Pusher with scale
Long and short shaft
36
Important safeguards
Carefully read all instructions before operating this appliance and save for further reference.
Do not attempt to use this appliance for any other than the intended use, described in these
instructions. Any other use, especially misuse, can cause severe injuries or damage by electric shock, moving parts, heat or fire.
These instructions are an essential part of the appliance. Do not pass the appliance without
this booklet to third parties.
Any operation, repair and technical maintenance of the appliance or any part of it other
than described in these instructions may only be performed at an authorised service centre.
Please contact your vendor.
General safety instructions
• This appliance is for household use only and NOT intended for use in moving vehicles. Do
not operate or store the appliance in humid or wet areas or outdoors. Any use of accessories, attachments or spare parts that are not recommended by the manufacturer or damaged
in any way may result in damage and/or injuries to persons.
• Check the entire appliance regularly for proper operation – especially the power cord. Do
not operate the appliance, when the appliance or any part of it is likely to be damaged, to
avoid risk of fire, electric shock or any other damage and/or injuries to persons. The appliance is likely to be damaged if the appliance has been subject to inadmissible strain (e.g.
overheating, mechanical or electric shock), or if there are any cracks, excessively frayed or
melted parts, or distortions, or if the appliance is not working properly. In this case, immediately unplug the appliance and return the entire appliance (including all parts and accessories) to an authorised service centre for examination and repair.
• Operate the appliance on a well accessible, stable, level, dry, water-resistant, and suitable
large table or counter. Always keep the appliance and the table or counter clean and dry,
and wipe off spilled liquids immediately. Always remove the bowl from the motor base,
before taking food out of the bowl. Do not place any clothes or tissue or other objects under
or on the motor base during operation, to avoid risk of fire, electric shock and overheating.
Do not place the appliance over a power cord, or near the edge of the table or counter, or
on wet or inclined surfaces, or where it can fall.
• During operation keep the appliance in an appropriate distance of at least 20 cm on each
side and 50 cm above to furniture, walls, boards, curtains, and any delicate objects. Exclusively use the appliance for processing edible food and domestic use. Immediately unplug
the appliance, if there is any kind of malfunction or problem (e.g. the motor gets stuck, liquid
running out, overheating). Do not needlessly operate the appliance continuously. Always
switch OFF the motor even when making short brakes (e.g. for preparing further ingredients).
• This appliance is NOT intended for use by persons (including children) with reduced
physical, sensory or mental capabilities, or lack of experience and knowledge, unless they
have been given supervision or instruction concerning use of the appliance by a person
responsible for their safety. Children must be supervised to ensure that they do
not play with the appliance or any parts of the appliance or the packaging.
Always keep the appliance where it is dry, frost-free, and clean, and where young children
cannot reach it. Do not leave the appliance or any part of it unattended, when it is in reach
of young children.
37
• Do not place the appliance or any part of it on or near hot surfaces (e.g. burner, heater or
oven). Do not use any parts or tools of the appliance with any other device or for any other
purpose.
• Before operation, always ensure that the appliance is assembled completely and correctly
according to the instructions in this booklet. Do not use violence.
• Do not insert your fingers or any foreign objects (e.g. clothes, cooking utensils) in the
feed tube, with the appliance connected to the power supply. Do not use any hard, sharp
or edged objects (e.g. knives, forks) with the appliance. Only use the provided pusher for
feeding food into the feed tube. Do not handle the appliance or any part of it with violence.
• Always use only one matching set of tools according to the instructions in this booklet to
avoid damage. Do not process bones, nutshells or any other extremely hard items.
• Do not overfill the bowl. If the maximum filling level is reached, empty the bowl, before
continuing processing your food. When processing liquids (e.g. cream), do not fill in more
than up to filling level 500 ml. Otherwise, liquids could run out from under the lid. If liquids
run out or are spilled on the motor base, immediately unplug the appliance.
• Do not leave the appliance unattended, when it is connected to the power supply. Always
switch OFF (ON/OFF button; indicator goes out) at first, then unplug the appliance, and
wait until the motor comes to a standstill, before moving, or cleaning the appliance, or assembling or disassembling any parts, or when the appliance is not in use. Always grasp the
motor base at both sides near the bottom for moving or lifting. Do not hold the appliance at
the bowl, lid, or power cord for moving the appliance. Do not place any hard and/or heavy
objects on the appliance or any part of it. Take care that no one will pull the appliance by
the power cord.
• Do not use any abrasive cleaners, cleaning pads (e.g. metal scouring pads), or any corrosive chemicals (e.g. bleach) for cleaning. Do not immerse the motor base or power cord in
water or any other liquid. Do not spill or drip any liquids on the motor base, or on the power
cord to avoid risk of fire and electric shock.
• Do not place the motor base or power cord in an automatic dishwasher.
• Do not leave any food dry on the appliance. Always clean the appliance after each use to
prevent a build up of baked-on foods (see Care and Cleaning). Always keep the appliance
and the tools clean.
Important safeguards for electrical appliances
The appliance is driven electrically. Place the appliance near a suitable wall power socket
to connect the appliance directly to a protected mains power supply with protective conductor (earth/ground) connected properly. Ensure that the voltage rating of your mains power
supply corresponds to the voltage requirements of the appliance (230 V, 50 Hz, AC, rated
for at least 8 A).
The installation of a residual current operated circuit breaker (r.c.c.b.) with a maximum rated
residual operating current of 30 mA in the supplying electrical circuit is strongly recommended. If in doubt, contact your electrician for further information.
In various foreign countries, the specifications for power supplies are subject to incompatible
norms. Therefore it is possible that power supplies in foreign countries do not meat the requi38
rements for safe operation of the appliance. Thus, before operating the appliance abroad,
ensure that safe operation is possible.
• Do not to use any extension cords or desk top multi socket outlets.
• Always handle power cords with care. Always completely unwind the power cord before
use. Do not place the appliance on a power cord. Power cords may never be knotted, twisted, pulled, strained or squeezed. Do not let the plug or power cord hang over the edge of
the table or counter. The power cord may not touch hot surfaces or sharp edges. Ensure that
no one will pull the appliance by the power cord. Take care not to entangle in the power
cord. Always grasp the plug to disconnect the power cord. Do not touch the power plug with
wet hands when the appliance is connected to the power supply.
• When liquids are spilled on the motor base or power cord, immediately unplug the
appliance. Thereafter, clean the appliance and let it dry for at least 1 day. See: Care and
Cleaning
Moving parts — Risks of injuries
The appliance is intended for cutting, chopping and mixing food. Thus,
moving/cutting parts of the appliance can cause severe injuries, when used
contrary to these instructions.
• Do not insert your hands, hair, clothes, brushes, or other foreign objects (e.g. bones, stalks
of vegetables, cooking utensils) in the feed tube of the appliance or in the outlet of the bowl,
when the appliance is connected to the power supply. Only use the provided pusher to push
down the ingredients. Do not push with violence, to avoid that the motor gets blocked.
• The blades of the tools are very sharp. Handle with care! Only touch the cutting
tools at the black plastic parts to avoid injuries. Do not attempt to use more than one set of
cutting tools simultaneously, unless it is described in the instructions in this booklet this way.
• Do not hold your face over the feed tube, while the motor is agitating, because food and
liquids could splash through the feed tube. Moreover, splinters could escape from the feed
tube, if you failed to see small pieces of bones or other hard parts (e.g. shells, stones) while
preparing the foods. DO NOT push the foods with your hands down in the feed tube, or
poke in the feed tube!
• Always assemble the appliance according to the instructions in this booklet completely and
correctly, before connecting the appliance to the power supply. Doing so, be aware, that
the motor will start IMMEDIATELY, if the ON/OFF button is set to ON at this moment. Thus,
always ensure that the appliance is always ready for working, before connecting to the power supply. Always switch OFF (indicator in the ON/OFF button goes out) the appliance via
the ON/OFF button first, when setting it out of operation. This holds also, when the motor
suddenly stops agitating due to overheating or braking of a safety interlock.
39
Technical specifications
Model:
Art. No. 40963 Design Food Processor S
Power supply:
230-240 V AC, 50/60 Hz
Power consumption:
450 - 500 W
Length of power cord:
ca. 1 m
Weight:
ca. 0.75 kg
Dimensions:
ca. 16.5 cm x 19.8 cm x 36.0 cm (width x depth x height)
Maximum filling level:
0.75 Litre
Certification:
Before first use
WARNING: DO NOT let young children play with the appliance, or any part
of it, or the packaging! The cutting tools are very sharp. Ensure not to get injured when
unpacking the tools. The length of the power cord is about 1 m. Do not attempt to pull out
the power cord any further than this.
1. Unpack the appliance and all accessories carefully.
2. Some cutting blades are placed in the drawer in the motor base. Pull out the drawer and
avoid cutting yourself, when taking out the tools. Thus, always grasp the tools only at the
black plastic parts.
3. Probably, the power cord is inserted in the back of the motor base. Carefully, pull out the
power cord without using violence. The power cord is about 1 m in length. Do not attempt to
pull out the power cord any further than this.
4. Check that no parts are damaged or missing. See: Knowing Your Design Food Processor
Pro
5. Carefully remove all shipping materials and promotional materials, but DO NOT remove
any warning labels or the model label. Especially ensure that there are no foreign objects
(e.g. packaging) in the interior of the bowl.
WARNING! Always switch OFF (ON/OFF button; indicator goes out) and unplug the
appliance, before cleaning. Do not immerse the motor base or power cord in water or other
liquids or spill any liquids on the motor base or power cord. Do not place the motor base or
power cord in an automatic dishwasher.
6. Before first use and after a longer period of storage, clean the appliance and all tools.
(See: „Care and Cleaning“)
40
Properties of the Design Food Processor S
Your new Food Processor processes your food in only a few seconds. For most purposes there is no need to continuously operate the appliance for more than a few minutes. Even heavy
dough (e.g. yeast dough) is processed in 2 or 3 minutes (at the maximum). Also when using
a cutting blade and adding your food via the feed tube, you should switch off the motor for
filling the feed tube anew. This way you get better results. Additionally, you should not press
too violently on the pusher, when processing your food. See: Safety interlocks
If you wish to process your food for a elongated time (e.g. mixing dough using the universal
‘s’ blade), always make brakes in between times, switching the motor OFF to avoid overheating.
The appliance is NOT suited for grinding very hard parts of foods (e.g. stones, woody
shells, bones).
The appliance is delivered with a lot of useful tools. Only use the designated tools for the
various tasks to avoid damage. (See: „Selecting the Appropriate Tools“)
Safety interlocks
WARNING: Do not attempt to damage or by-pass the safety interlocks!
Your new Design Food Processor Pro is equipped with various safety features for your protection.
• Safety interlocks switch OFF the motor, if the bowl or the lid is not assembled and locked
correctly, to avoid injuries due to the cutting blades and other moving parts.
• The automatic brake stops the motor almost immediately, as soon as the appliance is switched OFF.
• The appliance is provided with a safety thermal cut-out device and will shut off, when overloaded. If the appliance suddenly stops during operation, immediately switch OFF (indicator
goes out) and unplug. Then wait for about 15 minutes to let the motor cool down. Thereafter,
you can operate the appliance quite as usual. (See: „Operation“) However, to avoid that
overheating occurs again, you should repeatedly make brakes during working—depending
on the load (e.g. for kneading heavy dough).
• The motor base is mounted on rubber legs, ensuring a stable, non-slip stand on smooth
surfaces (e.g. glass, metal, painted surfaces).
• For storage you can place the cutting tools in the bowl and in a drawer in the motor base,
thus avoiding injuries. Additionally, this way the tools are always at hand.
(See: „Storage“)
Modes of operation
The appliance can be operated in two operating modes: continuously and pulse.
• Press the ON/OFF button for continuous operation.
An indicator in the ON/OFF button is illuminated, if the appliance is switched on. If the
indicator is illuminated but the motor does not work, first press the ON/OFF button to switch
OFF the appliance (indicator goes out), then check, if you assembled the appliance completely and correctly. (See: Operation) Thereafter try again. (See also: „Solving Problems“)
41
• Alternatively, you can operate the motor in short pulses using the PULSE button for a better
control of the consistency of your food.
This function is most useful, when using the universal ‘s’ blade for mincing and puréeing.
Even when using a cutting disc, you should prefer this operating mode for better results.
Selecting the appropriate tools
WARNING: The blades of the tools are very sharp. Handle with care! Do not
attempt to use more than one set of cutting tools simultaneously.
Your new Food Processor comes with various different sets of tools to meet all your requirements for processing your food.
• Universal ‘s’ blade: use this for chopping, mincing, mixing,
puréeing and kneading in a matter of seconds. Ensure to insert
the universal ‘s’ blade with the correct side facing upwards!
• Shredding disc: will shred most firm fruits (e.g. apples), vegetables (e.g. carrots) and cheeses (e.g. Parmesan) into even and
uniform shreds; coarse or fine, depending on which side is facing
upwards. This is to say; the desired results decide which
side must face upwards.
• Slicing disc: for fine or coarse even cuts; just turn it with the
desired side upwards to get slices of 1.3 mm or 3.5 mm thickness.
This is to say; the desired results decide which side must
face upwards.
Ejector disc: use this disc only for continuous operation in
combination with a cutting disc, large lid and long shaft. Ensure to
insert the separator disc with the correct side facing upwards! See:
„Continuous Operation“
Lid for continuous feeding
The lid for continuous feeding can be used for bigger quantities of food. The sliced food will
be transported over the disc for continous feeding into the food collector.
42
Tips for best results
General
• When processing some vegetables (e.g. onions), peel, if required, and quarter or cut
very large vegetables in eighths – especially if you wish to process the vegetables using the
universal ‘s’ blade and do not feed it through the feed tube.
• For measuring out small amounts up to 150 ml you can use the pusher. It is
equipped with an appropriate scale.
Using the universal ‘s’ blade
• In most cases, you should not process your food excessively. Most ingredients are better,
if chopped only coarsely (e.g. onions). In general, some short bursts using the PULSE button
are sufficient.
• For best, most consistent results, you should cut your food in pieces approximately equal in
size. Pre-cut meat into cubes of approx. 2 cm in size. Additionally, it is best, not to overload
the bowl. For processing large amounts, it is a good idea to work in portions of up to 100
ml.
• Raw meat will take slightly longer to process than cooked meat.
• The quantities that can be processed using the chopping blade will vary with the density of
the mixture.
• Herbs and greens as well as all parts of the appliance must be completely dry for this.
Otherwise the food will stick to the inner sides of the bowl. Push the food down in between,
using a wooden or plastic cooking spoon or the supplied spatula. It is best to use the PULSE
button.
• When adding solid finely grinded ingredients like icing or flour, there is no need to sieve
these ingredients.
• You may add further ingredients directly through the feed tube. It is best to stop the motor
for this.
Using the feed tube and cutting discs
• Cut the food in pieces fitting in the feed tube. Fill the feed tube loosely and insert the pusher, before switching on the motor and pushing down slowly. The more firmly you push, the
thicker the slices or shreds. However, do not push too vigorously to avoid that the motor gets
stuck.
• Especially when cutting slices, it is essential to evenly and firmly fill up the feed tube to
allow each piece of food supporting the other. Push down the foods evenly with the pusher.
Example: put carrots upright side by side into the feed tube to get small slices. Cut the carrots
in fitting pieces and insert these pieces horizontally in a stack in the feed tube. The thickness
of the cuts depends on which side of the slicing disc is facing upwards or how the variable
slicing disc is adjusted.
• Softer foods such as cheese (cheddar, mozzarella or Swiss) should be well chilled before
processing. Harder foods such as parmesan or Romano cheese should be at room temperature before processing. Do not apply too much pressure, when grating hard cheese.
43
Operation
WARNING: The appliance is intended for cutting and mixing food. For this, the appliance
is equipped with sharp knives and other electrically driven moving parts. DO NOT insert
your hands or any foreign objects (e.g. cooking utensils, clothes) in the feed tube, when the
appliance is connected to the power supply, to avoid risks of injuries and damage. Only use
the provided pusher for pushing food down in the feed tube.
Always switch OFF the ON/OFF button (indicator goes out) first, then unplug the appliance,
before assembling or disassembling any parts. Before operation, always ensure that you
have assembled the appliance completely and correctly according to the instructions in
this booklet, and that there are no foreign objects in the feed tube. Carefully remove hard,
inedible parts of your foods (e.g. bones, seeds, stalks, wooden shells) completely, before
processing.
Do not place clothes, tissues or any other foreign objects on or under the appliance during
operation. Do not place the appliance over a power cord. Do not use any hard or sharpedged objects (e.g. forks, knives), to avoid damage to the appliance. Do not use violence!
If liquids come out from under the lid, run down the exterior of the appliance and/or
accumulate under the appliance, immediately unplug the appliance to avoid injuries and
damage by electric shock. Always wipe off spilled liquids immediately. Do not overfill the
bowl. Always observe the maximum amount, given for the individual toolsets. If necessary,
empty the bowl regularly. If liquids accumulate again under the appliance, possibly the bowl
is leaking. (See: „Solving Problems“)
Preparing the appliance
WARNING: Only place the appliance on a stable, dry, level, and clean surface. Do not
place any clothes or tissue or other foreign objects on or under the appliance during operation, to avoid risk of fire or electric shock. Do not block the ventilation slots at the bottom and
rear of the motor base. During operation, the buttons for operation must be accessible any
time.
Always ensure that the appliance is unplugged, before assembling or disassembling the
appliance.
Before assembling the appliance, always ensure that all parts and accessories you wish to
use are in proper working order (e.g. not cracked, chapped, broken or distorted). Do not
use any damaged parts to avoid risk of injuries and damage.
1. Place the motor base on a flat, stable, and moisture-resistant surface near a suitable wall
power outlet with the operating buttons facing to you. (See: Important Safeguards) Leave at
least 20 cm of free space to walls, curtains, boards and other objects on each side of the appliance. Leave at least 50 cm of free space above the appliance to get unhindered access.
Ensure that the appliance is unplugged.
2. Grasp the bowl by the handle and place the bowl onto the motor
base with the handle at the right side.
3. Carefully turn the bowl clockwise on the motor base to the stop, until
the handle is positioned above the buttons of the motor base. Ensure
that the bowl is locked firmly on the motor base and will not wobble.
44
Chopping, kneading, mixing or puréeing
Required Tools:
Bowl, short shaft, - universal ‘s’ blade (chopping, puréeing, mixing, and kneading solid food) - lid with feed
chute including pusher
Operating functions, buttons:
Continuous operation or in short bursts, ON/OFF button
or PULSE button
Maximum filling level:
Depending on the type of processed food
Minimum amount:
Cover the lower blade
Usual operating time:
A few seconds up to 2-3 minutes
Typical way of operation:
Directly filling the bowl while motor is idle; keeping feed
tube closed with pusher during operation
WARNING: The knives of the universal ‘s’ blade are very sharp. Handle with
care! Only grasp the universal ‘s’ blade by the black plastic body.
Immediately wipe off spilled liquids. When liquids come out from under the lid, run down
at the exterior of the appliance and/or accumulate under the appliance, immediately
unplug the appliance to avoid injuries and damage caused by electricity. Clean and dry the
appliance, according to the instructions in section Care and Cleaning. Do not overfill the
bowl. For working with the universal ‘s’ blade, do not fill in more than the maximum amounts
given in the table below. This holds especially for processing liquids or very runny food (e.g.
light batter). In these cases, it is best to use the PULSE button in short bursts. If again liquids
accumulate under the appliance, then possibly the bowl is leaking. Get in contact with an
authorized service centre for examination and repair.
Some useful hints for working with the universal ‘s’ blade
Always remove the bowl from the motor base, before changing the tools or taking food out
of the bowl. This way, you avoid spilling food on / in the motor base. For this, unlock the
bowl (turn counter-clockwise as far as it goes), and then hold the bowl level while lifting it up.
The universal ‘s’ blade may only be assembled in one orientation with the somewhat wider
opening facing downwards. Otherwise, you can not push down the tools to the bottom of
the bowl and it is quite difficulty to remove the tools from the shaft thereafter.
For chopping, mincing, puréeing and mixing of solid ingredients or heavy mixtures (e.g.
dough), it is best to use the universal ‘s’ blade.
Further hints are given in chapter „Tips for best results“.
Food
Maximum
Quantity
Approx.
Hints for Preparation
Operation Time
Carrots
150 g
15-20 seconds
peel and cut into 2 cm pieces
Apple
150 g
15-20 seconds
peel and remove core; cut into
2 cm pieces
Cheese
60 g
15-20 seconds
Cut into 2 cm pieces.
45
Eggs
3
Meats
(raw or cooked)
100 g
15-20 seconds
cut into 2 cm pieces
Walnuts
100 g
10-15 seconds
without shells, use halved or
broken; scrap down sides
of the bowl to ensure even
consistency
Onions
100 g
10-15 seconds
peel and cut into quarters
Fresh herbs
a few springs
10 seconds
bowl and herbs must be completely dry; remove stalks
Potatoes
100 g
15-25 seconds
cooked and peeled; cut into 3
cm cubes
Royal icing
280 g icing
sugar + 1 eggs
15 seconds
5-10 seconds
hard-boiled; peel and cut into
quarters
Processing with the universal ‘s’ blade
1. Prepare your food for processing. Remove all inedible or too hard parts (e.g. seeds,
shells, stalks, bones), and cut the food in appropriate pieces. Various hints for preparation
and processing are summarized in section „Tips for best results“.
2. Prepare the appliance for use, assembling the bowl. See: „Preparing the appliance“
3. Insert the shaft with the wide end facing downwards. Possibly you must turn the shaft a
little until it slips down.
4. Insert the universal ‘s’ blade only one orientation with the somewhat wider opening facing
downwards. Push it down on the shaft to the bottom of the bowl until it engages with a click,
but do not use violence! If you can not push the universal ‘s’ blade down, just turn it upside
down and try again. It is best to insert the universal ‘s’ blade always BEFORE inserting your
food in the bowl.
5. Add the prepared food but do not overfill the bowl.
Depending on the consistency of your food (firm or soft) you can process different amounts in
a single processing step. For example, if you wish to knead heavy dough using the universal ‘s’ blade, you should not add more than 300 ml. If your recipe requires adding further
ingredients later on, consider these additional amounts right at the start. (See: „Tips for best
results“)
6. Close the bowl with the lid.
Place the lid on the bowl with the protrusion on the lid lying at the right side next to the
handle of the bowl. Possibly turn the lid a little until it settles on the bowl. Then, turn the lid
clockwise until the protrusion is lying exactly over the handle of the bowl and the safety
interlock of the lid engages tangibly.
7. Insert the pusher into the feed tube.
NOTE: When connecting the appliance to the power supply with the ON/OFF button set to
ON, the motor starts running immediately!
46
8. Connect the appliance to the power supply. If the motor starts running, press the ON/OFF
button to stop it.
9. Switch on the appliance. The appliance processes your food in a few seconds. Thus, it
is sufficient for mixing and chopping of most foods to use the PULSE button in a few short
bursts. The motor will agitate only as long as you press this button down.
For kneading dough or ice mixtures or similar food, you need to operate the appliance for
some minutes. For this, use the ON/OFF button. However, even in this case, only a few
minutes of processing will be sufficient. Even kneading of yeast dough will be done in two or
three minutes.
10. Switch OFF the appliance, as soon as your food reaches the desired consistency.
Adding further ingredients
WARNING: Ensure not to spill any liquids on the appliance, when adding further ingredients through the feed tube. Do not overfill the bowl. The maximum amount depends on the
type of processed food. Please refer to the table above.
11. If you wish to add further ingredients, it is best to switch OFF the motor first. Remove the
pusher and add the prepared ingredients through the feed tube. Then insert the pusher again
and switch ON the appliance.
Pushing down food that sticks to the inner sides
If food sticks to the inner sides of the bowl during processing, you should push it down in
between times. Refer to the instructions in section „After processing“, if you are not used to
handling the appliance.
WARNING: Always switch OFF and unplug the appliance before opening the lid. Do not
insert your hands in the bowl, if the bowl is mounted on the motor base. Do not scratch or
scrape on the surfaces of the appliance using hard or sharp-edged objects. Only use cooking utensils made of wood or plastic with the appliance.
12. First switch OFF and unplug the appliance. Remove the bowl (turn counter-clockwise
to the stop, then lift up). Open the lid (turn counter-clockwise to the stop, then lift up). Push
down the food. For this, use a wooden or a plastic cooking spoon.
Thereafter, re-assemble the lid on the bowl, re-assemble the bowl on the motor base, lock lid
and bowl and continue processing. In most cases, it is best to use the PULSE button in short
bursts. (See: „Tips for best results“)
Finishing Your Work
13. After you have processed your food as desired, switch OFF (indicators go out) and
unplug the appliance. Continue as described in section „After processing“.
14. Clean the appliance and all used parts and accessories immediately after use. Do not let
any food dry on the surfaces.
47
Grating, shredding and slicing using the cutting discs
The appliance is delivered with 2 different cutting discs. The blades
on the two sides of these discs are shaped differently, designated for
different purposes and, thus, providing different results. Therefore, it is
essential to assemble the cutting discs with the side facing upwards that
is provided with the required type of blades.
Tip: If you wish to process a large quantity or a partial separation
of the juice, it is best to use the large lid and the food collector. See:
Processing „Large quantities using the lid with feed and ejector chute“
Required Tools:
Bowl, shaft, one cutting disc (depending on the desired
results), lid including pusher
Operating functions, buttons:
Short-time operation; ON/OFF button or PULSE button
Maximum filling level:
750 ml
Usual operating time:
A few seconds for each filling of the feed tube
Typical way of operation:
Processing via the feed tube, processed food accumulates
in the bowl
WARNING: The knives of the cutting discs are very sharp. Handle with care!
Only grasp the cutting discs by the black plastic body or at the brim. Always assemble only
one single cutting disc. Do not attempt to use a cutting disc in combination with another
toolset simultaneously except for the separator disc when using the large lid (see: Working
Continuously Using the Large Lid).
Immediately wipe off spilled liquids. When liquids come out from under the lid, run down at
the exterior of the appliance and/or accumulate under the appliance, immediately unplug
the appliance to avoid injuries and damage caused by electricity. Clean and dry the appliance, according to the instructions in section Care and Cleaning.
Do no not overfill the bowl. Always observe the maximum amount given in the table
above. However, if again liquids accumulate under the appliance, then possibly the bowl is
leaking. Get in contact with an authorized service centre for examination and repair.
Always remove the bowl from the motor base, before changing the tools or taking food out
of the bowl. This way, you avoid spilling food on / in the motor base. For this, unlock the
bowl (turn counter-clockwise as far as it goes), and then hold the bowl level while lifting it
up.
1. Prepare your food for processing. Remove all inedible or too hard parts (e.g. seeds,
shells, stalks, bones), and cut the food in appropriate pieces. Various hints for preparation
and processing are summarized in section „Tips for Best Results“.
2. Prepare the appliance for use, assembling the bowl.
(See: „Preparing the Appliance“)
3. Insert the short shaft in the bowl. Doing so, insert the pin in the middle of the shaft in the
opening in the middle of the bowl. If necessary, turn the shaft a little until it settles on the
coupling in the centre of the motor base.
48
WARNING: The blades of the cutting discs are very sharp. Only grasp the
cutting discs at the brim or at the black central plastic body.
4. For slicing, shredding, and grating you need one of the cutting discs. Select the appropriate disc. The cutting discs can be used in two orientations. The processing results depend
on which side is facing upwards: coarse or fine. The discs are assembled with the bowl still
EMPTY and are mounted on top of the shaft, almost level with the brim of the bowl.
5. Cover the bowl with the lid. The protrusion on the lid must face to the right side near the
handle of the bowl. Insert the pin in the middle of the lid in the opening on top of the shaft. If
necessary, turn the lid a little over the bowl until the lid settles on the brim of the bowl.
6. Turn the lid clockwise until the safety interlock engages and the protrusion on the lid is
exactly over the handle of the bowl. Ensure that the lid is locked firmly and will not wobble.
NOTE: When connecting the appliance to the power supply with the ON/OFF button set to
ON, the motor starts running immediately!
7. Connect the appliance to the power supply. If the motor starts running, press the ON/OFF
button to stop it.
8.Take the pusher out of the feed tube and fill in the food, you have prepared already.
For getting optimal results, it is essential how you stack the food in the feed tube. For this,
some hints are given in section „Tips for Best Results“
WARNING: Do not push down your food with your hands! Always use the pusher. Do not
push too vigorously to avoid overloading the motor.
9. In most cases it takes only a few seconds to process a filling of the feed tube, and using
the PULSE button for this is more convenient. However, you can switch the motor on and off
via the ON/OFF button.
CAUTION: At the latest, empty the bowl as soon as the maximum filling level (MAX; 750
ml) is reached.
Tip: There will always be a small piece of food left unprocessed between the food pusher
and the disc. Generally, there is no need to remove it. Just fill up the feed tube again and
continue processing.
10. If the feed tube is empty, switch OFF the motor and fill the feed tube again with the next
portion. This way, process the desired amount. But doing so, do not overfill the bowl. Always
observe the maximum filling level (MAX).
WARNING: The blades of the cutting tools are very sharp. Handle with care to avoid
injuries!
11. If the food in the bowl reaches the maximum filling level (MAX), empty the bowl, before
continuing processing. Refer to the instructions in section „After Processing“, if you are not
used to handling the appliance.
First switch OFF and unplug the appliance. Remove the bowl from the motor base and then
remove the lid from the bowl. Take out the cutting disc. Thereafter take out the processed
food using a wooden or plastic spoon.
If you wish to continue processing, replace the cutting disc on the shaft and re-assemble the
lid. Wipe off all spilled liquids or food carefully from the exterior of the bowl. Then, replace
the bowl on the motor base and lock bowl and lid. Thereafter, connect the appliance to the
power supply again and continue working quite usually.
49
12. After you have processed your food as desired, switch OFF (indicators go out) and
unplug the appliance. Continue as described in section „After Processing“.
Clean the appliance and all used parts and accessories immediately after use. Do not let any
food dry on the surfaces.
Working with the lid for continuous feeding
The lid for continuous feeding can be used for bigger quantities of food. The sliced food will
be transported over the disc for continous feeding into the food collector.
Required Tools:
Bowl, shaft, adjustable slicing disc, lid including pusher
Operating functions, buttons:
Short-time operation; PULSE button or ON/OFF button
Maximum filling level:
Food collector 1750 ml, Bowl 500 ml
Usual operating time:
A few seconds for each filling of the feed tube
Typical way of operation:
Filling via the feed tube, processed food accumulates in
the bowl
WARNING: The knife of the adjustable slicing disc is very sharp. Handle with
care! Only grasp the cutting discs at the black plastic body or at the brim. Always assemble
only one cutting disc. Do not attempt to use more than one toolset simultaneously.
Immediately wipe off spilled liquids. When liquids come out from under the lid, run down at
the exterior of the appliance and/or accumulate under the appliance, immediately unplug
the appliance to avoid injuries and damage caused by electricity. Clean and dry the appliance, according to the instructions in section „Care and Cleaning“.
Do no not overfill the bowl. Always observe the maximum amount given in the table above.
However, if again liquids accumulate under the appliance, then probably the bowl is leaking. Get in contact with an authorized service centre for examination and repair.
Always remove the bowl from the motor base, before changing the tools or taking food out
of the bowl. This way, you avoid spilling liquids on or in the motor base. For this, unlock the
bowl (turn counter-clockwise as far as it goes), and then hold the bowl level while lifting it up.
1. Prepare your food for processing. Remove all inedible and too hard parts (e.g. seeds,
shells, stalks, bones), and cut the food to appropriate pieces. Various hints for preparation
and processing are summarized in section „Tips for Best Results“.
2. Prepare the appliance for use, assembling the bowl. (See: „Preparing the Appliance“)
3. Insert the long shaft in the bowl. Doing so, insert the pin in the middle of the shaft in the
opening in the middle of the bowl. If necessary, turn the shaft a little until the pin settles on
the coupling in the centre of the motor base.
4. Place the separator disc on the shaft with the baffle plate (vertical strip leading from the
centre to the brim of the disc) facing upwards.
WARNING: The blades of the cutting discs are very sharp. Only grasp the cutting discs at
the brim or at the black central plastic body.
5. For slicing, shredding, and grating you need one of the cutting discs. Select the appropriate disc. The cutting discs can be used in two orientations. The processing results depend on
50
which side is facing upwards: coarse or fine. If you can not install the cutting disc in combination with the separator disc, check whether you use the correct (long) shaft, and whether
you installed the separator disc in the correct orientation.
6. Cover the bowl with the lid for continuous feeding. The protrusion on the lid must fact to
the right side near the handle of the bowl. If necessary, turn the lid a little over the bowl until
the lid settles on the brim of the bowl.
7. Turn the lid clockwise until the safety interlock engages and the protrusion on the lid is
exactly over the handle of the bowl. Ensure that the lid is locked firmly.
8. Pull up the black universal ‘s’ blade of the outlet, until the outlet of the lid is completely
open.
9. Place the food collector under the outlet. One side of the food collector is rounded, so that
it fits exactly to the outer walls of the bowl. Place the food collector with this side as close as
possible to the bowl.
NOTE: When connecting the appliance to the power supply with the ON/OFF button set to
ON, the motor starts running immediately!
10. Connect the appliance to the power supply. If the motor starts running, press the ON/
OFF button to stop it.
CAUTION: At the latest, empty the bowl as soon as the maximum filling level (1500 ml) is
reached.
11. Take the pusher out of the feed tube and fill in the food, you have prepared already.
For getting optimal results, it is essential how you stack the food in the feed tube. For this,
some hints are given in section „Tips for Best Results“.
WARNING: Do not push down your food with your hands! Always use the pusher. Do not
push too vigorously to avoid overloading the motor.
11. While holding the pusher at the food with one hand, switch on the motor with the other
hand. In most cases, it takes only a few seconds to process a filling of the feed tube, and
using the PULSE button for this is more convenient. However, you can switch the motor on
and off via the ON/OFF button.
Tip: There will always be a small piece of food left unprocessed between the food pusher
and the cutting disc. Generally, there is no need to remove it. Just fill up the feed tube and
continue processing.
CAUTION: At the latest, empty the food collector and/or bowl as soon as the maximum
filling level (1750 ml for the food collector and 500 ml for the bowl) is reached.
13. If the feed tube is empty, switch OFF the motor and fill the feed tube again with the next
portion. This way, process your food. But doing so, do not overfill bowl and food collector.
WARNING: The blades of the cutting tools are very sharp. Handle with care to avoid
injuries!
14. If the food in bowl or food collector reaches the maximum filling level, empty bowl and
food collector, before continuing processing. Refer to the instructions in section „After Processing“, if you are not used to handling the appliance. First switch OFF and unplug the appliance. Remove the food collector from under der outlet. For this, tilt the food collector a little,
ensuring not to spill the contents. Empty the food collector. Remove the bowl from the motor
base and then remove the lid from the bowl. Carefully take out the cutting disc, separator
51
disc and shaft. Thereafter pour out the juice. If you wish to continue processing, replace shaft
and cutting disc and re-assemble the lid. Wipe off all spilled liquids or food carefully from
the exterior of the bowl. Then, replace the bowl on the motor base and lock bowl and lid.
Thereafter, you can connect the appliance to the power supply again and continue working
quite usually.
15. After you have processed your food as desired, switch OFF and unplug the appliance.
Continue as described in section „After Processing“. Clean the appliance and all used parts
and accessories immediately after use. Do not let any food dry on the surfaces.
After processing
After processing your food, remove the bowl from the motor base and take your food out of
the bowl.
WARNING: Switch OFF the appliance first (indicator of the ON/OFF button goes out), then
unplug the appliance, if you do not use the appliance or assemble/disassemble any parts or
accessories, or for cleaning or moving the appliance. Do not leave the appliance unattended, when connected to the power supply.
Always ensure that the appliance and any parts and accessories of it are out of reach of
young children.
Do not grasp in the bowl or insert any foreign objects (e.g. cooking utensils) with the bowl
mounted on the motor base and the appliance connected to the power supply. Always
remove the bowl from the motor base, before emptying and/or cleaning. The blades of the
cutting tools are very sharp. Handle with care to avoid injuries.
Do not use any violence. Bowl and lid are locked on the motor base for operation. Thus you
must unlock these parts by turning them counter-clockwise before you can remove them.
Remainder of food and liquids could drop from the parts of the appliance, when disassembling. Ensure that no liquids drip on the motor base or any other delicate objects, when
removing the lid. Always clean the appliance and all used parts and accessories after each
usage according to the instructions in section Care and Cleaning. Do not let any food dry on
the surfaces.
1. When you finished your work, switch OFF (indicator goes out) and unplug the appliance.
2. If you have used the large lid and jug, remove the jug from under the outlet. For this, tilt
the jug a little, but take care not to spill the contents of the jug.
Tip: Always ensure to hold the bowl level, when removing it from the motor base to avoid
spilling the contents. This holds especially when the bowl is quite full.
3. Grasp the handle of the bowl, turn the bowl counter-clockwise to the stop, and then,
holding the bowl level, lift it carefully straight upwards. Place the bowl on a stable, level and
water-resistant surface.
4. Remove the lid from the bowl. For this, hold the bowl by the handle while turning the lid
counter-clockwise to the stop. Then remove the lid.
5. Remove the tools you have used, from the bowl.
• If you have used a cutting disc, then grasp the central plastic part and pull out the disc. Maybe the shaft sticks to the disc and comes out with it.
• After working with the large lid with outlet: remove the separator disc.
52
• Take out the shaft. If you have used the universal ‘s’ blade or emulsifying disc, these tools will come out with the shaft.
6. Empty the container.
7. Clean the appliance and all used parts and tools according to the instructions in chapter
„Care and Cleaning“.
Solving problems
If any problems occur during operation, you will find solutions in this section.
Problem
Reason
The Solution
The motor will not work, the The appliance is not live. Ensure that the plug is inserted
indicators in the ON/OFF or
correctly and the power socket
PULSE button are dark.
is live.
The motor will not work,
the indicators in the ON/
OFF or PULSE button are
illuminated.
Suddenly the motor stops
during work.
Bowl or lid is not locked
correctly.
Assemble the appliance completely and correctly according
to the instructions in section
„Preparing the Appliance“
The overheat protection
is active.
Switch OFF and unplug the
appliance. Wait for about 1/4
hour to let the motor cool down.
Thereafter, put the appliance
into operation again quite
usually. To avoid overheating,
do not apply too much pressure,
when pushing down your foods
in the feed tube. Cut firm foods
(e.g. carrots) in smaller pieces, before processing. Make
brakes.
The overheat protection
is active.
Switch OFF and unplug the
appliance. Wait for about 1/4
hour to let the motor cool down.
Thereafter, put the appliance
into operation again as usual.
To avoid overheating, do not
apply too much pressure, when
pushing down your foods in the
feed tube. Cut firm foods (e.g.
carrots) in smaller pieces, before
processing. Make brakes.
53
Bowl or lid is not locked
correctly.
A safety interlock has been
released, for example, by
turning the lid while feeding
food through the feed tube.
Ensure that bowl and lid are still
mounted correctly.
Malfunction of the
appliance
Send the appliance to an authorized service centre for repair.
You can not loosen the
universal ‘s’ blade from the
shaft.
You have mounted the
universal ‘s’ blade in
wrong orientation.
The universal ‘s’ blade must
be assembled ALWAYS with
the somewhat wider opening
facing downwards. Do not use
violence! Insert the handle of a
teaspoon between the central
plastic body of the tool and
the shaft and press down the
notches of the shaft to loosen
the tool.
Liquid is coming out from
under the lid.
The bowl is overfilled.
Fill in no more than 500 ml.
The installed tool is not
For mixing, beating, and
suited best for the current emulsifying of liquids you should
task.
always use the emulsifying disc.
Liquids accumulate under the The bowl is leaking.
appliance and/or runs out
from under the bowl.
Immediately unplug the appliance. Contact an authorized
service centre for examination
and repair.
Care and cleaning
WARNING: Always switch OFF the appliance (indicator goes out), and then unplug the
appliance, before assembling or disassembling any parts, or moving or cleaning the appliance. Do not insert your hands or any foreign objects in the feed tube, with the appliance
assembled and connected to the power supply.
Do not leave any food dry up on the appliance or any parts of it to prevent a build up of
dried-on foods. Always clean the appliance after each use according to the following instructions.
Disassembling the appliance
WARNING: The blades of the cutting tools are very sharp. Handle with care!
Always ensure that the appliance and any parts of it are out of reach of
young children.
Do not use violence! Bowl and lid are locked on the motor base for operation. Thus you
must unlock these parts by turning them counter-clockwise before you can remove them. Ad54
ditionally, the large universal ‘s’ blade and emulsifying disc are firmly locked for operation
via nozzles on the shaft.
Remainder of food and liquids could drop from the parts of the appliance, when disassembling. Ensure that no liquids drip on the motor base, or any other delicate objects. Always
remove the bowl from the motor base first, and place it on a stable and water-resistant
surface, before opening the lid.
1. Switch OFF the ON/OFF switch (indicator goes out), wait until the motor comes to complete standstill, and unplug the appliance from power outlet.
2. Remove the pusher. If you have used the lid for continuous feeding, remove the food
collector. Doing so, ensure not to spill the contents of the food collector. Tilt the food collector
a little for removing it from under the outlet.
CAUTION: Ensure that you do not spill the contents of the bowl, when removing it from the
motor base. Keep the bowl level.
3. Grasp the bowl at its handle and turn it counter-clockwise as far as it goes to release the
safety interlock. Then, keeping the bowl level, lift it from the motor base.
4. Place the bowl on a level, stable and water-resistant surface.
5. Turn the lid counter-clockwise as far as it goes to release the safety interlock. Then lift the
lid from the bowl.
WARNING: Do not touch the blades of the cutting tools. Only touch the cutting tools at the
black plastic parts. Do not use any hard or sharp-edged object with the appliance to avoid
damage to the surfaces.
6. Lift the tools out of the bowl: maybe small universal ‘s’ blade and bowl, or cutting disc,
shaft, perhaps assembled with universal ‘s’ blade.
7. Empty the bowl. For this, you can use a plastic or wooden spoon or the provided spatula.
8. If you used the universal ‘s’ blade, remove these tools from the shaft. However, do not use
violence! These tools are locked on the shaft via two notches.
Grasp the tool at the central plastic body. Then, using forefinger and thumb, push in the two
notches on the shaft and simultaneously slip the tool over the notches. Thereafter, you can
separate shaft and tool completely.
9. Clean all used parts and accessories, as described below.
Cleaning the appliance
WARNING: The blades of the cutting tools are very sharp. Handle with care to avoid
injuries.
Do not use any abrasive cleaners, cleaning pads (e.g. metal scouring pads), or any corrosive chemicals (e.g. bleach) for cleaning the appliance or any parts of it, to avoid damage
to the surfaces. Do not immerse the motor base or power cord in water or any other liquid.
Do not spill or drip any liquids on the motor base, or on the power cord to avoid risk of fire
and electric shock. Do not use violence! Do not pour any liquids in the central opening of the
container, while the container is mounted on the motor base.
55
Dishwasher use
Do not place the motor base or power cord in an automatic dishwasher.
All plastic components deteriorate through prolonged use of a dishwasher for cleaning (e.g.
discolouration, cracks, distortions). Nevertheless, all removable parts and accessories (bowl,
lid, shaft, and tools) of your Food Processor are tolerant to dishwasher use.
However, if using the dishwasher, place the parts only on the top rack. If your dishwasher
features temperature control, do not select more than 65 °C (150 °F). Nevertheless, to extend the working life of the parts of your Food Processor, it is better to manually clean them
in warm dishwater.
Manual cleaning
1. Clean all removable parts (pusher, lid, tools, shaft, bowl) with warm dish-water and a soft
nylon brush. Doing so, ensure not to get injured by the cutting tools. Stubborn residues on
the surfaces can be removed better by soaking in warm dish-water for some minutes.
2. Moisture a clean cloth or soft sponge with a little warm dishwater and carefully wipe the
exterior of the appliance and the power cord.
WARNING: Always ensure that the appliance and all parts of it are out of reach of young
children.
3. Thoroughly dry the motor base and all parts, and let dry naturally for about half an hour
out of reach of young children. If liquids dripped on the motor base, then let the appliance
dry for at least 1 day.
Storage
WARNING: Always switch OFF (ON/OFF button indicator goes out), unplug and clean the
appliance and all its parts before storing. (See: „Care and Cleaning“).
The cutting tools are very sharp. Always ensure that no one can get injured by touching the
blades unintentionally.
Ensure to store the appliance where it is clean, dry and safe from frost, direct sunlight and
inadmissible strain (mechanical or electric shock, heat, moisture) and where it is out of reach
of young children. Place the appliance on a clean and stable surface, where it can not fall.
Do not place any hard or heavy objects on the appliance or any part of it.
Always handle the power cord with care. Power cords may never be knotted, twisted, or
squeezed.
Do not use any parts or tools of the appliance for any other purpose than operating the
appliance. It is good advice to store the parts and accessories of the appliance with the
appliance. For this, at least the cutting tools can be stored safely within the appliance or its
accessories.
1. Always switch OFF, unplug, and clean the appliance and its parts before storage. (See:
„Care and Cleaning“)
2. It is good advice to re-assemble the bowl on the motor base for storage. (See: „Preparing
the Appliance“) Additionally, you can store most of the parts and tools within the appliance.
This way, you avoid injuries and damage by the tools and the parts can not get lost. (See:
56
„Preparing the Appliance“)
Place the bowl on the motor base. For storage, it is quite sufficient to lock the bowl only until
it engages firmly on the motor base and will not fall. This way, you avoid excessive wear to
the safety interlocks.
Insert the long shaft in the container, and place the chopping blade on it without pushing it
down. There is no need to fix it on the shaft.
Then, place the short shaft carefully in the container, and put the emulsifying disc on it. Insert
the separator disc.
Place the large lid on the container. Again, the lid is already firmly in place without locking
the safety interlock completely. Put the pusher into the feed tube.
3. You can store some tools in the drawer of the motor base, to avoid injuries due to touching it unintentionally.
Carefully push the drawer back into the motor base.
CAUTION: Do not grasp the appliance by the bowl, power cord or lid for moving the appliance. To move the appliance, always grasp the motor base at both sides near the bottom.
4. Grasp the motor base with both hands at its sides, and place it on a suitable surface,
where it can not fall, and is out of reach of young children.
5. The regular lid and food collector should be stored near the appliance.
6. It is best to store the adjustable slicing disc and lid of the small bowl near the appliance.
7. Wind the power cord loosely around the motor base.
Notes for disposal
Dispose of the appliance and packaging must be effected in accordance with the corresponding local regulations and requirements for electrical appliances and packaging. Please
contact your local disposal company.
Information and service
Please check www.gastroback.de for further information. For technical support, please contact Gastroback Customer Care Center by phone: +49 (0)4165/22 25-0 or e-mail
[email protected].
Warranty
We guarantee that all our products are free of defects at the time of purchase.
Any demonstrable manufacturing or material defects will be to the exclusion of any further
claim and within warranty limits of the law free of charge repaired or substituted. There is
no warranty claim of the purchaser if the damage or defect of the appliance is caused by
inappropriate treatment, over loading or installation mistakes. The warranty claim expires if
there is any technical interference of a third party without an written agreement.
The purchaser has to present the sales slip in assertion-of-claim and has to bear all charges
of costs and risk of the transport.
57
Index
bowl.................................................................................................35, 41, 44, 52
workspace..........................................................................................................37
storage...............................................................................................................56
food collector..........................................................................................35, 43, 50
continuous feeding...................................................................................36, 42, 50
operating components....................................................................................35, 36
operation............................................................................................................44
intended use..................................................................................................35, 37
moving parts.......................................................................................................39
lid................................................................................................................35, 36
disposal..............................................................................................................57
first use...............................................................................................................40
liquids..........................................................................................................38, 45
filling level........................................................................................40, 45, 46, 49
feed tube......................................................................................................35, 43
properties...........................................................................................................41
test for proper operation.......................................................................................37
warranty.............................................................................................................57
shaft.............................................................................................................35, 36
scale..................................................................................................................36
cutting discs............................................................................................36, 43, 48
power cord.............................................................................................35, 38, 40
solving problems..................................................................................................53
shredding disc.........................................................................................36, 43, 48
cleaning........................................................................................................... 54ff
service................................................................................................................57
safety...........................................................................................................37, 41
dishwasher use....................................................................................................55
pusher..........................................................................................................35, 36
power supply.................................................................................................38, 40
buttons................................................................................................................35
technical specifications.........................................................................................40
tips....................................................................................................... 42, 15, 24ff
overheat protection..............................................................................................41
universal ‘s’ blades...................................................................................36, 42, 43
extension cord.....................................................................................................39
slider............................................................................................................35, 51
preparation...................................................................................................44, 45
tools.............................................................................................................36, 42
disassembling................................................................................................52, 54
accessories....................................................................................................35, 36
drawer.............................................................................................35, 40, 41, 57
assembling........................................................................................................ 44ff
58
GASTROBACK GmbH
Gewerbestraße 20 . D-21279 Hollenstedt / Germany
Telefon +49 (0)41 65/22 25-0 . Telefax +49 (0)41 65/22 25-29
[email protected] . www.gastroback.de