1
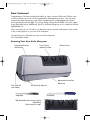
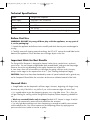
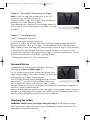
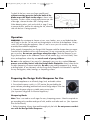
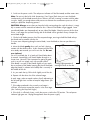
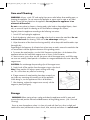
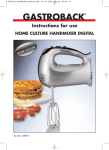
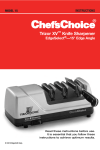
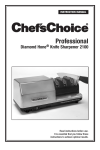
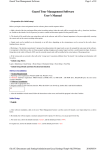
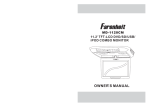
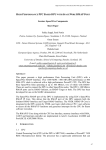
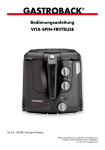
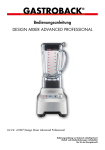
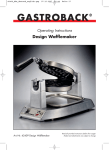
41620_Messer_BDA_k1.qxd 23.07.2010 13:35 Uhr Seite 15
GASTROBACK
®
Operating Instructions
Design Knife Sharpener
Art.-No. 41620 Design Knife Sharpener
Read all provided instructions before first usage!
Model and attachments are subject to change!
For household use only
15
41620_Messer_BDA_k1.qxd 23.07.2010 13:35 Uhr Seite 16
!
Read all provided instructions before first use!
Model and attachments are subject to change!
Carefully read all provided instructions before you start running the appli
ance, and pay regard to the warnings mentioned in these instructions.
Table of Contents
Knowing Your New Knife Sharpener . . . . . . . . . . . . . . . . . . . . . . . . . . . . . . . .19
Important Safeguards . . . . . . . . . . . . . . . . . . . . . . . . . . . . . . . . . . . . . . . . . .20
Important Safeguards for Electrical Appliances . . . . . . . . . . . . . . . . . . . . . . . .21
Technical Specifications . . . . . . . . . . . . . . . . . . . . . . . . . . . . . . . . . . . . . . . .22
Before First Use . . . . . . . . . . . . . . . . . . . . . . . . . . . . . . . . . . . . . . . . . . . . . .22
Important Hints for Best Results . . . . . . . . . . . . . . . . . . . . . . . . . . . . . . . . . . . .22
General Hints . . . . . . . . . . . . . . . . . . . . . . . . . . . . . . . . . . . . . . . . . . . . . .22
Selecting the Required Stages . . . . . . . . . . . . . . . . . . . . . . . . . . . . . . . . . . .23
Serrated Knives . . . . . . . . . . . . . . . . . . . . . . . . . . . . . . . . . . . . . . . . . . . . .24
Checking for a Burr . . . . . . . . . . . . . . . . . . . . . . . . . . . . . . . . . . . . . . . . . .24
Operation . . . . . . . . . . . . . . . . . . . . . . . . . . . . . . . . . . . . . . . . . . . . . . . . .25
Preparing the Knife Sharpener for Use . . . . . . . . . . . . . . . . . . . . . . . . . . . . . .25
Sharpening Blades . . . . . . . . . . . . . . . . . . . . . . . . . . . . . . . . . . . . . . . . . . .25
Care and Cleaning . . . . . . . . . . . . . . . . . . . . . . . . . . . . . . . . . . . . . . . . . . .27
Storage . . . . . . . . . . . . . . . . . . . . . . . . . . . . . . . . . . . . . . . . . . . . . . . . . . .27
Notes for Disposal . . . . . . . . . . . . . . . . . . . . . . . . . . . . . . . . . . . . . . . . . . . .28
Index . . . . . . . . . . . . . . . . . . . . . . . . . . . . . . . . . . . . . . . . . . . . . . . . . . . . .29
16
41620_Messer_BDA_k1.qxd 23.07.2010 13:35 Uhr Seite 17
Dear Customer!
Congratulations! You have purchased a helpful assistant. No more dull knives! Effortless and
in a few seconds your knives will be sharpened by diamond abrasive discs. The innovative
unique three stage sharpening system allows sharpening both straight-edged and serrated
knives-grinding a precision edge. The springy sliding cam guides the blade in the slots supporting a good positioning. Additionally, due to its functional design the unit is suitable for left and
right-handed use.
These instructions for use will inform you about the various functions and features which makes
it easy to take pleasure in your new Knife Sharpener.
We hope that you will benefit from your new Knife Sharpener.
Your Gastroback GmbH
Knowing Your New Knife Sharpener
Sturdy brushed die-cast aluminium housing
3 pairs of slots for
sharpening in 3 stages
Abrasive disc cover
Magnet-catches the metal dust
Magnet cover
Power switch with
power indicator
Base with non-slip rubber feet
Straight blade
serrated blade
100% diamond abrasive discs in stages A (coarse)
and B (medium)
Ultra-fine strop disc in stage C
17
41620_Messer_BDA_k1.qxd 23.07.2010 13:35 Uhr Seite 18
Important Safeguards
Carefully read all instructions before operating this appliance and save for further reference. Do not attempt to use this appliance for any other than the intended use, described in these instructions. Any other use, especially misuse, can cause severe injuries or damage by electric shock, heat or fire.
Any operation, repair and technical maintenance of the appliance or any part of it other than
described in these instructions may only be performed at an authorised service centre. Please
contact your vendor.
• This appliance is for household use only. Do not operate or store the appliance in humid or
wet areas or outdoors. Any use of accessories, attachments or spare parts not recommended by
the manufacturer may result in fire, electric shock and injuries to persons.
• Check the entire appliance regularly for proper operation especially the power cord. Do not
operate the appliance, when the appliance or any part of it is likely to be damaged, to avoid
risk of fire, electric shock or any other damage and/or injuries to persons. The appliance is likely to be damaged if the appliance was subject to inadmissible strain (e.g. overheating, mechanical or electric shock), or if there are any cracks, excessively frayed or melted parts, or distortions, or if the appliance is not working properly. In this case, immediately unplug the appliance
and return the entire appliance (including all parts and accessories) to an authorised service centre for examination and repair.
• Operate the appliance on a well accessible, stable, level, dry, and suitable large table or
counter. Do not place the appliance over a power cord, or near the edge of the table or counter, or on wet or inclined surfaces or where it can fall. Do not place any clothes or tissue or
other objects below or on the appliance during operation, to avoid risk of fire, electric shock,
moving parts and overheating.
• Close supervision is necessary when the appliance is used near young children. Do not let young children play with any parts of the appliance or the
packaging! The appliance is not intended for use by children or infirm persons without supervision. Do not leave the appliance unattended, when it is in reach of young children. Always
keep the entire appliance dry and clean and where young children cannot reach it. Do not
place any hard and/or heavy objects on the appliance or any part of it.
• Always switch OFF and unplug the appliance when the appliance is not in use and before
moving, cleaning, or for storage. Do not handle the appliance or any part of it with violence.
Do not insert any foreign objects (e.g. clothes) in the slots, when the appliance
is connected to the power supply!
• The appliance or power cord may never touch hot surfaces. Do not place the
appliance or any part of it on or near hot surfaces (e.g. burner, heater, or oven).
• Do not attempt to sharpen scissors, axe blades or any blade that does not fit freely in the
slots. Handle the processed blades with special care, as they are extremely and unexpectedly
sharp. Do not run your finger along the edge to check the sharpness. Do not cut
toward any part of your fingers, hand or body. Never point knifes against persons or lay knives
down in a way that persons could accidentally get injured. Store knives in a safe manner (e.g.
18
41620_Messer_BDA_k1.qxd 23.07.2010 13:35 Uhr Seite 19
in a knives block). Do not leave knives unattended, when they are in reach of
young children.
• Do not use abrasive cleaners, cleaning pads (e.g. metal scouring pads) for cleaning.
Always clean and dry the knives thoroughly before sharpening to prevent that water and any
pollution will get into the appliance.
• Do not use honing oils, water, or any lubricants with the appliance. DO NOT place the
appliance or any part of it in an automatic dishwasher.
• Some blades are hardened by means of a special technique (e.g. Laser) and will lose there
particular properties when grinded. Thus this type of knives should not be sharpened in general.
Important Safeguards for Electrical Appliances
Place the appliance near a suitable wall power socket to connect the appliance directly to a protected mains power supply with protective conductor (earth/ground) connected properly. Ensure
that the voltage rating of your mains power supply corresponds to the voltage requirements of
the appliance (220/240 V, 50/60 Hz, AC).
The installation of a residual current operated circuit breaker (r.c.c.b.) with a maximum rated
residual operating current of 30 mA in the supplying electrical circuit is strongly recommended.
If in doubt, contact your electrician for further information.
In various foreign countries, the specifications for power supplies are subject to incompatible
norms. Therefore it is possible that power supplies in foreign countries do not meat the requirements for safe operation of the appliance. Thus, before operating the appliance abroad, ensure
that safe operation is possible.
• If you wish to use an extension cord, it must be connected properly with live, neutral and protective ground conductor.
• Always handle the power cord with care. Always completely unwind the power cord before
use. Do not place the appliance on a power cord. Power cords may never be knotted, twisted,
pulled, strained or squeezed. Do not let the plug or power cord hang over the edge of the table
or counter. The power cord may not touch hot surfaces. Ensure that no one will pull the appliance by the power cord. Take care not to entangle in the power cord. Always grasp the plug to
disconnect the power cord from the power outlet.
• Do not place or immerse the appliance or power cord in water or any other liquid. Do not
spill or drip any liquids on the power cord or appliance. When liquids are spilled on the appliance or power cord, immediately switch OFF and unplug the appliance. Thereafter, clean the
appliance thoroughly and let it dry naturally. (See: Care and Cleaning)
• Do not process wet or dirty knives.
19
41620_Messer_BDA_k1.qxd 23.07.2010 13:35 Uhr Seite 20
Technical Specifications
Model:
Design Knife Sharpener
Power supply:
220/240 V AC, 50/60 Hz
Power consumption:
130 Watt
Length of power cord:
ca. 100 cm
Weight:
ca. 2.2 kg
Dimensions:
ca. 26 cm x 13 cm x 11 cm (width x depth x height)
Before First Use
WARNING: DO NOT let young children play with the appliance, or any part of
it, or the packaging!
1. Unpack the appliance and all accessories carefully and check that no parts are damaged or
missing.
2. Carefully remove all shipping materials and tags, but DO NOT remove the model label on the
bottom of the appliance. Ensure that there are no foreign objects in the slots.
Important Hints for Best Results
The Design Knife Sharpener is designed to sharpen kitchen knives, pocket knives, and most
sports knives. You can sharpen straight blades and serrated blades, and get a real sharp edge.
However, the results are depending on the quality characteristics of the knife.
In some cases, there will be no need to use all stages for getting sufficient results. However,
always use the stages in the sequence from A to C. (See: Selecting the Required Stages)
CAUTION: Some knives have been hardened by means of special methods and in general may
not be sharpened. Please follow the instructions at the case or collateral material of the knife.
General Hints
• Straight blades can be sharpened in all three stages. However, beginning with Stage A may
be necessary only if the knife is very dull or if you wish to create an edge with extra "bite".
• It is a good advice to give the sharpening process a try using older knives. This is how you
will get a feeling for working with the Design Knife Sharpener, before sharpening valuable knives.
• Work on serrated blades only in stage C and do NOT sharpen in stages A and/or
B as that will unnecessarily remove too much metal from the serrations.
• Use only light downward pressure when sharpening just enough to establish secure contact
with the abrasive disc. You will not improve on the sharpening process by applying more
pressure to the knives neither in time nor in quality.
20
41620_Messer_BDA_k1.qxd 23.07.2010 13:36 Uhr Seite 21
• Always pull the blades at the recommended steady speed (ca. 5 cm per second) over the
whole length of the blade. Never interrupt or stop the motion of the blade when it
is in contact with the abrasive discs.
• Alternate pulls in right and left slots (of any stage used). Exceptions are some specialized
blades that are sharpened only at one side of the blade. Select the correct slot for these knives:
always the upwards facing side of the blade will be grinded.
• During sharpening the blade should be moved maintaining a horizontal orientation relative
to the top of the counter or table. To sharpen the blade near the tip of a curved blade, lift the
handle up slightly as you approach the tip so that the part of the edge is maintained horizontal
to the table that is currently in contact with the abrasive disc.
• Used correctly you will find that you can sharpen the entire blade up to ca. 1.5 cm (1/2 in)
to the handle. If your chef's knives have a heavy knob or pommel near the handle extending to
the edge, a commercial grinder can modify or remove the lower portion of the knob so that it
will not interfere with the sharpening action allowing you to sharpen the entire blade length.
• Regardless of the used stage, you will find that many types of knives with differently wide
blades will be sharpened in a steady quality, because of the springy sliding cam that supports
a good positioning between the abrasive discs and sliding cam. This is one of the major
advantages of this Design Knife Sharpener.
• To improve your results, you should learn how to detect a burr along the edge (as described
below). Although you can sharpen well without using this technique, it is the best and fastest
way to determine whether you have sharpened sufficiently in stage A and B. This will help you
avoid over-sharpening and insure incredibly sharp edges every time.
• Cutting a tomato or a piece of paper is a convenient method of checking for blade sharpness. NEVER move your finger along the edge!
Selecting the Required Stages
Do not over-grind your knives, to avoid a too high loss of material. Thus a purposeful selection
of the used stages is critical. For this, observe the following hints.
Note: Some special knives are only sharpened at one side of the blade. For these blades use
only the appropriate slot, with the grinded side of the blade facing upwards.
Stage A - Pre grounding procedure
Note: Do not use stage A for serrated knives, as this will remove too much metal from the serration.
If your knife is already reasonably sharp, skip Stage
A and go directly to Stage B.
If you are sharpening a knife for the first time or if the knife is
very dull, start in stage A. (See: Sharpening Blades)
In most cases you will find that only one pull in each slot of stage
A is adequate. Then proceed to stage B.
21
41620_Messer_BDA_k1.qxd 23.07.2010 13:36 Uhr Seite 22
Stage B - Thoroughly Sharpening the Edge
Note: Do no use stage B for serrated knives, as this will
remove too much metal from the serration.
Sharpen the blade in stage B by using the same procedure as
described in the section Sharpening Blades.
When detecting a burr along one side of the edge, process the
knife in stage C once to remove the burr. (See below: Checking
for a Burr)
Stage C - Fine-Sharpening
Stage C is designed for three tasks:
• Fine-sharpening for extremely sharp knives
More pulls in stage C will refine the edge further, creating an edge particularly desirable for
gourmet preparations. Fewer pulls in stage C may be preferable if you will be cutting fibrous
foods. To obtain a razor sharp edge, only one or two pairs of pulls in stage C will be necessary.
• Removing a burr after thorough sharpening in stage B (See below: Checking for a Burr)
In general, one single pull in the respective slot of stage C is sufficient to remove a burr. For this,
select the slot where the burr of the blade is pointing upwards.
• Sharpening serrated knives. (See: Serrated Knives)
Serrated Knives
Serrated blades of all types can be sharpened in the Design
Knife Sharpener, but use ONLY stage C.
This will sharpen the teeth of the serrations and develop microblades along the edges of these teeth. Normally, five to ten pairs
of alternating pulls in stage C will be adequate.
If the knife edge has been severely damaged through use make
one fast pull (2 -3 seconds for a 20 cm blade) in each of the
slots of stage B, then make a series of pulls in stage C, alternating right and left slots. Excessive use of stage B will remove more metal along the edge then is
necessary in order to sharpen the teeth.
Because serrated blades are saw-like structures, the edges will never appear to be as "sharp" as
the edge on a straight-edge knife. However, their tooth-like structure will help break the skin on
hard crusty foods and penetrate other materials such as cardboard.
Checking for a Burr
WARNING: NEVER move your finger along the edge to avoid cutting your finger!
When sharpening in stages A and/or B, a burr could develop. Amongst other reasons, this is
depending on the material of the knife.
22
41620_Messer_BDA_k1.qxd 23.07.2010 13:36 Uhr Seite 23
To check for the burr, move your finger carefully and
without exerting pressure from the back of the
blade across the blade to the edge as shown in the
illustration. The burr will be a rough protrusion on one side
of the edge, whereas the other side is feeling smooth.
When detecting a burr, work on the knife in stage C once
to remove the burr, and for this selecting the slot, where the
side with the burr is facing upwards.
Checking the knife for a burr.
Operation
WARNING: Do not attempt to sharpen scissors, axes, hatches, saws or any blade that does
not fit freely in the slots. Do not insert any foreign objects in the slots of the appliance. Always
switch OFF and unplug the appliance, when it is not in use or you wish to move, clean or
assemble/disassemble the appliance.
Knifes properly sharpened on your Design Knife Sharpener could be sharper than you expect.
To avoid injuries handle the knives with extreme care. Do not cut toward any part of your fingers or persons. Do not run your finger along the edge. Check the sharpness by cutting a piece of paper or thin cardboard. Store in a safe manner (e.g. in a knives block). Store
knives and appliance where they are out of reach of young children.
Do not use the appliance if any part of it is damaged in any way (e.g. cracked). Do not
process wet or dirty knives with the Design Knife Sharpener. Always clean the knives after sharpening, to remove metal dust. Do not use any aiding components (e.g. honing
or drilling liquids, or any lubricants) with the Design Knife Sharpener. No lubrication is required
for any moving parts, motor, bearings, or sharpening surfaces.
Preparing the Design Knife Sharpener for Use
1. Place the appliance on a sufficiently large, level, and stable surface.
2. Ensure that the power switch is in OFF position (the part holding the
power indicator protruding) and that there are no foreign objects in the slots.
3. Connect the power plug to a suitable mains power outlet.
(See: Important Safeguards for Electrical Appliances)
power indicator
Sharpening Blades
Note: There is no need to use all stages for every sharpening process. Select the required stages according to the condition and type of knife, and the result after each run. (See: Important
Hints for Best Results)
1. Before sharpening: Always clean and thoroughly dry the knife. Do not process wet knives with the Design Knife Sharpener.
23
41620_Messer_BDA_k1.qxd 23.07.2010 13:36 Uhr Seite 24
2. Switch on the power switch. The red power indicator will be illuminated, and the motor starts.
Note: Do not twist the knife while sharpening. (See: Figure) Each time you insert the blade
simultaneously pull the blade toward you as soon as you feel it coming in contact with the abrasive disc. Apply just enough downward pressure to maintain the contact-more pressure will not
modify or speed the sharpening process.
CAUTION: Always ensure that you keep the knife moving along the used slot when it is tangibly in contact with the motor-driven abrasive disc. Otherwise the blade will get jagged. Some
specialized blades are sharpened only at one side of the blade. Select the correct slot for these
knives: in all stages the upwards facing side of the blade will be grinded. Always sharpen the
entire blade length.
3. Slip the knife blade into one slot of the requested stage, ensuring to hold the blade always
horizontal and in parallel with the slot.
To insure even sharpening along the entire blade, insert the blade as close as possible to its
handle.
4. Move the blade gently down until you feel it having
contact with the abrasive disc. At this moment pull the knife
at a steady rate towards you until it exits the slot. Do not
use violence!
For a 20 cm blade (ca. 8 in) each pull should take about
4 seconds. Accordingly, pull shorter blades through in a
shorter time. However, most important for getting a good
result is to pull in a steady way with constant speed.
If the blade is curved, lift the handle slightly as you reach
the curved part of the blade, keeping the part of the blade
edge horizontal (in relation to the table) that is currently in
the middle of the slot
Wrong/right operation of
moving the knife in the slots
5. As you reach the tip, lift the knife slightly out of the slot.
6. Repeat with the other slot of the selected stage.
In each stage, make an equal number of pulls alternating in
the left and right slots in order to keep the edge facets symmetrical.
7. If the edge produced in the currently used stage is
sufficient, on occasion repeat the process in the next stage.
(See: Selecting the Required Stages)
8. If the knife is sufficiently sharp, switch the power switch to the Off position. The red power
indicator light goes out. Unplug the appliance from the power supply.
24
41620_Messer_BDA_k1.qxd 23.07.2010 13:36 Uhr Seite 25
Care and Cleaning
WARNING: Always switch OFF and unplug from power outlet before disassembling parts, or
cleaning the appliance. Do not immerse the appliance or power cord in water or any other
liquids. Do not spill any liquids on the appliance. Do not place the appliance in an
automatic dishwasher.
Do not use any abrasive cleaners, cleaning pads, other hard or sharp-edged objects, chemicals, or corrosive liquids for cleaning as this could affect or damage the surfaces.
Regularly clean the appliance according to the following instructions.
1. Switch OFF and unplug the appliance.
2. Brush the abrasive wheel cover using a dry nylon brush to remove the metal dust. Do not
moisten the brush for cleaning. There will be no advantage in doing so.
3. Wipe the exterior of the aluminium housing carefully with a damp cloth and thereafter wipe
thoroughly dry.
Depending on the frequency of utilization but at least once a month, remove the metal dust that
will accumulate inside the appliance because of the grinding process.
4. To remove the metal particles, turn the Knife Sharpener upside down. At the bottom of the
appliance take out the small black magnet cover as shown in the illustration.
It is best to insert a screw driver into the slot at one side of the magnet cover, and lift the magnet cover out carefully. Metal particles will adhere to a magnet attached to the inner side of the
magnet cover.
CAUTION: Do not damage the protruding clips of the magnet cover.
5. Simply brush off the particles from the magnet using a nylon brush.
Note: Some particles will always remain sticking to the magnet. This will not have any effect on functioning.
6. If larger amounts of metal particles have been created, you
can shake any remaining dust carefully out of the appliance.
While doing so, turn the appliance a little in all directions.
7. After cleaning, replace the magnet cover securely with the
magnet in place (see figure).
Storage
WARNING: Before storing always unplug and clean the appliance and all its parts and
remove the metal particles that accumulated because of the grinding process. (See: Care and
Cleaning).
Ensure to store the appliance where it is clean, dry and safe from frost, direct sunlight and
inadmissible strain (mechanical or electric shock, heat, moisture) and where it is out of reach
25
41620_Messer_BDA_k1.qxd 23.07.2010 13:36 Uhr Seite 26
of young children. Place the appliance on a clean and stable surface, where it can not fall.
Do not place any hard or heavy objects on the appliance. Do not place any foreign objects
in the slots of the appliance.
Handle the power cord with care. Power cords may never be knotted, twisted, pulled, strained or squeezed. Do not place any hard or heavy objects on the power cord. Do not wrap
the power cord around the appliance.
To move the appliance, grasp the appliance with both hands at the aluminium housing, and
ensure that the power cord will not hang down. Place the appliance on a suitable surface
where it can not fall, and is out of reach of young children.
Notes for disposal
Dispose of the appliance must be effected in accordance with the corresponding local regulations and requirements for electrical appliances. Please contact your local disposal company.
26
41620_Messer_BDA_k1.qxd 23.07.2010 13:36 Uhr Seite 27
Index
burr
care and cleaning
check for proper functioning
checking the blade
disposal
energy consumption
extention cord
fine-sharpening
first use
functional components
intended use
knives
magnet
metal dust
operation
power cord
power indicator
power supply
pre-grounding
preparing for use
prosessing order
saftey
serrated knives
sharpening
storage, applicanes
storage, knives
technical specifications
thorough sharpening
tips
workspace
Site
21,22
25
18
21,22
26
20
19
22
20
17
18
19,20,23
17,25
25
23
19,20
17
19,20
21
23
20
18
22
23
25
19
20
18
20
18
27
41620_Messer_BDA_k1.qxd 23.07.2010 13:36 Uhr Seite 28
G A S T R O B A C K GmbH
Gewerbestraße 20
•
D-21279 Hollenstedt/Germany
Telefon +49 (0)41 65/22 25-0
[email protected]
•
•
Telefax +49 (0)41 65/22 25-29
www.gastroback.de