1
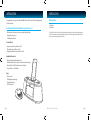
English
THANK YOU FOR YOUR PURCHASE
Visit our website at www.i-Luv.com
Model : iMM178
Instruction Manual
© 2010 www.i-Luv.com
iLuv is a registered trademark owned by iLuv Creative Technology. iPod is a trademark of Apple Inc. registered in the US and other countries. iPhone is
a trademark of Apple Inc. All logos and brands are the property of their respective owners. iPod is not included in this package. The specifications and
product images or graphics may slightly differ from the actual product. Features and specifications are subject to change without prior notification.
© 2010 iLuv Creative Technology All rights reserved. No portion of this printed material or product enclosed herewith including design, shape
or graphics, may be reproduced or transmitted in any form without the expressed written consent of iLuv Creative Technology by any means,
electronic or mechanical, including photocopying, recording or use of an information storage and retrieval system. Any unauthorized distribution or
reproduction of this printed material or product, or any portion thereof, will be prosecuted to the fullest possible extent of the law.
Designed in New York, USA / Printed in China
Vibe Plus
TM
INTRODUCTION
Congratulations on your purchase of the new iMM178 for your iPhone or iPod. Please keep this manual
for future reference.
Desktop Alarm Clock with Bed Shaker for your iPhone or iPod
· Built-in speakers allow you to hear your music with depth and clarity
· Large display; easy to read
· LCD dimmer level control
INTRODUCTION
What’s included
· AC adapter
· Bed shaker
* iPhone 3GS, iPhone 3G, iPhone, iPod touch 2nd generation, iPod nano 5th generation, iPod nano 4th generation,
iPod touch 1st generation, iPod nano 3rd generation, iPod classic, iPod nano 2nd generation, iPod with video, iPod
nano 1st generation, iPod 4th generation, iPod mini.
iPod and iPhone*
· Enjoy rich sound from your iPhone or iPod
· Plays and charges your iPhone or iPod
· Integrated universal dock for your iPhone or iPod
Digital Dual Alarm Clock
· Digital clock display with dual alarm clock
· Bed shaker vibrates a bed or pillow to wake up the heaviest sleepers
· Wake to iPhone or iPod, FM radio, buzzer, or bed shaker
· Sleep to iPhone or iPod, FM radio
Radio
· FM stereo radio
· PLL digital tuning technology
· Programmable presets
for 8 radio stations
1 | iLuv
iMM178 | V10M10_IM_EN_01262010
iLuv | 2
TABLE OF CONTENTS
INTRODUCTION
GETTING STARTED
1
GETTING STARTED
Installing the AC Adapter
Protect your Furniture Installing a Dock Adapter Location of Controls on the Main Unit
Power ON/OFF
Back Up battery
Back Up Function
4
4
4
5
6
6
6
3 | iLuv
Setting the Clock
Setting the Alarm
Using the Snooze Function
Using the Sleep Function
Listening to your iPhone or iPod
Using the Shaker Speaker
Listening to the Radio
Charging your iPhone or iPod
Adjusting the Brightness of the LCD Screen
Setting the Bass and Treble
Resetting the Unit
Locate the AC adapter jack on the back of the unit. Insert the AC adapter cable into the jack, and
plug into the wall outlet.
Protect your Furniture
This model is equipped with foam ‘feet’ to prevent the product from moving when you operate the
controls.
Installing a Dock Adapter
OPERATIONAL INSTRUCTIONS
Installing the AC Adapter
7
10
12
13
14
15
15
17
17
17
17
TROUBLESHOOTING GUIDE
18
USER SAFETY GUIDE
19
SPECIFICATIONS
25
1. How to insert a dock adapter
a. Please use dock adapter that came with your iPod or iPhone
b. Using the correct dock adapter ensures the proper fit for your iPod or iPhone.
c. Gently push the dock adapter down into the universal dock.
d. Carefully place your iPod into the universal dock. Your iPhone or iPod must not be in a case or
“Skin”.
2. How to remove the dock adapter
· Remove your iPod or iPhone first, then carefully remove the dock adapter.
iMM178 | V10M10_IM_EN_01262010
iLuv | 4
GETTING STARTED
GETTING STARTED
Location of Controls on the Main Unit
Power
1. iPhone/iPod dock
2. VOLUME knob
3. MODE button
4. / AL OFF button
5. Alarm 1 button
6. Alarm 2 button
7. SNOOZE/DIMMER button
8. DC power jack(12V/2A)
9. FM ANT.
10. Speaker (SHAKER)
11.
12.
13.
14.
15.
16.
17.
18.
19.
20.
SEARCH knob
SELECT button
SETUP button
SLEEP button
MEMORY button
PLAY/PAUSE /PRESET/ AUTO SCAN button
LCD screen
BED SHAKER jack
SPEAKER SELECTOR switch
Volume switch (SHAKER)
ON
Connect AC power adapter to the unit. Then plug into AC wall outlet. Clock will appear on LCD.
Press /AL OFF to turn on the unit. Power indication LED will light and LCD will display current
playing mode.
1
11
2
12
OFF
Press
4
13
Back Up battery
5
14
6
15
7
16
Insert three (3) AAA batteries. When there’s a power outage, clock setting will be maintained. In this
status, the unit will not fully function. When the inserted battery is low, low battery indicator will
display on the LCD.
3
17
18
8
19
/AL OFF to turn off the unit. LCD will display current time only.
Back Up Function
If the AC supply is interrupted, the clock display we will make memory function for FM preset even
power is outage will go off and most of settings will be canceled. To back up the clock, insert three
“AAA” size batteries (not supplied) in the battery compartment in the bottom of the unit. The back
up battery does not provide operation of your iPhone or iPod.
Note: Always use Alkaline batteries and remove the batteries when the unit is not to be used for an extended
period of time.
9
10
5 | iLuv
20
iMM178 | V10M10_IM_EN_01262010
iLuv | 6
OPERATIONAL INSTRUCTIONS
OPERATIONAL INSTRUCTIONS
Setting the Clock
Setting the Clock
Manual Setting
1. Press SETUP. “1. TIME SET” will appear on the LCD screen.
1. TIME SET
1. TIME SET
1. TIME SET
1. TIME
TIME SET
1.
SET
2. Press SELECT. “MANUAL SET” will blink on the LCD screen.
MANUAL SET
MANUAL SET
MANUAL SET
MANUAL SET
SET
MANUAL
3. Press SELECT. The year will blink “SET YEAR” will display on
the LCD screen and rotate the SEARCH wheel until current
year displays, and press SELECT to confirm.
7. The hour will blink and “SET HOUR” will appear on the LCD
screen and rotate the SEARCH wheel to the current hour,
and press SELECT to confirm.
SET HOUR
SET HOUR
8. The minute will blink and “SET MINUTE” will appear on the
LCD screen and rotate the SEARCH wheel to the current
hour, and press SELECT to confirm.
SET MINUTE
SET MINUTE
SET YEAR
SET YEAR
SET YEAR
SET
SET YEAR
YEAR
4. The month will blink and “SET MONTH” will appear on the
LCD screen and rotate the SEARCH wheel until current
month displays, and press SELECT to confirm.
MANUAL SET
MANUAL SET
SET MONTH
SET MONTH
SET MONTH
SET MONTH
SET
MONTH
5. The date will blink and “SET DATE” will appear on the LCD
screen and rotate the SEARCH wheel until current date
displays, and press SELECT to confirm.
6. “12H” or “24H” will blink and “SET FORMAT” will appear on
the LCD screen and rotate the SEARCH wheel to choose
your preferred format, and press SELECT to confirm.
AUG
AUG
27
27
2010
2010
THU
THU
SET DATE
SET DATE
SET DATE
SET DATE
SET
DATE
1.
1. TIME
TIME SET
SET
SET FORMAT
SET FORMAT
SET FORMAT
SET FORMAT
SET
FORMAT
7 | iLuv
TIME
TIME SYNC
SYNC
iMM178 | V10M10_IM_EN_01262010
iLuv | 8
SET
SET MINUTE
MINUTE
OPERATIONAL INSTRUCTIONS
OPERATIONAL INSTRUCTIONS
MANUAL
MANUAL SET
SET
Setting the Clock
Setting the Alarm
Time Sync
The easiest way to set the clock on the iMM178 is to
synchronize it with the atomic clock function on your iPhone
or iPod. This unit is equipped with a Time Sync function which
automatically sets the date and time by synchronizing it with
your iPhone or iPod, when it is placed in the dock.
User is able to set two distinct alarms on the unit.
1. Press SETUP. “1. TIME SET” will appear on the LCD screen.
2. Press SELECT. “MANUAL” will blink on the LCD screen.
3. Rotate the SEARCH wheel until “TIME SYNC” blinks on the
LCD screen.
4. Press SELECT again to confirm. The “TIME SYNC” icon will
display on the LCD screen.
5. Connect your iPhone or iPod to dock, “TIME SYNC” icon will
begin to blink during the Time Sync process.
6. When Time Sync is complete, “TIME SYNC” will disappear
from the screen and “TIME UPDATED” will appear for
approximately one (1) second.
7. The date and time are now set.
AUG
AUG
27
27
2010
2010
THU
THU
1. Press SETUP and rotate the SEARCH wheel until
“2. ALARM 1 SET” or “3. ALARM 2 SET” appears on the LCD
screen.
2. ALARM
1 SET
SET
2.
ALARM 1
2. Press SELECT and “FREQUENCY” will appear on the screen
1.
1. TIME SET
SET
3. “5” and “2” will blink in the upper left corner of the display
(5 = weekdays, 2 = weekends).
TIME
TIME SYNC
SYNC
TIME SYNC
TIME SYNC
Notes:
• To synchronize the most accurate time from your iPhone or iPod.
The unit will take one minute (max) to read the time.
• Time Sync can be activated from any mode (Standby, FM, iPod).
TIME UPDATED
TIME UPDATED
4. Rotate the SEARCH wheel to scroll through, “EVERYDAY” (5
+ 2), “WEEKDAYS” (5), or “WEEKENDS” (2). Press SELECT to
confirm frequency, the hour will blink and “SET HOUR” will
appear on the LCD screen.
FREQUENCY
FREQUENCY
SET HOUR
EVERYDAY
EVERYDAY
SET HOUR
5. Rotate the SEARCH wheel to change hour, press SELECT to
confirm, the “minute” flashes and “SET MINUTE” displays on
the LCD screen.
6. Rotate the SEARCH wheel to change minute, press SELECT
to confirm, the wake to mode flashes and “SET WAKE TO”
displays on the LCD screen.
SETMINUTE
HOUR
SET
SET MINUTE
SET MINUTE
SET WAKE TO
9 | iLuv
iMM178 | V10M10_IM_EN_01262010
SET WAKE TO
SET WAKE
WAKE TO
TO
SET
iLuv | 10
SET HOUR
OPERATIONAL INSTRUCTIONS
OPERATIONAL INSTRUCTIONS
Setting the Alarm
SET WAKE
MINUTE
SET
TO
7. Rotate the SEARCH wheel to change the wake mode (total
of 7 modes: Buzzer, iPod, Radio, Shaker, Buzzer + Shaker,
iPod + Shaker, Radio + Shaker), press SELECT to confirm,
the “SET BUZZ SOUND” displays for one (1) second and
then “Buzz” will blink on the LCD screen.
Note: “SET BUZZ SOUND” option displays only when the “Buzzer” or
“Buzzer + Shaker” wake to mode is selected. The setup menu will
skip this option and go to “SET VOLUME” if other wake to modes
are selected.
8. Rotate the SEARCH wheel to select the buzzer sound.
Press SELECT to confirm. “VOLUME” blinks and “SET
VOLUME” displays on the LCD screen.
· There are total of 7 melody sounds can be selected: Buzz,
Phone ring, Train horn, Rooster, Cuckoo clock, Xylophone,
Horse race.
Using the Snooze Function
1. Press SETUP in either power ON or power OFF mode and
rotate the SEARCH wheel to select “4. SNOOZE SET”.
2. Press SELECT to enter, the value of snooze time flashes and
“SNOOZE TIME” displays on LCD.
SET WAKE TO
SET WAKE TO
SET BUZZ
BUZZ SOUND
SOUND
SET
SET VOLUME
4. SNOOZE SET
4. SNOOZE SET
3. Rotate the SEARCH wheel to change the snooze time, press
SELECT to confirm and exit.
· Total 4 snooze time can be selected: 5, 7, 9, 15 minutes.
· The default setting of snooze time is 7 minutes.
SNOOZE TIME
SNOOZE TIME
SET BUZZ SOUND
BUZZ
SETBUZZ
WAKE TO
BUZZ
9. Rotate the SEARCH wheel to change alarm volume (1-40),
press SELECT to confirm and exit.
SET VOLUME
2.
2. ALARM
ALARM 1
1 SET
SET
SLEEP 120
SLEEP 120
2. ALARM 1 SET
Turning the Alarm ON and OFF
· Press the AL1 or AL2 button to turn on or turn off the alarm
function.
AUG
AUG
27
27
2010
2010
THU
THU
AUG
27
2010
THU
11 | iLuv
iMM178 | V10M10_IM_EN_01262010
ALARM
ALARM ON
ON
ALARM ON
AUG
27
2010
THU
AUG
27
2010
THU
iLuv | 12
SNOOZE TIME
SNOOZE TIME
OPERATIONAL INSTRUCTIONS
OPERATIONAL INSTRUCTIONS
Using the Sleep Function
Using the Sleep Function
1. Press SLEEP to activate sleep function and the Sleep icon
[Zzz] will display on LCD, repeat press SLEEP to change the
sleep time:
· 120 min. > 90 min. > 60 min. > 30 min. > 15 min. > off >
120 min…
IMPORTANT
1. Occasionally, files on your iPod may become corrupted. This may cause erratic
behavior with your iLuv products. Apple recommends visiting their website www.
apple.com to obtain instructions on resetting or restoring your iPod to factory settings.
2. It is imperative to your iPod and the built-in universal dock that you use the correct
dock adapter for your iPod and that the dock adapter fits appropriately into the built-in
universal dock. Ignoring these rules can cause severe damage to your iPod. Please
refer to the section “Installing the Dock Adapter” to install the dock adapter properly
before operating iMM178 with your iPod.
SLEEP 120
2. If inactive for five (5) seconds, the LCD returns to normal
display and [Zzz] icon remains on LCD.
SLEEP 120
3. In standby mode, if the Sleep function is activated, the unit
will turn on automatically.
4. During Sleep play mode, press SLEEP once to check the
remaining time with a five (5) second temporary display.
Press the SLEEP button twice or more to re-set the sleep
time.
AUG
27
2010
THU
AUG
27
2010
THU
Note: When setting the sleep time in power ON mode, if the sleep time is set to OFF, the unit will not will not
turn OFF tomatically. Repeatedly press SLEEP to set the sleep time to OFF. The sleep function will turn off
and [Zzz] icon will disappear.
13 | iLuv
Listening to your iPhone or iPod
Press
/AL OFF to Power on the unit.
1. To select iPod mode, press MODE until the “iPod” icon is shown on the top of display.
2. While the iPod mode is on, insert your iPod / iPhone to the universal dock and press
AUTO SCAN to play.
3. Press /PRESET/ AUTO SCAN to control the play and pause functions.
4. Rotate the VOLUME wheel to adjust the volume level of this unit as desired.
iMM178 | V10M10_IM_EN_01262010
/PRESET/
iLuv | 14
OPERATIONAL INSTRUCTIONS
OPERATIONAL INSTRUCTIONS
Using the Shaker Speaker
Listening to the Radio
Select sound output
1. Slide SPEAKER SELECT switch to select main speaker
/ main speaker+ shaker speaker
/shaker speaker .
2. While using shaker speaker, slide volume switch to select HIGH / MID / LOW volume
FM Tuning
Settings
: Main unit speaker sounds only
: Both main unit and shaker speakers will sound
: Shaker speaker sounds only.
Notes: · If SPEAKER SELECT switch set to , but the shaker is not connected to main unit, the main unit speaker will
sound.
· The main unit cannot control shaker speaker volume.
Listening to the Radio
Note: Unwind and extend antenna to its full length. It may be necessary to adjust
the direction of this wire antenna until you find the position that provides the
best reception for your favorite FM stations.
FM Operations
Turn on the unit, select the FM radio mode by pressing MODE until the “Radio” icon displays,
the FM frequency will display on the LCD screen.
· If there is no operation for three (3) seconds, the LCD will change to time display.
· If FM radio function is operating, unit will change from time display to FM screen.
· If LCD is time display in FM mode, press SELECT to temporarily display the FM frequency for
three (3) seconds, and returns to time display.
15 | iLuv
Manual tuning
· Rotate the SEARCH wheel to change the frequency with 0.1MHz step for US version, or 0.05MHz
step for EU version. Fast rotate the SEARCH wheel on unit to change the frequency with 1MHz
step.
Auto scanning
· Press and hold
/PRESET/AUTO SCAN for two (2) seconds to auto scan up frequency.
· During auto scan, unit speaker mutes. If a FM station is detected, auto scan stops and
broadcast starts.
Presetting FM Stations
1. Choose a desired radio station.
2. Press and hold MEMORY for 2 seconds, “PRESET 1” will blink on the LCD screen.
3. Rotate the SEARCH wheel to select the memory station to be stored (1-8).
4. Press SELECT to store, the “PRESET #” (# is a number between 1-8) will display on LCD.
Accessing Preset Stations
· In FM radio mode, repeatedly press
/PRESET/AUTO SCAN to select the stored stations.
· LCD displays the FM Preset screen if a preset station is selected.
iMM178 | V10M10_IM_EN_01262010
iLuv | 16
OPERATIONAL INSTRUCTIONS
TROUBLESHOOTING GUIDE
Charging your iPhone or iPod
The stereo speaker system (iMM178) does not turn on.
If your iPhone or iPod is connected to the unit, it will charge automatically.
- The AC adapter may not be connected properly. Check the connection.
- The wall outlet may not function. Try another outlet.
Adjusting the Brightness of the LCD Screen
Your iPhone or iPod does not fit into the built-in universal dock.
Press SNOOZE/DIMMER to adjust the brightness of the display. It will return to normal after three
(3) seconds. Brightness setting ranges from OFF to 9.
Setting the Bass and Treble
1.
2.
3.
4.
While unit is in playing, press SETUP.
Rotate the SEARCH wheel to select “5. BASS” or “6. TREBLE”.
Press SELECT to enter and rotate the SEARCH wheel to change.
Press SELECT again to confirm and exit.
Resetting the Unit
If the system does not respond, there may have been a power surge that triggered the internal
computer to shut down automatically. If this occurs, disconnect the main power and connect it
again after approximately one minute.
Maintenance
· Place the unit on a level surface away from sources of direct sunlight or excessive heat.
· Protect your furniture when placing your unit on a natural wood and lacquered finish. A cloth or
other protective material should be placed between it and the furniture.
· Clean your unit with a soft cloth moistened only with mild soap and water. Stronger cleaning
agents, such as Benzine, thinner or similar materials can damage the surface of the unit.
17 | iLuv
- The installed dock adapter is not the correct one. Check whether a correct dock adapter is installed.
- There might be some obstructions on the dock. Check whether there are any obstructions on the connector and
on the dock. If everything is secured, place your iPhone or iPod back into the dock.
It does not recognize your iPhone or iPod when docked.
- Your iPhone or iPod may not be properly docked. Take your iPhone or iPod out of the dock, and remove any
obstructions on the connector from the dock and on your iPhone or iPod. Place your iPhone or iPod back into the
dock.
- Your iPod is frozen or locked up. Check whether your iPhone or iPod operates correctly before placing it back into
the dock. Please refer to the owner’s instruction manual of your iPhone or iPod.
- The software of your iPhone or iPod is outdated. Upgrade the software on your iPhone or iPod. For the details on
how to upgrade the software on your iPhone or iPod, please visit the Apple website: http://www.apple.com.
Your iPhone or iPod is not charged even though it is in the dock.
- Your iPhone or iPod might not be properly docked. Take your iPhone or iPod out of the dock, and remove any
obstructions on the connector from the dock and on your iPhone or iPod. Place your iPhone or iPod back into the
dock.
- Your iPod is frozen or locked up. Check whether your iPhone or iPod operates correctly before placing it back into
the dock. Please refer to the owner’s instruction manual of your iPhone or iPod.
When playing music, the sound gets distorted
- The volume level on the connected device or the iMM178 is set too high. Decrease the volume until the distortion
has disappeared.
- The source sound is distorted. If the original sound source (MP3) on your iPhone or iPod is poor quality, the
distortion and noises are easily noticed with high-power speakers. Try a different audio source like a music CD to
test.
iMM178 | V10M10_IM_EN_01262010
iLuv | 18