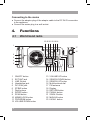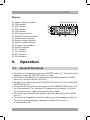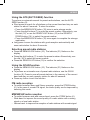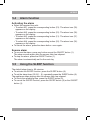
1
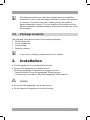
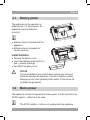
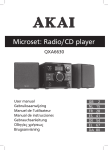
World receiver
ALD1915H
User manual
Gebruiksaanwijzing
Manuel de l’utilisateur
Manual de instrucciones
Gebrauchsanleitung
Οδηγίες χρήσεως
Brugsanvisning
GB 2
NL 15
FR 29
ES 43
DE 56
EL 70
DA 84
Table of contents
1.
2.
3.
4.
5.
Safety............................................................................ 3
1.1
1.2
Intended use.....................................................................3
General safety instructions...............................................3
2.1
2.2
Unpacking.........................................................................3
Package contents.............................................................4
3.1
3.2
Battery power....................................................................5
Mains power.....................................................................5
4.1
World band radio...............................................................6
5.1
5.2
5.3
5.4
5.5
5.6
General functions..............................................................7
Radio functions.................................................................8
Clock functions...............................................................10
Alarm function.................................................................11
Using the SLEEP function...............................................11
Resetting the appliance..................................................12
Preparations for use.................................................... 3
Installation.................................................................... 4
Functions...................................................................... 6
Operation...................................................................... 7
6.
Cleaning and maintenance....................................... 12
7.
Troubleshooting......................................................... 12
8.
Technical data............................................................ 13
9.Disposal of used electrical
and electronic equipment......................................... 14
Copyright notice
Design and specifications are subject to change without notice.
APW15
1.
Safety
1.1
Intended use
The world band radio plays music from radio stations all over the world.
The clock function includes an alarm and sleep program. Read the manual
carefully before the first use.
1.2
General safety instructions
WARNING
Do not put force on the appliance. The appliance can fall and can
cause serious injury.
CAUTION
Do not spill any liquid on the appliance.
WARNING
Do not insert any objects in the ventilation holes.
!
CAUTION
Do not block the ventilation holes.
2.
Preparations for use
2.1
Unpacking
!
!
!
● Unpack the appliance carefully.
● Check the package contents as described below. If any item is missing,
please contact your reseller.
● Remove the labels from the front panel carefully if present.
3
i
2.2
We recommend that you retain the original carton and packing
materials in case it ever becomes necessary to return your product
for service. This is the only way to safely protect the product
against damage in transit. If you do dispose of the carton and the
packing materials, please remember to recycle with due care to the
environment.
Package contents
The following items are included in the received package:
1 World band radio
1 In-ear headphone
1 Carrying bag
1 Operator manual
i
3.
If any item is missing, please contact your reseller.
Installation
● Put the appliance on a horizontal flat surface.
● Connect the appliance to a power source.
Read the paragraph "Connecting to a power source".
• Install batteries: Read the paragraph "Battery power".
• Connecting to the mains: Read the paragraph "Mains power".
!
CAUTION
● Do not put the appliance near a heat source.
● Do not expose the appliance to direct sunlight.
4
APW15
3.1 Battery power
The appliance can be operated on
battery power. For this purpose, the
appliance uses four batteries
(size AA).
i
● Batteries are not included with this
appliance.
● Batteries are not necessary for
normal operation.
Install batteries
● Remove the battery cover.
● Insert the batteries matching the (+)
and (-) polarity markings.
● Re-install the battery cover.
!
CAUTION
Incorrect installation can cause battery leakage and corrosion
which will damage the appliance. Corrosion, oxidation, battery
leakage and any other gradually acidic defect of this nature will
invalidate the guarantee.
3.2 Mains power
The appliance can also be operated on mains power. For this connection an
AC/DC adaptor + cable has to be used.
i
The AC/DC adaptor + cable is not supplied with the appliance.
5
Connecting to the mains
● Connect the adaptor plug of the adaptor cable to the DC IN 6V connection
in the appliance.
● Connect the mains plug to a wall socket.
4.
Functions
4.1
World band radio
23 22 21 20 19 18
1
17
16
2
3
4
5
6 7 8 9 10 11 12 13 14 15
1
2
3
4
5
6
7
8
9
10
11
12
6
ON/OFF button
EXT ANT jack
LINE IN jack
Headphone jack
DC IN 6V jack
ST/BW button
Digit buttons
SLEEP button
SCAN button
MEMO/LOCK button
PROGRAM button
VOLUME DOWN button
13
14
15
16
17
18
19
20
21
22
23
VOLUME UP button
SEARCH DOWN button
SEARCH UP button
Multifunctional dial
FM antenna
Display
RETURN button
FM/AL4 button
SW/AL3 button
MW/AL2 button
LW/AL1 button
APW15
Display
24
25
26
27
28
29
30
31
32
33
34
35
36
37
38
39
Radio reception symbol
FM indicator
SW indicator
MW indicator
LW indicator
FM stereo indicator
MW/SW/LW band indicator
Preset station indicator
Battery charge indicator
Mains connect indicator
Function lock indicator
SLEEP indicator
AL1 indicator
AL2 indicator
AL3 indicator
AL4 indicator
5.
Operation
5.1
General functions
3938 3736 35 34 33 32
24
25
26
27
28
29
30
31
● To switch on the appliance, press the ON/OFF button (1). To switch off the
appliance, press the ON/OFF button (1) again.
● To switch on the appliance in sleep mode, repeatedly press the SLEEP
button (8) until the indicator (35) is off.
● To adjust the volume, press the VOLUME UP button (13) or the VOLUME
DOWN button (12).
● To lock the function buttons, press and hold the MEMO/LOCK button (10)
for a few seconds. The indicator (34) appears on the display. To unlock
the function buttons, repeat the operation once again.
● To connect an external audio device, insert the cable plug in the LINE IN
jack (3).
● To connect a headphone, insert the cable plug in the headphone jack (4).
To prevent hearing damage, remember to adjust the volume to
a comfortable level.
7
5.2
Radio functions
● To select the radio band, press the corresponding button.
• Press the FM button (20) to select the FM band.
• Press the SW button (21) to select the SW band.
• Press the MW button (22) to select the MW band.
• Press the LW button (23) to select the LW band.
● To tune to the station of your choice, press the MEMO/LOCK button (10),
then enter the frequency using the digit buttons (7). Do not enter the
decimal point in the frequency.
● To delete a wrongly entered number, press the RETURN button (19).
i
If the frequency entered is beyond the range, the error symbol (Err)
appears on the display.
i
● To improve the reception of the FM frequency, extend the aerial antenna.
● You can further improve reception of the FM/SW signal by connecting an
external antenna. To connect an external antenna, insert the cable plug in
the EXT ANT jack (2).
Searching for radio stations
● To search for a specific frequency, press the SEARCH UP button (15) or
the SEARCH DOWN button (14) repeatedly until the desired frequency is
set.
● To search automatically, press and hold the SEARCH UP button (15) or
the SEARCH DOWN button (14). The appliance searches for the next
available station.
● To adjust the reception level, turn the dial (16) until the desired level is set.
Using the PROGRAM function
● To program frequencies as a preset station manually, press the
PROGRAM button (11) during radio playback. The indicator (31) flashes
on the display.
● Press the digit buttons (7) to enter the preset number. Alternatively, use
the dial (16), or use the SEARCH UP button (15) or the SEARCH DOWN
button (14), to select the preset number.
● Press the PROGRAM button (11) to confirm the selection.
8
APW15
Using the ATS (AUTO SEEK) function
To perform an automatic search for preset radio stations, use the AUTO
SEEK function (9).
● Short press to search for all stations on the current band and stay on each
station for about 5 seconds. To store the station:
• Press the MEMO/LOCK button (10) twice to enter storage mode.
• Press the digit buttons (7) to enter the preset number. Alternatively, use
the dial (16), or use the SEARCH UP button (15) or the SEARCH
DOWN button (14), to select the preset number.
• Press the MEMO/LOCK button (10) twice again to complete the storage
application.
● Long press to save the stations with good reception automatically and
scan each station for about 5 seconds.
Selecting preset radio stations
● Press the MEMO/LOCK button (10). The indicator (31) flashes on the
display.
● Press the digit buttons (7) to enter the preset number. Alternatively, use
the dial (16) to select the preset number.
● Press the SEARCH UP button (15) to confirm the selection.
Using the SCAN function
● Press the MEMO/LOCK button (10). The indicator (31) flashes on the
display.
● To perform an automatic scan of preset radio stations, use the SCAN
function (9). Press to scan all preset stations in the memory of the current
band and stay on each memory station for about 8 seconds.
● Press any button to exit this function.
FM radio reception
● To switch between Mono and Stereo reception, press the ST/BW button
(6). In the case of a weak FM signal, the audio quality can be improved by
selecting this mode.
MW/SW/LW radio reception
● To switch between wide and narrow band, press the ST/BW button (6).
-- Wide band: to improve the sound quality of a radio station with a strong
signal or a local radio station.
-- Narrow band: to improve the reception of radio stations with a weak signal.
9
MW radio reception
The frequency step required for tuning to stations broadcasting from Europe,
Africa and China is 9 kHz. The frequency step required for tuning to stations
broadcasting from USA and Canada is 10 kHz.
● Switch off the appliance.
● Press the ST/BW button (6). The current frequency step appears on the
display.
● Press the ST/BW button (6) again to change the setting.
5.3
Clock functions
With the clock function, the following parameters can be set:
-- current time
-- alarm time
Setting the current time
● Switch off the appliance.
● Press the PROGRAM button (11) once. The display (18) shows the time
and flashes.
● Press the SEARCH UP button (15) to set the hour.
● Press the SEARCH DOWN button (14) to set the minutes.
● Press the PROGRAM button (11) to store the settings and exit.
Setting the alarm time
Four time slots are available (AL1, AL2, AL3 and AL4).
● Switch off the appliance.
● Select the required time slot:
• To select AL1, press the corresponding button (23). The alarm icon (39)
appears on the display.
• To select AL2, press the corresponding button (22). The alarm icon (38)
appears on the display.
• To select AL3, press the corresponding button (21). The alarm icon (37)
appears on the display.
• To select AL4, press the corresponding button (20). The alarm icon (36)
appears on the display.
● Press the SEARCH UP button (15) to set the hour.
● Press the SEARCH DOWN button (14) to set the minutes.
● Press the alarm button again to confirm.
10
APW15
5.4
Alarm function
Activating the alarm
● Select the required time slot:
• To select AL1, press the corresponding button (23). The alarm icon (39)
appears on the display.
• To select AL2, press the corresponding button (22). The alarm icon (38)
appears on the display.
• To select AL3, press the corresponding button (21). The alarm icon (37)
appears on the display.
• To select AL4, press the corresponding button (20). The alarm icon (36)
appears on the display.
● To cancel the alarm, press the alarm button once again.
Snooze alarm
● To snooze the alarm, press any button except the ON/OFF button (1).
The alarm sounds again after the snooze time has elapsed.
● To stop the alarm, press the ON/OFF button (1).
The alarm is automatically set for the next day.
5.5
Using the SLEEP function
The default sleep time is: 90 minutes.
● To activate the SLEEP function, press the SLEEP button (8).
● To set the sleep timer (90, 80 ... 0), repeatedly press the SLEEP button (8).
The appliance stops playing after the chosen time has elapsed.
● To check the remaining time, press the SLEEP button (8).
● To cancel the SLEEP function, press the SLEEP button (8) or the ON/OFF
button (1).
11
5.6
Resetting the appliance
● To restore the default settings of the
appliance, press the RESET button
(40) using a pointed object.
40
6.
!
Cleaning and maintenance
WARNING
Before performing any cleaning or maintenance, switch off and
unplug the appliance.
● Clean the outside of the appliance with a soft cloth. When the appliance is
very dirty, dampen the cloth slightly with water and a neutral solution.
7.
Troubleshooting
Trouble
No display
No sound
12
Action
Switch on the appliance.
Connect the appliance properly.
Connect the appliance properly.
Adjust the volume.
Adjust the tuning control.
APW15
8.
Technical data
Parameter
Voltage
Input voltage
Power consumption
Max power output
Radio bands
Dimensions (W x H x D)
Weight
Battery power
Parameter
Power consumption
Battery size
Frequency range
Parameter
FM radio
LW radio
MW radio
SW radio
Value
6 VDC
100 ~ 240 VAC / 50 ~ 60 Hz
100 mW
260 mW
FM/LW/MW/SW
175 x 97 x 30 mm
253 g
Value
4 x 1.5 V
AA
Value
76.0 - 108.0 mHz
150 - 519 kHz
522 - 1620 kHz (9 kHz)
520 - 1710 kHz (10kHz)
3000 - 21850 kHz
Frequency range (SW meter band)
Parameter
13 m
16 m
19 m
22 m
25 m
31 m
41 m
49 m
60 m
75 m
90 m
Value
21450 - 21850 kHz
17550 - 17900 kHz
15100 - 15600 kHz
13600 - 13800 kHz
11650 - 12050 kHz
95000 - 99000 kHz
70000 - 73000 kHz
59500 - 62000 kHz
47500 - 50600 kHz
39000 - 40000 kHz
31000 - 34000 kHz
13
Memory storage capacity
Parameter
FM radio
LW radio
MW radio
SW radio
9.
Value
200 stations
100 stations
100 stations
200 stations
isposal of used electrical
D
and electronic equipment
Z
The meaning of the symbol on the material, its accessory or packaging
indicates that this product shall not be treated as household waste.
Please, dispose of this equipment at your applicable collection point for the
recycling of electrical and electronic equipments waste. In the European
Union and Other European countries which there are separate collection
systems for used electrical and electronic product. By ensuring the correct
disposal of this product, you will help prevent potentially hazardous to the
environment and to human health, which could otherwise be caused by
unsuitable waste handling of this product. The recycling of materials will help
conserve natural resources. Please do not therefore dispose of your old
electrical and electronic equipment with your household waste.
For more detailed information about recycling of this product, please contact
your local city office, your household waste disposal service or the shop
where you purchased the product.
For more information and warranty conditions, please visit: www.akai.eu
14