1
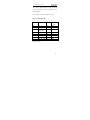
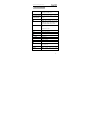
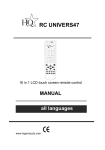
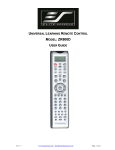
Congratulations on purchasing Unniversal™ 4100
Digital Control 8, the universal 8 in 1 remote control.
With this remote control you can control almost all brands
of TV sets (TV), DVD and DVR-players (DVD), DVB
receivers (DVB), digital Satellite receivers (SAT) and
Cable
receivers, Video Recorders (VCR),
Tuners
(TUNER), cassette decks (TAPE), CD players (CD),
Audio amplifiers and other Audio devices (AUX).
Unniversal™ 4100 controls almost all the device
functions which have been set. It is not intended to
replace all the functions of your original remote control.
The Unniversal™ 4100 large blue backlight LCD shows
you the actual operation/device status, the hour and the
ambient temperature in Cº. The LCD also displays if the
batteries are low and have to be replaced.
This universal remote control features a quick, automatic
or manual code search function. In case the code has not
been found, the remote control can LEARN the new code.
VOLUME and DEVICE can be locked to avoid unwanted
modifications.
28
Once set up is finished, all data (except time) will be
stored in the back-up memory to avoid data loss when
replacing batteries.
Please keep this user manual for future reference.
Device Code Assignment
Bank
for Device
Initial code
Total of
codes
TV
TV
048
488
VCR
VCR
075
182
DVB
Satellite,
413
413
Cable, DVB
DVD
DVD,DVR
026
190
CD
CD
035
124
TUNER
TUNER
039
114
TAPE
TAPE
067
134
AUX
AMP, LD VCD
032
204
Total codes: 1849
29
1. KEY DESCRIPTION
SET
To start the remote control set-up or to display
the status on the LCD screen.
LEARN
Set the learn functions.
TV/VCR/DVB/CD/DVD/
To select the device which you want to
TUNER/TAPE/AUX
control.
POWER
AV
Turn the device ON or OFF.
Works like the TV/Video key on your
original TV remote, and TV/SAT key on
your original satellite remote control.
MENU
Functions just like the Menu or OSD
(on-screen display) or Memory key on your
original remote control.
CH±
Channel UP and DOWN
VOL±
Volume UP and DOWN
REW
Fast rewind.
PLAY
Play your CD, DVD and etcetera.
FFWD
Fast forward.
REC
Record.
STOP
Stop the operation.
PAUSE
Pause
SHOW VIEW
Show View function scans all channels to
have a quick view.
ALL OFF
Turn off all devices controled.
MACRO
Macro
function
carries
out
several
30
successive operations via one button for your
Home-Theater.
DISPLAY
Displays current channel information.
Key to mute the sound.
0-9
The number keys operate just like the
number keys on your original remote control.
Works like the ENTER key on your original
remote control.
OK
EXIT
Functions just like the UP
RIGHT
DOWN
LEFT
OK and EXIT Keys on your original
remote control for menu function. During
Unniversal 4100 set up mode they will be
used as a cursor for confirming and exiting
remote control programming.
Television video
TV and text mixed
Teletext mode
Page hold
Red, green, Bellow and blue keys are for TV
Fast Text.
31
2. DIRECT SET UP (BY BRAND NAME AND
CODE)
If you know the brand name of the device, it can be set
up directly (direct search on the screen via brand name
and code selection).
1. Switch on the device (e.g. TV, DVD) which you wish to
control, if the device is VCR, please insert a video
cassette.
2. Press and hold the SET key on the remote control.
Simultaneously press a device key (i.e. TV, DVD)
3. Release the pressed keys, the brand name is
displayed on the LCD screen.
4. Press UP or DOWN key to select the device brand
name (e.g. Your TV set brand: ACME)
5. Check whether the keys are functioning correctly (e.g.
Power, CH+,CH-,VOL+,VOL-,Mute).
If none of the new remote control keys function
correctly or the majority of the keys do not function
correctly, try out another code by pressing
or
key until all basic functions operates correctly.
6. Once you are satisfied with the code, simply press OK
to save it. SUCESS is displayed on the LCD screen
and the set-up is exited. You can press device key
again to exit SET UP or use UP or DOWN to select
another set-up.
32
REMARK:
1. To return to initial status, press the EXIT key or the device key (e.g. TV,
or VCR…)
2. When testing key functioning, aim the remote control at the device
which you wish to control.
3.
During set-up, the
OK
, EXIT keys are
only used to set up your new remote control. These keys can not be used
for normal menu functions until you exit set-up.
4. If the device has been locked, it has to be unlocked before you can
carry out the set-up.
2.1 SET-UP BY AUTO SEARCH
If set-up via brand name and code has been
unsuccessful or if you can not find the brand name on the
remote control screen, you can also use the Auto Search
function to find the right code for your device.
1. Switch on the device (e.g. TV,DVD) which you wish to
control, if the device is VCR, please insert a video
33
cassette.
2. Press the SET key on your remote control for more
than 3 seconds before releasing it.
3. Press the UP or DOWN keys to select to C O D E
S E T U P in the LCD menu, and press the OK key.
4. The screen shows the D E V S E A R C H in the LCD
menu, and press OK key, then press device key to
select your desired operation device(e.g.TV) and then
press OK key to start the Auto Search.(In this case,you
have to aim the remote control directly at the device
which you wish to control)
5. Check whether the device reacts or not. As soon as
the device reacts, press any key to stop the search.
6. Check whether majority of the keys function correctly
or not. If the majority of the keys do not function correctly,
please press UP or DOWN key to select another code.
7. Once you are satisfied with the code, simply press OK
to save it. SUCESS is displayed on the LCD screen
and the set-up is exited. You can press device key
again to exit SET UP or use UP or DOWN to select
another set-up.
REMARK:
1. If you did not manage to stop the search when the device reacted,
use the UP or DOWN key to search for the code again.
2. During the automatic search ,the
OK, EXIT
keys are only used to set up your new remote control. These keys
can not be used for normal menu functions until you exit set-up.
34
3. Once the remote control has searched all the codes, it stops the
search at the first code.
4. If the device has been locked, it has to be unlocked before you can
carry out the set-up.
2.2 SET-UP BY ENTER CODE
1. Switch on the device (e.g. TV,DVD) which you wish to
control.
2. At the back of this user manual there is a list of brand
names and code numbers for your device (e.g. Lifetec
003,010,062).
3. Press the SET key on your remote control for more
than 3 seconds before releasing it.
4. Press UP or DOWN keys to select to C O D E S E T U P
in the LCD menu, and press the OK key.
5. The screen shows the D E V S E A R C H in the LCD
menu, press the UP or DOWN keys to select C O D E
S E T U P in the LCD menu, and press OK key.
6. Subsequently press the device key of the device which
you wish to control (eg. TV,DVD,…) and then press OK.
Now enter the 3-digit code(eg.003 for Lifetec TV set).
7. Press OK to save the code and SUCCESS is
displayed on the LCD screen. Press exit twice to exit
SETUP mode.
8. Check whether majority of the keys function correctly
or not. If the majority of the keys do not function
correctly, please press try another 3-digit code
35
(eg.010,…) listed under the same brand name in the
code list. Repeat steps 3 to 7 until all basic functions
operate correctly. You can press any device key again
(eg. TV) to exit set-up or use UP or DOWN to select
another set-up.
3. LEARNING
The
learning
function
is
used
to
extend
the
pre-programmed code list. The default code list may
provide all required functions, but it is still possible to add
a small number of additional functions for your new
remote control. Use the LEARN key to program
commands or the Delete key to delete programmed
commands, or select Delete Dev to delete all the
commands for a single device, or Delete All to delete all
the programmed commands of all the devices in the
learning category. Press the LEARN key for more than 3
36
seconds to access the learn mode.
3.1 Learn a Command
1. Press the respective device key (eg.TV) of the device
which you wish to carry out programming.
2. Press he SET key for more than 3 seconds, then
release it, or press the Learn key for more than 3
seconds to access the learn mode.
3. Press the UP and Down key to select LEARNING in
the LCD menu, then press the OK key.
4. Press the UP or DOWN key to select LEARN KEY in
the LCD menu and then press OK.
The SELECT KEY is displayed on the LCD screen.
5. Select the (target) key which you wish to program (e.g.
Power). WAITING is displayed on the LCD screen.
6. Aim the IR window of the original remote control at the
IR receiver window of your new remote control
(Distance approx.50mm)
7. Press the original remote control key (eg.Power) until
SUCCESS is displayed. If failed is displayed on the
LCD screen, please repeat Steps 4-6.
8. Repeat Steps 4-6 to program other keys.
9. Press a device key (eg.TV) to exit the learning
operation once all the desired commands have been
programmed.
37
REMARK:
1.
A programmed target key can programmed from various source
keys more than once. This remote control only Saves the most
recently programmed signal.
2. All usual function keys can be learnt except Show View Macro, Set,
Learn All off .
3. You may not be able to program some codes formats from this remote
control.
4. It is possible to learn approx. 100keys totally for 8 devices.
3.2 Deleting programmed Key
If you wish to delete a programmed command, proceed
as below:
1. Press the device key (e.g. TV) of the device at which
the command is to be deleted.
2. Press and hold the SET key for more than 3 seconds
before releasing it.
3. Press the UP or DOWN key to select Learning in the
LCD menu, then press OK key.
4. Press the UP or DOWN key to select DELETE KEY in
38
the LCD menu, then press OK key.
5. Press the remote control key that you want to delete,
SURE DELET is displayed on the LCD Screen, press
OK to confirm this query. SUCCESS is displayed on
the LCD screen.
6. Repeat Step 4-5 to delete other keys.
7. Press a device key (e.g. TV) to exit the deleting
operation once all the desired remote commands have
been deleted.
3.3 Deleting all the programmed commands for a
Device
If you wish to delete all the programmed commands in a
device at once and not one by one, proceed as follows:
1. Press the device key (eg. TV) of the device that you
want to delete the commands.
2. Press the SET key for more than 3 seconds before
releasing it.
39
3. Press the UP or DOWN key to select LEARNING in
the LCD menu, then press OK key.
4. Press the UP or DOWN key to select DELETE DEV in
the LCD menu, then press OK key.
5. Select the device which you wish to delete and press
OK..
6. SURE DELET is displayed on the LCD screen, press
OK key to confirm this query. SUCCESS is displayed
on the LCD screen..
7. Repeat step 5 to delete all the commands of another
device key.
8. Press EXIT key to quit from the deleting operation.
Remark: It will take about 3 minutes for delete all commands in one
device. If the commands are not so many, we suggest you
delete commands one by one.
3.4 Deleting all the programmed Keys
If you wish to delete all the programmed commands in
the Unniversal™ 4100, proceed as follows:
40
1. Press the SET key for more than 3 seconds before
releasing it.
2. Press the UP or DOWN key to select LEARNING in
the LCD menu and then press OK.
3. Press the UP or DOWN key to select DELETE ALL in
the LCD menu and then press OK.
4. SURE DELET is displayed on the LCD screen, press
OK to confirm this query. SUCCESS is displayed on the
LCD screen.
4. THE MACRO FUNCTION
4.1 Setting up macros
Carry
out
successive
operations
for
your
home
entertainment centre with the aid of the macro function.
Set up a macro as follows:
41
1.
Press SET key for more than 3 seconds before
releasing it.
2.
Press the UP or DOWN key to select Macro in the
LCD menu and then press OK.
3.
Press the UP or DOWN key to select Macro 1 or
Macro 2 or Macro 3 in the LCD menu, then press
OK.
4.
SETUP is displayed on the LCD screen, press OK to
confirm.
SELECT KEY is displayed on the LCD screen.
5.
You can select the device and function key for a
successive
operation
(eg.
TV+POWER+MUTE+AV,DVD+PLAY,VCR+RECOR
D,etc. That means you want to switch the TV set on
and the sound off, switch the TV set and input to AV
input, to start the DVD to play a disc while the VCR
starts recording at the same time).
6.
Press OK to save the setting. Success is displayed
on the LCD screen.
7.
You can press any device key to exit set-up, or press
the EXIT key to switch to the last status or use the
UP or DOWN key to select another set-up.
REMARK:
1.
A maximum of 10 commands can be set up in a macro.
2.
Ensure that all the keys can transmit signals; otherwise even if you
have programmed these Keys into the macro, the macro will not
42
function correctly. Check key functioning before setting up the
macro by pressing them to see whether the device keys flash or
not.
3.
Please observe that certain conditions have to be fulfilled if you
wish to carry out a macro. For example, a disc or video cassette has
to be inserted into the DVD player or VCR respectively if you wish to
play a DVD or a tape with the VCR.
4.2 Operate Macro
Press and hold Macro key and 1 key (or 2,3 key) and
then release them. The remote control will send out a
sequent IR commands that you programmed before.
4.3 Deleting Macro
1.
Press SET key for more than 3 seconds before
releasing it.
2.
Press the UP or DOWN key to select Macro in the
LCD menu and then press OK.
3.
Press the UP or DOWN key to select Macro 2 in the
LCD menu, and then press OK.
4.
Press the UP or DOWN key to select DELETE in the
LCD menu and then press OK.
5.
SURE DELETE is displayed on the LCD screen.
Press OK to confirm the deleting operation and
SUCCESS is displayed on the LCD screen and you
can return to the last status.
43
6.
You can press any device key to exit the deleting
operation, or press EXIT key to return to the last
status or use the UP or DOWN key to select another
set-up.
5. OTHER SET UP
5.1 Setting the Clock
It is possible to set the clock of your LCD remote control,
and the clock will be displayed on the screen.
1. Press the SET key for more than 3 seconds before
releasing it.
2. Press the UP or DOWN key to select C O N F I G U R E
in the LCD menu, and then press the OK.
3. Press the UP or DOWN key to select TI M E S E T U P
in the LCD menu, and then press the OK.
4. Press the
or
key to move the cursor to select
hour or minute or AM/PM, then press the number key
to set hour and minute, and press the
or
key to select AM or PM.
5. Press OK key to save the setting and SUCCESS is
displayed
on
the
LCD
screen
for
1
second.
Subsequently return to the current set up status. You
can press any device key to exit the set up or press
EXIT key to return to the last state.
44
5.2 Volume Lock
This function is very handy if you only wish to use one
device to control the volume. For example, you can use
your amplifier as the main volume control and can use
this function to fix the AUX volume and mute key.
Irrespectively
of
the
device
being
used
(TV,DVD,VCR,etc.) the remote control volume and mute
keys control the volume and mute of your amplifier.
1. Press the SET key for more than 3 seconds before
releasing it.
2. Press the UP or DOWN key to select C O N F I G U R E
in the LCD menu, and then press the OK .
3. Press the UP or DOWN key to select VOL LOCK in the
LCD menu, and then press the OK.
4. Press the device key to select the device which you
want to fix, eg. AUX.
5. Press the
or
key to change to the ON or OFF
mode.
6. Press OK key to save the setting and SUCCESS is
displayed on the LCD screen. Subsequently return to
the current set up status. You can press any device
key to exit the set- up or press EXIT key to return to the
last status or use the UP or DOWN key to select
another set-up.
45
REMARK:
You can lock one device for volume and mute control at your new remote
control. The locked device is automatically unlocked if you lock another
device.
5.3 Device Lock
Use the device lock function to fix the current device
code. The device code cannot be subsequently changed
via brand name and code or automatic search. You can
set it to OFF to quit this function.
1. Press the SET key for more than 3 seconds before
releasing it.
2. Press the UP or DOWN key to select C O N F I G U R E
in the LCD menu, and then press the OK .
3. Press the UP or DOWN key to select DEV LOCK in the
LCD menu, and then press the OK .
4. Press the device key to select the device which you
46
wish to fix, such as TV (or DVD,DVB,…)
5. Press the
or
key to change to the ON or OFF
mode.
6. Press OK key to save the setting and SUCCESS is
displayed on the LCD screen. Subsequently return to
the current set up status. You can press any device
key to exit the set- up or press exit key to return to the
last status or use the UP or DOWN key to select
another set-up.
REMARK:
It is possible to fix all device codes, however these device codes can not
be changed via brand name code or automatic search Set-up.
5.4 Background Light
If the backlight has been switched on, it lights up if you
press any key.
1. Press the SET key for more than 3 seconds before
47
releasing it.
2. Press the UP or DOWN key to select C O N F I G U R E
in the LCD menu, and then press the OK key.
3. Press the UP or DOWN key to select LIGHT in the
LCD menu, and then press OK.
4. Press the
or
key to change to the ON or OFF
mode.
6. Press OK key to save the setting and SUCCESS is
displayed on the LCD screen. Subsequently return to
the current set up status. You can press any device
key to exit the set- up or press EXIT key to return to the
last status or use the UP or DOWN key to select
another set-up.
5.5 Setting the contrast
If you are not satisfied with the screen contrast setting of
your remote control, check the steps below to change it:
1. Press the SET key for more than 3 seconds before
releasing it.
2. Press the UP or DOWN key to select C O N F I G U R E
in the LCD menu, and then press the OK key.
3. Press the UP or DOWN key to select CONTRAST in
the LCD menu, and then press the OK.
4. Press the
or
key to adjust the contrast level, press
OK once you are satisfied with the setting. SUCCESS is
displayed on the LCD screen.
48
5. You can press any device key to exit set-up, or press
the EXIT key to return to the last status or use the UP or
DOWN key to select another set-up.
5.6 Show View Function
The Unniversal™ 4100 has a SHOW VIEW function to
scan all TV or CAB/SAT channels for your quick view.
1. Press the device key to select the device which you
wish to operate.
2. Press and hold the Show View key about 1 second.
When the LED of the device button flashes and it goes
into
Show
View
mode.
The
remote
control
automatically scans all channels for a brief quick view.
REMARK:
1. The remote control must be pointed at the device until Show View
mode finished.
2. If you want to exit the show view mode, please press any key.
5.7 ALL OFF
You can turn off or turn on all devices using this button
only.
Press and hold the ALL OFF key for about 1 second and
then release it. The remote control will send out all
current power signals to turn off for every device one by
one. Meanwhile the device key flashes to tell you which
49
power signal is been sending.
Remark: The remote control must be pointed to device that you like to
control until the operation finished.
5.8 CLEAR ALL
Delete all set-up data and reset the device to the factory
default settings.
1. Press the SET key for more than 3 seconds before
releasing it.
2. Press the UP or DOWN key to select C O N F I G U R E
in the LCD menu, and then press the OK key.
3. Press the UP or DOWN key to select CLEAR ALL in
the LCD menu, and then press OK.
SURE CLEAR is displayed on the LCD screen.
4.
Press OK to delete all the settings and to return to
the factory original settings.
6. TECHNICAL SPECIFICATIONS
Power supply: 3 x 1.5V AAA batteries (not included)
Dimensions: 221x53x20mm
Weight (without batteries): 120g
50
WARRANTY PERIOD
Energy Sistem warrants its products to be free from
defects in materials and workmanship at the time of
purchase.
The warranty period is 36 months from the date of
purchase for MP3/MP4 Players, Digital Cameras,
Speakers, Keyboards, Mouses, Webcams, Universal
Remote Control, UPS (except for U.P.S. batteries, which
have a warranty period of 24 months). In the case of
Surge protection, the warranty period is 60 months.
WARRANTY PROCEDURE
1)
Visit
the
Support
http://support.energysistem.com
section
and
select
at
your
product to view the FAQ (Frequently Asked Questions).
The solution to your problem is very likely to have been
already published there. You will also be able to
download user manuals, user guides, drivers and
updates.
2) If you cannot find an appropriate the solution in the
Support section, you may send us your enquiry by email:
[email protected]
51
3) You may also reach by phone at the warranty service
number 902 294 294. Make sure to have your purchase
receipt or invoice and the product's serial number at hand
when you call.
4) Alternatively, you may prefer to contact the distributor
from which you purchased the product, presenting them
with the receipt or invoice.
DESIGN AND SPECIFICATIONS ARE SUBJECT
TO CHANGE WITHOUT NOTICE.
Trademarks.
All company, brand and product names are trademarks
or registered trademarks of their respective companies.
© 2008 by Energy Sistem®. All rights reserved.
52