1
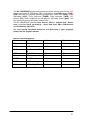
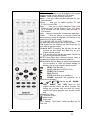
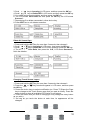
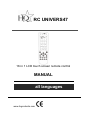
RC UNIVERS47
16 in 1 LCD touch screen remote control
MANUAL
all languages
www.hqproducts.com
The RC UNIVERS47 digital touch screen universal remote controls can work
almost all brands of Televisions (TV), DVD-players and DVR-players (DVD),
DVB receivers and (digital) Satellite receivers and Cable box (DVB), Video
Recorders (VCR), Tuner receivers (TUNER), Tape receivers (TAPE), CDplayers (CD), Audio amplifiers and LD players and other Audio (AUX). You
can controls 8 devices and add 8 new devices.
The RC UNIVERS47 provides Auto Search-, Macro-, Volume lock-, Device
lock-, permanent back up memory -, week, date, time, AM or PM function
and low battery indication
For very special functions which are not descriped in your language
please use the English manual.
Device Code Assignment
Bank
for Device
Initial code
Total of codes
TV
TV
048
488
VCR
VCR
075
182
DVB
075
403
DVD
Satellite,Cable,DV
B
DVD,DVR
026
190
CD
CD
035
124
TUNER
TUNER
039
114
TAPE
TAPE
067
134
032
204
AUX
AMP, LD,VCD
Total codes: 1839
2
Realize the Keys
SET
For you start to set up (program) the remote
control or show you the status in LCD screen.
LEARN Used to setup learning functions.
Macro Lets you make sequent operation for you
home theater.
Device
Lets you to switch devices TV and
TV1(VCR and VCR1,….)
Page
Lets you to switch between Page1 and
Page2 of touch screen buttons. If you hold down
for 3 seconds, you will see the date and year on
LCD screen.
Light
Lets you control the touch screen back light.
Power
Turns the device on and off. Press the
power button to show all available LCD choice for all
buttons in LCD layout mode.
TV,VCR,DVB,DVD,CD,TAPE,TUNER,AUX
Lets
you select the device which you want to control.
CH± Works like the Channel Up and Down key on
your original remote control.
VOL±and MUTE Controling the volume, like as the
Volume Up and Down and Mute key on your
original remote control.
0-9 The number keys operate the same function as
on your original remote control.
ENTER Used after direct channel number entry to
immediately change to the selected channel.
MENU Works like the Menu (to adjust some features
of your device) or OSD (on-screen display) or
Memory key on your original remote control.
REW(Fast Reverse)
PLAY (operate your DVD or CD)
FFWD (Fast Forward)
REC (Record)
STOP (terminate your operation)
PAUSE (terminate the operation for a
moment and standby)
OK, EXIT Works like the UP,DOWN,
LEFT , RIGHT , OK , EXIT Keys on your
original remote control for menu function. But
during set up mode, they are used for cursor,
confirm and exit to program your remote control
only.
Television video
TV and text mixed
Teletext mode
Page hold
R,G,Y, and B Red Green Yellow and Blue for TV
Fast Text.
3
Note: Before you set up any function, you must activate the RC UNIVERS47
on first by touching the screen or pressing any key on the remote control.
Battery Installation
This remote control needs 4 batteries to work with. please refer to the
direction marks inside the battery apartment and please put 4 pieces of fresh
AAA in the battery apartment. Alkaline batteries are recommended since it has
a large LCD screen to run out of more power consumption than the common
universal remote control.
To install the batteries:
1. Turn the remote over, pull up on the tap and lift the cover off.
2. Insert the batteries matching the batteries to the (+) and (-) marks
inside the battery case.
3. Slide the battery cover back into the place.
Note: Whenever the batteries need replacement, the LCD remote will indicate
with battery low message. Please replace them with new batteries now. All
settings you have programmed into the new remote control will be stored in
memory even if you take off the batteries (but you may need to reset the clock).
Device Edit
Adding a Device
If you want to operate the second TV (or second VCR, DVB, DVD, CD,
TAPE, TUNER etc.), you can add a new device. Please just operate the steps
following:
1. Press the SET key on your remote control for more than 3 seconds, then
release it.
or
keys to select to D e v i c e in LCD menu, and press
2. Press the
the OK key.
or
keys to select to Add New in the LCD menu, and
3. Press the
press the OK key, the LCD shows SelectDEV, then please you press device
key to select your desired adding device (e.g. TV or DVD …). If you add more
than 8 new devices, the LCD will shows Full.
4. Press the OK key to save it and LCD shows Success!.
5. If you add other devices please repeat steps 3~5. You can press device key
or
to select other set up.
(e.g. TV) again to finish SET UP or use
4
Delete a Device
1. Press the SET key on your remote control for more than 3 seconds, then
release it.
or
keys to select to D e v i c e in LCD menu, and press
2. Press the
the OK key.
3. Press the
or
keys to select to Delete in the LCD menu, and press
the OK key LCD shows DeleteDEV, then you press device key to select your
desired delete device(e.g. TV,DVD…). If no new add device ,LCD shows
EMPT.
4. Press the OK key to save it and LCD shows Success! .
5. If you delete other device please repeat steps 3~4. You can press device
or
to select other set up.
key (e.g. TV) again to finish SET UP or use
Device Set-up
Direct Set Up (by Brand and Code)
If you know the device’s brand name, you can set up by Direct Set-up
(search on screen by brand name directly and choose the code).
1. Turn on the device (e.g. TV, DVD…) you would like to operate. If it is a VCR,
Please insert a tape.
2. Press and hold the SET key on your remote control. Then press
(simultaneously) one of the device keys (e.g. TV, DVD…).
3. Then release them, the Brand will be displayed on the screen.
4. You can press the
or
key to select the brand of your device (e.g.
your TV brand: Life).
5
5. Check the function of the keys (e.g. POWER CH+ CH- VOL+ VOL- MUTE).
If none of the keys of your new remote control can work, or most of the keys
or
key, until all basic
work improperly, please try another code by the
functions operate properly.
6. If you are satisfied with the code, please just press the OK key to save it.
LCD shows Success! then it finishes the set up. You can press device key
(e.g. TV) again to finish SET UP or use
or
to select other set up.
Remark:
1. To return to beginning status, please press the EXIT key or the device
key (e.g. TV, or VCR…)
2. You must point your remote control to the device what you wanted to
control during when you test the keys.
OK, EXIT … only used to set-up your
3. The keys of
new remote control during set up. You can’t control your device as
normal menu function at this moment until you quit from set up.
4. If the device is locked, you must first unlock the device then setting up.
Set-up by Auto Search
If the set-up by brand and code failed or you cannot find the brand name in
your remote control screen, you may use the Auto Search to find the correct
code to operate your device.
1. Turn on the device (e.g. TV, DVD…) you would like to operate. If it is a VCR,
Please insert a tape.
2. Press the SET key on your new remote control for more than 3 seconds,
then release it.
or
keys to select to S e t u p C o d e in LCD menu, and
3. Press the
press the OK key.
or
keys to select to A u t o S r c h in the LCD menu,
4. Press the
and press the OK key, then you press device key to select your desired
operation device(e.g. DVD) and then press the OK key to start the Auto
Search.(you must point your remote control to your device at the moment).
5. See if the device reacts or not, once the device reacts,please press any key
to stop the search.
6. Test if most of keys work good or not. If most of keys work not very well ,
or
keys to select other code.
please press the
7. If you find one satisfied code ,please press the OK key to save it and LCD
shows Success!. You can press device key (e.g. TV) again to finish SET UP
or use
or
to select other set up.
6
Remark:
1. In case of you did not stop the search on time when device reacted, you
may press the
or
key to search back to find the passed code.
OK, EXIT are only used to set-up your new remote
2.The keys of
control during the Auto Search, you can’t control your device for menu
function at the moment until you quit from the set up .
3. When remote control searches through all codes, the remote control will
stop at the beginning code of the search.
4. If the device is locked, you must first unlock the device then set up.
Set-up by Enter Code
1. Switch on the device, which you would like to control (e.g. TV, DVD…).
2. In the back section of this manual, please find the brand name and code no
of your device brand (e.g. Lifetec 003,010,062,).
3. Press the SET key on your new remote control for more than 3 seconds,
then release it.
or
keys to select to S e t u p C o d e in LCD menu, and
4. Press the
press the OK key.
or
keys to select to EnterCode in LCD menu, and
5. Press the
press the OK key.
6. Then you press device key to select your desired operation device(e.g. TV,
DVD…) and then press the OK key, you must now enter the 3-digit device
code (e.g. 003 for Lifetec TV).
7. Press the OK key to save it and LCD shows Success!, and press EXIT key
two times to exit the SETUP mode.
8. Please you check the function of the keys on remote control. If most of keys
on your new remote control do not function correctly, please try to another 3digit device code (e.g. 010…) from the code list under the same brand. Then
repeat steps 3 to 7 until all the basic functions operate correctly. You can
or
to
press device key (e.g. TV) again to finish SET UP or use
select other set up.
7
LEARNING
Learn a Command
1. Press a device key (e.g. TV) where you want to learn.
2. Press and hold the SET key for more than 3 seconds, then release it.
3. Press the
key to Learning in LCD menu, and then press the OK
key.
4. Press the
key to Learn Key in LCD menu and then press the OK
key LCD shows Select Key, if you exit learn mode ,please press the device
key.
5. Select the (target) key you wanted to learn (e.g. Power). The LCD display
PLS Send Signal in.
6. Point the transmitter of the original remote control remotes face to the
receiver window of RC UNIVERS47 by approximately 50mm apart.
7. Press and hold the original remote key (e.g. Power) until the LCD display
S u c c e s s ! for 1 second. If LCD display F a i l e d , please Repeat Steps 46.
8. Repeat Steps 4-6 to learn more other keys.
9. Press a device key (e.g. TV) to quit the learn operation when all desired
remote commands are learnt.
8
Remark:
1. A selected target key can be multi learnt from different sources key, RC
UNIVERS47 will store the final learnt signal only.
2. All usual function keys can be learnt.
3. Some code form may not be learnt by this remote control (due to the
material cost limit.)
4. You can learn about 100 key totally for 8 devices and 8 new devices.
Delete the Learnt Key
1. Press the device key (e.g. TV) where the command you like to delete from.
2. Press and hold the SET key for more than 3 seconds, then release it.
3. Press the
key to Learning in LCD menu, then press the OK key
4. Press the
key to Delete Key in LCD menu and then press the OK
key.
5. Press the key on RC UNIVERS47 that you want to delete, the LCD shows
Sure Delet and then press the OK key to confirm, the LCD will show
Success! .
6. Repeat Step 4 ~5to delete next keys you wanted.
7. Press a device key (e.g. TV) to quit the delete operation when all desired
remote commands are deleted.
Delete All Learnt Command For a Device
1. Press a device key (e.g. TV) where you want to delete commands from.
2. Press and hold the SET key for more than 3 seconds, then release it.
9
3. Scrol
l
key to Learning in LCD menu, and then press the OK key.
4. Scroll
key to Delete DEV in LCD menu and then press the OK key.
5. You select device want to delete, and then press the OK key.
6. The LCD shows Sure Delet and then press the OK key, the LCD shows
Success! .
7. Repeat step 5 to delete commands in other device key.
8. Press EXIT key to quit deletes operation.
Delete All Learnt Keys
1. Press and hold the SET key for more than 3 seconds, then release it.
2. Scroll
key to Learning in LCD menu, then press the OK key.
3. Scroll
key to Delete All in LCD menu and then press the OK key.
4. The LCD shows Sure Delet, then press the O K , LCD shows Success! to
finish the deletion.
Changing Touch Screen Layout
1. Press and hold the SET key for more than 3 seconds, then release it.
2. Press the
or
key to select L a y o u t in LCD menu, and then press
the OK key.
3. Press the device keys to select modification.(ex. Press TV)Press the Page
key to change to the Touch Screen page that you want to modify. Press the
power button to show all available LCD choice for all buttons.
4. Touch the button that you wish to change(you may change as many button
as you wish.)
5. As long as you touch the button at each time, its appearance will be
changed.
10
6. Press the SET key to save the setting, LCD shows Success! then exit to
current setup state.
Macro Function
Set up Macro
Macro function let you make sequent operation for you home theater.
Please press and hold the MACRO key and 1 key ( or 2,3 key), and then
release them. The remote control will send out a sequent IR commands that
you programmed before.
You can set up a Macro by following below steps:
1. Press and hold the SET key for more than 3 seconds, then release it.
or
key to select M a c r o S e t on LCD menu, and then
2. Press the
press the OK key.
or
key to select the M a c r o 1 (or Macro2 or Macro3) on
3. Press the
LCD menu, then press the OK key.
4. Press the
or
key to select the S e t U p in LCD menu, and then
press the OK key.
5. You can select the device and function key for a sequent operation what
you enjoyed. (e.g.: TV+POWER+MUTE+AV, DVD+PLAY, VCR+RECORD,
etc. That means you want to turn on the TV and shut off its sound, switch TV
and input to AV port, DVD start to play disc, VCR begins to record at the
same time. )
6. Press the OK key to save the setting, LCD shows Success! then exit to
current setup state.
7. You can press any device key to finish set up or press the EXIT key to last
or
to select other set up.
state and use
11
Remark:
1. You can set up to maximum 10 commands in a MACRO.
2.Make sure all the keys can send out signals, otherwise even if you
programmed these keys into the MACRO, it still can not work properly when
you operate MACRO function. You can check those keys by pressing them to
see the relative Device buttons to flash or not before you set up MACRO.
3. Make sure the device must have relative conditions when you operate
MACRO function. For example the disc must be inserted into the DVD player
and a video tape must be inseted into the VCR when you like to play the DVD
or make a record by your VCR.
Delete Macro
1. Press and hold the SET key for more than 3 seconds, then release it.
or
key to select the M a c r o in LCD menu, and then
2. Press the
press the OK key.
or
key to select the M a c r o 2 in LCD menu, and then
3. Press the
press the OK key.
or
key to select the D e l e t e in LCD menu, and then
4. Press the
press the OK key.
5. The LCD shows Sure Delete, Press the OK key to confirm the delete and
LCD display Success! then back to last state.
6. You can press any device key to finish the delete operation or press the
or
to select other set up.
EXIT key to last state and use
12
Other Set-Up
A. Set up Clock
You can set up the clock on your RC UNIVERS47 LCD remote control and
the clock will be displayed on the screen.
1. Press and hold the SET key for more than 3 seconds, then release it.
or
key to select the T i m e S e t in LCD menu, and then
2. Press the
press the OK key.
3. Press the
or
key to select desired setup items such as Year,
or
key to change
Month, Date, Day, Hour and Minute, then press the
the year, month ,date ,day, hour and minute.
or
key to select AM or PM.
4. Press the
5. Press the OK key to save the setting and LCD display Success! for 1
second then exit to current setup state, if you enter errors, the LCD screen
shows Error for 1 second.You can press any device key to finish set up or
press EXIT key to return to the last state.
B. Volume Lock
This function makes you very convenient when you only use one device to
adjust volume. For example, you may use your amplifier as your main volume
13
control, then you can use this function to fix the volume and mute key of AUX,
no matter which device you will use (even you will use TV, DVD, VCR etc), the
volume and mute key on remote control still control the volume and mute of
your amplifier.
1. Press and hold the SET key for more than 3 seconds, then release it.
2. Press the
or
key to select the O t h e r S e t in LCD menu, and then
press the OK key.
3. Press the
or
key to select the V O L L o c k in LCD menu, and
then press the OK key.
4. Press the device key to select the device you want to fix, such as AUX.
5. Press the
or
key to change to the Locked or Unlock mode.
6. Press the OK key to save the setting and LCD display Success! then to
current setup state, You can press any device key to finish set up or press the
or
to select other set up.
EXIT key to last state, or you can use
Remark: You can only lock one device for the volume and mute of your new
remote control. The locked device will be unlocked when you lock on the other
device automatically.
C. Device Lock
You can use Device lock function to fix current device code and this
device code cannot be changed by brand and code set up or auto search.
You can set it to the Off to quit from this function.
1. Press and hold the SET key for more than 3 seconds, then release it.
or
key to select the O t h e r S e t in LCD menu, then
2. Press the
press the OK key.
3. Press the
or
key to select the D E V L o c k in LCD menu, and
then press the OK key.
4. Press the device key to select the device that you want to fix, such as TV (or
DVD, or DVB….)
or
key to change to the Locked or Unlock mode.
5. Press the
6. Press the OK key to save the setting and LCD display Success! then exit to
current setup state. You can press any device key to finish set up or press the
EXIT key to last state or you can use
or
to select other set up.
14
Remark:
You can fix all device codes but these device codes cannot be changed
by neither Auto Search nor Brand Code Set up.
D. Backlight
If the background light is on, the background light will be lighted up when you
press any key.
1. Press and hold the SET key for more than 3 seconds, then release it.
or
key to select the O t h e r S e t in LCD menu, and then
2. Press the
press the OK key.
3. Press the
or
key to select the BackL i g h t in LCD menu, and
then press the OK key.
or
key to change to the On or Off mode.
4. Press the
5. Press the
or
key to select Back Light on time (change length of Back
Light on-time from 5-30 seconds and 5 seconds as a step.).
6. Press the OK key to save setting and LCD shows Success! then exit to
current setup state, You can press any device key to finish set up or press the
EXIT key to last state, or you can use
or
to select other set up.
15
E. Contrast Adjust
If you are not satisfied the screen contrast of your remote control, you can
use below steps to change it:
1. Press and hold the SET key for more than 3 seconds, then release it.
2. Press the
or
key to select the O t h e r S e t in LCD menu, then press
the OK key.
or
key to select the C o n t r a s t in LCD menu, then
3. Press the
press the OK key.
or
key to adjust contrast level, and then press the OK
4. Press the
key when you satisfied the LCD shows S u c c e s s ! .
5. You can press any device key to finish set up or press the EXIT key to last
state, or you can use
or
to select other set up.
F. LCD Delay
1. Press and hold the SET key for more than 3 seconds, then release it.
2. Press the
or
key to select the O t h e r S e t in LCD menu, and then
press the OK key.
3. Press the
or
key to select the D e l a y in LCD menu, and then
16
press the OK key.
or
4. Press the
key to select On:xxSEC or All on.
5. Press the
or
key to select LCD on time (change length of LCD ontime from 5-60 seconds and 5 seconds as a step.).
6. Press the OK key to save setting and LCD display S u c c e s s ! for 1
second. You can press any device key to finish set up or press the EXIT key
to last state, or you can use
or
to select other set up.
Remark: Change length of LCD on time from 5-60 seconds and 5 seconds as a
step.
G. Beep
1. Press and hold the SET key for more than 3 seconds, then release it.
2. Press the
or
key to select the O t h e r S e t in LCD menu, and then
press the OK key.
or
key to select the B e e p in LCD menu, and then
3. Press the
press the OK key.
4. Press the
or
key to change to the On or Off mode.
5. Press the OK key to save the setting, and LCD shows Success! then exit to
current setup state, You can press any device key to finish set up or press the
EXIT key to last state, or you can use
or
to select other set up.
H. Clear All
1. Press and hold the SET key for more than 3 seconds, then release it.
or
key to select the O t h e r S e t in LCD menu, and then
2. Press the
press the OK key.
or
key to select the C l e a r A l l in LCD menu, and then
3. Press the
press the OK key and LCD shows Sure Clear.
4. Then press the OK key to clear all settings and go back to original default
settings.
17
18