1
Printing Labels with the Built-In Software
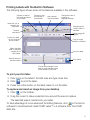
The following figure shows some of the features available in the software.
Capture an area of
the screen and insert
on your label.
Choose to print
a horizontal or
vertical label.
Add a border
around the label.
Change the units of
measure or
language settings.
Insert text you’ve
copied to the
Clipboard.
Start advanced
DYMO Label v.8
software.
Create a
new label.
Rotate images 90
degrees.
Format your label
as you would in
any text editor.
Crop an image
added to the label.
Match the label
width to the label
cassette in the
label maker.
Zoom the label.
View the status of
the label maker.
Print a label.
Choose a fixed length for the
label or make the label resize
automatically to fit the text.
To print your first label
1 Click once on the label in the Edit area and type some text.
2 Click
to print the label.
3 Press the cutter button on the label maker to cut the label.
To capture and insert an image from your desktop
1 Click
on the toolbar.
2 Drag the curser to draw a selection box around the area to capture.
The selected area is inserted into your label.
To take advantage of more advanced formatting features, click
in the built-in
software to download and install DYMO Label™ v.8 software from the DYMO
Web site.
5