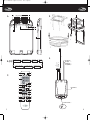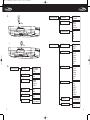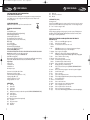
1
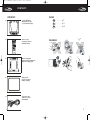
MVD 192 manual GB 3.qxd
28-03-2007
15:26
Pagina 4
CONTENTS
CONTENTS
1x
• 9.2" 16:9 TFT display
• Affichage TFT 9.2" 16:9
• 9,2" 16:9 wide TFT display
VOL-
REW
VOL+
ON OFF
STOP
FF
PLAY
EJECT
DOOR
SETUP
SRC
POWER
POWER MENU
1x
INDEX
GB . . . . . . . . . .p. 7
F . . . . . . . . . . .p. 11
NL . . . . . . . . . .p. 15
MUTE
4
3
1
2
5
6
7
8
9
0
DISPLAY
GO TO
• Remote control
• Commande à distance
• Afstandsbediening
WARNING!
VOL
AUDIO
MENU
ENTER
SUBTITLE
RANDOM
A-B
REPEAT
TITLE
SRC
RETURN
ANGLE
ZOOM
1x
• Metal mounting plate
• Plaque métallique d’installation
• Metalen bevestigings plaat
1x
• Rubber gasket
• Contour caoutchouc
• Rubberen pakking
1x
• Connection cables
• Câbles de connexion
• Aansluitkabels
1
2
MVD 192 manual GB 3.qxd
28-03-2007
15:26
Pagina 6
A.
D.
AV IN 1
3
E.
8
WIDE SCREEN
14
POWER
SETUP
MUTE
1
2
3
4
5
6
7
8
9
0
DISPLAY
GO TO
15
4
REPEAT
TITLE
SRC
RETURN
ANGLE
ZOOM
21
EJECT
A-B
PLAY
SUBTITLE
RANDOM
STOP
ENTER
5
19
20
FF
MENU
REW
10
11
12
13
FM ANTENNA
VOL
AUDIO
22
23
24
25
DOOR
5
6
7
8
9
16
17
18
ON OFF
3
7
VOL+
C.
2
FMT FREQ
VOL-
1
LAC ENABLE
B+ (YELLOW) 1
ACC (RED)
2
GND (BLACK) 3
DOOR(GREEN) 4
TINT
AV IN 2
COLOR
AV OUT
BRIGHTNESS
SRC
CONTRAST
POWER MENU
B. (C20)
6
POLARITY SWITCH 9
-
3
+
4
MVD 192 manual GB 3.qxd
28-03-2007
15:26
Pagina 8
F.
Speaker Setup page
1
USB in
2
Preference page
SD in
G.
General Setup page
- TV Display
- Normal/PS
- Normal/LB
- Wide
- Angle Mark
- On
- Off
- OSD Language
- English
- French
- Spanisch
- Italian
- Captions
- On
- Off
- Screen Saver
- On
- Off
- Logo Type
- Default
- Logo Captured
- Downmix
- Line Out
- RF Remod
- Dual Mono
- Stereo
- L-Mono
- R-Mono
- Mix-Mono
- Dynamic Range
- Full
- 3/4
- 1/2
- 1/4
- Off
- TV Type
- PAL
- AUTO
- NTSC
- Audio
- Englisch
- French
- Spanisch
- German
- Chinese
- Russian
- Thai
- Subtitle
- Englisch
- French
- Spanisch
- German
- Chinese
- Russian
- Thai
- Parental
- 1. Kid safe
- 2. G
- 3. PG
- 4. PG 13
- 5. PGR
- 6. R
- 7. NC 17
- 8. Adult
- Password
- Default
5
-****
(default 3308)
- No
- Yes
6
MVD 192 manual GB 3.qxd
28-03-2007
15:26
Pagina 10
GB USER MANUAL
GB USER MANUAL
CAUTION! IMPORTANT SAFETY INFORMATION
PLEASE READ THIS BEFORE USE.
This product is sold with an external power cord appropriate for accessing an external power
source. Makes sure to use only an appropriate external power source, as indicated on the
electricity ratings label.
LASER BEAM WARNING
Caution! laser radiation when open. Do not stare into laser beam.
TECHNICAL SPECIFICATIONS
DVD
Auto/PAL/NTSC system
Multi OSD language (English/French/Spanish/Italy)
Manual viewing angle adjustment
Vertical adjustable: up/down >150º
Fast forward/reverse (x2, x4, x8, x16, x32)
Zoom play (2x, 3x, 4x, 1/2x, 1/3x, 1/4x and normal)
TFT screen
9.2" 16:9 TFT display
Roof mounting Application
Resolution 800 (W) x 480(H) pixels
Wide view angle (U/D/L/R) 45º/55º/65º/65º
Formats media (DVD option)
DVD-R/DVD+R/DVD-RW/DVD+RW/ VCD/S-VCD/CD/CD-DA/CD-RW/MP3/MPEG4/WMA/DivX
NOTE: Multi-session CD’s can not be played on this player.
USB port and memory card port for SD/MMC/MS-card
White LED dome light (2W)
FM transmitter for listening the radio from your car audio system via FM radio receiver (setting
frequency: 88.1, 88.3, 88.5, 88.7, 88.9, 89.1, 89.3, 89.5, 89.7 MHz and 89.9 MHz).
Input/output
Volume control
1x Video/Audio out
2x Video/Audio in
IR headphone output
Screen size L x W x H: 282 x 246 x 54mm
Mounting size L x W: 163 x 163mm
Power source:Vehicle battery (DC +10V ~ + 16V)
Operating voltage: DC + 14V
Operation temperature: -5 ~ 50ºC
Storage temperature: -20 ~ 70ºC
OPERATION
A1.
Dome light
A2.
Reset button
A3.
Power button
A4.
Menu button
A5.
SRC input source button (to select video input mode: DVD-IN/USB/SD/MMC/MS/AV1/AV2)
A6/7. Volume buttons
A8.
Dome light switch
A9.
Panel open button
A10/11.Skip buttons (previous/next chapter/track)
A12. Stop button
A13. Play or pause button
A14. Eject button
A15. IR window
7
A16.
A17.
A18.
Fixing holes
TFT screen turn off switch
Disc slot
SYSTEM SETUP (ILL. B)
Accessing the menu
Press and hold the MENU button on the remote control for more than 1 second to open the
operation menu. Press the MENU button repeatedly to select one of the settings, then press
the ”<” and ”>” button to change the value.
Using FM transmitter for audio
Select the frequency regarding to the frequency of your radio receiver or FM headphone in
the MENU -> FMT Freq (88.1, 88.3, 88.5, 88.7, 88.9, 89.1, 89.3, 89.5, 89.7 and 89.9). Audio
from the player is received by the FM radio.
THE SETUP OF THE DVD CAN BE ADJUSTED USING THE REMOTE
CONTROL (ILL. C)
1 Setup
Press to access the DVD player’s setup menu.
2 Power
Control the power ON/OFF.
3 Number
The 0/10 button is used to enter a zero to 10.
Buttons
4 Skip
PREV SKIP button press to go to beginning of previous track/chapter.
NEXT SKIP button press to go to next track/chapter.
5 Play/pause Press to begin or pause playback.
6 Audio
DVD: press to change the audio language during DVD playback
VCD/CD: press to change the auddio channel (left, right and stereo) during playback
7 Enter
Press to confirm the items or setting.
8 Directions Press to select menu items.
9 Forward
Fast forward key (2x, 4x, 8x, 16x and 32x)
Reverse
Fast backward key (2x, 4x, 8x, 16x and 32x)
10 Random
Press to play chapters or tracks in random order
11 A-B
Replaying point A to point B when selected.
12 SRC
Press to select the video input mode (DVD-IN/USB/SD/MMC/MS/AV IN
1/AV IN 2).
13 Return
Return to main menu, press again to return the last position of playback.
14 Mute
Shut off all audio output.
15 Eject
Press to eject a disc.
16 Go to
Jump to select chapter/track or time.
17 Display
Press to display the playback information (such as title, chapter, track and time)
18 Stop
Stop the playing function.
19 Vol -/Vol + To control the volume.
20 Menu
Press to view the disc menu.
21 Subtitle
Press to select and turn on subtitles during playback.
22 Title
Press to display titles if present on the disc.
23 Repeat
Press to repeats the track or the entire disc.
24 Zoom
Press to set the zoom for movie viewing.
25 Angle
Press to select a different filming angle (if the DVD is recorded with multiple angles).
8
MVD 192 manual GB 3.qxd
28-03-2007
15:26
Pagina 12
GB USER MANUAL
WIRING AND CONNECTIONS (ILL. E)
1. Battery + lead (yellow) To connect the positive terminal of the car battery.
2. ACC power lead (red) To ACC power lead powered when engine key position is ACC.
3. Ground lead (black)
Connect the lead to a good chassis ground on the car. Make sure the
connection is made to bare metal and is securely fastened using the
sheet metal screw provided.
4. Door wire (green)
Connect this wire to the door sensor of the car. then the dome light
can be switched by opening or closing door.
PLEASE NOTE
Please slide the polarity switch to ”-” at the left position if your vehicle’s door trigger is negative;
please slide the polarity switch to ”+” at the right position if your verhicle’s door trigger is positive.
NOTE: • Please slide it to a side fully.
• Do not slide this switch after place it at a position. Otherwise, it’ll be damage.
5.
6.
7.
8.
FM Antenna
AUX A/V, input 1
AUX A/V, input 2
AUX A/V, output
GB USER MANUAL
DISC CANNOT BE PLAYED
• Ensure the disc is label side up.
• Clean the disc.
• Check if the disc is defective by trying another disc.
• Check the type of disc you put into the player.This player only plays DVD-R/DVD+R/
DVD-RW/DVD+RW/ VCD/S-VCD/CD/CD-DA/CD-RW/MP3
• Both the player and the disc are coded by region. If the regional codes don’t match, the disc
can’t be played.
DISTORTED PICTURE
• Check the disc for fingerprints and clean with soft cloth, wiping from center to edge.
• Sometimes a small amount of picture distortion may appear.This is not a malfunction.
• Interfered by short-distance strong interference (E.g. high voltage wire, transformation station
or aircraft etc.). Move the vehicle away from the interference.
This antenna send the signal to the FM receiver.
An auxiliary A/V output is provided to drive an external monitor.This
signal mirrors what’s being shown on this player.The volume function
does not affect the auxiliary A/V output.
CONNECTING TO USB OR MEMORY CARD (ILL. F)
Insert the USB stick/memory card into the USB/memory terminal of the player.When the unit sets in
DVD mode, pressing SRC button on the remote control for more than 1 second to change the mode
from DVD to USB/memory card,The main unit will read the USB stick/memory card automatically.
NOTE: • The USB terminal only supports USB 1.1.
• Please insert the memory card in the right direction.
• Some kind of USB sticks/memory cards can not be used in this player.
CUSTOMIZING DVD SETTINGS (ILL. G)
Press the SETUP button on the remote control to open the DVD setup menu.With the ”<”,
”>”, ” ”, ” ” and ENTER button you can change the settings.
TROUBLESHOOTING
If it appears that your DVD-Video player is faulty, first consult this checklist. It may be that
something simple has been overlooked. Under no circumstances should you try to repair the
player yourself; as this will invalidate the warranty. Only qualified service personnel can remove
the cover or service this player.
PLAYER WON’T WORK
• Press the Reset button on the front panel of the DVD player.
THE PICTURE ON THE SCREEN IS DARK
• This is the characteristics of TFT display in low temperature, it will restore to normal
brightness after starting the display for few minutes.
• Adjust the brightness settings.
NO SOUND CAN BE HEARD FROM THE IR WIRELESS HEADPHONES
• Turn on the Headphones.
• The battery in the headphone is low.
• Avoid all obstacles which may interfere with the signal path.
PICTURE SKIPS OCCASIONS
• Clean the disc or check if the disc is defective by trying another one.
THE PLAYER DOES NOT RESPOND TO THE REMOTE CONTROL
• Aim the remote control directly at the sensor on the front of the player.
• Avoid all obstacles which may interfere with the signal path.
• Inspect or replace the batteries.
• Clean the IR sensor from the remote control and DVD player.
BUTTONS DO NOT WORK
• Unplug the player from power outlet and reconnect after a few seconds.
DVD PLAYER DOESN’T TURN ON
• Check the on/off button.
• Check if power plug is properly connected.
• Check if there is power at the AC outlet by plugging in another appliance.
• Condensation in the player, wait one hour or until condensation evaporates.
THE DVD PLAYER SUDDENLY STOPPED WORKING OR THE SCREEN WENT BLACK
• Try turning the player off and on. If the player still doesn’t respond, press the reset button.
PLAYER OPERATES ERRATICALLY
• Check and tighten all connections.
9
10
MVD 192 manual GB 3.qxd
28-03-2007
15:26
Pagina 14
FR MANUEL D’UTILISATION
FR MANUEL D’UTILISATION
ATTENTION ! INFORMATIONS IMPORTANTES RELATIVES À LA SÉCURITÉ
À LIRE AVANT UTILISATION.
Ce produit est vendu avec un cordon d’alimentation externe convenant pour accéder à une
source d’énergie extérieure.Veillez à utiliser uniquement une source d’énergie extérieure,
comme indiqué sur l’étiquette de caractéristiques électriques.
AVERTISSEMENT RELATIF AU RAYON LASER
Attention! Radiation laser lorsqu’il est ouvert. Ne fixez pas le rayon laser.
SPÉCIFICATIONS TECHNIQUES:
DVD
Système Auto/PAL/NTSC
Affichage à l’écran multilingue (anglais/français/espagnol/italien)
Réglage manuel de l’angle de vue
Réglage vertical : haut/bas >150º
Avance / rembobinage rapides (x2, x4, x8, x16, x32)
Lecture avec zoom (2x, 3x, 4x, 1/2x, 1/3x, 1/4x et normal)
Écran TFT
Affichage TFT 9.2" 16:9
Usage plafonnier
Résolution 800 (H) x 480(V)
Angle de vision (U/D/L/R) 45º/55º/65º/65º
Formats média (option DVD)
DVD-R/DVD+R/DVD-RW/DVD+RW/ VCD/S-VCD/CD/CD-DA/CD-RW/MP3/MPEG4/WMA/DivX
ATTENTION: les CD multi sessions ne peuvent être lus par ce lecteur.
Port USB et port Carte de mémoire de type SD/MMC/MS.
Lumière du plafonnier (2W) LED blanche
Transmetteur FM pour écouter la radio depuis votre installation caraudio via un récepteur radio
FM (réglage de fréquence : 88.1, 88.3, 88.5, 88.7, 88.9, 89.1, 89.3, 89.5, 89.7 MHz et 89.9 MHz).
Entrée / sortie
Réglage du volume
1x Sortie vidéo / audio
2x Entrées vidéo / audio
Sortie stéréo infra rouge
Dimensions écran L x W x H: 282 x 246 x 54mm
Dimensions fixation L x W: 163 x 163mm
Énergie de base: (DC +10V ~ + 16V)
Tension opérationnelle : DC + 14V
Température de fonctionnement: -5 ~ 50ºC
Température de stockage: -20 ~ 70ºC
FONCTIONNEMENT
A1.
Éclairage plafonnier
A2.
Bouton reset
A3.
Bouton mise en marche
A4.
Bouton menu
A5.
SRC bouton de sélection de la source d’entrée (pour sélectionner le mode d’entrée vidéo:
IN/USB/SD/MMC/MS/AV1/AV2)
A6/7. Bouton volume
A8.
Interrupteur de l’éclairage plafonnier
A9.
Bouton d’ouverture de la façade
A10/11.Boutons de saut de séquence (séquence précédente/suivante/recherche)
A12. Bouton stop
A13. Bouton play et pause
A14. Bouton eject
A15. Fenêtre infrarouge
11
A16.
A17.
A18.
Trous de fixation
Interrupteur de l’écran TFT
Fente d’insertion du disque
INSTALLATION DU SYSTÈME (ILLUSTRATION B)
Accéder au menu
Afin d’ouvrir le menu, pressez le bouton MENU de la télécommande plus d’une seconde. Pressez
le bouton MENU de façon répétitive pour sélectionner les réglages, puis pressez les boutons ”<”
et ”>” afin de modifier les valeurs.
Uilisation du transmetteur FM pour l’écoute
Sélectionnez la fréquence en fonction de la fréquence de votre récepteur radio ou votre casque
FM dans le MENU -> FMT Freq (88.1, 88.3, 88.5, 88.7, 88.9, 89.1, 89.3, 89.5, 89.7 et 89.9). Le son
du lecteur est alors reçu par votre radio FM.
LES PARAMÈTRES DU DVD PEUVENT ÊTRE DÉFINIS À L’AIDE DE LA
COMMANDE À DISTANCE (ILL. C).
1
Setup
Appuyer pour accéder au menu de configuration du lecteur DVD.
2
Power
Contrôle de la mise sous/hors tension.
3
Number
Le bouton 0/10 est utilisé pour taper un chiffre de 0 à 10.
Buttons
4
Skip
Appuyer sur le bouton PREV SKIP pour revenir au début de la piste ou du
chapitre précédent.
Appuyer sur le bouton NEXT SKIP pour passer à la piste ou au chapitre suivant.
5
Play/pause Pour commencer la lecture et n’affiche qu’une image lorsque vous appuyez
sur ce bouton.
6
Audio
DVD: pressez ce bouton pour changer la langue durant la lecture du DVD
VCD/CD: pressez ce bouton pour changer le canal audio (gauche, droite,
stéréo) durant la lecture
7
Enter
Appuyer pour confirmer les rubriques ou les paramètres.
8
Directions Appuyer pour sélectionner les rubriques du menu.
9
Forward
Touche d’avance rapide (2x, 4x, 8x, 16x et 32x)
Reverse
Touche de rembobinage rapide (2x, 4x, 8x, 16x et 32x)
10
Random
pressez ce bouton pour lire les séquences ou titres de façon aléatoire
11
A-B
Relecture du point A au point B sélectionnés.
12
SRC
Pressez ce bouton pour sélectionner le mode d’entrée vidéo
(DVD-IN/USB/SD/MMC/MS/AV IN 1/AV IN 2).
13
Return
Retour au menu principal, pressez à nouveau ce bouton pour retourner à
la séquence précédente
14
Mute
Pour couper toute sortie audio.
15
Eject
Pour éjecter un disque.
16
Go to
Pour passer au chapitre ou au moment sélectionné.
17
Display
Pressez ce bouton afin d’afficher les informations telles que titres, séquences, temps)
18
Stop
Pour arrêter la fonction de lecture.
19
Vol -/Vol + Pour contrôler le volume.
20
Menu
Appuyer pour sélectionner le menu disque.
21
Subtitle
Lors de la lecture d'un DVD, appuyer pour sélectionner la langue des
sous-titres ou pour désactiver les sous-titres.
22
Title
Appuyer pour afficher les titres, s'ils sont présents sur le disque.
23
Repeat
Relecture d’1 piste ou de toutes les pistes du disque.
24
Zoom
Pressez ce bouton afin de régler le zoom
25
Angle
pressez ce bouton pour sélectionner les différents angles de vue (si le
DVD est enregistré sur plusieurs angles de vue)
12
MVD 192 manual GB 3.qxd
28-03-2007
15:26
Pagina 16
FR MANUEL D’UTILISATION
CÂBLAGES ET CONNECTIONS (ILLUSTRATION E)
1. Fil de batterie + (jaune) Connection au terminal positif de la batterie de voiture.
2. Fil d’alimentation ACC (rouge) à connecter au plus après contact.
3. Fil de terre (noir)
connectez le fil à une masse située sur le châssis du véhicule
4. Fil de porte (vert)
connectez ce fil au détecteur de porte de la voiture. Ensuite l’éclairage
plafonnier peut être allumé/éteint en ouvrant ou fermant la porte
NOTEZ
Faites glisser l’interrupteur de polarité sur la position ”-” situé à gauche le detecteur d’ouverture
des portes du véhicule est négatif, faites glisser l’interrupteur de polarité sur la position ”+” situé
à droite le detecteur d’ouverture des portes du véhicule est positif.
NOTEZ: • Faites glisser l’interrupteur à fond.
• Ne touchez plus à cet interrupteur après l’installation sans quoi il serait endommagé.
5.
6.
7.
8.
Antenne FM
AUX A/V, entrée 1
AUX A/V, entrée 2
AUX A/V, sortie
Cette antenne envoie le signal au récepteur FM
une sortie auxiliaire A/V est disponible pour la connection à un
moniteur externe. Ce signal reflète ce qui est vu sur ce lecteur. La
fonction volume n’affecte pas la sortie auxiliaire A/V.
CONNECTION DU PORT USD OU DE LA CARTE DE MÉMOIRE (ILLUSTRATION F)
Insérez la clé USB ou la carte mémoire dans la prise ou fente prévue à cet effet sur le lecteur. Lorsque
l’unité est réglée en mode DVD, pressez le bouton SRC sur la télécommande pendant plus d’une
seconde afin de changer le mode DVD en mode USB/carte de mémoire. L’unité principale lira donc
automatiquement la clé USB ou carte mémoire.
NOTEZ: • La prise USB ne peut lire que les clés USB 1.1.
• Assurez-vous d’insérer la carte mémoire dans le bon sens.
• Certaines clés USB/cartes mémoire ne peuvent pas être utilisées avec ce lecteur.
PERSONNALISATION DES RÉGLAGES DVD (ILLUSTRATION G)
Pressez le bouton SETUP sur la télécommande pour ouvrir le menu réglage DVD. Les différents
réglages peuvent être modifiés à l’aide des boutons ”<”, ”>”, ” ”, ” ” puis pressez le bouton ENTER.
RÉSOLUTION DES PROBLÈMES
S’il s’avère que votre lecteur DVD-Vidéo est en panne, consultez d’abord cette check-list. Il se
peut que quelque chose de simple a été omis. N’essayez en aucun cas de réparer vous-même le
lecteur; en effet, cela annulerait la garantie. Seul le personnel de service qualifié peut retirer le
couvercle ou réaliser l’entretien de ce lecteur.
FR MANUEL D’UTILISATION
LECTURE DU DISQUE IMPOSSIBLE
• Vérifiez que l’étiquette du disque est bien vers le haut.
• Nettoyez le disque.
• Vérifiez si le disque est défectueux en essayant un autre disque.
• Contrôler le type de disque inséré dans le lecteur. Les formats suivants sont supportés
DVD-R/DVD+R/DVD-RW/DVD+RW/ VCD/S-VCD/CD/CD-DA/CD-RW/MP3
• Le lecteur et les disques sont codés par région. Si les codes régionaux ne sont pas les
mêmes, la lecture du disque est impossible.
IMAGE DÉFORMÉE
• Vérifiez qu’il n’y a pas d’empreintes de doigts sur le disque. Essuyez au besoin le disque à l’aide
d’un chiffon propre et doux en partant du centre vers l’extérieur.
• Quelquefois quelques petites déformations d’images peuvent apparaître. Ce n’est pas une défaillance.
• Interférences par de fortes ondes (fils haute tension, transformateur, avions,…). Eloignez-vous
de ces interférences.
L’IMAGE EST FONCÉE
• C’est une des caractéristiques des écrans TFT par basses températures. Le contraste se fera
au bout de quelques minutes.
• Réglez le contraste
PAS DE SON DANS LE CASQUE INFRAROUGE
• Allumez le casque
• La batterie du casque est faible
• Évitez les obstacles entre le casque et l’unité
L’IMAGE SAUTE DES SÉQUENCES
• Nettoyez le disque ou vérifiez que le disque ne soit pas défectueux en en essayant un autre.
LE LECTEUR NE RÉAGIT PAS À LA COMMANDE À DISTANCE
• Dirigez la commande à distance directement vers le capteur à l’avant du lecteur.
• Évitez tous les obstacles qui peuvent interférer avec le chemin du signal.
• Inspectez ou remplacez les batteries.
• Nettoyez le détecteur infrarouge de la télécommande et du lecteur DVD.
LES BOUTONS NE FONCTIONNENT PAS
• Débranchez le lecteur de la prise de courant et rebranchez-le après quelques secondes.
LE LECTEUR DE DVD NE FONCTIONNE PAS
• Pressez le bouton reset.
LE LECTEUR DE DVD NE S’ALLUME PAS
• Vérifiez le bouton on/off.
• Vérifiez si la fiche d’alimentation est correctement branchée.
• Vérifiez s’il y a du courant dans la prise en branchant un autre appareil.
• Il y a de la condensation dans le lecteur, attendez une heure ou jusqu’à ce que la condensation soit évaporée.
LE LECTEUR DVD S’ARRÊTE SOUDAINEMENT OU L’ÉCRAN DEVIENT NOIR
• Essayez d’éteindre et de rallumer le lecteur. Si le lecteur ne fonctionne toujours pas, pressez le bouton reset.
LE LECTEUR FONCTIONNE DE FAÇON ALÉATOIRE
• Vérifiez et resserrez les branchements.
13
14
MVD 192 manual GB 3.qxd
28-03-2007
15:26
Pagina 18
NL GEBRUIKSAANWIJZING
NL GEBRUIKSAANWIJZING
LET OP! BELANGRIJKE VEILIGHEIDSINFORMATIE, LEES DIT EERST GOED
DOOR VOORDAT U DE DVD-SPELER GAAT GEBRUIKEN.
Dit produkt wordt geleverd met een aansluitsnoer, welke aan te sluiten is op een externe
stroomtoevoer. Gebruik hiervoor alleen een geschikte stroomtoevoer, als aangegeven op het
label op deze DVD-speler.
LASERSTRAAL WAARSCHUWING
Let op! Laserstraling komt vrij bij openen. Kijk nooit direct in deze laserstraal.
TECHNISCHE SPECIFICATIES
DVD
Auto/PAL/NTSC systeem
Multi OSD talen (Engels/Frans/Spaans/Italiaans)
Handmatige kijkhoek instellingen
Verticaal regelbaar: boven/beneden >150º
Snel vooruit/achteruit (x2, x4, x8, x20)
Zoom play (8x)
TFT scherm
9,2” 16:9 wide TFT display
Dakmontage toepassing
Resolutie 800 (W) x 480(H) pixels
Kijkhoek (B/O/L/R) 45º/55º/65º/65º
Leesbare media (DVD optie)
DVD-R/DVD+R/DVD-RW/DVD+RW/ VCD/S-VCD/CD/CD-DA/CD-RW/MP3/MPEG4/WMA/DivX
OPMERKING: Multi-sessie CD’s kunnen niet op deze speler worden afgespeeld.
USB poort en memory card poort voor SD/MMC/MS-card
Wit LED licht (2W)
FM zender voor het luisteren van de radio van je autoradio via de FM radio ontvanger
(instelbare frequenties: 88.1, 88.3, 88.5, 88.7, 88.9, 89.1, 89.3, 89.5, 89.7 MHz en 89.9 MHz).
Input/output
Regelbaar volume
1x Video/Audio uit
2x Video/Audio in
IR hoofdtelefoon uitgang
Scherm afmetingen L x B x H: 282 x 246 x 54mm
Bevestigings afmetingen L x B: 163 x 163mm
Voltage bereik (DC +10V ~ + 16V)
Gebruiks voltage: DC + 14V
Gebruikstemperatuur: -5 ~ 50ºC
Opslagtemperatuur: -20 ~ 70ºC
OPERATION
A1.
Dakverlichting
A2.
Reset knop
A3.
Power knop
A4.
Menu knop
A5.
SRC input source knop (om de video ingang modus te selecteren:
DVD-IN/USB/SD/MMC/MS/AV1/AV2)
A6/7. Volume knoppen
A8.
Schakelaar dakverlichting
A9.
Paneel open knop
A10/11.Skip knoppen (previous/next chapter/track)
A12. Stop knop
A13. Play of pause knop
A14. Eject knop
15
A15.
A16.
A17.
A18.
IR sensor
Bevestigings gaten
TFT scherm uit schakelaar
Disc gleuf
SYSTEEM SETUP (ILL. B)
Openen van het menu
Houdt de MENU knop op de afstandsbediening langer dan 1 seconden ingedrukt om het menu
te openen. Druk herhaaldelijk op de MENU knop om een van de functies te selecteren, druk dan
op de ”<” en ”>” knoppen om de waardes te veranderen.
Gebruik van de FM zender voor audio
Selecteer de frequentie overeenkomend met de frequentie van je autoradio of FM koptelefoon in
het MENU -> FMT Freq (88.1, 88.3, 88.5, 88.7, 88.9, 89.1, 89.3, 89.5, 89.7 en 89.9). Het geluid van
de DVD speler wordt ontvangen van de FM radio.
DE SET-UP VAN DE DVD SPELER KAN GEWIJZIGD WORDEN MET DE
AFSTANDSBEDIENING (ILL. C)
1 Setup
Het setup menu van de DVD spelers verschijnt.
2 Power
Aan/uit schakelen van de DVD speler.
3 Number
Kies het gewenste kanaal met de numerieke toetsen.
Buttons
4 Skip
PREV knop om naar het begin van de track/hoofdstuk te gaan.
NEXT knop om naar de volgende track/hoofdstuk te gaan.
5 Play/pause Speelt de disc af of pauseert het afspelen.
6 Audio
DVD: om de audio taal te wijzigen tijdens het afspelen van de DVD.
VCD/CD: om het audio kanaal (links, rechts en stereo) te wijzigen tijdens het afspelen.
7 Enter
Bevestigen van de items of instelingen.
8 Directions Selecteerd menu items.
9 Forward
Speelt de disc tijdens het spelen snel vooruit af (2x, 4x, 8x, 16x and 32x).
Reverse
Speelt de disc tijdens het spelen snel achteruit af (2x, 4x, 8x, 16x and 32x).
10 Random
Speelt tracks of hoofdstukken in willekeurige volgorde af.
11 A-B
Steeds opnieuw afspelen van punt A tot punt B, indien geselecteerd.
12 SRC
Selecteerd de video input modus (DVD-IN/USB/SD/MMC/MS/AV IN1/AV IN 2).
13 Return
Terugkeren naar het hoofdmenu, druk nogmaals om terug te keren naar de
laatste afspeelpositie.
14 Mute
Alle uitgaande audio uitschakelen.
15 Eject
Om de disc uit te werpen.
16 Go to
Ga naar het geselecteerde hoofdstuk/ afspeeltijd.
17 Display
Om de afspeelinformatie weer te geven (zoals Titel, hoofdstuk, track en tijd).
18 Stop
Stopt het afspelen.
19 Vol -/Vol + Volume controle
20 Menu
Het DVD menu verschijnt
21 Subtitle
Verandert de taal van de ondertiteling of schakelt deze uit.
22 Title
Geeft titels weer als deze aanwezig zijn op de disc.
23 Repeat
Herhaalt een hoofdstuk, track, titel of de gehele inhoud.
24 Zoom
Om de film zoom functie in te stellen.
25 Angle
Om een verschillende film hoek te selecteren (als de DVD hierover beschikt).
16
MVD 192 manual GB 3.qxd
28-03-2007
15:26
Pagina 20
NL GEBRUIKSAANWIJZING
KABELS EN VERBINDINGEN (ILL. E)
1. Batt + lead (geel)
Verbindt deze met de positieve klem van de autoaccu.
2. ACC voedingskabel (rood) Verbindt deze met de voedingskabel geschakelt via contact, werkt
als de contactsleutel op ACC stand staat.
3. Massakabel (zwart)
Verbindt de kabel goed met het chassis van de auto. Zorg ervoor dat
de kabel veilig met ongelakt metaal is verbonden bijvoorkeur met een
aantal metalen schroeven.
4. Deurcontact (groen) Verbindt deze kabel met de autodeur sensor, dan zal de dakverlichting
aan- een uitschakelen bij het openen van de deur.
LET OP!
Zet de polariteitsschakelaar op ”-” in de linkse positie als de autodeur sensor negatief is; zet de
polariteitsschakelaar op ”+” in de rechtse positie als de autodeur sensor positief is.
OPMERKING: • Zet de schakelaar volledig naar één kant.
• Verzet deze schakelaar niet nadat je een positie hebt gekozen.Anders zal deze beschadigen.
5.
6.
7.
8.
FM Antenne
AUX A/V, ingang 1
AUX A/V, ingang 2
AUX A/V, uitgang
NL GEBRUIKSAANWIJZING
DISC KAN NIET AFGESPEELD WORDEN.
• Zorg ervoor dat het label op de disc naar boven geplaatst is.
• Maak de disc schoon.
• Kijk of de disc beschadigd is door een andere disc te plaatsen.
• Controleer het type disc die je in de speler hebt gestopt. Deze speler speelt alleen DVD-R/
DVD+R/DVD-RW/DVD+RW/VCD/S-VCD/CD/CD-DA/CD-RW/MP3/MPEG4/WMA/DIVX
• De speler en de disc zijn gecodeerd op regio. Als de regiocodes niet overeenkomen kan je
de disc niet afspelen.
VERVORMD BEELD
• Controleer de disc op vingerafdrukken en maak deze schoon met een speciaal doekje, reinig
van het centrum af naar de buitenkant.
• Soms ontstaat er een korte beeld vervorming. De DVD speler is niet defect.
• In de weg staan van sterke hinder (Bijv. electriciteits mast,Transformatie huisje, vliegtuig etc.).
Verplaats het voertuig weg van de hinder.
Deze antenne zend het signaal naar de FM ontvanger.
De AUX A/V uitgang is bedoeld om een externe monitor aan te
sturen. Dit signaal geeft weer wat er afgespeeld wordt op de speler.
Het volume is niet regelbaar vanuit de AUX A/V uitgang.
VERBINDEN MET USB OF MEMORY CARD (ILL. F)
Stop de USB stick/memory card in het USB/memory poort van de DVD speler. Staat de speler in DVD
modus, druk dan langer als 1 seconden de SRC knop op de afstandsbediening in om de modus van DVD
naar USB/Memory card te zetten. De DVD speler leest de USB stick/memory card automatisch af.
OPMERKING: • De USB poort ondersteund alleen USB 1.1.
• Stop de memory card er op de juiste manier in.
• Sommige USB sticks/memory cards werken niet in deze DVD speler.
AANPASSEN VAN DVD INSTELLINGEN (ILL. G)
Druk op de SETUP knop op de afstandsbediening om het DVD stup menu te openen. Met de
”<”, ”>”, ” ”, ” ” en ENTER knop kun je de instellingen veranderen.
PROBLEMEN OPLOSSEN
Als uw DVD-Video speler gebreken vertoont, bekijk dan eerst onderstaande checklijst. Het kan
zijn dat er een simpele oorzaak over het hoofd is gezien. Onder geen enkele voorwaarde moet u
proberen deze speler zelf te repareren, dit maakt de garantie ongeldig. Alleen gekwalificeerd
Caliber personeel is toegestaan de speler te openen en te repareren, met behoud van garantie.
HET BEELD OP HET SCHERM IS DONKER
• Dit is een typisch kenmerk van TFT schermen in een lage temperatuur, het scherm zal
terugkeren naar zijn normale helderheid, een paar minuten nadat je de DVD speler hebt gestart.
• Wijzig de helderheidsinstellingen.
ER KOMT GEEN GELUID UIT DE DRAADLOZE HOOFDTELEFOON
• Zet de hoofdtelefoon uit.
• De batterij in de hoofdtelefoon is bijna leeg.
• Verwijder alle obstakels die het signaal kunnen hinderen.
BEELD SLAAT OVER
• Maak de disc schoon of check of de disc defect is door een andere disc te proberen.
DE SPELER REAGEERT NIET OP DE AFSTANDSBEDIENING
• Richt de afstandsbediening direct op de sensor aan de voorzijde van de speler.
• Vermijd alle obstakels die het signaal van de afstandsbediening kunnen storen.
• Controleer de batterij en laad deze indien nodig op.
• Maak de infrarood sensor van de afstandsbediening en DVD speler schoon.
KNOPPEN WERKEN NIET
• Reset door het loskoppelen van de speler, en sluit hem vervolgens weer aan.
SPELER WERKT NIET
• Druk de Reset knop op het frontpaneel van de DVD-speler in.
DVD SPELER GAAT NIET AAN
• Controleer of het apparaat aanstaat.
• Selecteer de juiste AV input op het apparaat.
• Controleer de video aansluiting.
• Condentie in de DVD speler, wacht 1 uur of tot de condentie is opgelost.
DE DVD SPELER STOPT PLOTSELING OF HET SCHERM WORDT ZWART
• Probeer de speler aan en uit te zetten. Als de speler nog steeds niet reagreed, druk dan op de
reset knop.
DVD SPELER WERKT ONREGELMATIG
• Controleer en maak alle verbindingen vast.
17
18