1
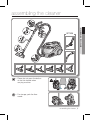
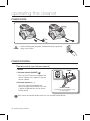
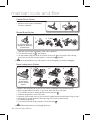
Vacuum Cleaner
user manual
✻ Before operating this unit, please read the instructions carefully.
✻ For indoor use only.
imagine the possibilities
Thank you for purchasing a Samsung product.
To receive a more complete service,
please register your product at
www.samsung.com/register
English
safety information
SAFETY INFORMATION
•
B
efore operating the appliance, please read this manual thoroughly and retain
it for your reference.
•
B
ecause these following operating instructions cover various models,
the characteristics of your vacuum cleaner may differ slightly from those
described in this manual.
WARNING
WARNING
CAUTION/WARNING SYMBOLS USED
WARNING
CAUTION
Indicates that a danger of death or serious injury exists.
Indicates that a risk of personal injury or material damage exists.
OTHER SYMBOLS USED
Represents something you must NOT do.
Represents something you must follow.
Indicates that you must disconnect the power plug from the socket.
2_ safety information
safety information
IMPORTANT SAFEGUARDS
1. Read all instructions carefully. Before switching on, make sure that the voltage of your
electricity supply is the same as that indicated on the rating plate on the bottom of the
cleaner.
2. WARNING : Do not use the vacuum cleaner when rug or floor is wet.
Do not use to suck up water.
3. Close supervision is necessary when any appliance is used by or near children. Do
not allow the vacuum cleaner to be used as a toy. Do not allow the vacuum cleaner
to run unattended at any time. Use the vacuum cleaner only for its intended use as
described in these instructions.
4. Do not use the vacuum cleaner without a dust bin. Empty the dust bin before it is full
in order to maintain the best efficiency.
5. Do not use the vacuum cleaner to pick up matches, live ashes or cigarette butts.
Keep the vacuum cleaner away from stoves and other heat sources. Heat can deform
and discolour the plastic parts of the unit.
6. Avoid picking up hard, sharp objects with the vacuum cleaner as they may damage
the cleaner parts. Do not stand on the hose assembly. Do not put weight on the hose.
Do not block the suction or the exhaust port.
7. Switch the vacuum cleaner off on the body of the machine before unplugging from
the electrical outlet. Disconnect the plug from the electrical outlet before emptying the
dust bin. To avoid damage, please remove the plug by grasping the plug itself, not by
pulling on the cord.
8. This appliance is not intended for use by persons (including children) with reduced
physical, sensory or mental capabilities, or lack of experience and knowledge, unless
they have been given supervision or instruction concerning use of the appliance by a
person responsible for their safety.
9. Children should be supervised to ensure that they do not play with the appliance.
10. T
he plug must be removed from the socket outlet before cleaning or maintaining the
appliance.
11. The use of an extension cord is not recommended.
12. If your vacuum cleaner is not operating correctly, switch off the power supply and
consult an authorized service agent.
13. If the supply cord is damaged, it must be replaced by the manufacturer or its service
agent or a similarly qualified person in order to avoid a hazard.
14. D
on’t carry the vacuum cleaner by holding the hose.
Use the handle on the vacuum cleaner set.
15. Unplug the cleaner when not in use. Turn off the power switch before unplugging.
safety information _3
contents
assembling the cleaner
05
Assembling the Cleaner
operating the cleaner
06
06
Power cord
Power control
maintain tools and filter
08
09
11
12
14
14
Using accessory
Maintain floor tools
Emptying the dust bin
Cleaning the dust pack
Cleaning the motor protection filter
Cleaning the outlet filter
15
Change the battery
05
06
08
troubleshooting
16
4_ contents
assembling the cleaner
• P
lease do not press the button
of dust bin handle when
carrying machine.
• F
or storage, park the floor
nozzle.
assembling the cleaner _5
01 assembling the cleaner
OPTION
operating the cleaner
POWER CORD
CAUTION
• When removing the plug from the electrical outlet, grasp the
plug, not the cord.
power control
Remote-control type (Infrared control)
- HOSE
sender
1. Vacuum cleaner ON/OFF(
)
Press the ON/OFF button to operate the
vacuum cleaner. Press again to stop the
vacuum cleaner.
2. Vacuum cleaner (+, -)
Press the (+) button to operate the
vacuum to high suction power. Press the
(-) button to operate the vacuum to low
suction power.
Handle Control
The cleaner is controlled by using
infrared signals.
Don’t cover the handle sender when you use a handle control button.
6_ operating the cleaner
- BODY
Press the power control button repeatedly to select
the correct mode.
(ON(MAX) ➞ OFF)
The ON/OFF button operates the vacuum cleanner or stops it.
The IR light indicates the part that receives the infra-red signal from the handle
control.
The filter light is illuminated when the dust pack requires checking or emptying.
An audio signal will also sound.
Body-control type
- HOSE
To reduce suction for cleaning draperies, small rugs,
and other light fabrics, pull the tap air until the hole is
open.
- BODY
Press the power control button repeatedly to select the
correct mode.
(ON ➞ OFF ➞ ON )
ON/OFF
To control power level, just slide the power control
button right and left.
MIN = For delicate surface e.g. net curtains.
MAX = For hard floors and heavily soiled carpets.
The indicator lamp will turn red when the dust
pack requires checking of emptying.
Indicator lamp
operating the cleaner _7
02 operating the cleaner
If the remote handle control is not working,
the cleaner can be operated using the
control button on the body of the machine.
maintain tools and filter
using accessory
Accessory
• Push the accessory on to the end of
the hose handle.
• To use the dusting tool, push the
accessory on to the end of the hose
handle.
• To use the upholstery tool, push the
accessory on to the end of the hose
handle.
Pipe
• Adjust the length of the telescopic pipe by sliding
the length control button located in the center of the
telescopic pipe back and forth.
• To check for blockages, separate the telescopic pipe
and adjust to shorten. This allows for easier removal
of waste clogging the tube.
8_ maintain tools and filter
maintain tools and filter
MAINTAIN FLOOR TOOLS
Elbow Extending Tube (Option)
1
2
3
4
5
3 Way Brush (Option)
Carpet Cleaning
Floor Cleaning
• Adjust the inlet lever according to the floor surface.
• Remove waste matter completely if the inlet is blocked.
2-Step Brush (Option)
Carpet Cleaning
Floor Cleaning
• Adjust the inlet lever according to the floor surface.
• Remove waste matter completely if the inlet is blocked.
Parquet Master Brush (Option)
• Vacuum dust in wide area at once.
• R
emove waste matter completely if
the inlet is blocked.
maintain tools and filter _9
03 maintain tools and filter
1. C
onnect the elbow extending tube to connecting part for hose knob and telescopic pipe.
2. Fit the telescopic pipe to the lower part of the elbow extending tube.
3. Press the PUSH button.
4. With the PUSH button pressed, the elbow extending tube is folded.
5. Using the elbow extending tube allows hard to reach areas (e.g. under furniture)to be
cleaned without having to kneel down.
maintain tools and filter
Parquet Brush (Option)
• Vacuum dust in wide area at once.
• R
emove waste matter completely if
the inlet is blocked.
Blanket Brush(Option)
1
2 Turbine
For picking up pet hair
and fibre on upholstery
and bed linen.
3
Brush
1. Remove waste matter completely when inlet is blocked.
2. Turn the lock button to ( ), and remove.
3. To reassemble, align the cover to the front of the main body and close. After closing
the cover, ensure that the lock button is turned to the( )position.
CAUTION
Use for bedclothes only. Be cautious not to damage brush during unclogging.
Super turbine brush (Option)
For improved
pickup of pet
hair and fibre on
carpets.
1
2
3
4
5
6
Frequent vacuuming of hair or pet fur may cause a falling-off of the rotation due to
matters tangled around the drum. In this case, clean the drum with care.
1. Turn the lock button to unlock position use the like coin( ).
2. Remove the guide air use the like coin.
3. Remove waste matter such as dust and hair tangled around the brushbar using scissors.
4. Remove dust inside the brush housing using a dry duster or crevice tool.
5. Assemble the guide air.
6. Turn the lock button to lock position use the like coin( ).
CAUTION
Please be careful not to damage the brush.
10_ maintain tools and filter
Power Pet Plus Brush (Option)
2
3
4
5
6
Frequent vacuuming of hair or pet fur may cause a falling-off of the rotation due to
matters tangled around the drum. In this case, clean the drum with care.
1. Push the Open button of the transparent screen cover to separate the cover.
2. Remove the brushbar from the transparent screen.
3. Remove waste matter such as dust and hair tangled around the brushbar using scissors.
4. Remove dust inside the brush housing using a dry duster or crevice tool.
5. Insert brushbar into rotating belt and assemble.
6. Click the transparent screen cover back into place to reassemble.
emptying the dust bin
1
2
3
Once dust reaches the dust
Take the dust bin out by
full mark, empty the dust bin. pressing the button.
Separate the dust bin cover.
4
5
6
Throw the dust away in the
bin.
After emptying the dust bin,
remove the obstacles like
hair, fur on the cap of the
dust bin.
Before use, push the dust
bin into the main body
and press the cover dust
of the vacuum cleaner
until you hear the “click”
sound.
maintain tools and filter _11
03 maintain tools and filter
For improved
pickup of pet
hair and fibre on
carpets.
1
maintain tools and filter
- Empty into a plastic bag.
(recommended for asthma/allergy sufferers)
You may rinse the dust bin
with cold water.
When emptying any vacuum cleaner it is difficult to avoid
exposure to dust. To minimize this risk, Please ensure that you
encase the dust pot in a large bag to empty it and close the
bag as tightly as possible round the pot. Remove the pot and
close the bag as tightly and quickly as possible and dispose of
this immediately. it is advisable to wear disposable gloves and
a face mask while emptying the cleaner. If at all possible, ask a
non allergy sufferer to empty the dust pot when required.
Option
CLEANING THE DUST PACK
WHEN TO CLEAN THE DUST PACK
• The lamp will turn red when
suction is reduced. If the
light comes on, please
clean the dust pack.
• Turn the vacuum power to ‘MAX’.
Body Control
Handle Control
• If the filter check indicator turns red with the inlet
floating 10cm above flat floor, clean the dust pack.
When suction is noticeably reduced continuously, please cleaning the dust pack.
12_ maintain tools and filter
CLEANING THE DUST PACK
2
3
Remove the dust bin and
dust pack as shown.
Remove the fixed frame
of the dust pack cover.
Remove the sponge and
filter from the dust pack.
4
5
6
Wash the sponge and the
filter of the dust pack with
water.
Let the sponge and filter dry
in the shade for more than
12 hours.
Put the sponge and filter into
the dust pack.
7
8
Before reassembly, align the
dust pack cover and dust
pack correctly.
Put the assembled dust pack into
the main body.
Make sure the filter is completely dry before putting it back into the vacuum
cleaner. Allow 12 hours for it to dry.
maintain tools and filter _13
03 maintain tools and filter
1
maintain tools and filter
CLEANING THE MOTOR PROTECTION FILTER
• Take out both the dust bin and the dust pack.
• R
emove the motor protection filter from the main
body. Shake and tap the dust from it and put back in
machine.
CLEANING THE OUTLET FILTER
1
2
3
Remove the dust bin and
HEPA Filter as shown.
Clean the HEPA Filter.
Let the HEPA Filter dry in the
shade for more than12 hours.
4
Put assemble HEPA Filter into the main body.
Make sure the filter is completely dry before putting it back into the vacuum
cleaner. Allow 12 hours for it to dry.
14_ maintain tools and filter
maintain tools and filter
chANGE ThE bATTERY (OPTION)
CAUTION
1. Never disassemble or recharge the batteries.
2. Never heat up the batteries or throw them into fire.
3. Do not reverse (+), (-) poles.
4. Dispose of the batteries property.
BATTERY TYPE : AAA Size
maintain tools and filter _15
03 maintain tools and filter
1. W
hen the vacuum cleaner does not work, replace
the batteries. If the problem persists, please
contact our authorized dealer.
2. Use 2 batteries of size AAA.
troubleshooting
PROBLEM
SOLUTION
Motor does not start
• Check cable, pulg and socket.
• Leave to cool.
Suction force is gradually
decreasing
• Check for blockage and remove.
Cord does not rewind fully
• Pull the cord out 2-3m and push down the cord rewind button.
Vacuum cleaner does
not pick up dirt
• Check hose and replace if required.
Low or decreasing suction
• Please check filter and, if required, clean as illustrated in the
instructions. if filters are out of condition change them to new ones.
Body overheating
• Please check filters, If required clean as illustrated in the instruction.
Static electicity discharge
• Please decrease power suction.
This Vacuum cleaner is approved the following.
EMC Directive : 2004/108/EEC
Low Voltage Directive : 2006/95/EC
If you have any questions or comments relating to Samsung products,
please contact the SAMSUNG customer care center.
Country
Customer Care Center
☎
Web Site
U.K
0845 SAMSUNG (7267864)
www.samsung.com/uk
SOUTH AFRICA
0860 7267864 (SAMSUNG)
www.samsung.com/za
Code No. DJ68-00466A REV(0.3)