1
Installation
GB
! Keep this instruction manual in a safe place for
future reference. Should the appliance be sold,
transferred or moved, make sure the instruction
manual accompanies the washing machine to inform
the new owner as to its operation and features.
! Read these instructions carefully: they contain
vital information on installation, use and safety.
Unpacking and levelling
Unpacking
1. Unpack the washing machine.
2. Check whether the washing machine has been
damaged during transport. If this is the case, do
not install it and contact your retailer.
Levelling your appliance correctly will provide it with
stability and avoid any vibrations, noise and shifting
during operation. If it is placed on a fitted or loose
carpet, adjust the feet in such a way as to allow
enough room for ventilation beneath the washing
machine.
Electric and water connections
Connecting the water inlet hose
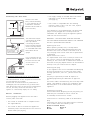
1. Connect the supply
pipe by screwing it to a
cold water tab using a
3/4 gas threaded
connection (see figure).
Before performing the
connection, allow the
water to run freely until
it is perfectly clear.
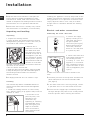
3. Remove the 4
protective screws and
the rubber bush with
the respective spacer,
situated on the rear of
the appliance (see also
the installation leaflet).
NB:The plastic spacers
may fall down inside the
machine once the bolt
has been removed, and will not interfere with the
operation of the machine.
4. Do not remove external bar.
5. Seal the gaps using the plastic plugs provided.
6. Keep all the parts: you will need them again if
the washing machine needs to be moved to
another location.
3. Make sure there are no kinks or bends in the
hose.
! Packaging materials are not children's toys.
! The water pressure at the tap must be within the
Levelling
Your machine may make a considerable amount of
noise if the two front feet have not been adjusted
correctly.
1. Install the washing machine on a flat sturdy
floor, without resting it up against walls, furniture
cabinets or other.
2. If the floor is not
perfectly level, compensate for any
unevenness by
tightening or loosening
the adjustable front
feet (see figure); the
angle of inclination
must not exceed 2°,
when measured over
the worktop.
2. Connect the other end
of the water inlet hose to
the washing machine,
screwing it onto the
appliance's cold water
inlet, situated on the top
right-hand side on the
rear of the appliance (see
figure).
values indicated in the Technical details table
(see page 5).
! If the water inlet hose is not long enough, contact
a specialist store or an authorised serviceman.
! Ensure that the supply taps are allowing water
through. Old taps may seize in the closed position
and thus prevent water reaching the machine.