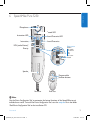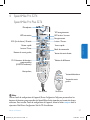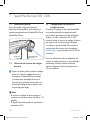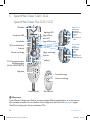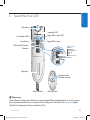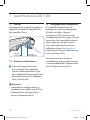
1
SpeechMike Classic / Pro / Pure / Barcode LFH 5250 LFH 5260 LFH 5262 LFH 5270 LFH 5272 LFH 5274 LFH 5276 LFH 5282 LFH 5284 For product information and support, visit ES Manual del usuario 33 3 NL Gebruikershandleiding 43 www.philips.com/dictation EN User manual DE Benutzerhandbuch 13 IT Manuale di istruzioni 53 FR Manuel de l‘utilisateur 23 SV Användarhandbok 63 speechmike_ifu_en-de-fr-es-nl-it-sv.indb 1 30.04.2008 17:38:33 speechmike_ifu_en-de-fr-es-nl-it-sv.indb 2 30.04.2008 17:38:33 E N G LISH User manual 1 1.1 Welcome What’s in the box 4 4 2 2.1 2.1.1 2.2 Important Safety SpeechMike Barcode Disposal of your old product 4 4 4 5 3 3.1 3.2 3.1 Get started System requirements Installation on Windows 2000, Windows XP, Vista systems Installation on Windows 98 SE and Windows ME systems 5 5 5 6 4 SpeechMike Pro 5274 SpeechMike Pro Plus 5276 7 SpeechMike Classic 5260 / 5262 SpeechMike Classic Plus 5270 / 5272 8 6 SpeechMike Pure 5250 9 7 7.1 7.2 7.3 SpeechMike Barcode 5282 / 5284 Overview Use the barcode scanner Configure the barcode scanner 10 10 10 10 8 Troubleshooting 11 9 Technical support and warranty 11 10 Technical data 12 5 User manual speechmike_ifu_en-de-fr-es-nl-it-sv.indb 3 3 30.04.2008 17:38:33 1 Welcome Congratulations on your purchase and welcome to Philips! To fully benefit from the service that Philips offers, visit our Website for support information such as user manuals, software downloads, warranty information and more: www.philips.com/dictation. 1.1 What’s in the box 3&$03% t&0-tt1 Important 2.1 Safety • To avoid short circuit, do not expose the product to rain or water. • Do not expose the device to excessive heat caused by heating equipment or direct sunlight. • Protect the cables from being pinched, particularly at plugs and the point where they exit from the device. 2.1.1 SpeechMike Barcode INS/OVR F1 2 F4 F2 F2 B Class 1 laser product PLUS SpeechMike Pro SpeechMike Hanging bracket SpeechMike Classic / Pro / Pure / Barcode LFH 5250 LFH 5260 LFH 5262 LFH 5270 LFH 5272 LFH 5274 LFH 5276 LFH 5282 LFH 5284 For product information and support, visit www.philips.com/dictation EN CD-ROM User manual 3 ES Manual del usuario NL Gebruikershandleiding 33 43 DE Benutzerhandbuch 13 IT Manuale di istruzioni 53 FR Manuel de l‘utilisateur 23 SV Användarhandbok 63 This product complies with: • 21CFR1040.10 and 1040.11 except for deviations pursuant to Laser Notice No. 50, dated July 26, 2001. • EN60825-1:1994 + A1:2002 + A2:2001 • IEC60825-1:1993 + A1:1997 + A2:2001 User manual The laser classification is marked near the scanner window on the product. Class 1 Laser devices are not considered to be hazardous when used for their intended purpose. The following statement is required to comply with US and international regulations: 4 speechmike_ifu_en-de-fr-es-nl-it-sv.indb 4 User manual 30.04.2008 17:38:33 2.2 Disposal of your old product • Your product is designed and manufactured with high quality materials and components, that can be recycled and re-used. • When this crossed-out wheeled bin symbol is attached to a product, it indicates that the product is covered by the European Directive 2002/96/ EC. • Please become informed about the local separate collection system for electrical and electronic products. • Please act according to your local rules and do not dispose of old products with your normal household waste. The correct disposal of old products will help prevent potential negative consequences for the environment and human health. 3 Get started 3.1 E N G LISH ACaution Do not try to open the unit. Allow only authorized service technicians to repair the unit. Use of controls, adjustments or performance of procedures other than those specified herein may result in hazardous laser light exposure. System requirements • Pentium III or similar, 500 MHz and 256 MB RAM; Recommended: Pentium IV, 1 GHz and 512 MB RAM • 75 MB hard disk space for SpeechMike drivers, 250 MB for Microsoft .NET Framework • One self-powered USB port • Windows Vista, Windows XP, Windows 2000, Windows ME, Windows 98 SE DNote • Windows 98 SE and Windows ME operating systems are supported for driver installation only! • For all operating systems, it is recommended that the latest service pack available be installed before installation. 3.2 Installation on Windows 2000, Windows XP, Vista systems CImportant Administrator rights are required to install the software. For more help, contact your administrator. 1 Turn on the PC. 2 Connect the USB plug of the SpeechMike to a free USB port. 3 The New Hardware Found message is User manual speechmike_ifu_en-de-fr-es-nl-it-sv.indb 5 5 30.04.2008 17:38:33 displayed and installation will proceed automatically. DNote If the message does not appear, verify if the USB port is enabled in the BIOS of the system. See the hardware documentation for details, or contact your hardware vendor. 4 Restart the PC when prompted by Windows. 5 Insert the installation CD in the CD-ROM drive. The set-up program should start automatically. If it does not, open the CD contents in Windows Explorer and doubleclick the autorun.exe file. 6 Click the Install button. 7 Follow the on-screen instructions of the set-up program. 3.1 Click the Next button. 8 Select the option Search for the best driver for your device (recommended) and click the Next button. 9 Activate the option Specify a location and select the Windows\inf folder. Click the Next button to continue with the installation. ⑩ Repeat from step 6 until all SpeechMike components are installed correctly. Installation on Windows 98 SE and Windows ME systems 1 Turn on the PC. 2 Insert the installation CD in the CD-ROM drive. The set-up program should start automatically. If it does not, open the CD contents in Windows Explorer and doubleclick the autorun.exe file. 3 Click the Install button. 4 Follow the on-screen instructions of the set-up program. 5 Remove the installation CD and insert your Windows 98 SE or Windows ME CD. 6 Connect the USB plug of the SpeechMike to a free USB port. 7 The Add New Hardware Wizard is displayed. 6 speechmike_ifu_en-de-fr-es-nl-it-sv.indb 6 User manual 30.04.2008 17:38:33 SpeechMike Pro 5274 E N G LISH 4 SpeechMike Pro Plus 5276 Microphone Record LED Instruction LED tt1 t&0- 3&$03% INS/O VR EOL (end-of-letter)/Priority Fast forward Fast rewind Play / Pause Trackball Right mouse button Left mouse button F1-F4: programmable function keys (LFH5276 only) Insert/Overwrite LED Record Insert/Overwrite F1 F4 F2 Scroll wheel F2 PLUS SpeechMike Pro Speaker Trigger button Left mouse button Front view Rear view D Note Use the Device Configuration Tool, to customize the button functions of the SpeechMike to suit individual user needs. To install the Device Configuration Tool, start the setup.exe file in the folder \Tools\Device Configuration Tool on the installation CD. User manual speechmike_ifu_en-de-fr-es-nl-it-sv.indb 7 7 30.04.2008 17:38:34 5 SpeechMike Classic 5260 / 5262 SpeechMike Classic Plus 5270 / 5272 Microphone Philips version LFH5260/5270 Slide switch Record LED Instruction LED INSTR INS/O VR INSTR Insert/Overwrite LED INS/O VR -tt1 t&0 Record Insert/Overwrite Instruction -tt1 EOL (end-of-letter)/ Priority t&0 International version LFH5262/5272 Left mouse button Right mouse button Trackball INSTR F1 F4 F2 Scroll wheel INS/O VR F1 F4 -tt1 ''8% t&0 F2 F1-F4: programmable function keys (LFH5270/5272 only) •Fastforward •Play •Stop •Fastrewind Slide switch •Record •Stop •Play •Fastrewind Fast forward F2 PLUS SpeechMike Classic F2 PLUS SpeechMike Classic F1 Speaker F4 Trigger button F2 F2 PLUS SpeechMike Classic Left mouse button Front view Rear view D Note Use the Device Configuration Tool, to customize the button functions of the SpeechMike to suit individual user needs. To install the Device Configuration Tool, start the setup.exe file in the folder \Tools\Device Configuration Tool on the installation CD. 8 speechmike_ifu_en-de-fr-es-nl-it-sv.indb 8 User manual 30.04.2008 17:38:36 SpeechMike Pure 5250 E N G LISH 6 Microphone Record LED Instruction LED 1-": Insert/Overwrite LED Insert/Overwrite Instruction EOL (end-of-letter)/ Priority Philips version LFH5250 1-": Slide switch •Fastforward •Play •Stop •Fastrewind SpeechMike Pure Record SpeechMike Pure Speaker Programmable function buttons Front view Rear view D Note Use the Device Configuration Tool, to customize the button functions of the SpeechMike to suit individual user needs. To install the Device Configuration Tool, start the setup.exe file in the folder \Tools\Device Configuration Tool on the installation CD. User manual speechmike_ifu_en-de-fr-es-nl-it-sv.indb 9 9 30.04.2008 17:38:37 7 SpeechMike Barcode 5282 / 5284 7.1 Overview For information about the buttons on the front side of the SpeechMike, refer to the chapter for the SpeechMike Pro or SpeechMike Classic. Scan trigger 7.2 Scan angle adjustment Use the barcode scanner 7.3 Configure the barcode scanner The SpeechMike barcode scanner is preconfigured with the keyboard language US English and the suffix “carriage return” (CR). Before using the barcode scanner for the first time, it is necessary to adapt it to your local keyboard language. To change the scanner configuration, start the application Barcodeconfig. exe on the installation CD. For information about customizing the barcode module, refer to the Advanced Barcode Scanner Configuration manual on the installation CD provided with your SpeechMike. 1 Press the scan trigger button and scan the barcode. When a barcode is recognized, the SpeechMike will beep and the barcode information is inserted into the currently active application as if the barcode number is typed in digit by digit. DNote • The barcode scanner allows barcode scanning from a distance of up to 30 cm / 12 inches. • The scan angle of the barcode scanner can be adjusted in two positions by 25°. 10 speechmike_ifu_en-de-fr-es-nl-it-sv.indb 10 User manual 30.04.2008 17:38:37 My operating system stops responding after restart Using the Philips SpeechMike together with certain USB hubs may cause the operating system to stop responding when the PC is started. To work around this, unplug the SpeechMike before starting the PC and reconnect it afterwards. To solve this problem, we recommend replacing the USB hub or connecting your SpeechMike directly to the USB port of the PC. The SpeechMike is completely without function Some PC providers limit the output power of USB ports to 100mA. These ports may not provide enough power for the SpeechMike to function properly. To resolve this issue, connect the SpeechMike via the self-powered hub. User manual speechmike_ifu_en-de-fr-es-nl-it-sv.indb 11 9 Technical support and E N G LISH 8 Troubleshooting warranty This Philips product was designed and manufactured to the highest quality standards. If your Philips product is not working correctly or is defective, contact your supplying Philips Speech Processing dealer who will provide you with the necessary information on how to proceed. If you have questions that your dealer cannot answer or any other related question, visit www.philips.com/dictation to contact us. No components are user-serviceable. Do not open or remove covers and do not insert objects not suitable for the specific connectors. Repairs may be made only by Philips service centers and official repair facilities. Failure to do so will void any warranty, stated or implied. Any operation expressly prohibited in this manual, any adjustments, or assembly procedures not recommended or authorized in this manual will void the warranty. 11 30.04.2008 17:38:37 10 Technical data Connectivity • USB connector Green specifications • Compliant to 2002/95/EC (RoHS) • Lead-free soldered product Operation conditions • Temperature: 5° - 45° Celsius / 41° - 113° Fahrenheit • Humidity: 10 % - 90 % Speaker • Acoustic frequency response: 200 – 6,000 Hz • Output power: > 100 mW SpeechMike Barcode Compatible barcodes • EAN • UPC • Code 11 / 39 / 93 / 128 • Codabar • MSI Code • RSS • Interleaved 2 of 5 • Discrete 2 of 5 Laser class • Class 1 laser product 12 speechmike_ifu_en-de-fr-es-nl-it-sv.indb 12 Specifications • Product dimensions (W x L x H): 43 x 155 x 30 mm / 1.7 x 6.1 x 1.2 inch • Weight: • LFH5260/70: 155 g / 5.5 oz • LFH5262/72: 160 g / 5.6 oz • LFH5276: 185 g / 6.5 oz • LFH5282: 165 g / 5.8 oz • LFH5284: 200 g / 7.1 oz System requirements • Pentium III or similar, 500 MHz and 256 MB RAM; Recommended: Pentium IV, 1 GHz and 512 MB RAM • 75 MB hard disk space for SpeechMike drivers, 250 MB for Microsoft .NET Framework • One self-powered USB port • Windows Vista, Windows XP, Windows 2000, Windows ME, Windows 98 SE Disclaimer and Notices Philips performs extensive testing with the most popular configurations. However, since PC addons and device drivers are updated continually, conflict-free operation cannot be guaranteed. User manual 30.04.2008 17:38:37 1 1.1 Willkommen Verpackungsinhalt 14 14 2 2.1 2.1.1 2.2 Wichtig Sicherheit SpeechMike Barcode Entsorgung Ihres Altgeräts 14 14 14 15 3 3.1 3.2 3.1 Erste Schritte Systemvoraussetzungen Installation auf Systemen mit Windows 2000, Windows XP oder Windows Vista Installation auf Systemen mit Windows 98 SE oder Windows ME 15 15 15 16 4 SpeechMike Pro 5274 SpeechMike Pro Plus 5276 17 SpeechMike Classic 5260 / 5262 SpeechMike Classic Plus 5270 / 5272 18 6 SpeechMike Pure 5250 19 7 7.1 7.2 7.3 SpeechMike Barcode 5282 / 5284 Überblick Verwenden des Barcode-Scanners Konfigurieren des Barcode-Scanner 20 20 20 20 8 Fehlerbehebung 21 9 Technische Unterstützung und Garantie 21 10 Technische Daten 22 5 Benutzerhandbuch speechmike_ifu_en-de-fr-es-nl-it-sv.indb 13 D E U T SC H Benutzerhandbuch 13 30.04.2008 17:38:37 1 Willkommen Herzlichen Glückwunsch zu Ihrem Kauf und willkommen bei Philips! Besuchen Sie unsere Webseite für zusätzliche Informationen wie Benutzerhandbücher, Software-Downloads, Garantieinformationen und vieles mehr: www.philips.com/dictation. 1.1 Verpackungsinhalt 3&$03% t&0-tt1 INS/OVR F1 2 Wichtig 2.1 Sicherheit • Um Kurzschlüsse zu vermeiden, darf das Gerät nicht Regen oder Wasser ausgesetzt werden. • Setzen Sie das Gerät keinen hohen Temperaturen durch Wärmequellen oder direkter Sonneneinstrahlung aus. • Schützen Sie Kabel vor unbeabsichtigen Beschädigungen durch Knicken oder Quetschen, besonders im Bereich von Steckers und der Austrittsstelle des Kabels aus dem Gehäuse. F4 F2 F2 PLUS SpeechMike Pro 2.1.1 SpeechMike Barcode SpeechMike Halterung B Laserprodukt der Klasse 1 SpeechMike Classic / Pro / Pure / Barcode LFH 5250 LFH 5260 LFH 5262 LFH 5270 LFH 5272 LFH 5274 LFH 5276 LFH 5282 LFH 5284 For product information and support, visit www.philips.com/dictation EN CD-ROM User manual 3 ES Manual del usuario NL Gebruikershandleiding 33 43 DE Benutzerhandbuch 13 IT Manuale di istruzioni 53 FR Manuel de l‘utilisateur 23 SV Användarhandbok 63 Benutzerhandbuch Dieses Produkt entspricht: • 21CFR1040.10 und 1040.11 außer Abweichungen gemäß Laser Notice No. 50, vom 26. Juli 2001. • EN60825-1:1994 + A1:2002 + A2:2001 • IEC60825-1:1993 + A1:1997 + A2:2001 Die Laser-Klasse steht neben dem ScannerFenster auf dem Produkt. Lasergeräte der Klasse 1 werden, wenn sie ihrer Zweckbestimmung entsprechend verwendet werden, als ungefährlich betrachtet. 14 speechmike_ifu_en-de-fr-es-nl-it-sv.indb 14 Benutzerhandbuch 30.04.2008 17:38:38 AVorsicht Nicht versuchen, das Gerät zu öffnen. Die Reparatur des Geräts darf nur durch einen zugelassenen Servicetechniker erfolgen. Werden die Steuerelemente, Einstellungen oder Vorgehensweisen nicht in Übereinstimmung mit den hier gegebenen Anweisungen verwendet, kann gefährliche Exposition mit Laserlicht auftreten. 2.2 Entsorgung Ihres Altgeräts • Ihr Gerät wurde unter Verwendung hochwertiger Materialien und Komponenten entwickelt und hergestellt, die recycelt und wieder verwendet werden können. • Befindet sich dieses Symbol (durchgestrichene Abfalltonne auf Rädern) auf dem Gerät, bedeutet dies, dass für dieses Gerät die Europäischen Richtlinie 2002/96/EG gilt. • Informieren Sie sich über die geltenden Bestimmungen zur getrennten Sammlung von Elektro- und Elektronik-Altgeräten in Ihrem Land. • Richten Sie sich bitte nach den geltenden Bestimmungen in Ihrem Land, und entsorgen Sie Altgeräte nicht über Ihren Haushaltsabfall. Durch die korrekte Entsorgung Ihrer Altgeräte werden Umwelt und Menschen vor möglichen negativen Folgen geschützt. Benutzerhandbuch speechmike_ifu_en-de-fr-es-nl-it-sv.indb 15 3 Erste Schritte 3.1 Systemvoraussetzungen • Pentium III oder vergleichbar, 500 MHz und 256 MB RAM; Empfohlen: Pentium IV, 1 GHz und 512 MB RAM • 75 MB Festplattenspeicherplatz für SpeechMike-Treiber, 250 MB für Microsoft .NET Framework • USB-Anschluss • Windows Vista, Windows XP, Windows 2000, Windows ME, Windows 98 SE D E U T SC H Die folgende Erklärung ist nach den US- und internationalen Regelwerken obligatorisch: DHinweis • Auf Systemen mit Windows 98 SE und Windows ME wird nur die Treiberinstallation unterstützt. • Es wird für alle Betriebssysteme empfohlen, vor der Installation das aktuellste Servicepack zu installieren. 3.2 Installation auf Systemen mit Windows 2000, Windows XP oder Windows Vista CWichtig Zur Installation der Software benötigen Sie Administrator-Rechte. Falls Sie weitere Hilfe benötigen, kontaktieren Sie bitte Ihren Administrator. 15 30.04.2008 17:38:38 1 Schalten Sie den PC ein. 2 Schließen Sie den USB-Stecker des SpeechMike an einen freien USB-Anschluss an. 3 Das Windows-Fenster Neue Hardware gefunden wird angezeigt und die Installation wird automatisch fortgesetzt. DHinweis Falls die Meldung nicht angezeigt wird, vergewissern Sie sich, ob der USBAnschluss im BIOS des Systems aktiviert ist. Einzelheiten dazu finden Sie in der Hardware-Dokumentation, oder wenden Sie sich an Ihren Hardware-Lieferanten. 4 Starten Sie den gegebenenfalls PC neu. 5 Legen Sie die Installations-CD in das CDROM-Laufwerk ein. Das Installationsprogramm sollte automatisch ausgeführt werden. Falls nicht, öffnen Sie den Inhalt der CD im Windows Explorer, und doppelklicken Sie auf die Datei autorun.exe. 6 Klicken Sie auf die Schaltfläche Installieren. 7 Befolgen Sie die Anleitungen auf dem Bildschirm. 3.1 3 Klicken Sie auf die Schaltfläche Installieren. 4 Befolgen Sie die Anleitungen auf dem Bildschirm. 5 Entfernen Sie die Installations-CD aus dem CD-ROM-Laufwerk und legen Sie die Windows 98 SE- oder Windows ME-CD ein. 6 Schließen Sie den USB-Stecker des SpeechMike an einen freien USB-Anschluss an. 7 Der Assistent zum Hinzufügen neuer Hardware wird angezeigt. Klicken Sie auf die Schaltfläche Weiter. 8 Wählen Sie die Option Den besten Treiber für das Gerät suchen (empfohlen) und klicken Sie auf die Schaltfläche Weiter. 9 Wählen Sie die Option Eine Position angeben und geben Sie den Ordner Windows\inf als Pfad an. Klicken Sie auf die Schaltfläche Weiter, um die Installation fortzusetzten. ⑩ Wiederholen Sie die Installation ab Schritt 6, bis alle Komponenten des SpeechMike korrekt installiert sind. Installation auf Systemen mit Windows 98 SE oder Windows ME 1 Schalten Sie den PC ein. 2 Legen Sie die Installations-CD in das CDROM-Laufwerk ein. Das Installationsprogramm sollte automatisch ausgeführt werden. Falls nicht, öffnen Sie den Inhalt der CD im Windows Explorer, und doppelklicken Sie auf die Datei autorun.exe. 16 speechmike_ifu_en-de-fr-es-nl-it-sv.indb 16 Benutzerhandbuch 30.04.2008 17:38:38 4 SpeechMike Pro 5274 SpeechMike Pro Plus 5276 Aufnahme-LED LED für Anweisungen EOL-Markierung (Briefende)/ Priorität setzen tt1 t&0- 3&$03% INS/O VR Schneller Vorlauf Schneller Rücklauf Wiedergabe / Pause Trackball Rechte Maustaste Linke Maustaste F1 – F4: programmierbare Funktionstasten (nur LFH5276) LED für Einfüge-/Überschreibmodus Aufnahme Einfügen/Überschreiben D E U T SC H Mikrofon F1 F4 F2 Scrollrad F2 PLUS SpeechMike Pro Lautsprecher Triggertaste Linke Maustaste Vorderansicht Rückansicht D Hinweis Benutzen Sie das Device Configuration Tool, um die Tastenfunktionen des SpeechMike an die Bedürfnisse jedes einzelnen Benutzers anzupassen. Um das Device Configuration Tool zu installieren, starten Sie die Datei setup.exe im Ordner \Tools\Device Configuration Tool auf der Installations-CD. Benutzerhandbuch speechmike_ifu_en-de-fr-es-nl-it-sv.indb 17 17 30.04.2008 17:38:39 5 SpeechMike Classic 5260 / 5262 SpeechMike Classic Plus 5270 / 5272 Mikrofon Philips-Version LFH5260/5270 Schiebeschalter Aufnahme-LED LED für Anweisungen INSTR INS/O VR INS/O INSTR LED für Einfüge-/ Überschreibmodus VR -tt1 t&0 Aufnahme Einfügen/Überschreiben Anweisung aufnehmen -tt1 EOL-Markierung (Briefende)/ Priorität setzen t&0 Internationale Version LFH5262/5272 Linke Maustaste Rechte Maustaste Trackball F1 F4 F2 Scrollrad INS/O INSTR VR F1 F4 -tt1 ''8% t&0 F2 F1-F4: programmierbare Funktionstasten (nur LFH5270/5272) •SchnellerVorlauf •Wiedergabe •Stopp •SchnellerRücklauf Schiebeschalter •Aufnahme •Stopp •Wiedergabe •SchnellerRücklauf Schneller Vorlauf F2 PLUS SpeechMike Classic F2 PLUS SpeechMike Classic F1 Lautsprecher F4 Trigger-Taste F2 F2 PLUS SpeechMike Classic Linke Maustaste Vorderansicht Rückansicht D Hinweis Benutzen Sie das Device Configuration Tool, um die Tastenfunktionen des SpeechMike an die Bedürfnisse jedes einzelnen Benutzers anzupassen. Um das Device Configuration Tool zu installieren, starten Sie die Datei setup.exe im Ordner \Tools\Device Configuration Tool auf der Installations-CD. 18 speechmike_ifu_en-de-fr-es-nl-it-sv.indb 18 Benutzerhandbuch 30.04.2008 17:38:40 E 6 SpeechMike Pure 5250 Mikrofon LED für Anweisungen D E U T SC H Aufnahme-LED LED für Einfüge-/Überschreibmodus 1-": Einfügen/Überschreiben Anweisung aufnehmen EOL-Markierung (Briefende)/ Priorität setzen Philips-Version LFH5250 1-": Schiebeschalter •SchnellerVorlauf •Wiedergabe •Stopp •SchnellerRücklauf SpeechMike Pure Aufnahme SpeechMike Pure Lautsprecher Programmierbare Funktionstasten Vorderansicht Rückansicht D Hinweis Benutzen Sie das Device Configuration Tool, um die Tastenfunktionen des SpeechMike an die Bedürfnisse jedes einzelnen Benutzers anzupassen. Um das Device Configuration Tool zu installieren, starten Sie die Datei setup.exe im Ordner \Tools\Device Configuration Tool auf der Installations-CD. Benutzerhandbuch speechmike_ifu_en-de-fr-es-nl-it-sv.indb 19 19 30.04.2008 17:38:42 7 SpeechMike Barcode 5282 / 5284 7.1 Überblick Informationen zu den Bedienelementen auf der Forderseite des SpeechMike finden Sie in den Kapiteln zum SpeechMike Pro oder SpeechMike Classic. Scan-Taste 7.2 Scanwinkel-Anpassung 7.3 Konfigurieren des Barcode-Scanner Der SpeechMike Barcode-Scanner ist mit der Tastatursprache US Englisch und dem Suffix „Zeilenumbruch“ (CR) vorkonfiguriert. Vor dem ersten Gebrauch des Barcode-Scanners muss er an die aktive Tastatursprache angepasst werden. Zum Ändern der Konfiguration des Barcode-Scanners starten Sie das Konfigurationsprogramm Barcodeconfig.exe auf der Installations-CD. Weitere Informationen über das Anpassen des Barcode-Scanners finden Sie im “Advanced Barcode Scanner Configuration” Handbuch auf der Installations-CD. Verwenden des Barcode-Scanners 1 Drücken Sie die Scan-Taste und scannen Sie den Strichcode ein. Wird ein Strichcode erkannt, gibt das SpeechMike ein Akustiksignal aus und die Informationen des Strichcodes werden in die gerade aktive Anwendung eingefügt so als würde die Strichcode-Nummer Ziffer für Ziffer eingegeben. DHinweis • Mit dem Barcode-Modul können Sie aus einer Entfernung von bis zu 30 cm scannen. • Der Scanwinkel des Strichcode-Lesegeräts kann entsprechend Ihrer Bedürfnisse in zwei Positionen um 25° geändert werden. 20 speechmike_ifu_en-de-fr-es-nl-it-sv.indb 20 Benutzerhandbuch 30.04.2008 17:38:42 Mein Betriebssystem reagiert nach einem Neustart nicht mehr Der Gebrauch des Philips SpeechMike mit bestimmten USB-Hubs kann das Betriebssystem während des Starts blockieren. Um das Problem zu umgehen, stecken Sie das SpeechMike ab während der PC gestartet wird und stecken es erst danach wieder an. Um dieses Problem zu lösen, empfehlen wir, den USB-Hub zu tauschen oder das SpeechMike direkt an den USBAnschluss des PCs anzuschließen. Das SpeechMike ist komplett ohne Funktion Einige PC-Hersteller begrenzen den Ausgangsstrom der USB-Anschlüsse auf 100mA. Diese USB-Anschlüsse stellen für das SpeechMike nicht genug Leistung zur Verfügung um eine einwandfreie Funktion zu gewährleisten. Um dieses Problem zu lösen, empfehlen wir, das SpeechMike über einen USB-Hub mit eigener Stromversorgung an den PC anzuschließen. Benutzerhandbuch speechmike_ifu_en-de-fr-es-nl-it-sv.indb 21 9 Technische Unterstützung und Garantie Philips-Geräte entsprechen dem neuesten Stand der Technik und werden nach strengsten Qualitätsnormen gefertigt. Sollte Ihr PhilipsProdukt dennoch einen Mangel aufweisen oder defekt sein, kontaktieren Sie bitte Ihren Philips Speech Processing Händler, um Informationen zur weiteren Vorgangsweise zu erhalten. D E U T SC H 8 Fehlerbehebung Wenn Sie Fragen haben, die Ihr Händler nicht beantworten kann, besuchen Sie unsere Website www.philips.com/dictation, um uns zu kontaktieren. Das Gerät enthält keine Teile, die vom Benutzer repariert werden können. Gehäuseabdeckungen dürfen nicht geöffnet oder entfernt werden. Reparaturen dürfen nur vom Philips Kundendienst und von offiziellen Reparaturbetrieben durchgeführt werden. Bei Nichtbeachtung erlischt jegliche Garantie, gleich ob ausdrücklich oder konkludent. Jeder Betrieb, der in diesem Handbuch ausdrücklich untersagt wird, und jegliche Einstellungen oder Montageverfahren, die in diesem Handbuch nicht empfohlen oder autorisiert werden, führen zum Erlöschen der Garantie. 21 30.04.2008 17:38:42 10 Technische Daten Anschlüsse • USB-Anschluss Umwelteigenschaften • Entspricht 2002/95/EC (RoHS) • Bleifrei gelötetes Produkt Betriebsbedingungen • Temperatur: 5° - 45° Celsius • Feuchtigkeit: 10 % - 90 % Lautsprecher • Frequenzbereich: 200 – 6.000 Hz • Ausgangsleistung: > 100 mW SpeechMike Barcode Kompatible Barcodes • EAN • UPC • Code 11 / 39 / 93 / 128 • Codabar • MSI Code • RSS • Interleaved 2 of 5 • Discrete 2 of 5 Laserklasse • Klasse 1 Laserprodukt 22 speechmike_ifu_en-de-fr-es-nl-it-sv.indb 22 Abmessungen • Geräteabmessungen (W x L x H): 43 x 155 x 30 mm • Gewicht: • LFH5260/70: 155 g • LFH5262/72: 160 g • LFH5276: 185 g • LFH5282: 165 g • LFH5284: 200 g Systemvoraussetzungen • Pentium III oder vergleichbar, 500 MHz und 256 MB RAM; Empfohlen: Pentium IV, 1 GHz und 512 MB RAM • 75 MB Festplattenspeicherplatz für SpeechMike-Treiber, 250 MB für Microsoft .NET Framework • USB-Anschluss • Windows Vista, Windows XP, Windows 2000, Windows ME, Windows 98 SE Gegenerklärung und Hinweise Philips führt ausführliche Tests mit den gebräuchlichsten Konfigurationen durch. PC-Peripherie und Gerätetreiber ändern sich jedoch äußerst rasch, so dass ein konfliktfreies Funktionieren nicht garantiert werden kann. Philips haftet nicht für Datenverlust. Benutzerhandbuch 30.04.2008 17:38:42 1 1.1 Bienvenue Contenu de l’emballage 24 24 2 2.1 2.1.1 2.2 Important Sécurité SpeechMike Barcode Mise au rebut de votre ancien produit 24 24 24 25 3 3.1 3.2 3.1 Mise en route Configuration minimale requise Installation sur Windows 2000, Windows XP et Vista Installation sur Windows 98 SE et Windows ME 25 25 25 26 4 SpeechMike Pro 5274 SpeechMike Pro Plus 5276 27 SpeechMike Classic 5260 / 5262 SpeechMike Classic Plus 5270 / 5272 28 6 SpeechMike Pure 5250 29 7 7.1 7.2 7.3 SpeechMike Barcode 5282 / 5284 Informations générales Utilisation du scanner de codes-barres Configuration du scanner de codes-barres 30 30 30 30 8 Dépannage 31 9 Support technique et garantie 31 10 Données techniques 32 5 Manuel de l‘utilisateur speechmike_ifu_en-de-fr-es-nl-it-sv.indb 23 FR A N Ç A I S Manuel de l‘utilisateur 23 30.04.2008 17:38:42 1 Bienvenue Félicitations pour votre achat et bienvenue dans l’univers Philips ! Pour profiter pleinement de l’assistance proposée par Philips, vous pouvez consulter notre site Internet où vous obtiendrez des informations sur les manuels de l’utilisateur, les téléchargements de logiciels, des informations sur garantie et bien d’autres choses encore, à l’adresse suivante : www.philips.com/dictation. 1.1 2 Important 2.1 Sécurité • Pour éviter tout court-circuit, n’exposez pas le produit à la pluie ou à l’eau. • N’exposez pas l’appareil à une chaleur excessive causée par un appareil de chauffage ou le rayonnement direct du soleil. • Protégez les câbles pour éviter qu’ils soient pliés, en particulier au niveau des prises et à l’endroit où ils sont connectés à l’appareil. Contenu de l’emballage 2.1.1 SpeechMike Barcode 3&$03% t&0-tt1 INS/OVR F1 B Produit laser de catégorie 1 F4 F2 F2 PLUS SpeechMike Pro SpeechMike Crochet SpeechMike Classic / Pro / Pure / Barcode LFH 5250 LFH 5260 LFH 5262 Le produit est conforme à : • 21CFR1040.10 et 1040.11, sauf Laser Notice No. 50, daté du 26 Juillet 2001. • EN60825-1:1994 + A1:2002 + A2:2001 • IEC60825-1:1993+A1:1997+A2:2001 LFH 5270 LFH 5272 LFH 5274 LFH 5276 LFH 5282 LFH 5284 For product information and support, visit ES www.philips.com/dictation CD-ROM Manual del usuario 33 EN User manual 3 NL Gebruikershandleiding DE Benutzerhandbuch 13 IT Manuale di istruzioni 53 FR Manuel de l‘utilisateur 23 SV Användarhandbok 63 43 La classification laser se trouve sur le produit, à côté de la fenêtre du scanner. Manuel de l’utilisateur Les produits laser de première catégorie ne sont pas considérés comme dangereux s’ils sont utilisés dans le but pour lequel ils ont été conçus. La règle suivante est nécessaire pour : 24 speechmike_ifu_en-de-fr-es-nl-it-sv.indb 24 Manuel de l‘utilisateur 30.04.2008 17:38:43 2.2 Mise au rebut de votre ancien produit • Votre produit a été conçu et fabriqué à l’aide de matériaux et composants de haute qualité, recyclables et réutilisables. • Le symbole de poubelle barrée sur un produit indique que ce dernier est conforme à la directive européenne 2002/96/EC. • Veuillez vous renseigner sur les systèmes locaux de collecte des produits électriques ou électroniques. • Veillez à respecter les réglementations locales; ne mettez pas au rebut vos anciens produits comme des déchets ménagers. La mise au rebut correcte de votre ancien produit permet la protection de l’environnement et la santé. 3 Mise en route 3.1 Configuration minimale requise • Pentium III ou semblable, 500 MHz et 256 Mo de RAM; Recommandé: Pentium IV, 1 GHz et 512 Mo de RAM • 75 Mo d’espace libre sur le disque dur pour pilotes SpeechMike, 250 Mo pour Microsoft .NET Framework • Un port USB autonome • Windows Vista, Windows XP, Windows 2000, Windows ME, Windows 98 SE DNote • Les systèmes Windows 98 SE et Windows ME sont supportés seulement pour l’installation du pilote! • Quel que soit votre système d‘exploitation, nous vous recommandons d‘installer le dernier Service Pack disponible. 3.2 FR A N Ç A I S AAvertissement N’essayez pas d’ouvrir la machine. Seuls des techniciens habilités au service peuvent réparer l’appareil. Tout écart par rapport aux règles (de fonctionnement, de paramètrage et d’utilisation) définies ci-dessus peut résulter d’un danger par exposition aux rayons lasers. Installation sur Windows 2000, Windows XP et Vista CImportant Vous devez disposer des droits d’administrateur pour installer le logiciel. Si vous avez besoin d’aide, contactez votre administrateur. 1 Mettez l‘ordinateur sous tension. 2 Branchez le câble USB du SpeechMike sur un port USB disponible. Manuel de l‘utilisateur speechmike_ifu_en-de-fr-es-nl-it-sv.indb 25 25 30.04.2008 17:38:43 3 Windows affiche le message Nouveau matériel détecté et lance automatiquement l‘installation. DNote Si ce message n‘est pas affiché, vérifiez si le port USB est activé dans le BIOS de votre système. Pour plus d‘informations, reportezvous à la documentation de votre matériel ou contactez votre fournisseur. 4 Vous devrez redémarrer votre ordinateur lorsque vous y serez invité par Windows. 5 Insérez le CD d‘installation dans votre lecteur de CD-ROM. Le programme d‘installation doit s‘ouvrir automatiquement. Si ce n‘est pas le cas, affichez le contenu du CD à l‘aide de l‘explorateur de Windows puis double-cliquez sur le fichier autorun.exe pour le lancer. 6 Cliquez sur le bouton Installer. 7 Suivez les indications données à l‘écran par le programme pour installer SpeechExec sur votre PC. 3.1 4 Suivez les indications données à l‘écran par le programme pour installer SpeechExec sur votre PC. 5 Enlevez le CD d’installation et insérez votre CD Windows 98 SE ou Windows ME. 6 Branchez le câble USB du SpeechMike sur un port USB disponible. 7 L’assistant d’ajout d’un nouveau périphérique est affiché. Cliquez sur le bouton Suivant. 8 Sélectionnez l’option Chercher le meilleur pilote pour votre appareil (recommandé) et cliquez sur le bouton Suivant. 9 Activez l’option Spécifiez un endroit et sélectionnez le répertoire Windows/inf. Cliquez sur le bouton Suivant pour poursuivre l’installation. ⑩ Répétez depuis l’étape 6 jusqu’à ce que tous les composants du SpeechMike soient correctement installés. Installation sur Windows 98 SE et Windows ME 1 Mettez l‘ordinateur sous tension. 2 Insérez le CD d‘installation dans votre lecteur de CD-ROM. Le programme d‘installation doit s‘ouvrir automatiquement. Si ce n‘est pas le cas, affichez le contenu du CD à l‘aide de l‘explorateur de Windows puis double-cliquez sur le fichier autorun.exe pour le lancer. 3 Cliquez sur le bouton Installer. 26 speechmike_ifu_en-de-fr-es-nl-it-sv.indb 26 Manuel de l‘utilisateur 30.04.2008 17:38:43 4 SpeechMike Pro 5274 SpeechMike Pro Plus 5276 Microphone LED enregistrement LED instruction tt1 t&0- 3&$03% INS/O VR EOL (fin de lettre) / Priorité FR A N Ç A I S Avance rapide Retour rapide Lecture / Pause Boule de commande Bouton de souris droite Bouton de souris gauche F1-F4: boutons de fonctions programmables (LFH5276 seulement) LED insérer / écraser Enregistrement Insérer / Écraser F1 F4 F2 Molette de défilement F2 PLUS SpeechMike Pro Haut-parleur Bouton déclencheur Bouton de souris gauche Vue de front Vue arrière D Note Utilisez l’outil de configuration de l’appareil (Device Configuration Tool) pour personnaliser les boutons de fonctions programmables du SpeechMike afin de répondre aux besoins de chaque utilisateur. Pour installer l’outil de configuration de l’appareil, lancez le fichier setup.exe dans le répertoire \Tools\Device Configuration Tool du CD d’installation. Manuel de l‘utilisateur speechmike_ifu_en-de-fr-es-nl-it-sv.indb 27 27 30.04.2008 17:38:43 5 SpeechMike Classic 5260 / 5262 SpeechMike Classic Plus 5270 / 5272 Version Philips Microphone LFH5260/5270 LED enregistrement LED instruction INSTR INS/O VR LED insérer / écraser Interrupteur à 4 positions INSTR •Avancerapide •Lecture •Arrêt •Retourrapide INS/O VR -tt1 t&0 Enregistrement Insérer / Écraser Instruction Version internationale -tt1 EOL (fin de lettre) / Priorité t&0 LFH5262/5272 Bouton de souris droite Boule de commande Bouton de souris gauche INSTR F1-F4: boutons de fonctions programmables (LFH5270/72 seulement) F4 F2 Molette de défilement •Enregistrement •Arrêt •Lecture •Retourrapide VR F1 F4 -tt1 ''8% t&0 F2 F1 Interrupteur à 4 positions INS/O Avance rapide F2 PLUS SpeechMike Classic F2 PLUS SpeechMike Classic F1 Haut-parleur F4 Bouton déclencheur F2 F2 PLUS SpeechMike Classic Bouton de souris gauche Vue de front Vue arrière D Note Utilisez l’outil de configuration de l’appareil (Device Configuration Tool) pour personnaliser les boutons de fonctions programmables du SpeechMike afin de répondre aux besoins de chaque utilisateur. Pour installer l’outil de configuration de l’appareil, lancez le fichier setup.exe dans le répertoire \Tools\Device Configuration Tool du CD d’installation. 28 speechmike_ifu_en-de-fr-es-nl-it-sv.indb 28 Manuel de l‘utilisateur 30.04.2008 17:38:45 6 SpeechMike Pure 5250 Microphone LED enregistrement LED instruction 1-": LED insérer / écraser Insérer / Écraser Instruction Version Philips EOL (fin de lettre) / Priorité LFH5250 FR A N Ç A I S Interrupteur à 4 positions 1-": •Avancerapide •Lecture •Arrêt •Retourrapide SpeechMike Pure Enregistrement SpeechMike Pure Haut-parleur Boutons de fonctions programmables Vue de front Vue arrière D Note Utilisez l’outil de configuration de l’appareil (Device Configuration Tool) pour personnaliser les boutons de fonctions programmables du SpeechMike afin de répondre aux besoins de chaque utilisateur. Pour installer l’outil de configuration de l’appareil, lancez le fichier setup.exe dans le répertoire \Tools\Device Configuration Tool du CD d’installation. Manuel de l‘utilisateur speechmike_ifu_en-de-fr-es-nl-it-sv.indb 29 29 30.04.2008 17:38:46 7 SpeechMike Barcode 5282 / 5284 7.1 Informations générales Pour des informations concernant les boutons se trouvant sur le devant du SpeechMike, référez-vous au chapitre sur le SpeechMike Pro ou le SpeechMike Classic. Bouton de scan 7.2 Réglage angle de lecture Utilisation du scanner de codesbarres 7.3 Configuration du scanner de codesbarres Le scanner de codes-barres du SpeechMike est configuré par défaut au clavier anglais US, et sur le retour chariot (CR). Avant la première utilisation, le scanner de codes-barres doit être configuré dans la langue demandée. Pour changer la configuration du scanner de codesbarres il faut utiliser le programme Barcodeconfig. exe sur le CD d’installation. Pour plus de détails concernant la personnalisation du module codes-barres, reportez-vous au manuel de configuration avancée du scanner codes-barres se trouvant sur le CD d’installation fourni avec votre SpeechMike. 1 Appuyez sur le bouton de scan et scannez le code-barres. Lorsqu’un code-barres est reconnu, le SpeechMike va biper et les informations relatives au code-barres seront insérées dans l’application active comme si le code-barres était inscrit chiffre par chiffre. DNote • Le scanner codes-barres permet de scanner des codes-barres d’une distance allant jusqu’à 30cm. • L’angle de scan du scanner codes-barres peut être ajusté en deux positions variables de 25 °. 30 speechmike_ifu_en-de-fr-es-nl-it-sv.indb 30 Manuel de l‘utilisateur 30.04.2008 17:38:47 Mon système d’exploitation ne répond pas après le redémarrage de l’ordinateur Utiliser le SpeechMike avec certains concentrateurs USB peut donner comme résultat que le système d’exploitation ne répond pas après redémarrage de l’ordinateur. Pour éviter cela, déconnectez le SpeechMike avant de démarrer l’ordinateur et reconnectez-le ensuite. Pour résoudre ce problème, nous vous recommandons de remplacer le concentrateur USB ou de brancher le SpeechMike directement au port USB de l’ordinateur. Le SpeechMike est complètement hors service Certains vendeurs d’ordinateurs limitent la performance de sortie des ports USB à 100 mA (milliamps). L’énergie de ces ports peut ne pas être suffisante que le SpeechMike fonctionne correctement. Pour résoudre ce problème, connectez le SpeechMike via le concentrateur autonome. Manuel de l‘utilisateur speechmike_ifu_en-de-fr-es-nl-it-sv.indb 31 9 Support technique et garantie Ce produit Philips a été élaboré et fabriqué selon les standards de meilleure qualité. Si votre produit Philips ne fonctionne pas correctement ou est défectueux, veuillez contacter votre fournisseur Philips Speech Processing qui vous apportera les informations nécessaires sur la marche à suivre. Pour toute autre question ou question à laquelle votre fournisseur ne peut répondre, consultez le site www.philips.com/dictation afin de nous contacter. FR A N Ç A I S 8 Dépannage Aucun composant ne peut être réparé par l’utilisateur. N’ouvrez ou n’enlevez pas les couvercles et n’insérez aucun objet non conforme aux connecteurs spécifiques. Seuls les Centres de Service Agréés Philips et les ateliers de réparation officiels sont autorisés à réparer nos produits. Le non-respect de cette consigne entraîne l’annulation de toute garantie, expresse ou tacite. Toute opération expressément interdite dans ce manuel, ou tout réglage ou toute procédure d’assemblage non recommandé(e) ou autorisé(e) par le présent manuel, entraîne l’annulation de la garantie. 31 30.04.2008 17:38:47 10 Données techniques Connectique • Connecteur USB Caractéristiques environnementales • Conforme à la directive 2002/95/EC (RoHS) • Produit sans soudures au plomb Conditions de fonctionnement • Température : 5° à 45° Celsius • Humidité : 10 % à 90 % Haut-parleur • Réponse en fréquence acoustique : 200 – 6.000 Hz • Puissance de sortie : > 100 mW SpeechMike Barcode Codes-barres compatibles • EAN • UPC • Code 11 / 39 / 93 / 128 • Codabar • MSI Code • RSS • Interleaved 2 of 5 • Discrete 2 of 5 Classification laser • Produit laser de catégorie 1 32 speechmike_ifu_en-de-fr-es-nl-it-sv.indb 32 Spécificités • Dimensions de l’appareil (l x H x P) : 43 x 155 x 30 mm / 1.7 x 6.1 x 1.2 in. • Poids : • LFH5260/70: 155 g / 5.5 oz • LFH5262/72: 160 g / 5.6 oz • LFH5276: 185 g / 6.5 oz • LFH5282: 165 g / 5.8 oz • LFH5284: 200 g / 7.1 oz Configuration minimale requise • Pentium III ou semblable, 500 MHz et 256 Mo de RAM; Recommandé: Pentium IV, 1 GHz et 512 Mo de RAM • 75 Mo d’espace libre sur le disque dur pour pilotes SpeechMike, 250 MB pour Microsoft .NET Framework • Un port USB autonome • Windows Vista, Windows XP, Windows 2000, Windows ME, Windows 98 SE Déni de responsabilité et avertissements Philips effectue de nombreux tests avec les configurations les plus courantes. Cependant, comme les additifs pour PC et les pilotes de périphériques sont constamment mis à jour, nous ne pouvons garantir un fonctionnement sans conflit. Philips ne peut être tenu responsable d‘une perte de données. Manuel de l‘utilisateur 30.04.2008 17:38:47 1 1.1 Bienvenido Qué viene en la caja 34 34 2 2.1 2.1.1 2.2 Importante Seguridad SpeechMike Barcode Desecho del producto antiguo 34 34 34 35 3 3.1 3.2 3.1 Primeros pasos Requisitos del sistema Instalación en sistemas Windows 2000, Windows XP y Vista Instalación en sistemas Windows 98 SE y Windows ME 35 35 35 36 4 SpeechMike Pro 5274 SpeechMike Pro Plus 5276 37 SpeechMike Classic 5260 / 5262 SpeechMike Classic Plus 5270 / 5272 38 6 SpeechMike Pure 5250 39 7 7.1 7.2 7.3 SpeechMike Barcode 5282 / 5284 Información general Utilización del escáner de códigos de barra Configuración del escáner de códigos de barra 40 40 40 40 8 Solución de problemas 41 9 Soporte técnico y garantía 41 10 Datos técnicos 42 5 Manual del usuario speechmike_ifu_en-de-fr-es-nl-it-sv.indb 33 E S PAÑO L Manual del usuario 33 30.04.2008 17:38:47 1 Bienvenido Enhorabuena por su adquisición y bienvenido a Philips! Para poder beneficiarse de toda la ayuda que le ofrece Philips, visite nuestra página Web para obtener información de soporte como manuales de usuario, descargas de software, información de garantía, etc. en: www.philips.com/dictation. 1.1 Qué viene en la caja 3&$03% t&0-tt1 Importante 2.1 Seguridad • Para evitar cortocircuitos, no exponga el producto a la lluvia ni al agua. • No lo exponga a excesivo calor procedente de aparatos de calefacción o de la luz directa del sol. • Evite pisar o apretar los cables, especialmente en los enchufes y el punto en que salen del aparato. 2.1.1 SpeechMike Barcode INS/OVR F1 2 F4 F2 F2 B Producto láser de clase 1 PLUS SpeechMike Pro SpeechMike Soporte de sujeción SpeechMike Classic / Pro / Pure / Barcode LFH 5250 LFH 5260 LFH 5262 LFH 5270 LFH 5272 LFH 5274 LFH 5276 LFH 5282 LFH 5284 For product information and support, visit www.philips.com/dictation EN CD-ROM User manual 3 ES Manual del usuario NL Gebruikershandleiding 33 43 DE Benutzerhandbuch 13 IT Manuale di istruzioni 53 FR Manuel de l‘utilisateur 23 SV Användarhandbok 63 Este producto cumple con las normas: • 21CFR1040.10 y 1040.11 a excepto de las desviaciones hechas a la Norma Láser No. 50 con fecha del 26 de julio de 2001. • EN60825-1:1994 + A1:2002 + A2:2001 • IEC60825-1:1993 + A1:1997 + A2:2001 Manual del ususario La clasificación del dispositivo láser se indica al lado de la ventana del escáner en el producto. Los dispositivos láser de clase 1 no se consideran peligrosos cuando se utilizan según el propósito para el que fueron creados. Es necesaria la siguiente declaración para cumplir con las normas internacionales de Estados Unidos: 34 speechmike_ifu_en-de-fr-es-nl-it-sv.indb 34 Manual del usuario 30.04.2008 17:38:47 2.2 Desecho del producto antiguo • El producto se ha diseñado y fabricado con materiales y componentes de alta calidad, que se pueden reciclar y volver a utilizar. • Cuando este símbolo de contenedor de ruedas tachado se muestra en un producto indica que éste cumple la directiva europea 2002/96/EC. • Obtenga información sobre la recogida selectiva local de productos eléctricos y electrónicos. • Cumpla con la normativa local y no deseche los productos antiguos con los desechos domésticos. El desecho correcto del producto antiguo ayudará a evitar consecuencias negativas para el medioambiente y la salud humana. 3 Primeros pasos 3.1 Requisitos del sistema • Pentium III o similar, 500 MHz y 256 MB RAM; Recomendado: Pentium IV, 1 GHz y 512 MB RAM • 75 MB de espacio en disco duro para los drivers SpeechMike, 250 MB para Microsoft .NET Framework • Puerto USB • Windows Vista, Windows XP, Windows 2000, Windows ME, Windows 98 SE DNota • Los sistemas operativos Windows 98 SE y Windows ME tienen soporte sólo para la instalación de los drivers! • Para todos los sistemas operativos es recomendable que instale la última versión disponible del Service Pack. 3.2 E SPAÑOL APrecaución No intente abrir la unidad, deje que sólo técnicos del servicio autorizado lleven a cabo la reparación. El uso de controles, ajustes u otros procedimientos que no sean los que se especifican a continuación pueden dar como resultado una exposición peligrosa a la luz láser. Instalación en sistemas Windows 2000, Windows XP y Vista CImportante Se requieren los derechos del administrador para instalar el software. Si necesita más ayuda, póngase en contacto con su administrador. 1 Encienda el ordenador. 2 Conecte el cable USB del SpeechMike a un puerto USB libre. Manual del usuario speechmike_ifu_en-de-fr-es-nl-it-sv.indb 35 35 30.04.2008 17:38:48 3 En Windows aparecerá el mensaje Nuevo Hardware Encontrado y la instalación se realizará automáticamente. DNota Si el mensaje no aparece, verifique que el puerto USB esté activado en el BIOS de su sistema. Vea los detalles en la documentación de su hardware o póngase en contacto con su proveedor de hardware. 4 Reinicie su ordenador cuando Windows lo indique. 5 Inserte el CD de instalación en la unidad CD-ROM de su ordenador. El programa de configuración debe iniciarse automáticamente. Si esto no ocurre, abra el contenido del CD con el Explorador de Windows y haga doble clic en el archivo autorun.exe. 6 Haga clic en el botón Instalar. 7 Siga las instrucciones del programa de instalación que aparecen en la pantalla. 3.1 instalación que aparecen en la pantalla. 5 Extraiga el CD de instalación e introduzca el CD de Windows 98 SE o Windows ME. 6 Conecte el cable USB del SpeechMike a un puerto USB libre. 7 El wizard para agregar un nuevo hardware es mostrado. Haga clic en el botón Siguiente. 8 Seleccione la opción Busque el mejor driver para su dispositivo (recomendado) y haga clic en el botón Siguiente. 9 Active la opción Especifique una ubicación y seleccione la carpeta Windows\inf. Haga clic en el botón Siguiente para continuar la instalación.. ⑩ Repita desde el paso 6 hasta que todos los componentes del SpeechMike se hayan instalados correctamente. Instalación en sistemas Windows 98 SE y Windows ME 1 Encienda el ordenador. 2 Inserte el CD de instalación en la unidad CD-ROM de su ordenador. El programa de configuración debe iniciarse automáticamente. Si esto no ocurre, abra el contenido del CD con el Explorador de Windows y haga doble clic en el archivo autorun.exe. 3 Haga clic en el botón Instalar. 4 Siga las instrucciones del programa de 36 speechmike_ifu_en-de-fr-es-nl-it-sv.indb 36 Manual del usuario 30.04.2008 17:38:48 4 SpeechMike Pro 5274 SpeechMike Pro Plus 5276 Micrófono LED de estado LED instrucción tt1 t&0- 3&$03% INS/O VR EOL (fin-de-carta) / Prioridad Avance rápido Rebobinado rápido Reproducir / Detener Bola de mando Botón derecho del ratón F1 F4 F2 Ruedo de despiazamiento E S PAÑO L Botón izquierdo del ratón F1-F4: telcas con función programable (LFH5276 sólo) LED modo insertar / sobreescribir Grabar Insertar / sobreescribir F2 PLUS SpeechMike Pro Altavoz Gatillo Botón izquierdo del ratón Vista frontal Vista trasera D Nota Use la Herramienta de Configuración del Dispositivo (Device Configuration Tool) para personalizar las funciones del SpeechMike a sus preferencias individuales. Para instalar la Herramienta de Configuración del Dispositivo, inicie el archivo setup.exe en la carpeta \Tools\Device Configuration Tool en el CD de instalación. Manual del usuario speechmike_ifu_en-de-fr-es-nl-it-sv.indb 37 37 30.04.2008 17:38:48 5 SpeechMike Classic 5260 / 5262 SpeechMike Classic Plus 5270 / 5272 Versión Philips Micrófono LFH5260/5270 Interruptor de 4 positiones LED de estado LED instrucción INSTR INS/O VR INSTR LED modo insertar / sobreescribir INS/O VR -tt1 t&0 Grabar Insertar/sobreescribir Instrucción Versión internacional -tt1 EOL (fin-de-carta) / Prioridad t&0 LFH5262/5272 Botón derecho del ratón Bola de mando Botón izquierdo del ratón INSTR Altavoz F1 F4 F2 Ruedo de despiazamiento INS/O VR F1 F4 -tt1 ''8% t&0 F2 F1-F4: telcas con función programable (LFH5270/5272 sólo) •Avancerápido •Reproducir •Detener •Rebobinadorápido Interruptor de 4 positiones •Grabar •Detener •Reproducir •Rebobinadorápido Avance rápido F2 PLUS SpeechMike Classic F2 PLUS SpeechMike Classic F1 Gatillo F4 F2 F2 PLUS SpeechMike Classic Botón izquierdo del ratón Vista trasera Vista frontal D Nota Use la Herramienta de Configuración del Dispositivo (Device Configuration Tool) para personalizar las funciones del SpeechMike a sus preferencias individuales. Para instalar la Herramienta de Configuración del Dispositivo, inicie el archivo setup.exe en la carpeta \Tools\Device Configuration Tool en el CD de instalación. 38 speechmike_ifu_en-de-fr-es-nl-it-sv.indb 38 Manual del usuario 30.04.2008 17:38:50 6 SpeechMike Pure 5250 Micrófono LED de estado LED instrucción 1-": LED modo insertar / sobreescribir Insertar / sobreescribir Instrucción Versión Philips EOL (fin-de-carta) / Prioridad LFH5250 Interruptor de 4 positiones 1-": •Avancerápido •Reproducir •Detener •Rebobinadorápido SpeechMike Pure E SPAÑOL Grabar SpeechMike Pure Altavoz Telcas con función programable Vista frontal Vista trasera D Nota Use la Herramienta de Configuración del Dispositivo (Device Configuration Tool) para personalizar las funciones del SpeechMike a sus preferencias individuales. Para instalar la Herramienta de Configuración del Dispositivo, inicie el archivo setup.exe en la carpeta \Tools\Device Configuration Tool en el CD de instalación. Manual del usuario speechmike_ifu_en-de-fr-es-nl-it-sv.indb 39 39 30.04.2008 17:38:51 7 SpeechMike Barcode 5282 / 5284 7.1 Información general Para información acerca de los botones delanteros del SpeechMike, favor referirse al capítulo correspondiente del SpeechMike Pro o SpeechMike Classic. Gatillo del escáner 7.2 Ajuste del àngulo del escáner Utilización del escáner de códigos de barra 7.3 Configuración del escáner de códigos de barra El escáner de códigos de barra del SpeechMike está configurado de forma predeterminada con el idioma del teclado en inglés de Estados Unidos y el sufijo “retorno de carro” (CR). Antes de utilizar el escáner de códigos de barras por primera vez, es necesario que lo adapte a su idioma y tipo de teclado. Para cambiar la configuración del escáner, inicie el programa Barcodeconfig.exe que se encuentra en el CD de instalación. Para más información sobre la adaptación del escáner de códigos de barras a sus necesidades individuales, consulte la Advanced Barcode Scanner Configuration Guide que aparece en el CD de instalación. 1 Oprima el botón gatillo y escanee el código de barras. Cuando el código de barras es reconocido, el SpeechMike hará un beep y la información del código de barras es insertada en la aplicación actual como si el número del código de barras hubiera sido escrito digito por digito. DNota • El escáner de códigos de barra permite el escaneo a una distancia máxima de 30 cm / 12 pulgadas. • El ángulo del escáner puede ser ajustado en 2 posiciones de 25 °. 40 speechmike_ifu_en-de-fr-es-nl-it-sv.indb 40 Manual del usuario 30.04.2008 17:38:51 Mi sistema operativo deja de responder después de iniciar Usar el SpeechMike de Philips junto con ciertos hubs USB puede ocasionar que el sistema operativo deje de responder al ser iniciado. Para trabajar con esto, desconecte su SpeechMike antes de iniciar su equipo y conéctelo después. Para resolver el problema, le recomendamos remplazar el hub USB y conectar directamente el SpeechMike al puerto USB de su PC. El SpeechMike no funciona Algunos provedores de PCs limitan el poder de entrada de los puertos USB a 100 mA (miliamperes). Dichos puertos pueden no proveer suficiente poder al SpeechMike para su funcionamiento adecuado. Para resolver este problema, conecte un hub USB de energía independiente al puerto USB de su PC, entonces conecte su SpeechMike en él. Manual del usuario speechmike_ifu_en-de-fr-es-nl-it-sv.indb 41 9 Soporte técnico y garantía Este producto de Philips fue diseñado y fabricado con los más altos estándares. Si tu producto Philips no funciona correctamente o tiene algún defecto, contacta con el distribuidor de Philips Speech Processig que te proveyó del equipo quien te dará la información necesaria y te dirá el procedimiento a seguir. Si tienes preguntas que nuestros distribuidores no pueden responder o cualquier inquietud, contacta con nosotros en ww.philips.com/dictation. Ninguno de los componentes puede ser reparado por el usuario. No abra ni quite las tapas del interior del producto. Las reparaciones sólo podrán llevarlas a cabo por los centros de servicio y establecimientos de reparación oficiales de Philips. De lo contrario, cualquier garantía expresa o implícita quedará invalidada. Cualquier funcionamiento prohibido de manera expresa en el presente manual, o cualquier ajuste o procedimiento de montaje no recomendado o no autorizado en el presente invalidarán la garantía. E SPAÑOL 8 Solución de problemas 41 30.04.2008 17:38:51 10 Datos técnicos Conectividad • Conector USB Especificaciones medioambiantales • Cumple con la norma 2002/95/EC (RoHS) • Producto con soldaduras sin plomo Condiciones de funcionamiento • Temperatura: 5° - 45° C / 41° - 113° F • Humedad: 10 % - 90 % Altavoz • Frecuencia de respuesta: 200 – 6,000 Hz • Potencia de salida: > 100 mW SpeechMike Barcode Códigos de barra compatibles • EAN • UPC • Code 11 / 39 / 93 / 128 • Codabar • MSI Code • RSS • Interleaved 2 of 5 • Discrete 2 of 5 Clasificación del dispositivo láser • Producto láser de clase 1 42 speechmike_ifu_en-de-fr-es-nl-it-sv.indb 42 Dimensiones • Dimensiones del producto: (W x L x H): 43 x 155 x 30 mm / 1.7 x 6.1 x 1.2 inch • Peso: • LFH5260/70: 155 g / 5.5 oz • LFH5262/72: 160 g / 5.6 oz • LFH5276: 185 g / 6.5 oz • LFH5282: 165 g / 5.8 oz • LFH5284: 200 g / 7.1 oz Requisitos del sistema • Pentium III o similar, 500 MHz y 256 MB RAM; Recomendado: Pentium IV, 1 GHz y 512 MB RAM • 75 MB de espacio en disco duro para drivers SpeechMike, 250 MB para Microsoft .NET Framework • Puerto USB • Windows Vista, Windows XP, Windows 2000, Windows ME, Windows 98 SE Limitaciones de responsabilidad y observaciones La empresa Philips realiza pruebas exhaustivas en sus aparatos teniendo en cuenta las configuraciones más conocidas y demandadas. Sin embargo, dado que los PC y los drivers se actualizan constantemente no podemos garantizar un funcionamiento perfecto. Manual del usuario 30.04.2008 17:38:51 1 1.1 Welkom Wat is meegeleverd? 44 44 2 2.1 2.1.1 2.2 Belangrijk Veiligheid SpeechMike Barcode Hergebruik van uw oude product 44 44 44 45 3 3.1 3.2 3.1 In gebruik nemen Systeemvereisten Installatie op Windows 2000, Windows XP, Vista systemen Installatie op Windows 98 SE en Windows ME systemen 45 45 45 46 4 SpeechMike Pro 5274 SpeechMike Pro Plus 5276 47 SpeechMike Classic 5260 / 5262 SpeechMike Classic Plus 5270 / 5272 48 6 SpeechMike Pure 5250 49 7 7.1 7.2 7.3 SpeechMike Barcode 5282 / 5284 Overzicht Gebruik de streepjescode scanner Configureer de streepjescode scanner 50 50 50 50 8 Problemen oplossen 51 9 Technische support en garantie 51 10 Technische gegevens 52 5 Gebruikershandleiding speechmike_ifu_en-de-fr-es-nl-it-sv.indb 43 NE DE R L ANDS Gebruikershandleiding 43 30.04.2008 17:38:52 1 Welkom Gefeliciteerd met uw aankoop en welkom bij Philips! Om volop te genieten van de ondersteuning die Philips biedt, kunt u een bezoek brengen aan onze website voor informatie zoals gebruikershandleidingen, softwaredownloads, garantie informatie en heel wat meer: www.philips.com/dictation. 1.1 2 Belangrijk 2.1 Veiligheid • Stel het product niet bloot aan regen of water om kortsluiting te voorkomen. • Het toestel niet blootstellen aan warmtebronnen zoals verwarmingsapparatuur of aan direct zonlicht. • Zorg ervoor dat de kabels niet afgeklemd worden, vooral aan de stekkers en de plaats waar ze uit het toestel komen. Wat is meegeleverd? 2.1.1 SpeechMike Barcode 3&$03% t&0-tt1 INS/OVR F1 B Klasse 1 laser product F4 F2 F2 PLUS SpeechMike Pro SpeechMike Ophangsteuntje SpeechMike Classic / Pro / Pure / Barcode LFH 5250 LFH 5260 LFH 5262 LFH 5270 LFH 5272 LFH 5274 LFH 5276 LFH 5282 LFH 5284 For product information and support, visit www.philips.com/dictation EN CD-ROM User manual 3 ES Manual del usuario NL Gebruikershandleiding 33 43 DE Benutzerhandbuch 13 IT Manuale di istruzioni 53 FR Manuel de l‘utilisateur 23 SV Användarhandbok 63 Gebruikershandleiding Dit product voldoet aan de eisen van: • 21CFR1040.10 en 1040.11 behalve voor afwijkingen conform Laser Notice No. 50, van 26 juli 2001. • EN60825-1:1994 + A1:2002 + A2:2001 • IEC60825-1:1993 + A1:1997 + A2:2001 De laser classificatie is aangeduid naast het scannervenster op het product. Klasse 1 Laser toestellen worden niet als schadelijk beschouwd wanneer ze gebruikt worden waarvoor ze bedoeld zijn. Volgende verklaring is vereist om te voldoen aan de US en internationale reglementeringen: 44 speechmike_ifu_en-de-fr-es-nl-it-sv.indb 44 Gebruikershandleiding 30.04.2008 17:38:52 2.2 Hergebruik van uw oude product • Uw product is ontworpen met en vervaardigd van kwalitatief hoogwaardige materialen en onderdelen, welke gerecycled en opnieuw gebruikt kunnen worden. • Producten die voorzien zijn van een symbool met een doorstreepte afvalcontainer op wieltjes vallen onder EU-richtlijn 2002/96/EC. • Laat u voorlichten over de manier waarop elektrische en elektronische producten in uw regio gescheiden worden ingezameld. • Neem bij het verwijderen van oude producten de lokale wetgeving in acht, en plaats deze niet bij het gewone huishoudelijke afval. Als u oude producten op de juiste wijze verwerkt, dan voorkomt u negatieve gevolgen voor het milieu en de volksgezondheid. 3 In gebruik nemen 3.1 Systeemvereisten • Pentium III of gelijkwaardig, 500 MHz en 256 MB RAM; Aanbevolen: Pentium IV, 1 GHz en 512 MB RAM • 75 MB ruimte op de harde schijf voor SpeechMike drivers, 250 MB voor Microsoft .NET Framework • 1 vrije USB poort • Windows Vista, Windows XP, Windows 2000, Windows ME, Windows 98 SE DOpmerking • Windows 98 SE en Windows ME besturingssystemen worden enkel ondersteund voor driver installatie! • Voor alle besturingssystemen is het aanbevolen de laatst beschikbare Service Pack te installeren. 3.2 NE DE R L ANDS AWaarschuwing Probeer het toestel niet te openen. Laat alleen geautoriseerde service technici toe het toestel te herstellen. Het gebruik van toetsen, instellingen of handelingen anders dan hierin beschreven, kunnen leiden tot schadelijke blootstelling aan laserlicht. Installatie op Windows 2000, Windows XP, Vista systemen CBelangrijk Administratorrechten zijn vereist om de software te installeren. Voor meer hulp, contacteer uw administrator. 1 Zet de PC aan. 2 Sluit de USB plug van de SpeechMike aan op een vrije USB poort. Gebruikershandleiding speechmike_ifu_en-de-fr-es-nl-it-sv.indb 45 45 30.04.2008 17:38:52 3 De New Hardware Found boodschap van Windows verschijnt en de installatie gebeurt automatisch. DOpmerking Wanneer de boodschap niet verschijnt, kijk dan na of de USB poort beschikbaar staat in de BIOS van uw systeem. Kijk in de hardware documentatie voor details of contacteer uw hardware leverancier. 4 Herstart de PC wanneer Windows dit aangeeft. 5 Plaats de installatie CD in uw CD-ROM drive. Het instelprogramma zou automatisch moeten starten. Indien dit niet het geval is, open de CD inhoud in Windows Explorer (Verkenner) en dubbelklik op het autorun.exe bestand. 6 Klik op de Install knop. 7 Volg de instructies van het instelprogramma op het scherm. 3.1 Windows 98 SE of Windows ME CD. 6 Sluit de USB plug van de SpeechMike aan op een vrije USB poort. 7 De Add New Hardware Wizard wordt getoond. Klik op de Next knop. 8 Selecteer de optie Search for the best driver for your device (recommended) (Zoek de beste driver voor uw toestel (aanbevolen)) en klik op de Next knop. 9 Activeer de optie Specify a location (Specifieer een locatie) en selecteer de Windows\inf folder. Klik op de Next knop om verder te gaan met de installatie. ⑩ Herhaal vanaf stap 6 tot alle SpeechMike componenten correct geïnstalleerd zijn. Installatie op Windows 98 SE en Windows ME systemen 1 Zet de PC aan. 2 Plaats de installatie CD in uw CD-ROM drive. Het instelprogramma zou automatisch moeten starten. Indien dit niet het geval is, open de CD inhoud in Windows Explorer (Verkenner) en dubbelklik op het autorun.exe bestand. 3 Klik op de Install knop. 4 Volg de instructies van het instelprogramma op het scherm. 5 Verwijder de installatie CD en plaats uw 46 speechmike_ifu_en-de-fr-es-nl-it-sv.indb 46 Gebruikershandleiding 30.04.2008 17:38:52 4 SpeechMike Pro 5274 SpeechMike Pro Plus 5276 Microfoon Status LED Instructie LED tt1 t&0- 3&$03% INS/O VR EOL (einde-brief )/Prioriteit Snel vooruit Snel terug Afspelen / Pauze Trackball Rechter muisknop Linker muisknop F1 F4 F2 Scrollwiel F2 PLUS SpeechMike Pro Luidspreker Trigger toets NE DE R L ANDS F1-F4: programmeerbare functietoets (enkel LFH5276) Invoeg/overschrijf LED Opname Invoegen/Overschrijven Linker muisknop Vooraanzicht Achteraanzicht D Opmerking Gebruik de Device Configuration Tool om de functies van de toetsen op de SpeechMike aan te passen naar individuele gebruikersbehoeften. Om de Device Configuration Tool te installeren, start het setup.exe bestand in de folder \Tools\Device Configuration Tool op de installatie CD. Gebruikershandleiding speechmike_ifu_en-de-fr-es-nl-it-sv.indb 47 47 30.04.2008 17:38:53 5 SpeechMike Classic 5260 / 5262 SpeechMike Classic Plus 5270 / 5272 Philips versie Microfoon LFH5260/5270 4-standenschakelaar Status LED Instructie LED INSTR INS/O VR INSTR Invoeg/overschrijf LED INS/O VR -tt1 t&0 Opname Invoegen/Overschrijven Instructie Internationale versie -tt1 EOL (einde-brief )/ Prioriteit t&0 LFH5262/5272 Linker muisknop Rechter muisknop Trackball INSTR F1 F4 F2 Scrollwiel INS/O VR F1 F4 -tt1 ''8% t&0 F2 F1-F4: programmeerbare functietoets (enkel LFH5270/5272) •Snelvooruit •Afspelen •Stop •Snelterug 4-standenschakelaar •Opname •Stop •Afspelen •Snelterug Snel vooruit F2 PLUS SpeechMike Classic F2 PLUS SpeechMike Classic F1 Luidspreker F4 Trigger toets F2 F2 PLUS SpeechMike Classic Linker muisknop Vooraanzicht Achteraanzicht D Opmerking Gebruik de Device Configuration Tool om de functies van de toetsen op de SpeechMike aan te passen naar individuele gebruikersbehoeften. Om de Device Configuration Tool te installeren, start het setup.exe bestand in de folder \Tools\Device Configuration Tool op de installatie CD. 48 speechmike_ifu_en-de-fr-es-nl-it-sv.indb 48 Gebruikershandleiding 30.04.2008 17:38:55 6 SpeechMike Pure 5250 Microfoon Status LED Instructie LED 1-": Invoeg/overschrijf LED Invoegen/Overschrijven Instructie Philips versie EOL (einde-brief )/ Prioriteit LFH5250 4-standenschakelaar 1-": •Snelvooruit •Afspelen •Stop •Snelterug SpeechMike Pure Opname SpeechMike Pure Luidspreker NE D E R LANDS Programmeerbare functietoetsen Vooraanzicht Achteraanzicht D Opmerking Gebruik de Device Configuration Tool om de functies van de toetsen op de SpeechMike aan te passen naar individuele gebruikersbehoeften. Om de Device Configuration Tool te installeren, start het setup.exe bestand in de folder \Tools\Device Configuration Tool op de installatie CD. Gebruikershandleiding speechmike_ifu_en-de-fr-es-nl-it-sv.indb 49 49 30.04.2008 17:38:56 7 SpeechMike Barcode 5282 / 5284 7.1 Overzicht Voor informatiie over de toetsen op de voorzijde van de SpeechMike, ga naar het hoofdstuk van SpeechMike Pro of SpeechMike Classic. Scan triggerknop 7.2 Scanhoek instelling Gebruik de streepjescode scanner 7.3 Configureer de streepjescode scanner De SpeechMike streepjescode scanner is voorgeconfigureerd met de klaviertaal US Engels en de suffix “carriage return” (CR). Alvorens de streepjescode scanner voor het eerst te gebruiken, is het noodzakelijk deze eerst in uw lokale klaviertaal in te stellen. Om de scanner configuratie te wijzigen, start de applicatie Barcodeconfig.exe op de installatie CD. Voor informatie over het aanpassen van de streepjescode module, ga naar de Advanced Barcode Scanner Configuration handleiding op de installatie CD die meegeleverd werd met uw SpeechMike. 1 Druk op de scan triggerknop en scan de streepjescode. Wanneer de streepjescode wordt herkend, geeft de SpeechMike een pieptoon en wordt de streepjescode informatie ingevoegd in de huidige actieve applicatie alsof het streepjescodenummer getal per getal werd ingetypt. DOpmerking • De streepjescode scanner kan scannen tot een afstand van 30 cm. • De scanhoek van de streepjescode scanner kan aangepast worden in twee posities van 25°. 50 speechmike_ifu_en-de-fr-es-nl-it-sv.indb 50 Gebruikershandleiding 30.04.2008 17:38:56 Mijn besturingssysteem reageert niet na het heropstarten Het gebruik van de Philips SpeechMike samen met USB hubs, kan er soms de oorzaak van zijn dat het besturingssysteem niet meer reageert wanneer de PC wordt heropgestart. Om dit probleem te omzeilen, moet de SpeechMike ontkoppeld worden alvorens de PC op te starten en nadien weer aangekoppeld worden. Om dit probleem op te lossen, bevelen we aan de USB hub te vervangen of de SpeechMike rechtstreeks in de USB poort van uw PC te pluggen. De SpeechMike functioneert helemaal niet Sommige PC fabrikanten limiteren het uitgangsvermogen van USB poorten tot 100mA. Deze poorten kunnen soms niet voldoende vermogen leveren om de SpeechMike te laten functioneren. Om dit probleem op te lossen, dient u de SpeechMike aan te sluiten via een self-powered hub. Gebruikershandleiding speechmike_ifu_en-de-fr-es-nl-it-sv.indb 51 9 Technische support en garantie Dit Philips product werd ontworpen en gefabriceerd volgens de hoogste kwaliteitsnormen. Mocht uw Philips product niet correct werken of defect zijn, gelieve dan contact op te nemen met uw Philips Speech Processing leverancier die u de nodige informatie zal geven over de te volgen procedure. Mocht u vragen hebben die uw dealer niet kan beantwoorden, ga dan naar www.philips.com/ dictation om ons te contacteren. De onderdelen kunnen niet door de gebruiker worden onderhouden. Open of verwijder geen kleppen die het binnenwerk van het product afschermen. Reparaties mogen uitsluitend worden uitgevoerd door servicecentra van Philips en erkende reparateurs. Als u zich hier niet aan houdt, vervallen alle garanties, uitdrukkelijk dan wel impliciet. De garantie vervalt in geval van handelingen die in deze handleiding uitdrukkelijk worden verboden of in geval van aanpassingen of montages die niet in deze handleiding worden aanbevolen of goedgekeurd. NE D E R LANDS 8 Problemen oplossen 51 30.04.2008 17:38:56 10 Technische gegevens Connectiviteit • USB aansluiting Milieuspecificaties • Voldoet aan de eisen van 2002/95/EC (RoHS) • Loodvrij gesoldeerd product Voorwaarden voor een goede werking • Temperatuur: 5° - 45° Celsius • Vochtigheid: 10 % - 90 % Luidspreker • Frequentiekarakteristiek: 200 – 6.000 Hz • Uitgangsvermogen: > 100 mW SpeechMike Barcode Compatibele streepjescodes • EAN • UPC • Code 11 / 39 / 93 / 128 • Codabar • MSI Code • RSS • Interleaved 2 of 5 • Discrete 2 of 5 Laser klasse • Klasse 1 laser product 52 speechmike_ifu_en-de-fr-es-nl-it-sv.indb 52 Afmetingen • Productafmetingen (B x D x H): 43 x 155 x 30 mm • Gewicht: • LFH5260/70: 155 g • LFH5262/72: 160 g • LFH5276: 185 g • LFH5282: 165 g • LFH5284: 200 g Systeemvereisten • Pentium III of gelijkwaardig, 500 MHz en 256 MB RAM; Aanbevolen: Pentium IV, 1 GHz en 512 MB RAM • 75 MB ruimte op de harde schijf voor SpeechMike drivers, 250 MB voor Microsoft .NET Framework • 1 vrije USB poort • Windows Vista, Windows XP, Windows 2000, Windows ME, Windows 98 SE Voorbehoud en opmerkingen Philips voert uitgebreide tests uit met de meest voorkomende systeemconfiguraties. Door de snelle opeenvolging van PC-randapparatuur en drivers is het echter niet mogelijk in alle gevallen een conflictvrije werking te garanderen. Philips kan niet verantwoordelijk geacht worden voor het verlies van gegevens. Gebruikershandleiding 30.04.2008 17:38:56 1 1.1 Benvenuto Contenuto della confezione 54 54 2 2.1 2.1.1 2.2 Importante Sicurezza SpeechMike Barcode Smaltimento di vecchi prodotti 54 54 54 55 3 3.1 3.2 3.1 Guida introduttiva Requisiti di sistema Installazione sui sistemi Windows 2000, Windows XP, Vista Installazione sui sistemi Windows 98 SE e Windows ME 55 55 55 56 4 SpeechMike Pro 5274 SpeechMike Pro Plus 5276 57 SpeechMike Classic 5260 / 5262 SpeechMike Classic Plus 5270 / 5272 58 6 SpeechMike Pure 5250 59 7 7.1 7.2 7.3 SpeechMike Barcode 5282 / 5284 Panoramica Uso dello scanner codici a barre Configurazione dello scanner codici a barre 60 60 60 60 8 Risoluzione dei problemi 61 9 Supporto tecnico e garanzia 61 10 Dati tecnici 62 5 Manuale di istruzioni speechmike_ifu_en-de-fr-es-nl-it-sv.indb 53 ITALIANO Manuale di istruzioni 53 30.04.2008 17:38:56 1 Benvenuto Congratulazioni per l’acquisto e benvenuto da Philips! Per poter beneficiare del servizio offerto da Philips, sul nostro sito web sono disponibili informazioni di supporto quali manuali per l’utente, download di software, informazioni sulla garanzia e altro ancora: www.philips.com/dictation. 1.1 2 Importante 2.1 Sicurezza • Al fine di evitare cortocircuiti, non esporre il prodotto a pioggia o acqua. • Non esporre il prodotto a calore eccessivo causato da elementi riscaldanti o dalla luce diretta del sole. • Proteggere i cavi da schiacciamento, con particolare attenzione ai punti di connessione e di uscita da/verso il prodotto. Contenuto della confezione 2.1.1 SpeechMike Barcode 3&$03% t&0-tt1 INS/OVR F1 B Prodotto laser di classe 1 F4 F2 F2 PLUS SpeechMike Pro SpeechMike Staffa di supporto SpeechMike Classic / Pro / Pure / Barcode LFH 5250 LFH 5260 LFH 5262 LFH 5270 LFH 5272 LFH 5274 LFH 5276 LFH 5282 LFH 5284 Questo prodotto è conforme a: • 21CFR1040.10 e 1040.11 tranne che alle deviazioni in base alla normativa Laser Notice n. 50, del 26 luglio 2001. • EN60825-1:1994 + A1:2002 + A2:2001 • IEC60825-1:1993 + A1:1997 + A2:2001 For product information and support, visit ES www.philips.com/dictation CD-ROM Manual del usuario 33 EN User manual 3 NL Gebruikershandleiding DE Benutzerhandbuch 13 IT Manuale di istruzioni 53 FR Manuel de l‘utilisateur 23 SV Användarhandbok 63 43 Manuale di istruzioni La classificazione del laser è indicata sul prodotto, accanto alla finestra dello scanner. I dispositivi laser di classe 1 non sono considerati pericolosi quando usati per lo scopo previsto. Le seguenti precauzioni devono essere indicate, per conformità alle normative statunitensi e internazionali: 54 speechmike_ifu_en-de-fr-es-nl-it-sv.indb 54 Manuale di istruzioni 30.04.2008 17:38:57 2.2 Smaltimento di vecchi prodotti • Il prodotto è stato progettato e realizzato con materiali e componenti di alta qualità che possono essere riciclati e riutilizzati. • Se su un prodotto si trova il simbolo del bidone con una croce sopra, significa che il prodotto è oggetto della Direttiva comunitaria 2002/96/ CE. • Informarsi sulle modalità di raccolta dei prodotti elettrici ed elettronici in vigore nella propria zona. • Attenersi alle normative locali per lo smaltimento dei rifiuti e non gettare i vecchi prodotti nei normali rifiuti domestici. Uno smaltimento adeguato dei prodotti aiuta a prevenire l’inquinamento ambientale e possibili danni alla salute. 3 Guida introduttiva 3.1 Requisiti di sistema • Pentium III o simile, 500 MHz e 256 MB RAM; consigliati: Pentium IV, 1 GHz e 512 MB RAM • Spazio nell’Hard disk: 75 MB per driver SpeechMike, 250 MB per Microsoft .NET Framework • 1 porta USB libera • Windows Vista, Windows XP, Windows 2000, Windows ME, Windows 98 SE DNota • I sistemi operativi Windows 98 SE e Windows ME sono supportati per la sola installazione dei driver! • Per tutti i sistemi operativi è consigliabile installare l’ultimo Service Pack disponibile prima di procedere all’installazione. 3.2 Installazione sui sistemi Windows 2000, Windows XP, Vista CImportante Per poter installare il software l’utente deve disporre dei diritti di amministratore. Contattare l’amministratore per ricevere ulteriore assistenza. 1 Accendere il PC. 2 Collegare la spina USB del SpeechMike a una porta USB libera. Manuale di istruzioni speechmike_ifu_en-de-fr-es-nl-it-sv.indb 55 ITALIANO AAttenzione Non cercare di aprire l’unità. Solo i tecnici dell’assistenza sono autorizzati a eseguire operazioni di riparazione sull’unità. L’uso di comandi, regolazioni, o l’esecuzione di procedure diverse da quelle specificate nel presente manuale possono determinare il pericolo di esposizione al fascio laser. 55 30.04.2008 17:38:57 3 Sarà visualizzato il messaggio Windows Trovato nuovo hardware e l’installazione sarà avviata automaticamente. DNota Se il messaggio non viene visualizzato, verificare che la porta USB sia abilitata nel BIOS del sistema. Per informazioni dettagliate consultare la documentazione hardware o contattare il produttore dell’hardware. 4 Riavviare il PC quando lo richiede Windows. 5 Inserire nell’unità CD-ROM il CD di installazione. Il programma di installazione si dovrebbe avviare automaticamente. Se così non fosse, accedere con Esplora risorse al contenuto del CD e fare doppio clic sul file autorun.exe. 6 Fare clic sul pulsante Installa. 7 Seguire le istruzioni del programma di installazione visualizzate sullo schermo. 3.1 proprio CD di Windows 98 SE o Windows ME. 6 Collegare la spina USB del SpeechMike a una porta USB libera. 7 7.Viene visualizzato il messaggio Add New Hardware Wizard (Installazione guidata nuovo hardware). Fare clic su Next (Avanti). 8 Selezionare l’opzione Search for the best driver for your device (recommended) [Cerca il driver più adatto all’apparecchio (consigliato)] e fare clic su Next (Avanti). 9 Attivare l’opzione Specify a location (Specificare una posizione) e selezionare la cartella Windows\inf. Fare clic sul pulsante Next (Avanti) per proseguire nell’installazione. ⑩ Ripetere la procedura dal punto 6 fino a che tutti i componenti dello SpeechMike vengono correttamente installati. Installazione sui sistemi Windows 98 SE e Windows ME 1 Accendere il PC. 2 Inserire nell’unità CD-ROM il CD di installazione. Il programma di installazione si dovrebbe avviare automaticamente. Se così non fosse, accedere con Esplora risorse al contenuto del CD e fare doppio clic sul file autorun.exe. 3 Fare clic sul pulsante Installa. 4 Seguire le istruzioni del programma di installazione visualizzate sullo schermo. 5 Rimuovere il CD di installazione e inserire il 56 speechmike_ifu_en-de-fr-es-nl-it-sv.indb 56 Manuale di istruzioni 30.04.2008 17:38:57 4 SpeechMike Pro 5274 SpeechMike Pro Plus 5276 Microfono LED registrazione LED istruzioni tt1 t&0- 3&$03% INS/O VR EOL (fine lettera) / Priorità Avanti veloce Riavvolgi veloce Riproduci / Pausa Trackball Pulsante destro del mouse Pulsante sinistro del mouse F1-F4: pulsanti funzione programmabili (solo LFH5276) LED inserisci/sovrascrivi Registra Inserisci/sovrascrivi F1 F4 F2 Rotellina di scorrimento F2 PLUS SpeechMike Pro Altoparlante Pulsante trigger Pulsante sinistro del mouse Vista retro Manuale di istruzioni speechmike_ifu_en-de-fr-es-nl-it-sv.indb 57 ITALIANO Vista frontale D Nota Usare il Device Configuration Tool (Strumento di configurazione dispositivo) per personalizzare le funzioni dei tasti dello SpeechMike affinché soddisfino le proprie esigenze individuali. Per installare il Device Configuration Tool, avviare il file setup.exe nella cartella \Tools\Device Configuration Tool sul CD di installazione. 57 30.04.2008 17:38:58 5 SpeechMike Classic 5260 / 5262 SpeechMike Classic Plus 5270 / 5272 Versione Philips Microfono LFH5260/5270 LED registrazione LED istruzioni INSTR INS/O VR LED inserisci/ sovrascrivi Interruttore a 4 posizioni INSTR INS/O VR -tt1 t&0 Registra Inserisci/sovrascrivi Istruzioni Versione internazionale -tt1 EOL (fine lettera) / Priorità t&0 LFH5262/5272 Pulsante destro del mouse Trackball Pulsante sinistro del mouse INSTR F1 F4 F2 Rotellina di scorrimento INS/O VR F1 F4 -tt1 ''8% t&0 F2 F1-F4: pulsanti funzione programmabili (solo LFH5270/5272) •Avantiveloce •Riproduci •Stop •Riavvolgiveloce Interruttore a 4 posizioni •Registra •Stop •Riproduci •Riavvolgiveloce Avanti veloce F2 PLUS SpeechMike Classic F2 PLUS SpeechMike Classic F1 Altoparlante F4 Pulsante trigger F2 F2 PLUS SpeechMike Classic Pulsante sinistro del mouse Vista frontale Vista retro D Nota Usare il Device Configuration Tool (Strumento di configurazione dispositivo) per personalizzare le funzioni dei tasti dello SpeechMike affinché soddisfino le proprie esigenze individuali. Per installare il Device Configuration Tool, avviare il file setup.exe nella cartella \Tools\Device Configuration Tool sul CD di installazione. 58 speechmike_ifu_en-de-fr-es-nl-it-sv.indb 58 Manuale di istruzioni 30.04.2008 17:38:59 6 SpeechMike Pure 5250 Microfono LED registrazione LED istruzioni LED inserisci/sovrascrivi 1-": Inserisci/sovrascrivi Istruzioni Versione Philips EOL (fine lettera) / Priorità LFH5250 Interruttore a 4 posizioni 1-": •Avantiveloce •Riproduci •Stop •Riavvolgiveloce SpeechMike Pure Registra SpeechMike Pure Altoparlante Pulsanti funzione programmabili Vista retro Manuale di istruzioni speechmike_ifu_en-de-fr-es-nl-it-sv.indb 59 ITAL IANO Vista frontale D Nota Usare il Device Configuration Tool (Strumento di configurazione dispositivo) per personalizzare le funzioni dei tasti dello SpeechMike affinché soddisfino le proprie esigenze individuali. Per installare il Device Configuration Tool, avviare il file setup.exe nella cartella \Tools\Device Configuration Tool sul CD di installazione. 59 30.04.2008 17:39:01 7 SpeechMike Barcode 5282 / 5284 7.1 Panoramica Per informazioni sui tasti sul lato frontale dello SpeechMike, fare riferimento al capitolo relativo allo SpeechMike Pro o SpeechMike Classic. Interruttore scansione 7.2 Regolazione angolo scansione Uso dello scanner codici a barre 1 Premere il pulsante di scansione ed effettuare la lettura del codice a barre. Quando riconosce il codice a barre, lo SpeechMike emette un “bip” e le informazioni contenute nel codice a barre vengono inserite nell’applicazione attiva al momento, come se il numero del codice a barre venisse inserito carattere per carattere. 7.3 Configurazione dello scanner codici a barre Lo scanner per codici a barre SpeechMike è pre-configurato con la lingua Inglese americano per la tastiera e il suffisso “ritorno a capo” (CR). Prima di poter usare lo scanner per codici a barre per la prima volta, è necessario adattarlo alla propria lingua di tastiera. Per modificare la configurazione dello scanner, avviare l’applicazione Barcodeconfig.exe sul CD di installazione. Per informazioni sulla personalizzazione del modulo codice a barre, fare riferimento all’Advanced Barcode Scanner Configuration manual (Manuale per la configurazione avanzata dello scanner per codici a barre) sul CD di installazione fornito con lo SpeechMike. DNota • Lo scanner per codici a barre consente la lettura di codici a barre da una distanza fino a 30 cm. • L’angolo di scansione dello scanner per codici a barre può essere regolato in due posizioni a scatti di 25°. 60 speechmike_ifu_en-de-fr-es-nl-it-sv.indb 60 Manuale di istruzioni 30.04.2008 17:39:01 8 Risoluzione dei problemi Il mio sistema operativo si blocca dopo il riavvio L’uso dello SpeechMike Philips insieme a certi concentratori USB può provocare il blocco del sistema operativo all’avvio del PC. Per aggirare il problema, scollegare lo SpeechMike prima di avviare il PC e ricollegarlo in seguito. Per risolvere il problema consigliamo di riposizionare il concentratore USB o di collegare lo SpeechMike direttamente alla porta USB del PC. Questo prodotto è stato progettato e costruito con i più alti standard qualitativi. Se il vostro prodotto Philips non funzionasse correttamente contattate il vostro rivenditore Philips Speech Processing che provvederà a darvi le informazioni necessarie su come procedere. Per maggiori informazioni oppure domande alle quali il vostro rivenditore non è in grado di rispondere, visitate il nostro sito e contattateci direttamente www.philips.com/dictation. I componenti di questo prodotto non sono riparabili dall’utente. Non aprire né rimuovere i coperchi di protezione e non inserire oggetti non idonei per i connettori specifici. Le riparazioni possono essere eseguite soltanto presso i centri di assistenza e di riparazione autorizzati. Il mancato rispetto di questa condizione renderà nulle tutte le garanzie esplicite e implicite. Tutte le operazioni espressamente vietate in questo manuale, le procedure di regolazione o montaggio non consigliate o autorizzate nel presente manuale invalidano la garanzia. ITAL IANO Lo SpeechMike non ha alcuna funzionalità Alcuni PC prevedono la limitazione della potenza in uscita delle porte USB a 100mA. È possibile che queste porte non forniscano sufficiente energia per il corretto funzionamento dello SpeechMike. Per risolvere il problema, collegare lo SpeechMike tramite un concentratore con alimentazione autonoma. 9 Supporto tecnico e garanzia Manuale di istruzioni speechmike_ifu_en-de-fr-es-nl-it-sv.indb 61 61 30.04.2008 17:39:01 10 Dati tecnici Connessioni • Connettore USB Specifiche ecologiche • Conforme alla norma 2002/95/CE (RoHS) • Prodotto in lega privo di piombo Condizioni operative • Temperatura: 5° − 45° C • Umidità: 10 % − 90 % Altoparlante • Risposta in frequenza: 200 – 6.000 Hz • Potenza in uscita: > 100 mW SpeechMike Barcode Codici a barre compatibili • EAN • UPC • Code 11 / 39 / 93 / 128 • Codabar • MSI Code • RSS • Interleaved 2 of 5 • Discrete 2 of 5 Classe laser • Prodotto laser di classe 1 62 speechmike_ifu_en-de-fr-es-nl-it-sv.indb 62 Dimensioni • Dimensioni del prodotto (largh. × lungh. × alt.): 43 x 155 x 30 mm • Peso: • LFH5260/70: 155 g • LFH5262/72: 160 g • LFH5276: 185 g • LFH5282: 165 g • LFH5284: 200 g Requisiti di sistema • Pentium III o simile, 500 MHz e 256 MB RAM; consigliati: Pentium IV, 1 GHz e 512 MB RAM • Spazio nell’Hard disk: 75 MB per driver SpeechMike, 250 MB per Microsoft .NET Framework • 1 porta USB libera • Windows Vista, Windows XP, Windows 2000, Windows ME, Windows 98 SE Limitazione della responsabilità e note La società Philips effettua una complessa procedura di test sui prodotti utilizzando le configurazioni più diffuse. Ma dato il costante aggiornamento dei dispositivi aggiuntivi per PC, non è possibile garantire un uso senza malfunzionamenti. Manuale di istruzioni 30.04.2008 17:39:01 SV E N SK A Användarhandbok 1 1.1 Välkommen Förpackningens innehåll 64 64 2 2.1 2.1.1 2.2 Viktigt Säkerhet SpeechMike Barcode Kassering av förbrukad produkt 64 64 64 65 3 3.1 3.2 3.1 Att komma igång Systemkrav Installation i Windows 2000, Windows XP, Vista-system Installation i Windows 98 SE och Windows ME-system 65 65 65 66 4 SpeechMike Pro 5274 SpeechMike Pro Plus 5276 67 SpeechMike Classic 5260 / 5262 SpeechMike Classic Plus 5270 / 5272 68 6 SpeechMike Pure 5250 69 7 7.1 7.2 7.3 SpeechMike Barcode 5282 / 5284 Översikt Använda streckkodsläsaren Streckkodsläsarens konfiguration 70 70 70 70 8 Felsökning 71 9 Tekniskt support och garanti 71 10 Tekniska data 72 5 Användarhandbok speechmike_ifu_en-de-fr-es-nl-it-sv.indb 63 63 30.04.2008 17:39:01 1 Välkommen 2 Viktigt 2.1 Säkerhet Grattis till ditt inköp och välkommen till Philips! För att använda den service som Philips erbjuder, besök vår hemsida www.philips.com/dictation. Där finner du information såsom användarhandböcker, information om garanti, nerladdning av programvara med mera. 1.1 Förpackningens innehåll • Utsätt inte produkten för vatten eller regn eftersom det kan orsaka kortslutning. • Utsätt inte produkten för höga temperaturer från t ex element eller för direkt solljus. • Se till att kablarna inte kläms, speciellt vid kontakterna och den punkt där kablarna ansluts till enheten. 2.1.1 SpeechMike Barcode 3&$03% t&0-tt1 INS/OVR F1 B Klass 1 laserprodukt F4 F2 F2 PLUS SpeechMike Pro SpeechMike Väggfäste SpeechMike Classic / Pro / Pure / Barcode LFH 5250 LFH 5260 LFH 5262 LFH 5270 LFH 5272 LFH 5274 LFH 5276 LFH 5282 LFH 5284 Denna produkt uppfyller: • 21CFR1040.10 och 1040.11 med undantag av avvikelser i enlighet med Laser Notice No. 50, daterad den 26 Juli 2001. • EN60825-1:1994 + A1:2002 + A2:2001 • IEC60825-1:1993 + A1:1997 + A2:2001 For product information and support, visit www.philips.com/dictation EN CD-ROM User manual 3 ES Manual del usuario NL Gebruikershandleiding 33 43 DE Benutzerhandbuch 13 IT Manuale di istruzioni 53 FR Manuel de l‘utilisateur 23 SV Användarhandbok 63 Användarhandbok Laserklassifikationen finns i närheten av avläsarens skärm på produkten. När produkten används på det sätt den är avsedd att användas är Klass 1 laserenheter inte riskfyllda att hantera. Följande meddelande behövs för att uppfylla internationella bestämmelser: 64 speechmike_ifu_en-de-fr-es-nl-it-sv.indb 64 Användarhandbok 30.04.2008 17:39:02 2.2 Kassering av förbrukad produkt • Produkten är utvecklad och tillverkad av högkvalitativa material och komponenter som kan både återvinnas och återanvändas. • När symbolen med en överkryssad papperskorg visas på produkten innebär det att produkten omfattas av det europeiska direktivet 2002/96/ EG. • Avyttra produkten på närmaste återvinningsstation för elektriska och elektroniska produkter. • Följ de lokala bestämmelserna och släng inte förbrukade produkter tillsammans med hushållsavfall. Genom att kassera förbrukade produkter på rätt sätt bidrar du till att minska negativa effekter på miljö och hälsa. 3 Att komma igång 3.1 SV E N SK A AVarning Försök inte att öppna enheten. Endast certifierade servicetekniker bör utföra reparationer. Användning av några andra kontroller, justeringar eller procedurer än de som beskrivs i denna handbok kan leda till att du utsätts för farligt laserljus. Systemkrav • Pentium III eller liknande, 500 MHz och 256 MB RAM; Rekommenderas: Pentium IV, 1 GHz och 512 MB RAM • 75 MB hårddiskutrymme för SpeechMikedrivrutiner, 250 MB för Microsoft .NET Framework • USB-port • Windows Vista, Windows XP, Windows 2000, Windows ME, Windows 98 SE DObservera • I operativsystemen Windows 98 SE och Windows ME stöds endast installation av drivrutin. • Senast tillgängliga service pack ska vara installerat före installation i alla operativsystem. 3.2 Installation i Windows 2000, Windows XP, Vista-system CViktigt Administratörsrättigheter krävs för att installera programvaran. För mer information, kontakta din administratör. 1 Sätt på datorn. 2 Anslut SpeechMikes USB-kontakt till en ledig USB-port. Användarhandbok speechmike_ifu_en-de-fr-es-nl-it-sv.indb 65 65 30.04.2008 17:39:02 3 Meddelandet Ny maskinvara hittades visas och installationen fortsätter automatiskt. DObservera Om meddelandet inte visas, kontrollera att USB-porten är ansluten i systemets BIOS. Se maskinvarans dokumentation för mer information eller kontakta återförsäljaren av maskinvaran. 4 Starta om datorn när Windows uppmanar dig att göra det. 5 Sätt i installations-CD:n i CD-enheten. Installationsprogrammet ska starta automatiskt. Om det inte gör det, öppna CD:ns innehåll i Windows utforskare och dubbelklicka på filen autorun.exe. 6 Klicka på Installera-knappen. 7 Följ installationsprogrammets instruktioner på skärmen. 3.1 6 Anslut SpeechMikes USB-kontakt till en ledig USB-port. 7 Guiden Lägg till ny maskinvara visas. Klicka på Nästa-knappen. 8 Välj alternativet Sök efter lämplig drivrutin för din enhet (rekommenderas) och klicka på Nästa-knappen. 9 Aktivera alternativet Ange en sökväg och välj mappen Windows\inf. Klicka på Nästaknappen för att fortsätta med installationen. ⑩ Repetera från steg 6 tills alla SpeechMikekomponenter är korrekt installerade. Installation i Windows 98 SE och Windows ME-system 1 Sätt på datorn. 2 Sätt i installations-CD:n i CD-enheten. Installationsprogrammet ska starta automatiskt. Om det inte gör det, öppna CD:ns innehåll i Windows utforskare och dubbelklicka på filen autorun.exe. 3 Klicka på Installera-knappen. 4 Följ installationsprogrammets instruktioner på skärmen. 5 Ta ut installations-CD:n och sätt i din CDskiva med Windows 98 SE eller Windows ME. 66 speechmike_ifu_en-de-fr-es-nl-it-sv.indb 66 Användarhandbok 30.04.2008 17:39:02 SpeechMike Pro 5274 SV E N SK A 4 SpeechMike Pro Plus 5276 Mikrofon Inspelning LED Instruktion LED tt1 t&0- 3&$03% INS/O VR EOL (end-of-letter)/Prioritet Snabbspolning framåt Snabbspolning bakåt Spela upp / Paus Styrkula Höger musknapp Vänster musknapp F1-F4: programmerbara funktionsknappar (Endast LFH5276) Lägg till/Skriv över LED Spela in Lägg till/Skriv över F1 F4 F2 Scrollhjul F2 PLUS SpeechMike Pro Högtalare Avtryckar-knapp Vänster musknapp Främre översikt Bakre översikt D Observera Använd Device Configuration Tool för att anpassa SpeechMikes knappfunktioner så att de anpassas efter användarens behov. För att installera Device Configuration Tool starta filen setup.exe i mappen \Tools\Device Configuration Tool på installations-CD:n. Användarhandbok speechmike_ifu_en-de-fr-es-nl-it-sv.indb 67 67 30.04.2008 17:39:02 5 SpeechMike Classic 5260 / 5262 SpeechMike Classic Plus 5270 / 5272 Mikrofon Philips version LFH5260/5270 Skjutreglage Inspelning LED Instruktion LED INSTR INS/O VR INS/O INSTR Lägg till/Skriv över LED VR -tt1 t&0 Spela in Lägg till/Skriv över Instruktion -tt1 EOL (end-of-letter)/ Prioritet t&0 Internationell version LFH5262/5272 Vänster musknapp Höger musknapp Styrkula F1 F4 F2 Scrollhjul INS/O INSTR VR F1 F4 -tt1 ''8% t&0 F2 F1-F4: programmerbara funktionsknappar (Endast LFH5270/5272) •Snabbspolaframåt •Spelaupp •Stopp •Snabbspolabakåt Skjutreglage •Spelain •Stopp •Spelaupp •Snabbspolabakåt Snabbspola framåt F2 PLUS SpeechMike Classic F2 PLUS SpeechMike Classic F1 Högtalare F4 Avtryckar-knapp F2 F2 PLUS SpeechMike Classic Vänster musknapp Främre översikt Bakre översikt D Observera Använd Device Configuration Tool för att anpassa SpeechMikes knappfunktioner så att de anpassas efter användarens behov. För att installera Device Configuration Tool starta filen setup.exe i mappen \Tools\Device Configuration Tool på installations-CD:n. 68 speechmike_ifu_en-de-fr-es-nl-it-sv.indb 68 Användarhandbok 30.04.2008 17:39:04 SpeechMike Pure 5250 SV E N SK A 6 Mikrofon Inspelning LED Instruktion LED Lägg till/Skriv över LED 1-": Lägg till/Skriv över Instruktion EOL (end-of-letter)/ Prioritet Philips version LFH5250 1-": Skjutreglage •Snabbspolaframåt •Spelaupp •Stopp •Snabbspolabakåt SpeechMike Pure Spela in SpeechMike Pure Högtalare Programmable function buttons Främre översikt Bakre översikt D Observera Använd Device Configuration Tool för att anpassa SpeechMikes knappfunktioner så att de anpassas efter användarens behov. För att installera Device Configuration Tool starta filen setup.exe i mappen \Tools\Device Configuration Tool på installations-CD:n. Användarhandbok speechmike_ifu_en-de-fr-es-nl-it-sv.indb 69 69 30.04.2008 17:39:05 7 SpeechMike Barcode 5282 / 5284 7.1 Översikt För information om knapparna på framsidan av SpeechMike, se kapitlet om SpeechMike Pro eller SpeechMike Classic. Skanningsavtryckare 7.2 Justering av skanningsvinkel Använda streckkodsläsaren 1 Tryck på skanningsavtryckaren och läs av streckkoden. När streckkoden registreras sänder SpeechMike en signal och streckkodsinformationen läggs till i den aktiva applikationen som om streckkoden skrevs in siffra för siffra. 7.3 Streckkodsläsarens konfiguration Din SpeechMike Barcode avläsare har förkonfigurerats med tangentbordsspråket US English och suffixet ”vagnretur” (carriage return, CR). Innan du använder streckkodsläsaren för första gången, måste du anpassa den till ditt tangentbords nationella språk. Vanligen gör man detta endast en gång. Om du tänker förändra avläsarens konfiguration, klicka på Barcodeconfig.exe, programmet för avläsarens konfiguration som finns på installations-CD:n. Mer information om hur du anpassar streckkodsläsaren enligt egna behov hittar du i användarhandboken eller i Advanced Barcode Scanner Configuration Guide på CD:n. DObservera • Streckkodsläsaren möjliggör avläsning av streckkoder på ett avstånd av upp till 30 cm. • Streckkodsläsarens avläsningsvinkel kan justeras i två positioner med 25 °. 70 speechmike_ifu_en-de-fr-es-nl-it-sv.indb 70 Användarhandbok 30.04.2008 17:39:05 Mitt operativsystem slutar svara efter omstart Om du använder Philips SpeechMike tillsammans med vissa USB-hubbar kan det hända att operativsystemet slutar svara när datorn startas. För att åtgärda detta ska du dra ut kabeln till SpeechMike innan du startar datorn och sedan ansluta den igen när datorn har startats. För att lösa problemet rekommenderar vi att du byter ut USB-hubben eller ansluter SpeechMike direkt till datorns USB-port. SpeechMike fungerar inte alls Vissa datortillverkare begränsar utmatningsströmmen från USB-portar till 100 mA. Dessa portar kanske inte kan erbjuda tillräckligt med ström för att SpeechMike ska fungera ordentligt. För att lösa problemet, anslut SpeechMike via en självströmförsörjande hubb. Användarhandbok speechmike_ifu_en-de-fr-es-nl-it-sv.indb 71 9 Tekniskt support och SV E N SK A 8 Felsökning garanti Denna Philips-produkt är utformad och tillverkad enligt högsta kvalitetsstandarder. Om din Philips-produkt inte fungerar korrekt eller felaktigt, kontakta återförsäljaren av Philips Speech Processing för information som krävs för att kunna fortsätta. Om du har frågor som din återförsäljare inte kan svara på eller andra frågor, besök www. philips.com/dictation för att kontakta oss. Inga komponenter får repareras av användaren. Skydd som finns inne i produkten får inte öppnas eller avlägsnas. Reparationer får endast utföras av Philips-personal eller officiella serviceverkstäder. Om detta inte följs upphör all garanti att gälla, såväl uttryckt som underförstådd. Garantin upphör att gälla vid användning som förbjuds enligt den här användarhandboken, eller vid ändringar eller monteringsprocedurer som inte rekommenderas eller godkänns enligt den här användarhandboken. 71 30.04.2008 17:39:06 10 Tekniska data Anslutning • USB-anslutning Miljöspecifikation • Överensstämmer med 2002/95/EC (RoHS) • Blyfri metallprodukt Användningsmiljö • Temperatur: 5° - 45° Celsius • Luftfuktighet: 10 % - 90 % Högtalare • Akustiskt frekvenssvar: 200 – 6000 Hz • Utmatningsström: > 100 mW SpeechMike Barcode Kompatibla streckkoder • EAN • UPC • Code 11 / 39 / 93 / 128 • Codabar • MSI Code • RSS • Interleaved 2 of 5 • Discrete 2 of 5 Laserklass • Klass 1 laserprodukt 72 speechmike_ifu_en-de-fr-es-nl-it-sv.indb 72 Specifications • Produktens mått (B x L x H): 43 x 155 x 30 mm • Vikt: • LFH5260/70: 155 g • LFH5262/72: 160 g • LFH5276: 185 g • LFH5282: 165 g • LFH5284: 200 g Systemkrav • Pentium III eller liknande, 500 MHz och 256 MB RAM; Rekommenderas: Pentium IV, 1 GHz och 512 MB RAM • 75 MB ledigt utrymme på hårddisken för SpeechMike drivrutiner, 250 MB för Microsoft .NET Framework • En självströmförsörjande USB-port • Windows Vista, Windows XP, Windows 2000, Windows ME, Windows 98 SE Friskrivningsklausul och meddelanden Philips utför omfattande tester med de flesta populära konfigurationer. Eftersom datortillägg och enheters drivrutiner uppdateras kontinuerligt, kan dock en konfliktfri användning inte garanteras. Användarhandbok 30.04.2008 17:39:06 speechmike_ifu_en-de-fr-es-nl-it-sv.indb 73 30.04.2008 17:39:06 speechmike_ifu_en-de-fr-es-nl-it-sv.indb 74 30.04.2008 17:39:06 Declaration of Conformity Tested to comply with FCC standards FOR HOME OR OFFICE USE Model Number: LFH 5250, LFH 5260, LFH 5262, LFH 5270, LFH 5272, LFH 5274, LFH 5276, LFH 5282, LFH 5284 Trade Name: SpeechMike Classic, SpeechMike Pro, SpeechMike Pure, SpeechMike Barcode Responsible Party: Philips Speech Processing Address: 64 Perimeter Center East, Atlanta, GA 30346, USA Telephone number:888-260-6261 Website: www.philips.com/dictation This device complies with Part 15 of the FCC Rules. Operation is subject to the following two conditions: 1) This device may not cause harmful interference. 2) This device must accept any interference received, including interference that may cause undesired operation. The CE mark confirms that the device corresponds to the relevant guidelines of the European Union. The cardboard used for packaging can be recycled. This electronic device contains recyclable material. speechmike_ifu_en-de-fr-es-nl-it-sv.indb 75 30.04.2008 17:39:06 Discover the comprehensive range of high-end dictation products from Philips www.philips.com/dictation Specifications are subject to change without notice. Trademarks are the property of Royal Philips Electronics or their respective owners. © 2008 Royal Philips Electronics. All rights reserved. Document Version 1.0, 30/04/2008. 5103 109 9627.2 speechmike_ifu_en-de-fr-es-nl-it-sv.indb 76 30.04.2008 17:39:06