1
Tuner Box
User Manual
Starting
Picture
•
•
Size
•
Auto Wide
•
16:9
•
Wide Zoom
•
Zoom
•
4:3
•
Just Scan
Screen Mode
•
16:9
•
Wide Zoom
•
Zoom
•
4:3
Channel
•
Country
•
Auto Store
•
Manual Store
•
•
Programme
•
Colour System
•
Sound System
•
Channel
•
Search
•
Store
Channel Manager
•
Channel List
•
Child Lock
•
Sort
•
Name
•
Fine Tune
•
LNA
Setup
•
Plug & Play
•
Language
Digital Menu
•
•
•
•
guide
•
Now & Next Guide
•
Full Guide
•
Scheduled List
•
Default Guide
Digital Channel
•
Country
•
Auto Store
•
Manual Store
•
Edit Favourite Channels
•
Channel List
Setup
•
Menu Transparency
•
Change PIN
•
Parental Lock
•
Subtitle
•
Subtitle Mode
•
Audio Format
•
Audio Description
•
Digital Text
•
Time Zone
•
Common Interface
•
System
Language
•
Audio Language
•
Subtitle Language
•
Teletext Language
•
Preference
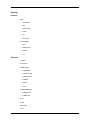
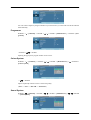
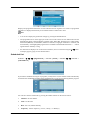
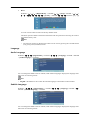
Picture
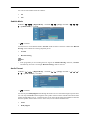
Size
D.MENU →[Picture] → ENTER → ENTER→[Size]
→
, → ENTER
Use to select PC, DVI or other external input sources connected to the LCD Display. Use to select the
screen of your choice.
1.
Auto Wide
: Automatically adjusts the picture size to the "16:9" aspect ratio.
2.
16:9
: Sets the picture to 16:9 wide mode.
3.
Wide Zoom
: Magnify the size of the picture more than 4:3.
4.
Zoom
: Magnifies the size of the picture on the screen.
5.
4:3
: Sets the picture to 4:3 normal mode.
6.
Just Scan
: Use the function to see the full image without any cutoff when HDMI (720p/1080i/1080p), DTV
(1080i) signals are input.
Note
Auto Wide function is available only in TV, DTV, AV mode.
In PC Mode, only 16:9 and 4:3 mode can be adjusted.
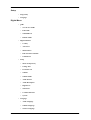
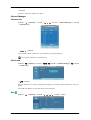
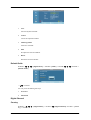
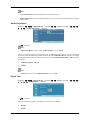
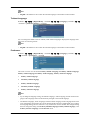
Screen Mode
D.MENU →[Picture] → ENTER → → ENTER
→
, → ENTER
Only when setting the picture size to Auto Wide can the user determine the Screen mode. Each
individual European country requires a different picture size so this function is intended to help users
to select it.
“Screen mode” is supported in TV, Ext., Component (480i/1080i) and HDMI (480i/1080i)
Picture Size is available in Auto Wide mode
This function is not available in PC or Component, Ext., HDMI mode.
1.
16:9
2.
Wide Zoom
3.
Zoom
4.
4:3
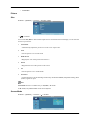
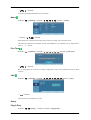
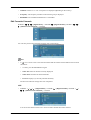
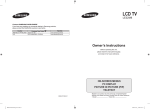
Channel
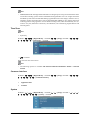
Country
D.MENU → →[Channel] → ENTER→ ENTER →[Country]
→
, → ENTER
Select the country in which the product is being used before you use the Auto Store feature. If you do
not see your country in the list, select Others.
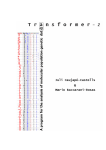
Auto Store
D.MENU → →[Channel] → ENTER → → ENTER →[Auto Store]
You can scan the frequency ranges available on your television in your area and store all the channels
found automatically.
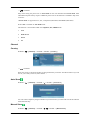
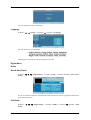
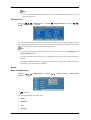
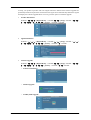
Manual Store
D.MENU → →[Channel] → ENTER → → → ENTER →[Manual Store]
You can scan the frequency ranges available on your television in your area and store all the channels
found manually.
Programme
D.MENU → →[Channel] → ENTER → → → ENTER →[Manual Store] → ENTER →[Programme]
→ENTER →
,
→ ENTER
Inputting the appropriate program number on the screen.
Colour System
D.MENU → →[Channel] → ENTER → → → ENTER →[Manual Store] →
[Colour System]
→
,
→ENTER→
→ ENTER
Adjusts repeatedly until the colour is of the best quality.
(Auto <-> PAL <-> SECAM <-> NTSC4.43 )
Sound System
D.MENU → →[Channel] → ENTER → → → ENTER →[Manual Store] →
→ [Sound System]
→ →ENTER
→
,
→ ENTER
Adjusts repeatedly until the sound is of the best quality.
Channel
D.MENU → →[Channel] → ENTER → → → ENTER →[Manual Store] → → → →ENTER
→ [Channel]
→
, / ,
→ ENTER
You can store television channels, including those received via cable networks.
When storing channels manually, you can choose:
Whether or not to store each of the channels found. The Programme number of each stored channel
which you wish to identify
- C (Air channel mode): You can select a channel by entering the assigned number to each air broadcasting station in this mode.
- S (Cable channel mode): You can select a channel by entering the assigned number for each cable
channel in this mode.
Search
D.MENU → →[Channel] → ENTER → → → ENTER →[Manual Store] → →
ENTER→ [Search]
→
,
→ → →
→ ENTER
The tuner scans the frequency range until the first channel or the channel that you selected is received
on your screen.
Store
D.MENU → →[Channel] → ENTER → → → ENTER →[Manual Store] → →
→ENTER→ [Store]
→ → →
→ ENTER
It's used to restore the number user inputs.
Channel Manager
Channel List
D.MENU → →[Channel] → ENTER → → → → ENTER →[Channel Manager] →ENTER
→ [Channel List]
→
, / ,
→ ENTER
You can add or delete a channel so only channels you want are displayed.
is active when Child Lock is selected to On.
Child Lock
D.MENU → →[Channel] → ENTER → → → → ENTER →[Channel Manager] → →ENTER
→ [Child Lock]
→
, → ENTER
Protects children from viewing inappropriate programs by blocking certain broadcast or video programs.
The Child Lock feature can be selected only from the remote.
Sort
D.MENU → →[Channel] → ENTER → → → → → ENTER →[Sort]
→
, / ,
→ ENTER
It's used to exchange the numbers of two channels.
Name
D.MENU → →[Channel] → ENTER → → → → → → ENTER →[Name]
→ ENTER →
, / ,
→ ENTER
Name the device connected to the input jacks to make your input source selection easier.
The following characters are available: Letters of the alphabet (A~Z) / Numbers (0~9) / Special characters (+, -, *, /, space)
Fine Tune
D.MENU → →[Channel] → ENTER → → → → → → → ENTER →[Fine Tune]
→
, / ,
→ ENTER
Due to weak signals or an incorrect antenna configuration, some of the channels may not be tuned
correctly.
LNA
D.MENU → →[Channel] → ENTER → → → → → → → → ENTER →[LNA]
→
, → ENTER
Turns the low noise amplifier on or off.
Setup
Plug & Play
D.MENU → → →[Setup] → ENTER →ENTER →[Plug & Play]
You can manage the entire configuration.
Language
D.MENU → → →[Setup] → ENTER→ →ENTER →[Language]
You can choose one of 18 languages.
The language chosen affects only the language of the OSD.
Digital Menu
Guide
Now & Next Guide
D.MENU → → → →[Digital Menu] → ENTER→[Guide] → ENTER→ENTER →[Now & Next
Guide]
For the six channels indicated in the left-hand column, displays the Current programme and the Next
programme information.
Full Guide
D.MENU → → → →[Digital Menu] → ENTER→[Guide] → ENTER→ →ENTER →[Full
Guide]
Displays the programme information as time ordered One hour segments. Two hours of programme
information is displayed which may be scrolled forwards or backwards in time.
Note
•
You can also display the guide menu simply by pressing the GUIDE button.
•
The programme title is on the upper part of the screen center. Please click on INFO button for the
detailed information. Channel Number, Running Time, Status Bar, Parental Level, Video Quality
Information(HD/SD), Sound Modes, Subtitle or Teletext, Languages of Subtitle or Teletext, and
brief summary of the highlighted programme are included on the detailed information. "..." will be
appeared if the summary is long.
•
Six channels are displayed. To scroll between channels, move to a channel using the or button.
To display page by page, use the channel button.
Scheduled List
D.MENU → → → →[Digital Menu] → ENTER→[Guide] → ENTER→ → →ENTER →
[Scheduled List]
If you make a scheduled viewing list of programs you may like to see, the channel will be automatically
switched to the scheduled Programme at the scheduled time even if you are watching another program.
You can also set hour and minute by pressing the number buttons on the remote control.
1.
Channel : Set the channel.
2.
Time : Set the time.
3.
Date : Set Year, Month and Day.
4.
Frequency : Set the frequency. ("Once", "Daily", or "Weekly")
1.
Save
Save the adjusted schedule.
2.
Cancel
Cancel the adjusted schedule.
3.
Add Programme
Add a new schedule.
4.
Edit
Re-adjust the selected schedule.
5.
Delete
Delete the selected schedule.
Default Guide
D.MENU → → → →[Digital Menu] → ENTER→[Guide] → ENTER→ → → →ENTER →
[Default Guide]
→
, → ENTER
You can preset the default guide style.
1.
Now/Next
2.
Full Guide
Digital Channel
Country
D.MENU → → → →[Digital Menu] → ENTER→ →[Digital Channel]→ENTER →[Country] → ENTER
→
, → ENTER
Select the country in which the product is being used before you use the Auto Store feature. If you do
not see your country in the list, select Others.
Auto Store
D.MENU → → → →[Digital Menu] → ENTER→ →[Digital Channel]→ENTER →
[Auto Store] → ENTER
→
You can update the channel list when the broadcaster adds new Services or if you move the TV to a
new location.
Note
•
Even though you have changed the country setting in this menu, the country setting for Analog TV
is not changed .
•
When it has finished, the number of scanned services will be displayed.
•
The existing favourite channel list will not be deleted when the channel list is updated.
•
To stop the scan before it has finished, press the ENTER button with "Stop" selected.
•
If the signal status is poor, the "No Service found! Check the aerial connection" message is
displayed.
Manual Store
D.MENU → → → →[Digital Menu] → ENTER→ →[Digital Channel]→ENTER → → →
[Manual Store] → ENTER
→
,
→ ENTER
You can specify the channel for a fast channel search.
•
Channel: Channel "5" to "69" in sequence are displayed (depending on the country)
•
Frequency: The frequency available in the Channel group is displayed.
•
Bandwidth: The available bandwidths are 7 and 8 MHz.
Edit Favourite Channels
D.MENU → → → →[Digital Menu] → ENTER→ →[Digital Channel]→ENTER → → →
→[Edit Favourite Channels] → ENTER
You can edit your favourite channels using the four colour buttons.
Note
•
A " " icon is shown next to the selected channel and the channel will be added to the favourite
channel list.
•
To undo, press the ENTER button again.
•
Select All: Select all channels currently displayed.
•
Select None: Deselect all selected channels.
•
Preview: Displays (a) currently selected channel(s).
The Favorite Channels settings have been completed.
Add
•
D.MENU → → → →[Digital Menu] → ENTER→ →[Digital Channel]→ENTER →
→ →[Edit Favourite Channels] → ENTER
You can use this function when one or more favourite channels have been selected.
→
Renumber
•
D.MENU → → → →[Digital Menu] → ENTER→ →[Digital Channel]→ENTER →
→ →[Edit Favourite Channels] → ENTER
→
Press the green button.
Note
•
The space for entering the number is a blank.
Enter the new channel number. Press ENTER button to store or RETURN button to cancel.
Note
•
Press the button to delete an entered digit. If you enter a number already assigned to another
channel, the number is assigned to the selected channel and the previous number assigned to
the selected channel is assigned to the other channel. That is, the two numbers are exchanged.
The favorite channels are automatically sorted in ascending order of channel numbers.
Preview
•
D.MENU → → → →[Digital Menu] → ENTER→ →[Digital Channel]→ENTER →
→ →[Edit Favourite Channels] → ENTER
→
Press the yellow button
The selected channel is displayed on the screen.
Delete
•
D.MENU → → → →[Digital Menu] → ENTER→ →[Digital Channel]→ENTER →
→ →[Edit Favourite Channels] → ENTER
Press the blue button
→
Note
•
The selected channel and number will be deleted. To add a deleted channel back in to the
favourite channel list.
Channel List
D.MENU → → → →[Digital Menu] → ENTER→ →[Digital Channel]→ENTER → → →
→ →[Channel List] → ENTER
You can exclude the channels you have chosen from the channels you have scanned. When you scan
through the stored channels, those you have chosen to skip are not displayed. All channels that you do
not specifically choose to skip are displayed during scanning.
Note
•
Your favourite channels are only displayed if they were previously set in the "Editing Your Favourite Channels" menu.
•
The channel number, name and an icon are displayed in the top left corner while changing the
channel.
•
The channel number and name are displayed if the channel is one of the all channels, and a icon if
the channel is one of the favourite channels.
Setup
Menu Transparency
D.MENU → → → →[Digital Menu] → ENTER→ → →[Setup]→ENTER → [Menu Transparency] → ENTER
→
, → ENTER
You can set the translucency of the menu.
1.
High
2.
Medium
3.
Low
4.
Opaque
Change PIN
D.MENU → → → →[Digital Menu] → ENTER→ → →[Setup]→ENTER → → [Change
PIN] → ENTER
→[0] ∼ [9] → [0] ∼ [9] → [0] ∼ [9] → ENTER
The Your PIN code has been changed successfully message is displayed.
Note
•
If you forget the PIN code, press the remote control buttons in the following sequence, which resets
the PIN to 0-0-0-0: POWER (Off), MUTE, 8, 2, 4, POWER (On).
Parental Lock
D.MENU → → → →[Digital Menu] → ENTER→ → →[Setup]→ENTER → →
[Parental Lock] → ENTER → [0] ∼ [9] → ENTER
→
→
, → ENTER
This feature allows you to prevent unauthorized users, such as children, from watching unsuitable
programmes by a 4-digit PIN (Personal Identification Number) code that is defined by the user. The
on-screen menu will instruct you to assign a PIN code (you can change it later, if necessary).
Note
•
The default PIN code for a new TV set is 0000.
•
If you enter an invalid PIN code, the "Invalid PIN code. Please try again." message is displayed.
Subtitle
D.MENU → → → →[Digital Menu] → ENTER→ → →[Setup]→ENTER → →
[Subtitle] → ENTER
→
, → ENTER
→
→
You can activate and deactivate the subtitles.
1.
On
2.
Off
Subtitle Mode
D.MENU → → → →[Digital Menu] → ENTER→ → →[Setup]→ENTER → →
→ [Subtitle Mode] → ENTER
→
→
→
, → ENTER
Use this menu to set the Subtitle Mode. "Normal" under the menu is the basic subtitle and "Hard of
hearing" is the subtitle for a hearing-impaired person.
1.
Normal
2.
Hard of hearing
Note
•
If the programme you are watching does not support the "Hard of hearing" function, "Normal"
automatically activates even though "Hard of hearing" mode is selected.
Audio Format
D.MENU → → → →[Digital Menu] → ENTER→ → →[Setup]→ENTER → →
→ → [Audio Format] → ENTER
→
→
→
, → ENTER
You can only hear Dolby Digital sound through the audio receiver connected through an optical cable.
You can only hear PCM sound through the main speaker. When sound is emitted from both the main
speaker and the audio receiver, a sound echo may occur due to the decoding speed difference between
the main speaker and the audio receiver. In this case, use the internal mute function.
1.
PCM
2.
Dolby Digital
Note
•
The Audio Format appears according to the broadcasting signal.
•
Dolby digital sound is only available when the TV is connected with an external speaker using an
optical cable.
Audio Description
D.MENU → → → →[Digital Menu] → ENTER→ → →[Setup]→ENTER → →
→ → → [Audio Description] → ENTER
→
→
→
, → ENTER
Note
•
"Audio Description" is active when "Audio Format" is set to "PCM".
This is an auxiliary audio function that provides an additional audio track for visually challenged
persons. this function handles the Audio Stream for the AD (Audio Description), when it is sent along
with the Main audio from the broadcaster. Users can turn the Audio Description On or Off and control
the volume.
1.
Audio Description - Off, On
2.
Volume
Note
•
"Volume" is active when "Audio Description" is set to "On".
Digital Text
D.MENU → → → →[Digital Menu] → ENTER→ → →[Setup]→ENTER → →
→ → → → [Digital Text] → ENTER
→
, → ENTER
If the programme is broadcast with digital text, this feature is enabled.
1.
Disable
2.
Enable
→
→
Note
•
MHEG(Multimedia and Hypermedia Information Coding Experts Group) An International standard for data encoding systems used in multimedia and hypermedia. This is at a higher level than
the MPEG system which includes data-linking hypermedia such as still images, character service,
animation, graphic and video files as well as multimedia data. MHEG is user runtime interaction
technology and is being applied to various fields including VOD (Video-On-Demand), ITV (Interactive TV), EC (Electronic Commerce), tele-education, tele-conferencing, digital libraries and
network games.
Time Zone
Note
•
Spain only
D.MENU → → → →[Digital Menu] → ENTER→ → →[Setup]→ENTER → →
→ → → → → [Time Zone] → ENTER
→
→
→
, → ENTER
Select the time zone where locate
Note
•
The following options are available The Iberian Peninsula and Balears Islands - Canarian
Islands
Common Interface
D.MENU → → → →[Digital Menu] → ENTER→ → →[Setup]→ENTER → →
→ → → → → → [Common Interface]
1.
Application Info
2.
CI Menu
→
→
→
→
System
D.MENU → → → →[Digital Menu] → ENTER→ → →[Setup]→ENTER → →
→ → → → → → → [System] → ENTER
To keep your product up-to-date with new Digital Television features then software upgrades are
periodically broadcast as part of the normal Television signal. It will automatically detect these signals
and display the software upgrade banner. You are given the option to install the upgrade.
1.
Product Information
D.MENU → → → →[Digital Menu] → ENTER→ → →[Setup]→ENTER → →
→ → → → → → → → [System] → ENTER → ENTER
2.
Signal Information
D.MENU → → → →[Digital Menu] → ENTER→ → →[Setup]→ENTER → →
→ → → → → → → → [System] → ENTER → →ENTER
3.
→
→
Software Upgrade
D.MENU → → → →[Digital Menu] → ENTER→ → →[Setup]→ENTER → →
→ → → → → → → → [System] → ENTER → → →ENTER
•
Software Information
•
Manual Upgrade
•
Standby Mode upgrade
→
4.
Reset
D.MENU → → → →[Digital Menu] → ENTER→ → →[Setup]→ENTER → → →
→ → → → → → → → [System] → ENTER → → → →ENTER →[0] ∼ [9]
You can reset the values stored to the factory default values.
The Reset operation deletes all channel information and user preferences returning all values to
their default factory state.
Note
•
The warning message is displayed.All values will be reset by pressing the coloured buttons
(red, green, yellow, and blue) in turn.
Language
Audio Language
D.MENU → → → →[Digital Menu] → ENTER→ → → →[Language]→ENTER →ENTER
→[Audio Language] → ENTER
You can change the default value for subtitle, audio teletext languages. Displays the language information for the incoming stream.
Note
•
English is the default in cases where the selected language is unavailable in the broadcast.
Subtitle Language
D.MENU → → → →[Digital Menu] → ENTER→ → → →[Language]→ENTER → →
ENTER →[Subtitle Language] → ENTER
You can change the default value for subtitle, audio teletext languages. Displays the language information for the incoming stream.
Note
•
English is the default in cases where the selected language is unavailable in the broadcast.
Teletext Language
D.MENU → → → →[Digital Menu] → ENTER→ → → →[Language]→ENTER → →
→ENTER →[Teletext Language] → ENTER
You can change the default value for subtitle, audio teletext languages. Displays the language information for the incoming stream.
Note
•
English is the default in cases where the selected language is unavailable in the broadcast.
Preference
D.MENU → → → →[Digital Menu] → ENTER→ → → →[Language]→ENTER → →
→ →ENTER →[Preference] → ENTER
This menu consists of 6 sub-menus:Primary Subtitle Language, Secondary Subtitle Language,
Primary Audio Language, Secondary Audio Language, Primary Teletext Language.
1.
Primary Audio Language
2.
Secondary Audio Language
3.
Primary Subtitle Language
4.
Secondary Subtitle Language
5.
Primary Teletext Language
Note
•
If you change the language setting, the Subtitle Language, Audio Language, and the Teletext Language of the Language menu are automatically changed to the selected language.
•
The Subtitle Language, Audio Language, and the Teletext Language of the Language menu show
a list of languages supported by the current channel and the selection is highlighted. If you change
this language setting, the new selection is only valid for the current channel. The changed setting
does not change the setting of the Primary Subtitle Language, Primary Audio Language, or the
Primary Teletext Language of the Preference menu.