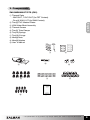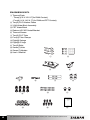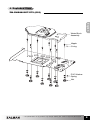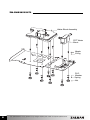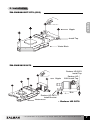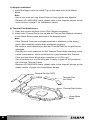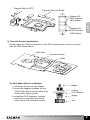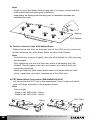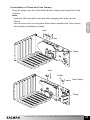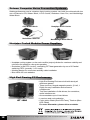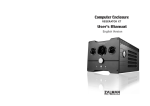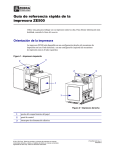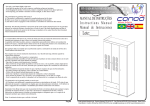
1
English / 한글
VGA WATER BLOCK
ZM-GWB 8800 GT/GTS (G92)
ZM-GWB 3850/3870
◈Please visit our website and watch the
ZM-GWB8800GT/GTS (G92), ZM-GWB3850/3870
installation video for easy installation.
※ Please read this manual thoroughly before installation.
http://www.zalman.com
http://www.zalmanusa.com
Table of Contents
1. Precautions
2
2. Components
3
3. Exploded View
5
4. Installation Guide
7
www.zalman.com
www.zalmanusa.com
English
English version
Precautions
1) Test the product for leakage away from the system before installing it on the
system. Once no leakage is confirmed, proceed with the installation and use.
2) Use approved coolant for computer water-cooling to prevent corrosion.
3) Use coolant tubes listed under the compatibility list.
4) Do not install the product if it interferes with any VGA components.
5) To maintain absolute leak-free operation, this product is not designed to be
disassembled. Do not disassemble the product under any circumstances.
Disclaimer
Zalman Tech Co., Ltd. is not responsible for any damages due to external causes,
including but not limited to, improper use, problems with electrical power,
accident, neglect, alteration, repair, improper installation, or improper testing.
1. Features
1) Zalman’s innovative dimple-type processing technology allows lightness in weight
and excellent cooling performance.
2) Pure aluminum-base material water block provides excellent heat transfer, and
anodized base prevents corrosion.
3) High performance thermal pads with excellent elasticity provide great adhesion to
all heat-generating components.
4) The optimized design allows easy installation and direct cooling of high heat
generating components such as RAM and the FET chipset.
2. Specifications
ZM-GWB8800GT/GTS (G92)
1) Weight : 350g
2) Material : Pure Aluminum Alloy
3) Dimensions : 93(W) x 183(L) x 31(H)mm
4) Compatible Tubes (Outer x Inner) : 13x9mm, 12x8mm, 11x8mm,
10x8mm14x10mm, 12x10mm, 11x9mm
ZM-GWB3850/3870
1) Weight : 380g
2) Material : Pure Aluminum Alloy
3) Dimensions : 85(W) x 117(L) x 31(H)mm
4) Compatible Tubes (Outer x Inner) : 13x9mm, 12x8mm, 11x8mm, 10x8mm
14x10mm, 12x10mm, 11x9mm
2
※
The specifications of any product may change without prior notice to improve performance.
3. Components
ZM-GWB8800GT/GTS (G92)
English
① Thermal Pads
- 20X78X1T, 7.5X7.5X1T (for FET Contact)
- Four(4) 38X11X1T (for RAM Contact)
② Two(2) PVC Washer Plates
③ VGA Water Block Assembly
④ Thermal Grease
⑤ Two(2) Tube Clamps
⑥ Ten(10) Springs
⑦ Ten(10) O-rings
⑧ Nine(9) Nuts
⑨ Nine(9) Nipples
⑩ User’
s Manual
①
④
③
⑦
⑥
⑨
②
⑤
⑧
⑩
※
The specifications of any product may change without prior notice to improve performance.
3
ZM-GWB3850/3870
① Thermal Pads
- Three(3) 32 X 12 X 1T(for RAM Contact)
- Four(4) 14 X 14.5 X 1T (for RAM and FET Contact)
② Two(2) PVC Washer Plates
③ VGA Water Block Assembly
④ FET Water Block
⑤ Radeon HD 3870 Install Bracket
⑥ Thermal Grease
⑦ Two(2) PVC Tube
⑧ Four(4) Tube Clamps
⑨ Eight(8) Springs
⑩ Eight(8) O-rings
⑪ Two(2) Bolts
⑫ Seven(7) Nuts
⑬ Seven(7) Nipples
⑭ User’
s Manual
①
②
③
⑤
⑫
4
※
⑦
⑥
⑨
④
⑧
⑩
⑪
⑬
⑭
The specifications of any product may change without prior notice to improve performance.
4. Exploded View
ZM-GWB8800GT/GTS (G92)
English
Water Block
Assembly
Nipple
O-ring
PVC Washer
Spring
Nut
※
The specifications of any product may change without prior notice to improve performance.
5
ZM-GWB3850/3870
Water Block Assembly
FET Water
Block
Nipple
O-ring
PVC
Washer
Spring
Nut
6
※
The specifications of any product may change without prior notice to improve performance.
5. Installation
ZM-GWB8800GT/GTS (G92)
English
Nipple
Install Tap
Water Block
ZM-GWB3850/3870
Radeon HD 3870
Install Tap
Nipple
Radeon HD
3850 Install Tap
Bolt
Radeon HD 3870
Install Bracket
Water Block
※
※ Radeon HD 3870
The specifications of any product may change without prior notice to improve performance.
7
1) Nipple Installation
① Install the Nipple onto the Install Tap on the base side of the Water
Block.
Note
·Use a tool such as Long Nose Pliers to firmly tighten the Nipples.
·Radeon HD 3850/3870 users, please refer to the diagram shown on the
lower section of page 7 for installation details.
2) Thermal Pad Attachment
① Clean the contact surface of the VGA Chipset completely.
② Attach each Thermal Pad to line up with the Thermal Pad Outlines indicated
on the Water Block's base as shown in the diagram below.
Note
·If the Thermal Pads are crookedly attached or attached on the wrong
place, then carefully remove them and attach properly.
·Be cautious while attaching so that the Thermal Pads do not get bent or
damaged.
·Exerting too much pressure on the Thermal Pads while attaching could
cause compression, which could lead to a gap between the Thermal
Pads and the Water Block when installed on a VGA card.
·Use of tweezers or a knife will make it easier to peel off the protective
film from the Thermal Tapes.
·Radeon HD 3850/3870 users, please refer to the diagram shown on the
upper section of page 9 for installations details.
Thermal Pad (for FET)
Thermal Pad
(for RAM)
Thermal Pad Outline
Water Block
Base
8
※
The specifications of any product may change without prior notice to improve performance.
Thermal Pad (for FET)
Thermal Pad (for RAM)
Radeon HD
3870 Thermal
PAD Outline
English
Radeon HD
3850 Thermal
PAD Outline
3) Thermal Grease Application
Evenly apply the Thermal Grease on the GPU surface that comes in contact
with the VGA Water Block.
VGA Card
Thermal Grease
GPU
4) VGA Water Block Installation
① Insert the O-ring into the Nipple.
② Insert the Nipples installed on the
VGA Water Block into the Mounting
Holes after aligning them.
③ Install the PVC Washers, Springs,
and Nuts on the back side of the
VGA card in the mentioned order.
※
Nipple
O-Ring
PVC Washer
Spring
Nut
The specifications of any product may change without prior notice to improve performance.
9
Note
·Check to see if the Water Block’s base side is in proper contact with the
VGA chipset before finishing the installation.
·Assembling the Springs with the Nuts prior to installation will ease the
installation process.
Nut
Spring
PVC Washer
5) Tension Control of the VGA Water Block
Tighten/loosen the Nuts on the back side of the VGA card to control the
tension between the VGA Water Block and the VGA Chipset.
Note
·If the Nuts are turned too tightly, then the VGA chipset or VGA card may
get damaged.
·Fully tightening one Nut at a time may result in damaging the VGA
Chipset. Please tighten each Nut one rotation at a time until all are
completely tightened.
·Make sure that the VGA Water Block does not interfere with the VGA
cooler, capacitors, and other components of the VGA card.
6) FET Water Block Connection (ZM-GWB3850/3870)
Cut the enclosed PVC Tube to the appropriate Tube Length and install
onto its Fittings as shown in the diagrams below.
Note
·Tube Length
- Radeon HD 3850 VGA : 65mm
- Radeon HD 3870 VGA : 50mm
Fitting
10
※
The specifications of any product may change without prior notice to improve performance.
PVC Tube
7) Installation of Tubes and Tube Clamps
Plug the tubes over the VGA Water Block’s fittings and install the Tube
Clamps.
Note
·Hold the VGA card with one hand when plugging the Tube into the
Fitting.
will ease the installation process.
Inlet
English
·Use of a tool such as Long Nose Pliers when installing the Tube Clamp
Outlet
Fitting
Inlet
Outlet
Tube Clamp
Fitting
※
The specifications of any product may change without prior notice to improve performance.
11
Zalman Computer Noise Prevention Systems
Stable performance and a noiseless liquid cooling system can both be achieved with the
use of Zalman’s CPU Water Block, H.D.D Cooler, Noiseless Case Fan, and Northbridge
Water Block.
CPU Water Block
Heatpipe H.D.D Cooler
Noiseless Case Fan
Northbridge Water Block
Heatpipe Cooled Modular Power Supplies
ZM500-HP
ZM600-HP
Heatpipe cooling system on the main rectifier (output) diodes for maximum stability and
minimum fan speed for ultra quiet operation
Reduction in the PFC circuitry’
s switching FET heat generation by use of 3 Parallel
switching FETs (normally 1 or 2 used)
Modular design for convenient and tidy cable installation
Blue LEDs for cool aethetics
High End Gaming PC Enclosures
GT 1000
High-End Gaming Enclosure built with sturdy all
aluminum panels
Three tool-free, hinged magnetic panels, (2 Left, 1
Right) for easy installation and access to
components.
Tool-free installation of disk drives, fan controllers,
audio interfaces etc.
Accommodates up to 6 hard drives
Luxurious and cool aesthetics.
Color option: Black (Red LED Fans), Titanium (Blue
LED Panel)
For more information, please visit our website.
12
※
The specifications of any product may change without prior notice to improve performance.