1
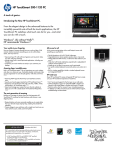
Printed in
*584963-001*
*584963-001*
HP Touchsmart300 PC
Upgrading and Servicing Guide
Replacing a Wireless Keyboard or Mouse .......2
Before You Begin................................................. 2
Replacing the Keyboard or Mouse......................... 2
Replacing Batteries .............................................. 3
Upgrading or Replacing Memory ....................6
Before You Begin................................................. 6
Computer Preparation .......................................... 6
Removing the Memory ......................................... 7
Installing a New Memory Card ............................. 8
Troubleshooting................................................... 9
Removing the Hard Disk Drive .............................13
Installing a New Hard Disk Drive ......................... 14
Removing and Replacing a CD/DVD Drive ..... 18
Before You Begin ............................................... 18
Computer Preparation ........................................ 18
Removing the CD/DVD Drive ..............................19
Installing a New CD/DVD Drive ..........................21
Removing and Replacing a Hard Disk Drive .. 12
Before You Begin............................................... 12
Computer Preparation ........................................ 12
584963-001
i
ii
584963-001
HP Touchsmart300 PC
Replacing a Wireless Keyboard or
Mouse
Replacing a Wireless Keyboard or Mouse
5-10 minutes
Before You Begin
Two replacement kits are available:
z
Wireless keyboard
z
Wireless mouse with wireless receiver
IMPORTANT: The keyboard and mouse must be next to
the HP PC, within 1 foot (30 cm) and away from
interference with other devices.
3 Connect the new receiver into the back of the
computer, and rotate it into place.
Replacing the Keyboard or Mouse
1 Leave the computer on.
2 If you are replacing the wireless mouse, rotate the old
receiver away from the computer and pull it out to
remove it. Skip Steps 2 and 3 if you are
replacing the keyboard only.
4 Remove the tab from the battery compartment on the
bottom of the mouse and/or the keyboard. This
activates the pre-installed battery.
2
584963-001 — Replacing a Wireless Keyboard or Mouse
5 If you are replacing the mouse and it has a power
switch on the bottom, turn on the mouse power switch
(A). The keyboard does not have a power switch, so
you can skip this step if you are installing the
keyboard only.
6 Press the blue connect button on the bottom of the
keyboard (B) and/or mouse (C) for 5 to 10 seconds.
The blue activity LED on the wireless receiver
illuminates when the synchronization command has
been received and goes off when synchronization is
complete.
NOTE: If the synchronization does not work, remove and
then re-insert the wireless receiver from the back of the
computer and synchronize the keyboard and/or mouse
again.
Replacing Batteries
If repeated attempts at synchronization do not work, you
may need to replace the batteries in the keyboard and
mouse.
z
The mouse requires two AA batteries.
z
The keyboard requires two AAA batteries.
Turn the devices over, take off the battery cover, remove the
old batteries, and insert new alkaline batteries. Do not use
rechargeable batteries.
584963-001 — Replacing a Wireless Keyboard or Mouse
3
4
584963-001 — Replacing a Wireless Keyboard or Mouse
HP Touchsmart300 PC
Upgrading or Replacing Memory
Upgrading or Replacing Memory
5 - 10 minutes
Before You Begin
3 Unplug the computer by disconnecting the power cord
from the back of the computer.
Observe the following requirements before removing and
replacing memory cards.
Tools Needed
z
Torx or flat screwdriver - medium tip
CAUTION: Static electricity can damage
the electronic components inside the
computer. Discharge static electricity by
touching the metal cage of the computer
before touching any internal parts or
electronic components.
WARNING:
z
Never open the cover with the
power cord attached or power
applied. You may damage your
computer.
z
Avoid touching sharp edges
inside the computer.
4 Unplug all attached cables from the back of the
computer.
5 Set down a blanket, towel, or other soft cloth to protect
the screen from scratches or other damage. Place the
computer face-down on the soft surface.
Computer Preparation
1 Remove any media (CD, DVD, and memory cards)
from the computer.
2 Shut down the computer.
6
584963-001 — Upgrading or Replacing Memory
Removing the Memory
6 Lift the plastic shield on the back of the computer
stand.
7 Use a torx or flat-head screwdriver to remove the screw
that secures the right cover.
9 Use your fingers to press outwards on the tabs on the
left and right sides of a memory card to release it.
10 Hold the card by its edges, and remove it from the
compartment.
8 Slide the right cover off.
584963-001 — Upgrading or Replacing Memory
7
Installing a New Memory Card
1 Orient the new card so that the notch on the edge of
the card faces forward and is on the right.
4 Slide the right cover into place.
2 Holding the card by its edges, slide it all the way into
the slot.
5 Replace the right cover screw.
3 Gently push downward on the card to snap it into
place.
6 Reconnect any cables that were disconnected for this
procedure.
8
584963-001 — Upgrading or Replacing Memory
7 Plug the power cord into the back of the computer and
then into the power source.
Troubleshooting
[This section needs to be verified and/or
modified for M5. It was copied from Amazon.]
If the computer displays a memory error after you have
turned it back on, check the following:
8 Return the computer to the upright position and turn on
the computer.
z
Turn the computer off and unplug the power cord, then
open up the memory compartment and make sure the
memory card is firmly seated. To install it correctly,
make sure it inserted all the way into the compartment
and then push down on it to snap it into place.
z
Verify that the memory installed is compatible with this
computer. SO-DIMMs are small outline dual inline
memory modules. They are smaller and thinner than
most other DIMMs, so that they take less space in the
case.
SO-DIMM modules must meet the following
requirements:
584963-001 — Upgrading or Replacing Memory
z
200-pin DDR2-DIMM
z
PC2-4200 (533 MHz) DDR2-SDRAM or PC25300 (667 MHz) DDR2-SDRAM
z
Unbuffered, non-ECC (64-bit) DIMMs
z
1.8 V memory only
z
4.0 GB maximum installable memory. Actual
available memory that can be used in Windows
will be less.
z
Because the memory uses dual channels, you
should use the same DIMM type for both sockets.
9
10
584963-001 — Upgrading or Replacing Memory
HP Touchsmart300 PC
Removing and Replacing a Hard
Disk Drive
Removing and Replacing a Hard Disk Drive
5 - 10 minutes
Before You Begin
3 Unplug the computer by disconnecting the power cord
from the back of the computer.
Observe the following requirements before removing and
replacing the hard disk drive.
Tools Needed
z
Torx or flat screwdriver - medum-sized tip
CAUTION: Static electricity can damage
the electronic components inside the
computer. Discharge static electricity by
touching the metal cage of the computer
before touching any internal parts or
electronic components.
WARNING:
z
Never open the cover with the
power cord attached or power
applied. You may damage your
computer.
z
Avoid touching sharp edges
inside the computer.
4 Unplug all attached cables from the back of the
computer.
5 Set down a blanket, towel, or other soft cloth to protect
the screen from scratches or other damage. Place the
computer face-down on the soft surface.
Computer Preparation
1 Remove any media (CD, DVD, and memory cards)
from the computer.
2 Shut down the computer.
12
584963-001 — Removing and Replacing a Hard Disk Drive
Removing the Hard Disk Drive
6 Lift the plastic shield on the back of the computer
stand.
9 Loosen the screw at the bottom of the hard disk drive
cage.
TIP: You do not need to remove this screw,
only loosen it in order to release the hard
disk drive cage.
7 Use a torx or flat-head screwdriver to remove the screw
that secures the left cover.
10 Lift up on the wire handle, and pull the hard disk drive
cage out.
8 Slide the left cover off.
11 Disconnect the cable connector from the back of the
hard disk drive.
584963-001 — Removing and Replacing a Hard Disk Drive
13
12 Remove the four screws that hold the drive in the cage.
Remove the drive from the cage.
Installing a New Hard Disk Drive
1 Insert the new hard disk drive into the cage. Make
sure that the hard drive is inserted with the label on the
bottom.
2 Install and tighten the four screws that hold the hard
drive in the cage.
3 Connect the cable connector to the back of the new
hard disk drive.
14
584963-001 — Removing and Replacing a Hard Disk Drive
4 Align the wheels on each side of the top of the hard
disk drive cage with the slots in the hard disk drive
bay, and insert the hard disk drive.
5 Press down on the hard disk cage handle to snap it
into place.
6 Tighten the captive screw on the hard disk drive cage.
7 Slide the left cover into place.
8 Replace the left cover screw.
9 Reconnect any cables that were disconnected for this
procedure.
10 Plug the power cord into the back of the computer and
then into the power source.
584963-001 — Removing and Replacing a Hard Disk Drive
15
11 Return the computer to the upright position and turn on
the computer.
16
584963-001 — Removing and Replacing a Hard Disk Drive
HP Touchsmart300 PC
Removing and Replacing a
CD/DVD Drive
Removing and Replacing a CD/DVD Drive
5 — 10 minutes
Before You Begin
Observe the following requirements before removing and
replacing the CD/DVD drive.
Tools Needed
z
Torx or flat-head screwdriver - medum-sized tip
z
Very small Phillips screwdriver
CAUTION: Static electricity can damage
the electronic components inside the
computer. Discharge static electricity by
touching the metal cage of the computer
before touching any internal parts or
electronic components.
3 Unplug the computer by disconnecting the power from
the back of the computer.
WARNING:
z
Never open the cover with the
power cord attached or power
applied. You may damage your
computer.
z
Avoid touching sharp edges
inside the computer.
4 Unplug any attached cables from the back of the
computer.
5 Set down a blanket, towel, or other soft cloth to protect
the screen from scratches or other damage. Place the
computer face-down on the soft surface.
Computer Preparation
1 Remove any media (CD, DVD, and memory cards)
from the computer.
2 Shut down the computer.
18
584963-001 — Removing and Replacing a CD/DVD Drive
Removing the CD/DVD Drive
6 Lift the plastic shield on the back of the computer
stand.
9 Loosen the screw at the back of the CD/DVD drive
cage.
TIP: You do not need to remove this screw,
only loosen it in order to release the
CD/DVD drive cage.
7 Use a torx or flat-head screwdriver to remove the screw
that secures the left cover.
10 Grasp the tab at the top of the CD/DVD drive cage,
and slide it in the direction of the arrow to disengage
the CD/DVD drive cage.
8 Slide the left cover off.
584963-001 — Removing and Replacing a CD/DVD Drive
19
11 Disconnect the cable on the right-hand side of the
CD/DVD drive cage.
13 Slide the CD/DVD drive forward to remove it from the
cage.
12 Use the small Phillips screwdriver to remove the four
screws that secure the CD/DVD drive in the cage. Two
screws are on each side.
TIP: These screws are very small and can
be lost easily. Use caution when you remove
them. Work over a surface where you can
retrieve a screw if it falls.
20
584963-001 — Removing and Replacing a CD/DVD Drive
Installing a New CD/DVD Drive
1 Insert the new CD/DVD drive into the cage. Orient the
CD/DVD drive so that the connection for the cable
aligns with the opening at the rear of the cage.
3 Connect the cable to the rear of the CD/DVD drive.
4 Insert the CD/DVD drive cage, making sure that the
two arrows next to the screw at the rear of the cage
line up.
2 Insert and tighten the four screws on the sides of the
CD/DVD cage - two on each side.
5 Tighten the screw at the rear of the CD/DVD drive
cage.
TIP: Do not over-tighten these screws. It is
easy to strip the screw heads.
584963-001 — Removing and Replacing a CD/DVD Drive
21
6 Slide the left cover into place.
8 Reconnect any cables that were disconnected for this
procedure.
9 Plug the power cord into the back of the computer and
then into the power source.
7 Replace the left cover screw.
22
10 Return the computer to the upright position and turn on
the computer.
584963-001 — Removing and Replacing a CD/DVD Drive
23
584963-001 — Removing and Replacing a CD/DVD Drive
Copyright © 2009 Hewlett-Packard Development Company, L.P.
The information contained herein is subject to change without notice.
Version: 1.0