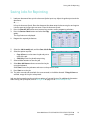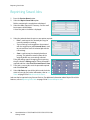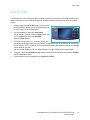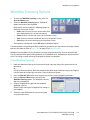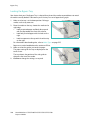
1
Version 1.0
12/09
®
Xerox Xerox WorkCentre
5735/5740/5745/5755/5765/5775/
5790
User Guide
©2009 Xerox Corporation. All Rights Reserved. Unpublished rights reserved under the copyright laws of the United States. Contents
of this publication may not be reproduced in any form without permission of Xerox Corporation.
Xerox®and the sphere of connectivity design are trademarks of Xerox Corporation in the United States and/or other countries.
Copyright protection claimed includes all forms of matters of copyrightable materials and information now allowed by statutory or
judicial law or hereinafter granted, including without limitation, material generated from the software programs which are displayed
on the screen such as styles, templates, icons, screen displays, looks, etc.
Changes are periodically made to this document. Changes, technical inaccuracies, and typographic errors will be corrected in
subsequent editions.
Document Version1.0: December 2009
Table of Contents
Getting Started . . . . . . . . . . . . . . . . . . . . . . . . . . . . . . . . . . . . . . . . . . . . . . . . . . . . . . . . . . . . . . . 1
Introduction . . . . . . . . . . . . . . . . . . . . . . . . . . . . . . . . . . . . . . . . . . . . . . . . . . . . . . . . . . . . . . . . . . . . . . . . . . . . . .4
Device Overview. . . . . . . . . . . . . . . . . . . . . . . . . . . . . . . . . . . . . . . . . . . . . . . . . . . . . . . . . . . . . . . . . . . . . . . . . . .5
Services and Options . . . . . . . . . . . . . . . . . . . . . . . . . . . . . . . . . . . . . . . . . . . . . . . . . . . . . . . . . . . . . . . . . . . . . .6
Control Panel Overview . . . . . . . . . . . . . . . . . . . . . . . . . . . . . . . . . . . . . . . . . . . . . . . . . . . . . . . . . . . . . . . . . . 10
Power On and Off . . . . . . . . . . . . . . . . . . . . . . . . . . . . . . . . . . . . . . . . . . . . . . . . . . . . . . . . . . . . . . . . . . . . . . . 11
Loading Paper . . . . . . . . . . . . . . . . . . . . . . . . . . . . . . . . . . . . . . . . . . . . . . . . . . . . . . . . . . . . . . . . . . . . . . . . . . 13
Loading Documents . . . . . . . . . . . . . . . . . . . . . . . . . . . . . . . . . . . . . . . . . . . . . . . . . . . . . . . . . . . . . . . . . . . . . 14
Making Copies . . . . . . . . . . . . . . . . . . . . . . . . . . . . . . . . . . . . . . . . . . . . . . . . . . . . . . . . . . . . . . . . . . . . . . . . . . 15
Printing a Document . . . . . . . . . . . . . . . . . . . . . . . . . . . . . . . . . . . . . . . . . . . . . . . . . . . . . . . . . . . . . . . . . . . . 16
Sending a Fax. . . . . . . . . . . . . . . . . . . . . . . . . . . . . . . . . . . . . . . . . . . . . . . . . . . . . . . . . . . . . . . . . . . . . . . . . . . 17
Server Fax . . . . . . . . . . . . . . . . . . . . . . . . . . . . . . . . . . . . . . . . . . . . . . . . . . . . . . . . . . . . . . . . . . . . . . . . . . . . . . 18
Internet Fax . . . . . . . . . . . . . . . . . . . . . . . . . . . . . . . . . . . . . . . . . . . . . . . . . . . . . . . . . . . . . . . . . . . . . . . . . . . . 19
Sending a Fax from the PC . . . . . . . . . . . . . . . . . . . . . . . . . . . . . . . . . . . . . . . . . . . . . . . . . . . . . . . . . . . . . . . 20
Workflow Scanning. . . . . . . . . . . . . . . . . . . . . . . . . . . . . . . . . . . . . . . . . . . . . . . . . . . . . . . . . . . . . . . . . . . . . . 21
Sending an E-mail . . . . . . . . . . . . . . . . . . . . . . . . . . . . . . . . . . . . . . . . . . . . . . . . . . . . . . . . . . . . . . . . . . . . . . . 22
Saving Jobs for Reprinting . . . . . . . . . . . . . . . . . . . . . . . . . . . . . . . . . . . . . . . . . . . . . . . . . . . . . . . . . . . . . . . 23
Reprinting Saved Jobs . . . . . . . . . . . . . . . . . . . . . . . . . . . . . . . . . . . . . . . . . . . . . . . . . . . . . . . . . . . . . . . . . . . 24
Log In / Out . . . . . . . . . . . . . . . . . . . . . . . . . . . . . . . . . . . . . . . . . . . . . . . . . . . . . . . . . . . . . . . . . . . . . . . . . . . . . 25
Enhance Productivity . . . . . . . . . . . . . . . . . . . . . . . . . . . . . . . . . . . . . . . . . . . . . . . . . . . . . . . . . . . . . . . . . . . . 26
Maintenance and Consumables . . . . . . . . . . . . . . . . . . . . . . . . . . . . . . . . . . . . . . . . . . . . . . . . . . . . . . . . . . 27
Troubleshooting. . . . . . . . . . . . . . . . . . . . . . . . . . . . . . . . . . . . . . . . . . . . . . . . . . . . . . . . . . . . . . . . . . . . . . . . . 28
Help . . . . . . . . . . . . . . . . . . . . . . . . . . . . . . . . . . . . . . . . . . . . . . . . . . . . . . . . . . . . . . . . . . . . . . . . . . . . . . . . . . . . 30
Copy. . . . . . . . . . . . . . . . . . . . . . . . . . . . . . . . . . . . . . . . . . . . . . . . . . . . . . . . . . . . . . . . . . . . . . . . . 33
Introduction . . . . . . . . . . . . . . . . . . . . . . . . . . . . . . . . . . . . . . . . . . . . . . . . . . . . . . . . . . . . . . . . . . . . . . . . . . . .
Making Copies . . . . . . . . . . . . . . . . . . . . . . . . . . . . . . . . . . . . . . . . . . . . . . . . . . . . . . . . . . . . . . . . . . . . . . . . . .
Copy Options . . . . . . . . . . . . . . . . . . . . . . . . . . . . . . . . . . . . . . . . . . . . . . . . . . . . . . . . . . . . . . . . . . . . . . . . . . .
Image Quality . . . . . . . . . . . . . . . . . . . . . . . . . . . . . . . . . . . . . . . . . . . . . . . . . . . . . . . . . . . . . . . . . . . . . . . . . .
Layout Adjustment . . . . . . . . . . . . . . . . . . . . . . . . . . . . . . . . . . . . . . . . . . . . . . . . . . . . . . . . . . . . . . . . . . . . . .
Output Format . . . . . . . . . . . . . . . . . . . . . . . . . . . . . . . . . . . . . . . . . . . . . . . . . . . . . . . . . . . . . . . . . . . . . . . . . .
Job Assembly . . . . . . . . . . . . . . . . . . . . . . . . . . . . . . . . . . . . . . . . . . . . . . . . . . . . . . . . . . . . . . . . . . . . . . . . . . .
36
37
38
44
46
49
57
Fax . . . . . . . . . . . . . . . . . . . . . . . . . . . . . . . . . . . . . . . . . . . . . . . . . . . . . . . . . . . . . . . . . . . . . . . . . . 61
Fax Overview. . . . . . . . . . . . . . . . . . . . . . . . . . . . . . . . . . . . . . . . . . . . . . . . . . . . . . . . . . . . . . . . . . . . . . . . . . . .
Fax . . . . . . . . . . . . . . . . . . . . . . . . . . . . . . . . . . . . . . . . . . . . . . . . . . . . . . . . . . . . . . . . . . . . . . . . . . . . . . . . . . . . .
Server Fax . . . . . . . . . . . . . . . . . . . . . . . . . . . . . . . . . . . . . . . . . . . . . . . . . . . . . . . . . . . . . . . . . . . . . . . . . . . . . .
Internet Fax . . . . . . . . . . . . . . . . . . . . . . . . . . . . . . . . . . . . . . . . . . . . . . . . . . . . . . . . . . . . . . . . . . . . . . . . . . . .
Xerox WorkCentre 5735/5740/5745/5755/5765/5775/5790
User Guide
64
66
84
92
3
Fax from PC. . . . . . . . . . . . . . . . . . . . . . . . . . . . . . . . . . . . . . . . . . . . . . . . . . . . . . . . . . . . . . . . . . . . . . . . . . . . 101
Receiving a Fax. . . . . . . . . . . . . . . . . . . . . . . . . . . . . . . . . . . . . . . . . . . . . . . . . . . . . . . . . . . . . . . . . . . . . . . . . 108
Workflow Scanning . . . . . . . . . . . . . . . . . . . . . . . . . . . . . . . . . . . . . . . . . . . . . . . . . . . . . . . . . .111
Introduction . . . . . . . . . . . . . . . . . . . . . . . . . . . . . . . . . . . . . . . . . . . . . . . . . . . . . . . . . . . . . . . . . . . . . . . . . . . 114
Workflow Scanning Options . . . . . . . . . . . . . . . . . . . . . . . . . . . . . . . . . . . . . . . . . . . . . . . . . . . . . . . . . . . . . 115
Advanced Settings. . . . . . . . . . . . . . . . . . . . . . . . . . . . . . . . . . . . . . . . . . . . . . . . . . . . . . . . . . . . . . . . . . . . . . 119
Layout Adjustment . . . . . . . . . . . . . . . . . . . . . . . . . . . . . . . . . . . . . . . . . . . . . . . . . . . . . . . . . . . . . . . . . . . . . 122
Filing Options . . . . . . . . . . . . . . . . . . . . . . . . . . . . . . . . . . . . . . . . . . . . . . . . . . . . . . . . . . . . . . . . . . . . . . . . . . 124
Job Assembly . . . . . . . . . . . . . . . . . . . . . . . . . . . . . . . . . . . . . . . . . . . . . . . . . . . . . . . . . . . . . . . . . . . . . . . . . . 126
Creating Templates . . . . . . . . . . . . . . . . . . . . . . . . . . . . . . . . . . . . . . . . . . . . . . . . . . . . . . . . . . . . . . . . . . . . 127
Scan to Mailbox . . . . . . . . . . . . . . . . . . . . . . . . . . . . . . . . . . . . . . . . . . . . . . . . . . . . . . . . . . . . . . . . . . . . . . . . 134
Scan to Home . . . . . . . . . . . . . . . . . . . . . . . . . . . . . . . . . . . . . . . . . . . . . . . . . . . . . . . . . . . . . . . . . . . . . . . . . . 137
Print . . . . . . . . . . . . . . . . . . . . . . . . . . . . . . . . . . . . . . . . . . . . . . . . . . . . . . . . . . . . . . . . . . . . . . . .139
Introduction . . . . . . . . . . . . . . . . . . . . . . . . . . . . . . . . . . . . . . . . . . . . . . . . . . . . . . . . . . . . . . . . . . . . . . . . . . . 142
Printing a Document. . . . . . . . . . . . . . . . . . . . . . . . . . . . . . . . . . . . . . . . . . . . . . . . . . . . . . . . . . . . . . . . . . . . 144
Paper/Output . . . . . . . . . . . . . . . . . . . . . . . . . . . . . . . . . . . . . . . . . . . . . . . . . . . . . . . . . . . . . . . . . . . . . . . . . . 145
Special Pages . . . . . . . . . . . . . . . . . . . . . . . . . . . . . . . . . . . . . . . . . . . . . . . . . . . . . . . . . . . . . . . . . . . . . . . . . . 150
Image Options . . . . . . . . . . . . . . . . . . . . . . . . . . . . . . . . . . . . . . . . . . . . . . . . . . . . . . . . . . . . . . . . . . . . . . . . . 153
Layout/Watermark . . . . . . . . . . . . . . . . . . . . . . . . . . . . . . . . . . . . . . . . . . . . . . . . . . . . . . . . . . . . . . . . . . . . . 154
Advanced . . . . . . . . . . . . . . . . . . . . . . . . . . . . . . . . . . . . . . . . . . . . . . . . . . . . . . . . . . . . . . . . . . . . . . . . . . . . . . 157
E-mail. . . . . . . . . . . . . . . . . . . . . . . . . . . . . . . . . . . . . . . . . . . . . . . . . . . . . . . . . . . . . . . . . . . . . . .159
Introduction . . . . . . . . . . . . . . . . . . . . . . . . . . . . . . . . . . . . . . . . . . . . . . . . . . . . . . . . . . . . . . . . . . . . . . . . . . . 162
Sending an E-mail . . . . . . . . . . . . . . . . . . . . . . . . . . . . . . . . . . . . . . . . . . . . . . . . . . . . . . . . . . . . . . . . . . . . . . 163
E-mail . . . . . . . . . . . . . . . . . . . . . . . . . . . . . . . . . . . . . . . . . . . . . . . . . . . . . . . . . . . . . . . . . . . . . . . . . . . . . . . . . 164
Advanced Settings. . . . . . . . . . . . . . . . . . . . . . . . . . . . . . . . . . . . . . . . . . . . . . . . . . . . . . . . . . . . . . . . . . . . . . 168
Layout Adjustment . . . . . . . . . . . . . . . . . . . . . . . . . . . . . . . . . . . . . . . . . . . . . . . . . . . . . . . . . . . . . . . . . . . . . 171
E-mail Options . . . . . . . . . . . . . . . . . . . . . . . . . . . . . . . . . . . . . . . . . . . . . . . . . . . . . . . . . . . . . . . . . . . . . . . . . 173
Job Assembly . . . . . . . . . . . . . . . . . . . . . . . . . . . . . . . . . . . . . . . . . . . . . . . . . . . . . . . . . . . . . . . . . . . . . . . . . . 175
Save and Reprint Jobs . . . . . . . . . . . . . . . . . . . . . . . . . . . . . . . . . . . . . . . . . . . . . . . . . . . . . . .177
Introduction . . . . . . . . . . . . . . . . . . . . . . . . . . . . . . . . . . . . . . . . . . . . . . . . . . . . . . . . . . . . . . . . . . . . . . . . . . . 180
Saving a Job . . . . . . . . . . . . . . . . . . . . . . . . . . . . . . . . . . . . . . . . . . . . . . . . . . . . . . . . . . . . . . . . . . . . . . . . . . . 181
Reprinting Saved Jobs . . . . . . . . . . . . . . . . . . . . . . . . . . . . . . . . . . . . . . . . . . . . . . . . . . . . . . . . . . . . . . . . . . 184
Managing Folders . . . . . . . . . . . . . . . . . . . . . . . . . . . . . . . . . . . . . . . . . . . . . . . . . . . . . . . . . . . . . . . . . . . . . . 186
ID Card Copy. . . . . . . . . . . . . . . . . . . . . . . . . . . . . . . . . . . . . . . . . . . . . . . . . . . . . . . . . . . . . . . .189
Introduction . . . . . . . . . . . . . . . . . . . . . . . . . . . . . . . . . . . . . . . . . . . . . . . . . . . . . . . . . . . . . . . . . . . . . . . . . . . 192
ID Card Copy . . . . . . . . . . . . . . . . . . . . . . . . . . . . . . . . . . . . . . . . . . . . . . . . . . . . . . . . . . . . . . . . . . . . . . . . . . 193
Copying an ID Card . . . . . . . . . . . . . . . . . . . . . . . . . . . . . . . . . . . . . . . . . . . . . . . . . . . . . . . . . . . . . . . . . . . . 195
4
Xerox WorkCentre 5735/5740/5745/5755/5765/5775/5790
User Guide
Internet Services . . . . . . . . . . . . . . . . . . . . . . . . . . . . . . . . . . . . . . . . . . . . . . . . . . . . . . . . . . . .197
Introduction . . . . . . . . . . . . . . . . . . . . . . . . . . . . . . . . . . . . . . . . . . . . . . . . . . . . . . . . . . . . . . . . . . . . . . . . . . . 200
Using Internet Services . . . . . . . . . . . . . . . . . . . . . . . . . . . . . . . . . . . . . . . . . . . . . . . . . . . . . . . . . . . . . . . . . 201
Status . . . . . . . . . . . . . . . . . . . . . . . . . . . . . . . . . . . . . . . . . . . . . . . . . . . . . . . . . . . . . . . . . . . . . . . . . . . . . . . . . 202
Jobs . . . . . . . . . . . . . . . . . . . . . . . . . . . . . . . . . . . . . . . . . . . . . . . . . . . . . . . . . . . . . . . . . . . . . . . . . . . . . . . . . . . 204
Print . . . . . . . . . . . . . . . . . . . . . . . . . . . . . . . . . . . . . . . . . . . . . . . . . . . . . . . . . . . . . . . . . . . . . . . . . . . . . . . . . . . 205
Scan. . . . . . . . . . . . . . . . . . . . . . . . . . . . . . . . . . . . . . . . . . . . . . . . . . . . . . . . . . . . . . . . . . . . . . . . . . . . . . . . . . . 206
Address Book . . . . . . . . . . . . . . . . . . . . . . . . . . . . . . . . . . . . . . . . . . . . . . . . . . . . . . . . . . . . . . . . . . . . . . . . . . 207
Properties. . . . . . . . . . . . . . . . . . . . . . . . . . . . . . . . . . . . . . . . . . . . . . . . . . . . . . . . . . . . . . . . . . . . . . . . . . . . . . 208
Support. . . . . . . . . . . . . . . . . . . . . . . . . . . . . . . . . . . . . . . . . . . . . . . . . . . . . . . . . . . . . . . . . . . . . . . . . . . . . . . . 209
Help . . . . . . . . . . . . . . . . . . . . . . . . . . . . . . . . . . . . . . . . . . . . . . . . . . . . . . . . . . . . . . . . . . . . . . . . . . . . . . . . . . . 210
Paper and Media . . . . . . . . . . . . . . . . . . . . . . . . . . . . . . . . . . . . . . . . . . . . . . . . . . . . . . . . . . . .211
Introduction . . . . . . . . . . . . . . . . . . . . . . . . . . . . . . . . . . . . . . . . . . . . . . . . . . . . . . . . . . . . . . . . . . . . . . . . . . . 214
Trays 1 and 2 . . . . . . . . . . . . . . . . . . . . . . . . . . . . . . . . . . . . . . . . . . . . . . . . . . . . . . . . . . . . . . . . . . . . . . . . . . 215
Trays 3 and 4 . . . . . . . . . . . . . . . . . . . . . . . . . . . . . . . . . . . . . . . . . . . . . . . . . . . . . . . . . . . . . . . . . . . . . . . . . . 217
Bypass Tray. . . . . . . . . . . . . . . . . . . . . . . . . . . . . . . . . . . . . . . . . . . . . . . . . . . . . . . . . . . . . . . . . . . . . . . . . . . . 219
Tray 5 . . . . . . . . . . . . . . . . . . . . . . . . . . . . . . . . . . . . . . . . . . . . . . . . . . . . . . . . . . . . . . . . . . . . . . . . . . . . . . . . . 221
Tray 6 (Inserter). . . . . . . . . . . . . . . . . . . . . . . . . . . . . . . . . . . . . . . . . . . . . . . . . . . . . . . . . . . . . . . . . . . . . . . . 223
Media Types . . . . . . . . . . . . . . . . . . . . . . . . . . . . . . . . . . . . . . . . . . . . . . . . . . . . . . . . . . . . . . . . . . . . . . . . . . . 225
Storage and Handling . . . . . . . . . . . . . . . . . . . . . . . . . . . . . . . . . . . . . . . . . . . . . . . . . . . . . . . . . . . . . . . . . . 227
Machine and Job Status . . . . . . . . . . . . . . . . . . . . . . . . . . . . . . . . . . . . . . . . . . . . . . . . . . . . .229
Introduction . . . . . . . . . . . . . . . . . . . . . . . . . . . . . . . . . . . . . . . . . . . . . . . . . . . . . . . . . . . . . . . . . . . . . . . . . . . 232
Job Status . . . . . . . . . . . . . . . . . . . . . . . . . . . . . . . . . . . . . . . . . . . . . . . . . . . . . . . . . . . . . . . . . . . . . . . . . . . . . 233
Machine Status . . . . . . . . . . . . . . . . . . . . . . . . . . . . . . . . . . . . . . . . . . . . . . . . . . . . . . . . . . . . . . . . . . . . . . . . 236
Administration and Accounting . . . . . . . . . . . . . . . . . . . . . . . . . . . . . . . . . . . . . . . . . . . . . .241
Tools . . . . . . . . . . . . . . . . . . . . . . . . . . . . . . . . . . . . . . . . . . . . . . . . . . . . . . . . . . . . . . . . . . . . . . . . . . . . . . . . . . 244
Device Settings. . . . . . . . . . . . . . . . . . . . . . . . . . . . . . . . . . . . . . . . . . . . . . . . . . . . . . . . . . . . . . . . . . . . . . . . . 245
Service Settings . . . . . . . . . . . . . . . . . . . . . . . . . . . . . . . . . . . . . . . . . . . . . . . . . . . . . . . . . . . . . . . . . . . . . . . . 255
Network Settings . . . . . . . . . . . . . . . . . . . . . . . . . . . . . . . . . . . . . . . . . . . . . . . . . . . . . . . . . . . . . . . . . . . . . . . 265
Accounting . . . . . . . . . . . . . . . . . . . . . . . . . . . . . . . . . . . . . . . . . . . . . . . . . . . . . . . . . . . . . . . . . . . . . . . . . . . . 267
Security Settings . . . . . . . . . . . . . . . . . . . . . . . . . . . . . . . . . . . . . . . . . . . . . . . . . . . . . . . . . . . . . . . . . . . . . . . 268
Troubleshooting. . . . . . . . . . . . . . . . . . . . . . . . . . . . . . . . . . . . . . . . . . . . . . . . . . . . . . . . . . . . . . . . . . . . . . . . 269
General Care and Troubleshooting . . . . . . . . . . . . . . . . . . . . . . . . . . . . . . . . . . . . . . . . . . .273
General Care . . . . . . . . . . . . . . . . . . . . . . . . . . . . . . . . . . . . . . . . . . . . . . . . . . . . . . . . . . . . . . . . . . . . . . . . . . . 276
Troubleshooting. . . . . . . . . . . . . . . . . . . . . . . . . . . . . . . . . . . . . . . . . . . . . . . . . . . . . . . . . . . . . . . . . . . . . . . . 280
Further Assistance. . . . . . . . . . . . . . . . . . . . . . . . . . . . . . . . . . . . . . . . . . . . . . . . . . . . . . . . . . . . . . . . . . . . . . 288
Safety and Regulations . . . . . . . . . . . . . . . . . . . . . . . . . . . . . . . . . . . . . . . . . . . . . . . . . . . . . .289
Notices and Safety . . . . . . . . . . . . . . . . . . . . . . . . . . . . . . . . . . . . . . . . . . . . . . . . . . . . . . . . . . . . . . . . . . . . . 292
Xerox WorkCentre 5735/5740/5745/5755/5765/5775/5790
User Guide
5
Safety Labels and Symbols . . . . . . . . . . . . . . . . . . . . . . . . . . . . . . . . . . . . . . . . . . . . . . . . . . . . . . . . . . . . . . 292
Operational Safety Information . . . . . . . . . . . . . . . . . . . . . . . . . . . . . . . . . . . . . . . . . . . . . . . . . . . . . . . . . 293
Basic Regulations. . . . . . . . . . . . . . . . . . . . . . . . . . . . . . . . . . . . . . . . . . . . . . . . . . . . . . . . . . . . . . . . . . . . . . . 297
Copy Regulations. . . . . . . . . . . . . . . . . . . . . . . . . . . . . . . . . . . . . . . . . . . . . . . . . . . . . . . . . . . . . . . . . . . . . . . 299
Fax Regulations . . . . . . . . . . . . . . . . . . . . . . . . . . . . . . . . . . . . . . . . . . . . . . . . . . . . . . . . . . . . . . . . . . . . . . . . 302
Material Safety Data . . . . . . . . . . . . . . . . . . . . . . . . . . . . . . . . . . . . . . . . . . . . . . . . . . . . . . . . . . . . . . . . . . . 305
Product Recycling and Disposal. . . . . . . . . . . . . . . . . . . . . . . . . . . . . . . . . . . . . . . . . . . . . . . . . . . . . . . . . . 305
Energy Program Compliance . . . . . . . . . . . . . . . . . . . . . . . . . . . . . . . . . . . . . . . . . . . . . . . . . . . . . . . . . . . . 306
EH&S Contact Information. . . . . . . . . . . . . . . . . . . . . . . . . . . . . . . . . . . . . . . . . . . . . . . . . . . . . . . . . . . . . . 307
Index . . . . . . . . . . . . . . . . . . . . . . . . . . . . . . . . . . . . . . . . . . . . . . . . . . . . . . . . . . . . . . . . . . . . . . .309
6
Xerox WorkCentre 5735/5740/5745/5755/5765/5775/5790
User Guide
Version 1.0
12/09
®
Xerox WorkCentre
5735/5740/5745/5755/5765/5775/
5790
Getting Started
©2009 Xerox Corporation. All Rights Reserved. Unpublished rights reserved under the copyright laws of the United States. Contents
of this publication may not be reproduced in any form without permission of Xerox Corporation.
Xerox®and the sphere of connectivity design are trademarks of Xerox Corporation in the United States and/or other countries.
Copyright protection claimed includes all forms of matters of copyrightable materials and information now allowed by statutory or
judicial law or hereinafter granted, including without limitation, material generated from the software programs which are displayed
on the screen such as styles, templates, icons, screen displays, looks, etc.
Changes are periodically made to this document. Changes, technical inaccuracies, and typographic errors will be corrected in
subsequent editions.
Document Version 1.0: December 2009
Table of Contents
Introduction . . . . . . . . . . . . . . . . . . . . . . . . . . . . . . . . . . . . . . . . . . . . . . . . . . . . . . . . . . . . . . . . . . . . . . . . . . . . . .4
Support . . . . . . . . . . . . . . . . . . . . . . . . . . . . . . . . . . . . . . . . . . . . . . . . . . . . . . . . . . . . . . . . . . . . . . . . . . . . . .4
Device Overview . . . . . . . . . . . . . . . . . . . . . . . . . . . . . . . . . . . . . . . . . . . . . . . . . . . . . . . . . . . . . . . . . . . . . . . . . .5
Services and Options . . . . . . . . . . . . . . . . . . . . . . . . . . . . . . . . . . . . . . . . . . . . . . . . . . . . . . . . . . . . . . . . . . . . . .6
WorkCentre Copier/Printer Models . . . . . . . . . . . . . . . . . . . . . . . . . . . . . . . . . . . . . . . . . . . . . . . . . . . . .6
WorkCentre Copier/Printer/Scanner Models . . . . . . . . . . . . . . . . . . . . . . . . . . . . . . . . . . . . . . . . . . . . .7
Control Panel Overview . . . . . . . . . . . . . . . . . . . . . . . . . . . . . . . . . . . . . . . . . . . . . . . . . . . . . . . . . . . . . . . . . . 10
Power On and Off . . . . . . . . . . . . . . . . . . . . . . . . . . . . . . . . . . . . . . . . . . . . . . . . . . . . . . . . . . . . . . . . . . . . . . . 11
Power On . . . . . . . . . . . . . . . . . . . . . . . . . . . . . . . . . . . . . . . . . . . . . . . . . . . . . . . . . . . . . . . . . . . . . . . . . . . 11
Power Off . . . . . . . . . . . . . . . . . . . . . . . . . . . . . . . . . . . . . . . . . . . . . . . . . . . . . . . . . . . . . . . . . . . . . . . . . . 11
Energy Saver . . . . . . . . . . . . . . . . . . . . . . . . . . . . . . . . . . . . . . . . . . . . . . . . . . . . . . . . . . . . . . . . . . . . . . . . 12
Loading Paper . . . . . . . . . . . . . . . . . . . . . . . . . . . . . . . . . . . . . . . . . . . . . . . . . . . . . . . . . . . . . . . . . . . . . . . . . . 13
Loading Documents . . . . . . . . . . . . . . . . . . . . . . . . . . . . . . . . . . . . . . . . . . . . . . . . . . . . . . . . . . . . . . . . . . . . 14
Making Copies . . . . . . . . . . . . . . . . . . . . . . . . . . . . . . . . . . . . . . . . . . . . . . . . . . . . . . . . . . . . . . . . . . . . . . . . . . 15
Printing a Document . . . . . . . . . . . . . . . . . . . . . . . . . . . . . . . . . . . . . . . . . . . . . . . . . . . . . . . . . . . . . . . . . . . . 16
Sending a Fax . . . . . . . . . . . . . . . . . . . . . . . . . . . . . . . . . . . . . . . . . . . . . . . . . . . . . . . . . . . . . . . . . . . . . . . . . . 17
Server Fax . . . . . . . . . . . . . . . . . . . . . . . . . . . . . . . . . . . . . . . . . . . . . . . . . . . . . . . . . . . . . . . . . . . . . . . . . . . . . . 18
Internet Fax . . . . . . . . . . . . . . . . . . . . . . . . . . . . . . . . . . . . . . . . . . . . . . . . . . . . . . . . . . . . . . . . . . . . . . . . . . . . 19
Sending a Fax from the PC . . . . . . . . . . . . . . . . . . . . . . . . . . . . . . . . . . . . . . . . . . . . . . . . . . . . . . . . . . . . . . 20
Workflow Scanning . . . . . . . . . . . . . . . . . . . . . . . . . . . . . . . . . . . . . . . . . . . . . . . . . . . . . . . . . . . . . . . . . . . . . 21
Sending an E-mail . . . . . . . . . . . . . . . . . . . . . . . . . . . . . . . . . . . . . . . . . . . . . . . . . . . . . . . . . . . . . . . . . . . . . . 22
Saving Jobs for Reprinting . . . . . . . . . . . . . . . . . . . . . . . . . . . . . . . . . . . . . . . . . . . . . . . . . . . . . . . . . . . . . . . 23
Reprinting Saved Jobs . . . . . . . . . . . . . . . . . . . . . . . . . . . . . . . . . . . . . . . . . . . . . . . . . . . . . . . . . . . . . . . . . . . 24
Log In / Out . . . . . . . . . . . . . . . . . . . . . . . . . . . . . . . . . . . . . . . . . . . . . . . . . . . . . . . . . . . . . . . . . . . . . . . . . . . . 25
Enhance Productivity . . . . . . . . . . . . . . . . . . . . . . . . . . . . . . . . . . . . . . . . . . . . . . . . . . . . . . . . . . . . . . . . . . . . 26
Maintenance and Consumables . . . . . . . . . . . . . . . . . . . . . . . . . . . . . . . . . . . . . . . . . . . . . . . . . . . . . . . . . 27
Troubleshooting . . . . . . . . . . . . . . . . . . . . . . . . . . . . . . . . . . . . . . . . . . . . . . . . . . . . . . . . . . . . . . . . . . . . . . . . 28
Help . . . . . . . . . . . . . . . . . . . . . . . . . . . . . . . . . . . . . . . . . . . . . . . . . . . . . . . . . . . . . . . . . . . . . . . . . . . . . . . . . . . 30
On the Device . . . . . . . . . . . . . . . . . . . . . . . . . . . . . . . . . . . . . . . . . . . . . . . . . . . . . . . . . . . . . . . . . . . . . . . 30
Information Pages . . . . . . . . . . . . . . . . . . . . . . . . . . . . . . . . . . . . . . . . . . . . . . . . . . . . . . . . . . . . . . . . . . 30
Faults . . . . . . . . . . . . . . . . . . . . . . . . . . . . . . . . . . . . . . . . . . . . . . . . . . . . . . . . . . . . . . . . . . . . . . . . . . . . . . 30
Documentation . . . . . . . . . . . . . . . . . . . . . . . . . . . . . . . . . . . . . . . . . . . . . . . . . . . . . . . . . . . . . . . . . . . . . 30
On the Print Driver . . . . . . . . . . . . . . . . . . . . . . . . . . . . . . . . . . . . . . . . . . . . . . . . . . . . . . . . . . . . . . . . . . 31
On Internet Services . . . . . . . . . . . . . . . . . . . . . . . . . . . . . . . . . . . . . . . . . . . . . . . . . . . . . . . . . . . . . . . . . 31
Further Assistance . . . . . . . . . . . . . . . . . . . . . . . . . . . . . . . . . . . . . . . . . . . . . . . . . . . . . . . . . . . . . . . . . . 31
Xerox WorkCentre 5735/5740/5745/5755/5765/5775/5790
Getting Started
3
Introduction
Introduction
Your new device is not simply a conventional copier, it is a digital device capable of copying, faxing,
printing and scanning, dependent on your model and configuration.
There are two configurations available:
• WorkCentre Copier/Printer - A multi-functional digital device capable of copying, printing, faxing
(optional), e-mailing and network scanning (optional).
• WorkCentre Copier/Printer/Scanner - An advanced multi-functional device offering a high
specification of features and functions. This model is capable of copying, printing, scanning, emailing and faxing (optional).
Each model has seven configurations available which provide either 35, 40, 45, 55, 65, 75 or 90
copies/prints a minute. All configurations are fully upgradable so as to meet any future requirements
you may have. Please contact your local Xerox representative for further information.
For further assistance in identifying your model, configuration and the additional options available
please refer to Device Overview on page 5.
All features and functions described within the User Guide relate to a fully configured WorkCentre and
may not be available on your device. If you require further information on any of the optional
components, or information on any of the other device configurations please contact your local Xerox
representative.
Support
If you need assistance during or after product installation, please visit the Xerox website for online
solutions and support.
If you require further assistance, call our experts at the Xerox Support Center, or contact your local
representative. When telephoning please quote the machine serial number. Use the space below to
make a note of the machine serial number:
# ______________________________________________________________________________
To access the serial number open the front door. The serial number is located on a label above the
toner cartridge. The Xerox Support Center or local representative telephone number is provided when
the device is installed. For convenience and future reference, please record the telephone number in the
space below:
Xerox Support Center or local representative telephone number:
# ______________________________________________________________________________
4
Xerox WorkCentre 5735/5740/5745/5755/5765/5775/5790
Getting Started
Device Overview
Device Overview
2
10
7
xerox
xerox
13
11
1
8
5
14
3
xerox
12
6
9
4
1
2
3
4
5
6
7
Control Panel: Touch Screen and Numeric
Keypad.
Document Feeder and Document Glass: Used
for scanning single or multiple documents. The
document glass can be used for scanning single,
bound, custom size or damaged documents.
Paper Trays 1 and 2: These trays are standard
on all models. Trays 1 and 2 are fully adjustable
and can be used for media sizes 5.5x8.5” to
11x17”(A5 to A3).
Paper Trays 3 and 4: These trays are high
capacity paper trays. Trays 3 and 4 are dedicated
trays used for 8.5x11” or A4 size media.
Bypass Tray: Used for non-standard printing
media.
Paper Tray 5: This is an optional high capacity
paper tray. It is a dedicated tray used for 8.5x11”
or A4 long edge feed size media. Optional kits
are available to accommodate 11x17”, A3,
8.5x14”, 8.5x11” or A4 Short Edge Feed (SEF)
media.
Tray 6 (Inserter): An optional paper tray for use
with the High Volume Finisher. It is used to insert
pre-printed sheets into copy sets. It is not part of
the printing process and cannot be used for
imaging.
8
9
10
11
12
13
14
High Volume Finisher: This optional finisher
collates, offsets, stacks and staples your output.
Booklet Maker, Tri-fold and Hole Punch kits can
be installed with this finisher.
Booklet Maker and Trifolder: These are optional
devices which can be installed with the High
Volume Finisher to staple and fold booklets or
leaflets.
Convenience Stapler: This optional device
provides manual stapling of up to 50 sheets. The
Convenience Shelf must also be fitted.
Offset Catch Tray: Delivers output collated or
uncollated. Each set or stack will be offset from
the previous to enable easy separation.
Basic Office Finisher: This optional device
stacks, collates, staples and offsets your output.
Advanced Office Finisher: This optional device
stacks, collates, staples and offsets your output.
Hole punch kits are also available for this finisher.
Document Glass Cover: This is a flat hinged
cover for the document glass. It is fitted instead
of the document feeder and is standard on some
configurations.
Xerox WorkCentre 5735/5740/5745/5755/5765/5775/5790
Getting Started
5
Services and Options
Services and Options
There are a number of services and options available for use with your device. Many services are
provided as standard and simply require enabling or configuring with additional third party hardware.
Optional functions and kits are also available and can be purchased and installed. The options
available are dependent on your WorkCentre model.
WorkCentre Copier/Printer Models
Key:
Standard
Optional
Not Available
WorkCentre
Description
35
Document Glass Cover a flat hinged cover for the document glass.
Fitted instead of the document feeder.
40
45
55
65
75
90
-
-
-
-
-
-
-
-
-
-
-
-
Document Feeder feeds 75 (35 model only) or 100 single or double
sided documents. Documents from A5 to A3 (5.5"x8.5" to 11"x17")
can be fed. Fitted instead of the document glass cover.
Paper Trays 3 and 4 high capacity paper trays.
Paper Tray 5 high capacity platform feed paper tray.
Paper Tray 6 (Post Process Inserter) optional insert tray which can
be fitted with the High Volume Finisher.
-
Envelope Tray this tray is fitted instead of paper tray 2 to enable
envelope printing. Up to 55 #10 Envelope s (4.1"x9.5") can be
loaded in the tray.
Offset Catch Tray delivers collated or uncollated output.
Basic Office Finisher stacks, collates, staples and offsets your
output.
-
Advanced Office Finisher stacks, collates, staples and offsets your
output. Hole punch kits are also available for this finisher.
High Volume Finisher collates, offsets, stacks and staples your
output. Booklet Maker, Trifold and Hole Punch kits can be installed
with this finisher.
Hole Punch Kits available with the Advanced Office Finisher and
the High Volume Finisher. The kits available are 2 Hole, 2 Hole
Legal, 3 Hole, 4 Hole or Swedish 4 Hole. Only one kit can be fitted at
one time.
6
Xerox WorkCentre 5735/5740/5745/5755/5765/5775/5790
Getting Started
-
-
Services and Options
WorkCentre
Description
35
40
45
55
65
75
90
-
-
-
-
-
-
Convenience Stapler for manual stapling. The Convenience Shelf
must be installed.
Convenience Shelf a shelf which can be installed on the left side of
the device.
Stand a storage area which is fitted instead of trays 3 and 4.
Basic Fax Kit (Embedded) this kit enables a single fax line
connection.
Extended Fax Kit (Embedded) this kit enables two fax lines to be
connected.
LAN Faxa enables users to send faxes directly from their PC using
the print and fax drivers.
Server Faxb enables users to send and receive hard copy faxes via a
fax server.
Internet Fax allows users to send or receive faxes over the internet
or intranet.
Network Scanning Kit enables E-Mail and Workflow Scanning
services. The mono-scanner is provided as standard.
Security kit provides additional security features, such as image
overwrite options.
Xerox Secure Access provides a card reading device to restrict
access to the device.
Color Scanner used to scan in color (factory fit).
Color Scanning Enablement kit a pin code is provided which
enables color scanning capabilities.
-
-
-
-
Network Accounting enables the tracking of device usage for Print,
Copy and Scan jobs from multiple devices over the network.
Xerox Standard Accounting is an accounting tool which tracks the
number of Copy, Print, Workflow Scanning, Server Fax and Fax jobs
for each user.
Foreign Interface Device enables the attachment of a third party
access and accounting device, such as a card swipe or coin
operated unit.
a.
b.
Requires the Basic or Extended Fax Kit or a Third Party Fax Server to be configured and installed.
Requires a Third Party Fax Server to be configured and installed.
WorkCentre Copier/Printer/Scanner Models
Xerox WorkCentre 5735/5740/5745/5755/5765/5775/5790
Getting Started
7
Services and Options
Key:
Standard
Optional
Not Available
WorkCentre
Description
35
40
45
55
65
75
90
-
-
-
-
-
-
Document Feeder feeds 75 (35 model only) or 100 single or double
sided documents. Documents from A5 to A3 (5.5"x8.5" to 11"x17")
can be fed. Fitted instead of the document glass cover.
Paper Trays 3 and 4 high capacity paper trays.
Paper Tray 5 high capacity platform feed paper tray.
Paper Tray 6 (Post Process Inserter) optional insert tray which can
be fitted with the High Volume Finisher.
-
Envelope Tray this tray is fitted instead of paper tray 2 to enable
envelope printing. Up to 55 #10 Envelopes (4.1"x9.5") can be
loaded in the tray.
Offset Catch Tray delivers collated or uncollated output.
Basic Office Finisher stacks, collates, staples and offsets your
output.
-
Advanced Office Finisher stacks, collates, staples and offsets your
output. Hole punch kits are also available for this finisher.
High Volume Finisher collates, offsets, stacks and staples your
output. Booklet Maker, Trifold and Hole Punch kits can be installed
with this finisher.
Hole Punch Kits available with the Advanced Office Finisher and
the High Volume Finisher. The kits available are 2 Hole, 2 Hole
Legal, 3 Hole, 4 Hole or Swedish 4 Hole. Only one kit can be fitted at
one time.
Convenience Stapler for manual stapling. The Convenience Shelf
must be installed.
Convenience Shelf a shelf which can be installed on the left side of
the device.
Basic Fax Kit (Embedded) this kit enables a single fax line
connection.
Extended Fax Kit (Embedded) this kit enables two fax lines to be
connected.
LAN Faxa enables users to send faxes directly from their PC using
the print and fax drivers.
Server Faxb enables users to send and receive hard copy faxes via a
fax server.
8
Xerox WorkCentre 5735/5740/5745/5755/5765/5775/5790
Getting Started
-
-
Services and Options
WorkCentre
Description
35
40
45
55
65
75
90
-
-
-
Internet Fax allows users to send or receive faxes over the internet
or intranet.
Network Scanning Kit enables E-Mail and Workflow Scanning
services. The mono-scanner is provided as standard.
Security kit provides additional security features, such as image
overwrite options.
Xerox Secure Access provides a card reading device to restrict
access to the device.
Color Scanner used to scan in color (factory fit).
Color Scanning Enablement kit a pin code is provided which
enables color scanning capabilities.
-
-
-
-
Network Accounting enables the tracking of device usage for Print,
Copy and Scan jobs from multiple devices over the network.
Xerox Standard Accounting is an accounting tool which tracks the
number of Copy, Print, Workflow Scanning, Server Fax and Fax jobs
for each user.
Foreign Interface Device enables the attachment of a third party
access and accounting device, such as a card swipe or coin
operated unit.
a.
b.
Requires the Basic or Extended Fax Kit or a Third Party Fax Server to be configured and installed.
Requires a Third Party Fax Server to be configured and installed.
Xerox WorkCentre 5735/5740/5745/5755/5765/5775/5790
Getting Started
9
Control Panel Overview
Control Panel Overview
13
6
8
14
1
11
9
2
5
12
7
3
10
4
15
1
2
3
4
5
6
7
8
10
Services Home: Provides access to the services
available on the device.
Services: Returns the display to the previous
copy, fax, or scan feature screen when the Job
Status screen or Machine Status screen is
displayed.
Job Status: Use to check the progress of active
jobs, or display detailed information about
completed jobs.
Machine Status: Use to check the device status,
the billing meters, the status of consumables, or
print the user documentation and reports. Use
this button also when accessing the Tools mode.
Touch Screen: Use to select programing features
and display fault clearance procedures and
general device information.
Log In/Out: Use to enter log in details, and to log
out.
Numeric Keypad: Use to enter alphanumeric
characters.
Help: Displays help messages for device features.
9
10
11
12
13
14
15
16
16
Interrupt Printing: Use to pause the job which is
currently printing, to run a more urgent copy job.
Start: Use to start a job.
Clear All: Press once to clear a current entry.
Press twice to return to default settings.
Stop: Stops the job in progress.
Energy Saver: Use to select energy saver mode,
perform a quick restart or to power down the
device.
Language: Use to select a different language for
the touch screen options.
Dial Pause: Use to insert a pause when dialing a
fax number.
‘C’ Cancel Entry: Cancels the previous entry
made on the Numeric Keypad.
Xerox WorkCentre 5735/5740/5745/5755/5765/5775/5790
Getting Started
Power On and Off
Power On and Off
Power On
1.
2.
Ensure that your device is connected to a suitable
power supply and that the power cord is fully plugged
in to the electrical outlet of the device.
Press the Power switch. The entire powering on process
(to power on all installed options) takes less than 3
minutes.
Power Off
1.
2.
Press the Power switch. The Power Down options are displayed:
• If Energy Saver is selected, the device will
immediately enter the Power Saver Mode
appropriate to its configuration.
• If Quick Restart is selected and confirmed the
device will restart. Any copy jobs in the job list will
be deleted, print jobs in the job list are recovered.
• If Power Down is selected and confirmed the
device is powered down.
• If Cancel is selected the power down options will be cancelled and the device will be available
for use.
Select Power Down. A confirmation screen displays a warning that data may be lost if the device
is powered down.
Note: Confirming power down will result in the deletion of any jobs currently in the queue.
3.
Select the Confirm button to power off the device.
The device will begin a controlled power down sequence. It remains on for approximately 45
seconds before switching off.
Xerox WorkCentre 5735/5740/5745/5755/5765/5775/5790
Getting Started
11
Power On and Off
Energy Saver
The device is designed to be energy efficient and automatically reduces its power consumption after
periods of inactivity. The System Administrator can set up Energy Saver options. The Energy Saver
button on the control panel causes the Power Down options to be displayed. To activate Energy Saver
mode use the instructions below:
1.
2.
3.
Press the Energy Saver button on the control panel.
The Power Down options are displayed.
Select Energy Saver. The device will immediately enter
Low Power mode.
If Sleep mode has been configured, the device will
then enter Sleep mode after a specified period of time.
The Energy Saver button is illuminated when the
device is in Energy Saver mode. A steady light indicates
the device is in Low Power mode. A flashing light
indicates the device is in Sleep Mode.
To re-activate the device when in Low Power or Sleep mode, touch a button on the touch screen or
control panel. The device takes longer to recover from Sleep mode.
For information about setting up the Energy Saver options, refer to the System Administrator Guide.
12
Xerox WorkCentre 5735/5740/5745/5755/5765/5775/5790
Getting Started
Loading Paper
Loading Paper
1.
Open the required paper tray.
• Paper Trays 1 and 2 are fully adjustable for all media sizes between A5 and A3 (5.5x8.5" and
11x17").
• Paper Trays 3 and 4 are dedicated paper trays which are set to hold either A4 or 8.5 x11" LEF
paper.
• Paper Tray 5 is an optional high capacity paper source. The standard tray has a single tray
which is set to A4 or 8.5x11" LEF. Two optional kits are available to allow Tray 5 to feed A3 or
11x17” SEF and A4 or 8.5x11” SEF.
• Bypass Tray accommodates most types of media in a range of sizes between A6 and A3 SEF
(4.25x5.5” and 11x17" SEF).
Note: LEF = Long Edge Feed and SEF = Short Edge Feed.
2.
3.
4.
Load paper. Paper must not be loaded above the maximum fill line.
If loading trays 1 or 2, make sure that the paper guides
are in the correct position for the paper size. Adjust
each guide by squeezing the clamp mechanism and
sliding the guide to just touch the edge of the media.
If loading the Bypass Tray, locate the media against
the front of the tray and move the rear guide to touch
the rear of the stack.
If loading Tray 5, press the button to open the door.
Wait for the paper tray to lower. The media required is
displayed on the screen. Place the media in the tray. Media must be positioned against the right
side of the tray.
Close the paper tray or tray door as required. The Bypass Tray remains open.
If the Paper Settings screen is displayed, select the size, type and color of the paper you have
loaded and select Confirm.
If the tray is a Dedicated tray the paper size and type specified on the touch screen must be
loaded and the Paper Settings screen is not displayed.
For information about loading special media, refer to Media Types on page 225 of Paper and Media.
Specification information for the Xerox WorkCentre 5735/5740/5745/5755/5765/5775/5790 is
provided at www.xerox.com.
Xerox WorkCentre 5735/5740/5745/5755/5765/5775/5790
Getting Started
13
Loading Documents
Loading Documents
Original documents can be loaded either into the
document feeder or onto the document glass.
1.
Load your documents face up in the document feeder
input tray.
Adjust the guide to just touch the documents.
Or...........
2.
Lift up the document feeder. Place the document face
down onto the document glass and register it to the
arrow at the top right rear corner. Close the document
feeder.
Note: Original documents are only scanned once even
when several copies are selected.
Specification information for the Xerox WorkCentre
5735/5740/5745/5755/5765/5775/5790 is provided at
www.xerox.com.
14
Xerox WorkCentre 5735/5740/5745/5755/5765/5775/5790
Getting Started
B
A
A4
A4
5.5"
A5
1
3
2
5
6
Making Copies
Making Copies
1.
2.
3.
4.
Load your documents face up in the document feeder input tray. Adjust the guide to just touch the
documents.
Or...........
Lift up the document feeder. Place the document face down onto the document glass and register
it to the arrow at the top right rear corner. Close the document feeder.
Press the Clear All (AC) button once to cancel any previous screen programing selections.
Press the Services Home button and select the Copy
option.
The Copy features are displayed.
Select the required features using the touch screen:
Reduce / Enlarge can be used to reduce or enlarge the image by 25% to 400%.
Paper Supply is used to select the required tray and size of paper for the copy output.
2-Sided Copy is used to produce 1 or 2-sided copy output.
Copy Output is used to select collate, staple or fold options (depending on the finishing
device available).
5.
6.
Enter the copy quantity using the numeric keypad and press Start to scan the originals.
Remove the originals from the document feeder or document glass when scanning has completed.
Note: The Copy job enters the job list ready for printing.
7.
Select Job Status to view the job list and check the status of your job.
If your job is held in the list it requires additional resources to print. To identify the resources
required, select the job and select Job Details. Once the resources are available the job will print.
For information about additional Copy features, refer to Copy Options on page 38 of Copy.
For information about copying an ID card, refer to Copying an ID Card on page 195 of ID Card Copy.
Xerox WorkCentre 5735/5740/5745/5755/5765/5775/5790
Getting Started
15
Printing a Document
Printing a Document
1.
2.
3.
4.
Ensure that the correct Xerox print driver has been installed on your PC. To install the print drivers
refer to the System Administrator Guide.
Open the document to be printed. From your application, select File > Print and select the Xerox
device from the list of printers displayed.
To change the default printing properties click Properties.
The print driver has various tabs that contain options
and properties.
• Use the Paper/Output tab to choose the type of
media, size and color and output choices such as
2-sided prints.
• The Special Pages tab allows you to add covers,
inserts and exceptions.
• The Image Options tab enables you to adjust the
image quality.
• The Layout/Watermark tab has various options
to add watermarks to pages, change image
orientation (landscape or portrait) and enable
booklet and multi-up printing.
• The Advanced tab contains various font, document and printing options.
Choose the options required for your printing job and click OK to print the document.
The print job will be sent to the device and will appear in the Active Jobs list. To view the list at the
device, press the Job Status button on the control panel.
If your job is held in the list it requires additional resources or a passcode to print. To identify the
resources required, select the job and select Resources Required. Once the resources are available
the job will print. If a passcode is required, select Release and enter the secure passcode.
For information about additional Print features, refer to Printing a Document on page 144 of Print.
16
Xerox WorkCentre 5735/5740/5745/5755/5765/5775/5790
Getting Started
Sending a Fax
Sending a Fax
1.
2.
3.
4.
5.
6.
Load your documents face up in the document feeder input tray. Adjust the guide to touch the
documents.
Or...........
Lift up the document feeder. Place the document face down onto the document glass and register
it to the arrow at the top right rear corner. Close the document feeder.
Press the Clear All (AC) button once to cancel any previous screen programing selections.
Press the Services Home button and select the Fax
option. The Fax features are displayed.
Enter the recipient’s fax number by:
• Keypad Dial - select the Enter Number area on
the touch screen and enter the number using the
numeric keypad.
• Manual Dial - if a telephone handset is attached
to the device, select the Manual Dial key and dial
the number using the handset or the numeric keypad.
• Speed Dial - select the Enter Number area and enter the 3 digit speed dial number, then
select the Speed Dial option.
• Address Book - select the Address Book button to access the fax address book. Select an
entry from the Address Book to add to the Recipient list. Continue adding recipients as
required and select Close to return to the previous screen.
If required, select Add to add the number entered to the Recipient list. Enter additional numbers
as required. The fax will be sent to all the numbers in the Recipient list.
Select the required features for your fax job using the touch screen:
Dialing Characters are alphanumeric characters which have a specific fax function and can be
entered as part of the fax number.
Cover Letter allows you to send a fax with a covering letter.
2-Sided Scanning is used to select whether your originals are 1-sided or 2-sided.
Original Type is used to define the original document as text, text and photo, photo or halftone
photo.
Resolution can be used to optimize the resolution settings.
7.
Press Start to scan the originals and process the fax job. Remove the originals from the document
feeder or document glass when scanning has completed.
Note: The Fax job enters the job list ready for sending.
8.
Select Job Status to view the job list and check the status of your job.
For information about additional Fax features, refer to Sending a Fax on page 66 of Fax.
Xerox WorkCentre 5735/5740/5745/5755/5765/5775/5790
Getting Started
17
Server Fax
Server Fax
1.
2.
3.
4.
5.
6.
Load your documents face up in the document feeder input tray. Adjust the guide to touch the
documents.
Or...........
Lift up the document feeder. Place the document face down onto the document glass and register
it to the arrow at the top right rear corner. Close the document feeder.
Press the Clear All (AC) button once to cancel any previous screen programing selections.
Press the Services Home button and select the Server
Fax option. The Server Fax features are displayed.
Enter the recipient’s fax number by:
• Keypad Dial - select the Enter Number area on
the touch screen and enter the number using the
numeric keypad.
• Fax Directory - Touch the Fax Directory button,
select an entry from the Fax Directory to add to
the Recipient list.
Select Add to add the number to the Recipient list.
Select the required features for your fax job using the touch screen:
Dialing Characters are alphanumeric characters which have a specific fax function and can be
entered as part of the fax number.
2-Sided Scanning is used to select whether your originals are 1-sided or 2-sided.
Original Type is used to define the original document as text, text and photo, or photo.
Resolution can be used to optimize the resolution settings.
7.
Press Start to scan the originals and process the Server Fax job.
Remove the originals from the document feeder or document glass when scanning has completed.
Note: The Server Fax job enters the job list ready for sending.
8.
Select Job Status to view the job list and check the status of your job.
For information about additional Server Fax features, refer to Sending a Server Fax on page 84 of Fax.
18
Xerox WorkCentre 5735/5740/5745/5755/5765/5775/5790
Getting Started
Internet Fax
Internet Fax
1.
2.
3.
4.
5.
6.
7.
8.
Load your documents face up in the document feeder input tray. Adjust the guide to touch the
documents.
Or...........
Lift up the document feeder. Place the document face down onto the document glass and register
it to the arrow at the top right rear corner. Close the document feeder.
Press the Clear All (AC) button once to cancel any previous screen programing selections.
Press the Services Home button and select the
Internet Fax option. The Internet Fax features are
displayed.
Select New Recipients.
Select To or Cc for the recipient using the drop-down
menu to the left of the entry box.
Using the keyboard, enter the e-mail address.
• Up to 128 alphanumeric characters can be
entered.
• To delete a character use the backspace key, or to clear the entire entry select the X button.
• Use the Keyboards... button to access additional language keyboards.
Select Add to add the e-mail address to the Recipient list. Continue adding e-mail addresses until
all the recipients have been added to the list, then select Save. All the recipients are displayed in
the Recipient list.
If an address book has been setup, enter the name of the recipient and select Search. A list of
matching recipients is displayed. Select the e-mail address required and select Add (To:) or Add
(Cc:) from the drop-down menu. The e-mail address is added to the recipient list. Multiple
recipients can be added to the Recipient list in this way. Select Close to exit.
Enter the Message, Reply To, From and Subject details as required.
Select the required features for your fax job using the touch screen:
Output Color is used to replicate the original colors or to change the output to black and white,
grayscale or color.
Note: This feature may not be available on your device.
2-Sided Scanning is used to select whether your originals are 1-sided or 2-sided.
Original Type is used to define the original document as text, text and photo, or photo.
9.
Press Start to scan the originals and process the Internet Fax job. Remove the originals from the
document feeder or document glass when scanning has completed.
Note: The Internet Fax job enters the job list ready for sending.
10. Select Job Status to view the job list and check the status of your job.
For information about additional Internet Fax features, refer to Sending an Internet Fax on page 92 of
Fax.
Xerox WorkCentre 5735/5740/5745/5755/5765/5775/5790
Getting Started
19
Sending a Fax from the PC
Sending a Fax from the PC
1.
2.
3.
4.
5.
6.
7.
Ensure that the correct Xerox print driver has been installed on your PC and the Fax from PC option
is available. To install the print drivers refer to the System Administrator Guide.
Open the document to be faxed. Click File > Print and select the Xerox device from the list of
printers displayed.
Select the Properties button to display the print driver printing preferences.
Select Fax as the Job Type on the Paper/Output
screen of the print driver.
The Fax screen will automatically open. This screen
displays the recipients for the current fax. You can
now Add Fax Recipients or Add From Phonebook.
To add a new recipient select the Add Recipient button.
Input the name and fax number of the recipient. Complete the
additional information.
Select the Save to Personal Phonebook option if you want to
add the recipient to your Personal Phonebook.
The Fax window has various tabs that contain options and
properties.
• Use the Cover Sheet tab to add a covering letter to your
fax.
• Use the Options tab to enable a confirmation sheet,
choose a specific send speed or select the resolution for
the fax. You can also select the Send Time option to enter a
specific time to transmit the fax.
Choose the options required for your fax job and click OK to
send the document. Your fax will be submitted to the device job
list ready to be transmitted.
For information about additional Fax from PC features, refer to Fax from PC Options on page 103 of
Fax.
20
Xerox WorkCentre 5735/5740/5745/5755/5765/5775/5790
Getting Started
Workflow Scanning
Workflow Scanning
Workflow Scanning allows the user to scan a hard copy original and convert it into an electronic file.
The file is placed into a specified filing location on a networked server, workstation or the device hard
drive. The settings used for scanning the original are stored in a template.
1.
2.
3.
4.
5.
Load your documents face up in the document feeder input tray. Adjust the guide to touch the
documents.
Or...........
Lift up the document feeder. Place the document face down onto the document glass and register
it to the arrow at the top right rear corner. Close the document feeder.
Press the Clear All (AC) button once to cancel any previous screen programing selections.
Press the Services Home button and select the
Workflow Scanning option. The Workflow Scanning
features are displayed.
Select a Template for the job from the templates
displayed in the list.
All the current settings are changed to the settings in
the template.
Select the required features for your scanning job
using the touch screen.
If required, modify the template settings from the options on the Workflow Scanning, Advanced
Settings, Layout Adjustment and Filing Options tabs:
Output Color is used to replicate the original colors or to change the output to black and white,
grayscale or color.
Note: This feature may not be available on your device.
2-Sided Scanning is used to select whether your originals are 1-sided or 2-sided. The second side
can be rotated.
Original Type is used to define the original document as text, text and photo, or photo.
Scan Presets is used to set the scan settings to suit how the scanned image will be used.
6.
Press Start to scan the originals and process the Workflow Scanning job. Remove the originals
from the document feeder or document glass when scanning has completed. The Workflow
Scanning job enters the job list ready for filing. The scanned images are then filed to the location
specified on the template ready for retrieval by the user.
For information about additional Workflow Scanning features, refer to Workflow Scanning Options on
page 115 of Workflow Scanning.
Xerox WorkCentre 5735/5740/5745/5755/5765/5775/5790
Getting Started
21
Sending an E-mail
Sending an E-mail
1.
2.
3.
4.
5.
6.
7.
Load your documents face up in the document feeder input tray. Adjust the guide to touch the
documents.
Or...........
Lift up the document feeder. Place the document face down onto the document glass and register
it to the arrow at the top right rear corner. Close the document feeder.
Press the Clear All (AC) button once to cancel any previous screen programing selections.
Press the Services Home button and select the E-mail
option. The E-mail features are displayed.
Select New Recipients.
Select To, Cc or Bcc for the recipient using the dropdown menu to the left of the entry box.
Using the keyboard, enter the e-mail address.
• Up to 128 alphanumeric characters can be
entered.
• To delete a character use the backspace key, or to clear the entire entry select the X button.
• Use the Keyboards... button to access additional language keyboards.
Select Add to add the e-mail address to the Recipient list. Continue adding e-mail addresses until
all the recipients have been added to the list, then select Save.
All the recipients are displayed in the Recipient list.
If an address book has been setup, enter the name of the recipient and select Search. A list of
matching recipients is displayed. Select the e-mail address required and select Add (To:), Add (Cc:)
or Add (Bcc:) from the drop-down menu. The e-mail address is added to the recipient list. Multiple
recipients can be added to the Recipient list in this way. Select Close to exit.
Enter the Message, Reply To, From and Subject details as required.
Select the required features for your e-mail using the touch screen:
Output Color is used to replicate the original colors or to change the output to black and white,
grayscale or color.
Note: This feature may not be available on your device.
2-Sided Scanning is used to select whether your originals are 1-sided or 2-sided. The second side
can be rotated.
Original Type is used to define the original document as text, text and photo, or photo.
Scan Presets is used to set the scan settings to suit how the scanned image will be used.
8.
Press Start to scan your originals and process the E-mail job. Remove the originals from the
document feeder or document glass when scanning has completed.
Note: The E-mail job enters the job list ready for sending.
9.
Select Job Status to view the job list and check the status of your job.
For information about additional E-mail features, refer to Sending an E-mail on page 163 of E-mail.
22
Xerox WorkCentre 5735/5740/5745/5755/5765/5775/5790
Getting Started
Saving Jobs for Reprinting
Saving Jobs for Reprinting
1.
2.
3.
4.
Load your documents face up in the document feeder input tray. Adjust the guide to just touch the
documents.
Or...........
Lift up the document feeder. Place the document face down onto the document glass and register
it to the arrow at the top right rear corner. Close the document feeder.
Press the Clear All (AC) button once to cancel any previous screen programing selections.
Press the Services Home button and select the Copy
option.
The Copy features are displayed.
Program the required job features.
Select the Job Assembly tab, and then Save Job for Reprint.
Select the option required:
• Copy & Save is used to store the job and print a
copy of the job.
• Save Only stores the job without printing.
7. Select a folder location to store the job.
8. Select New Job Name and enter a name for the job
using the keyboard.
Select Save to save the job name and return to the previous screen.
9. Press Start to run the job.
10. The job is scanned and saved with the name entered, in the folder selected. If Copy & Save was
selected, a copy of the job is also printed.
5.
6.
Jobs can also be saved using the print driver options or Internet Services. For additional information
about Saving Jobs for Reprint, refer to Saving a Job on page 181 of Save and Reprint Jobs.
Xerox WorkCentre 5735/5740/5745/5755/5765/5775/5790
Getting Started
23
Reprinting Saved Jobs
Reprinting Saved Jobs
1.
2.
3.
4.
5.
6.
Press the Services Home button.
Select the Reprint Saved Jobs option.
Folders containing the saved jobs are displayed.
Select the folder required. If necessary, use the scroll
bar to access all the folders.
A list of the jobs in the folder is displayed.
Select the job and select the print or save option required:
• Print is used to print the selected job using the
currently saved print settings.
• If print settings are changed from those stored
with the original print job, Print and Save is used
to print and then store the selected job with the
new settings.
• Save is used to save the selected job without
printing. The job will be saved in place of the
original job with any new settings selected.
If the job settings require changing prior to printing
the job, select the Settings option. Select the options
required and then select Print, Print and Save or Save.
If the job is a secure job, enter the passcode required
and select Print Job.
Select Job Status to view all the job lists and check the
status of your job. For further information, refer to Job
Status on page 233 of Machine and Job Status.
Jobs can also be reprinted using Internet Services. For additional information about Reprint Saved Jobs
features, refer to Reprinting Saved Jobs on page 184 of Save and Reprint Jobs.
24
Xerox WorkCentre 5735/5740/5745/5755/5765/5775/5790
Getting Started
Log In / Out
Log In / Out
If Authentication or Accounting has been enabled on the device, you may need to log in before using
some or all of the services. A picture of a lock on a button indicates that you must log in to use that
service.
1.
2.
3.
4.
5.
To log in select the Log In/Out button on the control
panel. Selecting a locked service will also prompt you
to enter a log in name and password.
Use the keyboard to enter your User Name.
If a password is required, select the Next button and
use the keyboard to enter your Password.
Select the Enter button.
If an accounting system is in use on the device, you
may also need to enter additional information, for example a User ID or Account ID. If a Foreign
Device Interface (FDI) is installed, you are prompted to access via the device installed, for example
a card reader or coin slot.
Your user details display in the User Details area on the right side of the message display.
To log out, select the Log In/Out button again or select the User Details area and select Log Out
from the drop-down menu.
A confirmation screen is displayed, select Log Out or Cancel.
Xerox WorkCentre 5735/5740/5745/5755/5765/5775/5790
Getting Started
25
Enhance Productivity
Enhance Productivity
Your device is a powerful multi-functional device with many digital functions integrated into one sleek
system. It is designed to support large workgroups in different office environments. You can do more
with less and streamline your workflow with these productivity enhancing features, for example:
• Online address books
• Customization to meet own work processes
• Powerful documentation features for example, Booklet Creation, Special Pages, Build Job and
Annotations
To maximize job productivity, use the Job Status button to access the Active jobs list and manage your
jobs. If a job is urgent, use the Promote option to prioritize your jobs.
If a job is Held in the list, it may require additional resources or a secure code to print. The reason for
the held status is displayed on the Job Progress screen. Once the requirement has been met or the
correct secure code entered, the job is released for printing.
For further information about customizing or using your device refer to Tools on page 244 of
Administration and Accounting.
26
Xerox WorkCentre 5735/5740/5745/5755/5765/5775/5790
Getting Started
Maintenance and Consumables
Maintenance and Consumables
There are several consumables on the device that need replenishing or replacing, such as paper,
staples, and customer replaceable units. To place an order for Xerox consumables, please contact your
local Xerox Representative giving your company name, product number and the machine serial
number.
For information about locating the serial number, please refer to Machine Information on page 236 of
Machine and Job Status.
Customer Replaceable Units
There are 5 replaceable units on the device:
• Xerographic Module
• Toner Cartridge
• Fuser Module
• Ozone Filter
• Waste Toner bottle
The device will display a message on the touch screen when any of the units need to be reordered. This
message is a warning that the unit is nearing the end of its life. Only replace the unit when a message
actually instructs you to do so.
To replace a Customer Replaceable Unit, follow the instructions on the touch screen or use the
instructions provided with the consumable.
Staple Cartridges and Hole Punch Waste
If your device is equipped with a finisher, or a convenience stapler, you will be required to replace the
staple cartridge or cartridges when the device displays a message instructing you to do so. If your
finisher has the optional hole punch unit, you will also be required to empty the hole punch waste
container when prompted by the device.
Cleaning Tasks
Performing regular cleaning activities ensures the device is kept free of dust and debris. The device
covers, control panel and touch screen should all be cleaned using a soft lint-free cloth, lightly
dampened with water. Xerox Cleaning Fluid or Anti-Static Cleaner can be used to clean the document
glass, but must be applied using a cloth and not poured directly on the document glass. Remove any
residue with a clean cloth or paper towel.
For further information on maintenance tasks, refer to General Care on page 276 of General Care and
Troubleshooting.
Xerox WorkCentre 5735/5740/5745/5755/5765/5775/5790
Getting Started
27
Troubleshooting
Troubleshooting
A variety of situations can affect the quality of your output. The animations and fault messages on the
device help you to locate and resolve a problem easily. Some problems can be resolved by restarting
your device. If after rebooting your device the problem has not been resolved, have a look at some of
the areas below to identify solutions.
Problem
Solution
The device will not power on
• Check to see that the device is not in Energy Saver Mode as
indicated by the green light on the control panel. Touch the user
interface screen to re-activate.
• Check to see that the power cord is correctly inserted.
Documents will not feed through the
document feeder
• Ensure that you have selected the correct service e.g. Copy, Fax,
Workflow Scanning.
• Ensure that all staples or paper clips have been removed from the
originals.
• Ensure the document feeder is not overloaded, a maximum of 75
documents (35 model) or 100 documents (other models) can be
loaded.
• Ensure that the edge guides are adjusted to touch the sides of the
originals.
The device will not print from a
workstation
• Make sure that an active network cable is connected to the
workstation.
• Check that the Network Setup is correct. For further information
refer to the System Administrator Guide.
Cannot send an E-mail
• Check if the device is connected on the network.
• Check that E-mail is enabled. For further information, refer to the
System Administrator Guide.
Avoiding paper jams
• If the paper curls excessively, flip the paper over in the applicable
paper tray.
• Use paper from a fresh package.
Cannot fax a document
• Ensure the Fax service is enabled.
• Ensure your device is connected to a telephone socket if using Fax,
or the network for other fax services.
The job has been scanned or sent
from the PC but does not print
• Select the Job Status button and check the status.
• If the job is Held, select the job in the list and use the Required
Resources option to identify the resources required to enable the
job to print.
• If the job is a Secure Print job, select Release and enter the
passcode required.
For further information about problem solving, refer to Troubleshooting on page 280 of General Care
and Troubleshooting.
28
Xerox WorkCentre 5735/5740/5745/5755/5765/5775/5790
Getting Started
Troubleshooting
Jam Clearance
Paper and media jams happen for a variety of reasons. When a jam occurs, the device presents
instructions on the screen explaining how to remove the jam.
Paper Jams
Any printed sheets removed will automatically reprint once the paper jam is cleared.
1.
2.
The fault screen will indicate the location of the jam. Use the green handles and knobs indicated
in the instructions displayed on the screen to remove the jammed paper.
Ensure that all jam clearance handles and levers are returned to their correct positions. The red
flashes behind the jam clearance handles and levers should not be visible.
Note: Jam Clearance areas vary depending on your device model and configuration.
Document Jams
1.
2.
Remove all the documents from the document feeder and document glass as instructed.
Re-order the documents as at the start of the job and reload. The documents will be recycled
automatically to recover the job.
For further information and help refer to Troubleshooting on page 280 of General Care and
Troubleshooting.
Xerox WorkCentre 5735/5740/5745/5755/5765/5775/5790
Getting Started
29
Help
Help
When using your device, detailed and timely help is available at your fingertips. You can access Help
information and tips from a variety of sources.
On the Device
Press the Help button at any time to access the online help screens. Messages, screen instructions and
graphics provide additional information.
Information Pages
The user documentation and various reports can be accessed and printed at the device.
1.
2.
3.
Press the Machine Status button and select Machine Information.
Select Information Pages.
A list of the reports and documentation available is displayed.
Select the report or document required and select Print.
Documentation
Most answers to your questions will be provided by the documentation that is supplied with the device.
• User Guide - the user guide is divided into several sections and provides instructions and
information about all the features on the device.
• Posters - the posters overview all the basic functions of the device and can be printed and
displayed next to your device.
• System Administrator Guide - provides detailed instructions and information about connecting
your device to the network and installing optional features.
The user documentation can be accessed and printed at the device, as described above. Other
documents are either provided on disc or can be downloaded from the Xerox website.
Faults
Faults on the device can be accessed at the device. The screen displays fault listings, and the device
error logs. The fault page is separated into three options:
• All Faults
• Active Messages
• Event Log
To access the Faults page: Press the Machine Status button, touch Faults and select the required
option.
30
Xerox WorkCentre 5735/5740/5745/5755/5765/5775/5790
Getting Started
Help
On the Print Driver
Click ? on the print driver screen or press [F1] on the PC keyboard for information on the displayed print
driver screen.
On Internet Services
To access Internet Services, open the web browser from your workstation. In the URL field, enter http://
followed by the IP Address of the device and press Enter to view the Home page.
Click Index to view the contents of the Internet Services site.
Click Help to take you to the Xerox online support web site.
Note: To find out the IP Address of your device, print a configuration report. For instructions, refer
to Print Reports on page 236 of Machine and Job Status.
Further Assistance
For any additional help visit our customer web site at www.xerox.com or contact the Xerox Support
Center quoting the machine serial number.
To locate the machine serial number and contact information, press the Machine Status button on the
control panel. The Customer Support information and the Machine Serial Number are displayed on the
Machine Information tab.
Xerox WorkCentre 5735/5740/5745/5755/5765/5775/5790
Getting Started
31
Help
32
Xerox WorkCentre 5735/5740/5745/5755/5765/5775/5790
Getting Started
Version 1.0
12/09
®
Xerox WorkCentre
5735/5740/5745/5755/5765/5775/
5790
Copy
©2009 Xerox Corporation. All Rights Reserved. Unpublished rights reserved under the copyright laws of the United States. Contents
of this publication may not be reproduced in any form without permission of Xerox Corporation.
Xerox®and the sphere of connectivity design are trademarks of Xerox Corporation in the United States and/or other countries.
Copyright protection claimed includes all forms of matters of copyrightable materials and information now allowed by statutory or
judicial law or hereinafter granted, including without limitation, material generated from the software programs which are displayed
on the screen such as styles, templates, icons, screen displays, looks, etc.
Changes are periodically made to this document. Changes, technical inaccuracies, and typographic errors will be corrected in
subsequent editions.
Document Version 1.0: December 2009
34
Xerox WorkCentre 5735/5740/5745/5755/5765/5775/5790
Copy
Table of Contents
Introduction . . . . . . . . . . . . . . . . . . . . . . . . . . . . . . . . . . . . . . . . . . . . . . . . . . . . . . . . . . . . . . . . . . . . . . . . . . . .
Making Copies . . . . . . . . . . . . . . . . . . . . . . . . . . . . . . . . . . . . . . . . . . . . . . . . . . . . . . . . . . . . . . . . . . . . . . . . . .
Copy Options . . . . . . . . . . . . . . . . . . . . . . . . . . . . . . . . . . . . . . . . . . . . . . . . . . . . . . . . . . . . . . . . . . . . . . . . . . .
Reduce/Enlarge . . . . . . . . . . . . . . . . . . . . . . . . . . . . . . . . . . . . . . . . . . . . . . . . . . . . . . . . . . . . . . . . . . . . .
Paper Supply . . . . . . . . . . . . . . . . . . . . . . . . . . . . . . . . . . . . . . . . . . . . . . . . . . . . . . . . . . . . . . . . . . . . . . .
2 Sided Copy . . . . . . . . . . . . . . . . . . . . . . . . . . . . . . . . . . . . . . . . . . . . . . . . . . . . . . . . . . . . . . . . . . . . . . .
Copy Output . . . . . . . . . . . . . . . . . . . . . . . . . . . . . . . . . . . . . . . . . . . . . . . . . . . . . . . . . . . . . . . . . . . . . . . .
Image Quality . . . . . . . . . . . . . . . . . . . . . . . . . . . . . . . . . . . . . . . . . . . . . . . . . . . . . . . . . . . . . . . . . . . . . . . . . .
Original Type . . . . . . . . . . . . . . . . . . . . . . . . . . . . . . . . . . . . . . . . . . . . . . . . . . . . . . . . . . . . . . . . . . . . . . .
Image Options . . . . . . . . . . . . . . . . . . . . . . . . . . . . . . . . . . . . . . . . . . . . . . . . . . . . . . . . . . . . . . . . . . . . . .
Image Enhancement . . . . . . . . . . . . . . . . . . . . . . . . . . . . . . . . . . . . . . . . . . . . . . . . . . . . . . . . . . . . . . . .
Layout Adjustment . . . . . . . . . . . . . . . . . . . . . . . . . . . . . . . . . . . . . . . . . . . . . . . . . . . . . . . . . . . . . . . . . . . . .
Original Size . . . . . . . . . . . . . . . . . . . . . . . . . . . . . . . . . . . . . . . . . . . . . . . . . . . . . . . . . . . . . . . . . . . . . . . .
Book Copying . . . . . . . . . . . . . . . . . . . . . . . . . . . . . . . . . . . . . . . . . . . . . . . . . . . . . . . . . . . . . . . . . . . . . . .
Image Shift . . . . . . . . . . . . . . . . . . . . . . . . . . . . . . . . . . . . . . . . . . . . . . . . . . . . . . . . . . . . . . . . . . . . . . . . .
Edge Erase . . . . . . . . . . . . . . . . . . . . . . . . . . . . . . . . . . . . . . . . . . . . . . . . . . . . . . . . . . . . . . . . . . . . . . . . .
Invert Image . . . . . . . . . . . . . . . . . . . . . . . . . . . . . . . . . . . . . . . . . . . . . . . . . . . . . . . . . . . . . . . . . . . . . . .
Output Format . . . . . . . . . . . . . . . . . . . . . . . . . . . . . . . . . . . . . . . . . . . . . . . . . . . . . . . . . . . . . . . . . . . . . . . . .
Booklet Creation . . . . . . . . . . . . . . . . . . . . . . . . . . . . . . . . . . . . . . . . . . . . . . . . . . . . . . . . . . . . . . . . . . . .
Covers . . . . . . . . . . . . . . . . . . . . . . . . . . . . . . . . . . . . . . . . . . . . . . . . . . . . . . . . . . . . . . . . . . . . . . . . . . . . . .
Inserts . . . . . . . . . . . . . . . . . . . . . . . . . . . . . . . . . . . . . . . . . . . . . . . . . . . . . . . . . . . . . . . . . . . . . . . . . . . . .
Annotations . . . . . . . . . . . . . . . . . . . . . . . . . . . . . . . . . . . . . . . . . . . . . . . . . . . . . . . . . . . . . . . . . . . . . . . .
Transparency Separators . . . . . . . . . . . . . . . . . . . . . . . . . . . . . . . . . . . . . . . . . . . . . . . . . . . . . . . . . . . .
Page Layout . . . . . . . . . . . . . . . . . . . . . . . . . . . . . . . . . . . . . . . . . . . . . . . . . . . . . . . . . . . . . . . . . . . . . . . .
Job Assembly . . . . . . . . . . . . . . . . . . . . . . . . . . . . . . . . . . . . . . . . . . . . . . . . . . . . . . . . . . . . . . . . . . . . . . . . . . .
Build Job . . . . . . . . . . . . . . . . . . . . . . . . . . . . . . . . . . . . . . . . . . . . . . . . . . . . . . . . . . . . . . . . . . . . . . . . . . .
Sample Job . . . . . . . . . . . . . . . . . . . . . . . . . . . . . . . . . . . . . . . . . . . . . . . . . . . . . . . . . . . . . . . . . . . . . . . . .
Save Job for Reprint . . . . . . . . . . . . . . . . . . . . . . . . . . . . . . . . . . . . . . . . . . . . . . . . . . . . . . . . . . . . . . . . .
Save Current Settings . . . . . . . . . . . . . . . . . . . . . . . . . . . . . . . . . . . . . . . . . . . . . . . . . . . . . . . . . . . . . . .
Retrieve Saved Settings . . . . . . . . . . . . . . . . . . . . . . . . . . . . . . . . . . . . . . . . . . . . . . . . . . . . . . . . . . . . .
Xerox WorkCentre 5735/5740/5745/5755/5765/5775/5790
Copy
36
37
38
38
39
40
40
44
44
44
45
46
46
46
47
48
48
49
49
50
51
52
55
56
57
57
58
59
59
60
35
Introduction
Introduction
This section describes the copying features of the device,
including options for Reduce/Enlarge, 2-Sided Copy, Layout
Adjustments, Image Quality, Output Formats, Job
Assembly, and other copy functions.
When Start is pressed from within the copy service, the
device scans your originals and temporarily stores the
images. It then prints the images based on the selections
made.
1.
2.
To select the Copy service, press the Services Home
button.
Select the Copy option. Additional options and
features are displayed.
For instructions on using the basic Copy features refer to
Making Copies on page 37.
If Authentication or Accounting has been enabled on your
device you may have to enter log in details to access the features. Refer to Log In / Out on page 25 of
Getting Started.
36
Xerox WorkCentre 5735/5740/5745/5755/5765/5775/5790
Copy
Making Copies
Making Copies
1.
2.
3.
4.
Load your documents face up in the document feeder input tray. Adjust the guide to just touch the
documents.
Or...........
Lift up the document feeder. Place the document face down onto the document glass and register
it to the arrow at the top right rear corner. Close the document feeder.
Press the Clear All (AC) button once to cancel any previous screen programing selections.
Press the Services Home button and select the Copy
option.
The Copy features are displayed.
Select the required features using the touch screen:
Reduce / Enlarge can be used to reduce or enlarge the image by 25% to 400%.
Paper Supply is used to select the required tray and size of paper for the copy output.
2 Sided Copy is used to produce 1 or 2-sided copy output.
Copy Output is used to select collate, staple or fold options (depending on the finishing
device available).
5.
6.
Enter the copy quantity using the numeric keypad and press Start to scan the originals.
Remove the originals from the document feeder or document glass when scanning has completed.
Note: The Copy job enters the job list ready for printing.
7.
Select Job Status to view the job list and check the status of your job.
If your job is held in the list it requires additional resources to print. To identify the resources required,
select the job and select Job Details. Once the resources are available the job will print.
Xerox WorkCentre 5735/5740/5745/5755/5765/5775/5790
Copy
37
Copy Options
Copy Options
The Copy tab includes basic copying selections such as
Reduce/Enlarge, Paper Supply, 2-Sided Copy and Copy
Output. Each option is described in detail below.
Reduce/Enlarge
A variety of options are available on your device to enable you to reduce or enlarge the output from
your original, including selecting a specific ratio - either proportionately or independently - and
choosing from a selection of pre-defined preset buttons. For convenience, easy access to ratio
selections can be found on the Copy tab in the Reduce/Enlarge area. Use the More... button to access
further options not on the main screen.
Images from originals placed on the document glass can be enlarged or reduced by any ratio between
400% and 25%. Images from originals fed through the document feeder can be enlarged or reduced
by any ratio between 200% and 25%.
• Use the arrow buttons on the Copy screen to select the required reduction or enlargement
percentage.
•
•
•
Alternatively, select the ratio button
and use the numeric keypad to type in the ratio
required.
Set the ratio window to 100% if you want your output image to be the same size as your original.
Other options are listed below including A3 to A4 reduction, Auto and More.
Proportional %
Selections made on this screen will reduce or enlarge the image by the same ratio in both directions so
that the image gets bigger or smaller, but the proportions remain the same.
•
•
38
Select the Variable % button
and use the
numeric keypad or the arrow buttons to enter the ratio
required.
Use the Presets buttons to select 100%, Auto % or
commonly used ratios which can be set up by your
Administrator. The selected proportional ratios in
percentages are shown next to the button.
When Auto % is selected, the device chooses the best
ratio to reduce or enlarge the original onto the selected paper size. You must specify a paper tray
before using this option.
Xerox WorkCentre 5735/5740/5745/5755/5765/5775/5790
Copy
Copy Options
Independent X-Y%
This selection enables you to set different reduction or enlargement ratios for the X (width) and the
Y (length) of the image. This will produce a distorted copy of your original.
•
•
Select the Variable X-Y% buttons
and use the
numeric keypad or the arrow buttons to enter the
Width - X% and Length - Y% ratios required.
Use the Presets (X/Y%) buttons to select 100%/100%,
Auto Independent X-Y% or commonly used ratios
which can be set up by your Administrator. The
selected X and Y ratios in percentages are shown next
to the button.
Use 100% / 100% to produce an image the same size as your original.
Auto Independent X-Y% automatically fits the image of your original onto the paper you have
selected. The reduction or enlargement may not be proportional, the device will distort the image
so that it will fit onto the paper. You must specify a paper tray before using this option or select
Auto Select on the Paper Supply screen.
Select Save to save your selections and exit.
Paper Supply
On the Paper Supply section of the Copy tab you have the option to select one of the paper trays, or
Auto Select. Use More... to access all the options.
• Auto Select automatically selects the appropriate paper size for each original based on the size of
the original and any directly selected magnification ratios.
• Alternatively, you can select a paper tray that contains the size and type of paper you require. The
size and type of media loaded in each tray is displayed.
When the More... button is selected, the Paper Supply
screen is displayed showing all the trays and the size, color
and type of media loaded in each tray.
• A user can select which tray to use from this list. The
chosen tray is highlighted in blue.
• If the Auto Tray Switching feature has been enabled
by your System Administrator and the same size, color
and type of media is loaded in more than one other
tray, the device will automatically switch from the active tray to another if media in the active tray
runs out.
Select Save to save your selections and exit.
Xerox WorkCentre 5735/5740/5745/5755/5765/5775/5790
Copy
39
Copy Options
2 Sided Copy
The device provides options to make one or two-sided copies from one or two-sided originals using
either the document feeder or the document glass. The options are:
• 1 > 1 sided use this option if your originals are printed on one side and you want single-sided
copies.
• 1 > 2 sided use this option if your originals are printed on one side and you want 2-sided copies.
You can also select the Rotate Side 2 button to have the second page rotated by 180o.
• 2 > 2 sided use this option if you want to make two sided copies from two-sided originals. You can
also select the Rotate Side 2 button to have the second side(s) rotated by 180o.
• 2 > 1 sided this option will make one-sided copies from two-sided originals.
Note: If using the document glass to scan originals, the device displays a message when ready to
scan side 2. Continue scanning until all sides have been scanned.
Copy Output
The most commonly used Copy Output options are selected directly from the Copy tab. The options
available are dependent on the finishing device and kits installed. For further information, refer to
Finishing Devices on page 42.
Use More... to access all the options. When you have finished programing your options, select Save to
save your selections and exit.
None
This option is selected if no finishing is required for the copy output.
Collation
Select the Collation option required. The options are:
• Collated sorts your copies into sets 1,2,3 1,2,3 1,2,3.
• Uncollated sorts your copies into stacks 1,1,1 2,2,2 3,3,3.
Stapled
The stapling options available are dependent on the finishing device available and the configuration
setup. For information about the available options, refer to Services and Options on page 6 of Getting
Started.
• 1 Staple select this option and then select the corner
required for the staple. A single staple will be
positioned in the corner selected.
• 2 Staple select this option and then select the edge
required for the staples. Two staples will be positioned
along the edge selected.
40
Xerox WorkCentre 5735/5740/5745/5755/5765/5775/5790
Copy
Copy Options
•
Multi Staple when this option is selected, depending on the size of your media, either three or
four staples will be positioned on the edge selected. For example:
• 4 Staples = A4 LEF, A3, 8.5x11” LEF, 11x17”, 8x10” LEF.
• 3 Staples = 8x10” SEF, 8.5x11” SEF, 8.5x5.5” LEF, A4 SEF, A5 LEF, 8.5x14” SEF, B5 SEF.
Note: SEF is Short Edge Feed and LEF is Long Edge Feed.
Note: For some staple selections the device will rotate the image. If you are unable to staple,
ensure that Image Rotation is On in Tools. Refer to Auto Image Rotation on page 264 of
Administration and Accounting.
Hole Punched/Stapled
The Hole Punched/Stapled options available are dependent on the finishing device and Hole Punch Kit
available. For information about the available options, refer to Services and Options on page 6 of
Getting Started.
This option is selected if you require your output to be hole punched or hole punched and stapled. Each
sheet will be punched individually so there is no limit to the number of pages in the set. Hole punching
can only be selected for A4 LEF and A3 (8.5x11” LEF and 11x17”) paper. Select the Collation option
required prior to selecting the required Hole Punched/Stapled option. The options are:
• Hole Punched Only select this option to hole punch
your sets or stacks on the left edge.
• 1 Staple select this option to hole punch your sets and
add a single staple. Select the location required for the
staple.
• 2 Staples select this option to hole punch your sets or
stacks and add two staples. Select the edge required
for the staples.
Booklet
If your device is fitted with the High Volume Finisher with Booklet Maker, you can use the Booklet
feature to automatically produce folded and stapled booklets. The following Booklet Maker
specifications apply:
• Paper Sizes A3, 11x17”, A4, 8.5x11”, 8.5x13” and 8.5x14”.
• Paper weight 60 to 216 gsm (16 to 57 lb).
• All media must be Short Edge Feed (SEF).
• Booklet thickness:
• For Folded and Stapled booklets a maximum of 15 sheets of 80 gsm (20 lb) or equivalent
thickness. For example you can have 13 sheets of 80 gsm (20 lb) and a cover sheet of
160 gsm (43 lb).
• For Folded Only booklets a maximum of 5 sheets of 80 gsm (20 lb) or equivalent thickness.
For example you can have 3 sheets of 80 gsm (20 lb) and a cover sheet of 200 gsm (53 lb).
Xerox WorkCentre 5735/5740/5745/5755/5765/5775/5790
Copy
41
Copy Options
Using the Booklet Creation - On option the device will scan your originals and automatically reduce and
arrange the images in the correct sequence on your selected media, so that a booklet is created when
the copy set is folded in half. A cover can be inserted onto the booklet automatically, refer to Covers on
page 50.
The options are:
Booklet Creation
• Off select this option if you want your output layout to
match your originals. For example, if your originals are
already in a booklet layout.
• On select this option if you want the device to
automatically reduce and arrange the images to
create a booklet layout.
Finishing
• Folded & Stapled will staple and fold the output along the center margin to produce booklets.
• Fold Only will fold the output along the center margin to produce booklets.
• None select this option if you do not want the device to fold and staple your output.
Tri-Folded
If the optional Tri-fold Module is installed on your device, a single sheet of A4 or 8.5x11” media in a
weight range of 60 to 120 gsm (16 to 32 lb) can be folded in a C Fold or Z Fold. Originals must always
be loaded Short Edge Feed (SEF).
•
C Fold
the page will be folded as shown. Select
Collated for sets or Uncollated for stacks.
•
Z Fold
the page will be folded as shown. Select
Collated for sets or Uncollated for stacks.
Finishing Devices
Finishing Device
Description
Basic Office Finisher
• Holds up to 250 sheets of paper in the Top Tray, and up to 1000 sheets
in the Stacker Tray.
• Paper weight 60 to 216 gsm (16 to 57 lb).
• The Stacker can collate, stack and staple your output, depending on the
features selected. It staples between 2 and 30 sheets of 80 gsm (20 lb)
paper, less if using heavyweight paper or tabs.
• The staple cartridge for the Basic Office Finisher contains 3000 staples.
Note: Double Staple is not available with the Basic Office Finisher.
42
Xerox WorkCentre 5735/5740/5745/5755/5765/5775/5790
Copy
Copy Options
Finishing Device
Description
Advanced Office Finisher
• Holds up to 250 sheets of paper in the Top Tray, and up to 1500 sheets
in the Stacker Tray.
• Paper weight 60 to 216 gsm (16 to 57 lb).
• The Advanced Office Finisher can collate, stack, staple and hole punch
(if available) your output depending on the features selected. It staples
between 2 and 50 sheets of 80 gsm (20 lb) paper, less if using
heavyweight paper or tabs.
• Use the Pause button on the top of the finisher to pause printing and
unload the output tray. Press the button again to resume.
• The finisher stapler has 1 staple cartridge containing 5000 staples.
• This finisher can be fitted with the optional 2, 3 or 4 Hole-Punch kit.
High Volume Finisher
• Holds up to 250 sheets of paper in the Top Tray, and up to 3000 sheets
in the Stacker Tray.
• Paper weight 60 to 216 gsm (16 to 57 lb).
• The High Volume Finisher can collate, stack, staple and hole punch (if
available) your output depending on the features selected. It staples
between 2 and 100 sheets of 80 gsm (20 lb) paper, less if using
heavyweight paper or tabs.
• Use the Pause button on the top of the finisher to pause printing and
unload the output tray. Press the button again to resume.
• This finisher can be fitted with the optional 2, 3 or 4 Hole-Punch kit and
the Tray 6 (Post Process Inserter) kit.
• The High Volume Finisher is also available with a Booklet Maker which
enables booklets to be folded and stapled. Folded sheets and booklets
are delivered to the booklet tray which can hold between 10 and 30
booklets, depending upon the number of pages. If the flap on the right
of the tray is folded down, an unlimited number of booklets can be
collected in a suitable container.
• If you have a High Volume Finisher with Booklet Maker, a Tri-fold
module can also be fitted. This enables your device to produce tri-folded
output. With the Tri-fold module fitted, the capacity of the finisher
stacker tray is reduced to 2000 sheets and a maximum paper weight of
120 gsm (32lb).
Xerox WorkCentre 5735/5740/5745/5755/5765/5775/5790
Copy
43
Image Quality
Image Quality
Your device can enhance the quality of your output using
the Image Quality features. This section describes the
options available and when they would usually be used.
This includes features such as setting the device to suit the
type of input and controlling the lightness, darkness,
sharpness and contrast of the image.
Original Type
This feature provides a convenient way to enhance the
copy quality of your output based on the type of original
images you are copying and how they were produced.
• Photo and Text is recommended for text and line art
originals.
• Text produces sharper edges and is recommended for
text and line art.
• Photo is used specifically for originals containing
photos or continuous tones without any text or line art. Produces the best quality for photos but
reduced quality text and line art.
• Halftone Photo is used if your original is from a magazine or newspaper that contains
photographs or text.
Select Save to save your selections and exit.
Image Options
Image Options provides options for changing the appearance of the copy output. The options are:
Lighten/Darken
This provides manual control to adjust the lightness or
darkness of the scanned images.
• Move the indicator down to darken the scanned
image, for light originals such as pencil images.
• Move the indicator up to lighten the scanned image,
for dark originals such as halftones or originals with
colored backgrounds.
Sharpness
This provides manual control to adjust the sharpness of the scanned images.
• Move the indicator up to sharpen the scanned image.
• Move the indicator down to soften the scanned image.
44
Xerox WorkCentre 5735/5740/5745/5755/5765/5775/5790
Copy
Image Quality
Screen
This option is available with Photo and Text, Text and Halftone Photo Original Type options. The Screen
options are as follows:
• Auto reduces the risk of blotches or small areas that have a different texture or pattern
appearance than the surrounding area.
• Special enhances continuous tone photographs or high frequency halftone images. It is used to
create smoother, less grainy output for continuous tone and halftone images.
Select Save to save your selections and exit.
Image Enhancement
Image Enhancement provides options for improving the quality of the output, by reducing the
background or adjusting the contrast. The options are:
Background Suppression
This enhances originals that have colored backgrounds, by
reducing or eliminating the background on the output
copy. This option is useful when your original is on colored
paper.
• Select Auto Suppression to automatically suppress
unwanted background.
• Select Off to turn the Background Suppression feature
off, particularly when:
• The Darken adjustment does not produce a satisfactory output from light originals.
• The original has a gray or colored border, such as a certificate.
• You want to bring out fine detail that was lost due to a dark edge when using bound originals.
Contrast
This feature controls the image density on the output and compensates for an original that has too
much or too little contrast on the image.
• Move the indicator towards high to reproduce more vivid blacks and whites for sharper text and
lines but less detail in pictures.
• Move the indicator towards low to reproduce more detail in light and dark areas of the original.
Select Save to save your selections and exit.
Xerox WorkCentre 5735/5740/5745/5755/5765/5775/5790
Copy
45
Layout Adjustment
Layout Adjustment
Using the Layout Adjustment features you can change the
appearance of your output image. This includes shifting
the image, producing a mirror image, deleting an area from
any or all of the edges of the original and copying from
bound originals.
Original Size
Original Size allows you to specify automatic size detection
of the originals, mixed size originals, or the specific size of
the image to be scanned. The options are:
• Auto Detect is the default setting and enables
automatic size sensing. The size detected is matched
to a standard size paper.
• Preset Scan Areas allows you to define the size of your
original from a list of preset, standard original sizes.
You can view the list by using the scroll bar.
• Custom Scan Areas is used to enter a specific area for scanning. Measure the area to be scanned
on the original and enter the X and Y axis measurements into the fields provided. Only the area
specified is scanned.
• Mixed Size Originals allows you scan documents containing different size pages. The pages must
be the same width, like A4 LEF and A3 SEF (8.5x11” LEF and 11x17” SEF), other combinations are
shown on the screen. The device detects the size of the documents and can produce the following
output:
• If Auto Reduce/Enlarge and a specific Paper Supply is selected, all the images are reduced
or enlarged and copied onto the same size paper.
• If Auto Paper supply is selected, the images are copied size for size and a mix of paper sizes
will be output.
Select Save to save your selections and exit.
Book Copying
CAUTION: Do Not close the document feeder when scanning bound originals.
This feature enables you to specify which page or pages of a book are to be scanned. The book original
is placed face down on the document glass with the spine of the book lined up with the marker at the
centre of the rear edge of the document glass. Align the top of the bound original against the rear
edge of the document glass.
46
Xerox WorkCentre 5735/5740/5745/5755/5765/5775/5790
Copy
Layout Adjustment
The device will identify the size of the original during scanning. If the pages have a black or dark
colored border the device will assume that the pages are smaller than they really are. To overcome this
use the Custom Scan Areas feature in Original Size to enter the exact size of the page. Refer to
Original Size on page 46 for more information.
• Both Pages use to scan both pages, the left page of
the book first will be scanned first. Use the arrow
buttons to specify an amount from 0 to 50 mm (0 to
2”) to be deleted from the center of the book in order
to delete unwanted marks reproduced from the gutter
of the book.
• Left then Right or Right then Left is used to scan
both pages, but the pages will be scanned in the order
specified. These options replace the Both Pages option and will not be displayed unless enabled
in Tools. Refer to Display Options on page 253 of Administration and Accounting.
• Left Page Only use to scan the left page only. Use the arrow buttons to specify an amount from 0
to 25mm (0 to 1”) to be deleted from the right side of the page in order to delete unwanted marks
reproduced from the gutter of the book.
• Right Page Only use to scan the right page only. Use the arrow buttons to specify an amount
from 0 to 25mm (0 to 1”) to be deleted from the left side of the page in order to delete unwanted
marks reproduced from the gutter of the book.
Select Save to save your selections and exit.
Image Shift
Image Shift allows you to move the position of the image on the output page. The options are:
• Auto Center automatically centers the scanned image on the output paper. To work effectively,
the original should be smaller than the selected output media or alternatively, the image should
be reduced.
• Margin Shift moves the image up / down or left / right
on the page to give a bigger or smaller margins. Enter
the shift required by selecting a field or use the arrow
buttons.
The amount of shift is in 1 mm (0.1”) increments up to
50 mm (2.0”).
When copying 2-sided there are two options:
• Adjust the margin of side two independently of
side one.
• Use Mirror Side 1 for side two to mirror the image shift set for side one if a binding margin is
required.
Select Save to save your selections and exit.
Xerox WorkCentre 5735/5740/5745/5755/5765/5775/5790
Copy
47
Layout Adjustment
Edge Erase
Edge Erase enables you to specify how much of the image to erase around the edges of your
document. For example, you can remove the marks caused by punched holes or staples in your original.
The options are:
• All Edges is used to erase an equal amount from all the edges. Use the arrow buttons to adjust the
amount to be erased from 3 mm to 50 mm (0.1” to 2.0”) or select the entry field and enter the
amount required. All marks or defects within the measurement set are deleted.
• Individual Edges enables an individual amount to be
erased from each of the edges, on both the first and
second sides. Use the arrow buttons to adjust the
amount to be erased from 3 mm to 50 mm (0.1” to
2.0”) or select the appropriate entry field and enter the
amount required.
• Print to Edge is used to print to the edge of the output
documents.
Note: This option may reduce the ability of the system to clean itself and can cause defects on the
output if used excessively.
Select Save to save your selections and exit.
Invert Image
Invert Image allows you to reverse the image or create a
negative. This feature is useful for originals that have a
substantial amount of dark background or light text and
images, saving on toner usage.
The options are:
• Mirror Image reverses the original image creating a mirror of the
original.
•
Negative Image converts the dark image areas in the original to
light, and the light image areas to dark.
Select Save to save your selections and exit.
48
Xerox WorkCentre 5735/5740/5745/5755/5765/5775/5790
Copy
Output Format
Output Format
The output options allow you to manipulate the copied
images and enhance the appearance and style of your
copy jobs. For example, you can add covers or annotations
to your copies, create booklets, combine several images
onto one page and interleave transparencies.
Booklet Creation
Booklet Creation enables the production of booklets from 1 or 2 sided originals. The device will scan
your originals and automatically reduce and arrange the images in the correct sequence on your
selected copy paper, so that a booklet is created when the copy set is folded in half.
A cover can be inserted onto the booklet automatically.
Refer to Covers on page 50 for more information.
If your device is fitted with the High Volume Finisher with
Booklet Maker you can use the Booklet Creation feature to
automatically produce folded and stapled booklets. The
following Booklet Maker specifications apply:
• Paper Sizes A3, 11x17”, A4, 8.5x11”, 8.5x13” and
8.5x14”.
• Paper weight 60 to 216 gsm (16 to 57 lb).
• All media must be Short Edge Feed (SEF).
• Booklet thickness:
• For Folded and Stapled booklets a maximum of 15 sheets of 80 gsm (20 lb) or equivalent
thickness. For example you can have 13 sheets of 80 gsm (20 lb) and a cover sheet of
160 gsm (43 lb).
• For Folded Only booklets a maximum of 5 sheets of 80 gsm (20 lb) or equivalent thickness.
For example you can have 3 sheets of 80 gsm (20 lb) and a cover sheet of 200 gsm (53 lb).
To create a booklet:
1.
On the Copy tab, select the Paper Supply required for the job. If stapling and/or folding is required
a Short Edge Feed (SEF) paper supply must be selected.
Note: Booklet Creation is not available if Auto Paper is selected.
Xerox WorkCentre 5735/5740/5745/5755/5765/5775/5790
Copy
49
Output Format
2.
3.
4.
5.
Select the On button on the Booklet Creation screen.
If the High Volume Finisher with Booklet Maker is
installed, select the finishing option required:
• Folded & Stapled will staple and fold the output
along the center margin to produce booklets.
• Fold Only will fold the output along the center
margin to produce booklets.
Select the Original Input, either 1 Sided Originals or
2 Sided Originals depending on the originals being scanned.
Select the Reading Order required for the finished output, either Left to Right or Right to Left.
Note: This option will not be displayed if it has not been enabled in Tools. Refer to Set Copy
Defaults on page 255 of Administration and Accounting.
6.
7.
Select Save to confirm your selections.
Load your originals into the document feeder and select Start to run the job.
Covers
Covers enables blank or printed pages to be added to the front, back or front and back of your set. This
option is also used to add a cover to a booklet. The covers can be a different media to the rest of your
job.
Note: Covers cannot be used with Auto Paper Supply, a paper supply must be specified.
Use the following instructions to program Covers:
1.
2.
On the Copy tab, select the paper you want to use for the main body of the job.
Load the media to be used for the covers into another paper tray, ensuring that it is in the same
size and orientation as the paper you are using for the main body of your job.
Note: For further information about loading media, refer to Paper and Media on page 211.
3.
4.
5.
50
Update the Paper Settings screen and Confirm your selections.
Select Covers from the Output Format tab.
Select the Covers Option required:
• No Covers
• Front Cover Only adds a blank or printed cover to
the front of the document.
• Back Cover Only adds a blank or printed cover to
the back of the document.
• Front & Back Covers adds a blank or printed cover
to the front and back of the document. The
printing and paper supply options can be programmed individually for each cover.
• Booklet Cover used to add a cover to a booklet if using the Booklet Creation option.
Select the Printing Options required for the selected covers:
• Blank provides a blank sheet as the cover.
• 1 Sided prints an image on one side of the cover.
Xerox WorkCentre 5735/5740/5745/5755/5765/5775/5790
Copy
Output Format
2 Sided prints an image on both sides of the cover.
2 Sided, Rotate Side 2 prints an image on both sides of the cover. The image on the second
side is rotated to change the read orientation.
Select the Paper Supply required for the selected covers.
Select Save to confirm your selections.
Load your originals into the document feeder and select Start to run the job.
•
•
6.
7.
8.
Inserts
Inserts enables blank pages on a different media to be inserted into your document, or for specified
pages to be printed on a different media. Up to two sources of media can be used for the inserts. If
inserting blank pages, a blank sheet must be inserted in the appropriate place in your original
document prior to scanning.
If you have a High Volume Finisher and the optional Tray 6 (Inserter) installed, you can feed the inserts
from this tray. Media loaded into Tray 6 (Inserter) is not part of the printing process, therefore blank
pages do not need to be added to your original document. When entering the insert page numbers,
the insert sheets are counted as a page.
Note: Inserts cannot be used with Auto Paper Supply, a paper supply must be specified.
Use the following instructions to program Inserts.
1.
2.
On the Copy tab, select the paper you want to use for the main body of the job.
Load the media to be used for the inserts into another paper tray, ensuring that it is in the same
orientation as the paper you are using for the main body of your job.
Note: For further information about loading media, refer to Paper and Media on page 211.
3.
4.
5.
6.
Update the Paper Settings screen and Confirm your selections.
If blank inserts are required, add blank sheets to your set of originals where the inserts are to be
placed.
Select Inserts from the Output Format tab.
Select On to enable inserts.
Enter the page number of the insert. The page
numbers are the physical page numbers and not the
page numbers which may already be printed on the
document.
For copying 2-sided to 2-sided, each page of your
document has 2 page numbers, so you need to count
each side of your document.
If using the optional Tray 6 (Inserter) each insert counts as 1 page, and the page numbers entered
for remaining inserts must take this into account. Use the Tray 6 Supply option if using the
inserter to feed the inserts.
Use the arrow buttons or select the entry box and use the numeric keypad to enter the page
number.
Xerox WorkCentre 5735/5740/5745/5755/5765/5775/5790
Copy
51
Output Format
Select the Paper Supply required for the insert using the Paper Supply 1 or Paper Supply 2
options.
If a tab insert is required, ensure the paper tray containing the tabs is selected. For instructions on
loading tabs, select the Tab Loading Instructions option. Ensure the correct tab sequence and
number of tabs are loaded for the job. If printing on the tabs, use the Tab Shift option to enter the
amount of shift required to ensure the tab image prints correctly on the tab.
8. Select Add Insert to add the insert to the list.
A summary of the inserts using each paper supply is displayed.
To delete the last insert entry, use the Delete Last Insert option.
9. Continue programing the inserts required.
10. Select Save to confirm the selections.
11. Load your originals into the document feeder and select Start to run the job.
7.
Annotations
The Annotations feature enables you to automatically add
a comment, page number, today’s date or Bates Stamp to
your copy output. You can select any or all of these
annotation options and specify where on the copy output
they should appear. You can also select the appearance of
the annotations such as the font size.
The options are:
• Page Numbers to automatically print a page number
in a specified position on the page. Page numbers are automatically increased by one. For 2 sided
copy output the page number is printed on both sides and counts as two pages.
• Comment to add up to 50 alphanumeric characters in a specified position on the page. An
existing comment can be amended, or a new comment can be created and edited.
• Date to add today’s date in a specified format and position on the page. The date printed is the
date set on your device.
• Bates Stamp to add a selected Bates Stamp in a specified position on the page. Bates Stamping
is used primarily in the legal and business fields and consists of a set prefix (such as a case number
or client reference) together with a page number applied to a document as it is being processed.
The prefix can contain up to 8 alphanumeric characters. You can add a new prefix or choose an
existing one from the list provided.
52
Xerox WorkCentre 5735/5740/5745/5755/5765/5775/5790
Copy
Output Format
Page Numbers
Use the following instructions to program Page Numbers:
1.
2.
3.
4.
5.
6.
7.
Select Output Format, then Annotations and the
Page Numbers button. Select the On button.
Select one of the arrow buttons to determine the
position of the page number on the page.
Select the Starting Page Number input box and use
the numeric keypad to enter the first page number you
want printed on your first copy output sheet.
Select Save to store your selections and return to the
Annotations screen. Program additional annotations as required.
Program the Format options required for your Annotations. Refer to Format and Style on page 55
for instructions.
Select Save to confirm your selections.
Load your originals into the document feeder and select Start to run the job.
Comment
Use the following instructions to add a Comment:
1.
2.
3.
4.
5.
6.
7.
8.
9.
Select Output Format, then Annotations and the
Comment button. Select the On button.
Select one of the arrow buttons to determine the
position of the comment on the page.
Specify whether you want the comment to appear on
All Pages, First Page Only or All Pages Except First.
Use the scroll bar to browse the list of available
comments and select the comment you require.
To add a new comment to the list, highlight an empty entry and use the keyboard to enter up to
50 alphanumeric characters. To edit an existing comment, highlight the comment in the list and
select the Edit button. Use the keyboard to edit the entry, then select Save to close the keyboard.
Select Save to store your selections and return to the Annotations screen. Program additional
Annotations as required.
Program the Format options required for your Annotations. Refer to Format and Style on page 55
for instructions.
Select Save to confirm your selections.
Load your originals into the document feeder and select Start to run the job.
Xerox WorkCentre 5735/5740/5745/5755/5765/5775/5790
Copy
53
Output Format
Date
Use the following instructions to add the Date:
1.
2.
3.
4.
5.
6.
7.
8.
Select Output Format, then Annotations and the
Date button. Select the On button.
Select one of the arrow buttons to determine the
position of the date on the page.
Specify the date format by selecting the
DD/MM/YYYY, the MM/DD/YYYY or the
YYYY/MM/DD button.
Specify whether you want the date to appear on All
Pages, First Page Only or All Pages Except First
Select Save to store your selections and return to the Annotations screen. Program additional
Annotations as required.
Program the Format options required for your Annotations. Refer to Format and Style on page 55
for instructions.
Select Save to confirm your selections.
Load your originals into the document feeder and select Start to run the job.
Bates Stamp
Use the following instructions to program a Bates Stamp:
1.
2.
3.
4.
5.
6.
7.
8.
54
Select Output Format, then Annotations and the
Bates Stamp button. Select the On button.
Select one of the arrow buttons to determine the
position of the Bates Stamp on the page.
Select the Starting Page Number box and use the
numeric keypad to enter a starting page number.
Leading zeros may be entered to set the starting page
number length, for example 000000001.
Select the Prefix option and use the keyboard to enter a prefix. Up to eight alphanumeric
characters can be entered. Select Save to close the keyboard.
Select Save to store your selections and return to the Annotations screen. Program additional
Annotations as required.
Program the Format options required for your Annotations. Refer to Format and Style on page 55
for instructions.
Select Save to confirm your selections.
Load your originals into the document feeder and select Start to run the job.
Xerox WorkCentre 5735/5740/5745/5755/5765/5775/5790
Copy
Output Format
Format and Style
To specify the orientation, style and printing requirements
for the selected annotations, select the Format option:
• Orientation use to specify if the annotation is printed
Portrait or Landscape.
• Font Size use the -/+ buttons to select a font size for
the annotation, or select the entry box and enter the
size required using the numeric keypad.
• Appearance is used to specify if the annotated text is
Opaque or Transparent. Opaque text is placed on top of the copy output and no image is visible
under the annotated text. Transparent text allows the copy image to remain visible under the
annotated text.
• Side 2 options are used to specify the printing requirements if the output is 2-sided.
• Same as Side 1 settings will apply to both Side 1 and Side 2 of your output.
• Mirror Side 1 Flip on Long Edge output will open from right to left like a book, with the
binding edge on the left. The position of the annotation on Side 2 will mirror Side 1. For
example, if a page number is positioned in the bottom left corner of Side 1, it will appear in
the bottom right corner of Side 2.
• Mirror Side 1 Flip on Short Edge output will open from bottom to top like a calendar, with
the binding edge at the top. The position of the annotation on Side 2 will mirror Side 1. For
example, if a page number is positioned in the bottom left corner of Side 1, it will appear in
the top left corner of Side 2.
Select Save to save your selections and exit.
Transparency Separators
Use Transparency Separators to interleave each printed transparency with a blank or printed sheet of
paper from a specified paper tray.
1.
2.
3.
4.
5.
Select the Transparency Separators button on the Output Format tab.
Select the Transparency Separators option required:
• Off
• Blank Separators adds a blank sheet to each
transparency.
• Imaged Separators adds a copy of each
transparency.
Select the paper tray containing the paper for the
separators. The selected paper should match the size
and orientation of the transparencies. If necessary, select More... to access all the paper tray
options.
Select Save to confirm the selections.
Load your originals into the document feeder and select Start to run the job.
For instructions on loading transparencies into the paper tray, refer to Media Types on page 225 of
Paper and Media.
Xerox WorkCentre 5735/5740/5745/5755/5765/5775/5790
Copy
55
Output Format
Page Layout
The Page Layout feature is ideal for handouts, story boards or for archival purposes. It allows up to 36
images to fit onto one sheet of paper. Your device will reduce or enlarge the images as needed, to
display them either in landscape or portrait orientation on one page, based on the paper supply
selected. The options are:
Note: Some features cannot be used with the Page Layout feature and will be grayed out on the
touch screen.
The examples shown here are typical
outputs that can be produced when using
the Page Layout feature.
Note: The practical limit is for 16
images on A4 (8.5x11”) paper.
4 Originals using 2 6 Originals using 3
rows and 2 columns rows and 2
columns
1.
2 Originals using 2
rows and 1 column
Select the tray that contains the paper you want to use.
Note: Page Layout is not available if Auto Paper is
selected.
2.
3.
4.
5.
6.
7.
56
Select the Page Layout button on the Output Format
tab.
Select the Pages per Side to enable the Page Layout
option.
Select the Orientation of Images, Upright for portrait
images or Sideways for landscape images.
Enter the number of Rows and Columns required using the arrow buttons, between 1 and 6.
Select Save to confirm the selections.
Load your originals into the document feeder and select Start to run the job.
Xerox WorkCentre 5735/5740/5745/5755/5765/5775/5790
Copy
Job Assembly
Job Assembly
Use the productivity features available on the Job Assembly
tab to program a job that requires individual selections for
specific pages or sections, produce a Sample Job before
printing the whole job or for storing and retrieving
frequently run job settings.
Build Job
Use this feature to build a job that requires
different settings for each page, or a segment of
pages.
You can select the appropriate settings to be
applied to individual pages or segments of a
completed job. First split the originals into
sections for individual programing.
1.
2.
3.
Some pages
with text and
some with
photos
Some pages Various
2 sided and sized
some 1 sided originals
More than
100 pages
Select Build Job on the Job Assembly tab.
Switch on Build Job by selecting the On button and
select Save.
Select the features required for the first segment of
the job.
If using Build Job for a job with tabs, ensure the tabs
are loaded correctly and select the tray containing the
tabs. For loading instructions, select the Tab Loading
Instructions... option.
Note: If tab media is selected, the image will be shifted 13mm (0.5”) to the right automatically if
the tab original is A4 or 8.5x11” size.
4.
5.
6.
Load the first segment originals and press Start.
Remove the first segment originals after they have been scanned. The Build Job screen displays
the first segment in the list. The following options can be applied to any segment:
• Sample Last Segment produces a proof print of the last segment scanned. The proof is
delivered to the output module. If you are satisfied with the proof you can continue
programing the Build Job.
• Delete Last Segment deletes the last segment scanned. You can continue programing the
Build Job.
• Delete All Segments deletes the current Build Job and returns you to the main Build Job
screen.
Select the options required for the second segment.
Xerox WorkCentre 5735/5740/5745/5755/5765/5775/5790
Copy
57
Job Assembly
7.
8.
9.
Load the second segment originals and press Start.
Repeat these steps until all segments of your job have been programmed and scanned.
After the last segment has been scanned, select End Build Job to indicate you have finished
scanning and the job will be processed and printed.
Sample Job
When copying a large number of sets, use the Sample Job feature to review a proof copy to ensure that
all the print settings are correct before printing the remaining sets.
1.
2.
3.
4.
5.
58
Select the Sample Job button on the Job Assembly tab.
Select the On button and the Save button.
Load the originals in the document feeder and
program the job requirements. Enter the total quantity
required and press the Start button.
One copy set of the job, the Sample Job, is printed.
The whole job is held in the Job List.
Access your job by selecting the Job Status button.
The job has the status Held: Sample Made.
Select the job in the list.
If the Sample Job is acceptable, select Release. The programmed number of sets will be produced.
If the Sample Job is unacceptable, select Delete and Delete Job to confirm. Your job will be
deleted from the list.
Xerox WorkCentre 5735/5740/5745/5755/5765/5775/5790
Copy
Job Assembly
Save Job for Reprint
The Save Job For Reprint feature allows you to scan hard-copy documents as an electronic file (or Job)
and place it into a folder located on the device. The job settings, such as 2-sided and image quality
selections, are also stored with the image.
Once stored you can select and output that job as many times as you need. Many of the job settings
that were applied when the document was originally stored are also recalled and displayed to the user
when the job is selected. These settings can be modified and will be applied to the output job.
To store a job for reprinting:
1.
2.
3.
4.
5.
6.
Program the required job features.
Select the Save Job For Reprint button on the Job
Assembly tab.
Select the Save Job for Reprint option required:
• Copy & Save is used to store the job and print a
copy of the job.
• Save Only stores the job without printing.
Select a folder location to store the job.
Select New Job Name and enter a name for the job using the keyboard.
Select Save to save the job name and return to the previous screen.
Load your originals into the document feeder and select Start to run the job.
The job is scanned and saved with the name entered, in the folder selected. If Copy & Save was
selected, a copy of the job is also printed.
For information about File Folder Management, refer to Managing Folders on page 186 of Save and
Reprint Jobs.
Save Current Settings
Up to ten combinations of commonly used feature selections can be retained in the device memory as
Saved Settings. The device stores only the programing of the job, NOT the image. Each time Saved
Settings are retrieved and used, the image must be scanned. To save the current settings:
1.
2.
3.
4.
Program the required job features.
Select the Save Current Settings button on the Job
Assembly tab.
Use the arrow buttons to enter a number for the saved
settings.
If a number has already been used to store settings
previously a confirmation message is displayed. Select
Overwrite to replace the stored settings or Cancel to
cancel the Save Current Settings operation.
Select Save Settings.
The settings are stored and can be accessed using the Retrieve Saved Settings feature.
Xerox WorkCentre 5735/5740/5745/5755/5765/5775/5790
Copy
59
Job Assembly
Retrieve Saved Settings
This feature enables you to Retrieve Saved Settings from the device memory and apply them to the
current job. Changes can be made to the retrieved settings, but these will not be stored with the saved
settings. To retrieve saved settings:
1.
2.
3.
4.
5.
60
Select the Retrieve Saved Settings button on the Job
Assembly tab.
Use the arrow buttons to enter the number for the
saved settings.
Select the Load Settings button, to retrieve the
programing information.
The recalled programing features become active.
You can modify the features further. These additional
modifications are not saved with the saved settings. Modify the selections as required.
Load your originals and press the Start button to run the job.
Xerox WorkCentre 5735/5740/5745/5755/5765/5775/5790
Copy
Version 1.0
12/09
®
Xerox WorkCentre
5735/5740/5745/5755/5765/5775/
5790
Fax
©2009 Xerox Corporation. All Rights Reserved. Unpublished rights reserved under the copyright laws of the United States. Contents
of this publication may not be reproduced in any form without permission of Xerox Corporation.
Xerox®and the sphere of connectivity design are trademarks of Xerox Corporation in the United States and/or other countries.
Copyright protection claimed includes all forms of matters of copyrightable materials and information now allowed by statutory or
judicial law or hereinafter granted, including without limitation, material generated from the software programs which are displayed
on the screen such as styles, templates, icons, screen displays, looks, etc.
Changes are periodically made to this document. Changes, technical inaccuracies, and typographic errors will be corrected in
subsequent editions.
Document Version 1.0: December 2009
62
Xerox WorkCentre 5735/5740/5745/5755/5765/5775/5790
Fax
Table of Contents
Fax Overview . . . . . . . . . . . . . . . . . . . . . . . . . . . . . . . . . . . . . . . . . . . . . . . . . . . . . . . . . . . . . . . . . . . . . . . . . . . 64
Fax . . . . . . . . . . . . . . . . . . . . . . . . . . . . . . . . . . . . . . . . . . . . . . . . . . . . . . . . . . . . . . . . . . . . . . . . . . . . . . . . . 64
Server Fax . . . . . . . . . . . . . . . . . . . . . . . . . . . . . . . . . . . . . . . . . . . . . . . . . . . . . . . . . . . . . . . . . . . . . . . . . . 64
Internet Fax . . . . . . . . . . . . . . . . . . . . . . . . . . . . . . . . . . . . . . . . . . . . . . . . . . . . . . . . . . . . . . . . . . . . . . . . 65
Fax from PC . . . . . . . . . . . . . . . . . . . . . . . . . . . . . . . . . . . . . . . . . . . . . . . . . . . . . . . . . . . . . . . . . . . . . . . . 65
Fax . . . . . . . . . . . . . . . . . . . . . . . . . . . . . . . . . . . . . . . . . . . . . . . . . . . . . . . . . . . . . . . . . . . . . . . . . . . . . . . . . . . . 66
Sending a Fax . . . . . . . . . . . . . . . . . . . . . . . . . . . . . . . . . . . . . . . . . . . . . . . . . . . . . . . . . . . . . . . . . . . . . . 66
Dialing Options . . . . . . . . . . . . . . . . . . . . . . . . . . . . . . . . . . . . . . . . . . . . . . . . . . . . . . . . . . . . . . . . . . . . . 67
2-Sided Scanning . . . . . . . . . . . . . . . . . . . . . . . . . . . . . . . . . . . . . . . . . . . . . . . . . . . . . . . . . . . . . . . . . . . 69
Original Type . . . . . . . . . . . . . . . . . . . . . . . . . . . . . . . . . . . . . . . . . . . . . . . . . . . . . . . . . . . . . . . . . . . . . . . 69
Resolution . . . . . . . . . . . . . . . . . . . . . . . . . . . . . . . . . . . . . . . . . . . . . . . . . . . . . . . . . . . . . . . . . . . . . . . . . . 70
Cover Letter . . . . . . . . . . . . . . . . . . . . . . . . . . . . . . . . . . . . . . . . . . . . . . . . . . . . . . . . . . . . . . . . . . . . . . . . 70
Address Book . . . . . . . . . . . . . . . . . . . . . . . . . . . . . . . . . . . . . . . . . . . . . . . . . . . . . . . . . . . . . . . . . . . . . . . 71
Image Quality . . . . . . . . . . . . . . . . . . . . . . . . . . . . . . . . . . . . . . . . . . . . . . . . . . . . . . . . . . . . . . . . . . . . . . 74
Layout Adjustment . . . . . . . . . . . . . . . . . . . . . . . . . . . . . . . . . . . . . . . . . . . . . . . . . . . . . . . . . . . . . . . . . . 75
Fax Options . . . . . . . . . . . . . . . . . . . . . . . . . . . . . . . . . . . . . . . . . . . . . . . . . . . . . . . . . . . . . . . . . . . . . . . . . 77
Job Assembly . . . . . . . . . . . . . . . . . . . . . . . . . . . . . . . . . . . . . . . . . . . . . . . . . . . . . . . . . . . . . . . . . . . . . . . 83
Server Fax . . . . . . . . . . . . . . . . . . . . . . . . . . . . . . . . . . . . . . . . . . . . . . . . . . . . . . . . . . . . . . . . . . . . . . . . . . . . . . 84
Sending a Server Fax . . . . . . . . . . . . . . . . . . . . . . . . . . . . . . . . . . . . . . . . . . . . . . . . . . . . . . . . . . . . . . . . 84
Dialing Options . . . . . . . . . . . . . . . . . . . . . . . . . . . . . . . . . . . . . . . . . . . . . . . . . . . . . . . . . . . . . . . . . . . . . 85
2-Sided Scanning . . . . . . . . . . . . . . . . . . . . . . . . . . . . . . . . . . . . . . . . . . . . . . . . . . . . . . . . . . . . . . . . . . . 86
Original Type . . . . . . . . . . . . . . . . . . . . . . . . . . . . . . . . . . . . . . . . . . . . . . . . . . . . . . . . . . . . . . . . . . . . . . . 87
Resolution . . . . . . . . . . . . . . . . . . . . . . . . . . . . . . . . . . . . . . . . . . . . . . . . . . . . . . . . . . . . . . . . . . . . . . . . . . 87
Fax Directory . . . . . . . . . . . . . . . . . . . . . . . . . . . . . . . . . . . . . . . . . . . . . . . . . . . . . . . . . . . . . . . . . . . . . . . 87
Image Quality . . . . . . . . . . . . . . . . . . . . . . . . . . . . . . . . . . . . . . . . . . . . . . . . . . . . . . . . . . . . . . . . . . . . . . 88
Layout Adjustment . . . . . . . . . . . . . . . . . . . . . . . . . . . . . . . . . . . . . . . . . . . . . . . . . . . . . . . . . . . . . . . . . . 90
Internet Fax . . . . . . . . . . . . . . . . . . . . . . . . . . . . . . . . . . . . . . . . . . . . . . . . . . . . . . . . . . . . . . . . . . . . . . . . . . . . 92
Sending an Internet Fax . . . . . . . . . . . . . . . . . . . . . . . . . . . . . . . . . . . . . . . . . . . . . . . . . . . . . . . . . . . . . 92
New Recipient . . . . . . . . . . . . . . . . . . . . . . . . . . . . . . . . . . . . . . . . . . . . . . . . . . . . . . . . . . . . . . . . . . . . . . 93
Message: . . . . . . . . . . . . . . . . . . . . . . . . . . . . . . . . . . . . . . . . . . . . . . . . . . . . . . . . . . . . . . . . . . . . . . . . . . . 94
Reply To . . . . . . . . . . . . . . . . . . . . . . . . . . . . . . . . . . . . . . . . . . . . . . . . . . . . . . . . . . . . . . . . . . . . . . . . . . . . 94
From: . . . . . . . . . . . . . . . . . . . . . . . . . . . . . . . . . . . . . . . . . . . . . . . . . . . . . . . . . . . . . . . . . . . . . . . . . . . . . . 94
Subject: . . . . . . . . . . . . . . . . . . . . . . . . . . . . . . . . . . . . . . . . . . . . . . . . . . . . . . . . . . . . . . . . . . . . . . . . . . . . 95
Output Color . . . . . . . . . . . . . . . . . . . . . . . . . . . . . . . . . . . . . . . . . . . . . . . . . . . . . . . . . . . . . . . . . . . . . . . . 95
2-Sided Scanning . . . . . . . . . . . . . . . . . . . . . . . . . . . . . . . . . . . . . . . . . . . . . . . . . . . . . . . . . . . . . . . . . . . 95
Original Type . . . . . . . . . . . . . . . . . . . . . . . . . . . . . . . . . . . . . . . . . . . . . . . . . . . . . . . . . . . . . . . . . . . . . . . 96
Address Book . . . . . . . . . . . . . . . . . . . . . . . . . . . . . . . . . . . . . . . . . . . . . . . . . . . . . . . . . . . . . . . . . . . . . . . 96
Advanced Settings . . . . . . . . . . . . . . . . . . . . . . . . . . . . . . . . . . . . . . . . . . . . . . . . . . . . . . . . . . . . . . . . . . 97
Layout Adjustment . . . . . . . . . . . . . . . . . . . . . . . . . . . . . . . . . . . . . . . . . . . . . . . . . . . . . . . . . . . . . . . . . . 99
Internet Fax Options . . . . . . . . . . . . . . . . . . . . . . . . . . . . . . . . . . . . . . . . . . . . . . . . . . . . . . . . . . . . . . . . 99
Fax from PC . . . . . . . . . . . . . . . . . . . . . . . . . . . . . . . . . . . . . . . . . . . . . . . . . . . . . . . . . . . . . . . . . . . . . . . . . . . 101
Fax from PC Options . . . . . . . . . . . . . . . . . . . . . . . . . . . . . . . . . . . . . . . . . . . . . . . . . . . . . . . . . . . . . . . 103
Receiving a Fax . . . . . . . . . . . . . . . . . . . . . . . . . . . . . . . . . . . . . . . . . . . . . . . . . . . . . . . . . . . . . . . . . . . . . . . . 108
Xerox WorkCentre 5735/5740/5745/5755/5765/5775/5790
Fax
63
Fax Overview
Fax Overview
There are several Fax services which can be installed or enabled on your device. These are as follows:
Fax
If Fax is installed, your device is connected
directly to a telephone line and therefore gives
you direct control over your fax transmissions.
This type of fax travels over normal telephone
lines and will therefore be charged at telephone
rates.
Using Fax enables you to scan your documents
and send them to most types of fax machines
that are connected to the telephone network.
Received faxes can be setup to print at the
device automatically, held in the job list until a secure passcode is entered or sent to an e-mail address
using the Fax Forward feature. Refer to Receiving a Fax on page 108 for further information.
The standard Fax option has the ability to connect to one telephone. An Extended Fax option is also
available which utilizes two telephone lines. Using two telephone lines provides the capability to
simultaneously send to 2 destinations, receive from 2 destinations, or send and receive.
For instructions on using the Fax service features, refer to Fax on page 66.
Note: If Fax and Server Fax are installed on your device, only one of these services can be active at
a time. Each service remains on the device, but one is enabled and one is disabled.
Server Fax
Server Fax scans your documents and sends
them to any type of fax machine that is
connected to a telephone network. Your images
are sent from your device to a Third Party fax
server, which relays them over the telephone
network to the fax number of your choice.
This means that your fax transmissions are
controlled by the server, which may limit your
faxing options. For example, the server may be
set-up to collect and send all faxes at off peak
times.
For instructions on using the Server Fax service features, refer to Server Fax on page 84.
Note: If Fax and Server Fax are installed on your device, only one of these services can be active at
a time. Each service remains on the device, but one is enabled and one is disabled.
64
Xerox WorkCentre 5735/5740/5745/5755/5765/5775/5790
Fax
Fax Overview
Internet Fax
Internet Fax enables the creation of an
electronic image file by scanning an original
hard copy document. The scanned image is
converted into e-mail format to transmit over
the internet or intranet.
Recipients are selected from an address book or
entered manually using the keyboard. Received
Internet Faxes are automatically sent from the
server to the device as print jobs.
For instructions on using the Internet Fax service features, refer to Internet Fax on page 92.
Fax from PC
The Fax from PC service on the Xerox
WorkCentre
5735/5740/5745/5755/5765/5775/5790 Print
Driver enables you to send a fax to any fax
machine over the telephone network from your
PC or workstation. The great advantage of this
feature is that you do not have to print your
document before you send it as a fax, and you
can accomplish the complete task without
leaving your workstation.
The 2 requirements for this option are:
• A connected printer configuration.
• Fax must be enabled on the device.
For instructions on using the Fax from PC service features, refer to Fax from PC on page 101.
Xerox WorkCentre 5735/5740/5745/5755/5765/5775/5790
Fax
65
Fax
Fax
If Authentication or Accounting has been enabled on your device you may have to enter log in details
to access the features. Refer to Log In / Out on page 25 of Getting Started.
1.
2.
To select the Fax service, press the Services Home
button.
Select the Fax option.
When a service is selected on the device, additional
options and features are displayed. Most feature
screens include the following buttons to confirm or
cancel your choices.
• Undo resets the current screen to the values that
were displayed when the screen was opened.
• Cancel resets the screen and returns to the previous screen.
• Save saves the selections made and returns to the previous screen.
• Close closes the screen and returns to the previous screen.
If an option is not required, use the Off option to disable a feature.
Sending a Fax
1.
2.
3.
4.
Load your documents face up in the document feeder input tray. Adjust the guide to touch the
documents.
Or...........
Lift up the document feeder. Place the document face down onto the document glass and register
it to the arrow at the top right rear corner. Close the document feeder.
Press the Clear All (AC) button once to cancel any previous screen programing selections.
Press the Services Home button and select the Fax
option. The Fax features are displayed.
Enter the recipient’s fax number by:
• Keypad Dial - select the Enter Number area on
the touch screen and enter the number using the
numeric keypad.
• Manual Dial - if a telephone handset is attached
to the device, select the Manual Dial key and dial
the number using the handset or the numeric keypad.
• Speed Dial - select the Enter Number area and enter the 3 digit speed dial number, then
select the Speed Dial option.
• Address Book - select the Address Book button to access the fax address book. Select an
entry from the Address Book to add to the Recipient list. Continue adding recipients as
required and select Close to return to the previous screen.
Note: To use the Batch Send feature to send multiple faxes to the same destination in one
transmission, refer to Batch Send on page 69 for instructions.
66
Xerox WorkCentre 5735/5740/5745/5755/5765/5775/5790
Fax
Fax
5.
6.
If required, select Add to add the number entered to the Recipient list. Enter additional numbers
as required. The fax will be sent to all the numbers in the Recipient list.
Select the required features for your fax job using the touch screen:
Dialing Characters are alphanumeric characters which have a specific fax function and can be
entered as part of the fax number.
Cover Letter allows you to send a fax with a covering letter.
2-Sided Scanning is used to select whether your originals are 1-sided or 2-sided.
Original Type is used to define the original document as text, text and photo, photo or halftone
photo.
Resolution can be used to optimize the resolution settings.
7.
Press Start to scan the originals and process the fax job. Remove the originals from the document
feeder or document glass when scanning has completed.
Note: The Fax job enters the job list ready for sending.
8.
Select Job Status to view the job list and check the status of your job.
Dialing Options
The dialing options enable you to enter the destination fax number or numbers. Select the appropriate
dialing option for your fax job.
Manual Dialing
1.
2.
3.
4.
Select the fax number field and enter the fax number
required using the numeric keypad.
If special characters are required, use the Dialing
Characters option to enter the number plus additional
dialing characters. Refer to Dialing Characters on
page 68 for further information.
Select Add to add the number to the Recipient list.
Enter additional numbers as required.
To amend the Recipient list:
• Select the entry in the list. If necessary, use the scroll bar to access all the entries.
• Use Edit to amend the entry. Use Remove to delete the entry from the list, or Remove All to
delete all entries.
The fax will be sent to all the numbers in the Recipient list.
Xerox WorkCentre 5735/5740/5745/5755/5765/5775/5790
Fax
67
Fax
Speed Dialing
If numbers have been entered into the Address Book they can be accessed via a Speed Dial number.
Each entry in the Address Book is allocated a 3-digit Speed Dial number, shown next to the entry. For
information about the Address Book, refer to Address Book
on page 71.
1.
2.
3.
4.
Select the Speed Dial option.
Select the fax number entry field and enter the 3-digit
speed dial number.
Select Add to add the number to the Recipient list.
Enter additional numbers as required.
Speed Dialing can be combined with Manual Dialing to build the Recipient list.
Dialing Characters
Additional dialing characters can be accessed by selecting the Dialing Characters button. Use this
option to enter the fax number if special characters are required. To enter a fax number using the
dialing characters:
1.
2.
68
Select the Dialing Characters button.
Use the numeric keypad to enter the number plus
additional dialing characters.
The following characters are available:
• Dial Pause [,] use to pause between numbers. For
additional pause time, add multiple pauses. If
you are using charge code numbers, enter a pause
after the fax number but before the charge code
number.
• Pulse to Tone [:] use to switch between pulse and tone dialing.
• Mask Data [/] use to protect confidential information. For example, if a special charge code
or credit card number is required for a call, simply use the Mask Data character. Select the /
character before entering confidential numbers. After the last confidential numbers, select /
again to turn the mask data off. Characters between the / symbols will appear as *.
• Wait for Dial Tone [=] suspends dialing until an expected network tone is detected. It can
also be used to detect a specific tone when accessing an outside line or other service.
• Begin DTMF [*] Starts a sequence of DTMF (Dual Tone Multi-frequency) characters.
• End DTMF [#] Ends a sequence of DTMF (Dual Tone Multi-frequency) characters.
• Start Mailbox Signalling [!] pauses regular fax dialing and starts DTMF (Dual Tone Multifrequency) procedure for the fax mailbox.
• Optional Readability Characters [Space ( ) - ] these are used for readability purposes but
do not affect the number entered. For example, if you wish to identify the area code of a fax
number, use the Readability Characters (1234) 567890.
If more than one fax line is available, the following characters are also available:
Xerox WorkCentre 5735/5740/5745/5755/5765/5775/5790
Fax
Fax
Line 1 [<1>] selects line 1 to dial the number. Using the line selection identifier temporarily
overwrites the fax settings and is for the current job only.
• Line 2 [<2>] selects line 2 to dial the number. Using the line selection identifier temporarily
overwrites the fax settings and is for the current job only.
When you have entered the fax number and dialing characters required, select Add to add the
number to the Recipient list.
Select Close to return to the fax options.
•
3.
4.
Batch Send
The Batch Send feature allows several fax jobs to be sent to the same destination fax machine during
one transmission. This reduces the connection time and provides a reduced call connection charge.
Batch Send is enabled from Tools. For more information about enabling the Batch Send feature refer
to Batch Send on page 259 of Administration and Accounting.
Once Batch Send has been enabled, it applies to all fax transmissions. Once Batch Send has been
enabled, program your fax job settings as required. To allow other fax jobs to be transmitted with your
job add a delay to the transmission time. For more information refer to Delay Send on page 78.
Enter the destination fax number and select the Start button. Your job is submitted to the job list,
ready for transmission. When a new fax job is submitted that has the same destination as the held fax
job, a pop-up message is displayed.
When the delayed time has elapsed, all faxes to the same destination are linked together and
transmitted. All individual fax job settings are maintained, except the communication speed which
uses the speed of the first fax job for the remaining jobs.
Note: If Batch Send is enabled and a delay send job is programmed, any subsequent fax jobs
programmed to send to the same destination will automatically be added to the batch and
delayed until the scheduled time.
2-Sided Scanning
The 2-Sided Scanning option allows you to set whether 1 or 2 sides of your original document are
scanned. Documents must first be loaded in the document feeder to enable the 2 Sided option. The
options are:
• 1-Sided is used if your originals are single-sided.
• 2-Sided is used if your originals are double-sided. The document feeder must be used to scan your
originals with this option.
• 2-Sided, Rotate Side 2 select if your original is double-sided and opens up like a calendar.
Original Type
Use this option to define the type of original being used for scanning. Making the correct selection
enhances the quality of your output image. The options are:
• Photo & Text is recommended for originals containing high quality photographs and halftones.
Using this setting the scanned image will contain high quality pictures though the sharpness of
text and line art is slightly reduced.
Xerox WorkCentre 5735/5740/5745/5755/5765/5775/5790
Fax
69
Fax
•
•
•
Photo is used specifically for originals containing photos or continuous tones without any text or
line art. Produces the best quality for photos but reduced quality text and line art.
Text produces sharper edges and is recommended for text and line art. This option requires less
communication time.
Halftone Photo is used if your original is from a magazine or newspaper that contains
photographs or text.
Resolution
The Resolution affects the appearance of the fax at the receiving fax terminal. A higher resolution
produces a better quality image. A lower resolution reduces communication time. The options are:
• Standard (200x100 dpi) is recommended for text originals. It requires less communication time
but does not produce the best image quality for graphics and photos.
• Fine (200 dpi) is recommended for line art and photos. This is the best choice in most cases.
• Superfine (600 dpi) is recommended for photos and halftones, or images that have gray tones. It
requires more communication time, but produces the best image quality.
Cover Letter
The Cover Letter feature attaches a cover letter to the document being transmitted. Using the cover
letter feature replaces the routine of manually sending a cover letter each time you send a document.
The Cover Letter includes the following information:
• To the recipients name, can be entered at the device.
• From the sender’s name, as entered at the device.
• Comment the comment as specified from the comment list.
• Start Time the date and time of the fax transmission. Depending on the setup, the time is
displayed as a 12 or 24 hour clock. This information is added automatically to the cover letter.
• Pages the page count, excluding the cover page. This information is added automatically to the
cover letter.
• Fax number the number of the sending fax device. This information is added automatically to the
cover letter.
To select a Cover Letter:
1.
2.
3.
70
Select the Cover Letter button and select On.
Select the To... field and enter the name of the recipient using the keyboard.
• Up to 30 alphanumeric characters can be entered.
• To delete a character use the backspace key, or to clear the entire entry select the X button.
• Use the Keyboards... button to access additional language keyboards.
Select the From... field and enter the name of the sender using the keyboard.
Xerox WorkCentre 5735/5740/5745/5755/5765/5775/5790
Fax
Fax
4.
5.
6.
Select the comment required from the list.
If a customized comment is required, select a spare
comment slot and select Edit. Enter the text required
using the keyboard, then select Save.
To delete a comment from the list, select the comment
and select Clear. A confirmation screen is displayed,
select Clear.
Select Save to save your selections and exit.
Address Book
The Address Book is used to store individual fax numbers or groups of fax numbers which are used
frequently. Up to 200 individual entries and 40 Group entries can be stored. For each number stored,
transmission settings can also be set. The Address Book can be accessed from all screens where a fax
number requires entering. Use the following instructions to set up and use Individual or Group entries.
Using the Address Book
If numbers have been entered into the Address Book they can be accessed via the Address Book
button.
1.
2.
Select the Address Book button.
A list of individuals entered in the Address Book is
displayed.
Select the required recipient and select Add to
Recipients from the drop-down menu. The number is
added to the Recipient list.
Continue adding recipients as required.
3.
To add a Group entry to the list, select the Individuals drop-down menu and select Groups. The
available Groups are displayed. Select the Group required and select Add to Recipients from the
drop-down menu.
The Group is added to the Recipient list.
4.
To edit an existing entry, select the entry from the list and select the Edit Details button. Edit the
entry as required and select Save.
To clear an entry from the list, select the entry requiring deletion and select Clear Entry from the
drop-down menu. A confirmation screen is displayed, select Clear Entry.
Select Close to return to the fax options screen.
5.
6.
The fax will be sent to all the numbers in the Recipient list.
Xerox WorkCentre 5735/5740/5745/5755/5765/5775/5790
Fax
71
Fax
Using Chain Dial
The Chain Dial feature allows you to create a single fax recipient by adding 2 or more fax numbers
together. For example, an area code may be stored separately to the telephone number. Chain dialing
combines these 2 entries into a single fax number.
1.
2.
3.
4.
5.
6.
Select Address Book and then the Chain Dial button.
If numbers or special dialing characters are required
before the fax number, use the numeric keypad to
enter the numbers and characters required.
Select the Address Book entry required and select Add
to Recipient.
The fax number is added to the number in the
Recipient entry box.
Continue adding numbers using the numeric keypad or Address Book until the number is
complete.
Select Save to save your number and return to the Address Book screen.
Select Close to return to the fax options.
The number displays in the Recipient list.
Setting up the Address Book
Individuals
1.
2.
3.
4.
5.
6.
7.
72
Select the Fax tab and the Address Book button.
Select the Individuals button from the drop-down
menu.
Select an empty slot from the list of entries. If
necessary, use the scroll bar.
Select the Individual Name... field and enter the
name of the recipient using the keyboard.
To delete a character use the backspace key, or to clear
the entire entry select the X button.
Select Save.
Select the Fax Number field and enter the fax number
of the recipient using the keypad. Use the Dialing
Characters button to enter the number if special
characters are required. Refer to Dialing Characters on page 68 for further information.
Select a Starting Rate for the recipient. Use the drop-down menu to select a speed for the option
selected. Refer to Starting Rate on page 77 for further information.
Select Cover Letter and select On to include a covering note for the recipient. Complete the details
required, refer to Cover Letter on page 70 for further information.
Xerox WorkCentre 5735/5740/5745/5755/5765/5775/5790
Fax
Fax
8.
9.
Select the Save button. The new entry is displayed in the list.
To amend an entry, select the entry and use the Edit Details option.
Groups
Group entries allow you to group individual entries under one number, for regularly used broadcast
transmissions. When transmitting a fax you only have to enter the one group number to send to
multiple destinations. Fax numbers can only be added to a group if they are entered as an individual
entry.
1.
2.
3.
To add a Group entry, select the Fax tab and the Address Book button.
Select the Groups option from the drop-down menu.
Select an empty slot from the list of entries. If
necessary, use the scroll bar.
Select the Group Name... field and enter the name of
the Group using the keyboard.
To delete a character use the backspace key, or to clear
the entire entry select the X button.
Select Save.
5. Select the Add Recipients button to add recipients to
the Group.
6. Individual or Group recipients can be added to a
Group:
• To add an individual entry, select Individuals from the drop-down menu. Select the entry
required and select Add to Group.
• To add a group entry to the new group, select Group from the drop-down menu. Select the
group entry required and select Add to Group.
7. Continue adding individuals and groups until all the recipients have been added.
8. Use Remove to delete any unwanted entries from the Group.
9. Select Save when you have finished adding recipients. The recipients display in the list.
10. Select Close to return to the Address Book screen. The new Group has been created.
11. To amend a Group entry, use the Edit Details option.
4.
Xerox WorkCentre 5735/5740/5745/5755/5765/5775/5790
Fax
73
Fax
Image Quality
The Image Quality options provide access to the features
which enhance the image quality or output quality. To
access the Image Quality options, select Services Home
and Fax. Then select the Image Quality tab.
Image Options
Lighten / Darken
This provides manual control to adjust the lightness or
darkness of the scanned images.
• Move the indicator down to darken the scanned
image, for light originals such as pencil images.
• Move the indicator up to lighten the scanned image,
for dark originals such as halftones or originals with
colored backgrounds.
Image Enhancement
Background Suppression
This enhances originals that have colored backgrounds, by
reducing or eliminating the background on the output. This
option is useful when your original is on colored paper.
• Select Auto Suppression to automatically suppress
unwanted background.
• Select Off to turn the Background Suppression feature
off, particularly when:
• The Darken adjustment does not produce a
satisfactory output from light originals.
• The original has a gray or colored border, such as a certificate.
• You want to bring out fine detail that was lost due to a dark edge when using bound originals.
Select Save to save your selections and exit.
74
Xerox WorkCentre 5735/5740/5745/5755/5765/5775/5790
Fax
Fax
Layout Adjustment
The Layout Adjustment options allow you to specify the
type and size of document for scanning, for example a
custom size or book original. You can also specify how to
process documents that are too big for the receiving fax
machine. To access the Layout Adjustment options, select
Services Home and Fax. Then select the Layout
Adjustment tab.
Original Size
Select Original Size to enter the size of your document when scanning from the document glass or the
document feeder. Your device uses this information to calculate the size of your original and the
scanned image. You can also select Auto Detect for automatic size detection, or Mixed Size Originals
if scanning a mix of sizes. The options are:
• Auto Detect is the default setting and enables
automatic size sensing. The size detected is matched
to a standard size paper.
• Pre-set Scan Areas allows you to define the size of
your original from a list of pre-set, standard document
sizes. You can view the list by using the scroll bar.
• Custom Scan Areas is used to enter a specific area for
scanning. Measure the area to be scanned on the
original and enter the X and Y axis measurements into the fields provided. Only the area specified
is scanned.
• Mixed Size Originals allows you scan documents containing different size pages. The pages must
be the same width, like A4 LEF and A3 SEF (8.5x11” LEF and 11x17” SEF), other combinations are
shown on the screen. The device will detect the size of the documents and determine whether the
receiving fax machine can support the various paper sizes. If the receiving fax cannot support the
page sizes, the image is reduced or enlarged to fit.
Select Save to save your selections and exit.
Reduce/Split
Select Reduce/Split to specify how your faxed document is printed if your document paper size is
larger than the receiving fax machine's capabilities. The options are:
• Reduce to Fit this option reduces the image to fit the
paper size of the receiving fax machine.
• Split Across Pages this option splits the document
into 2 equal parts, or the majority of the image is put
on to 1 page and the remainder on the next page.
Select Save to save your selections and exit.
Xerox WorkCentre 5735/5740/5745/5755/5765/5775/5790
Fax
75
Fax
Book Faxing
CAUTION: Do not close the document feeder when scanning bound originals.
Select Book Faxing to specify which page or pages of a book are to be scanned. The book original is
placed face down on the document glass with the spine of the book lined up with the marker on the
rear edge of the document glass. Align the top of the bound original against the rear edge of the
document glass.
The device will identify the size of the original during scanning. If the pages have a black or dark
colored border the device will assume that the pages are smaller than they really are. To overcome this
use the Custom Scan Areas feature in Original Size to enter the exact size of the page. Refer to
Original Size on page 75 for more information.
The options are:
• Both Pages use to scan both pages, the left page of
the book first will be scanned first. Use the arrow
buttons to specify an amount from 0 to 50 mm (0 to
2”) to be deleted from the center of the book in order
to delete unwanted marks reproduced from the gutter
of the book.
• Left then Right or Right then Left is used to scan
both pages, but the pages will be scanned in the order
specified. These options replace the Both Pages option and will not be displayed unless enabled
in Tools. Refer to Display Options on page 253 of Administration and Accounting.
• Left Page Only use to scan the left page only. Use the arrow buttons to specify an amount from 0
to 25mm (0 to 1”) to be deleted from the right side of the page in order to delete unwanted marks
reproduced from the gutter of the book.
• Right Page Only use to scan the right page only. Use the arrow buttons to specify an amount
from 0 to 25mm (0 to 1”) to be deleted from the left side of the page in order to delete unwanted
marks reproduced from the gutter of the book.
Select Save to save your selections and exit.
Several pages of a bound document can be faxed using the Build Job feature. Refer to Build Job on
page 83 for more information.
76
Xerox WorkCentre 5735/5740/5745/5755/5765/5775/5790
Fax
Fax
Fax Options
The Fax Options allow you to specify how your fax
document is transmitted and how it is printed at the
receiving fax machine. To access the Fax Options, select
Services Home and Fax. Then select the Fax Options tab.
Confirmation Report
Select Confirmation Report to print a broadcast report to identify the success or failure of a fax job.
The options displayed depend on the settings enabled in Tools. Refer to the System Administrator
Guide for more information.
The options are:
Print Confirmation
• Use to print a transmission report containing details about the fax, together with a reduced copy
of the first faxed page.
• The Confirmation report is printed after every transmission.
• When sending a fax to multiple recipients, one report is printed listing all of the recipients.
Print On Error Only
• Select this option to print the Confirmation report only if an error occurs with the transmission.
Select Save to save your selections and exit.
Starting Rate
Use Starting Rate to select the top transmission speed of your fax job. The actual transmission speed
will depend on the receiving fax machine. The options are:
Super G3 (33.6 Kbps)
• The fastest fax transmission rates and the default option.
• Determines the transmission rate to be used based on the maximum capabilities of the receiving
fax machine.
• This rate minimizes transmission errors by using Error Correction Mode (ECM). Initial transmission
speed is 33,600 Bits Per Second (bps).
G3 (14.4 Kbps)
• The standard Group 3 fax transmission rates. These are used in fax environments where there is
existing noise or stress on the phone network which prevents higher speed fax transmissions
working well.
• Selects the transmission rate based on the maximum capabilities of the receiving fax machine.
Xerox WorkCentre 5735/5740/5745/5755/5765/5775/5790
Fax
77
Fax
•
Initial transmission speed is 14,400 Bits Per Second (bps). This rate minimizes transmission errors
by using Error Correction Mode (ECM).
Forced (4800 bps)
• Used in areas of low quality communication, when experiencing telephone noise, or when fax
connections are susceptible to errors.
• Forced (4800 bps) is a slower transmission rate but is less susceptible to errors. In some regional
areas the use of Forced (4800 bps) is restricted.
Select Save to save your selections and exit.
Delay Send
Select Delay Send to specify the time within the next 24 hours that you want the fax to be
transmitted. Use this feature to transmit faxes during off-peak hours or when sending to another
country or time zone. Delay Send can also be used with Mailbox and Polling options.
1.
2.
3.
Select Specified Time and select either the Hour or
the Minute field to enter a time to send your fax.
Use the arrow buttons or numeric keypad to enter the
hours and minutes.
If the device is set up to display the time using a 12
hour clock, you must also select either the AM or PM
button.
Select Save to save your selections and exit.
Once scanned, the fax will be stored in memory and sent at the specified time.
Note: Delay Send can be used for Batch Send fax jobs. For more info refer to Batch Send on
page 69.
Send Header Text
This feature allows you to add header text information when sending the fax. This is in addition to the
standard header text. The information is printed in the header at the top of each page of the fax
transmission. The information included is displayed on the screen and can be customized using Tools.
Refer to the System Administrator Guide for more information.
Select On then Save to enable the Send Header Text to print on the fax output.
78
Xerox WorkCentre 5735/5740/5745/5755/5765/5775/5790
Fax
Fax
Mailboxes
Mailboxes are areas of device memory where incoming faxes are stored or from which outgoing faxes
can be polled. Mailboxes enable you to store all received fax documents until it is convenient to retrieve
them. Conversely, storing fax documents in a mailbox for Polling allows a remote user or users to
retrieve the fax on demand.
Mailboxes must be set up by the System Administrator before fax documents can be stored in them.
The device can contain up to 200 electronic mailboxes within its memory. To allow a remote user to fax
to your mailbox they must know your mailbox number. To retrieve a document from your mailbox the
remote user must know your mailbox number and if, appropriate, your passcode.
The mailbox passcode ensures that the fax documents held in the mailbox are secure and can only be
accessed by an authorized user. The passcode is a 4 digit number. If the mailbox has been setup with a
passcode of 0000 then any combination of numbers, including no numbers, can be entered as the
passcode to gain access to the mailbox.
Select the Mailboxes button. The options are:
Send to a Remote Mailbox
This feature enables you to send a fax directly to an individual's private mailbox on a remote machine.
The remote machine must have mailbox capabilities.
1.
2.
3.
4.
5.
6.
Select Send to a Remote Mailbox.
Select the Fax Number entry field and enter the
recipient's fax number using the numeric keypad.
Alternatively, select the Address Book option and
select the recipient from the directory.
To send to a remote mailbox you must know the
recipients mailbox number.
Select the Mailbox Number entry field and enter the
mailbox number, between 001 and 255.
Select Save to save your selections and exit.
If required, use Delay Send to program a specific time to send the fax. Refer to Delay Send on
page 78 for more information.
Load the originals and select Start on the control panel to send the fax to the recipient's mailbox.
A Store to Remote Mailbox message is displayed for information.
If enabled by your System Administrator, a report is printed once the documents are sent to the
remote mailbox.
Xerox WorkCentre 5735/5740/5745/5755/5765/5775/5790
Fax
79
Fax
Store to Local Mailbox
This feature allows you to store documents to be polled. The document is stored in your mailbox and
automatically sent to a remote fax machine when requested.
1.
2.
3.
4.
Select the Store to Mailbox button.
Select the Mailbox Number entry field and enter the
mailbox number, between 001 and 200.
Select the Mailbox Passcode entry field and enter the
4-digit mailbox passcode.
Load the originals and select Start.
Your fax job is scanned and stored in the mailbox and the
Mailboxes screen returns.
Print Mailbox Documents
Faxes stored in your mailbox can be printed.
1.
2.
3.
4.
Select the Print Mailbox Documents button.
Select the Mailbox Number entry field and enter the
mailbox number, between 001 and 200.
Select the Mailbox Passcode entry field and enter the
4-digit mailbox passcode.
Select Start to print the contents of the mailbox.
The documents may be deleted after printing, depending
on the Mailbox & Polling Policies set.
Delete Mailbox Documents
All the faxes stored in your mailbox can be deleted. Mailbox Documents are faxes you have stored
ready for Polling and faxes that you have received in your mailbox.
1.
2.
3.
4.
Select the Delete Mailbox Documents button.
Select the Mailbox Number entry field and enter the
mailbox number, between 001 and 200.
Select the Mailbox Passcode entry field and enter the
4-digit mailbox passcode.
Select Start to delete the contents of the mailbox.
Note: The storage time for faxes is set up by the
System Administrator.
A confirmation screen is displayed prior to deleting the faxes stored in the selected mailbox.
80
Xerox WorkCentre 5735/5740/5745/5755/5765/5775/5790
Fax
Fax
Polling
Using the Polling function, documents stored on a remote
fax machine can be retrieved and printed on your device.
Alternatively, documents stored on your device can be
polled by a remote fax machine. Polling is a useful way of
constantly providing access to updated information
without having to re-distribute it.
Local Polling
The Local Polling feature allows a fax document to be left in the memory of your device to be retrieved
by another fax machine. If the fax document is in memory it may be polled once and deleted, or polled
several times, depending on the Mailbox & Polling Policies set.
Select the Local Polling button and then On to enable Local Polling. The options are:
• Secure Polling is used for sensitive documents. Access is only granted if the fax numbers of the
retrieving devices have been entered, or if the Allow All Address Book numbers access option is
selected.
a. Select the Secure Polling button and then Enabled.
b. Select the Polling Passcodes button and add the
fax numbers of the devices retrieving the
document. Alternatively, select Allow All Address
Book numbers access to enable all fax numbers
stored in the Address Book access to the
document.
c. Use Add to add more than one number to the list.
To delete a number from the list, select the entry
and select Delete.
d. Select Close to exit.
e. Load the originals to be stored for polling and press Start.
The originals are scanned and stored in memory ready to be polled.
• Print Polling Documents prints the documents stored in memory.
• Delete Polling Documents deletes all stored documents. A confirmation screen is displayed,
select Delete All or Cancel.
Select Save to save your selections and exit.
Xerox WorkCentre 5735/5740/5745/5755/5765/5775/5790
Fax
81
Fax
Poll Remote Fax
The Poll a Remote Fax feature allows you to call a remote fax machine. The call locates and retrieves
faxes stored at the remote machine. Remote Polling allows you to poll a remote machine immediately
or at a specified time. More than one remote machine can be polled at a time.
1.
2.
3.
4.
Select the Poll a Remote Fax button and select On.
Then select Save.
Enter the fax numbers of the devices which are being
polled. Use Add to add more than one number to the
list.
Use the Speed Dial or Address Book option to add a
specific number from the directory.
If required, use Delay Send to program a specific time
to poll the remote machine. Refer to Delay Send on page 78 for more information.
Select Start to commence polling.
The remote device is polled and the retrieved document printed.
Poll Remote Mailbox
The Poll Remote Mailbox feature allows you to call a remote machine which has a mailbox setup. The
call locates and retrieves the faxes stored within the mailbox. The mailbox number and passcode must
be known.
1.
2.
3.
4.
5.
Select the Poll a Remote Mailbox button.
Select the Fax Number entry field and enter the fax
number of the device being polled using the numeric
keypad. Use the Address Book option to add the
number if required.
Use the Dialing Characters option to enter the
number if special characters are required. Refer to
Dialing Characters on page 68 for more information.
Select the Mailbox Number entry field and enter the mailbox number, between 001 and 200.
Select the Mailbox Passcode entry field and enter the 4-digit mailbox passcode.
Select Start to commence polling the mailbox.
The remote device mailbox is polled and the retrieved document printed.
Fax Reports
Various fax reports are available for printing on your device. Select one of the following reports to print:
• Activity Report prints details of the last 50 fax transactions.
• Address Book Individuals Report prints details of all entries in the individual directory.
• Address Book Group Report prints details of all groups in the group directory.
• Options Report prints details of the fax card configuration.
82
Xerox WorkCentre 5735/5740/5745/5755/5765/5775/5790
Fax
Fax
•
Pending Jobs Report prints information about jobs currently queued in the device memory and
details of available memory.
Select Print Report to print the selected report.
Job Assembly
This tab provides access to the Build Job feature for compiling jobs which have different originals or
programing requirements within a job. To access the Job Assembly options, select Services Home and
Fax. Then select the Job Assembly tab.
Build Job
Use this feature to build a job that requires
different settings for each page, or a segment of
pages.
You can select the appropriate settings to be
applied to individual pages or segments of a
completed job. First split the originals into
sections for individual programing.
1.
2.
3.
4.
5.
6.
7.
8.
9.
Some pages
with text and
some with
photos
Some pages Various
2 sided and sized
some 1 sided originals
More than
100 pages
Select Build Job on the Job Assembly tab.
Switch on Build Job by selecting the On button and
select Save.
Select the options required for the first segment of the
job.
Load the first segment originals and press Start.
Remove the first segment originals. The Build Job
screen displays the first segment in the list. The
following options can be applied:
• Delete Last Segment deletes the last segment scanned. You can continue programing the
Build Job.
• Delete All Segments deletes the current Build Job and returns you to the main Build Job
screen.
Select the options required for the second segment.
Load the second segment originals and press Start.
Repeat these steps until all segments of your job have been programmed and scanned.
After the last segment has been scanned, select End Build Job to indicate you have finished
scanning and the job can be processed and completed.
Xerox WorkCentre 5735/5740/5745/5755/5765/5775/5790
Fax
83
Server Fax
Server Fax
If Authentication or Accounting has been enabled on your device you may have to enter log in details
to access the features. Refer to Log In / Out on page 25 of Getting Started.
1.
2.
To select the Server Fax service, press the Services
Home button.
Select the Server Fax option.
When a service is selected on the device, additional
options and features are displayed. Most feature
screens include the following buttons to confirm or
cancel your choices.
• Undo resets the current screen to the values that
were displayed when the screen was opened.
• Cancel resets the screen and returns to the previous screen.
• Save saves the selections made and returns to the previous screen.
• Close closes the screen and returns to the previous screen.
If an option is not required, use the Off option to disable a feature.
Sending a Server Fax
1.
2.
3.
4.
5.
84
Load your documents face up in the document feeder input tray. Adjust the guide to touch the
documents.
Or...........
Lift up the document feeder. Place the document face down onto the document glass and register
it to the arrow at the top right rear corner. Close the document feeder.
Press the Clear All (AC) button once to cancel any previous screen programing selections.
Press the Services Home button and select the Server
Fax option. The Server Fax features are displayed.
Enter the recipient’s fax number by:
• Keypad Dial - select the Enter Number area on
the touch screen and enter the number using the
numeric keypad.
• Fax Directory - Touch the Fax Directory button,
select an entry from the Fax Directory to add to
the Recipient list.
Select Add to add the number to the Recipient list.
Xerox WorkCentre 5735/5740/5745/5755/5765/5775/5790
Fax
Server Fax
6.
Select the required features for your fax job using the touch screen:
Dialing Characters are alphanumeric characters which have a specific fax function and can be
entered as part of the fax number.
2-Sided Scanning is used to select whether your originals are 1-sided or 2-sided.
Original Type is used to define the original document as text, text and photo, or photo.
Resolution can be used to optimize the resolution settings.
7.
Press Start to scan the originals and process the Server Fax job.
Remove the originals from the document feeder or document glass when scanning has completed.
Note: The Server Fax job enters the job list ready for sending.
8.
Select Job Status to view the job list and check the status of your job.
Dialing Options
The dialing options enable you to enter the destination fax number or numbers. Select the appropriate
dialing option for your fax job.
To access the Dialing Options, select Services Home and Server Fax.
Manual Dialing
1.
2.
3.
Select the fax number field and enter the fax number
required using the numeric keypad.
If special characters are required, use the Dialing
Characters option to enter the number plus additional
dialing characters. Refer to Image Quality on page 74
for further information.
Select Add to add the number to the Recipient list.
Enter additional numbers as required.
The fax will be sent to all the numbers in the Recipient list.
Xerox WorkCentre 5735/5740/5745/5755/5765/5775/5790
Fax
85
Server Fax
Dialing Characters
Additional dialing characters can be accessed by selecting the Dialing Characters button. Use this
option to enter the fax number if special characters are required. To enter a fax number using the
dialing characters:
1.
2.
3.
4.
Select the Dialing Characters button.
Use the numeric keypad to enter the number plus
additional dialing characters.
The following characters are available:
• Dial Pause [,] use to pause between numbers.
The pause allows time to switch from an inside to
an outside line during automatic dialing. For
additional pause time, add multiple pauses. If
you are using charge code numbers, enter a pause after the fax number but before the
charge code number.
• Long Pause [,] use to enter a long pause between numbers.
• Mask Data [/] use to protect confidential information. For example, if a special charge code
or credit card number is required for a call, simply use the Mask Data character. Select the /
character before entering confidential numbers. After the last confidential numbers, select /
again to turn the mask data off. Characters between the / symbols will appear as *.
• Group Dial [\] use to add another fax number to the entry if the fax is being transmitted to
multiple recipients.
• Pulse to Tone [:] use to switch between pulse and tone dialing.
• Password Check [S] use for remote terminal identification. This character verifies that the
correct number has been dialled.
• Wait for Network Tone [W] suspends dialing until an expected network tone is detected. It
can also be used to detect a specific tone when accessing an outside line or other service.
• Optional Readability Characters [+] and [ ] these characters are used for readability
purposes and do not affect the number entered. For example, if you wish to identify the area
code of a fax number, you can use the space readability character 01234 567890.
When you have entered the fax number and dialing characters required, select Add to add the
number to the Recipient list.
Select Close to return to the fax options.
2-Sided Scanning
The 2-Sided Scanning option allows you to set whether 1 or 2 sides of your original document are
scanned. Documents must first be loaded in the document feeder to enable the 2 Sided option. The
options are:
• 1 Sided is used if your original documents are single-sided.
• 2 Sided is used if your original documents are double-sided. The document feeder must be used to
scan your originals with this option.
• 2-Sided, Rotate Side 2 select if your original opens up like a calendar.
86
Xerox WorkCentre 5735/5740/5745/5755/5765/5775/5790
Fax
Server Fax
Original Type
Use this option to define the type of original being used for scanning. Making the correct selection
enhances the quality of your output image. The options are:
• Photo & Text is recommended for originals containing high quality photographs and halftones.
Using this setting the scanned image will contain high quality pictures though the sharpness of
text and line art is slightly reduced.
• Photo is used specifically for originals containing photos or continuous tones without any text or
line art. Produces the best quality for photos but reduced quality text and line art.
• Text produces sharper edges and is recommended for text and line art. This option requires less
communication time.
Resolution
The Resolution affects the appearance of the fax at the receiving fax terminal. A higher resolution
produces a better quality image. A lower resolution reduces communication time. The options are:
• Standard (200x100 dpi) is recommended for text documents. It requires less communication
time but does not produce the best image quality for graphics and photos.
• Fine (200 dpi) is recommended for line art and photos. This is the best choice in most cases.
Fax Directory
The Fax Directory is used to store individual fax numbers which are used frequently. The Fax Directory
can be accessed from all screens where a fax number requires entering. Up to 29 entries can be added.
Using the Fax Directory
If numbers have been entered into the Fax Directory they can be accessed via the Fax Directory
button.
1.
2.
3.
4.
5.
Select the Fax Directory button.
A list of fax numbers entered in the Fax Directory is
displayed.
Select the required number and select Add to
Recipients from the drop-down menu. The number is
added to the Recipient list.
Continue adding recipients as required.
To edit an entry, select it in the list and select the Edit
button.
Edit the entry as required and select Save.
To clear an entry from the list, select the entry requiring deletion and select Clear Entry from the
drop-down menu. A confirmation screen is displayed, select Clear Entry.
Select Close to return to the fax options.
The fax will be sent to all the numbers in the Recipient list.
Xerox WorkCentre 5735/5740/5745/5755/5765/5775/5790
Fax
87
Server Fax
Setting up the Fax Directory
1.
2.
3.
4.
5.
6.
Select the Server Fax tab and the Fax Directory button.
Select an empty slot from the list of entries. If necessary, use the scroll bar.
Enter the fax number in the Edit Fax Number field.
Use the C button to delete an incorrect entry, or to clear the entire entry select the X button.
Select Save.
The new entry is displayed in the list.
To use the entry for the current job, select the entry in the list and select Add To Recipients.
The number is added to the Recipient list.
To edit an entry, select it in the list and select the Edit button.
Edit the entry as required and select Save.
To exit from the Fax Directory, select Close.
Image Quality
The Image Quality options provide access to the features
which enhance the image quality or output. To access the
Image Quality options, select Services Home and Server
Fax. Then select the Image Quality tab.
Image Options
Select Image Options to adjust the lightness and darkness
of the image, and to sharpen the image. The options are:
Lighten/Darken
Provides a manual control to adjust the lightness or
darkness of the scanned images.
• Move the indicator down to darken the scanned
image, for light originals such as pencil images.
• Move the indicator up to lighten the scanned image,
for dark originals such as halftones or originals with
colored backgrounds.
Sharpness
This provides manual control to adjust the sharpness of the scanned images.
• Move the indicator up to sharpen the scanned image.
• Move the indicator down to soften the scanned image.
Select Save to save your selections and exit.
88
Xerox WorkCentre 5735/5740/5745/5755/5765/5775/5790
Fax
Server Fax
Image Enhancement
Select Image Enhancement to reduce background and adjust the image
. The options are:
Background Suppression
This enhances originals that have colored backgrounds, by
reducing or eliminating the background from your original.
This option is useful when your original is on colored paper.
• Select Auto Suppression to automatically suppress
unwanted background.
• Select Off to turn the Background Suppression feature
off, particularly when:
• The Darken adjustment does not produce a
satisfactory output from light originals.
• The original has a gray or colored border, such as a certificate.
• You want to bring out fine detail that was lost due to a dark edge when using bound originals.
Contrast
The Contrast feature controls the image density on the output and compensates for an original that
has too much or too little contrast on the image.
• Select Manual Contrast to set the level of contrast yourself. Move the indicator towards the High
setting to reproduce more vivid blacks and whites for sharper text and lines but less detail in
pictures. Move the indicator towards the Low setting to reproduce more detail in light and dark
areas of the original.
Select Save to save your selections and exit.
Xerox WorkCentre 5735/5740/5745/5755/5765/5775/5790
Fax
89
Server Fax
Layout Adjustment
The Layout Adjustment options allow you to specify the
original size or mixed size originals for scanning. To access
the Layout Adjustment options, select Services Home and
Server Fax. Then select the Layout Adjustment tab.
Original Size
Select Original Size to enter the size of your document when scanning from the document glass or the
document feeder. Your device uses this information to calculate the size of your original and the
scanned image. You can also select Auto Detect for automatic size detection, or Mixed Size Originals
if scanning a mix of sizes. The options are:
• Auto Detect is the default setting and enables automatic size sensing. The size detected is
matched to a standard size paper.
• Pre-set Scan Areas allows you to define the size of your original from a list of pre-set, standard
document sizes. You can view the list by using the scroll bar.
• Custom Scan Areas is used to enter a specific area for
scanning. Measure the area to be scanned on the
original and enter the X and Y axis measurements into
the fields provided. Only the area specified is scanned.
• Mixed Size Originals allows you scan documents
containing different size pages. The pages must be the
same width, like A4 LEF and A3 SEF (8.5x11” LEF and
11x17” SEF), other combinations are shown on the
screen.
The device will detect the size of the documents and determine whether the receiving fax
machine can support the various paper sizes. If the receiving fax cannot support the page sizes,
the image is reduced or enlarged to fit.
Select Save to save your selections and exit.
Fax Options
The Fax Options allow you to specify a specific time for
sending your fax. To access the Fax Options, select Services
Home and Server Fax. Then select the Fax Options tab.
90
Xerox WorkCentre 5735/5740/5745/5755/5765/5775/5790
Fax
Server Fax
Delay Send
Select Delay Send to specify the time within the next 24 hours that you want the fax to be
transmitted. Use this feature to transmit faxes during off-peak hours or when sending to another
country or time zone. Delay Send can also be used with Mailbox and Polling options.
1.
2.
3.
Select Specified Time and select either the Hour or
the Minute field to enter a time to send your fax.
Use the arrow buttons or numeric keypad to enter the
hours and minutes.
If the device is set up to display the time using a 12
hour clock, you must also select either the AM or PM
button.
Select Save and program and scan the fax job.
The fax will be stored in memory and sent at the specified time.
Xerox WorkCentre 5735/5740/5745/5755/5765/5775/5790
Fax
91
Internet Fax
Internet Fax
If Authentication or Accounting has been enabled on your device you may have to enter log in details
to access the features. Refer to Log In / Out on page 25 of Getting Started.
1.
2.
To select the Internet Fax service, press the Services
Home button.
Select the Internet Fax option.
When a service is selected on the device, additional
options and features are displayed. Most feature
screens include the following buttons to confirm or
cancel your choices.
• Undo resets the current screen to the values that
were displayed when the screen was opened.
• Cancel resets the screen and returns to the previous screen.
• Save saves the selections made and returns to the previous screen.
• Close closes the screen and returns to the previous screen.
If an option is not required, use the Off option to disable a feature.
Sending an Internet Fax
1.
2.
3.
4.
5.
6.
92
Load your documents face up in the document feeder input tray. Adjust the guide to touch the
documents.
Or...........
Lift up the document feeder. Place the document face down onto the document glass and register
it to the arrow at the top right rear corner. Close the document feeder.
Press the Clear All (AC) button once to cancel any previous screen programing selections.
Press the Services Home button and select the
Internet Fax option. The Internet Fax features are
displayed.
Select New Recipients.
Select To or Cc for the recipient using the drop-down
menu to the left of the entry box.
Using the keyboard, enter the e-mail address.
• Up to 128 alphanumeric characters can be
entered.
• To delete a character use the backspace key, or to clear the entire entry select the X button.
• Use the Keyboards... button to access additional language keyboards.
Select Add to add the e-mail address to the Recipient list. Continue adding e-mail addresses until
all the recipients have been added to the list, then select Save.
All the recipients are displayed in the Recipient list.
Xerox WorkCentre 5735/5740/5745/5755/5765/5775/5790
Fax
Internet Fax
7.
8.
If an address book has been setup, enter the name of the recipient and select Search. A list of
matching recipients is displayed. Select the e-mail address required and select Add (To:) or Add
(Cc:) from the drop-down menu. The e-mail address is added to the recipient list. Multiple
recipients can be added to the Recipient list in this way. Select Close to exit.
Enter the Message, Reply To, From and Subject details as required.
Select the required features for your fax job using the touch screen:
Output Color is used to replicate the original colors or to change the output to black and white,
grayscale or color.
Note: This feature may not be available on your device.
2-Sided Scanning is used to select whether your originals are 1-sided or 2-sided.
Original Type is used to define the original document as text, text and photo, or photo.
9.
Press Start to scan the originals and process the Internet Fax job. Remove the originals from the
document feeder or document glass when scanning has completed.
Note: The Internet Fax job enters the job list ready for sending.
10. Select Job Status to view the job list and check the status of your job.
New Recipient
Use this option to enter details of all the recipients of the internet fax. To enter the recipient details:
1.
2.
3.
4.
5.
Select New Recipients.
Select To or Cc for the recipient using the drop-down
menu to the left of the entry box.
Using the keyboard, enter the e-mail address.
• Up to 128 alphanumeric characters can be
entered.
• To delete a character use the backspace key, or to
clear the entire entry select the X button.
• Use the Keyboards... button to access additional
language keyboards.
Select Add to add the e-mail address to the Recipient list.
Continue adding e-mail addresses until all the recipients have been added to the list.
Select Close.
All the recipients are displayed in the Recipient list.
If an Address Book has been setup the Search option can be used to search for e-mail addresses. Refer
to Address Book on page 96.
Xerox WorkCentre 5735/5740/5745/5755/5765/5775/5790
Fax
93
Internet Fax
Message:
This option is used to enter a message for the internet fax. The message is the text contained within
the internet fax and not the subject line.
1.
2.
Using the keyboard, enter the message required.
• Up to 128 alphanumeric characters can be
entered.
• To delete a character use the backspace key, or to
clear the entire entry select the X button.
• Use the Keyboards... button to access additional
language keyboards.
Select Save to save your selections and exit.
Reply To
The Reply To feature enables you to include an e-mail address you want the recipient to reply to. For
example you can enter your personal e-mail address. If you logged in through authentication and your
details are available in the Address Book, your e-mail address is displayed.
1.
2.
Using the keyboard, enter the message required.
• Up to 128 alphanumeric characters can be entered.
• To delete a character use the backspace key, or to clear the entire entry select the X button.
• Use the Keyboards... button to access additional language keyboards.
If an address book has been setup, enter the name required and select Search. A list of matching
names is displayed. Select the e-mail address required and select Save.
If required, select Save to save your selections and exit.
The e-mail address entered is displayed in the Reply To field.
From:
To enter or edit the sender’s name:
1.
2.
3.
94
Select From.
If a default name is displayed, select the X button to
delete the entry.
Using the keyboard, enter the e-mail address of the
sender.
• Up to 128 alphanumeric characters can be
entered.
• To delete a character use the backspace key, or to
clear the entire entry select the X button.
• Use the Keyboards... button to access additional language keyboards.
If an address book has been setup, enter the name required and select Search. A list of matching
names is displayed. Select the e-mail address required and select Save.
Xerox WorkCentre 5735/5740/5745/5755/5765/5775/5790
Fax
Internet Fax
4.
If required, select Save to save and return to the previous screen, or Cancel to exit.
The e-mail address entered is displayed in the From field.
Subject:
To enter a subject for the internet fax:
1.
2.
3.
Select the Subject field.
Using the keyboard, enter the subject of the internet fax.
• Up to 128 alphanumeric characters can be entered.
• To delete a character use the backspace key, or to clear the entire entry select the X button.
• Use the Keyboards... button to access additional language keyboards.
Select Save to save and return to the previous screen, or Cancel to exit.
The subject entered is displayed in the Subject field.
Output Color
Select the Auto Detect option in Output Color to automatically detect and match the color of your
original and produce black and white, grayscale or color output from your original. The options are:
• Auto Detect to select output that matches your original.
• Black & White to select black and white output regardless of the color of your original.
• Grayscale to use gray scales instead of color.
• Color to select color output from your original.
Note: This feature may not be available on your device.
2-Sided Scanning
The 2-Sided Scanning option allows you to set whether 1 or 2 sides of your original document are
scanned. Documents must first be loaded in the document feeder to enable the 2 Sided option. The
options are:
• 1 Sided is used if your original documents are single-sided.
• 2 Sided is used if your original documents are double-sided. The document feeder must be used to
scan your originals with this option.
• 2-Sided, Rotate Side 2 select if your original opens up like a calendar.
Xerox WorkCentre 5735/5740/5745/5755/5765/5775/5790
Fax
95
Internet Fax
Original Type
Use this option to define the type of original being used for scanning. Making the correct selection
enhances the quality of your output image. The options are:
• Photo & Text is recommended for originals containing high quality photographs and halftones.
Using this setting the scanned image will contain high quality pictures though the sharpness of
text and line art is slightly reduced.
• Text produces sharper edges and is recommended for text and line art.
• Photo is used specifically for originals containing photos or continuous tones without any text or
line art. Produces the best quality for photos but reduced quality text and line art.
Address Book
If the device has been setup to access the Network and Internal Address Books, you can use them to
select recipients. For information about setting up address books, refer to the System Administrator
Guide.
1.
2.
3.
4.
5.
6.
7.
Select New Recipients.
Enter the name of the recipient and select Search.
The matching entries are displayed.
Select the e-mail address required. The recipient details are displayed to the right of the list.
Select Add (To:) or Add (Cc:) from the drop-down
menu.
The e-mail address is added to the recipient list.
Continue adding e-mail addresses as required.
To search different address books select the Internal
Address Book option. Select the Address Book
required using the drop-down menu and search using
the same method described.
Select Recipient List to view the current Recipient list. To remove an entry from the list, select the
entry and select Remove from the drop-down menu. The recipient is removed from the list.
Select New Search to continue adding recipients or Close to exit.
The Address Book Search option can also be used when entering a Reply To or From e-mail address.
96
Xerox WorkCentre 5735/5740/5745/5755/5765/5775/5790
Fax
Internet Fax
Advanced Settings
The Advanced Settings provide access to the features
which enhance the image quality or output quality. To
access the Advanced Settings, select Services Home and
Internet Fax. Then select the Advanced Settings tab.
Image Options
Select Image Options to adjust the lightness and darkness
of the image, and to sharpen the image. The options are:
Lighten/Darken
Provides a manual control to adjust the lightness or
darkness of the scanned images.
• Move the indicator down to darken the scanned
image, for light originals such as pencil images.
• Move the indicator up to lighten the scanned image,
for dark originals such as halftones or originals with
colored backgrounds.
Sharpness
This provides manual control to adjust the sharpness of the scanned images.
• Move the indicator up to sharpen the scanned image.
• Move the indicator down to soften the scanned image.
Select Save to save your selections and exit.
Image Enhancement
Select Image Enhancement to reduce background and adjust the image contrast. The options are:
Background Suppression
This enhances originals that have colored backgrounds, by
reducing or eliminating the background from your original.
This option is useful when your original is on colored paper.
• Select Auto Suppression to automatically suppress
unwanted background.
• Select Off to turn the Background Suppression feature
off, particularly when:
• The Darken adjustment does not produce a
satisfactory output from light originals.
• The original has a gray or colored border, such as a certificate.
• You want to bring out fine detail that was lost due to a dark edge when using bound originals.
Xerox WorkCentre 5735/5740/5745/5755/5765/5775/5790
Fax
97
Internet Fax
Contrast
The Contrast feature controls the image density on the output and compensates for an original that
has too much or too little contrast on the image.
• Select Manual Contrast to set the level of contrast yourself. Move the indicator towards the High
setting to reproduce more vivid blacks and whites for sharper text and lines but less detail in
pictures. Move the indicator towards the Low setting to reproduce more detail in light and dark
areas of the original.
Select Save to save your selections and exit.
Resolution
The Resolution affects the appearance of the scanned image. A higher resolution produces a better
quality image. A lower resolution reduces communication time. The options are:
• 72 dpi recommended for output displayed on a
computer. It produces the smallest file size.
• 100 dpi recommended for output that delivers low
quality text documents.
• 150 dpi recommended for average quality text
documents and line art. Does not produce the best
image quality for photos and graphics.
• 200 x 100 dpi recommended for standard office
documents and photographs.
• 200 dpi recommended for average quality text documents and line art. Does not produce the best
image quality for photos and graphics.
• 300 dpi recommended for high quality text documents that are to pass through OCR applications.
Also recommended for high quality line art or medium quality photos and graphics. This is the
best choice in most cases.
• 400 dpi recommended for photos and graphics. It produces average image quality for photos and
graphics.
• 600 dpi recommended for high quality photos and graphics. It produces the largest image file
size, but delivers the best image quality.
Select Save to save your selections and exit.
Quality / File Size
The Quality / File Size settings allow you to choose between scan image quality and file size. These
settings allow you to deliver the highest quality or make smaller files. A small file size delivers slightly
reduced image quality but is better when sharing the file over a network. A larger file size delivers
improved image quality but requires more time when transmitting over the network. The options are:
• Normal/Small produces small files by using advanced compression techniques. Image quality is
acceptable but some quality degradation and character substitution errors may occur with some
originals.
• Higher/Larger produces larger files with better image quality.
98
Xerox WorkCentre 5735/5740/5745/5755/5765/5775/5790
Fax
Internet Fax
•
Highest/Largest produces the largest files with the maximum image quality. Large files are not
ideal for sharing and transmitting over the network.
Select Save to save your selections and exit.
Layout Adjustment
The Layout Adjustment options allow you to manipulate the scanned image and enhance the
appearance and style of your faxed document. To access the Layout Adjustment options, select
Services Home and Internet Fax. Then select the Layout Adjustment tab.
Original Size
Select Original Size to enter the size of your document when scanning from the document glass or the
document feeder. Your device uses this information to calculate the size of your original and the
scanned image. You can also select Auto Detect for automatic size detection. The options are:
• Auto Detect is the default setting and enables
automatic size sensing. The size detected is matched
to a standard size paper.
• Pre-set Scan Areas allows you to define the size of
your original from a list of pre-set, standard document
sizes. You can view the list by using the scroll bar.
• Custom Scan Areas is used to enter a specific area for
scanning. Measure the area to be scanned on the
original and enter the X and Y axis measurements into the fields provided. Only the area specified
is scanned.
Select Save to save your selections and exit.
Internet Fax Options
The Internet Fax Options allow you to temporarily change
the format of the image file, set a Reply To address and add
a brief message. The Acknowledgement Report can also be
enabled. To access the Internet Fax Options, select Services
Home and Internet Fax. Then select the Internet Fax
Options tab.
File Format
File Format determines the type of file created and can be temporarily changed for the current job.
You can select the file format you wish to use for your scanned image. The options are:
Multi-Page TIFF (Tagged Image File Format)
• This format produces a single TIFF file containing several pages of scanned images.
• A more specialized software is required to open this type of file format.
Xerox WorkCentre 5735/5740/5745/5755/5765/5775/5790
Fax
99
Internet Fax
PDF Image Only (Portable Document Format)
• This allows recipients with the right software to view, print or edit the Internet Fax file, no matter
what their computer platform.
Note: Depending on the receiving device, the PDF selection may not be compatible when the
resolution is set to 200 dpi.
Select Save to save your selections and exit.
Acknowledgement Report
Using this feature a confirmation report is printed indicating the delivery status of the internet fax job.
Each internet fax recipient provides a delivery receipt when the job is received. Once the receipt is
received by the device, the report is compiled and printed.
Note: The report may be delayed depending on how quickly the recipients respond.
Print Report
• The device requests a receipt from each of the
recipients when the Internet Fax is sent.
• Once the recipients acknowledge receipt, the report is
compiled and printed automatically.
Select Save to save your selections and exit.
100
Xerox WorkCentre 5735/5740/5745/5755/5765/5775/5790
Fax
Fax from PC
Fax from PC
To fax your job, the fax option must be installed on your printer and
fax must be enabled in the Installable Options screen.
1.
2.
3.
4.
5.
Select or create a document on your PC.
With your document open in your application, select Print, then
select your Xerox WorkCentre
5735/5740/5745/5755/5765/5775/5790 printer.
If the printer is not available in the menu it may have not been
installed correctly, contact your System Administrator for
advice.
Select the Properties button to display the print driver printing
preferences.
Select Fax as the Job Type on the Paper/Output screen of the print driver.
The Fax Recipients screen will automatically open. This screen
displays the recipients for the current fax.
You can now Add Fax Recipients or Add From Phonebook.
Select the Add Recipient button. Input the name and fax
number of the recipient. Complete the additional information.
Select the Save to Personal Phonebook option if you want to
add the recipient to your Personal Phonebook.
To enter a recipient from a phonebook select the Add From
Phonebook button. Select the phonebook required. The system
retrieves the phonebook information and the entries are
displayed.
• Type a name or select the name required from the list.
• Use the green arrow to add a recipient to the list from the
phonebook.
• Use the Edit button to edit the entry in the Recipient list.
Xerox WorkCentre 5735/5740/5745/5755/5765/5775/5790
Fax
101
Fax from PC
• Use the Delete button to delete an entry from the list.
When you have selected all the options you require, select OK to continue making selections for
the job.
6. If you require a Cover Sheet to be sent with your fax document, select Print a Cover Sheet in the
Cover Sheet tab. The Cover Sheet options window will display automatically, allowing you to
customize the page to your requirements. Refer to Cover Sheet on page 105 for more information.
When you have selected all the options you require, select OK.
7. Select the Options tab to program the following options:
• Confirmation Sheet is used to print a confirmation sheet
on the device containing details of the transmission.
• Send Speed is used to select the top transmission speed of
your fax job. The actual transmission speed will also
depend on the speed capability of the receiving fax
machine. Select either Super G3 (33.6 Kbps), G3
(14.4Kbps) or Forced (4800 bps).
• Resolution affects the appearance of the fax at the
receiving fax terminal. A higher resolution produces a
better quality image. A lower resolution reduces
communication time. Select Standard, Fine or Superfine.
• Send Time is used to specify when to send the fax. Send
Now will send the fax immediately, or Send At allows you
to enter the time to send the fax within the next 24 hours.
• Fax Dialing Options are used to enter a dialing prefix to
add to the fax number, or a credit card number if a billing system is in use.
When you have selected all the options you require, select OK.
8. Select OK on the print driver screen and OK on the Print screen. The Fax Confirmation screen will
appear with the list of recipients you have chosen.
9. If you wish to make any changes, edit the details by selecting the button with a pencil icon. If the
details are correct, select the OK button and your fax will be submitted to the device job list ready
to be transmitted.
10. Select the Job Status button on the control panel to display the job list.Your job will be displayed
in the list. If there are no other jobs in the list your job may have already been processed. For
further information, refer to Job Status on page 233 of Machine and Job Status.
102
Xerox WorkCentre 5735/5740/5745/5755/5765/5775/5790
Fax
Fax from PC
Fax from PC Options
Recipients
Use the Recipients option to enter a recipient or group of recipients for your fax.
1.
2.
3.
4.
5.
Select Fax as the Job Type on the Paper/Output screen of the print driver.
The Fax Recipients screen will automatically open.
This screen displays the recipients for the current fax. It will
normally be empty. To add a new recipient select the Add
Recipient button.
Enter the following information for the recipient:
• Name
• Fax Number
• Organization
• Telephone Number
• E-mail Address
• Mailbox
Select the Save to Personal Phonebook if you want to add the recipient to your Personal
Phonebook. Select OK to confirm your entry.
Your entry has been added to the Recipient list.
To enter a recipient from a phonebook select the Add From
Phonebook button.
You can choose from 3 Phonebooks, Personal, Shared and
Shared LDAP. The Personal and Shared phonebook information
is stored in data files. The file for your Personal phonebook will
be located on your PC or personal file space. The file for the
Shared phonebook will be located on a server and can be
shared with other people. The Shared LDAP option will be linked
to your company phonebook if you have one.
Select the phonebook required. The system retrieves the
phonebook information and the entries are displayed.
• Type a name or select the name required from the list.
• Use the green arrow to add a recipient to the list from the
phonebook.
• Use the Edit button to edit the entry in the Recipient list.
• Use the Delete button to delete an entry from the list.
When you have selected all the options you require, select OK to continue making selections for
the job.
Preferences
The Preferences screen enables you to set up your Phonebooks and display preferences to suit your own
requirements.
Xerox WorkCentre 5735/5740/5745/5755/5765/5775/5790
Fax
103
Fax from PC
Phonebook Preferences
Select Fax as the Job Type on the Paper/Output screen of the print
driver. The Fax Recipients screen will automatically open.
Select the Preferences button at the bottom of the Fax Recipients
screen to access the Phonebook Preferences screen.
• Personal Phonebook information is stored in files with a suffix
of .pb or .xpd. You can create numerous files of this type and
select them as your personal phonebook. They will then appear
as phonebook options on the Add From Phonebook screen. You
can create a personal or shared phonebook using this option or
you can import a comma-separate value (.CSV) file (Windows
only). You can store up to 1,000 entries phonebook.
• Shared Phonebook shows the location of a shared phonebook,
which is accessed by many users and is typically located on a network server. You can copy
information from the shared phonebook to a personal phonebook, but shared phonebooks are
generally set to read-only mode.
• Shared LDAP Phonebook shows the location of a shared LDAP (Lightweight Directory Access
Protocol) phonebook (if enabled). LDAP is a protocol that is often used for corporate address
books. This phonebook is located on a network server and accessed by many users. You can copy
information from the LDAP phonebook to a personal phonebook. To access an LDAP phonebook,
bi-directional communication must be set-up and the phonebook must be configured on the
device using Internet Services.
Refer to Help on the Preferences screen in your print driver for more information about importing,
exporting and creating Phonebooks.
User Preferences
Select the User Preferences required:
• Prompt When Adding Duplicate Recipients provides a warning if the same recipient will be
added twice.
• Prompt When Removing a Recipient provides a warning if deleting a recipient from the Fax
Recipient list.
• Always Use Current Recipient List is used if you always send faxes to the same recipients. This
option eliminates the need to create a Recipient list each time you send a fax.
• Always Use Current Cover Sheet Notes always send faxes with the same message on the fax
cover sheet. This option eliminates the need to create a cover sheet message each time you send
a fax.
104
Xerox WorkCentre 5735/5740/5745/5755/5765/5775/5790
Fax
Fax from PC
Cover Sheet
The Cover Sheet option enables you to add a cover sheet to your fax.
Select Print a Cover Sheet to send a cover sheet with your job. The
cover sheet options are displayed.
• Select the Recipient Information to print:
• Use Show Recipient Names to print the names of the
recipients on the cover sheet.
• Use Hide Recipient Names if you do not want the
recipient names to print on the cover sheet.
• Use Show Custom Text to customize the cover sheet with your own information.
• Select the Sender’s Information to print:
• Use Show Sender’s Information to print the sender’s information on the cover sheet.
• Use Hide Sender’s Information if you do not want the sender’s information to print on the
cover sheet.
• Enter the details of the sender to include on the cover sheet:
• Fax Number
• Organization
• Telephone Number
• E-mail Address
• Use Cover Sheet Image to select an image or text to include
on the cover sheet. Select New to import an image to include or
to create your own text.
• Use Cover Sheet Paper Size to select the paper size for the
cover sheet.
Xerox WorkCentre 5735/5740/5745/5755/5765/5775/5790
Fax
105
Fax from PC
Options
On this screen there are 5 fax transmission options that you may use
to customize the transmission of your fax.
Confirmation Sheet
Here you can choose to print a Confirmation Sheet that will confirm
the success or failure of the transmission.
Select Print a Confirmation Sheet using the drop-down menu.
Send Speed
You can choose one of 3 transmission speeds. Select Send Speed to
select the transmission speed. The options are:
• Super G3 (33.6 Kbps) uses the fastest fax transmission rates
and is the default option. Determines the transmission rate to
be used based on the maximum capabilities of the receiving fax
machine. This rate minimizes transmission errors by using Error
Correction Mode (ECM). Initial transmission speed is 33,600 Bits Per Second (bps).
• G3 (14.4 Kbps) uses the standard Group 3 fax transmission rates. These are used in fax
environments where there is existing noise or stress on the phone network which prevents higher
speed fax transmissions working well. Selects the transmission rate based on the maximum
capabilities of the receiving fax machine. Initial transmission speed is 14,400 Bits Per Second
(bps). This rate minimizes transmission errors by using Error Correction Mode (ECM).
• Forced (4800 bps) is used in areas of low quality communication, when experiencing telephone
noise, or when fax connections are susceptible to errors. Forced (4800 bps) is a slower transmission
rate but is less susceptible to errors. In some regional areas the use of Forced (4800 bps) is
restricted.
Fax Resolution
You can choose one of 3 image resolutions depending on the type of documents being sent. The
higher the resolution you choose the better the received image will be but it will take longer to
transmit. The options are:
• Standard (200 x 100 dpi) is recommended for text originals. It requires less communication time
but does not produce the best image quality for graphics and photos.
• Fine (200 dpi) is recommended for line art and photos. This is the best choice in most cases.
• Superfine (600 dpi) is recommended for photos and halftones, or images that have gray tones. It
requires more communication time, but produces the best image quality.
Send Time
This is sometimes called Delayed Send. Use this feature to transmit faxes during off-peak hours or
when sending to another country or time zone. The default setting will send the fax immediately.
To send the fax at a specific time in the next 24 hours, select Send At and either type in or use the
arrow buttons to choose the local time that you want the fax sent.
106
Xerox WorkCentre 5735/5740/5745/5755/5765/5775/5790
Fax
Fax from PC
Fax Dialing Options
Use if you need to add an external access number, a country code or an area code to the recipient
number or if a credit card number is required.
• Select Dialing Prefix if you need to add, for example, an external access number, a country code
or an area code to the recipient number you have selected on the recipients screen.
• Select Credit Card if you want to bill the call to a credit card.
Xerox WorkCentre 5735/5740/5745/5755/5765/5775/5790
Fax
107
Receiving a Fax
Receiving a Fax
All incoming faxes are submitted to the Active Jobs list as fax jobs and can be set-up to print
immediately or be held in the job list until a secure passcode is entered. If the Fax service is available
on your device, you can also configure received faxes to be forwarded to an e-mail address or file
repository using the Fax Forward feature.
Secure Faxes
If the administrator has switched on the Secure Receive feature, all incoming faxes require a passcode
in order to release them for printing.
1.
2.
3.
To release a Secure Fax for printing, press the Job
Status button and select the held fax job in the list.
To release a fax for printing, select the Release button.
Use the numeric keypad to enter the passcode and
select the Release Job button.
The secure fax job is released for printing.
108
Xerox WorkCentre 5735/5740/5745/5755/5765/5775/5790
Fax
Receiving a Fax
Fax Forward
This feature enables the device to send incoming fax jobs to one or more e-mail addresses, a
repository, or a combination of both.
Note: In order to enable the Fax Forwarding feature the device must have either Workflow
Scanning or E-mail enabled and Fax must be installed and enabled.
Fax Forward is set-up by the System Administrator using Internet Services. The incoming fax jobs which
require forwarding are specified using their fax number. An e-mail address and/or repository is then
entered as the forwarding address for the fax jobs specified.
• Fax Forward to E-mail - the fax job is forwarded to an e-mail address as an attachment.
Information to include in the e-mail, such as the subject or a message can also be entered during
set-up. When the user receives a forwarded fax in their e-mail, it will be either a single e-mail or
multiple e-mails depending upon the size of the job.
• Fax Forward to a Repository - the fax job is forwarded to an SMB file share repository. The fax job
is stored using the parameters specified by the System Administrator. An e-mail notification can
be set-up to notify the user that the fax job has been stored and is ready for retrieval. The user
then accesses the file server to retrieve the stored forwarded fax document.
The System Administrator specifies the file format type to use for the fax job, the supported types are:
• Image only PDF
• Searchable PDF
• Multiple page TIFF
• Image only XPS
• Searchable XPS
The feature can also be set-up to print a copy of the fax at the device prior to forwarding.
If the forwarded fax job fails to reach its destination, the device can be set-up to print a copy of the
received document or notify the user the job has failed.
Xerox WorkCentre 5735/5740/5745/5755/5765/5775/5790
Fax
109
Receiving a Fax
110
Xerox WorkCentre 5735/5740/5745/5755/5765/5775/5790
Fax
Version 1.0
12/09
®
Xerox WorkCentre
5735/5740/5745/5755/5765/5775/
5790
Workflow Scanning
©2009 Xerox Corporation. All Rights Reserved. Unpublished rights reserved under the copyright laws of the United States. Contents
of this publication may not be reproduced in any form without permission of Xerox Corporation.
Xerox®and the sphere of connectivity design are trademarks of Xerox Corporation in the United States and/or other countries.
Copyright protection claimed includes all forms of matters of copyrightable materials and information now allowed by statutory or
judicial law or hereinafter granted, including without limitation, material generated from the software programs which are displayed
on the screen such as styles, templates, icons, screen displays, looks, etc.
Changes are periodically made to this document. Changes, technical inaccuracies, and typographic errors will be corrected in
subsequent editions.
Document Version 1.0: December 2009
112
Xerox WorkCentre 5735/5740/5745/5755/5765/5775/5790
Workflow Scanning
Table of Contents
Introduction . . . . . . . . . . . . . . . . . . . . . . . . . . . . . . . . . . . . . . . . . . . . . . . . . . . . . . . . . . . . . . . . . . . . . . . . . . . 114
Repositories . . . . . . . . . . . . . . . . . . . . . . . . . . . . . . . . . . . . . . . . . . . . . . . . . . . . . . . . . . . . . . . . . . . . . . . 114
Templates . . . . . . . . . . . . . . . . . . . . . . . . . . . . . . . . . . . . . . . . . . . . . . . . . . . . . . . . . . . . . . . . . . . . . . . . . 114
Workflow Scanning Options . . . . . . . . . . . . . . . . . . . . . . . . . . . . . . . . . . . . . . . . . . . . . . . . . . . . . . . . . . . . 115
Selecting a Template . . . . . . . . . . . . . . . . . . . . . . . . . . . . . . . . . . . . . . . . . . . . . . . . . . . . . . . . . . . . . . . 116
Output Color . . . . . . . . . . . . . . . . . . . . . . . . . . . . . . . . . . . . . . . . . . . . . . . . . . . . . . . . . . . . . . . . . . . . . . . 117
2-Sided Scanning . . . . . . . . . . . . . . . . . . . . . . . . . . . . . . . . . . . . . . . . . . . . . . . . . . . . . . . . . . . . . . . . . . 117
Original Type . . . . . . . . . . . . . . . . . . . . . . . . . . . . . . . . . . . . . . . . . . . . . . . . . . . . . . . . . . . . . . . . . . . . . . 117
Scan Presets . . . . . . . . . . . . . . . . . . . . . . . . . . . . . . . . . . . . . . . . . . . . . . . . . . . . . . . . . . . . . . . . . . . . . . . 118
Advanced Settings . . . . . . . . . . . . . . . . . . . . . . . . . . . . . . . . . . . . . . . . . . . . . . . . . . . . . . . . . . . . . . . . . . . . . 119
Image Options . . . . . . . . . . . . . . . . . . . . . . . . . . . . . . . . . . . . . . . . . . . . . . . . . . . . . . . . . . . . . . . . . . . . . 119
Image Enhancement . . . . . . . . . . . . . . . . . . . . . . . . . . . . . . . . . . . . . . . . . . . . . . . . . . . . . . . . . . . . . . . 119
Resolution . . . . . . . . . . . . . . . . . . . . . . . . . . . . . . . . . . . . . . . . . . . . . . . . . . . . . . . . . . . . . . . . . . . . . . . . . 120
Quality / File Size . . . . . . . . . . . . . . . . . . . . . . . . . . . . . . . . . . . . . . . . . . . . . . . . . . . . . . . . . . . . . . . . . . . 120
Update Templates . . . . . . . . . . . . . . . . . . . . . . . . . . . . . . . . . . . . . . . . . . . . . . . . . . . . . . . . . . . . . . . . . 121
Layout Adjustment . . . . . . . . . . . . . . . . . . . . . . . . . . . . . . . . . . . . . . . . . . . . . . . . . . . . . . . . . . . . . . . . . . . . 122
Original Orientation . . . . . . . . . . . . . . . . . . . . . . . . . . . . . . . . . . . . . . . . . . . . . . . . . . . . . . . . . . . . . . . . 122
Original Size . . . . . . . . . . . . . . . . . . . . . . . . . . . . . . . . . . . . . . . . . . . . . . . . . . . . . . . . . . . . . . . . . . . . . . . 122
Edge Erase . . . . . . . . . . . . . . . . . . . . . . . . . . . . . . . . . . . . . . . . . . . . . . . . . . . . . . . . . . . . . . . . . . . . . . . . 123
Filing Options . . . . . . . . . . . . . . . . . . . . . . . . . . . . . . . . . . . . . . . . . . . . . . . . . . . . . . . . . . . . . . . . . . . . . . . . . . 124
File Name . . . . . . . . . . . . . . . . . . . . . . . . . . . . . . . . . . . . . . . . . . . . . . . . . . . . . . . . . . . . . . . . . . . . . . . . . 124
File Format . . . . . . . . . . . . . . . . . . . . . . . . . . . . . . . . . . . . . . . . . . . . . . . . . . . . . . . . . . . . . . . . . . . . . . . . 124
If File Already Exists . . . . . . . . . . . . . . . . . . . . . . . . . . . . . . . . . . . . . . . . . . . . . . . . . . . . . . . . . . . . . . . . 125
Document Management . . . . . . . . . . . . . . . . . . . . . . . . . . . . . . . . . . . . . . . . . . . . . . . . . . . . . . . . . . . 125
Add File Destinations . . . . . . . . . . . . . . . . . . . . . . . . . . . . . . . . . . . . . . . . . . . . . . . . . . . . . . . . . . . . . . . 125
Job Assembly . . . . . . . . . . . . . . . . . . . . . . . . . . . . . . . . . . . . . . . . . . . . . . . . . . . . . . . . . . . . . . . . . . . . . . . . . . 126
Build Job . . . . . . . . . . . . . . . . . . . . . . . . . . . . . . . . . . . . . . . . . . . . . . . . . . . . . . . . . . . . . . . . . . . . . . . . . . 126
Creating Templates . . . . . . . . . . . . . . . . . . . . . . . . . . . . . . . . . . . . . . . . . . . . . . . . . . . . . . . . . . . . . . . . . . . . 127
New Templates . . . . . . . . . . . . . . . . . . . . . . . . . . . . . . . . . . . . . . . . . . . . . . . . . . . . . . . . . . . . . . . . . . . . 127
Modifying a Template . . . . . . . . . . . . . . . . . . . . . . . . . . . . . . . . . . . . . . . . . . . . . . . . . . . . . . . . . . . . . . 128
Copying a Template . . . . . . . . . . . . . . . . . . . . . . . . . . . . . . . . . . . . . . . . . . . . . . . . . . . . . . . . . . . . . . . . 129
Deleting a Template . . . . . . . . . . . . . . . . . . . . . . . . . . . . . . . . . . . . . . . . . . . . . . . . . . . . . . . . . . . . . . . 129
Template Options . . . . . . . . . . . . . . . . . . . . . . . . . . . . . . . . . . . . . . . . . . . . . . . . . . . . . . . . . . . . . . . . . . 129
Scan to Mailbox . . . . . . . . . . . . . . . . . . . . . . . . . . . . . . . . . . . . . . . . . . . . . . . . . . . . . . . . . . . . . . . . . . . . . . . 134
Creating a Private Folder . . . . . . . . . . . . . . . . . . . . . . . . . . . . . . . . . . . . . . . . . . . . . . . . . . . . . . . . . . . 134
Using Scan to Mailbox . . . . . . . . . . . . . . . . . . . . . . . . . . . . . . . . . . . . . . . . . . . . . . . . . . . . . . . . . . . . . 135
Scan to Home . . . . . . . . . . . . . . . . . . . . . . . . . . . . . . . . . . . . . . . . . . . . . . . . . . . . . . . . . . . . . . . . . . . . . . . . . 137
Using Scan to Home . . . . . . . . . . . . . . . . . . . . . . . . . . . . . . . . . . . . . . . . . . . . . . . . . . . . . . . . . . . . . . . 137
Xerox WorkCentre 5735/5740/5745/5755/5765/5775/5790
Workflow Scanning
113
Introduction
Introduction
Workflow Scanning enables the creation of an electronic
image file by scanning an original hard copy document.
Use Workflow Scanning when both your device and your
computer have access to the same specified filing location.
The scanned file is placed in a network filing location
known as a repository, as specified by the template
selected on the device.
The standard Workflow Scanning option enables the electronic images to be stored and retrieved from
a server or workstation on the network. Two further options are available:
• Scan to Mailbox will store the image on the device hard disk and the user can retrieve the files
using Internet Services. For further information, refer to Scan to Mailbox on page 134.
• Scan to Home allows the user to send the files to a location on the network specified as their
Home destination. For further information, refer to Scan to Home on page 137.
Workflow Scanning is set up by a System Administrator using Internet Services. Users can use Internet
Services to create templates and folders once the relevant scanning function has been set up and
enabled.
Repositories
Repositories are directories or filing locations setup on a server, where your scanned files are saved to
and held. The Repositories are set up using Internet Services. Before you can use Workflow Scanning,
your System Administrator must set up the repositories available to your device. Selecting a template
identifies the repository / location your scanned job is filed to. Repositories are validated by Internet
Services when defined by the System Administrator as a scanning destination. Up to 5 Repositories (1
default and 4 additional) can be defined. After the Repositories are setup, they are available to you as
choices when modifying templates.
Templates
Templates are used for scanning and faxing jobs at your device via the Workflow Scanning service.
They define the parameters of your scan or fax job. Information such as the final destination of your
job (the repository) and the image quality settings are defined within the template, along with the
template name. The template name is displayed within the template list, accessed on the device touch
screen.
You can select an existing template 'as is' or use Internet Services to create a brand new one or modify
an existing one. To successfully complete a Workflow Scanning job you must select a template from the
device touch screen.
Template operations can either be performed using Internet Services, or FreeFlow™ SMARTsend™. For
information about FreeFlow™ SMARTsend™ templates refer to the FreeFlow™ SMARTsend™ User
Guide. This guide is included with the FreeFlow™ software documentation that accompanied your
device.
114
Xerox WorkCentre 5735/5740/5745/5755/5765/5775/5790
Workflow Scanning
Workflow Scanning Options
Workflow Scanning Options
1.
2.
To select the Workflow Scanning service, press the
Services Home button.
Select the Workflow Scanning option. Additional
options and features are displayed.
Most feature screens include the following buttons to
confirm or cancel your choices.
• Undo resets the current screen to the values that
were displayed when the screen was opened.
• Cancel resets the screen and returns to the previous screen.
• Save saves the selections made and returns to the previous screen.
• Close closes the screen and returns to the previous screen.
If an option is not required, use the Off option to disable a feature.
If Authentication or Accounting has been enabled on your device you may have to enter log in details
to access the features. Refer to Log In / Out on page 25 of Getting Started.
Workflow Scanning allows the user to scan a hard copy original and convert it into an electronic file.
The file is placed into a specified filing location on a networked server, workstation or the device hard
drive. The settings used for scanning the original are stored in a template.
Using Workflow Scanning
1.
2.
3.
4.
5.
Load your documents face up in the document feeder input tray. Adjust the guide to touch the
documents.
Or...........
Lift up the document feeder. Place the document face down onto the document glass and register
it to the arrow at the top right rear corner. Close the document feeder.
Press the Clear All (AC) button once to cancel any previous screen programing selections.
Press the Services Home button and select the
Workflow Scanning option. The Workflow Scanning
features are displayed.
Select a Template for the job from the templates
displayed in the list.
All the current settings are changed to the settings in
the template.
Select the required features for your scanning job
using the touch screen.
Xerox WorkCentre 5735/5740/5745/5755/5765/5775/5790
Workflow Scanning
115
Workflow Scanning Options
If required, modify the template settings from the options on the Workflow Scanning, Advanced
Settings, Layout Adjustment and Filing Options tabs:
Output Color is used to replicate the original colors or to change the output to black and white,
grayscale or color.
Note: This feature may not be available on your device.
2-Sided Scanning is used to select whether your originals are 1-sided or 2-sided. The second side
can be rotated.
Original Type is used to define the original document as text, text and photo, or photo.
Scan Presets is used to set the scan settings to suit how the scanned image will be used.
6.
Press Start to scan the originals and process the Workflow Scanning job. Remove the originals
from the document feeder or document glass when scanning has completed. The Workflow
Scanning job enters the job list ready for filing. The scanned images are then filed to the location
specified on the template ready for retrieval by the user.
Selecting a Template
To use a template, select the template required from the
Template Destinations list. To ensure the latest templates
are available, select Update Templates from the Advanced
Settings tab. Use the scroll bar to access templates not
shown in the list. There are several types of template
available:
• Default Template this is the template supplied with
your device software and is always available at the top
of the list. Once your System Administrator has set up the file repository they define the
parameters of the Default template. Any user can select the Default template, make the
programing selections required for their individual job and scan their originals.
• Local Public or Private Templates are created using Internet Services. Users can create a new
template, delete an existing template or copy and then modify an existing template.
• Network Templates are advanced network scanning templates and workflows which have been
created using optional scanning applications.
• Home Template this is the Scan to Home template and is available if you have entered your
authentication log in details into the device. Images are scanned to a destination specific to the
logged in user.
• Public/Private Mailbox Templates enable users to scan images to public or private mailboxes
which have been setup on the device using Internet Services. You must give the mailbox folder a
name and private mailboxes may also require a secure password.
116
Xerox WorkCentre 5735/5740/5745/5755/5765/5775/5790
Workflow Scanning
Workflow Scanning Options
Output Color
Select the Auto Detect option in Output Color to automatically detect and match the color of your
original and produce black and white, grayscale or color output from your original. The options are:
• Auto Detect to select output that matches your original.
• Black & White to select black and white output regardless of the color of your original.
• Grayscale to use gray scales instead of color.
• Color to select color output from your original.
Note: This feature may not be available on your device.
2-Sided Scanning
The 2-Sided Scanning option allows you to set whether 1 or 2 sides of your original document are
scanned. The options are:
• 1-Sided is used if your original documents are single-sided.
• 2-Sided is used if your original documents are double-sided. The document feeder must be used to
scan your originals with this option.
• 2-Sided, Rotate Side 2 select if your original opens up like a calendar. The document feeder must
be used to scan your originals with this option.
Original Type
Use this option to define the type of original being used for scanning. Making the correct selection
enhances the quality of your output image. The options are:
• Photo & Text is recommended for originals containing high quality photographs and halftones.
Using this setting the scanned image will contain high quality pictures though the sharpness of
text and line art is slightly reduced.
• Text produces sharper edges and is recommended for text and line art.
• Photo is used specifically for originals containing photos or continuous tones without any text or
line art. Produces the best quality for photos but reduced quality text and line art.
Xerox WorkCentre 5735/5740/5745/5755/5765/5775/5790
Workflow Scanning
117
Workflow Scanning Options
Scan Presets
Use Scan Presets to optimize scan settings to match the intended purpose of the scanned documents.
The options are:
• Sharing & Printing is used for sharing files that are going to be viewed on-screen and for printing
most standard business documents. This setting results in a small file size and normal image
quality.
• Archival - Small File Size is best for standard business documents that are stored electronically for
record keeping purposes. This setting results in the smallest file sizes and normal image quality.
• Simple Scan is used for faster processing but may result in excessively large file sizes. Using this
setting applies only minimal image processing and compression.
• OCR is best for documents that are going to be processed by Optical Character Recognition (OCR)
software. This setting results in large file sizes and the highest image quality.
• High Quality Printing is best for business documents containing detailed graphics and photos.
This setting results in large file sizes and the highest image quality.
• More... is used to access all the Scan Presets options available. If using this option, select Save to
save your selections and exit.
118
Xerox WorkCentre 5735/5740/5745/5755/5765/5775/5790
Workflow Scanning
Advanced Settings
Advanced Settings
The Advanced Settings provide access to the features
which enhance the image quality or output quality. To
access the Advanced Settings, select Services Home and
Workflow Scanning. Then select the Advanced Settings
tab.
Image Options
Select Image Options to adjust the lightness and darkness of the image, and to sharpen the image.
The options are:
• Lighten/Darken provides a manual control to adjust
the lightness or darkness of the scanned images.
• Move the indicator down to darken the scanned
image, for light originals such as pencil images.
• Move the indicator up to lighten the scanned
image, for dark originals such as halftones or
originals with colored backgrounds.
• Sharpness provides manual control to adjust the
sharpness of the scanned images.
• Move the indicator up to sharpen the scanned image.
• Move the indicator down to soften the scanned image.
Select Save to save your selections and exit.
Image Enhancement
Select Image Enhancement to reduce background and
adjust the image contrast. The options are:
• Background Suppression enhances originals that
have colored backgrounds, by reducing or eliminating
the background from your original. This option is
useful when your original is on colored paper.
• Select Auto Suppression to automatically
suppress unwanted background.
• Select Off to turn the Background Suppression feature off, particularly when:
• The Darken adjustment does not produce a satisfactory output from light originals.
• The original has a gray or colored border, such as a certificate.
• You want to bring out fine detail that was lost due to a dark edge when using bound
originals.
Xerox WorkCentre 5735/5740/5745/5755/5765/5775/5790
Workflow Scanning
119
Advanced Settings
•
Contrast controls the image density on the output and compensates for an original that has too
much or too little contrast on the image.
• Move the indicator up to reproduce more vivid blacks and whites for sharper text and lines
but less detail in pictures.
• Move the indicator down to reproduce more detail in light and dark areas of the original.
Select Save to save your selections and exit.
Resolution
The Resolution affects the appearance of the scanned
image. A higher resolution produces a better quality image.
A lower resolution reduces communication time when
sending the file over the network. The options are:
• 72 dpi recommended for output displayed on a
computer. It produces the smallest file size.
• 100 dpi recommended for output that delivers low
quality text documents.
• 150 dpi recommended for average quality text documents and line art. Does not produce the best
image quality for photos and graphics.
• 200 dpi recommended for average quality text documents and line art. Does not produce the best
image quality for photos and graphics.
• 300 dpi recommended for high quality text documents that are to pass through OCR applications.
Also recommended for high quality line art or medium quality photos and graphics. This is the
default resolution and the best choice in most cases.
• 400 dpi recommended for photos and graphics. It produces average image quality for photos and
graphics.
• 600 dpi recommended for high quality photos and graphics. It produces the largest image file
size, but delivers the best image quality.
Select Save to save your selections and exit.
Quality / File Size
The Quality / File Size settings allow you to choose
between scan image quality and file size. These settings
allow you to deliver the highest quality or make smaller
files. A small file size delivers slightly reduced image quality
but is better when sharing the file over a network. A larger
file size delivers improved image quality but requires more
time when transmitting over the network. The options are:
• Normal/Small produces small files by using advanced
compression techniques. Image quality is acceptable but some quality degradation and character
substitution errors may occur with some originals.
• Higher/Larger produces larger files with better image quality.
120
Xerox WorkCentre 5735/5740/5745/5755/5765/5775/5790
Workflow Scanning
Advanced Settings
•
Highest/Largest produces the largest files with the maximum image quality. Large files are not
ideal for sharing and transmitting over the network.
Select Save to save your selections and exit.
Note: If you change the Quality / File Size option you may affect the settings in the Scan Presets
options on the Workflow Scanning tab.
Update Templates
The Update Templates feature retrieves new or updated
templates or workflows and removes outdated items from
the list.
1.
2.
3.
Select Update Template List to retrieve updated
template information immediately.
Select the Update List option to confirm an update is
required.
Select Close.
Note: Selecting this option may cause a delay and the Workflow Scanning service will be
unavailable for several minutes. The delay does not affect the other services available on the
device.
Xerox WorkCentre 5735/5740/5745/5755/5765/5775/5790
Workflow Scanning
121
Layout Adjustment
Layout Adjustment
The Layout Adjustment options allow you to manipulate
the scanned image and enhance the appearance and style
of your output. To access the Layout Adjustment options,
select Services Home and Workflow Scanning. Then select
the Layout Adjustment tab.
Original Orientation
Use to specify the orientation of the originals being scanned. The orientation of the images on the
originals must match the orientation selected. The device uses this information to identify if the
images require rotating to produce the required output.
• Upright Images the images on the originals are in a
portrait orientation. A graphical representation of the
image orientation is shown when the option is
selected.
• Sideways Images the images on the originals are in a
landscape orientation. A graphical representation of
the image orientation is shown when the option is
selected.
Select Save to save your selections and exit.
Original Size
Original Size allows you to specify automatic size detection of the originals, mixed size originals, or the
specific size of the image to be scanned. The options are:
• Auto Detect is the default setting and enables automatic size sensing. The size detected is
matched to a standard size paper.
• Preset Scan Areas allows you to define the size of your original from a list of pre-set, standard
original sizes. You can view the list by using the scroll bar.
• Custom Scan Areas is used to enter a specific area for
scanning. Measure the area to be scanned on the
original and enter the X and Y axis measurements into
the fields provided. Only the area specified is scanned.
• Mixed Size Originals allows you scan documents
containing different size pages. The pages must be the
same width, like A4 LEF and A3 SEF (8.5x11” LEF and
11x17” SEF), other combinations are shown on the
screen.
Select Save to save your selections and exit.
122
Xerox WorkCentre 5735/5740/5745/5755/5765/5775/5790
Workflow Scanning
Layout Adjustment
Edge Erase
Edge Erase enables you to specify how much of the image to erase around the edges of your
document. For example, you can remove the marks caused by punched holes or staples in your original.
The options are:
• All Edges is used to erase an equal amount from all
the edges. Use the arrow buttons to adjust the
amount to be erased from 1 mm to 50 mm (0.1” to
2.0”). All marks or defects within the measurement set
are deleted.
• Individual Edges enables an individual amount to be
erased from each of the edges, on both the first and
second sides.
Use the arrow buttons to adjust the amount for each edge, from 1 mm to 50 mm (0.1” to 2.0”).
• Scan to Edge use this option to scan to the edge of the image.
Select Save to save your selections and exit.
Xerox WorkCentre 5735/5740/5745/5755/5765/5775/5790
Workflow Scanning
123
Filing Options
Filing Options
Use the filing options to specify details about the scanned
images to be stored, for example the file name, the file
format and the overwrite conditions. To access the Filing
Options, select Services Home and Workflow Scanning.
Then select the Filing Options tab.
File Name
This feature enables you to name the file that is stored.
1.
2.
Using the keyboard, enter the name of the file.
• Up to 50 alphanumeric characters can be entered.
• To delete a character use the backspace key, or to clear the entire entry select the X button.
• Use the Keyboards... button to access additional language keyboards.
Select Save to save your selections and exit.
File Format
The File Format determines the type of file created and can
be temporarily changed for the current job. You can select
the file format you wish to use for your scanned image.
• TIFF (Tagged Image File Format) produces a graphic
file that can be opened by a variety of graphic
software packages across a variety of computer
platforms. A separate file is produced for each image
scanned.
• Multi-Page TIFF produces a single TIFF file containing several pages of scanned images. A more
specialized software is required to open this type of file format.
• PDF (Portable Document Format) allows recipients with the right software to view, print or edit
the electronic file, no matter what their computer platform.
Note: Depending on the receiving device, the PDF selection may not be compatible when the
resolution is set to 200 dpi.
•
•
PDF/A is an industry standard format for long term document preservation based on the PDF
format. The Advanced Settings may need checking to ensure they are appropriate for extended
use.
XPS (XML Paper Specification) given the right software the recipient of the scanned image can
view, print or edit the file, no matter what their computer platform.
Select Save to save your selections and exit.
124
Xerox WorkCentre 5735/5740/5745/5755/5765/5775/5790
Workflow Scanning
Filing Options
If File Already Exists
This option is used to determine how the device handles
duplicate filenames.
• Rename New File use this option when you want the
device to name the new file (or folder) with a unique
name.
• Add Date To Name this option appends a date and
time stamp to the filename.
• Append to Existing File use this option to add the
newly created scanned image file to an existing document with the same name as the document
being scanned.
Note: This option is not available with Multi-Page Tiff and PDF file format options.
•
•
Overwrite Existing File the new file overwrites the existing file with the same name.
Do Not Save the scanned images are not saved if a file with the same name exists.
Select Save to save your selections and exit.
Document Management
The Document Management feature enables users to
assign descriptive data to a scanned job. The descriptive
data can be accessed by other software applications to
assist in searching, indexing and the automated processing
of scanned documents.
The Document Management data requirements are
individually defined and programmed within the workflow
scanning template.
The Document Management data fields can be either mandatory or optional. If the data is
mandatory, the user is prompted to enter the data before scanning is allowed. Once the required data
is entered, the user can commence scanning the job. If the data is optional, the user is prompted to
enter the data, but can complete the job without the data if required.
Add File Destinations
This option allows you to select additional network locations as filing destinations for your scanned
documents. These additional filing destinations must be set up by the System Administrator using
Internet Services.
1.
2.
3.
Select the destination required from the list.
To view information about the destination, select View Details.
Select Save to save your selections and exit.
The destination filing path and information is displayed.
Xerox WorkCentre 5735/5740/5745/5755/5765/5775/5790
Workflow Scanning
125
Job Assembly
Job Assembly
This tab provides access to the Build Job feature for
compiling jobs which have different originals or programing
requirements within a job. To access the Job Assembly
options, select Services Home and Workflow Scanning.
Then select the Job Assembly tab.
Build Job
Use this feature to build a job that requires
different settings for each page, or a segment of
pages.
You can select the appropriate settings to be
applied to individual pages or segments of a
completed job. First split the originals into
sections for individual programing.
1.
2.
3.
4.
5.
6.
7.
8.
9.
126
Some pages
with text and
some with
photos
Some pages Various
2 sided and sized
some 1 sided originals
More than
100 pages
Select Build Job on the Job Assembly tab.
Switch on Build Job by selecting the On button and
select Save.
Select the options required for the first segment of the
job.
Load the first segment originals and press Start.
Remove the first segment originals. The Build Job
screen displays the first segment in the list.
Delete All Segments deletes the current Build Job and
returns you to the main Build Job screen.
Select the options required for the second segment.
Load the second segment originals and press Start.
Repeat these steps until all segments of your job have been programmed and scanned.
After the last segment has been scanned, select End Build Job to indicate you have finished
scanning and the job can be processed and completed.
Xerox WorkCentre 5735/5740/5745/5755/5765/5775/5790
Workflow Scanning
Creating Templates
Creating Templates
Templates can be created, modified and deleted using the Internet Services option on your device.
Template operations can only be performed once your System Administrator has defined the
repositories and the Default template. This operation is performed within Internet Services. To access
Internet Services:
1.
2.
3.
Open the web browser from your Workstation.
In the URL field, enter http:// followed
by the IP Address of the device. For
example: If the IP Address is
192.168.100.100, enter the following
into the URL field:
http://192.168.100.100.
Press Enter to view the Home page.
The Internet Services options for your device are displayed.
Note: To find out the IP Address of your device, print a configuration report. For instructions, refer
to Print Reports on page 236 of Machine and Job Status.
New Templates
1.
To create a new template, select the
Scan option and select Create New
Template.
Note: A New Distribution Template
General Information window is
displayed.
2.
3.
4.
Enter the name that you want to
appear as the template name on the
device.
Complete the Description and Owner
fields, if required.
Select the Add Destination to
Template options required:
• Select from a Predefined List is
selected if the file destination
required is available in the drop-down menu.
• Enter a Scan Destination is selected if you need to enter a new file destination for the
scanned images.
• Enter a Server Fax Number use this option to enter a telephone number if the images are to
be sent to a server fax.
• File Destination select the file destination required from the drop-down menu.
• Friendly Name use to enter an appropriate name for the file destination.
Xerox WorkCentre 5735/5740/5745/5755/5765/5775/5790
Workflow Scanning
127
Creating Templates
•
•
•
•
5.
Protocol, IP Address and Port if entering a new destination for the scanned images, select
the protocol type and enter the address details.
Document Path use to specify a path to the destination selected, if required.
Filing Policy use this option to determine how the device handles duplicate filenames.
• Rename New File use this option when you want the device to name the new file (or
folder) with a unique name.
• Append to Existing File use this option to add the newly created scanned image file to
an existing document with the same name as the document being scanned.
• This option is not available with Multi-Page Tiff and PDF file format options.
• Overwrite Existing File the new file overwrites the existing file with the same name.
• Do Not Save the scanned images are not saved if a file with the same name exists.
• Add Date To Name this option appends a date and time stamp to the filename.
Login Name or Login Credentials are used to enter any login details the device requires to
access the file destination.
Select the Add button to create the
template.
The new template name is added to
the list on the left of the screen. The
new template is populated with the
same settings as the Default
template.
You can now modify the settings as
required.
Modifying a Template
Existing templates can be modified using Internet Services.
1.
2.
3.
4.
128
To modify a template, select the
Internet Services Scan option.
Select the required template from the
list on the left of the screen.
The template settings are displayed.
Refer to Template Options on
page 129 for information about the
available settings.
Select Edit to change the options
required.
Select Apply to save the selections
and exit.
Xerox WorkCentre 5735/5740/5745/5755/5765/5775/5790
Workflow Scanning
Creating Templates
Copying a Template
A template can be copied and used as a base for a new template using Internet Services.
1.
2.
3.
4.
5.
6.
To copy a template, select the
Internet Services Scan option.
Select the required template from the
list on the left of the screen.
Select the Copy button.
Enter the new template name and the
template description and owner if
required.
If the name is not changed, “Copy” is
appended to the template name.
Select Add.
An exact copy of the original template is displayed with the new name.
Select the copied template and make any changes required.
Deleting a Template
Templates can be deleted using Internet Services.
1.
2.
3.
To delete a template, select the
Internet Services Scan option.
Select the required template from the
list on the left of the screen.
Select the Delete button.
The template is deleted from the list
on the left of the screen.
Note: The Default template cannot be deleted.
Template Options
Destination Services
This option is used to select whether the
template is for filing and/or faxing.
• File is selected if you only require your
originals to be scanned and stored in
the designated filing location.
• Fax is selected if you also require your scanned images to be faxed to a remote fax destination. If
this is selected the fax destination must also be entered.
Xerox WorkCentre 5735/5740/5745/5755/5765/5775/5790
Workflow Scanning
129
Creating Templates
File
This option is used to select the filing location required for your scanned images.
A default filing destination is always available. If additional locations have been defined by the System
Administrator, these can also be added to the template.
1.
2.
3.
130
To add a new destination, select Add.
The Filing Destination options are
displayed.
Select the destination options
required:
• Select from a Predefined List is
selected if the file destination
required is available in the dropdown menu.
• Enter a Scan Destination is
selected if you need to enter a
new file destination for the
scanned images.
• Enter a Server Fax Number use this option to enter a telephone number if the images are to
be sent to a server fax.
• File Destination select the file destination required from the drop-down menu.
• Friendly Name use to enter an appropriate name for the file destination.
• Protocol, IP Address and Port if entering a new destination for the scanned images, select
the protocol type and enter the address details.
• Document Path use to specify a path to the destination selected, if required.
• Filing Policy use this option to determine how the device handles duplicate filenames.
• Rename New File use this option when you want the device to name the new file (or
folder) with a unique name.
• Append to Existing File use this option to add the newly created scanned image file to
an existing document with the same name as the document being scanned.
• This option is not available with Multi-Page Tiff and PDF file format options.
• Overwrite Existing File the new file overwrites the existing file with the same name.
• Do Not Save the scanned images are not saved if a file with the same name exists.
• Add Date To Name this option appends a date and time stamp to the filename.
• Login Name or Login Credentials are used to enter any login details the device requires to
access the file destination.
Select Apply to add the new destination and exit the screen. The destination is listed.
Xerox WorkCentre 5735/5740/5745/5755/5765/5775/5790
Workflow Scanning
Creating Templates
Document Management Fields
This option enables users to assign
descriptive data to a scanned job.The
descriptive data can be accessed by other
software applications to assist in
searching, indexing and the automated
processing of scanned documents.
1.
2.
3.
4.
To add a field, select Add and enter
the data required.
Select Editable if the user is required
to enter data at the time of scanning.
Select Not Editable to include fixed data.
Enter a field label and a default value if required. If user input is required select User Input
Required. Select Mask User Input if the data entered is confidential, such as a passcode. If details
of the entry must be added to the log, select Record User Input to Job Log.
Select Apply to save the field entry.
Workflow Scanning
These options are used to set the basic options for a job. The options are:
• Output Color use to automatically
detect and match the color of your
original or produce black and white,
grayscale or color output from your
original.
Note: This feature may not be
available on your device.
•
•
•
•
2-Sided Scanning allows you to set whether 1 or 2 sides of your original document will be scanned
and then filed.
Content Type is used to define the type of original being used for scanning.
How Original was Produced is used to select the production method of the original.
Scan Presets are used to optimize scan settings to match the intended purpose of the scanned
documents.
Xerox WorkCentre 5735/5740/5745/5755/5765/5775/5790
Workflow Scanning
131
Creating Templates
Advanced Settings
These settings provide advanced scanning options used to adjust image quality, select the file size and
enhance the image.
The following options are available:
• Image Options are used to adjust the
image quality applied to the scanned
document.
• Image Enhancement is used to
select an image quality setting
appropriate for your originals.
• Resolution is used to define the
resolution to use for scanning the original. The higher the scanning resolution, the better the
image quality, although a larger image file is created.
• Build Job allows you to build a job that requires different settings for each page, or a segment of
pages or has more originals that can be scanned in the document feeder at one time.
• Quality / File Size allows you to choose between scan image quality and file size. These settings
allow you to deliver the highest quality or make smaller files. A small file size delivers slightly
reduced image quality but is better when sharing the file over a network. A larger file size delivers
improved image quality but requires more time when transmitting over the network.
Select Edit to change the options. Select Apply to save the selections and exit.
Layout Adjustment
These options allow you to manipulate the scanned image and enhance the appearance and style of
your filed image.
The following options are available:
• Original Orientation is used to
specify the orientation of the originals
being scanned.
• Original Size is used to enter the size
of your document when scanning
from the document glass or the
document feeder. Your device uses
this information to calculate the size
of your original and the scanned
image.
• Edge Erase is used to erase spots,
unwanted lines, marks and punched
holes that appear on your original but
are not required on the scanned
image.
132
Xerox WorkCentre 5735/5740/5745/5755/5765/5775/5790
Workflow Scanning
Creating Templates
Filing Options
These options are used to specify the document name and file format used to store the scanned
images. The following options are available:
• Document Name enables you to name the file that will be stored.
• File Format determines the type of file created and can be temporarily changed for the current
job.
Report Options
These options are used to enable the confirmation sheet and job log.
• Confirmation Sheet provides information about the success of the scanning job and prints at the
device when the job has completed.
• Job Log allows you to print a list of the last jobs that the system has completed processing.
Workflow Scanning Image Settings
These settings are used to set the image optimization, the searchable options and the compression
settings. The following options are available:
• Optimized for Fast Web Viewing these options are used to set the device to optimize the image
file for viewing on a website.
• Searchable Options are used to select if the file content is searchable, and the language options
required.
• Text Compression allows you to enable the text to be compressed if the file format output is PDF
or PDF/A.
Compression Capability
Use to choose PDF compression for the media type that is most frequently sent to your Xerox device.
The device is capable of optimizing for mixed text and images, or for uniform text or images.
• CCITT Group 4 (G4 MMR) provides lossless compression. This format is widely supported, but
some document types may not compress significantly.
• JBIG2 this compression is usually used for text and halftone documents. This compression format
requires Acrobat 5 with PDF version 1.4 or greater.
• Flate Compression used for bi-level or color images, or for general data. It is a lossless
compression format that combines LZ77 and adaptive Huffman encoding (RFC 1951).
• MRC Compression enables you to customize the compression that will be applied to images that
contain Mixed Raster Content.
Xerox WorkCentre 5735/5740/5745/5755/5765/5775/5790
Workflow Scanning
133
Scan to Mailbox
Scan to Mailbox
Scan to Mailbox allows you to scan hard
copy originals and store them on the
device for later retrieval. To use Scan to
Mailbox you can use a default public folder
or create a private folder using Internet
Services. If creating a private folder, you
must enter folder a name and may be
required to enter a secure password.
The default public folder and any private
folders which have been setup are
displayed on the device under the
templates list. To store images in a folder,
select the folder required and scan your
images. If a private folder is selected, a password may be requested.
The scanned images can then be retrieved at your PC by accessing Internet Services and selecting the
folder required. If a private folder is selected, a password may be required. You can then print your
scanned documents or download them to your PC.
The Workflow Scanning option needs to be installed before this feature can be used but it is NOT
necessary for the Workflow Scanning repositories and templates to be configured.
Creating a Private Folder
To create a private folder:
1.
2.
3.
Open the web browser from your Workstation.
In the URL field, enter http:// followed
by the IP Address of the device. For
example: If the IP Address is
192.168.100.100, enter the following
into the URL field:
http://192.168.100.100.
Press Enter to view the Home page.
The Internet Services options for your device are displayed.
Note: To find out the IP Address of your device, print a configuration report. For instructions, refer
to Print Reports on page 236 of Machine and Job Status.
4.
134
Select Scan and select Mailboxes
from the display options.
The Scan to Mailbox options are
displayed.
Xerox WorkCentre 5735/5740/5745/5755/5765/5775/5790
Workflow Scanning
Scan to Mailbox
5.
6.
7.
8.
Select Create Folder and enter the folder name, a password and password confirmation (if
required).
Select Apply.
The new folder is created and is displayed in the folder list.
To access the private folder and customize the options, select the folder. If required, enter the
folder password.
Select Personalize Settings to customize the scanning selections using the Edit option. Select
Apply after customizing each option.
When you have finished customizing your scanning options, select Back to return to the Folder
Contents screen.
To change your folder password or delete the folder, use the Modify Folder option.
Your private folder is now set up and will display in the templates list when Workflow Scanning is
selected on the device.
Using Scan to Mailbox
1.
2.
3.
4.
5.
6.
7.
8.
Load the original documents in the document feeder
or on the document glass.
Press the Clear All (AC) button twice and then Confirm
to cancel any previous screen programing selections.
Press the Services Home button and select the
Workflow Scanning option.
The Workflow Scanning features are displayed.
Select the folder template required from the Template Destination list. If you select a private
folder, a password may be requested. Enter the folder password using the keyboard.
Make programing changes to Output Color (if available), 2-Sided Scanning, Original Type and
Scan Presets as required.
Refer to Workflow Scanning Options on page 115 for more information.
Additional Workflow Scanning options are provided on each of the tabs. Refer to the following
sections for further information:
• Advanced Settings on page 119
• Layout Adjustment on page 122
• Filing Options on page 124
• Job Assembly on page 126
Press Start to scan the originals and process the Workflow Scanning job.
Remove the originals from the document feeder or document glass when scanning has completed.
The Workflow Scanning job enters the job list ready for filing.
Select Job Status to view all the job lists and check the status of your job. For more information,
refer to Job Status on page 233 of Machine and Job Status.
The scanned images are filed in the selected folder and can be accessed using Internet Services.
Xerox WorkCentre 5735/5740/5745/5755/5765/5775/5790
Workflow Scanning
135
Scan to Mailbox
Accessing Jobs in a Mailbox
1.
To access Internet Services, open the web browser from your workstation.
In the URL field, enter http:// followed
by the IP Address of the device. For
example: If the IP Address is
192.168.100.100, enter the following
into the URL field:
http://192.168.100.100.
Press Enter to view the Home page.
The Internet Services options for your device are displayed.
Note: To find out the IP Address of your device, print a configuration report. For instructions, refer
to Print Reports on page 236 of Machine and Job Status.
2.
3.
4.
136
Select Scan and select Mailboxes from the display options.
Select the folder required. If it is a private folder, a password may be requested. Enter the folder
password and select OK.
A list of the folder contents is displayed. If necessary, use the Update View option to update the
list of contents.
Modify Settings or Modify Folder is used to update the folder settings or delete the folder from
the device.
Delete All is used to delete all the jobs from the folder.
Select the file required. The following
options are available:
• Download is used to save a copy
of the file to a specified location.
If Download is selected you will
need to select Save and specify a
file location.
• Reprint can be used to print the file on the device. The job is sent to the device immediately
and printed.
• Delete is used to permanently remove the file from the folder and from the device.
Select the option required from the drop-down menu and select Go.
Xerox WorkCentre 5735/5740/5745/5755/5765/5775/5790
Workflow Scanning
Scan to Home
Scan to Home
Scan to Home allows you to scan hard copy originals at the Xerox WorkCentre
5735/5740/5745/5755/5765/5775/5790 and send them to a destination on the network which is
specified as your "Home" destination.
You enter your Network Authentication log
in at the device. The device displays one
Scan to Home template. When you scan a
document the authentication server
provides the information as to who is
logged in at the device.
The Workflow Scanning option needs to be
installed before this feature can be used
but it is NOT necessary for the Workflow
Scanning repositories and templates to be
configured.
Your System Administrator enables the Scan to Home option in Internet Services. Your System
Administrator also needs to enable Network Authentication for this feature to be available.
Lightweight Directory Application Protocol (LDAP) connectivity may also be used.
Using Scan to Home
The Scan to Home option must be enabled and set up by the System Administrator in order for the
Scan to Home template to be available on the device. You must also be logged in on the device using
Network Authentication to use this option.
1.
2.
3.
4.
5.
6.
Load the original documents in the document feeder or on the document glass.
Press the Clear All (AC) button twice and then Confirm to cancel any previous screen programing
selections.
To log in select the Log In/Out button on the control panel.
Use the keyboard to enter your User Name, then select the Next button.
Use the keyboard to enter your Password, then select the Enter button.
Press the Services Home button and select the Workflow Scanning option.
The Workflow Scanning features are displayed.
Select the Scan To Home template from the Template
Destination list.
Xerox WorkCentre 5735/5740/5745/5755/5765/5775/5790
Workflow Scanning
137
Scan to Home
7.
8.
9.
138
Make programing changes to Output Color (if available), 2-Sided Scanning, Original Type and
Scan Presets as required.
Additional Workflow Scanning options are provided on each of the tabs. Refer to the following
sections for further information:
• Advanced Settings on page 119
• Layout Adjustment on page 122
• Filing Options on page 124
• Job Assembly on page 126
Press Start to scan the originals and process the Scan to Home job.
Remove the originals from the document feeder or document glass when scanning has completed.
The job enters the job list ready for filing to the home location specified.
Select Job Status to view all the job lists and check the status of your job. For more information,
refer to Job Status on page 233 of Machine and Job Status.
The scanned images are filed to the location specified on the template ready for retrieval by the
user.
Xerox WorkCentre 5735/5740/5745/5755/5765/5775/5790
Workflow Scanning
Version 1.0
12/09
®
Xerox WorkCentre
5735/5740/5745/5755/5765/5775/
5790
Print
©2009 Xerox Corporation. All Rights Reserved. Unpublished rights reserved under the copyright laws of the United States. Contents
of this publication may not be reproduced in any form without permission of Xerox Corporation.
Xerox®and the sphere of connectivity design are trademarks of Xerox Corporation in the United States and/or other countries.
Copyright protection claimed includes all forms of matters of copyrightable materials and information now allowed by statutory or
judicial law or hereinafter granted, including without limitation, material generated from the software programs which are displayed
on the screen such as styles, templates, icons, screen displays, looks, etc.
Changes are periodically made to this document. Changes, technical inaccuracies, and typographic errors will be corrected in
subsequent editions.
Document Version 1.0: December 2009
140
Xerox WorkCentre 5735/5740/5745/5755/5765/5775/5790
Print
Table of Contents
Introduction . . . . . . . . . . . . . . . . . . . . . . . . . . . . . . . . . . . . . . . . . . . . . . . . . . . . . . . . . . . . . . . . . . . . . . . . . . . 142
Print and Fax Drivers . . . . . . . . . . . . . . . . . . . . . . . . . . . . . . . . . . . . . . . . . . . . . . . . . . . . . . . . . . . . . . . 142
Printing a Document . . . . . . . . . . . . . . . . . . . . . . . . . . . . . . . . . . . . . . . . . . . . . . . . . . . . . . . . . . . . . . . . . . . 144
Paper/Output . . . . . . . . . . . . . . . . . . . . . . . . . . . . . . . . . . . . . . . . . . . . . . . . . . . . . . . . . . . . . . . . . . . . . . . . . . 145
Job Type . . . . . . . . . . . . . . . . . . . . . . . . . . . . . . . . . . . . . . . . . . . . . . . . . . . . . . . . . . . . . . . . . . . . . . . . . . 145
Paper . . . . . . . . . . . . . . . . . . . . . . . . . . . . . . . . . . . . . . . . . . . . . . . . . . . . . . . . . . . . . . . . . . . . . . . . . . . . . 146
2-Sided Printing . . . . . . . . . . . . . . . . . . . . . . . . . . . . . . . . . . . . . . . . . . . . . . . . . . . . . . . . . . . . . . . . . . . . 147
Finishing . . . . . . . . . . . . . . . . . . . . . . . . . . . . . . . . . . . . . . . . . . . . . . . . . . . . . . . . . . . . . . . . . . . . . . . . . . 148
Output Destination . . . . . . . . . . . . . . . . . . . . . . . . . . . . . . . . . . . . . . . . . . . . . . . . . . . . . . . . . . . . . . . . 149
Special Pages . . . . . . . . . . . . . . . . . . . . . . . . . . . . . . . . . . . . . . . . . . . . . . . . . . . . . . . . . . . . . . . . . . . . . . . . . . 150
Add Covers . . . . . . . . . . . . . . . . . . . . . . . . . . . . . . . . . . . . . . . . . . . . . . . . . . . . . . . . . . . . . . . . . . . . . . . . 150
Add Inserts . . . . . . . . . . . . . . . . . . . . . . . . . . . . . . . . . . . . . . . . . . . . . . . . . . . . . . . . . . . . . . . . . . . . . . . . 151
Add Exceptions . . . . . . . . . . . . . . . . . . . . . . . . . . . . . . . . . . . . . . . . . . . . . . . . . . . . . . . . . . . . . . . . . . . . 152
Image Options . . . . . . . . . . . . . . . . . . . . . . . . . . . . . . . . . . . . . . . . . . . . . . . . . . . . . . . . . . . . . . . . . . . . . . . . 153
Layout/Watermark . . . . . . . . . . . . . . . . . . . . . . . . . . . . . . . . . . . . . . . . . . . . . . . . . . . . . . . . . . . . . . . . . . . . . 154
Page Layout . . . . . . . . . . . . . . . . . . . . . . . . . . . . . . . . . . . . . . . . . . . . . . . . . . . . . . . . . . . . . . . . . . . . . . . 154
Watermark . . . . . . . . . . . . . . . . . . . . . . . . . . . . . . . . . . . . . . . . . . . . . . . . . . . . . . . . . . . . . . . . . . . . . . . . 156
Advanced . . . . . . . . . . . . . . . . . . . . . . . . . . . . . . . . . . . . . . . . . . . . . . . . . . . . . . . . . . . . . . . . . . . . . . . . . . . . . 157
Xerox WorkCentre 5735/5740/5745/5755/5765/5775/5790
Print
141
Introduction
Introduction
The Xerox WorkCentre 5735/5740/5745/5755/5765/5775/5790 will produce high quality prints from
your electronic documents. The advanced print features of this device will enable you to create
professionally finished documents at the click of a mouse button.
You access the printer from your PC application in
the normal way through a print driver. A print
driver converts the code contained in an electronic
document into a language that the printer can
understand. While you can use generic print drivers
on this printer they will not enable all the
features.This is why you should use the print drivers
that accompany this printer.
For instructions on using the basic Print features refer to Printing a Document on page 144.
There are numerous print drivers for this device to enable it to be used on all the popular computer
operating systems. They are provided on a disc with your device or you can download the latest
versions from the Xerox website www.xerox.com.
Instructions for installing the Xerox WorkCentre 5735/5740/5745/5755/5765/5775/5790 and print
drivers are provided in the System Administrator Guide.
Print and Fax Drivers
For Windows users there several drivers available. Your System Administrator may have loaded specific
drivers on your PC. However, if the choice of driver is yours, the following information will help you
decide which driver is most suited to your workstation.
The print drivers available for your device are PostScript, PCL, PCL6 and PPD.
• PostScript gives you greater ability to scale and manipulate images; it offers more precision with
high-end graphics. PostScript also provides you with different types of error-handling and font
substitution options.
• PCL (Printer Command Language) generally has fewer advanced features than PostScript.
However, using PCL enables you to process most jobs faster.
• PPD Driver a PostScript Printer Description (PPD) file which is a readable text file that provides a
uniform approach to specifying special features for print drivers that interpret PostScript. Xerox
provides PostScript PPDs for use with generic Windows XP / Server 2003 / Vista PostScript print
drivers.
142
Xerox WorkCentre 5735/5740/5745/5755/5765/5775/5790
Print
Introduction
You also have the option of using the Global Print Driver or the Mobile Express Driver.
• Global Print Driver this driver is available for PS, PCL or PCL6 printer description languages, the
same as the device specific drivers mentioned above. This GPD manages Xerox and non-Xerox
printers on your network with a single, easy-to-use interface. It simplifies enterprise printer
management, making it easy to add and update printers without changing drivers.
• Mobile Express Driver this driver lets you find and print to any PostScript printer in any location
from a single, easy-to-use interface, without driver downloads and installations.
Once you have decided upon the most appropriate print driver, install it on your workstation in the
usual way. If you do not know how to install drivers refer to the System Administrator Guide or consult
your System Administrator.
Note: You can load more than one print driver for the device on your workstation. Then, when you
send a job to print, you can choose the most appropriate print driver for the job.
Print and Fax Driver Information
The Help system is the primary source for information about using the print drivers. You can access the
Help system through the Help buttons in the driver. Included in the Help system are feature
descriptions, step-by-step procedures, Xerox system information, problem-solving information, and
support information.
Xerox WorkCentre 5735/5740/5745/5755/5765/5775/5790
Print
143
Printing a Document
Printing a Document
1.
2.
3.
4.
144
Ensure that the correct Xerox print driver has been installed on your PC. To install the print drivers
refer to the System Administrator Guide.
Open the document to be printed. From your application, select File > Print and select the Xerox
device from the list of printers displayed.
To change the default printing properties click Properties.
The print driver has various tabs that contain options
and properties.
• Use the Paper/Output tab to choose the type of
media, size and color and output choices such as
2-sided prints.
• The Special Pages tab allows you to add covers,
inserts and exceptions.
• The Image Options tab enables you to adjust the
image quality.
• The Layout/Watermark tab has various options
to add watermarks to pages, change image
orientation (landscape or portrait) and enable
booklet and multi-up printing.
• The Advanced tab contains various font, document and printing options.
Choose the options required for your printing job and click OK to print the document.
The print job will be sent to the device and will appear in the Active Jobs list. To view the list at the
device, press the Job Status button on the control panel.
If your job is held in the list it requires additional resources or a passcode to print. To identify the
resources required, select the job and select Required Resources. Once the resources are available
the job will print. If a passcode is required, select Release and enter the secure passcode.
Xerox WorkCentre 5735/5740/5745/5755/5765/5775/5790
Print
Paper/Output
Paper/Output
Use the Paper/Output tab to select the basic printing
requirements for your job. Identify the type of job
being submitted, the paper, sides printed, finishing and
quality requirements.
Note: Some features are only supported by specific
printer configurations, operating systems, or driver
types. You may see more features or options listed
than your specific device supports.
Job Type
Use this option to select the type of job being submitted to the printer.
• Normal Print prints the job immediately without requiring a passcode.
• Secure Print is used for confidential or sensitive jobs. The job is
held at the device until a passcode is entered to release the job
for printing.
When you select this job type, the Secure Print screen is
displayed for you to enter a unique passcode.
When the job arrives at the printer it is held in the job list until
you release the job using the same passcode entered when the
job was submitted.
Note: If multiple secure jobs are held in the list and require the
same secure code, they will all be released for printing.
•
•
Sample Set prints one copy of the job as a sample and holds
the remaining copies in the job list at the printer.
Once you have checked the sample set you can release the remaining sets for printing, or delete
the job if no longer required.
Delay Print use this option to enter a specific time to print the
job. This is useful for large jobs or if you want all your jobs to
print at the same time. When you select this job type, the Delay
Print screen is displayed.
Enter the time required and submit the job. The job remains in
the job list until the specified time for printing.
Xerox WorkCentre 5735/5740/5745/5755/5765/5775/5790
Print
145
Paper/Output
•
Saved Job stores the job on the printer's hard drive so that it
can then be printed on demand when required or printed from
Internet Services.
The job is assigned a name and Save only or Save and Print
can be selected. The Folder for storing the job is also specified.
This determines whether the job is available to other users or in
a private folder.
If the job requires a passcode, select Secure Saved Job and
enter the passcode required. This passcode is required to print
the job.
Note: To save jobs on the printer, Job Storage must be enabled in the Installable Options screen.
•
Fax use this option to send the current job as a Fax from PC job.
The job is sent from the PC to the printer over the network, then
faxed over a telephone line to the specified fax destination.
When you select this job type, the Fax screen is displayed so
you can specify the fax recipients and specify other fax settings.
For more information, refer to Fax from PC on page 101 of Fax.
Note: To fax your job, the fax option must be installed on your
printer and fax must be enabled in the Installable Options
screen.
Paper
This option displays information about the paper to use for the print
job, such as size and type.
To change the paper to use for printing, select the Paper drop-down
menu. The options are:
• Other Size select this option to display the Paper Size screen.
Select the paper size and scaling amount required.
• Other Color use this option to select a paper color for the print
job. Select a color from the drop-down menu. Use
Automatically Select to enable the printer to select a paper
color.
• Other Type use this option to select a type of paper or media to
use for the print job. Use Automatically Select to enable the
printer to select a type.
• Select by Tray use this option to select a specific tray for
printing the job. The printer only uses the paper in the selected tray, even when more than one
tray contains the same paper size and type. Use Automatically Select to enable the printer to
select a tray loaded with the size and type of paper selected for the job.
146
Xerox WorkCentre 5735/5740/5745/5755/5765/5775/5790
Print
Paper/Output
Advanced Paper Selection
Select this option to display the Advanced Paper Selection screen. If
there is a bi-directional connection to the printer, the media loaded
in each of the trays is shown.
Select the paper tray, size, color and type to use for printing.
If Pre-Cut Tab is selected as the paper type, the image will be
shifted 13mm (0.5”) to the right automatically. Ensure the correct
tab sequence and number of tabs are loaded for the job.
Note: For information about loading different media, refer to Media Types on page 225 of Paper
and Media.
Transparency Separators
Select this option to display the Transparency Separators screen. If
this option is selected, a blank or printed sheet is placed after each
transparency. The paper type for your job must be set to
Transparency using the Other Type menu option.
• Select Blank Separators or Printed Separators using the
Separator Options drop-down menu.
• Select the Separator Color.
2-Sided Printing
You can have your job automatically printed on both sides of a sheet of paper.
• 1-Sided Print prints on one side of the paper or transparency. Use this option when printing on
transparencies, envelopes, or labels.
• 2-Sided Print prints on both sides of a sheet of paper. The images are printed so the job can be
bound on the long edge of the sheet.
• 2-Sided Print, Flip on Short Edge prints on both sides of a sheet of paper. The images are printed
so the job can be bound on the short edge of the sheet.
Note: Some media types, sizes, and weights cannot be automatically printed on both sides. Refer
to www.xerox.com for specifications information.
Xerox WorkCentre 5735/5740/5745/5755/5765/5775/5790
Print
147
Paper/Output
Finishing
Use to select the finishing options for the print job, such as stapling or hole punching. To change the
finishing options, select the button to the right of the summary to display the finishing selection dropdown menu.
Stapling
•
•
Select the number or location of staples required to staple each set.
Select No Stapling to switch off stapling.
Note: The stapling options vary depending on the type of finisher.
Hole Punching
•
•
Select Hole Punch to punch the paper.
Select No Hole Punching to switch off hole punching.
Note: The number of holes punched and their location depend on the hole punch unit in the
finisher.
Folding
•
•
•
•
Bi Fold folds the output in the middle, creating two sides.
C Tri Fold folds the output to create three sides, with the outer flap folded over the inner flap.
Z Tri Fold folds the output to create three sides in a Z effect.
Select No Folding to switch off folding.
Booklet Creation
Select this menu item to display the Booklet Creation screen to
select booklet layout and booklet finishing options.
Booklet Finishing
• Select Booklet Fold to fold the booklet
• Select Booklet Fold and Staple to staple the booklet in the
center and then fold.
Booklet Layout
• Using the option, the document pages are rearranged into the
correct sequence to create the booklet.
• Use Print Page Borders to place a border around the images or
text on each page.
Booklet Paper Size
• Use Automatically Select to enable the printer to select the
paper size for the job.
• To select a paper size for the job, deselect the checkbox and use the drop-down menu.
148
Xerox WorkCentre 5735/5740/5745/5755/5765/5775/5790
Print
Paper/Output
Booklet Margins
• Booklet Margins control whether the Booklet Layout feature fits the virtual pages into the
printable area of the sheet, or into the full physical size of the sheet.
• Standard ensures the entire image fits on two pages per sheet, even if the original document
has little or no white space around the edges.
• None assumes the original document has enough white space around all the borders to fit
two pages per sheet, for example if printing two 8.5x11” images on 11x17” paper (or two A4
images on A3 paper).
Gutter
• Use this option to shift the images to create a center margin for the booklet.
• This option provides space for the booklet center fold.
• Specify the horizontal distance (in points) between the page images. (A point is 1/72” or .35 mm.)
Creep
• This option gradually shifts the images throughout the document, providing less shift in the center
of the booklet and more shift to the outer pages of the booklet. This is useful for booklets with
more than 10 pages.
• Setting the Creep compensates for the thickness of the folded paper, which otherwise might
cause the page images to shift slightly outward when folded.
• Specify how much the page images are shifted outward (in 10ths of a point).
Note: Some media types, sizes, and weights cannot be stapled, punched, or folded. Refer to
www.xerox.com for specifications information.
Output Destination
•
•
Use this option to select the destination for your output from the tray choices in the drop-down
menu.
Use Automatically Select to send the printed output to a destination based on the paper size.
Note: If a destination appears in gray text, it may not be available due to other settings that you
have selected.
Xerox WorkCentre 5735/5740/5745/5755/5765/5775/5790
Print
149
Special Pages
Special Pages
The Special Pages tab enables you to add, modify, or delete cover pages, inserts, or exception pages.
The table provides a summary of the special pages for
your print job. Up to 250 inserts and exception pages
can be included in the table. You can change the width
of the columns in the table.
To edit, delete or move an entry in the table use the
following buttons:
•
Edit you can select single or multiple entries
and use this button to change the properties for
the selected entries.
•
Delete is used to delete an individual entry or a
selection of entries.
•
Delete All is used to delete all the entries in the
table.
•
Undo is used to undo the last actions if you
make an error.
•
Up and
Down are used to move the entries up or down in the table.
Some features are only supported by specific printer configurations, operating systems, or driver types.
You may see more features or options listed than your specific device supports.
Add Covers
Use this option to add blank or printed covers to your printed document.
1.
2.
3.
4.
5.
150
To add a cover select the Add Covers button above the table.
Select the Cover Options required:
• Front Only provides a front cover.
• Back Only provides a back cover.
• Front and Back: Same provides a front and back cover
with the same settings, on the same media.
• Front and Back: Different provides a front and back cover with individual programing
requirements and on different media if required.
Select the Paper Settings for the selected cover options.
Select the printing options:
• Blank or Preprinted inserts a blank or pre-printed sheet and does not print an image.
• Printed uses the first page of the document to print the front cover (if selected), and the last
page to print the back cover (if selected).
Select OK to save your selections and exit.
The cover details display in the table.
Xerox WorkCentre 5735/5740/5745/5755/5765/5775/5790
Print
Special Pages
Add Inserts
Use this option to add blank or pre-printed inserts to your printed document. To program the inserts,
you enter the page number of the page before the insert. If an insert is required as your first page,
Before Page 1 can be specified. It is recommended that you work through your document and identify
the page numbers where inserts are required prior to programing.
This option is also used if pre-printed or blank tabs are required in the job. For further information
about loading tabs, refer to Media Types on page 225 of Paper and Media.
To add an insert select the Add Inserts button above the table.
6. Using the Inserts Options drop-down menu, select whether the
insert is to be placed Before Page 1 or select After Page(s) to
place inserts after the specified page numbers.
Note: To add an insert to the front of your document, use the
Before Page 1 option.
7.
8.
9.
Select the number of insert sheets required.
Specify the page number before each insert. If multiple inserts
are required it is recommended you enter all the page numbers,
separated by a comma or enter a page range separated by a
dash.
Select the Paper requirements for the inserts and select OK.
If using tab media for your insert, ensure the correct tab
sequence and number of tabs are loaded for the job.
Note: If using tab media for your blank or pre-printed inserts,
refer to Media Types on page 225 of Paper and Media.
All the inserts programed display in the table.
10. If any inserts have individual programing, such as a different paper color or a different number of
inserts, select the entry required and use the Edit button to change the programing.
Xerox WorkCentre 5735/5740/5745/5755/5765/5775/5790
Print
151
Special Pages
Add Exceptions
Use this option to specify the characteristics of any pages in the print job that differ from the settings
used for the majority of the job. For example, your print job may contain 30 pages that print on
standard-sized paper and two pages that print on a different size of paper. Use this option to indicate
these two exception pages and select the alternate paper size to use.
This option is also used if printed tabs are required in the job. For further information about loading
tabs, refer to Media Types on page 225 of Paper and Media.
To add Exceptions select the Add Exceptions button above the table.
1.
2.
Enter the page number the exception programing applies to. If multiple exceptions are required it
is recommended you enter all the page numbers, separated by a comma or enter a page range
separated by a dash.
If individual programing is required for some of the exceptions, the entry can be edited from the
table.
Select the Paper requirements for the exceptions and select OK.
If Pre-Cut Tab is selected as the paper type, the image will be shifted 13mm (0.5”) to the right
automatically. Ensure the correct tab sequence and number of tabs are loaded for the job.
If Use Job Setting is displayed, the same paper as the main job is used.
Note: If adding tabs to your job, refer to Media Types on page 225 of Paper and Media.
3.
4.
5.
152
Select the 2-Sided Printing requirements for the exceptions:
• Use Job Setting uses the same programing applied to the
main job.
• 1-Sided Print prints the exception pages on one side only.
• 2-Sided Print prints the exception pages on both sides of
the sheet of paper with the images printed so the job can
be bound along the long edge of the sheet.
• 2-Sided Print, Flip on Short Edge prints the exception
pages on both sides of the sheet of paper with the images
printed so the job can be bound along the short edge of
the sheet.
Job Settings displays the paper requirements specified for the
main job.
Select OK to save your selections and exit.
All the exceptions programed display in the table.
If any exceptions pages require individual programing, such as a different paper color or a
different number of inserts, select the entry and use the Edit button to change the programing.
Xerox WorkCentre 5735/5740/5745/5755/5765/5775/5790
Print
Image Options
Image Options
The Image Options tab enables you to adjust the
lightness or darkness of the image.
Move the slider to the left to darken the image or to the
right to lighten the image. A graphical representation
of the adjustment is shown.
Xerox WorkCentre 5735/5740/5745/5755/5765/5775/5790
Print
153
Layout/Watermark
Layout/Watermark
The Layout/Watermark tab contains settings for
selecting page layout, booklet layout and watermark
options.
Some features are only supported by specific printer
configurations, operating systems, or driver types. You
may see more features or options listed than your
specific device supports.
Page Layout
Pages Per Sheet (N-Up)
Select this option to print 1, 2, 4, 6, 9, or 16 pages on each side of a sheet of paper. Selecting multiple
pages per sheet saves paper and is useful when you want to review the layout of the document.
Booklet Layout
Automatically prints 2 pages on each side of each sheet of paper.
The print driver changes the order of the pages so that they can be
folded and stapled to create a booklet.
To program additional booklet settings, select the Booklet Options
button.
• Booklet Fold folds the booklet.
• Booklet Fold and Staple staples the booklet in the center and
then folds.
• Booklet Paper Size use Automatically Select to enable the
printer to select the paper size for the job. To select a paper size
for the job, deselect the checkbox and use the drop-down
menu.
154
Xerox WorkCentre 5735/5740/5745/5755/5765/5775/5790
Print
Layout/Watermark
•
•
•
Booklet Margins control whether the Booklet Layout feature fits the virtual pages into the
printable area of the sheet, or into the full physical size of the sheet. Standard ensures the entire
image fits on two pages per sheet, even if the original document has little or no white space
around the edges. None assumes the original document has enough white space around all the
borders to fit two pages per sheet, for example if printing two 8.5x11” images on 11x17” paper (or
two A4 images on A3 paper).
Gutter use this option to shift the images to create a center margin for the booklet. This option
provides space for the booklet center fold. Specify the horizontal distance (in points) between the
page images. (A point is 1/72” or .35 mm.)
Creep this option gradually shifts the images throughout the document, providing less shift in the
center of the booklet and more shift to the outer pages of the booklet. This is useful for booklets
with more than 10 pages. Specify how much the page images are shifted outward (in 10ths of a
point).
Note: Some media types, sizes, and weights cannot be stapled, punched, or folded. Refer to
www.xerox.com for specifications information. If your document is already formatted as a
booklet, do not select Booklet Layout.
Page Layout Options
If the orientation is not already set in your application, select the orientation from the first drop-down
menu.
• Portrait prints the text and images across the shortest dimension of the paper.
• Landscape prints the text and images across the longest dimension of the paper.
• Rotated Landscape places the landscape text and image upside down (rotates the text and
image 180 degrees).
Select the sides printed option required from the second drop-down menu.
• 1-Sided Print prints on one side of the paper or transparency. Use this option when printing on
transparencies, envelopes, or labels.
• 2-Sided Print prints on both sides of a sheet of paper with the images printed so the job can be
bound on the long edge of the sheet.
• 2-Sided Print, Flip on Short Edge prints on both sides of a sheet of paper with the images printed
so the job can be bound on the short edge of the sheet.
Note: You can also select these options on the Paper/Output tab for 2-Sided Printing.
If you select multiple pages per sheet for Pages Per Sheet or Booklet Layout select one of the following
options from the third drop-down menu.
• No Page Borders does not print a border around each page.
• Draw Page Borders prints a border around each page.
Xerox WorkCentre 5735/5740/5745/5755/5765/5775/5790
Print
155
Layout/Watermark
Watermark
A watermark is a picture or text (independent of that provided by the application) that is printed on
every page or the first page of the job.
The watermark options are provided in the drop-down menu. There are pre-set watermarks listed
available, Draft, Confidential and Copy.
Once a watermark is selected, use the Options menu to select whether to print the watermark in the
background, in the foreground, or blend with the job. Also select whether to print the watermark on all
pages or on the first page only.
Additional watermarks can be created using the New option. The Watermark Editor screen is displayed
with options for creating a new watermark.
• Name is used to enter a name for the watermark. The name
appears in the watermark selection menu under the
Layout/Watermark tab. When creating a new watermark, type a
name that is no more than 255 characters.
• The Options pull down menu allows you to choose the type of
watermark to create. Select one of the following options:
• Text uses the characters that you type in the Text field.
This is displayed in the document as the watermark.
• Time Stamp uses a time stamp as the watermark. Select
whether to include the weekday, date, time, and/or time
zone in the Time Stamp Format drop-down list.
• Picture uses a picture as the watermark. The picture can be in Bitmap, GIF or JPG format.
Specify the file name in the File Name field or select the Choose File button to browse to the
picture that you want to use.
• Font if you selected Text or Time Stamp, select this option to access the Font screen to change
the font family, style, and size to use for the text.
• Angle if you selected Text or Time Stamp, either specify an angle or move the slider to select the
angle of the text on the page. The default angle is 45 degrees.
• Scale if you selected Picture, either specify the percentage or move the slider to select the
percentage to scale the picture.
• Density either specify a density for the watermark or move the slider to select the density. The
default density is 25 percent.
• Use Position (from center) to select the number of inches or millimeters to shift the watermark
from the center of the page or select the Center option to center the watermark.
• Preview Options selects the paper size and orientation to use for the preview image of the
watermark.
Use the Edit option to change an existing watermark. To delete the selected watermark, select Delete
from the drop-down menu.
Note: Not all applications support watermark printing.
156
Xerox WorkCentre 5735/5740/5745/5755/5765/5775/5790
Print
Advanced
Advanced
The Advanced tab enables you to select advanced
printing options that are rarely changed.
Note: Some features are only supported by specific
printer configurations, operating systems, or driver
types. You may see more features or options listed
than your specific device supports.
Xerox WorkCentre 5735/5740/5745/5755/5765/5775/5790
Print
157
Advanced
158
Xerox WorkCentre 5735/5740/5745/5755/5765/5775/5790
Print
Version 1.0
12/09
®
Xerox WorkCentre
5735/5740/5745/5755/5765/5775/
5790
E-mail
©2009 Xerox Corporation. All Rights Reserved. Unpublished rights reserved under the copyright laws of the United States. Contents
of this publication may not be reproduced in any form without permission of Xerox Corporation.
Xerox®and the sphere of connectivity design are trademarks of Xerox Corporation in the United States and/or other countries.
Copyright protection claimed includes all forms of matters of copyrightable materials and information now allowed by statutory or
judicial law or hereinafter granted, including without limitation, material generated from the software programs which are displayed
on the screen such as styles, templates, icons, screen displays, looks, etc.
Changes are periodically made to this document. Changes, technical inaccuracies, and typographic errors will be corrected in
subsequent editions.
Document Version 1.0: December 2009
160
Xerox WorkCentre 5735/5740/5745/5755/5765/5775/5790
E-mail
Table of Contents
Introduction . . . . . . . . . . . . . . . . . . . . . . . . . . . . . . . . . . . . . . . . . . . . . . . . . . . . . . . . . . . . . . . . . . . . . . . . . . . 162
E-mail . . . . . . . . . . . . . . . . . . . . . . . . . . . . . . . . . . . . . . . . . . . . . . . . . . . . . . . . . . . . . . . . . . . . . . . . . . . . . . . . . 164
Message: . . . . . . . . . . . . . . . . . . . . . . . . . . . . . . . . . . . . . . . . . . . . . . . . . . . . . . . . . . . . . . . . . . . . . . . . . . 164
Reply To . . . . . . . . . . . . . . . . . . . . . . . . . . . . . . . . . . . . . . . . . . . . . . . . . . . . . . . . . . . . . . . . . . . . . . . . . . . 165
From: . . . . . . . . . . . . . . . . . . . . . . . . . . . . . . . . . . . . . . . . . . . . . . . . . . . . . . . . . . . . . . . . . . . . . . . . . . . . . 165
Subject: . . . . . . . . . . . . . . . . . . . . . . . . . . . . . . . . . . . . . . . . . . . . . . . . . . . . . . . . . . . . . . . . . . . . . . . . . . . 166
Output Color . . . . . . . . . . . . . . . . . . . . . . . . . . . . . . . . . . . . . . . . . . . . . . . . . . . . . . . . . . . . . . . . . . . . . . . 166
2-Sided Scanning . . . . . . . . . . . . . . . . . . . . . . . . . . . . . . . . . . . . . . . . . . . . . . . . . . . . . . . . . . . . . . . . . . 166
Original Type . . . . . . . . . . . . . . . . . . . . . . . . . . . . . . . . . . . . . . . . . . . . . . . . . . . . . . . . . . . . . . . . . . . . . . 166
Scan Presets . . . . . . . . . . . . . . . . . . . . . . . . . . . . . . . . . . . . . . . . . . . . . . . . . . . . . . . . . . . . . . . . . . . . . . . 167
Address Book . . . . . . . . . . . . . . . . . . . . . . . . . . . . . . . . . . . . . . . . . . . . . . . . . . . . . . . . . . . . . . . . . . . . . . 167
Advanced Settings . . . . . . . . . . . . . . . . . . . . . . . . . . . . . . . . . . . . . . . . . . . . . . . . . . . . . . . . . . . . . . . . . . . . . 168
Image Options . . . . . . . . . . . . . . . . . . . . . . . . . . . . . . . . . . . . . . . . . . . . . . . . . . . . . . . . . . . . . . . . . . . . . 168
Image Enhancement . . . . . . . . . . . . . . . . . . . . . . . . . . . . . . . . . . . . . . . . . . . . . . . . . . . . . . . . . . . . . . . 168
Resolution . . . . . . . . . . . . . . . . . . . . . . . . . . . . . . . . . . . . . . . . . . . . . . . . . . . . . . . . . . . . . . . . . . . . . . . . . 169
Quality / File Size . . . . . . . . . . . . . . . . . . . . . . . . . . . . . . . . . . . . . . . . . . . . . . . . . . . . . . . . . . . . . . . . . . . 170
Layout Adjustment . . . . . . . . . . . . . . . . . . . . . . . . . . . . . . . . . . . . . . . . . . . . . . . . . . . . . . . . . . . . . . . . . . . . 171
Original Orientation . . . . . . . . . . . . . . . . . . . . . . . . . . . . . . . . . . . . . . . . . . . . . . . . . . . . . . . . . . . . . . . . 171
Original Size . . . . . . . . . . . . . . . . . . . . . . . . . . . . . . . . . . . . . . . . . . . . . . . . . . . . . . . . . . . . . . . . . . . . . . . 171
Edge Erase . . . . . . . . . . . . . . . . . . . . . . . . . . . . . . . . . . . . . . . . . . . . . . . . . . . . . . . . . . . . . . . . . . . . . . . . 172
E-mail Options . . . . . . . . . . . . . . . . . . . . . . . . . . . . . . . . . . . . . . . . . . . . . . . . . . . . . . . . . . . . . . . . . . . . . . . . . 173
File Name . . . . . . . . . . . . . . . . . . . . . . . . . . . . . . . . . . . . . . . . . . . . . . . . . . . . . . . . . . . . . . . . . . . . . . . . . 173
File Format . . . . . . . . . . . . . . . . . . . . . . . . . . . . . . . . . . . . . . . . . . . . . . . . . . . . . . . . . . . . . . . . . . . . . . . . 173
Job Assembly . . . . . . . . . . . . . . . . . . . . . . . . . . . . . . . . . . . . . . . . . . . . . . . . . . . . . . . . . . . . . . . . . . . . . . . . . . 175
Build Job . . . . . . . . . . . . . . . . . . . . . . . . . . . . . . . . . . . . . . . . . . . . . . . . . . . . . . . . . . . . . . . . . . . . . . . . . . 175
Xerox WorkCentre 5735/5740/5745/5755/5765/5775/5790
E-mail
161
Introduction
Introduction
E-mail enables the creation of an electronic image file by
scanning an original hard copy document. The scanned
image is e-mailed to the specified e-mail recipient or
recipients over the internet or intranet.
Using the E-mail feature allows you to add and remove
recipients and edit the subject line of the e-mail message.
1.
2.
To select the E-mail service, press the Services Home
button.
Select the E-mail option. Additional options and
features are displayed.
Most feature screens include the following buttons to
confirm or cancel your choices.
• Undo resets the current screen to the values that
were displayed when the screen was opened.
• Cancel resets the screen and returns to the previous screen.
• Save saves the selections made and returns to the previous screen.
• Close closes the screen and returns to the previous screen.
If an option is not required, use the Off option to disable a feature.
For instructions on using the basic E-mail features refer to Sending an E-mail on page 163.
If Authentication or Accounting has been enabled on your device you may have to enter log in details
to access the features. Refer to Log In / Out on page 25 of Getting Started.
162
Xerox WorkCentre 5735/5740/5745/5755/5765/5775/5790
E-mail
Sending an E-mail
Sending an E-mail
1.
2.
3.
4.
5.
6.
7.
Load your documents face up in the document feeder input tray. Adjust the guide to touch the
documents.
Or...........
Lift up the document feeder. Place the document face down onto the document glass and register
it to the arrow at the top right rear corner. Close the document feeder.
Press the Clear All (AC) button once to cancel any previous screen programing selections.
Press the Services Home button and select the E-mail
option. The E-mail features are displayed.
Select New Recipients.
Select To, Cc or Bcc for the recipient using the dropdown menu to the left of the entry box.
Using the keyboard, enter the e-mail address.
• Up to 128 alphanumeric characters can be
entered.
• To delete a character use the backspace key, or to clear the entire entry select the X button.
• Use the Keyboards... button to access additional language keyboards.
Select Add to add the e-mail address to the Recipient list. Continue adding e-mail addresses until
all the recipients have been added to the list, then select Save.
All the recipients are displayed in the Recipient list.
If an address book has been setup, enter the name of the recipient and select Search. A list of
matching recipients is displayed. Select the e-mail address required and select Add (To:), Add (Cc:)
or Add (Bcc:) from the drop-down menu. The e-mail address is added to the recipient list. Multiple
recipients can be added to the Recipient list in this way. Select Close to exit.
Enter the Message, Reply To, From and Subject details as required.
Select the required features for your e-mail using the touch screen:
Output Color is used to replicate the original colors or to change the output to black and white,
grayscale or color.
Note: This feature may not be available on your device.
2-Sided Scanning is used to select whether your originals are 1-sided or 2-sided. The second side
can be rotated.
Original Type is used to define the original document as text, text and photo, or photo.
Scan Presets is used to set the scan settings to suit how the scanned image will be used.
8.
Press Start to scan your originals and process the E-mail job. Remove the originals from the
document feeder or document glass when scanning has completed.
Note: The E-mail job enters the job list ready for sending.
9.
Select Job Status to view the job list and check the status of your job.
Xerox WorkCentre 5735/5740/5745/5755/5765/5775/5790
E-mail
163
E-mail
E-mail
These E-mail options provide access to features which are
required for programing basic e-mail jobs. Details such as
the recipients addresses, Reply To information and the
subject are entered here.
New Recipient
Use this option to enter details of all the recipients of the Email. To enter the recipient details:
1.
2.
3.
4.
5.
Select New Recipients.
Select To, Cc or Bcc for the recipient using the dropdown menu to the left of the entry box.
Using the keyboard, enter the e-mail address.
• Up to 128 alphanumeric characters can be
entered.
• To delete a character use the backspace key, or to
clear the entire entry select the X button.
• Use the Keyboards... button to access additional
language keyboards.
Select Add to add the e-mail address to the Recipient list.
Continue adding e-mail addresses until all the recipients have been added to the list.
Select Close.
All the recipients are displayed in the Recipient list.
If an Address Book has been setup the Search option can be used to search for e-mail addresses. Refer
to Address Book on page 167.
Message:
This option is used to enter a message for the e-mail. The message is the text contained within the email and not the e-mail subject line.
1.
2.
164
Using the keyboard, enter the message required.
• Up to 128 alphanumeric characters can be
entered.
• To delete a character use the backspace key, or to
clear the entire entry select the X button.
• Use the Keyboards... button to access additional
language keyboards.
Select Save to save your selections and exit.
Xerox WorkCentre 5735/5740/5745/5755/5765/5775/5790
E-mail
E-mail
Reply To
The Reply To feature enables you to include an e-mail address you want the recipient to reply to. For
example you can enter your personal e-mail address. If you logged in through authentication and your
details are available in the Address Book, your e-mail address is displayed.
1.
2.
Using the keyboard, enter the message required.
• Up to 128 alphanumeric characters can be entered.
• To delete a character use the backspace key, or to clear the entire entry select the X button.
• Use the Keyboards... button to access additional language keyboards.
If an address book has been setup, enter the name required and select Search. A list of matching
names is displayed. Select the e-mail address required and select Save.
If required, select Save to save your selections and exit.
The e-mail address entered is displayed in the Reply To field.
From:
To enter or edit the sender’s name:
1.
2.
3.
4.
Select From.
If a default name is displayed, select the X button to
delete the entry.
Using the keyboard, enter the e-mail address of the
sender.
• Up to 128 alphanumeric characters can be
entered.
• To delete a character use the backspace key, or to
clear the entire entry select the X button.
• Use the Keyboards... button to access additional language keyboards.
If an address book has been setup, enter the name required and select Search. A list of matching
names is displayed. Select the e-mail address required and select Save.
If required, select Save to save and return to the previous screen, or Cancel to exit.
The e-mail address entered is displayed in the From field.
Xerox WorkCentre 5735/5740/5745/5755/5765/5775/5790
E-mail
165
E-mail
Subject:
To enter a subject for the e-mail:
1.
2.
3.
Select the Subject field.
Using the keyboard, enter the subject of the e-mail.
• Up to 128 alphanumeric characters can be entered.
• To delete a character use the backspace key, or to clear the entire entry select the X button.
• Use the Keyboards... button to access additional language keyboards.
Select Save to save and return to the previous screen, or Cancel to exit.
The subject entered is displayed in the Subject field.
Output Color
Select the Auto Detect option in Output Color to automatically detect and match the color of your
original and produce black and white, grayscale or color output from your original. The options are:
• Auto Detect to select output that matches your original.
• Black & White to select black and white output regardless of the color of your original.
• Grayscale to use gray scales instead of color.
• Color to select color output from your original.
Note: This feature may not be available on your device.
2-Sided Scanning
The 2-Sided Scanning option allows you to set whether 1 or 2 sides of your original document are
scanned. Documents must first be loaded in the document feeder to enable the 2 Sided option. The
options are:
• 1 Sided is used if your original documents are single-sided.
• 2 Sided is used if your original documents are double-sided. The document feeder must be used to
scan your originals with this option.
• 2-Sided, Rotate Side 2 select if your original opens up like a calendar.
Original Type
Use this option to define the type of original being used for scanning. Making the correct selection
enhances the quality of your output image. The options are:
• Photo & Text is recommended for originals containing high quality photographs and halftones.
Using this setting the scanned image will contain high quality pictures though the sharpness of
text and line art is slightly reduced.
• Text produces sharper edges and is recommended for text and line art.
• Photo is used specifically for originals containing photos or continuous tones without any text or
line art. Produces the best quality for photos but reduced quality text and line art.
166
Xerox WorkCentre 5735/5740/5745/5755/5765/5775/5790
E-mail
E-mail
Scan Presets
Use Scan Presets to optimize scan settings to match the intended purpose of the scanned documents.
The options are:
• Sharing & Printing is used for sharing files that are
going to be viewed on-screen and for printing most
standard business documents. This setting results in a
small file size and normal image quality.
• Archival - Small File Size is best for standard business
documents that are stored electronically for record
keeping purposes. This setting results in the smallest
file sizes and normal image quality.
• OCR is best for documents that are going to be processed by Optical Character Recognition (OCR)
software. This setting results in large file sizes and the highest image quality.
• High Quality Printing is best for business documents containing detailed graphics and photos.
This setting results in large file sizes and the highest image quality.
• Simple Scan is used for faster processing but may result in excessively large file sizes. Using this
setting applies only minimal image processing and compression.
More... is used to access all the Scan Presets options available. If using this option, select Save to save
your selections and exit.
Address Book
If the device has been setup to access the Network and Internal Address Books, you can use them to
select recipients. For information about setting up address books, refer to the System Administrator
Guide.
1.
2.
3.
4.
5.
6.
7.
Select New Recipients.
Enter the name of the recipient and select Search.
The matching entries are displayed.
Select the e-mail address required. The recipient details are displayed to the right of the list.
Select Add (To:), Add (Cc:) or Add (Bcc:) from the
drop-down menu.
The e-mail address is added to the recipient list.
Continue adding e-mail addresses as required.
To search different address books select the Internal
Address Book option. Select the Address Book
required using the drop-down menu and search using
the same method described.
Select Recipient List to view the current Recipient list. To remove an entry from the list, select the
entry and select Remove from the drop-down menu. The recipient is removed from the list.
Select New Search to continue adding recipients or Close to exit.
The Address Book Search option can also be used when entering a Reply To or From e-mail address.
Xerox WorkCentre 5735/5740/5745/5755/5765/5775/5790
E-mail
167
Advanced Settings
Advanced Settings
The Advanced Settings provide access to the features
which enhance the image quality or output quality. To
access the Advanced Settings, select Services Home and Email. Then select the Advanced Settings tab.
Image Options
Select Image Options to adjust the lightness and darkness of the image, and to sharpen the image.
The options are:
• Lighten/Darken provides a manual control to adjust
the lightness or darkness of the scanned images.
• Move the indicator down to darken the scanned
image, for light originals such as pencil images.
• Move the indicator up to lighten the scanned
image, for dark originals such as halftones or
originals with colored backgrounds.
• Sharpness provides manual control to adjust the
sharpness of the scanned images.
• Move the indicator up to sharpen the scanned image.
• Move the indicator down to soften the scanned image.
Select Save to save your selections and exit.
Image Enhancement
Select Image Enhancement to reduce background and
adjust the image contrast. The options are:
• Background Suppression enhances originals that
have colored backgrounds, by reducing or eliminating
the background from your original. This option is
useful when your original is on colored paper.
• Select Auto Suppression to automatically
suppress unwanted background.
• Select Off to turn the Background Suppression feature off, particularly when:
• The Darken adjustment does not produce a satisfactory output from light originals.
• The original has a gray or colored border, such as a certificate.
• You want to bring out fine detail that was lost due to a dark edge when using bound
originals.
168
Xerox WorkCentre 5735/5740/5745/5755/5765/5775/5790
E-mail
Advanced Settings
•
Contrast controls the image density on the output and compensates for an original that has too
much or too little contrast on the image.
• Move the indicator up to reproduce more vivid blacks and whites for sharper text and lines
but less detail in pictures.
• Move the indicator down to reproduce more detail in light and dark areas of the original.
Select Save to save your selections and exit.
Resolution
The Resolution affects the appearance of the scanned
image. A higher resolution produces a better quality image.
A lower resolution reduces communication time when
sending the file over the network. The options are:
• 72 dpi recommended for output displayed on a
computer. It produces the smallest file size.
• 100 dpi recommended for output that delivers low
quality text documents.
• 150 dpi recommended for average quality text documents and line art. Does not produce the best
image quality for photos and graphics.
• 200 dpi recommended for average quality text documents and line art. Does not produce the best
image quality for photos and graphics.
• 300 dpi recommended for high quality text documents that are to pass through OCR applications.
Also recommended for high quality line art or medium quality photos and graphics. This is the
default resolution and the best choice in most cases.
• 400 dpi recommended for photos and graphics. It produces average image quality for photos and
graphics.
• 600 dpi recommended for high quality photos and graphics. It produces the largest image file
size, but delivers the best image quality.
Select Save to save your selections and exit.
Xerox WorkCentre 5735/5740/5745/5755/5765/5775/5790
E-mail
169
Advanced Settings
Quality / File Size
The Quality / File Size settings allow you to choose
between scan image quality and file size. These settings
allow you to deliver the highest quality or make smaller
files. A small file size delivers slightly reduced image quality
but is better when sharing the file over a network. A larger
file size delivers improved image quality but requires more
time when transmitting over the network. The options are:
• Normal/Small produces small files by using advanced
compression techniques. Image quality is acceptable but some quality degradation and character
substitution errors may occur with some originals.
• Higher/Larger produces larger files with better image quality.
• Highest/Largest produces the largest files with the maximum image quality. Large files are not
ideal for sharing and transmitting over the network.
Select Save to save your selections and exit.
Note: If you change the Quality / File Size option you may affect the settings in the Scan Presets
options on the E-mail tab.
170
Xerox WorkCentre 5735/5740/5745/5755/5765/5775/5790
E-mail
Layout Adjustment
Layout Adjustment
The Layout Adjustment options allow you to manipulate
the scanned image and enhance the appearance and style
of your output. To access the Layout Adjustment options,
select Services Home and E-mail. Then select the Layout
Adjustment tab.
Original Orientation
Use to specify the orientation of the originals being scanned. The options are:
• Upright Images refers to the direction the images are
loaded in the document feeder. Use this option if your
images are in the orientation matching the image
shown when loaded in the document feeder.
• Sideways Images refers to the direction the images
are loaded in the document feeder. Use this option if
your images are in the orientation matching the
image shown when loaded in the document feeder.
Select Save to save your selections and exit.
Original Size
Original Size allows you to specify automatic size detection of the originals, mixed size originals, or the
specific size of the image to be scanned. The options are:
• Auto Detect is the default setting and enables automatic size sensing. The size detected is
matched to a standard size paper.
• Preset Scan Areas allows you to define the size of your original from a list of preset, standard
original sizes. You can view the list by using the scroll bar.
• Custom Scan Areas is used to enter a specific area for
scanning. Measure the area to be scanned on the
original and enter the X and Y axis measurements into
the fields provided. Only the area specified is scanned.
• Mixed Size Originals allows you to scan documents
containing different size pages. The pages must be the
same width, like A4 LEF and A3 SEF (8.5x11” LEF and
11x17” SEF). Other combinations are shown on the
screen.
Select Save to save your selections and exit.
Xerox WorkCentre 5735/5740/5745/5755/5765/5775/5790
E-mail
171
Layout Adjustment
Edge Erase
Edge Erase enables you to specify how much of the image to erase around the edges of your
document. For example, you can remove the marks caused by punched holes or staples in your original.
The options are:
• All Edges is used to erase an equal amount from all
the edges. Use the arrow buttons to adjust the
amount to be erased from 1 mm to 50 mm (0.1” to
2.0”). All marks or defects within the measurement set
are deleted.
• Individual Edges enables an individual amount to be
erased from each of the edges.
Use the arrow buttons to adjust the amount for each
edge, from 0 mm to 50 mm (0” to 2.0”).
• Scan to Edge use this option to scan to the edge of the image.
Select Save to save your selections and exit.
172
Xerox WorkCentre 5735/5740/5745/5755/5765/5775/5790
E-mail
E-mail Options
E-mail Options
The E-mail Options allow you to temporarily change the
format of the e-mail image file, set a Reply To address and
add a brief message. To access the E-mail Options, select
Services Home and E-mail. Then select the E-mail Options
tab.
File Name
This feature enables you to name the file that is sent by E-mail.
1.
2.
Using the keyboard, enter the name of the file.
• Up to 50 alphanumeric characters can be entered.
• To delete a character use the backspace key, or to
clear the entire entry select the X button.
• Use the Keyboards... button to access additional
language keyboards.
Select Save to save your selections and exit.
File Format
The File Format determines the type of file created. You can select the file format you wish to use for
your scanned image. The options are:
• PDF (Portable Document Format) allows recipients
with the right software to view, print or edit the file, no
matter what their computer platform.
• Image Only optimizes the file for viewing and
printing and cannot be modified.
• Searchable runs the file through an Optical
Character Recognition (OCR) process. This can
take a few minutes but allows the text in the file
to be searchable and editable. If Searchable is selected, the Document Language menu
becomes available. Select the appropriate language from the menu.
Depending on the receiving device, the PDF selection may not be compatible when the resolution
is set to 200 dpi.
• PDF/A is an industry standard format for long term document preservation based on the PDF
format. The Advanced Settings may need checking to ensure they are appropriate for extended
use.
• Image Only optimizes the file for viewing and printing and cannot be modified.
• Searchable runs the file through an Optical Character Recognition (OCR) process. This can
take a few minutes but allows the text in the file to be searchable and editable. If Searchable
is selected, the Document Language menu becomes available. Select the appropriate
language from the menu.
Xerox WorkCentre 5735/5740/5745/5755/5765/5775/5790
E-mail
173
E-mail Options
•
•
•
•
XPS (XML Paper Specification) is a is a Microsoft proprietary format similar to PDF.
• Image Only optimizes the file for viewing and printing and cannot be modified.
• Searchable runs the file through an Optical Character Recognition (OCR) process. This can
take a few minutes but allows the text in the file to be searchable and editable. If Searchable
is selected, the Document Language menu becomes available. Select the appropriate
language from the menu.
Multi-Page TIFF (Tagged Image File Format) produces a single TIFF file containing several
pages of scanned images. A more specialized software is required to open this type of file format.
TIFF (1 File per Page) produces a graphic file that can be opened by a variety of graphic software
packages across a variety of computer platforms. A separate file is produced for each image
scanned.
JPEG (1 File per Page) (Joint Photographic Experts Group) produces a compressed graphic file
that can be opened by a variety of graphic software packages across a variety of computer
platforms. A separate file is produced for each image scanned.
Select Save to save your selections and exit.
174
Xerox WorkCentre 5735/5740/5745/5755/5765/5775/5790
E-mail
Job Assembly
Job Assembly
This tab provides access to the Build Job feature for
compiling jobs which have different originals or programing
requirements within a job. To access the Job Assembly
options, select Services Home and E-mail. Then select the
Job Assembly tab.
Build Job
Use this feature to build a job that requires
different settings for each page, or a segment of
pages.
You can select the appropriate settings to be
applied to individual pages or segments of a
completed job. First split the originals into
sections for individual programing.
1.
2.
3.
4.
5.
6.
7.
8.
9.
Some pages
with text and
some with
photos
Some pages Various
2 sided and sized
some 1 sided originals
More than
100 pages
Select Build Job on the Job Assembly tab.
Switch on Build Job by selecting the On button and
select Save.
Select the options required for the first segment of the
job.
Load the first segment originals and press Start.
Remove the first segment originals. The Build Job
screen displays the first segment in the list.
Delete All Segments deletes the current Build Job and
returns you to the main Build Job screen.
Select the options required for the second segment.
Load the second segment originals and press Start.
Repeat these steps until all segments of your job have been programmed and scanned.
After the last segment has been scanned, select End Build Job to indicate you have finished
scanning and the job can be processed and completed.
Xerox WorkCentre 5735/5740/5745/5755/5765/5775/5790
E-mail
175
Job Assembly
176
Xerox WorkCentre 5735/5740/5745/5755/5765/5775/5790
E-mail
Version 1.0
12/09
®
Xerox WorkCentre
5735/5740/5745/5755/5765/5775/
5790
Save and Reprint Jobs
©2009 Xerox Corporation. All Rights Reserved. Unpublished rights reserved under the copyright laws of the United States. Contents
of this publication may not be reproduced in any form without permission of Xerox Corporation.
Xerox®and the sphere of connectivity design are trademarks of Xerox Corporation in the United States and/or other countries.
Copyright protection claimed includes all forms of matters of copyrightable materials and information now allowed by statutory or
judicial law or hereinafter granted, including without limitation, material generated from the software programs which are displayed
on the screen such as styles, templates, icons, screen displays, looks, etc.
Changes are periodically made to this document. Changes, technical inaccuracies, and typographic errors will be corrected in
subsequent editions.
Document Version 1.0: December 2009
178
Xerox WorkCentre 5735/5740/5745/5755/5765/5775/5790
Save and Reprint Jobs
Table of Contents
Introduction . . . . . . . . . . . . . . . . . . . . . . . . . . . . . . . . . . . . . . . . . . . . . . . . . . . . . . . . . . . . . . . . . . . . . . . . . . . 180
Saving a Job . . . . . . . . . . . . . . . . . . . . . . . . . . . . . . . . . . . . . . . . . . . . . . . . . . . . . . . . . . . . . . . . . . . . . . . . . . . 181
Using the Xerox WorkCentre 5735/5740/5745/5755/5765/5775/5790 . . . . . . . . . . . . . . . 181
Using the Print Driver . . . . . . . . . . . . . . . . . . . . . . . . . . . . . . . . . . . . . . . . . . . . . . . . . . . . . . . . . . . . . . 181
Using Internet Services . . . . . . . . . . . . . . . . . . . . . . . . . . . . . . . . . . . . . . . . . . . . . . . . . . . . . . . . . . . . . 182
Reprinting Saved Jobs . . . . . . . . . . . . . . . . . . . . . . . . . . . . . . . . . . . . . . . . . . . . . . . . . . . . . . . . . . . . . . . . . . 184
Using the Xerox WorkCentre 5735/5740/5745/5755/5765/5775/5790 . . . . . . . . . . . . . . . 184
Using Internet Services . . . . . . . . . . . . . . . . . . . . . . . . . . . . . . . . . . . . . . . . . . . . . . . . . . . . . . . . . . . . . 185
Managing Folders . . . . . . . . . . . . . . . . . . . . . . . . . . . . . . . . . . . . . . . . . . . . . . . . . . . . . . . . . . . . . . . . . . . . . 186
Using the Xerox WorkCentre 5735/5740/5745/5755/5765/5775/5790 . . . . . . . . . . . . . . . 186
Using Internet Services . . . . . . . . . . . . . . . . . . . . . . . . . . . . . . . . . . . . . . . . . . . . . . . . . . . . . . . . . . . . . 186
Xerox WorkCentre 5735/5740/5745/5755/5765/5775/5790
Save and Reprint Jobs
179
Introduction
Introduction
Reprint Saved Jobs is a standard feature that can be
enabled on your device. It enables you to retrieve jobs
which have been stored on the device using the Store Job
feature of the Copy service, the print driver or the Internet
Services Print Submission option.
Prior to using the Reprint Saved Jobs option, a job must be
saved to a folder on the device. For instructions on using
the basic Save Job for Reprint features refer to Saving a Job
on page 181.
Jobs are placed into a folder located on the device and can be accessed and retrieved for printing at
later date. Jobs can be recalled and printed as many times as you need.
1.
2.
To select the Reprint Saved Jobs service, press the
Services Home button.
Select the Reprint Saved Jobs option. Additional
options and features are displayed.
Most feature screens include the following buttons to
confirm or cancel your choices.
• Undo resets the current screen to the values that
were displayed when the screen was opened.
• Cancel resets the screen and returns to the previous screen.
• Save saves the selections made and returns to the previous screen.
• Close closes the screen and returns to the previous screen.
For instructions on using the basic Reprint Saved Jobs features refer to Reprinting Saved Jobs on
page 184.
If Authentication or Accounting has been enabled on your device you may have to enter log in details
to access the features. Refer to Log In / Out on page 25 of Getting Started.
180
Xerox WorkCentre 5735/5740/5745/5755/5765/5775/5790
Save and Reprint Jobs
Saving a Job
Saving a Job
Prior to using the Reprint Saved Jobs option, a job must be saved to a folder on the device. Jobs can be
saved using the Copy service at the device, or at your PC using the print driver or Internet Services.
Using the Xerox WorkCentre 5735/5740/5745/5755/5765/5775/5790
To store a job using the device:
1.
2.
3.
4.
5.
6.
7.
8.
9.
Press the Services Home button.
Select the Copy option. Additional options and
features are displayed.
Program the required job features.
Select the Save Job for Reprint button on the Job
Assembly tab.
Select the Save Job for Reprint option required:
• Copy & Save is used to store the job and print a
copy of the job.
• Save Only stores the job without printing.
Select a folder location to store the job.
Select New Job Name and enter a name for the job using the keyboard.
Select Save to save the job name and return to the previous screen.
Load your originals into the document feeder and select Start to run the job.
The job is scanned and saved with the name entered, in the folder selected. If Copy & Save was
selected, a copy of the job is also printed.
For information about File Folder Management, refer to Managing Folders on page 186.
Using the Print Driver
To store a job using the print driver:
1.
2.
3.
Open your document and select Print from the application’s File menu. The application Print
window is displayed.
Select the Xerox WorkCentre 5735/5740/5745/5755/5765/5775/5790 printer from the Printer
Name drop-down menu.
Select Properties to access the print settings for the job.
Xerox WorkCentre 5735/5740/5745/5755/5765/5775/5790
Save and Reprint Jobs
181
Saving a Job
4.
Select the Job Type drop-down menu and select
Saved Job.
The Saved Job options are displayed.
5.
Program the Saved Job options as required:
• Select Save to store the job only or Save and Print to store
and print the job.
• Job Name is used to enter a name for the job or select Use
Document Name to use the filename of the document
being submitted.
• Folder is used to select a location to store the job. The
Default Public Folder is available to all users, other folders
may have restricted access.
• Secure Saved Job is used to add a passcode to the job.
The job can only be accessed and printed using the
passcode entered here.
Select OK to save the settings and exit the Saved Job options.
Program the print features required for the saved job.
The Help option provides an explanation of all the options.
Select OK to save the print settings.
Select OK on the Print dialogue window to send the job.
The job is processed and sent to the device for saving or saving and printing, depending on the
selection.
6.
7.
8.
9.
Using Internet Services
The Print option within Internet Services can also be used to create a Saved Job. The job file submitted
must be a print ready file, such as a PDF or PostScript file.
1.
2.
3.
Open the web browser from your Workstation.
In the URL field, enter http:// followed
by the IP Address of the device. For
example: If the IP Address is
192.168.100.100, enter the following
into the URL field:
http://192.168.100.100.
Press Enter to view the Home page.
The Internet Services options for your device are displayed.
Note: To find out the IP Address of your device, print a configuration report. For instructions, refer
to Print Reports on page 236 of Machine and Job Status.
182
Xerox WorkCentre 5735/5740/5745/5755/5765/5775/5790
Save and Reprint Jobs
Saving a Job
4.
5.
6.
7.
Select Print to access the Job
Submission options.
Enter the file name of the job
requiring saving, or use the Browse
option to locate the file.
Select the Job Type drop-down menu
and select Save Job for Reprint.
The Saved Job options are displayed.
• Select Save to store the job only
or Save and Print to store and
print the job.
• Job Name is used to enter a
name for the job.
• Folder is used to select a location to store the job. The Default Public Folder is available to all
users, other folders may have restricted access.
• Secure Saved Job is used to add a passcode to the job. The job can only be accessed and
printed using the passcode entered here.
• Program the Paper, 2-Sided Printing, Collate, Orientation, Output Destination and the
finishing options as required.
Select Submit Job at the top of the page to send the job to the device over the internet.
The job is processed and sent to the device for saving or saving and printing, depending on the
selection.
Xerox WorkCentre 5735/5740/5745/5755/5765/5775/5790
Save and Reprint Jobs
183
Reprinting Saved Jobs
Reprinting Saved Jobs
Saved Jobs can be reprinted using the device touch screen or from Internet Services.
Using the Xerox WorkCentre 5735/5740/5745/5755/5765/5775/5790
1.
2.
3.
4.
5.
6.
184
Press the Services Home button.
Select the Reprint Saved Jobs option.
Folders containing the saved jobs are displayed.
Select the folder required. If necessary, use the scroll
bar to access all the folders.
A list of the jobs in the folder is displayed.
Select the job and select the print or save option required:
• Print is used to print the selected job using the
currently saved print settings.
• If print settings are changed from those stored
with the original print job, Print and Save is used
to print and then store the selected job with the
new settings.
• Save is used to save the selected job without
printing. The job will be saved in place of the
original job with any new settings selected.
If the job settings require changing prior to printing
the job, select the Settings option. Select the options
required and then select Print, Print and Save or Save.
If the job is a secure job, enter the passcode required
and select Print Job.
Select Job Status to view all the job lists and check the
status of your job. For further information, refer to Job
Status on page 233 of Machine and Job Status.
Xerox WorkCentre 5735/5740/5745/5755/5765/5775/5790
Save and Reprint Jobs
Reprinting Saved Jobs
Using Internet Services
You can reprint your saved jobs using Internet Services:
1.
2.
3.
Open the web browser from your Workstation.
In the URL field, enter http:// followed
by the IP Address of the device. For
example: If the IP Address is
192.168.100.100, enter the following
into the URL field:
http://192.168.100.100.
Press Enter to view the Home page.
The Internet Services options for your device are displayed.
Note: To find out the IP Address of your device, print a configuration report. For instructions, refer
to Print Reports on page 236 of Machine and Job Status.
4.
5.
6.
7.
8.
9.
Select the Jobs tab.
This screen shows the jobs currently in
the device list.
To access the list of Saved Jobs, select
the Saved Jobs tab.
Select the folder that contains the job
you want to print.
Select the check box next to the job you want to print.
You may choose several jobs and specify how many copies you would like.
Select Print Job from the drop-down menu and then select Go.
Your selected job or jobs are printed at the device using the saved print setting for each job.
Xerox WorkCentre 5735/5740/5745/5755/5765/5775/5790
Save and Reprint Jobs
185
Managing Folders
Managing Folders
The folders are set up by the System Administrator using Internet Services and can be managed by the
users. Folder management tasks can be performed at the device, using the Reprint Saved Jobs service,
or at your PC using Internet Services.
Using the Xerox WorkCentre 5735/5740/5745/5755/5765/5775/5790
1.
2.
3.
4.
Press the Services Home button.
Select the Reprint Saved Jobs option.
Folders containing the saved jobs are displayed.
Select the File Folder Management option. The
Manage Folders options are as follows
• Open Folder opens the selected folder.
• New Folder is used to create a new folder. Enter
the folder name and select the access options
required.
• Modify Folder is used to edit the folder name or access details.
• Delete is used to delete a folder and its contents.
Within each folder, the options are as follows:
• Back to Folders is used to return to the folder list.
• Rename Job is used to rename selected job.
• Select All is used to select all the jobs within the folder.
• Deselect All is used to deselect any jobs selected.
• Delete is used to delete the selected file(s).
Select Close to exit the File Folder Management option.
Using Internet Services
Create New Folder
Folders and the files saved within them can be managed using Internet Services.
1.
2.
3.
Open the web browser from your Workstation.
In the URL field, enter http:// followed by the IP Address of the device. For example: If the IP
Address is 192.168.100.100, enter the following into the URL field: http://192.168.100.100.
Press Enter to view the Home page.
The Internet Services options for your device are displayed.
Note: To find out the IP Address of your device, print a configuration report. For instructions, refer
to Print Reports on page 236 of Machine and Job Status.
186
Xerox WorkCentre 5735/5740/5745/5755/5765/5775/5790
Save and Reprint Jobs
Managing Folders
4.
5.
6.
7.
8.
Select the Jobs option.
Select the Saved Jobs tab to access
the folder options.
Select Create New Folder.
Input the name for the folder in the
Name field.
As a normal user you are only able to
create Public folders. These are the
other kind of folders you may see.
• The Public folder has been created by a user. It can be used by any user and has no access
authority limitations. Any user can access, modify and delete the documents in this folder.
• The Read Only folder is created by the System Administrator or a user as a Read Only Public
folder. Any user can print from the folder but documents cannot be deleted or modified.
• The Private folder is created by a user only when the device is in Authentication mode. The
User marks the folder as Private and the folder is only visible to the Owner and the System
Administrator.
When you have selected the appropriate Permissions, select Apply.
The Folder is displayed in the Folders List.
Modify or Delete Folder
You can modify or delete existing folders that contain Saved Jobs using Internet Services.
1.
2.
3.
Open the web browser from your Workstation.
In the URL field, enter http:// followed
by the IP Address of the device. For
example: If the IP Address is
192.168.100.100, enter the following
into the URL field:
http://192.168.100.100.
Press Enter to view the Home page.
The Internet Services options for your device are displayed.
Note: To find out the IP Address of your device, print a configuration report. For instructions, refer
to Print Reports on page 236 of Machine and Job Status.
4.
5.
6.
Select the Jobs option.
Select Saved Jobs tab to access the folder options.
Select Manage Folders.
The window displays all the Public folders and any Private folders belonging to you.
Check the box next to the folder you want to modify.
Xerox WorkCentre 5735/5740/5745/5755/5765/5775/5790
Save and Reprint Jobs
187
Managing Folders
7.
188
Select options required for the folder.
The folder can be deleted by selecting
the Delete Folder button.
The folder and the contents of the
folder are deleted from the list on this
screen and the list of available folders
at the device.
Xerox WorkCentre 5735/5740/5745/5755/5765/5775/5790
Save and Reprint Jobs
Version 1.0
12/09
®
Xerox WorkCentre
5735/5740/5745/5755/5765/5775/
5790
ID Card Copy
©2009 Xerox Corporation. All Rights Reserved. Unpublished rights reserved under the copyright laws of the United States. Contents
of this publication may not be reproduced in any form without permission of Xerox Corporation.
Xerox®and the sphere of connectivity design are trademarks of Xerox Corporation in the United States and/or other countries.
Copyright protection claimed includes all forms of matters of copyrightable materials and information now allowed by statutory or
judicial law or hereinafter granted, including without limitation, material generated from the software programs which are displayed
on the screen such as styles, templates, icons, screen displays, looks, etc.
Changes are periodically made to this document. Changes, technical inaccuracies, and typographic errors will be corrected in
subsequent editions.
Document Version 1.0: December 2009
190
Xerox WorkCentre 5735/5740/5745/5755/5765/5775/5790
ID Card Copy
Table of Contents
Introduction . . . . . . . . . . . . . . . . . . . . . . . . . . . . . . . . . . . . . . . . . . . . . . . . . . . . . . . . . . . . . . . . . . . . . . . . . . . 192
ID Card Copy . . . . . . . . . . . . . . . . . . . . . . . . . . . . . . . . . . . . . . . . . . . . . . . . . . . . . . . . . . . . . . . . . . . . . . . . . . 193
Paper Supply . . . . . . . . . . . . . . . . . . . . . . . . . . . . . . . . . . . . . . . . . . . . . . . . . . . . . . . . . . . . . . . . . . . . . . 193
Image Quality - Side 1 and Image Quality - Side 2 . . . . . . . . . . . . . . . . . . . . . . . . . . . . . . . . . . . 193
Copying an ID Card . . . . . . . . . . . . . . . . . . . . . . . . . . . . . . . . . . . . . . . . . . . . . . . . . . . . . . . . . . . . . . . . . . . . 195
Xerox WorkCentre 5735/5740/5745/5755/5765/5775/5790
ID Card Copy
191
Introduction
Introduction
ID Card Copy enables you to scan each side of an ID card
onto one side of a single sheet of paper. The ID card is
placed on the document glass and the first side is scanned.
When prompted, the card is turned over and the other side
is scanned. You can also set different image quality settings
for side 1 and side 2.
1.
2.
To select the ID Card Copy service, press the Services
Home button.
Select the ID Card Copy option. Additional options
and features are displayed.
Most feature screens include the following buttons to
confirm or cancel your choices.
• Undo resets the current screen to the values that
were displayed when the screen was opened.
• Cancel resets the screen and returns to the previous screen.
• Save saves the selections made and returns to the previous screen.
• Close closes the screen and returns to the previous screen.
If an option is not required, use the Off option to disable a feature.
If Authentication or Accounting has been enabled on your device you may have to enter log in details
to access the features. Refer to Log In / Out on page 25 of Getting Started.
192
Xerox WorkCentre 5735/5740/5745/5755/5765/5775/5790
ID Card Copy
ID Card Copy
ID Card Copy
The ID Card Copy tab includes Paper Supply options and
Image Quality options for Side 1 and Side 2. Each option is
described in detail below.
Paper Supply
Use the Paper Supply options to select the paper tray for the job. The options are:
• Tray 1 use this option to select the paper loaded in Tray 1.
• Tray 2 use this option to select the paper loaded in Tray 2.
• Tray 3 use this option to select the paper loaded in Tray 3.
• Tray 4 use this option to select the paper loaded in Tray 4.
• Bypass use this option when feeding individual types of media.
• More... provides access to all the tray options.
Select a long edge feed or short edge feed media, depending on the output orientation required. When
a paper supply option is selected, the screen graphic illustrates the orientation of the image on the
output.
Image Quality - Side 1 and Image Quality - Side 2
Use these features to enhance the image quality of your
output. Individual settings can be selected for Side 1 and
Side 2. The options are:
Original Type
•
•
•
•
Photo and Text is recommended for text and line art
originals.
Text produces sharper edges and is recommended for text and line art.
Photo is used specifically for originals containing photos or continuous tones without any text or
line art. Produces the best quality for photos but reduced quality text and line art.
Halftone Photo is used if your original is from a magazine or newspaper that contains
photographs or text.
Xerox WorkCentre 5735/5740/5745/5755/5765/5775/5790
ID Card Copy
193
ID Card Copy
Lighten/Darken
This provides manual control to adjust the lightness or darkness of the scanned images.
• Move the indicator down to darken the scanned image, for light originals such as pencil images.
• Move the indicator up to lighten the scanned image, for dark originals such as halftones or
originals with colored backgrounds.
Background Suppression
This enhances originals that have colored backgrounds, by reducing or eliminating the background on
the output copy. This option is useful when your original is on colored paper.
• Select Auto Suppression to automatically suppress unwanted background.
• Select Off to turn the Background Suppression feature off, particularly when:
• The Darken adjustment does not produce a satisfactory output from light originals.
• The original has a gray or colored border, such as a certificate.
• You want to bring out fine detail that was lost due to a dark edge when using bound originals.
Select Save to save your selections and exit.
194
Xerox WorkCentre 5735/5740/5745/5755/5765/5775/5790
ID Card Copy
Copying an ID Card
Copying an ID Card
1.
2.
3.
4.
5.
6.
7.
8.
Lift up the document feeder. Place the ID card face down onto the document glass and register it
to the arrow at the top right rear corner. Close the document feeder.
Press the Clear All (AC) button once to cancel any previous screen programing selections.
Press the Services Home button and select the ID Card Copy option.
The ID Card Copy features are displayed.
Select the paper tray required for the job. The graphic on the screen changes to reflect the
orientation of the output paper.
Select the Side 1 - Image Quality option and program
the features required for side 1.
Select the Side 2- Image Quality option and program
the features required for side 2.
Enter the copy quantity using the numeric keypad and
press Start to scan side 1 of the ID card.
Lift up the document feeder and turn over the ID card
to enable side 2 to be scanned. Close the document
feeder.
Press Start to scan side 2 of the ID card.
The job is processed and printed. Retrieve your copies from the output tray.
If your job is held in the list it requires additional resources to print. To identify the resources required,
select the Job Status button. Select your job in the list and select Job Details. Once the resources are
available the job will print.
Xerox WorkCentre 5735/5740/5745/5755/5765/5775/5790
ID Card Copy
195
Copying an ID Card
196
Xerox WorkCentre 5735/5740/5745/5755/5765/5775/5790
ID Card Copy
Version 1.0
12/09
®
Xerox WorkCentre
5735/5740/5745/5755/5765/5775/
5790
Internet Services
©2009 Xerox Corporation. All Rights Reserved. Unpublished rights reserved under the copyright laws of the United States. Contents
of this publication may not be reproduced in any form without permission of Xerox Corporation.
Xerox®and the sphere of connectivity design are trademarks of Xerox Corporation in the United States and/or other countries.
Copyright protection claimed includes all forms of matters of copyrightable materials and information now allowed by statutory or
judicial law or hereinafter granted, including without limitation, material generated from the software programs which are displayed
on the screen such as styles, templates, icons, screen displays, looks, etc.
Changes are periodically made to this document. Changes, technical inaccuracies, and typographic errors will be corrected in
subsequent editions.
Document Version 1.0: December 2009
198
Xerox WorkCentre 5735/5740/5745/5755/5765/5775/5790
Internet Services
Table of Contents
Introduction . . . . . . . . . . . . . . . . . . . . . . . . . . . . . . . . . . . . . . . . . . . . . . . . . . . . . . . . . . . . . . . . . . . . . . . . . . . 200
Using Internet Services . . . . . . . . . . . . . . . . . . . . . . . . . . . . . . . . . . . . . . . . . . . . . . . . . . . . . . . . . . . . . . . . . 201
Status . . . . . . . . . . . . . . . . . . . . . . . . . . . . . . . . . . . . . . . . . . . . . . . . . . . . . . . . . . . . . . . . . . . . . . . . . . . . . . . . . 202
Welcome . . . . . . . . . . . . . . . . . . . . . . . . . . . . . . . . . . . . . . . . . . . . . . . . . . . . . . . . . . . . . . . . . . . . . . . . . . 202
Description & Alerts . . . . . . . . . . . . . . . . . . . . . . . . . . . . . . . . . . . . . . . . . . . . . . . . . . . . . . . . . . . . . . . . 202
Billing Information . . . . . . . . . . . . . . . . . . . . . . . . . . . . . . . . . . . . . . . . . . . . . . . . . . . . . . . . . . . . . . . . . 202
Usage Counters . . . . . . . . . . . . . . . . . . . . . . . . . . . . . . . . . . . . . . . . . . . . . . . . . . . . . . . . . . . . . . . . . . . . 202
Configuration . . . . . . . . . . . . . . . . . . . . . . . . . . . . . . . . . . . . . . . . . . . . . . . . . . . . . . . . . . . . . . . . . . . . . . 203
Consumables . . . . . . . . . . . . . . . . . . . . . . . . . . . . . . . . . . . . . . . . . . . . . . . . . . . . . . . . . . . . . . . . . . . . . . 203
Trays . . . . . . . . . . . . . . . . . . . . . . . . . . . . . . . . . . . . . . . . . . . . . . . . . . . . . . . . . . . . . . . . . . . . . . . . . . . . . . 203
Information Pages . . . . . . . . . . . . . . . . . . . . . . . . . . . . . . . . . . . . . . . . . . . . . . . . . . . . . . . . . . . . . . . . . 203
SMart eSolutions . . . . . . . . . . . . . . . . . . . . . . . . . . . . . . . . . . . . . . . . . . . . . . . . . . . . . . . . . . . . . . . . . . . 203
Jobs . . . . . . . . . . . . . . . . . . . . . . . . . . . . . . . . . . . . . . . . . . . . . . . . . . . . . . . . . . . . . . . . . . . . . . . . . . . . . . . . . . 204
Active Jobs . . . . . . . . . . . . . . . . . . . . . . . . . . . . . . . . . . . . . . . . . . . . . . . . . . . . . . . . . . . . . . . . . . . . . . . . 204
Saved Jobs . . . . . . . . . . . . . . . . . . . . . . . . . . . . . . . . . . . . . . . . . . . . . . . . . . . . . . . . . . . . . . . . . . . . . . . . 204
Print . . . . . . . . . . . . . . . . . . . . . . . . . . . . . . . . . . . . . . . . . . . . . . . . . . . . . . . . . . . . . . . . . . . . . . . . . . . . . . . . . . 205
Scan . . . . . . . . . . . . . . . . . . . . . . . . . . . . . . . . . . . . . . . . . . . . . . . . . . . . . . . . . . . . . . . . . . . . . . . . . . . . . . . . . . 206
Address Book . . . . . . . . . . . . . . . . . . . . . . . . . . . . . . . . . . . . . . . . . . . . . . . . . . . . . . . . . . . . . . . . . . . . . . . . . . 207
Properties . . . . . . . . . . . . . . . . . . . . . . . . . . . . . . . . . . . . . . . . . . . . . . . . . . . . . . . . . . . . . . . . . . . . . . . . . . . . . 208
Support . . . . . . . . . . . . . . . . . . . . . . . . . . . . . . . . . . . . . . . . . . . . . . . . . . . . . . . . . . . . . . . . . . . . . . . . . . . . . . . 209
Help . . . . . . . . . . . . . . . . . . . . . . . . . . . . . . . . . . . . . . . . . . . . . . . . . . . . . . . . . . . . . . . . . . . . . . . . . . . . . . . . . . 210
Xerox WorkCentre 5735/5740/5745/5755/5765/5775/5790
Internet Services
199
Introduction
Introduction
Internet Services uses the embedded HTTP Server on the
device. This allows you to communicate with the Xerox
WorkCentre 5735/5740/5745/5755/5765/5775/5790
through a web browser.
Entering the IP Address of the device as the URL (Universal
Resource Locator) in the browser provides direct access to
the device over the internet or intranet.
Internet Services enables users to perform many functions, including:
• Checking machine status, billing information and consumable status.
• Submitting print jobs over the internet or intranet.
• Setting up the Public Address Book by importing an existing address book, or by adding entries
individually.
• Creating, modifying and deleting Workflow Scanning templates.
• Customizing the device settings such as Energy Saver, Paper Trays and Timeout Settings.
The Internet Services Help function describes all the features and functions available.
200
Xerox WorkCentre 5735/5740/5745/5755/5765/5775/5790
Internet Services
Using Internet Services
Using Internet Services
Prior to connecting to Internet Services the device must be physically connected to the network with
TCP/IP and HTTP enabled. An operational workstation with TCP/IP Internet or Intranet accessibility is
also required. To access Internet Services:
1.
2.
3.
Open the web browser from your Workstation.
In the URL field, enter http:// followed
by the IP Address of the device. For
example: If the IP Address is
192.168.100.100, enter the following
into the URL field:
http://192.168.100.100.
Press Enter to view the Home page.
The Internet Services options for your device are displayed.
Note: To find out the IP Address of your device, print a configuration report. For instructions, refer
to Print Reports on page 236 of Machine and Job Status.
Xerox WorkCentre 5735/5740/5745/5755/5765/5775/5790
Internet Services
201
Status
Status
The Status option provides information about the device.
Welcome
The Welcome page provides information
about setting up and installing your
device.
Once you have reviewed this page it can
be switched off using the Don’t Show
Welcome Page again option.
Description & Alerts
A description of any problems or Alerts on
the device.
Billing Information
Provides the machine serial number, the
number of black impressions and the
number of color impressions made.
Usage Counters
Provides more detailed information on
device usage, such as number of copied
sheets, number of printed sheets, number
of faxes and number of large sheets.
202
Xerox WorkCentre 5735/5740/5745/5755/5765/5775/5790
Internet Services
Status
Configuration
This section displays the configuration of
the device and the option to print a
configuration report.
Consumables
This option provides information on the
life of the device consumables, such as the
Toner Cartridge and Xerographic Module.
Trays
This area displays status information
about all the paper trays. It also provides
information about the tray media and
settings.
Information Pages
Using this option, individual guides can be printed which provide information about the Xerox
WorkCentre 5735/5740/5745/5755/5765/5775/5790 services and features.
It also provides sampler pages which are used for checking the quality and color settings.
Select the guide or sampler page required and select Print.
SMart eSolutions
This option provides information about
the SMart eSolutions enabled on the
device. SMart eSolutions is a hassle free,
hands free, secure way to manage your
device via automatic meter reading,
automatic supplies replenishment and remote diagnostics.
Xerox WorkCentre 5735/5740/5745/5755/5765/5775/5790
Internet Services
203
Jobs
Jobs
The Jobs option provides information about the all the incomplete jobs in the Job List on the device
and the Saved Jobs.
Active Jobs
Use this option to check the status of your
job. The Active Jobs list displays a list of
the current jobs and the status of each job.
Saved Jobs
Jobs which have been saved to the device memory can be accessed using the Saved Jobs option. A
Saved Job can be selected and printed, deleted, copied or moved.
204
Xerox WorkCentre 5735/5740/5745/5755/5765/5775/5790
Internet Services
Print
Print
The Print option enables you to send
a print ready job such as a PDF or
PostScript file to the printer over the
internet. You can send the job from
your desktop or from a remote
location.
To use the Job Submission option:
• Enter the file name of the job
requiring printing, or use the
Browse option to locate the file.
• Program the printing options
required.
• Select Submit Job to send the
job to the printer over the
internet.
Xerox WorkCentre 5735/5740/5745/5755/5765/5775/5790
Internet Services
205
Scan
Scan
The Scan option displays a list of all
the Workflow Scanning templates
that have been created using Internet
Services.
Use the Scan options to create,
modify, copy or delete Workflow
Scanning templates.
For more information about the Scan
options, refer to Workflow Scanning
Options on page 115 of Workflow
Scanning.
206
Xerox WorkCentre 5735/5740/5745/5755/5765/5775/5790
Internet Services
Address Book
Address Book
The device supports two types of address book:
• Internal - A global address book provided by LDAP (Lightweight Directory Access Protocol)
services.
• Public - An address book created from a list of names and addresses saved in a CSV file (Comma
Separated Values) format.
The Address Book tab is used to setup
and manage a Public Address Book.
The file must be in a CSV (Comma
Separated Values) format for the
device to be able to read the file
contents. The device can have access
to both an LDAP server and a Public
Address Book. If both are configured the user will be presented with the choice to use either address
book to select email recipients.
Refer to the System Administrator Guide for further information about Address Books.
Xerox WorkCentre 5735/5740/5745/5755/5765/5775/5790
Internet Services
207
Properties
Properties
The Properties option contains all the
settings, setups and default values for
installing and setting up the device.
These are protected by a user name
and password and should only be
changed by your System
Administrator.
208
Xerox WorkCentre 5735/5740/5745/5755/5765/5775/5790
Internet Services
Support
Support
The Support option contains the
name and telephone number of your
System Administrator and the
telephone numbers you should use for
Customer Support and Supplies.
Xerox WorkCentre 5735/5740/5745/5755/5765/5775/5790
Internet Services
209
Help
Help
Select the Help button to display the Help screens.
The structure of the Help screens corresponds to the structure of the Internet Services options.
Use the menu on the left of the Help page to access descriptions and instructions about all the
features and functions of Internet Services.
210
Xerox WorkCentre 5735/5740/5745/5755/5765/5775/5790
Internet Services
Version 1.0
12/09
®
Xerox WorkCentre
5735/5740/5745/5755/5765/5775/
5790
Paper and Media
©2009 Xerox Corporation. All Rights Reserved. Unpublished rights reserved under the copyright laws of the United States. Contents
of this publication may not be reproduced in any form without permission of Xerox Corporation.
Xerox®and the sphere of connectivity design are trademarks of Xerox Corporation in the United States and/or other countries.
Copyright protection claimed includes all forms of matters of copyrightable materials and information now allowed by statutory or
judicial law or hereinafter granted, including without limitation, material generated from the software programs which are displayed
on the screen such as styles, templates, icons, screen displays, looks, etc.
Changes are periodically made to this document. Changes, technical inaccuracies, and typographic errors will be corrected in
subsequent editions.
Document Version 1.0: December 2009
212
Xerox WorkCentre 5735/5740/5745/5755/5765/5775/5790
Paper and Media
Table of Contents
Introduction . . . . . . . . . . . . . . . . . . . . . . . . . . . . . . . . . . . . . . . . . . . . . . . . . . . . . . . . . . . . . . . . . . . . . . . . . . . 214
Trays 1 and 2 . . . . . . . . . . . . . . . . . . . . . . . . . . . . . . . . . . . . . . . . . . . . . . . . . . . . . . . . . . . . . . . . . . . . . . . . . . 215
Loading Trays 1 and 2 . . . . . . . . . . . . . . . . . . . . . . . . . . . . . . . . . . . . . . . . . . . . . . . . . . . . . . . . . . . . . . 216
Trays 3 and 4 . . . . . . . . . . . . . . . . . . . . . . . . . . . . . . . . . . . . . . . . . . . . . . . . . . . . . . . . . . . . . . . . . . . . . . . . . . 217
Loading Trays 3 and 4 . . . . . . . . . . . . . . . . . . . . . . . . . . . . . . . . . . . . . . . . . . . . . . . . . . . . . . . . . . . . . . 218
Bypass Tray . . . . . . . . . . . . . . . . . . . . . . . . . . . . . . . . . . . . . . . . . . . . . . . . . . . . . . . . . . . . . . . . . . . . . . . . . . . 219
Loading the Bypass Tray . . . . . . . . . . . . . . . . . . . . . . . . . . . . . . . . . . . . . . . . . . . . . . . . . . . . . . . . . . . 220
Tray 5 . . . . . . . . . . . . . . . . . . . . . . . . . . . . . . . . . . . . . . . . . . . . . . . . . . . . . . . . . . . . . . . . . . . . . . . . . . . . . . . . . 221
Loading Tray 5 . . . . . . . . . . . . . . . . . . . . . . . . . . . . . . . . . . . . . . . . . . . . . . . . . . . . . . . . . . . . . . . . . . . . . 222
Tray 6 (Inserter) . . . . . . . . . . . . . . . . . . . . . . . . . . . . . . . . . . . . . . . . . . . . . . . . . . . . . . . . . . . . . . . . . . . . . . . 223
Loading Tray 6 (Inserter) . . . . . . . . . . . . . . . . . . . . . . . . . . . . . . . . . . . . . . . . . . . . . . . . . . . . . . . . . . . 223
Media Types . . . . . . . . . . . . . . . . . . . . . . . . . . . . . . . . . . . . . . . . . . . . . . . . . . . . . . . . . . . . . . . . . . . . . . . . . . 225
Storage and Handling . . . . . . . . . . . . . . . . . . . . . . . . . . . . . . . . . . . . . . . . . . . . . . . . . . . . . . . . . . . . . . . . . . 227
Xerox WorkCentre 5735/5740/5745/5755/5765/5775/5790
Paper and Media
213
Introduction
Introduction
This guide describes the different types of media that can be used in your device, the paper trays
available and the types and sizes of media that can be loaded and fed from each tray. It also identifies
the orientation the media can be loaded, Long Edge Feed (LEF) or Short Edge Feed (SEF).
Detailed media specifications for this device are provided at www.xerox.com.
6
7
1
2
5
3
4
1
2
3
4
Paper Tray 1: This tray is standard on the device. It
is a fully adjustable tray and is used for media sizes
A5 LEF to A3 SEF (5.5x8.5” LEF to 11x17” SEF). The
capacity for this tray is 500 sheets of 75 gsm or
20 lb paper.
Paper Tray 2: This tray is standard on the device. It
is a fully adjustable tray and is used for media sizes
A5 LEF to A3 SEF (5.5x8.5” LEF to 11x17” SEF). The
capacity for this tray is 500 sheets of 75 gsm or
20 lb paper.
Paper Tray 3: This tray is standard on the device. It
is a dedicated tray and is set to a fixed size, either
A4 or 8.5x11”. The capacity for this tray is 2000
sheets of 75 gsm or 20 lb paper.
Paper Tray 4: This tray is standard on the device. It
is a dedicated tray and is set to a fixed size, either
A4 or 8.5x11”. The capacity for this tray is 1600
sheets of 75 gsm or 20 lb paper.
5
6
7
Tray 5: An optional high capacity paper source
which feeds A4 or 8.5x11” Long Edge Feed (LEF)
media as standard. Optional kits are available to
accommodate 11x17”, A3, 8.5x14”, 8.5x11” or A4
Short Edge Feed (SEF) media. The capacity for this
tray is 4000 sheets of 75 gsm or 20 lb paper (A4 or
8.5x11” LEF), up to 2000 sheets of 75 gsm or 20 lb
paper (optional kits).
Tray 6 (Post Process Inserter): An optional paper
tray for use with the High Volume Finisher. It is
used to insert pre-printed sheets into copy sets.
The device cannot print on sheets fed from this
tray. The capacity for this tray is 250 sheets of
75 gsm or 20 lb paper.
Bypass Tray: This tray is also standard on the
device and is used for non-standard printing
media. It can be used for media sizes in the range
A6 SEF to A3 SEF (4.25x5.5” SEF to 11x17” SEF).
The capacity for this tray is 100 sheets of 75 gsm
or 20 lb paper.
The trays automatically detect low media and out of media conditions. A warning message is
displayed on the screen when a tray requires loading.
Always use the information labels in each of the trays for guidance on loading orientations and
maximum fill information.
214
Xerox WorkCentre 5735/5740/5745/5755/5765/5775/5790
Paper and Media
Trays 1 and 2
Trays 1 and 2
Trays 1 and 2 are located on the front of the device and feed the majority of media sizes. Media can be
loaded Long Edge Feed (LEF) or Short Edge Feed (SEF). Your device uses a system of programable
settings to manage the trays and media. These settings are established by your System Administrator
who can set Trays 1 and 2 to Fully Adjustable or Dedicated.
• Fully Adjustable if this option is set, the paper settings screen is displayed each time the tray is
opened and closed. The drop-down menus are used to change the size, type and color of the
media loaded. The guides automatically detect the size of media loaded and the device gives a
warning if the guides are not set correctly or a non-standard media size is used.
• Dedicated when a tray is opened a screen is displayed identifying the media that should be
loaded in the tray. If the wrong size of media is loaded, or the tray guides are set incorrectly, the
device gives a warning to adjust the guides.
Note: Only the System Administrator can change the media attributes for a dedicated tray.
If a non-standard size media is loaded, or the tray guides are set incorrectly, the device displays a
screen showing Unknown size and asking you to confirm or change the settings.
If set to Adjustable, the following media can be loaded in Trays 1 and 2:
• Up to 500 sheets of 75 gsm or 20 lb paper.
• Weights from 60 to 200 gsm (16 to 53 lb).
Note: For 80 gsm paper capacities are slightly lower then specified.
•
•
Media sizes in the range A5 LEF to A3 SEF (5.5x8.5” LEF to 11x17” SEF). Custom sizes are also
supported.
Media types:
• Plain, Bond and Recycled
• Punched
• Letterhead and Pre-printed
• Heavyweight
• Pre-cut tabs
• Rough Surface
Trays 1 and 2 must not be used to feed labels, transparencies or envelopes. The Bypass Tray can be
used for these media types. The optional Envelope Tray can be used in place of Tray 2 for envelopes.
Xerox WorkCentre 5735/5740/5745/5755/5765/5775/5790
Paper and Media
215
Trays 1 and 2
Loading Trays 1 and 2
If Tray 1 or Tray 2 is set as a Dedicated tray, the media requested must be loaded in the tray and the
settings cannot be adjusted.
CAUTION: A problem will occur if a tray is opened while it is being used to feed media. Do not
open Tray 1 if Tray 2 is open.
1.
2.
3.
4.
5.
216
Open the tray.
Place the media in the tray. Media must be positioned
against the left side of the tray.
• Load pre-printed paper face-down and with the
top towards the front of the device.
• Load hole punched paper with the holes on the
left edge.
Paper must not be loaded above the maximum fill line.
Make sure that the paper guides just touch the paper.
• To position the right side guide, squeeze the
clamp mechanism and slide the guide to touch the right edge of the media.
• To position the rear guide, squeeze the clamp mechanism and slide the guide to touch the
rear edge of the media.
Close the paper tray.
The paper settings for the tray are displayed on the touch screen.
Confirm or change the settings, as required.
Xerox WorkCentre 5735/5740/5745/5755/5765/5775/5790
Paper and Media
Trays 3 and 4
Trays 3 and 4
Trays 3 and 4 are optional high capacity paper trays. They are intended to be the primary feeders for
the most commonly used media. They are set as dedicated trays and feed only A4 or 8.5x11” LEF sized
media. The following media can be loaded in each tray:
• Tray 3:
• Up to 2000 sheets of 75 gsm or 20 lb paper.
• Weights from 60 to 200 gsm (16 to 53 lb).
• Tray 4:
• Up to 1600 sheets of 75 gsm or 20 lb paper.
• Weights from 60 to 200 gsm (16 to 53 lb).
Note: For 80 gsm paper capacities are slightly lower then specified.
•
Media types which can be used in either tray:
• Plain, Bond and Recycled
• Punched
• Letterhead and Pre-printed
• Heavyweight
• Pre-cut tabs
• Rough Surface
Trays 3 and 4 must not be used to feed labels, transparencies, envelopes or tabs. The Bypass Tray can
be used for these media types.
Xerox WorkCentre 5735/5740/5745/5755/5765/5775/5790
Paper and Media
217
Trays 3 and 4
Loading Trays 3 and 4
Only A4 or 8.5x11” LEF sized media can be loaded. The media size and type requested must be loaded
in the tray and the settings cannot be adjusted by the user.
Note: Your device does not warn you if the wrong sized media is loaded.
CAUTION: A problem may occur if a tray is opened while it is being used to feed media.
1.
2.
3.
4.
218
Opening the tray automatically lowers an elevator in
the base of the tray.
The media required is displayed on the screen. Ensure
the correct media is loaded.
Place the media in the tray. Media must be positioned
against the left side of the tray.
• Load pre-printed paper face-down and with the
top towards the front of the device.
• Load hole punched paper with the holes on the
left edge.
Paper must not be loaded above the maximum fill line.
Close the paper tray. When the tray is closed the elevator rises to feed the media.
Xerox WorkCentre 5735/5740/5745/5755/5765/5775/5790
Paper and Media
Bypass Tray
Bypass Tray
The Bypass Tray is a paper tray on the left hand side of your device and can be folded away when not
in use. It is primarily intended for use as a small quantity, special materials feeder and accommodates
media of all types including transparencies (non-paper backed), envelopes and tabs.
When media is detected in the Bypass Tray a paper settings screen is displayed. The drop-down menus
are used to change the size, type and color of the media loaded. The guides automatically detect the
size of media loaded and the device gives a warning if the guides are not set correctly or a nonstandard media size is used. The following media can be loaded in the Bypass Tray:
• Up to 100 sheets of 75 gsm or 20 lb paper.
• Weights from 60 to 216 gsm (16 to 56 lb).
Note: For 80 gsm paper capacities are slightly lower then specified.
•
•
Media sizes in the range A6 SEF to A3 SEF (4.25x5.5” SEF to 11x17” SEF). Envelope sizes DL to C4
(#10 to 9x12”), all envelopes must be fed Short Edge Feed (SEF).
Media types:
• Plain, Bond and Recycled
• Punched
• Letterhead and Pre-printed
• Heavyweight
• Transparency
• Labels
• Pre-cut tabs
• Envelopes
• Rough Surface
Note: Labels can only be printed 1-sided.
Xerox WorkCentre 5735/5740/5745/5755/5765/5775/5790
Paper and Media
219
Bypass Tray
Loading the Bypass Tray
Your device alerts you if the Bypass Tray is selected for a job and the media requested does not match
the media currently loaded. It also warns you if the tray runs out of paper during a job.
1.
2.
3.
4.
220
Make sure the tray is in the down position. For larger
media, use the tray extension.
Place the media on the tray. Locate the media to the
right edge.
• Load pre-printed paper and labels face-up and
with the top towards the front of the device.
• Load hole punched paper with the holes on the
right.
• Load transparencies face-up with the white strip
on the right.
For information about loading tabs, refer to Media Types on page 225.
Paper must not be loaded above the maximum fill line.
Make sure that the guides just touch the paper.
The paper settings for the tray are displayed on the
touch screen.
The tray detects the position of the side guide to
determine the size of the media.
Confirm or change the settings, as required.
Xerox WorkCentre 5735/5740/5745/5755/5765/5775/5790
Paper and Media
Tray 5
Tray 5
Tray 5 is an optional high capacity paper source. When
installed, Tray 5 takes priority as the primary paper feeder.
This tray is a dedicated tray and as standard feeds A4 or
8.5x11” Long Edge Feed (LEF) media. Optional kits are
available to accommodate 11x17”, A3, 8.5x14”, 8.5x11” or
A4 Short Edge Feed (SEF) media. The following media can
be loaded in Tray 5:
• Up to 4000 sheets of 75 gsm or 20 lb paper (A4 or
8.5x11” LEF), up to 2000 sheets of 75 gsm or 20 lb
paper (optional kits).
• Weights from 60 to 216 gsm (16 to 56 lb).
Note: For 80 gsm paper capacities are slightly lower then specified.
•
Media types:
• Plain, Bond and Recycled
• Punched
• Letterhead and Pre-printed
• Heavyweight
• Rough Surface
Tray 5 must not be used to feed labels, transparencies, envelopes or tabs. The Bypass Tray can be used
for these media types.
Xerox WorkCentre 5735/5740/5745/5755/5765/5775/5790
Paper and Media
221
Tray 5
Loading Tray 5
The media size and type requested must be loaded in the tray and the settings cannot be adjusted by
the user.
Note: Your device does not warn you if the wrong sized media is loaded.
CAUTION: A problem may occur if a tray is opened while it is being used to feed media.
1.
2.
3.
4.
222
Press the button to open the door.
Opening the tray automatically lowers an elevator in the base of the tray. Wait for the paper tray
to lower.
The media required is displayed on the screen. Ensure the correct media is loaded.
Place the media in the tray. Media must be positioned against the right side of the tray.
• Load pre-printed paper face-up and with the top
towards the front of the device.
• Load hole punched paper with the holes on the
right edge.
Paper must not be loaded above the maximum fill line.
Close the door.
When the door is closed the elevator rises to feed the
media.
Xerox WorkCentre 5735/5740/5745/5755/5765/5775/5790
Paper and Media
Tray 6 (Inserter)
Tray 6 (Inserter)
Tray 6 (Inserter) is an optional paper tray for use with the
High Volume Finisher and is used for inserting post process
sheets in the set. This tray provides a very convenient and
efficient way of adding pre-printed covers or inserts to a
job. The following media can be loaded in Tray 6 (Inserter):
• Up to 250 sheets of 75 gsm or 20 lb paper.
• Weights from 60 to 216 gsm (16 to 56 lb).
Note: For 80 gsm paper capacities are slightly lower
then specified.
•
•
Media sizes:
• A4 or 8.5x11” SEF or LEF
• 8.5x13” SEF
• 8.5x14” SEF
• A3 or 11x17” SEF
Media types:
• Plain, Bond or Recycled
• Punched
• Letterhead
• Pre-printed
Tray 6 (Inserter) must not be used to feed labels, envelopes, tabs or carbonless paper. The Bypass Tray
can be used for these media types.
Loading Tray 6 (Inserter)
A4 or 8.5x11” media may be loaded either long edge feed or short edge feed. Media sizes larger than
A4 or 8.5x11” must be loaded short edge feed.
1.
2.
3.
Place the media in the correct orientation for the job.
The labels on the top of Tray 6 (Inserter) provide
instructions for input and output orientations. Refer to
Orientation of Pre-printed Media on page 224.
The paper is registered to the left edge of the tray.
Paper must not be loaded above the maximum fill line.
Make sure that the guides just touch the paper.
Xerox WorkCentre 5735/5740/5745/5755/5765/5775/5790
Paper and Media
223
Tray 6 (Inserter)
Orientation of Pre-printed Media
It is important to load the media in the correct orientation so that it matches the output. The table
below compares the various original orientations and how the pre-printed media should be loaded in
each case.
Paper Size and
Orientation
Output Required
A4, 8.5x11” LEF
Long Edge Feed
Stapled Top Left or
Non-stapled
A4, 8.5x11” SEF
Short Edge Feed
Stapled Top Left or
Non-stapled
A4, 8.5x11” SEF
Short Edge Feed
Staple Bottom Left or
Non-stapled
A4, 8.5x11” SEF
Short Edge Feed
Stapled Top Left or
Non-stapled
A4, 8.5x11” LEF
Booklets from
A4/8.5x11” Long
Edge Feed Originals
A3/A4 11x17”/8.5x11”
SEF
Booklets from A4/A3
or 11x17”/8.5x11”
SEF Originals In
Booklet Format
224
Original
Orientation
Xerox WorkCentre 5735/5740/5745/5755/5765/5775/5790
Paper and Media
Output Tray
Orientation
Inserter
Orientation (to
match output)
Media Types
Media Types
This section describes the different types of media which can be loaded in your device. For further
information about media types and specifications, refer to www.xerox.com.
The Type can be selected from a drop-down menu for the adjustable trays. It is important to select the
correct Type setting for the media loaded in each tray. The device can detect different types of media
as it travels through the paper path and will halt a job if a mismatch occurs.
The following table identifies the media types available, a description of each type and the tray
loading instructions.
Media Type
Description
Loading Instructions
Plain, Recycled and
Bond
The device supports media
that has been designed for
laser devices, such as Xerox
Recycled paper.
Plain, Recycled and Bond paper can be loaded in any
tray.
Carbonless paper can also be used with this media
type, instructions for use are provided with the paper.
Punched
Used for hole punched and
perforated media which
has two or more holes
along one edge for use in
ring binders and
notebooks.
Before loading hole punched media make sure that
any plugs (the round pieces cut out of the paper to
create the holes) do not remain in the stack. Fan the
media to separate the individual sheets.
Trays 1, 2, 3 and 4:
• Load paper face-down with the holes on the left
edge.
Tray 5 and Bypass Tray:
• Load paper face-up with the holes on the right.
Transparency
Used to create images that
can be projected on to a
screen for presentations, or
as covers. Transparencies
are made of polyester film
coated with a chemical
substance. Clear
transparencies allow
maximum presentation
space.
Bypass Tray only:
• Load paper-backed transparencies face-up with
the adhesive side to the right.
• Load transparencies which have a white strip
along one edge with the strip to the right and on
the underside of the transparencies.
• Load transparencies on top of a small stack of
same-size paper and fan transparencies to stop
them sticking together.
• If a coating of oil remains on the transparency
after printing, remove it with a lint free cloth.
Letterhead and Preprinted
Used for pre-printed, forms
and letterhead paper.
Trays 1, 2, 3 and 4:
• Load pre-printed paper face-down with the top to
the front of the device.
Tray 5 and Bypass Tray:
• Load pre-printed paper face-up with the top to
the front of the device.
Xerox WorkCentre 5735/5740/5745/5755/5765/5775/5790
Paper and Media
225
Media Types
Media Type
Description
Loading Instructions
Labels
Labels that have been
designed for laser devices,
such as Xerox Labels are
supported. The adhesives
are designed to withstand
the higher temperatures of
these devices without
bleeding and causing
spotting or damage to the
internal components.
Labels should be left in the printing environment for
72 hours before being used in the printer to allow
them to adjust to the ambient temperature.
Leave labels sealed in their plastic wrapping until
they are ready to be loaded into the printer.
Bypass Tray:
• Load labels face-up in the Bypass Tray with the
top towards the front of the device.
Note: Dry gum labels can
cause dry particles of glue
to detach from the backing
and should not be used.
Pre-Cut Tabs
Tabs are used as dividers in
documents. Your device
can accommodate tabs
with 1 to 10 tabs and
weights of up to 200 gsm
(53 lb bond).
Note: Do not use tabs with
bent corners. They can
cause feeding related
problems. If a tab is bent,
remove it from the set and
replace it with an
undamaged tab in the
same position.
Note: Do not fan the label sheets before use unless
the package instructs you to do so. If jamming or
multi-sheet feeding occurs shuffle the labels before
loading. Labels can only be printed 1-sided.
Trays 1and 2:
• Load pre-cut tabs in the tray with the tab edge to
the right (on the trailing edge) with the top tab to
the front of the tray.
Bypass Tray:
• Load pre-cut tabs in the Bypass Tray with the tab
edge to the left (on the trailing edge) with the top
tab to the front of the tray.
Ensure the tab sequence and number of tab sets is
correct for the document being copied or printed, and
the quantity required.
For information about programing a tab job, refer to
Build Job on page 57 for copy jobs and Add
Exceptions on page 152 for print jobs.
Heavyweight
Use this media type for
feeding heavyweight paper
and card. The maximum
weight which can be fed is
216 gsm (56 lb bond).
Trays 1, 2, 3 and 4:
• Load up to 200 gsm (53 lb bond) paper.
Tray 5 and Bypass Tray:
• Load up to 216 gsm (56 lb bond) paper or card.
Paper capacities are reduced for heavyweight paper,
ensure the paper does not exceed the maximum fill
line in each tray.
Rough Surface
(optional on some
configurations)
Use this media type for
paper which has a rough
surface.
Rough Surface paper can be loaded in any tray.
226
Xerox WorkCentre 5735/5740/5745/5755/5765/5775/5790
Paper and Media
Storage and Handling
Media Type
Description
Loading Instructions
Envelopes
The device supports
diamond/banker, pocket
and wallet envelopes.
Lightweight and medium
weight are acceptable and
envelope seals can be
gummed or press and seal.
The following envelope
sizes are supported:
• DL (Wallet) and C5
(Wallet and Pocket)
• Monarch and #10
(Wallet)
• Custom Sizes (less
reliable feed and image
quality)
Bypass Tray:
• Load envelopes face-up. The flaps should always
be open and on the trailing edge.
Optional Envelope Tray:
• The optional envelope tray is installed instead of
Tray 2.
• Load envelopes into the envelope tray face-down
with the long edge of the envelope along the left
side of the tray.
• Place wallet type envelopes (flap on the long side)
with the flap open and facing to the right of the
tray.
Place pocket type envelopes (flap on short side)
with the flap either open or closed and facing to
the rear of the tray.
• Move the rear guide so that it just touches the
envelopes. Move the right side guide so that the
tip of the guide just touches the envelopes.
• Ensure the maximum fill line is visible or that
there are no more than 50 envelopes in the tray.
Note: Do not feed window,
board backed, gusset type,
padded or peal and seal
envelopes, or envelopes
with triangular flaps.
Storage and Handling
It is important for optimum printing that paper is stored correctly. Take note of the following when
storing media:
• Store at ambient temperature. Damp paper may cause problems or poor image quality.
• Do not open reams of paper until they are required for use. The ream wrapper contains an inner
lining that protects the paper from moisture.
• Store on a flat surface to prevent the paper from folding or curling.
• Stack reams of paper carefully on top of one another to avoid crushing the edges. Do not stack
more than five reams on top of each other.
For problem free printing and copying, observe the following when loading paper into the paper trays:
• Do not use folded or wrinkled papers.
• Do not load paper of varied sizes into the tray.
• If feed problems occur, fan the media or shuffle labels before loading.
Xerox WorkCentre 5735/5740/5745/5755/5765/5775/5790
Paper and Media
227
Storage and Handling
228
Xerox WorkCentre 5735/5740/5745/5755/5765/5775/5790
Paper and Media
Version 1.0
12/09
®
Xerox WorkCentre
5735/5740/5745/5755/5765/5775/
5790
Machine and Job Status
©2009 Xerox Corporation. All Rights Reserved. Unpublished rights reserved under the copyright laws of the United States. Contents
of this publication may not be reproduced in any form without permission of Xerox Corporation.
Xerox®and the sphere of connectivity design are trademarks of Xerox Corporation in the United States and/or other countries.
Copyright protection claimed includes all forms of matters of copyrightable materials and information now allowed by statutory or
judicial law or hereinafter granted, including without limitation, material generated from the software programs which are displayed
on the screen such as styles, templates, icons, screen displays, looks, etc.
Changes are periodically made to this document. Changes, technical inaccuracies, and typographic errors will be corrected in
subsequent editions.
Document Version 1.0: December 2009
230
Xerox WorkCentre 5735/5740/5745/5755/5765/5775/5790
Machine and Job Status
Table of Contents
Introduction . . . . . . . . . . . . . . . . . . . . . . . . . . . . . . . . . . . . . . . . . . . . . . . . . . . . . . . . . . . . . . . . . . . . . . . . . . . 232
Job Status . . . . . . . . . . . . . . . . . . . . . . . . . . . . . . . . . . . . . . . . . . . . . . . . . . . . . . . . . . . . . . . . . . . . . . . . . . . . . 233
Active Jobs . . . . . . . . . . . . . . . . . . . . . . . . . . . . . . . . . . . . . . . . . . . . . . . . . . . . . . . . . . . . . . . . . . . . . . . . 233
Completed Jobs . . . . . . . . . . . . . . . . . . . . . . . . . . . . . . . . . . . . . . . . . . . . . . . . . . . . . . . . . . . . . . . . . . . . 234
Managing Jobs . . . . . . . . . . . . . . . . . . . . . . . . . . . . . . . . . . . . . . . . . . . . . . . . . . . . . . . . . . . . . . . . . . . . 234
Machine Status . . . . . . . . . . . . . . . . . . . . . . . . . . . . . . . . . . . . . . . . . . . . . . . . . . . . . . . . . . . . . . . . . . . . . . . . 236
Machine Information . . . . . . . . . . . . . . . . . . . . . . . . . . . . . . . . . . . . . . . . . . . . . . . . . . . . . . . . . . . . . . 236
Faults . . . . . . . . . . . . . . . . . . . . . . . . . . . . . . . . . . . . . . . . . . . . . . . . . . . . . . . . . . . . . . . . . . . . . . . . . . . . . 237
Supplies . . . . . . . . . . . . . . . . . . . . . . . . . . . . . . . . . . . . . . . . . . . . . . . . . . . . . . . . . . . . . . . . . . . . . . . . . . . 238
Billing Information . . . . . . . . . . . . . . . . . . . . . . . . . . . . . . . . . . . . . . . . . . . . . . . . . . . . . . . . . . . . . . . . . 238
Tools . . . . . . . . . . . . . . . . . . . . . . . . . . . . . . . . . . . . . . . . . . . . . . . . . . . . . . . . . . . . . . . . . . . . . . . . . . . . . . 239
Xerox WorkCentre 5735/5740/5745/5755/5765/5775/5790
Machine and Job Status
231
Introduction
Introduction
This section explains how to use the Machine Status and
Job Status functions. These are both accessed by buttons
on the control panel.
• Job Status displays all the jobs in the job list waiting
to be processed, and the completed jobs. Each list can
be viewed by selecting the relevant tab.
• Machine Status provides information about the
installed options on your device, the status of the
paper trays and consumables, user documentation and fault information.
The serial number and device details are also provided, along with usage information such as the
number of impressions and number of scanned images.
232
Xerox WorkCentre 5735/5740/5745/5755/5765/5775/5790
Machine and Job Status
Job Status
Job Status
The job lists can be accessed by pressing the Job Status button. Information about current jobs and
completed jobs is displayed.
Active Jobs
This screen displays all the jobs currently in the list waiting to be processed. Each job is identified with
the following information Owner, Name and Status. The Active Jobs list displays up to 150 jobs.
• Select the Job Status button on the control panel.
The Active Jobs list is displayed.
Use the scroll bar to access all the jobs in the list.
The most recently submitted job is displayed at the
bottom of the list.
• The sequence of jobs can be altered by promoting or
deleting jobs in the list.
• The Status is updated as the jobs are processed and printed. The following Status information can
be shown:
• Printing the device is currently printing the job.
• Scheduling the job has been converted into the appropriate format and is being scheduled to
print.
• Pending the job has been scanned, but is awaiting the resources to be formatted.
• Paused the active job was paused. The pause can be initiated using the Stop button on the
control panel, by selecting Pause from the print queue screen on your computer or due to a
system fault during the running of the job. The job is not deleted from the list and can be
resumed.
• Interrupted the job was interrupted because a task at the device is being carried out. Once
the task has been completed the interrupted job automatically continues.
• Sending the device is sending the job through a network transmission.
• Completed the job was successfully completed without errors.
• Waiting for Printer the job is ready to print and is waiting for the current job to finish printing
and the required resources to become available.
• Formatting the job is being converted into the appropriate format. For print tasks the job is
decompressed, for fax, internet fax, scan and e-mail tasks the job is compressed.
• Scanning the device is currently scanning the image for this job, ready for formatting.
• Held the job has been temporarily stopped from printing. The job remains in the job list and
continues to proceed up the list as prior jobs are printed. If a held job is at the top of the list
all subsequent jobs continue to be processed and printed, a held job does not hold up other
jobs in the list. There are various reasons why a job might be held, for example the job is a
secure print or the required resources are not available. The reason for the held status is
displayed on the Job Progress screen.
• Receiving the device is receiving the job through a network transmission.
• Deleted the job has been deleted from the job list.
Xerox WorkCentre 5735/5740/5745/5755/5765/5775/5790
Machine and Job Status
233
Job Status
•
• Completed with Errors the job was completed with errors.
Select All Jobs and use the drop-down list to filter the jobs and display only Copy, Print and Fax
Received Jobs or Scan Jobs and Fax Sent Jobs which are active on the device.
Completed Jobs
This option displays the jobs which have been completed on the device. Up to 150 jobs can be
displayed. The Owner, Name and Status of each job is shown.
• Select the Job Status button on the control panel.
The Active Jobs list is displayed.
• Select Completed Jobs.
The list of completed jobs is displayed.
Use the scroll bar to access all the jobs in the list.
• To view the details of a completed job, select the job.
The job details are displayed.
Select Close to exit the Job Details screen.
• Select All Jobs to filter the jobs and display only Copy, Print and Fax Received Jobs or Scan Jobs
and Fax Sent Jobs that have been completed.
Managing Jobs
Job Progress
When a job is processing or a job in the Active Jobs list is selected, the Job Progress screen is displayed.
The Job Progress screen provides information about the job and provides Job Control options. You can
also view the Job Details and the Required Resources to complete the job.
• Required Resources displays the resources needed to
complete the job, for example special paper or staples.
• Program Next Job is used to select the service and
features required for the next job while the current job
is in progress.
• Job Controls the following job controls are available:
• Delete removes the selected job from the list. Any
job can be deleted using the feature, regardless of
the job originator.
• Promote is used to move a job to the top of the list. It will be completed after the current job.
• Hold pauses the job until it is released or deleted.
• Release is selected if a Secure Print job has been held in the list and a passcode is required or
if a job has been held.
234
Xerox WorkCentre 5735/5740/5745/5755/5765/5775/5790
Machine and Job Status
Job Status
•
Job Details provides information about the job
depending on the type of job, for example the
submission time, image quality settings, the owner,
finishing options, sender’s e-mail address.
Held Jobs
If a job is Held in the list it requires additional resources or
a passcode to print.
1.
2.
3.
Select the job in the list.
If the job requires additional resources to print, select
Required Resources to find out the resource required.
If the job is a Secure Print or a Secure Receive job a
passcode is required to release the job for printing.
Ensure the job resources are available in order for the
job to print, or select Release and enter the passcode.
If the passcode is valid, the job is released for printing.
Xerox WorkCentre 5735/5740/5745/5755/5765/5775/5790
Machine and Job Status
235
Machine Status
Machine Status
When the Machine Status button is selected, information about the device is displayed.
Machine Information
General Information about the device is displayed on the
right, providing customer support and supplies contact
details, the machine serial number and the software
version number. If installed, the Fax Line ID is also
displayed.
The following options are also available:
Paper Tray Status
Information about each of the trays, including the Bypass
Tray is displayed. The paper Size, Type and Color are the
attributes set when loading the trays.
Information Pages
This option provides access to individual guides and posters
which can be selected and printed on your device. The
guides provide information about the setup, functions and
features of your Xerox WorkCentre
5735/5740/5745/5755/5765/5775/5790.
Select the document required and select Print.
Print Reports
Using this option, a System Configuration report can be
printed. This provides information about your device,
including the serial number, IP Address, device
configuration and the software version. It also provides
details of the last 20 faults and the number to call for
assistance.
Select Print Report to print the System Configuration
report. The report is sent to the job list, processed and
printed.
236
Xerox WorkCentre 5735/5740/5745/5755/5765/5775/5790
Machine and Job Status
Machine Status
Machine Hardware Options
This option displays a list of the Services or additional
solutions which have been installed on your device. Use the
scroll bar to access the entire list.
Machine Software Versions
This option displays the software version of each of the
device components. This information may be required by a
Xerox Representative for trouble-shooting purposes or
when software upgrades are performed.
Faults
The Faults tab displays fault listings and the device error
logs.
The faults are separated into All Faults, Active Messages
and Event Log.
All Faults
This option displays a list of current faults on the device.
Each fault can be selected for further information. Select Instructions for fault clearance instructions.
Active Messages
This option displays a list of all the current fault messages. The message and the code associated with
the message is displayed.
Event Log
The Event Log is a log of all the device errors. A fault code and the date and time of the fault is
displayed. If the fault occurred during a job, the image count and the paper size of the job is also
provided.
Xerox WorkCentre 5735/5740/5745/5755/5765/5775/5790
Machine and Job Status
237
Machine Status
Supplies
The Supplies tab provides status information about the
device consumables. The percentage remaining is
displayed for toner and customer replaceable units. The
projected number of days remaining for the document feed
roller, xerographic module and fuser module is also shown.
Billing Information
The Billing Information tab provides the usage counters
for all the services.
• Total Impressions displays the total number of print
and copy impressions the device has made. This is the
counter used for billing purposes.
• Black Copied Impressions displays the total number
of impressions made using Copy.
• Black Printed Impressions displays the total number
of impressions made using Print.
• Network Images Sent displays the number of images sent from the device using the Workflow
Scanning option.
• Internet Fax Images Sent displays the number of images sent from the device using the Internet
Fax option.
• E-mail Images Sent displays the number of images sent from the device using the E-mail option.
• Server Fax Impressions displays the number of images sent from the device using the Server Fax
option.
• Internet Fax Impressions displays the number of prints which have been made using the Internet
Fax option.
• Embedded Fax Impressions displays the number of prints which have been made using the Fax
option.
• Embedded Fax Images Sent displays the number of images which have been sent from the
device using the Fax option.
• Black Stored Image Printed Impressions displays the number of prints made from black and
white images stored on the device.
• Colored Stored Image Printed Impressions displays the number of prints made from color
images stored on the device.
238
Xerox WorkCentre 5735/5740/5745/5755/5765/5775/5790
Machine and Job Status
Machine Status
Tools
Tools provides access to the administrative and
maintenance tools for the device. Access to the entire Tools
options is restricted. General users are permitted to access
options such as Display Brightness, Xerographic Module
Cleaning, Option Enablement and Configuration Report.
Note: Information about the Tools option is provided
in the Administration and Accounting guide, and the
System Administration Guide. Contact your System
Administrator for more details.
Xerox WorkCentre 5735/5740/5745/5755/5765/5775/5790
Machine and Job Status
239
Machine Status
240
Xerox WorkCentre 5735/5740/5745/5755/5765/5775/5790
Machine and Job Status
Version 1.0
12/09
®
Xerox WorkCentre
5735/5740/5745/5755/5765/5775/
5790
Administration and Accounting
©2009 Xerox Corporation. All Rights Reserved. Unpublished rights reserved under the copyright laws of the United States. Contents
of this publication may not be reproduced in any form without permission of Xerox Corporation.
Xerox®and the sphere of connectivity design are trademarks of Xerox Corporation in the United States and/or other countries.
Copyright protection claimed includes all forms of matters of copyrightable materials and information now allowed by statutory or
judicial law or hereinafter granted, including without limitation, material generated from the software programs which are displayed
on the screen such as styles, templates, icons, screen displays, looks, etc.
Changes are periodically made to this document. Changes, technical inaccuracies, and typographic errors will be corrected in
subsequent editions.
Document Version 1.0: December 2009
242
Xerox WorkCentre 5735/5740/5745/5755/5765/5775/5790
Administration and Accounting
Table of Contents
Tools . . . . . . . . . . . . . . . . . . . . . . . . . . . . . . . . . . . . . . . . . . . . . . . . . . . . . . . . . . . . . . . . . . . . . . . . . . . . . . . . . . 244
Accessing Tools . . . . . . . . . . . . . . . . . . . . . . . . . . . . . . . . . . . . . . . . . . . . . . . . . . . . . . . . . . . . . . . . . . . . 244
Device Settings . . . . . . . . . . . . . . . . . . . . . . . . . . . . . . . . . . . . . . . . . . . . . . . . . . . . . . . . . . . . . . . . . . . . . . . . 245
General . . . . . . . . . . . . . . . . . . . . . . . . . . . . . . . . . . . . . . . . . . . . . . . . . . . . . . . . . . . . . . . . . . . . . . . . . . . 245
Paper Management . . . . . . . . . . . . . . . . . . . . . . . . . . . . . . . . . . . . . . . . . . . . . . . . . . . . . . . . . . . . . . . . 247
Consumables Management . . . . . . . . . . . . . . . . . . . . . . . . . . . . . . . . . . . . . . . . . . . . . . . . . . . . . . . . . 249
Timers . . . . . . . . . . . . . . . . . . . . . . . . . . . . . . . . . . . . . . . . . . . . . . . . . . . . . . . . . . . . . . . . . . . . . . . . . . . . . 250
Output Options . . . . . . . . . . . . . . . . . . . . . . . . . . . . . . . . . . . . . . . . . . . . . . . . . . . . . . . . . . . . . . . . . . . . 251
Display Brightness . . . . . . . . . . . . . . . . . . . . . . . . . . . . . . . . . . . . . . . . . . . . . . . . . . . . . . . . . . . . . . . . . 252
Xerographic Module Cleaning . . . . . . . . . . . . . . . . . . . . . . . . . . . . . . . . . . . . . . . . . . . . . . . . . . . . . . . 252
Option Enablement . . . . . . . . . . . . . . . . . . . . . . . . . . . . . . . . . . . . . . . . . . . . . . . . . . . . . . . . . . . . . . . . 252
Job Operation Rights . . . . . . . . . . . . . . . . . . . . . . . . . . . . . . . . . . . . . . . . . . . . . . . . . . . . . . . . . . . . . . . 253
Configuration Report . . . . . . . . . . . . . . . . . . . . . . . . . . . . . . . . . . . . . . . . . . . . . . . . . . . . . . . . . . . . . . . 253
Altitude Adjustment . . . . . . . . . . . . . . . . . . . . . . . . . . . . . . . . . . . . . . . . . . . . . . . . . . . . . . . . . . . . . . . . 253
Display Options . . . . . . . . . . . . . . . . . . . . . . . . . . . . . . . . . . . . . . . . . . . . . . . . . . . . . . . . . . . . . . . . . . . . 253
Service Settings . . . . . . . . . . . . . . . . . . . . . . . . . . . . . . . . . . . . . . . . . . . . . . . . . . . . . . . . . . . . . . . . . . . . . . . . 255
Feature Defaults . . . . . . . . . . . . . . . . . . . . . . . . . . . . . . . . . . . . . . . . . . . . . . . . . . . . . . . . . . . . . . . . . . . 255
Job Sheets . . . . . . . . . . . . . . . . . . . . . . . . . . . . . . . . . . . . . . . . . . . . . . . . . . . . . . . . . . . . . . . . . . . . . . . . . 256
Reduce/Enlarge Presets . . . . . . . . . . . . . . . . . . . . . . . . . . . . . . . . . . . . . . . . . . . . . . . . . . . . . . . . . . . . . 257
Fax Settings . . . . . . . . . . . . . . . . . . . . . . . . . . . . . . . . . . . . . . . . . . . . . . . . . . . . . . . . . . . . . . . . . . . . . . . 258
Optional Services . . . . . . . . . . . . . . . . . . . . . . . . . . . . . . . . . . . . . . . . . . . . . . . . . . . . . . . . . . . . . . . . . . 263
Auto Image Rotation . . . . . . . . . . . . . . . . . . . . . . . . . . . . . . . . . . . . . . . . . . . . . . . . . . . . . . . . . . . . . . . 264
Network Settings . . . . . . . . . . . . . . . . . . . . . . . . . . . . . . . . . . . . . . . . . . . . . . . . . . . . . . . . . . . . . . . . . . . . . . 265
Network Setup . . . . . . . . . . . . . . . . . . . . . . . . . . . . . . . . . . . . . . . . . . . . . . . . . . . . . . . . . . . . . . . . . . . . . 265
Online/Offline . . . . . . . . . . . . . . . . . . . . . . . . . . . . . . . . . . . . . . . . . . . . . . . . . . . . . . . . . . . . . . . . . . . . . 265
Ethernet Physical Media . . . . . . . . . . . . . . . . . . . . . . . . . . . . . . . . . . . . . . . . . . . . . . . . . . . . . . . . . . . . 265
802.1x . . . . . . . . . . . . . . . . . . . . . . . . . . . . . . . . . . . . . . . . . . . . . . . . . . . . . . . . . . . . . . . . . . . . . . . . . . . . 265
IP Sec . . . . . . . . . . . . . . . . . . . . . . . . . . . . . . . . . . . . . . . . . . . . . . . . . . . . . . . . . . . . . . . . . . . . . . . . . . . . . 266
USB Printer Port . . . . . . . . . . . . . . . . . . . . . . . . . . . . . . . . . . . . . . . . . . . . . . . . . . . . . . . . . . . . . . . . . . . . 266
Accounting . . . . . . . . . . . . . . . . . . . . . . . . . . . . . . . . . . . . . . . . . . . . . . . . . . . . . . . . . . . . . . . . . . . . . . . . . . . . 267
Authentication . . . . . . . . . . . . . . . . . . . . . . . . . . . . . . . . . . . . . . . . . . . . . . . . . . . . . . . . . . . . . . . . . . . . . 267
Security Settings . . . . . . . . . . . . . . . . . . . . . . . . . . . . . . . . . . . . . . . . . . . . . . . . . . . . . . . . . . . . . . . . . . . 268
Security Settings . . . . . . . . . . . . . . . . . . . . . . . . . . . . . . . . . . . . . . . . . . . . . . . . . . . . . . . . . . . . . . . . . . . . . . . 268
On Demand Image Overwrite . . . . . . . . . . . . . . . . . . . . . . . . . . . . . . . . . . . . . . . . . . . . . . . . . . . . . . . 268
Troubleshooting . . . . . . . . . . . . . . . . . . . . . . . . . . . . . . . . . . . . . . . . . . . . . . . . . . . . . . . . . . . . . . . . . . . . . . . 269
Image Quality Test Patterns . . . . . . . . . . . . . . . . . . . . . . . . . . . . . . . . . . . . . . . . . . . . . . . . . . . . . . . . 270
User Interface Tests . . . . . . . . . . . . . . . . . . . . . . . . . . . . . . . . . . . . . . . . . . . . . . . . . . . . . . . . . . . . . . . . 269
Echo test . . . . . . . . . . . . . . . . . . . . . . . . . . . . . . . . . . . . . . . . . . . . . . . . . . . . . . . . . . . . . . . . . . . . . . . . . . 270
Network Connectivity Test . . . . . . . . . . . . . . . . . . . . . . . . . . . . . . . . . . . . . . . . . . . . . . . . . . . . . . . . . . 270
Image Quality Adjustment . . . . . . . . . . . . . . . . . . . . . . . . . . . . . . . . . . . . . . . . . . . . . . . . . . . . . . . . . 271
Xerox Customer Support . . . . . . . . . . . . . . . . . . . . . . . . . . . . . . . . . . . . . . . . . . . . . . . . . . . . . . . . . . . . 271
Software Reset . . . . . . . . . . . . . . . . . . . . . . . . . . . . . . . . . . . . . . . . . . . . . . . . . . . . . . . . . . . . . . . . . . . . 271
Xerox WorkCentre 5735/5740/5745/5755/5765/5775/5790
Administration and Accounting
243
Tools
Tools
The settings on the device can be setup via two options, Internet Services or Tools. This guide explains
the options available in Tools. For information about the settings available in Internet Services, refer to
the System Administrator Guide.
These options should be setup and customized by the System Administrator. Therefore access to the
Tools options is passcode protected. Entry to the Tools pathway is via the Machine Status button on
the control panel.
Accessing Tools
1.
2.
3.
4.
Press the Machine Status button.
Select the Tools tab.
To have access to all the Tools options you must be
logged in as an Administrator.
To log in select the Log In/Out button on the control
panel.
Use the keyboard to enter your User Name, then
select the Next button.
Use the keyboard to enter your Password, then select the Enter button.
Note: The default user name and password are: admin and 1111.
The Tools options are displayed.
Most Tools screens include the following buttons to confirm or cancel your choices:
• Undo resets the current screen to the values that were displayed when the screen was
opened.
• Cancel resets the screen and returns to the previous screen.
• Save saves the selections made and returns to the previous screen.
• Close closes the screen and returns to the previous screen.
244
Xerox WorkCentre 5735/5740/5745/5755/5765/5775/5790
Administration and Accounting
Device Settings
Device Settings
The Device Settings are used to customize options which
are specific to the device, such as Energy Saver and Paper
Tray settings.
General
Select the General option to access the following settings:
• Energy Saver on page 245
• Date & Time on page 246
• Audio Tones on page 246
• Screen Defaults on page 246
• Measurements on page 247
Energy Saver
The device is designed to be energy efficient and automatically reduces its power consumption after
periods of inactivity. This utility enables the Administrator to modify the time the device spends
between standby, low power and sleep modes.
• Intelligent Ready wakes up and sleeps automatically based on previous usage.
• Job Activated wakes up the device when activity is detected. There are two modes, Low Power
Mode and Sleep Mode. Enter the minutes required for each option or use one of the Auto Presets
options.
• From Standby Mode to Low Power Mode enter a time between 1 and 120 minutes.
• From Low Power Mode to Sleep Mode enter a time between 10 and 120 minutes.
• Auto Presets these presets have been setup with recommended settings that comply with
energy saving regulations. To use one of the preset options, select the option required. The
settings for the option are displayed in the entry boxes.
Xerox WorkCentre 5735/5740/5745/5755/5765/5775/5790
Administration and Accounting
245
Device Settings
Date & Time
Some features and functions on the device require the local date and time, such as Annotations, Delay
Send or the Configuration report. This utility enables you to set and change the local date and time on
the device.
• Date select the Format required and enter the Month, Day and Year.
• Time enter the correct Hour and Minutes and select PM or AM. If a 24 hour clock is required,
select the 24 hour clock option and enter the Hour and Minutes using the 24 hour clock format.
• GMT Offset (Time Zone) use this option to set the difference between your local time and
Greenwich Mean Time. Enter the GMT Offset time between -12.0 and 14.0 hours using the arrow
buttons.
• Select Reboot to save and reboot the device, or Cancel to exit without saving.
Audio Tones
The device generates three types of audio tones to notify the user of an event that has occurred at the
device. Use this feature to switch off or adjust the volume of each of the tones.
• Fault Tone sounds when there is a fault on the device. Select High, Medium, Low or Off. Use the
Test option to hear the tone selected.
• Conflict Tone sounds when an incorrect touch screen selection has been made. Select High,
Medium, Low or Off. Use the Test option to hear the tone selected.
• Selection Tone sounds when the device accepts your selection or when you touch a button on the
touch screen. Select High, Medium, Low or Off. Use the Test option to hear the tone selected.
Screen Defaults
Selecting Screen Defaults allows you to choose the initial screen that users will see at the device,
display either the Active or Completed jobs list, or change the default language displayed on the touch
screen.
The options are:
• Entry Screen Default this feature enables the Administrator to set which screen the user sees first,
Services, Job Status or Machine Status.
• Job Status Default this feature controls which jobs list and types of jobs appear on the screen
when the Job Status button is pressed.
• Language Default this feature is used to select the language that is displayed when the device is
switched on.
• Services Default this feature allows the Administrator to select the Service that is displayed as the
default service, or to select the Services Home screen as the default. Use the Promote and Demote
buttons to place the services into the order required.
246
Xerox WorkCentre 5735/5740/5745/5755/5765/5775/5790
Administration and Accounting
Device Settings
Measurements
This utility enables you to set the device to display measurements either in millimeters or inches, and
the numeric separator as a period (full stop) or a comma.
• Units is used to select Inches or mm (millimeters) as the unit of measure.
• Numeric Separator is used to define which character is used to separate numbers, select Comma
or Period.
Paper Management
Select the Paper Management option to access the following settings:
• Paper Settings on page 247
• Tray Settings on page 247
• Default Paper Settings on page 248
• Standard Size Required on page 248
• Paper Substitution on page 248
• Tray Information Timeout on page 248
Paper Settings
Use to specify the size, type and color of the media in a tray that has been designated as a dedicated
tray. For information about setting up a dedicated tray, refer to Tray Settings below.
• Select a tray designated as a dedicated tray.
• Change Size is used to select the size required for the tray. Select the size of media loaded in
the tray and select Save.
• Change Description is used to specify the paper type and color. It is important this setting
matches the paper type and color loaded in the device. Select the appropriate Paper Type
and Color setting and select Save.
• Repeat the process for each of the trays as required.
Tray Settings
Use to apply attributes to each paper tray so they operate productively in your own working
environment. You can assign trays as dedicated to a specific paper size and type, and setup Auto
Selection and the selection Priority of each tray.
• Select the tray required and select Change Settings.
• Select the Tray Type required:
• Dedicated is set to contain one size and type of media only and cannot be adjusted by the
user.
• Fully Adjustable is selected if the tray can be adjusted by the user to contain any media
within specification. This option may not be available for all trays.
• Tray Priority is used to indicate which tray is selected if trays contain the same media, it also
determines in which order the trays are displayed on the Copy tab. Set the Tray Priority between 1
- 99. 1 is the highest priority and 99 is the lowest.
Xerox WorkCentre 5735/5740/5745/5755/5765/5775/5790
Administration and Accounting
247
Device Settings
•
•
Auto Selection enables the device to choose the best media for the job. This setting also enables
the device to automatically switch from one tray to another when a tray runs out of paper and
another tray is available with the same media loaded. Select Enable or Disable.
Repeat the process for each of the trays as required.
Default Paper Settings
This option allows you to set the default media type and color. This is the most common media that
will be used in the device and is the media that the device will feed if a specific media type is not
selected.
• Paper Type select the default media type required from the list shown.
• Paper Color select the default media color required from the list shown.
Standard Size Required
This feature determines which paper sizes are selected when Auto Paper is used during a copy job and
the required paper size is not available.
• Enable allows the device to select the best match for the job when the required paper is not
available, plus or minus 5mm of the standard size.
• Disable allows the system to use the closest paper size that accommodates the entire image. If
this is not available, the job is held by the system.
Paper Substitution
Enables the device to automatically substitute common US and metric paper sizes when printing.
• Nearest Match select Enable to allow the device to automatically substitute the paper sizes
shown on the screen e.g. if an A4 document is received for printing and only 8.5x11" paper is
available, the device substitutes 8.5x11" for A4. Select Disable to ensure the device does not
substitute the sizes shown. In this instance, a job would be held in the job list until the correct
paper size is loaded.
Note: Substituting paper sizes may result in image loss.
•
Reduce Size when this feature is enabled, the device will substitute A3 or 11x17” for a job
requesting 8.5x14” media.
Tray Information Timeout
When Tray 1 or 2 are opened and closed the Tray Information screen is displayed asking the user to
confirm the size and type of the paper loaded in the tray. This feature enables the Administrator to set
the length of time the Tray Information screen is displayed.
• Enable allows you to specify the length of time that Tray Information screen is displayed.
• Timeout select the timeout period required, 0, 20 or 40 seconds.
• Disable when this option is selected, the Tray Information screen will be displayed until the user
selects Confirm.
248
Xerox WorkCentre 5735/5740/5745/5755/5765/5775/5790
Administration and Accounting
Device Settings
Consumables Management
Select the Consumables Management option to access the following settings:
• Service Plan on page 249
• Feed Roll Replacement on page 249
• Ozone Filter Replacement on page 249
• Xerographic Reordering on page 249
• Fuser Module Replacement on page 249
• Toner Cartridge Reordering on page 250
Service Plan
This option is used to change your Xerox Service Plan. To change the plan, contact the Xerox Support
Center with your machine serial number. Xerox will provide you with a Service Plan Authorization
Number. Enter the number and select the Enter button.
Feed Roll Replacement
This option provides notification of how many days the Document Feed Roll has until it reaches the
end of its life.
Ozone Filter Replacement
The Ozone Filter is a customer replaceable unit. This option provides notification of how many days
the Ozone Filter has until it reaches the end of its life. The Ozone Filter has the same life as the Fuser
Module and is supplied with the Fuser Module. Always replace the Ozone Filter at the same time as the
Fuser Module.
Xerographic Reordering
The Xerographic Module has a specific life expectancy and will occasionally need to be replaced to
maintain good image quality. This option is used to set the interval in days between the appearance of
the “Re-order” message and the day that the new module should be installed.
• Reorder Notification enter the number of days notification required between 1 and 25.
• Cancel Current Notifications once the re-order message has appeared and you have placed your
order for a new module, you can switch the message off by selecting this button.
Fuser Module Replacement
The Fuser Module has a specific life expectancy and will occasionally need to be replaced to maintain
good image quality. This option is used to set the interval in days between the appearance of the “Reorder” message and the day that the new module should be installed.
• Reorder Notification enter the number of days notification required between 1 and 25.
• Cancel Current Message(s) once the re-order message has appeared and you have placed your
order for a new module, you can switch the message off by selecting this button.
Xerox WorkCentre 5735/5740/5745/5755/5765/5775/5790
Administration and Accounting
249
Device Settings
Toner Cartridge Reordering
Toner usage depends on the type and the number of images printed. The device calculates how long
the toner will last according to your usage and displays the information on the Machine Status
Supplies screen. It also uses this information to inform you when to order a new Toner Cartridge and
when to install it. This option allows you to control how the toner usage monitoring system works.
• Reorder Notification enter the number of days notification required between 1 and 25.
• Toner Cartridge Status when this option is Enabled, the device will analyse the toner usage,
predict the % toner remaining and the estimated number of days remaining. When this option is
Disabled, the device will not predict the toner usage and you will not receive a re-order reminder.
• Cancel Current Notification once the re-order message has appeared and you have placed your
order for a new module, you can switch the message off by selecting this button.
• Confirm Toner Replacement if you replace the toner cartridge when instructed to do so by the
message on the display, the device resets the toner usage counters. If you choose to install a new
toner cartridge before the message is displayed, you will have to reset the toner usage counters
manually by selecting this option.
Note: Selecting this option when you haven’t replaced a toner cartridge will disable the toner reorder message for this toner cartridge.
Timers
Select the Timers option to access the following settings:
• System Timeout use to set whether the device should return to the default screen and feature
settings after a set period of time.
• Enable instructs the device to timeout after the specified period of time. Select the period of
time between 1 and 10 minutes using the slide bar.
• Disable should be selected if you do not want the device to automatically return to the
default settings after a set period of time.
• Auto Resume Timer if the device is stopped during a job, this feature determines if the device
automatically resumes the job after a set period of time or whether it waits for user intervention
to resume the job. This can prevent a user leaving the device in a stopped or paused state.
• Auto Resume is selected to automatically resume stopped operations at the time
designated. Select the period of time the device waits before resuming using the arrow
buttons, between 15 and 120 seconds.
• Wait for User instructs the system to remain stopped until a user selects Resume or Cancel.
• Incomplete Scan if a job is scanning using the document feeder it can be interrupted by pressing
the Stop button on the control panel before all the documents have been scanned. If the
documents are removed from the document feeder, this timer determines the time before the
partially scanned job is deleted from memory. This prevents the memory from storing partially
scanned jobs.
• Enable instructs the device to timeout after the specified period of time. Select the period of
time between 1 and 10 minutes using the slide bar.
• Disable if this option is selected the device will not delete partially scanned jobs from
memory.
250
Xerox WorkCentre 5735/5740/5745/5755/5765/5775/5790
Administration and Accounting
Device Settings
•
Held Job Timeout use this option to enable the device to delete jobs which have been held in the
job list for a specified period of time and have not been cleared by a user. E-mail, workflow
scanning, incoming server fax, embedded fax and internet fax jobs are not affected by this setting.
• Enable instructs the device to automatically delete held jobs after the specified period of
time. Select the period of time between 1 and 120 hours and 0 and 59 minutes.
• Disable if this option is selected the device will not delete held jobs from memory.
Output Options
Select the Output option to access the following settings:
• Output Location on page 251
• Out of Staples Options on page 251
• Within Job Offsetting on page 251
• Staple Productivity Mode on page 252
Output Location
If your device has a finisher, this utility enables you to specify which output tray receives specific types
of jobs within the limitations of the finisher and the finishing requirements. The Output Location
options you have depend upon the finishing options selected.
• Non-Stapled and Non-Punched Jobs select the output location for non-finished Copy Jobs, Fax
Jobs, Print Jobs and Reports.
• Punched and Stapled Jobs select the output location for hole punched and stapled Copy Jobs,
Fax Jobs, Print Jobs and Reports.
• Stapled Jobs select the output location for all stapled Copy Jobs, Fax Jobs, Print Jobs and Reports.
• Punched Jobs select the output location for all hole punched Copy Jobs, Fax Jobs, Print Jobs and
Reports.
Out of Staples Options
If your device has a finisher you can set how the device handles a stapling job when the stapler runs
out of staples.
• Complete Job Without Stapling instructs the device to continue the job without stapling.
• Fault/Hold Job instructs the device to hold the job in the job list for the user. If a job has already
started and the staples run out, a fault is declared.
Within Job Offsetting
The device offsets every set from the previous set, making it easier to separate the sets. There maybe
occasions when you require the job to stack without offsetting. Use this feature to enable or disable
the offsetting.
• Enable instructs the device to offset each printed set.
• Disable instructs the device to stack the sets without offsetting.
Xerox WorkCentre 5735/5740/5745/5755/5765/5775/5790
Administration and Accounting
251
Device Settings
Output Performance
This feature enables the Administrator to optimize the performance of the finisher for either speed or
improved stacking alignment. The feature is only available if your device is fitted with a High Volume
Finisher.
Note: This setting does not apply to stapled jobs.
•
•
Optimum Speed this option produces well stacked jobs at the maximum operating speed of the
device.
Optimum Stacking with this option selected the output prints will be collated every 10 pages.
This will produce better alignment of the finished stack but will reduce the output speed of the
device.
Staple Productivity Mode
This feature enables the Administrator to improve productivity when stapling long edge feed,
landscape jobs. The feature is only available if your device is fitted with a High Volume Finisher.
• Enable delivers landscape documents stapled in the top right corner.
• Disable delivers landscape documents stapled in the top left corner.
Display Brightness
Enables you to adjust the brightness of the touch screen to suit the ambient light levels.
• Adjust the brightness as required using the indicator.
Xerographic Module Cleaning
This option is used to initiate the Xerographic Module Cleaning cycle. This will help prolong the life of
the Xerographic Module and maintain image quality.
• Select the Clean button. A message is displayed stating that Xerographic Module cleaning is in
progress.
• When the message disappears the cleaning cycle is complete.
Option Enablement
If you have been instructed to enter an enablement code by the Xerox Support Center, use this option
to enter the code.
• Select the entry box and enter the code using the numeric keypad.
• Select Enter.
252
Xerox WorkCentre 5735/5740/5745/5755/5765/5775/5790
Administration and Accounting
Device Settings
Contention Management
The device is capable of processing several jobs at the same time, such as scanning, sending a fax, and
printing a job. At times, 2 jobs may require the same resource and the contention management system
decides which job has priority. This device enables you to change the priority of print and copy jobs.
• Priority enables you to choose which jobs have priority, Copy or Print jobs. Use the arrow buttons
to set the priority for the Copy Jobs and Print Jobs. Number 1 has the highest priority.
• First In, First Out instructs the device to process jobs based on when they are received. The jobs
are processed in the order they enter the job list.
Job Operation Rights
To delete a job from the Active Jobs list, you must have permission. The feature enables the
Administrator to set the delete permissions.
• Select the All Users button to give all users the right to delete any job in the jobs list.
• Select the System Administrator only button to give just the System Administrator rights to delete
jobs from the jobs list.
Configuration Report
Provides various options for printing the configuration report when the device is powered on.
• Print Report prints the configuration report on power up.
• Do Not Print Report prevents the configuration report from printing on power up.
• Print Now prints the configuration report immediately.
Altitude Adjustment
The xerographic process used in your device to make prints is affected by air pressure. Air pressure is
determined by the height of the device above sea level. The device will automatically compensate for
differences in air pressure if you input the approximate height of the device above sea level. The
adjustment can be set in meters or feet.
Display Options
The Book Copying, Book Faxing and Booklet Creation features in their default modes assume that the
books and booklets have a reading order of left to right. In some countries the reading order is from
right to left. This utility provides additional options for both features to enable the user to select the
appropriate reading order.
• Book Scan Order if set to On the user of the Book Copying or Book Faxing feature will be able to
choose to scan both pages of a bound original, either left page then right page or right page then
left page.
• Booklet Print Order if set to On the user of the Booklet Creation feature will be able to choose to
print the booklet so that the pages can be read from left to right or from right to left.
Xerox WorkCentre 5735/5740/5745/5755/5765/5775/5790
Administration and Accounting
253
Device Settings
Document Feeder Size Sensing
The Document Feeder automatically senses the size of the documents being fed from the input tray so
that features such as Auto Paper selection can be used. It can automatically detect 18 different sizes of
document which includes all the standard sizes the user is likely to use. This feature enables you to set
up the document feeder so that it will detect a different or custom size of document that you may use
regularly.
• To customize the Document Feeder Size Sensing, place the document in the document feeder in
the correct orientation and adjust the guides.
• Select the Document Feeder Size Sensing feature.
The screen displays the default document size detected.
• To change the document size select the size you require from the list. If the size required is not
available, select the Custom Size button and enter the size required. When you have entered the
size of the document, select Save.
Remove the document from the document feeder and then place it back in again. The device
should detect the size of your document and display it on the screen.
254
Xerox WorkCentre 5735/5740/5745/5755/5765/5775/5790
Administration and Accounting
Service Settings
Service Settings
The Service Settings are used to customize options which
are specific to individual services, such as Copy, Fax or Print.
Feature Defaults
Select the Feature Defaults option to access the following
settings:
• Set Fax Defaults on page 255
• Set Copy Defaults on page 255
• Set ID Card Copy Defaults on page 255
Set Fax Defaults
Use to select the default settings for each programing feature within the Fax service, such as 2-Sided
Scanning, Original Type and Resolution.
• Select the default required for each feature in each of the programing tabs.
• Select End Defaults. The settings selected become the default settings for each Fax job.
• A confirmation screen is displayed, select Done to return to the previous screen.
Set Copy Defaults
Use to select the default settings for each programing feature within the Copy service, such as Paper
Supply, Copy Output and 2-Sided Copy.
• Select the default required for each feature in each of the programing tabs.
• Select End Defaults. The settings selected become the default settings for each Copy job.
• A confirmation screen is displayed, select Done to return to the previous screen.
Set ID Card Copy Defaults
Use to select the default settings for each programing feature within the ID Card Copy service, such as
Paper Supply, Image Quality - Side 1 and Image Quality - Side 2.
• Select the default required for each feature.
• Select End Defaults. The settings selected become the default settings for each ID Card Copy job.
• A confirmation screen is displayed, select Done to return to the previous screen.
Xerox WorkCentre 5735/5740/5745/5755/5765/5775/5790
Administration and Accounting
255
Service Settings
Job Sheets
Select the Job Sheets option to access the following settings:
• Banner Sheets on page 256
• Output Error Sheets on page 256
• Scan Status Sheet on page 256
• Paper Type & Color on page 256
• Server Fax Status Sheet on page 256
Banner Sheets
With this option the device can print a banner sheet with every print job. If enabled, you can still
choose not to print the banner sheet from the print driver for specific jobs.
• Print Banner Sheets select Enable to print a banner sheet or Disable to switch off the banner
sheet option.
• Print Driver Override select Enable to allow the print driver to produce Banner Sheets if required,
or Disable to only use the device setting.
Output Error Sheets
Enables the device to print an error report if an error occurs during a print job.
• Enable is selected to print an Output Error Sheet.
• Disable switches off the Output Error Sheet option.
Scan Status Sheet
This feature enables the device to print a status sheet when a Workflow Scanning job is completed.
• Enable is selected to print a Scan Status Sheet.
• Disable switches off the Scan Status Sheet.
• Errors Only prints a Scan Status Sheet if an error occurred during the job.
Paper Type & Color
Allows you to select the type and color of media used to print the job sheets.
• Select the required Paper Type and Paper Color.
Server Fax Status Sheet
This feature enables the device to print a status sheet when a Server Fax job is completed.
• Enable is selected to print a Server Fax Status Sheet.
• Disable switches off the Server Fax Status Sheet.
• Errors Only prints a Server Fax Status Sheet if an error occurred during the job.
256
Xerox WorkCentre 5735/5740/5745/5755/5765/5775/5790
Administration and Accounting
Service Settings
Reduce/Enlarge Presets
Select the Reduce/Enlarge Presets option to access the following settings:
• Reduce/Enlarge Presets on page 257
• Basic Copy Presets on page 257
Reduce/Enlarge Presets
Use to set the 6 reduction or enlargement ratios that are displayed when you select More on the
Reduce/Enlarge panel of the Copy screen.
• Normal these ratios produce a proportional reduction or enlargement of the image. To change
one of the preset ratios, select the appropriate preset window and use the numeric keypad to type
in the required value.
• Custom enables the user to reduce or enlarge the image disproportionately, that is with a
different ratio for the X and Y axis. To change a setting, select the required axis window, X or Y and
use the numeric keypad to type in the required value.
Basic Copy Presets
When the Basic Copy Presets window opens, 2 lists each containing the 6 Reduce/Enlarge presets are
displayed. The current Reduce/Enlarge presets that are displayed on the basic copying screen are
highlighted. If you want different preset ratios displayed, select your preferred ratio in each list.
Xerox WorkCentre 5735/5740/5745/5755/5765/5775/5790
Administration and Accounting
257
Service Settings
Fax Settings
Select the Fax Settings option to access the following settings:
• Fax Transmission Defaults on page 258
• Fax Country Setting on page 259
• Incoming Fax Defaults on page 260
• File Management on page 261
• Line Setup on page 262
• Fax Report Options on page 263
Fax Transmission Defaults
Use these options to set the fax sending defaults.
Automatic Redial Setup
If the device cannot make contact with the destination fax machine, it automatically waits and redials
later. Use this setting to specify the interval between unsuccessful attempts and the number of times
the device redials.
• Redial Time Interval is used to specify the time interval between redials for a failed transmission.
Between 1 and 25 minutes can be entered.
• Automatic Redial Attempts instructs the device how many times to redial the remote fax
machine before rejecting the job. Between 0 and 14 attempts can be entered.
Automatic Resend
If the device connects to the receiving fax machine but the fax transmission is unsuccessful the device
automatically attempts to resend the fax. Use this setting to specify how may attempts should be
made to resend the fax, and which pages should be resent.
• Number of Resends is used to specify how many times the fax is resent. Between 0 and 5 can be
selected.
• Failed page(s) without a Cover Page is selected to resend the failed pages but not the cover page
again.
• Failed page(s) with a Cover Page is selected if only the failed pages should be resent with a cover
page.
• Whole Job without a Cover Page is selected if the entire job should be resent but not the cover
page.
• Whole Job with Cover Page is selected if the whole job, including the cover page should be resent.
258
Xerox WorkCentre 5735/5740/5745/5755/5765/5775/5790
Administration and Accounting
Service Settings
Audio Line Monitor
When the device is transmitting a fax the dialing, handshake and digital data creates audible beeps
and buzzing sounds. The audio line monitor allows a user to listen to the call progress and hear the
number dialled and the beginning of the handshake.
• Enable allows the transmission tones to be heard. Select High, Medium or Low. Set the Line
Monitor Duration between 1 and 25 Seconds.
• Disable deactivates the sounds.
Transmission Header Text
When a fax is sent it includes the telephone number, name, date, time and page number at the top of
each page of the fax. You can add personalized sentence to the header of all the fax pages using this
option.
• Enter the text required on the Header. Up to 30 characters can be entered. Use the backspace key
to delete an incorrect character entry, or use Clear Text to delete the entire entry.
Batch Send
Use this feature to enable a user to send several fax jobs to the same destination in one transmission
using the Delay Send option. For information about using Batch Send, refer to Batch Send on page 69
of Fax.
• Disable switches off the function.
• Enable activates the Batch Send option.
Note: If Batch Send is enabled and a delay send job is programmed, any subsequent fax jobs
programmed to send to the same destination will automatically be added to the batch and
delayed until the scheduled time.
Fax Country Setting
Use this option to select the country the device is located in. Reboot the device after setting this option.
• Select the Country required from the options shown.
Xerox WorkCentre 5735/5740/5745/5755/5765/5775/5790
Administration and Accounting
259
Service Settings
Incoming Fax Defaults
This setting allows you to select the default options for incoming faxes.
Auto Answer Delay
This setting allows you to set a time delay before the device responds to a call. This is particularly
useful if the device is attached to a shared telephone line.
• Enter the time delay required, between 0 and 15 seconds.
Junk Fax Prevention
This setting enables you to prevent the receipt of unwanted (junk) faxes. This is done by only allowing
the receipt of faxes from numbers held in the individual directory.
• Disabled switches off the Junk Fax Prevention option.
• Enabled allows only faxes sent from numbers held in the individual directory to be received.
Note: Faxes sent from numbers not entered into the individual directory will not be received.
Receive Printing Mode
The feature determines whether an incoming fax is printed onto media that is selected automatically
by the device according to the parameters of the fax, or specified manually within this feature.
• Automatic an incoming fax will be printed on paper that most closely matches the attributes of
the fax.
• Manual use this option to control the media used for printing incoming faxes. There are 4
parameters that you can set, Paper Size, Stock Defaults, Page Margin and Receive Header.
Ring Volume
This setting enables the user to hear a ringing tone from the device when an incoming fax is being
received.
• Disabled deactivates the tone.
• Enabled instructs the device to sound the tone when a fax is received. Select High, Medium or
Low.
Secure Receive
If this option is enabled, a 4 digit passcode is requested. The passcode is then required in order to print
any incoming fax.
• Disable enables all incoming faxes to print without the passcode.
• Enable activates Secure Receive, enter a 4-digit passcode to be used to release incoming fax jobs
for printing.
260
Xerox WorkCentre 5735/5740/5745/5755/5765/5775/5790
Administration and Accounting
Service Settings
Default Output Options
If your device is fitted with a finisher you are able to staple, 2 hole punch or 2-side your incoming faxes.
This utility is used to specify the output options you require for all your incoming faxes.
• Stapled staples all incoming fax output if enabled.
• Punched prints all incoming faxes on 2 hole punched media if enabled.
• Duplex prints all incoming faxes 2-sided if enabled.
Advanced Capabilities
This feature allows the device to use the full capabilities of the fax card to improve document
transmission speed and resolution.
Note: Enabling this option may prevent faxes being received from older fax machines.
•
•
Disable switches off the option.
Enable switches on the option.
File Management
Use the File Management options to identify how long fax documents will be held on the device and
setup Mailboxes.
Mailbox & Polling Policies
Use this option to specify how long the system keeps documents received or stored in mailboxes before
deleting.
• Documents Received in Mailbox is used to specify the policy for documents received from remote
machines.
• Delete On Print deletes the document after printing.
• Keep 1 - 72 Hours allows you to specify between 1 and 72 hours before deleting the
document.
• Keep Forever keeps the document until manually deleted. A confirmation screen is displayed
as this can cause the memory to become full very quickly.
• Documents Stored for Polling is used to specify the policy for documents stored in the device for
polling.
• Delete On Poll deletes the document after it has been polled.
• Keep 1 - 72 Hours allows you to specify between 1 and 72 hours before deleting the
document.
• Keep Forever keeps the document until manually deleted. A confirmation screen is displayed
as this can cause the memory to become full very quickly.
Xerox WorkCentre 5735/5740/5745/5755/5765/5775/5790
Administration and Accounting
261
Service Settings
Mailbox Setup
Incoming Faxes can be stored in mailboxes prior to printing for convenience or added security. Users
can print the faxes in their mailboxes at anytime. This option enables you to create, edit and delete
mailboxes. There is also a facility to print a list of all 200 mailboxes.
The Mailbox List displays the list of mailboxes available on the system. If a mailbox has already been
setup and assigned a user a name, the name is displayed next to the mailbox number.
• Edit Mailbox... is used to setup or amend an individual mailbox. Select the mailbox required from
the Mailbox List and select Edit.
• Mailbox Passcode is used to enter a 4-digit passcode required to access the mailbox.
• Mailbox Name is used to enter a name for the mailbox, e.g. the owner, department or group.
Use the backspace key to delete an incorrect character entry or Delete Text to delete the
entire entry.
• Mailbox Notification is enabled to provide notification of faxes received into the mailbox. If
disabled, no notification is provided.
• Delete Mailbox is used to delete a mailbox which has already be setup. A confirmation screen
displays a warning that the mailbox and its contents are deleted if Confirm is selected.
• Print Mailbox List is used to print a list of all the mailboxes available on the system.
Line Setup
The standard fax option supports one analogue telephone line. If the Extended Fax option is installed
the device can support two analogue fax lines. This option enables you to set up each line.
• Line Setup is used to select the line being setup.
• Fax Number is the number of the phone line your system is attached to. Enter the number for Line
1 using the numeric keypad.
• Fax Name is a friendly name to logically identify the system. Enter the name using the keyboard
provided. Use the backspace key to delete an incorrect character, or use the X button to delete the
entire entry. Select Save.
• Options determine whether the line is able to Send and Receive, Send Only or Receive Only.
Select the required option for the fax line.
• Dial Type select Tone or Pulse for the dial type.
• Uninstall Line is used to remove a fax line from the device.
262
Xerox WorkCentre 5735/5740/5745/5755/5765/5775/5790
Administration and Accounting
Service Settings
Fax Report Options
There are 3 fax reports available, Activity Report, Broadcast and MultiPoll Report and Transmission
Report. This option enables you to specify the appearance and printing behavior of these reports.
• Activity Report provide information on the fax activities which have occurred on the device:
• Auto Print is used to print an Activity automatically.
• Disable is selected if the Activity Report is not required.
• Broadcast & Multipoll Report provides a report when there is broadcast or multi-poll fax activity.
• Always Print prints a report after each broadcast or multipoll fax transmission.
• Print on Error is selected if the report is required only when an error occurs.
• Disable switches off the report.
• Transmission/Broadcast Report Appearance is used to add an image of the front page of the fax
to your report:
• Reduced Image is used to add the image.
• No Image is selected if an image is not required.
• Transmission Report provides information on an individual transmission.
• Always Print prints a report after each fax transmission.
• Print on Error is selected if the report is required only when an error occurs.
• Disable switches off the report.
• Select Close to return to the previous screen.
Optional Services
This option is used to setup the optional services available on the device. To enable a service select
Enable. Some services require a PIN code to activate the service. The PIN code is provided when the
service is purchased. The following services are available.
• ID Card Copy
• Workflow Scanning
• Color Scanning
• E-Mail
• Internet Fax
• Image Overwrite Security
• Network Accounting
• Immediate Image Overwrite
• Server Fax
• Embedded Fax
• Save Job for Reprint
• Searchable File Formats
• Common Access Card
Xerox WorkCentre 5735/5740/5745/5755/5765/5775/5790
Administration and Accounting
263
Service Settings
Once a service has been enabled, it may require configuring using Internet Services. For further
instructions, refer to the System Administration Guide.
Note: Some services will require a Reboot to activate them on the device.
Auto Image Rotation
This feature enables the use of the Auto% reduction or enlargement and Auto paper selections for
both print and copy. It also enables the automatic rotation of the image to fit the required paper size,
even if the paper is a different orientation to the original.
• Auto % if this option is enabled the user will be able to automatically reduce or enlarge the image
of the original onto a specified size of paper.
• Auto Paper if this option is enabled the device will automatically select paper from a tray that will
produce the “best fit” available.
In addition to the basic functions, when both these features are enabled the device will:
• Automatically rotate images when using the Booklet Creation feature.
• Enable the 2-Sided, Rotate Side 2 feature for calendar format output.
• Select the appropriate size of paper irrespective of orientation.
264
Xerox WorkCentre 5735/5740/5745/5755/5765/5775/5790
Administration and Accounting
Network Settings
Network Settings
These settings are used to enter the network parameters
for the system. This section provides an overview of the
options available.
Detailed instructions for network installation are provided
in the System Administrator Guide.
Network Setup
These options are used by the System Administrator to configure the network settings. Network
settings for TCP/IP, Microsoft Network, Apple Talk and Netware can be configured.
Online/Offline
Use to disconnect the device from the network temporarily. Selecting Offline disconnects the device
from all networks. Any job entering the system is held. Any current outgoing jobs are not completed
while the system is offline.
Select Online reconnect the device to the network.
Ethernet Physical Media
The Ethernet Physical Media option is used to set the speed of your network. The device supports the
following selectable speeds:
• Auto
• 10Mbps Half-Duplex
• 10Mbps Full-Duplex
• 100 Mbps Half-Duplex
• 100 Mbps Full-Duplex
• 1 Gbps Half-Duplex.
• 1 Gbps Full-Duplex
802.1x
The device supports 802.1x authentication based on the Extensible Application Protocol (EAP). 802.1x
Port Based Network Access Control is used to ensure that devices that are connected to the network
have the proper authorization. The 802.1X configuration is used to authenticate the device rather than
an individual user. After the device has been authenticated, it will be accessible to users on the
network.
Xerox WorkCentre 5735/5740/5745/5755/5765/5775/5790
Administration and Accounting
265
Network Settings
IP Sec
IP Sec is a security protocol enabled using Internet Services. To disable IP Sec on the device, select the
Disable IP Sec option.
USB Printer Port
This option is used to enable the device to be connected to a workstation via a USB cable. There are
two modes of use for this option:
• Software Tools is used to connect the Xerox Copier Assistant, Customer Utilities or a Portable
Workstation for service call purposes.
• Direct Printing via Driver is used to connect the device directly to a workstation for printing via a
printer driver, instead of being installed on a network.
Note: Printing from USB memory sticks is not supported on this device.
266
Xerox WorkCentre 5735/5740/5745/5755/5765/5775/5790
Administration and Accounting
Accounting
Accounting
The Accounting settings are used to configure the
accounting options. Accounting options are used to record
device usage by different groups or departments and can
also be used to restrict access to different services.
Detailed instructions for Accounting Setups are provided in
the System Administrator Guide.
Authentication
Use this option to select the authentication and accounting mode required:
• Xerox Standard Accounting is an accounting system setup using the Internet Services user
interface. Once enabled, the IP Address of the device is entered and Xerox Standard Accounting
can be setup.
• Network Accounting is a feature of the device which automatically tracks print, scan, server fax
and copy usage for each user. Network Accounting is run over a network and the accounting
functions are performed remotely via third party software.
• Foreign Interface Device is used if a third party device is installed on the device for accounting
purposes. For example, card activated or coin activated devices can be installed.
Select On to enable the authentication and accounting mode required.
For information about setting up Xerox Standard Accounting, Network Accounting and Foreign
Interface Device options, refer to the System Administrator Guide.
Xerox WorkCentre 5735/5740/5745/5755/5765/5775/5790
Administration and Accounting
267
Security Settings
Security Settings
The Security Settings are used to manage the security
features of the device. Image Overwrite Settings can be
configured.
Detailed instructions for Security Settings are provided in
the System Administrator Guide.
On Demand Image Overwrite
If you have sent print jobs to the device that are confidential or sensitive, you can delete any data that
is stored on the hard disk after the job has been printed. This is done using the On Demand Overwrite
option.
There are two types of Overwrite available, Standard or Full. Standard Overwrite takes approximately
20 minutes and excludes:
• Print file directories
• Scan to mailbox jobs
• Fax dial directories
• Mailbox contents
A Full Overwrite takes approximately 60 minutes and includes all data. Select the Overwrite option
required and select Start Image Overwrite to run the overwrite process.
268
Xerox WorkCentre 5735/5740/5745/5755/5765/5775/5790
Administration and Accounting
Troubleshooting
Troubleshooting
These settings are used to troubleshoot any problems that
maybe occurring on the device. They provide various tests
to check the functionality of the system and identify
performance levels.
User Interface Tests
Use this option to run tests on the User Interface that will
help you diagnose screen problems. The following tests are available:
• User Interface Button Test enables the user to test the operation of all the hard buttons on the
control panel.
• Audio Tone Test enables the user to verify that the audible tone created by the user interface is
operating correctly.
• LED Indicator Test enables the user to verify that the lights on the user interface are operating
correctly.
• Touch Area Test enables the user to verify that the touch screen is operating correctly.
• Display Pixel Test enables the user to check that all the pixels that make up the display screen are
operating.
• Video Memory Test verifies that the memory used by the video controller on the user interface is
functioning correctly. Symptoms of memory failure are corrupted or non-functional screens on the
display.
• Communications Self Test tests the communication between the user interface and the main
control functions of the device. A communication failure will manifest itself as a corrupt or blank
display or an inoperative control panel.
• Reset UI to Factory Settings provides the facility to reboot or restart the software that controls
the user interface. Once the device has rebooted, the display will return to the default screen.
• Application Checksum Verification checks that the software used in the user interface is not
corrupt. Corrupt software may result in the user interface operating incorrectly.
To run each test, select Start Test and follow the instructions provided on the screen.
Xerox WorkCentre 5735/5740/5745/5755/5765/5775/5790
Administration and Accounting
269
Troubleshooting
Image Quality Test Patterns
This feature enables you to print test prints that will help you and the Xerox Support Center diagnose
image quality problems. Each test pattern checks parts of the printing process.
There are 19 test patterns resident in the device memory that are used to test the functionality of the
printing system.
1.
2.
3.
4.
Select 1 Sided or 2 Sided for the test pattern.
Select the Stock Size required for the test pattern.
Select the up/down buttons to select the required test pattern.
Select the Start Test button to start the test. The appropriate test pattern is submitted to the print
queue.
Echo test
The Echo Test allows you to test the network connectivity.
1.
2.
Select the appropriate protocol for the Echo Test.
• TCP/IP
• Novell (R) or IPX
• NetBIOS/NetBEUI
• AppleTalk
Select the Start Test button to run the Echo Test.
Network Connectivity Test
The Network Connectivity Test collects network connectivity data and displays the results on the
screen.
1.
2.
270
Select the appropriate protocol for the Network Connectivity Test.
• TCP/IP
• Novell (R) or IPX
• NetBIOS/NetBEUI
• AppleTalk
Select the Start Test button to run the Network Connectivity Test.
Xerox WorkCentre 5735/5740/5745/5755/5765/5775/5790
Administration and Accounting
Troubleshooting
Image Quality Adjustment
Use this option to print test patterns which are then scanned and used by the device to adjust the
image quality settings.
1.
2.
3.
4.
Ensure 8.5x11” or A4 white paper is loaded and select Print Test Pattern.
Place the test pattern in the document feeder or on the document glass, long edge feed.
Select the Start Test button to scan the test pattern and start the test.
The device will scan the test pattern and automatically make any adjustments required.
If the adjustment is successful, select Close to return to Tools.
If the adjustment is unsuccessful the reasons are provided on the screen. Select Close and run the
test again.
Xerox Customer Support
Use to enter your Xerox Support and Supplies Telephone numbers which are displayed on the device.
• Customer Support Number is selected to enter the Xerox Support Center number supplied with
your device. Enter the number using the keyboard and select Save. To delete an incorrect
character entry use the backspace key, or to delete the entire entry select the X button.
• Supplies Number is selected to enter the telephone number you call to obtain supplies for your
device. Enter the number using the keyboard and select Save. To delete an incorrect character
entry use the backspace key, or to delete the entire entry select the X button.
Select Save to save the entry and exit.
Software Reset
This utility provides the facility to reset the device software without switching off and switching on the
device.
• Reset System Software resets the copier system software.
• Network Software resets the network controller software.
• Reset Both resets the whole system software.
Xerox WorkCentre 5735/5740/5745/5755/5765/5775/5790
Administration and Accounting
271
Troubleshooting
272
Xerox WorkCentre 5735/5740/5745/5755/5765/5775/5790
Administration and Accounting
Version 1.0
12/09
®
Xerox WorkCentre
5735/5740/5745/5755/5765/5775/
5790
General Care and Troubleshooting
©2009 Xerox Corporation. All Rights Reserved. Unpublished rights reserved under the copyright laws of the United States. Contents
of this publication may not be reproduced in any form without permission of Xerox Corporation.
Xerox®and the sphere of connectivity design are trademarks of Xerox Corporation in the United States and/or other countries.
Copyright protection claimed includes all forms of matters of copyrightable materials and information now allowed by statutory or
judicial law or hereinafter granted, including without limitation, material generated from the software programs which are displayed
on the screen such as styles, templates, icons, screen displays, looks, etc.
Changes are periodically made to this document. Changes, technical inaccuracies, and typographic errors will be corrected in
subsequent editions.
Document Version 1.0: December 2009
274
Xerox WorkCentre 5735/5740/5745/5755/5765/5775/5790
General Care and Troubleshooting
Table of Contents
General Care . . . . . . . . . . . . . . . . . . . . . . . . . . . . . . . . . . . . . . . . . . . . . . . . . . . . . . . . . . . . . . . . . . . . . . . . . . 276
Customer Replaceable Units . . . . . . . . . . . . . . . . . . . . . . . . . . . . . . . . . . . . . . . . . . . . . . . . . . . . . . . . 276
Cleaning the Device . . . . . . . . . . . . . . . . . . . . . . . . . . . . . . . . . . . . . . . . . . . . . . . . . . . . . . . . . . . . . . . . 277
Paper and Media Storage . . . . . . . . . . . . . . . . . . . . . . . . . . . . . . . . . . . . . . . . . . . . . . . . . . . . . . . . . . . 279
Troubleshooting . . . . . . . . . . . . . . . . . . . . . . . . . . . . . . . . . . . . . . . . . . . . . . . . . . . . . . . . . . . . . . . . . . . . . . . 280
Defining the Problem . . . . . . . . . . . . . . . . . . . . . . . . . . . . . . . . . . . . . . . . . . . . . . . . . . . . . . . . . . . . . . . 280
Faults . . . . . . . . . . . . . . . . . . . . . . . . . . . . . . . . . . . . . . . . . . . . . . . . . . . . . . . . . . . . . . . . . . . . . . . . . . . . . 280
Fault Displays . . . . . . . . . . . . . . . . . . . . . . . . . . . . . . . . . . . . . . . . . . . . . . . . . . . . . . . . . . . . . . . . . . . . . . 282
Fault Logs . . . . . . . . . . . . . . . . . . . . . . . . . . . . . . . . . . . . . . . . . . . . . . . . . . . . . . . . . . . . . . . . . . . . . . . . . 282
Fault Clearance . . . . . . . . . . . . . . . . . . . . . . . . . . . . . . . . . . . . . . . . . . . . . . . . . . . . . . . . . . . . . . . . . . . . 283
Troubleshooting Tips . . . . . . . . . . . . . . . . . . . . . . . . . . . . . . . . . . . . . . . . . . . . . . . . . . . . . . . . . . . . . . . 284
Further Assistance . . . . . . . . . . . . . . . . . . . . . . . . . . . . . . . . . . . . . . . . . . . . . . . . . . . . . . . . . . . . . . . . . . . . . 288
Xerox Support Center . . . . . . . . . . . . . . . . . . . . . . . . . . . . . . . . . . . . . . . . . . . . . . . . . . . . . . . . . . . . . . 288
Locating the Serial Number . . . . . . . . . . . . . . . . . . . . . . . . . . . . . . . . . . . . . . . . . . . . . . . . . . . . . . . . . 288
Xerox WorkCentre 5735/5740/5745/5755/5765/5775/5790
General Care and Troubleshooting
275
General Care
General Care
There are several consumables on the device that need replenishing or replacing, such as paper,
staples, and customer replaceable units. To place an order for Xerox consumables, please contact your
local Xerox Representative giving your Company Name, product number and the machine serial
number.
For information about locating the serial number, please refer to Machine Information on page 236 of
Machine and Job Status.
Customer Replaceable Units
There are 5 replaceable units on the device:
• Xerographic Module
• Toner Cartridge
• Fuser Module
• Ozone Filter
• Waste Toner bottle
The device will display a message on the touch screen when any of the units need to be reordered. This
message is a warning that the unit is nearing the end of its life. Only replace the unit when a message
actually instructs you to do so.
To replace a Customer Replaceable Unit, follow the instructions on the touch screen or use the
instructions provided with the consumable.
WARNING: When replacing consumables, DO NOT remove the covers or guards that are fastened
with screws. You cannot maintain or service any of the parts that are behind these covers and
guards. Do NOT attempt any maintenance procedure that is NOT specifically described in the
documentation supplied with your device.
276
Xerox WorkCentre 5735/5740/5745/5755/5765/5775/5790
General Care and Troubleshooting
General Care
Staple Cartridges and Hole Punch Waste
If your device is equipped with a finisher, or a convenience stapler, you will be required to replace the
staple cartridge or cartridges when the device displays a message instructing you to do so. If your
finisher has the optional hole punch unit, you will also be required to empty the hole punch waste
container when prompted by the device.
The staple cartridge for the Basic Office Finisher contains 3000 staples. The Advanced Office Finisher
and High Volume Finisher staple cartridges hold 5000 staples each. The High Volume Finisher with
Booklet Maker has 2 additional staple cartridges located within the Booklet Maker, each of these
cartridges holds 2000 staples. To replace a staple cartridge, follow the instructions provided with the
new staple cartridge.
The hole punch waste container is a catch tray that collects the waste punched paper. Your device will
prompt you when the hole punch waste container needs emptying.
1.
2.
3.
Open the finisher door and locate the hole punch waste
container.
Slide the hole punch waste container out of the finisher.
Dispose of the waste punched paper in the waste bin.
Install the emptied hole punch waste container, ensuring
that the container is inserted correctly.
Cleaning the Device
WARNING: When cleaning the device do NOT use organic or strong chemical solvents or aerosol
cleaners. Do NOT pour fluids directly onto any area. Use supplies and cleaning materials only as
directed in this documentation. Keep all cleaning materials out of the reach of children.
WARNING: Do not use pressurized air-spray cleaning aids on or in this equipment. Some
pressurized air-spray containers contain explosive mixtures and are not suitable for use in
electrical applications. Use of such cleaners can result in a risk of explosion and fire.
Xerox WorkCentre 5735/5740/5745/5755/5765/5775/5790
General Care and Troubleshooting
277
General Care
Document Glass and Constant Velocity Transport Glass
To ensure optimum print quality at all times, regularly clean the glass areas of your device. This helps
avoid output with streaks, smears and other marks that may transfer from the glass area when
scanning documents.
When you use the document feeder, your documents will pass over the stationary scanner using the
Constant Velocity Transport glass. Any dirt or marks on this piece of glass will cause lines or streaks on
your copies, faxes or scanned images. Also, any marks or dirt on the Constant Velocity Transport roll
may show through the document and appear on your scanned images.
1.
2.
3.
Use a lint-free cloth, lightly dampened with Xerox AntiStatic or general cleaning fluid or another suitable nonabrasive glass cleaner to clean the document glass 1 and
the Constant Velocity Transport glass 2 .
Wipe away any residue with a clean cloth or paper towel.
Use a lint-free cloth, lightly dampened with water, Xerox
cleaning fluid or Xerox film remove to clean the under side
of the document cover or document feeder 3 and the
complete circumference of the Constant Velocity Transport
roll 4 .
3
4
1
2
Control Panel, Touch Screen, Document Feeder and Output Trays
Regular cleaning keeps the touch screen, control panel and other device areas free from dust and dirt.
1.
2.
3.
4.
278
Use a soft, lint-free cloth, lightly dampened with water.
Wipe clean the entire area of the control panel, including
the touch screen.
Wipe clean the document feeder, output trays, paper trays
and other outside areas of your device.
Remove any residue with a clean cloth or paper towel.
Xerox WorkCentre 5735/5740/5745/5755/5765/5775/5790
General Care and Troubleshooting
General Care
Xerographic Module Maintenance
At regular intervals, depending on device usage, this message will be displayed requesting that you
perform the Xerographic Module Maintenance procedures. When you open the front door further
messages will tell you what to do.
Note: You cannot use the device for printing or copying until you have completed this procedure.
Follow the instructions provided on the touch screen to complete the Xerographic Module maintenance
tasks. If problems occur, you may be required to initiate a Xerographic Module Cleaning cycle using the
following instructions.
1.
2.
3.
4.
5.
Press the Machine Status button.
Select the Tools tab.
Select Device Settings and Xerographic Module
Cleaning.
Select Clean to initiate the cleaning cycle.
Exit Tools.
Paper and Media Storage
It is important for optimum printing that paper is stored correctly. Take note of the following when
storing media:
• Store at ambient temperature. Damp paper may cause problems or poor image quality.
• Do not open reams of paper until they are required for use. The ream wrapper contains an inner
lining that protects the paper from moisture.
• Store on a flat surface to prevent the paper from folding or curling.
• Stack reams of paper carefully on top of one another to avoid crushing the edges. Do not stack
more than five reams on top of each other.
For problem free printing and copying, observe the following when loading paper into the paper trays:
• Do not use folded or wrinkled papers.
• Do not load paper of varied sizes into the tray.
• If feed problems occur, fan the media or shuffle labels before loading.
Xerox WorkCentre 5735/5740/5745/5755/5765/5775/5790
General Care and Troubleshooting
279
Troubleshooting
Troubleshooting
A variety of situations can affect the quality of your output. For optimal performance, ensure the
following guidelines are followed:
• Do not position the device in direct sunlight or near a heat source such as a radiator.
• Avoid sudden changes in the environment surrounding the device. When a change occurs, allow
the device at least two hours to adjust to its new environment, depending on the extent of the
change.
• Follow routine maintenance schedules for cleaning areas such as the document glass and touch
screen.
• Always set the edge guides in the paper trays to the size of the media in the tray and ensure the
screen is displaying the correct size.
• Ensure paper clips and paper debris do not contaminate the device.
Defining the Problem
This section contains problem-solving procedures to help you locate and resolve a problem.
Some problems can be resolved by rebooting your device. Refer to General Care on page 276 for
instructions about power procedures.
If rebooting the device does not resolve the problem, use the instructions contained in this section to
identify and solve the problem. If you still cannot fix the problem, contact the Xerox Support Center for
advice.
Faults
There are different categories of faults that can occur on your device and different ways in which they
are identified depending on the type of fault occurring. This section gives an overview of the different
types of faults and the way that faults are displayed and recorded.
Your device has three fault types, Hard Down faults, User Clearable faults and Status Messages. Within
each fault type there are subgroups of fault categories relating to the effect the fault has on the device
operation. The fault display generated for each fault depends on the category of that fault.
280
Xerox WorkCentre 5735/5740/5745/5755/5765/5775/5790
General Care and Troubleshooting
Troubleshooting
Hard Down Faults
Hard Down faults prevent a subsystem, module or component from functioning properly. There are
three categories of Hard Down faults.
• Low Level Fault this occurs when a subsystem or module is unable to function correctly. For
example, if during a stapler job a fault is detected, other features are still functional but the stapler
is unavailable.
• Failure Fault this is declared when a low level fault causes a major subsystem to function
incorrectly. For example if a fault occurs with the Xerographic Module causing the print and copy
features to become non-functioning.
• Fatal Fault this occurs when a system wide failure exists that is unrecoverable. For example a
power fault occurs causing the device to be inoperable.
Customer Clearable Faults
A Customer Clearable fault is a fault that can be cleared by the user. There are three categories of
Customer Clearable faults:
• Low Level Fault this occurs when a subsystem has detected a customer clearable fault, for
example, when a stapler runs out of staples. The print and copy features are still operable, but the
stapler function is not.
• Failure Fault this is declared when a Low Level Fault causes a major subsystem to become
unavailable. For example, when a paper misfeed is detected, the print and copy functions are
made inoperable until the paper is cleared by the user.
• Reset Fault this can be cleared by powering the device off then on again.
Status Messages
Status Messages are informal messages that do not impact the device from functioning properly.
There are two categories of Status Messages:
• Warning Messages are informational and usually have to do with replacing consumables. The
messages warn the local user of impending problems, or actions, that need to be taken to avoid a
fault occurring. For example, if the Xerographic Module is close to the end of its life, the device
displays a warning message that the unit needs to be replaced soon. At this time the system sets a
pre-defined limit until a Customer Clearable fault is declared to change the Xerographic Module.
• Job Fault Messages indicate a fault with the job, for example the required paper is unavailable. If
a job is paused because of a fault, the user is required to take action to correct the condition, or to
delete the job.
Xerox WorkCentre 5735/5740/5745/5755/5765/5775/5790
General Care and Troubleshooting
281
Troubleshooting
Fault Displays
All faults that affect the users of the device are presented to the user by one of two methods:
Interrupting Fault
Interrupting faults are presented if the associated fault affects the entire device, where the device is
not capable of accepting input or output. They are also presented if the associated fault affects the
currently selected document service but does not affect another service, which can still be used.
The type of fault screen presented depends on the type of fault occurring. Some fault displays present
the user with fault recovery options. A selection of buttons allow you to choose a fault recovery option.
When an interrupting fault window is displayed, any status messages associated with the displayed
fault are presented in the Status Message area.
Non-Interrupting Fault
Non-Interrupting fault displays consist of messages displayed in the Status Message area. They do not
affect the successful completion of a job from the current pathway. For example, if the user is running
a Copy job and a fault occurs with faxing, then a non-interrupting fault display is presented.
Both Interrupting and Non-Interrupting fault displays are generated automatically by the device and
are displayed in the fault logs. Once the conditions which resulted in the fault display being generated
have been resolved, the display is removed.
Fault Logs
Fault information can be accessed using the Machine Status button.
Machine Status provides information about the device, the status of the paper trays, consumables and
any current faults. Usage counters are also available.
The Faults tab displays fault listings and the device error
logs.
The faults are separated into All Faults, Active Messages
and Event Log.
• All Faults this option displays a list of any current
faults on the device. Each fault can be selected for
further information and instructions.
• Active Messages this option displays a list of all the current fault messages associated with the
current device status and faults.
• Event Log this is a log of the last 20 faults occurring on the device. The fault code associated with
each fault and the date and time a fault occurred is displayed. It also displays the device image
count at the time each fault occurred and any relevant paper or document size information.
282
Xerox WorkCentre 5735/5740/5745/5755/5765/5775/5790
General Care and Troubleshooting
Troubleshooting
Fault Clearance
When a fault occurs, a fault screen displays which provides recovery instructions. Follow these
instructions to clear the fault.
Paper Jams
Any printed sheets removed will automatically be reprinted once the paper jam is cleared.
1.
2.
The fault screen will indicate the location of the jam. Use the green handles and knobs indicated
in the instructions displayed on the screen to remove the jammed paper.
Ensure that all jam clearance handles and levers are returned to their correct positions. The red
flashes behind the jam clearance handles and levers should not be visible.
Note: Jam Clearance areas vary depending on your device model and configuration.
Document Jams
1.
2.
3.
Remove all the documents from the document feeder and document glass as instructed.
Re-order the documents as at the start of the job and reload. The documents will be recycled
automatically to recover the job.
If you are unable to clear the fault, refer to Troubleshooting Tips on page 284 for further
information.
If you are still unable to resolve the problem, refer to Further Assistance on page 288 for instructions on
how to contact the Xerox Support Center.
Xerox WorkCentre 5735/5740/5745/5755/5765/5775/5790
General Care and Troubleshooting
283
Troubleshooting
Troubleshooting Tips
If you are experiencing difficulties using your device, check the suggestions below for problem solving
advice:
Problem
Potential Solution
The device will not power on
• Check to see that the device is not in Energy Saver mode as indicated by
the green light on the control panel. Touch the User Interface screen to
re-activate.
• Press the ON/OFF button.
• Check to see if the power cord is correctly installed.
Documents will not feed
through the document feeder
• Ensure that all staples or paper clips have been removed from the
originals.
• Ensure the document feeder is not overloaded. The document feeder
can hold 75 sheets (35 model only) or 100 sheets (all other models) of
80 gsm (20 lb) paper. Use Build Job if you have more originals than this.
• Check to see if the document set is fully inserted into the document
feeder.
• Ensure that the edge guides are adjusted to touch the sides of the
originals.
• Ensure that the document feeder Feed Head is installed correctly. Open
the top cover and push feed head down into position.
• Check for obstructions or paper debris in the document feeder.
• Ensure that the document feeder cover is closed.
• Check that the device is Ready as indicated by a message on the touch
screen.
Repeated paper jams, misfeeds
or multisheet feeds
• Ensure that the correct paper size is displayed on the touch screen.
• Ensure that the paper tray is not filled above the MAX line.
• Ensure that the edge guides are adjusted to touch the sides of the
paper.
• If the problem is not resolved, check for obstructions where paper enters
the device.
Paper Jams inside the device
• Check the Paper Path for obstructions.
• Ensure all the handles and levers are in the correct (home) position. The
red flashes behind the jam clearance handles and levers should not be
visible. Follow the instructions displayed on the touch screen.
• Flip the paper over in the paper tray.
• Check the paper tray Edge Guides to see if they are against the edges of
the paper.
• Check that the touch screen is displaying the correct size for the paper
in use.
• Load fresh paper.
Repeated Check Tray messages
on the touch screen and the
paper is loaded in the tray
• Adjust the edge guides against the stack of paper in the tray.
• If the edge guides were not set against the paper in the tray when Start
was selected, delete the job in the job queue and begin again.
284
Xerox WorkCentre 5735/5740/5745/5755/5765/5775/5790
General Care and Troubleshooting
Troubleshooting
Problem
Potential Solution
Paper Curls
• Load the paper in the paper trays with the seam side of the paper up.
Load the paper in the Bypass Tray with the seam side down.
• Load non-standard media in the Bypass Tray.
• If the paper curls excessively, flip the paper over in the applicable paper
tray.
The Finisher does not stack the
output correctly
•
•
•
•
•
•
•
•
Unload the finisher tray frequently.
Do not remove stapled sets while the finisher is compiling.
Check the paper tray guides are locked into position against the paper.
When using large paper, remove any output contained in the Stacker
Tray.
Load the paper in the paper trays with the seam side of the paper up.
Load the paper in the Bypass Tray with the seam side down.
Load non-standard media in the Bypass Tray.
If the paper curls excessively, flip the paper over in the applicable paper
tray.
Check the correct paper size has been selected for the paper loaded in
the tray.
The Finisher does not staple or
hole punch correctly
• To correct stapling problems, ensure the maximum number of sheets is
not exceeded for the finisher being used.
• The maximum number of sheets when stapling heavyweight paper is
determined by the finisher type. The Basic Office Finisher staples 12
sheets of heavyweight paper, the Advanced Office Finisher staples 20
sheets of heavyweight paper, and the High Volume Finisher staples 30
sheets.
• Check the correct option has been selected on the touch screen.
• Check the touch screen for a fault message indicating no staples.
Replace the staple cartridge.
• When using large paper, remove any output contained in the Stacker
Tray.
• Check that the Chad Bin is not full. The Chad Bin collects waste from the
hole punch.
• Check the correct paper size has been selected for the paper loaded in
the tray.
• Check the paper tray guides are locked into position against the paper.
Stray marks or black marks
from hole punched originals are
not removed
• Use the Edge Erase option to erase the edge with the punched holes.
Refer to Edge Erase on page 48 of Copy.
• Copy from the document glass with the document cover or document
feeder down.
Images are out of sequence or
upside down when the Booklet
Creation feature is used
• Ensure that the originals are in the correct sequence.
• Feed LEF originals to SEF orientated paper.
• Enable the display options for Booklet Creation and ensure that the
correct sequence is selected (i.e. Left to Right or Right to Left).
The output is blank
• Ensure the originals are loaded either face up in the document feeder or
face down on the document glass in the top right position.
Xerox WorkCentre 5735/5740/5745/5755/5765/5775/5790
General Care and Troubleshooting
285
Troubleshooting
Problem
Potential Solution
Streaks, lines, spots, solid lines
or dotted lines on the prints
• Clean the document glass and, if using the document feeder, also clean
the Constant Velocity Transport glass (the thin strip of glass to the left
of the document glass), especially near the plastic ramp on the glass.
• Clean the white underside of the document feeder/document cover.
• Clean the document feeder roller.
• Clean the halo guide.
• Clean the Charge Scorotron and Transfer Corotron, if available on your
device.
• Check the paper tray guides are against the paper stack.
• Run the job from the document glass.
• Check the quality of the original. Use Edge Erase to remove lines from
the edges of the document, refer to Edge Erase on page 48 of Copy.
• Use the Background Suppression feature, refer to Background
Suppression on page 45 of Copy.
• Load fresh paper.
• Do not use heavily embossed paper.
Image Loss
• When copying a document from a larger paper size to a smaller size, use
Auto% to reduce the image onto the smaller size, refer to
Reduce/Enlarge on page 38 of Copy.
• Use reduction i.e. copy at 90% instead of 100%.
• Use the Auto Center feature and run the job again. Refer to Image Shift
on page 47 of Copy.
• If scanning from the document glass use Original Size to define the
document size, refer to Original Size on page 46 of Copy. Register the
document in the right rear corner and copy with the cover down.
• Do not use heavily embossed paper.
Blurred images on output
• Load fresh paper.
• If copying from the document glass, check the quality of the originals,
close the cover and try again. Ensure that the original is entirely flat
against the document glass.
• Use Original Size to specify the size of the original, refer to Original Size
on page 46 of Copy.
• Clean the Charge Scorotron and Transfer Corotron, if available on your
device. Refer to Xerographic Module Maintenance on page 279.
• Clean the document glass and if using the document feeder also clean
the Constant Velocity Transport Glass (the thin strip of glass to the left
of the document glass), especially near the plastic ramp on the glass.
Refer to Document Glass and Constant Velocity Transport Glass on
page 278.
Missing characters on output
• Load fresh paper.
• Try using a smoother paper.
• Select darken if the original is light or the font is colored.
Gloss variations (coining)
• Check the quality of the original.
• If the original has large areas of solid density, adjust the contrast.
286
Xerox WorkCentre 5735/5740/5745/5755/5765/5775/5790
General Care and Troubleshooting
Troubleshooting
Problem
Potential Solution
Double image or show through
(ghosting)
• Check the quality of the original.
• Clean the document glass, if it is being used.
• Rotate the original 180 degrees and try the job again.
The device cannot sense the
size of the original on the glass
• Use Original Size to specify the size of the original, refer to Original Size
on page 46 of Copy.
• Rescan the original, leaving the cover raised.
Jobs scan but do not print
• Some jobs require image processing before printing. This may take as
long as 2 seconds per page.
• Press the Job Status button and check the Active Jobs list to determine if
a job is processing. There may be a job in the list with a status of
“paused”. Delete this job if it remains in the state over 3 minutes.
• This may possibly be a result of an incorrect feature combination. The
software may need to be reset. Refer to Software Reset on page 271 of
Administration and Accounting.
Output does not reflect the
selections made on the touch
screen
• Press Clear All between jobs.
• If a Save button displays on the touch screen, ensure Save is selected
after each selection.
The image is reduced on a
transmission
• Confirm the original size of the documents. Documents may be reduced
on the available paper supply at the receiving fax machine.
The device does not answer
incoming fax calls
• Change the Auto Answer Delay setting to 0 seconds. Refer to Auto
Answer Delay on page 260 of Administration and Accounting.
The device answers incoming
fax calls but does not accept
incoming data
• If the job contains several graphics, the device may not have enough
memory. The device will not answer if memory is low.
• Remove stored documents and jobs and wait for existing jobs to
complete. This will increase the available memory.
Fault messages will not clear
• There may be occasions when a fault is cleared but the message will not
clear. Reboot your device by powering OFF and ON using the ON/OFF
switch at the side of the device.
• Wait approximately 20 seconds before turning the device back ON. Any
incomplete jobs in the jobs list will be lost.
• Use only the ON/OFF switch to reboot your device. Damage may occur
to your device if power is removed by other means.
Xerox WorkCentre 5735/5740/5745/5755/5765/5775/5790
General Care and Troubleshooting
287
Further Assistance
Further Assistance
For any additional help visit our customer web site at www.xerox.com or contact the Xerox Support
Center quoting the machine serial number.
Xerox Support Center
If a fault cannot be resolved by following the touch screen instructions, check the Troubleshooting Tips
on page 284 - they may help to solve the problem quickly. If the difficulty persists, contact the Xerox
Support Center. The Xerox Support Center will want to know the nature of the problem, the machine
serial number, the fault code (if any) plus the name and location of your company.
Locating the Serial Number
Press the Machine Status button on the control panel. The
Machine Information screen displays the serial number.
The serial number can also be found inside the front door.
288
Xerox WorkCentre 5735/5740/5745/5755/5765/5775/5790
General Care and Troubleshooting
Version 1.0
12/09
®
Xerox WorkCentre
5735/5740/5745/5755/5765/5775/
5790
Safety and Regulations
©2009 Xerox Corporation. All Rights Reserved. Unpublished rights reserved under the copyright laws of the United States. Contents
of this publication may not be reproduced in any form without permission of Xerox Corporation.
Xerox®and the sphere of connectivity design are trademarks of Xerox Corporation in the United States and/or other countries.
Copyright protection claimed includes all forms of matters of copyrightable materials and information now allowed by statutory or
judicial law or hereinafter granted, including without limitation, material generated from the software programs which are displayed
on the screen such as styles, templates, icons, screen displays, looks, etc.
Changes are periodically made to this document. Changes, technical inaccuracies, and typographic errors will be corrected in
subsequent editions.
Document Version 1.0: December 2009
290
Xerox WorkCentre 5735/5740/5745/5755/5765/5775/5790
Safety and Regulations
Table of Contents
Notices and Safety . . . . . . . . . . . . . . . . . . . . . . . . . . . . . . . . . . . . . . . . . . . . . . . . . . . . . . . . . . . . . . . . . . . . 292
Safety Labels and Symbols . . . . . . . . . . . . . . . . . . . . . . . . . . . . . . . . . . . . . . . . . . . . . . . . . . . . . . . . . . . . . 292
Operational Safety Information . . . . . . . . . . . . . . . . . . . . . . . . . . . . . . . . . . . . . . . . . . . . . . . . . . . . . . . . 293
Electrical Supply . . . . . . . . . . . . . . . . . . . . . . . . . . . . . . . . . . . . . . . . . . . . . . . . . . . . . . . . . . . . . . . . . . . 293
Maintenance Information . . . . . . . . . . . . . . . . . . . . . . . . . . . . . . . . . . . . . . . . . . . . . . . . . . . . . . . . . . 296
Consumables Information . . . . . . . . . . . . . . . . . . . . . . . . . . . . . . . . . . . . . . . . . . . . . . . . . . . . . . . . . . 296
Product Safety Certification . . . . . . . . . . . . . . . . . . . . . . . . . . . . . . . . . . . . . . . . . . . . . . . . . . . . . . . . 296
Basic Regulations . . . . . . . . . . . . . . . . . . . . . . . . . . . . . . . . . . . . . . . . . . . . . . . . . . . . . . . . . . . . . . . . . . . . . . 297
United States (FCC Regulations) . . . . . . . . . . . . . . . . . . . . . . . . . . . . . . . . . . . . . . . . . . . . . . . . . . . . 297
Canada (Regulations) . . . . . . . . . . . . . . . . . . . . . . . . . . . . . . . . . . . . . . . . . . . . . . . . . . . . . . . . . . . . . . 297
European Union . . . . . . . . . . . . . . . . . . . . . . . . . . . . . . . . . . . . . . . . . . . . . . . . . . . . . . . . . . . . . . . . . . . 298
Turkey RoHS Regulation . . . . . . . . . . . . . . . . . . . . . . . . . . . . . . . . . . . . . . . . . . . . . . . . . . . . . . . . . . . . 298
Copy Regulations . . . . . . . . . . . . . . . . . . . . . . . . . . . . . . . . . . . . . . . . . . . . . . . . . . . . . . . . . . . . . . . . . . . . . . 299
United States . . . . . . . . . . . . . . . . . . . . . . . . . . . . . . . . . . . . . . . . . . . . . . . . . . . . . . . . . . . . . . . . . . . . . . 299
Canada . . . . . . . . . . . . . . . . . . . . . . . . . . . . . . . . . . . . . . . . . . . . . . . . . . . . . . . . . . . . . . . . . . . . . . . . . . . 301
Other Countries . . . . . . . . . . . . . . . . . . . . . . . . . . . . . . . . . . . . . . . . . . . . . . . . . . . . . . . . . . . . . . . . . . . . 301
Fax Regulations . . . . . . . . . . . . . . . . . . . . . . . . . . . . . . . . . . . . . . . . . . . . . . . . . . . . . . . . . . . . . . . . . . . . . . . 302
United States . . . . . . . . . . . . . . . . . . . . . . . . . . . . . . . . . . . . . . . . . . . . . . . . . . . . . . . . . . . . . . . . . . . . . . 302
Canada . . . . . . . . . . . . . . . . . . . . . . . . . . . . . . . . . . . . . . . . . . . . . . . . . . . . . . . . . . . . . . . . . . . . . . . . . . . 304
Europe . . . . . . . . . . . . . . . . . . . . . . . . . . . . . . . . . . . . . . . . . . . . . . . . . . . . . . . . . . . . . . . . . . . . . . . . . . . . 304
South Africa . . . . . . . . . . . . . . . . . . . . . . . . . . . . . . . . . . . . . . . . . . . . . . . . . . . . . . . . . . . . . . . . . . . . . . . 305
Material Safety Data . . . . . . . . . . . . . . . . . . . . . . . . . . . . . . . . . . . . . . . . . . . . . . . . . . . . . . . . . . . . . . . . . . 305
Product Recycling and Disposal . . . . . . . . . . . . . . . . . . . . . . . . . . . . . . . . . . . . . . . . . . . . . . . . . . . . . . . . . 305
USA & Canada . . . . . . . . . . . . . . . . . . . . . . . . . . . . . . . . . . . . . . . . . . . . . . . . . . . . . . . . . . . . . . . . . . . . . 305
European Union . . . . . . . . . . . . . . . . . . . . . . . . . . . . . . . . . . . . . . . . . . . . . . . . . . . . . . . . . . . . . . . . . . . 306
Energy Program Compliance . . . . . . . . . . . . . . . . . . . . . . . . . . . . . . . . . . . . . . . . . . . . . . . . . . . . . . . . . . . 306
All Markets . . . . . . . . . . . . . . . . . . . . . . . . . . . . . . . . . . . . . . . . . . . . . . . . . . . . . . . . . . . . . . . . . . . . . . . . 306
EH&S Contact Information . . . . . . . . . . . . . . . . . . . . . . . . . . . . . . . . . . . . . . . . . . . . . . . . . . . . . . . . . . . . . 307
Xerox WorkCentre 5735/5740/5745/5755/5765/5775/5790
Safety and Regulations
291
Notices and Safety
Notices and Safety
Please read the following instructions carefully before operating the device. Refer to them as needed to
ensure the continued safe operation of your device.
Your Xerox device and supplies have been designed and tested to meet strict safety requirements.
These include safety agency evaluation and certification, and compliance with electromagnetic
regulations and established environmental standards.
The safety and environment testing and performance of this device have been verified using Xerox
materials only.
WARNING: Unauthorized alterations, which may include the addition of new functions or
connection of external devices, may impact the device certification. Please contact your Xerox
representative for more information.
Safety Labels and Symbols
All warnings and instructions marked on or supplied with the device should be followed.
This WARNING alerts users to areas of the device where there is the possibility of personal
injury.
This WARNING alerts users to areas of the device where there are heated surfaces, which
should not be touched.
292
Xerox WorkCentre 5735/5740/5745/5755/5765/5775/5790
Safety and Regulations
Operational Safety Information
Operational Safety Information
Your Xerox device and supplies have been designed and tested to meet strict safety requirements.
These include safety agency examination, approval, and compliance with established environmental
standards. To ensure the continued safe operation of your Xerox device, follow these safety guidelines
at all times:
Electrical Supply
This section provides important electrical supply safety information that you should read before
installing or using the device.
Read the information in the following sections:
• Power Outlet Electrical Safety on page 293.
• Power Cord Electrical Safety on page 293.
• Laser Safety Information on page 294.
• Device Safety on page 294.
• Emergency Power Off on page 295.
• Disconnect Device on page 295.
Power Outlet Electrical Safety
This device must be operated from the type of electrical supply indicated on the data plate label
located on the rear cover of the device. If you are not sure that your electrical supply meets the
requirements, please consult your local power company or a licensed electrician for advice.
The electrical supply outlet should be installed near the device and should be easily accessible.
WARNING: This device must be connected to a protective earth circuit. This device is supplied
with a plug that has a protective earth pin. This plug will only fit into an earthed electrical outlet.
This is a safety feature. If you are unable to insert the plug into the outlet, contact a licensed
electrician to replace the outlet. Always connect the device to a correctly grounded power outlet.
If in doubt, have the outlet checked by a qualified electrician. Improper connection of the devicegrounding conductor can result in electrical shock.
Power Cord Electrical Safety
•
•
•
•
Use only the power cord supplied with this device.
Plug the power cord directly into a grounded electrical outlet. Do not use an extension cord. If you
do not know whether or not an outlet is grounded, consult a qualified electrician.
Do not place this device where people might step on or trip on the power cord.
Do not place objects on the power cord.
Xerox WorkCentre 5735/5740/5745/5755/5765/5775/5790
Safety and Regulations
293
Operational Safety Information
Laser Safety Information
CAUTION: Use of controls, adjustments or performance of procedures other than those specified
herein may result in hazardous light exposure.
With specific regard to laser safety, the device complies with performance standards for laser products
set by government, national and international agencies as a Class 1 laser product. It does not emit
hazardous light, as the beam is totally enclosed during all phases of customer operation and
maintenance.
Device Safety
This device has been designed to provide operator access to safe areas only. Operator access to
hazardous areas is restricted using covers or guards, which require a tool to enable removal. Never
remove the covers or guards that protect hazardous areas.
Device Safety - Do These
WARNING: Do not use aerosol cleaners. Aerosol cleaners can be explosive or flammable when
used on electromechanical equipment.
•
•
•
•
•
•
Always follow all warnings and instructions that are marked on or supplied with the device.
Before cleaning this device, unplug the device from the electrical outlet. Always use materials
specifically designated for this device, the use of other materials may result in poor performance
and create a hazardous situation.
Always exercise care when moving or relocating the device. Please contact your local Xerox dealer
to arrange relocation of the device to a location outside of your building.
Always locate the device on a solid support surface (not on plush carpet) that has adequate
strength to support the weight of the machine.
Always locate the device in an area that has adequate ventilation and room for servicing.
Always unplug this device from the electrical outlet before cleaning.
Note: Your Xerox device is equipped with an energy saving function to conserve power when the
device is not in use. The device may be left on continuously.
Device Safety - Do Not Do These
WARNING: Do not use aerosol cleaners. Aerosol cleaners can be explosive or flammable when
used on electromechanical equipment.
•
•
•
•
•
294
Never use a ground adapter plug to connect the device to a power outlet that lacks a ground
connection terminal.
Never attempt any maintenance function that is not specifically described in this documentation.
Never obstruct ventilation openings. They are provided to prevent overheating.
Never remove covers or guards that are fastened with screws. There are no operator serviceable
areas within these covers.
Never locate the machine near a radiator or any other heat source.
Xerox WorkCentre 5735/5740/5745/5755/5765/5775/5790
Safety and Regulations
Operational Safety Information
•
•
•
•
Never push objects of any kind into the ventilation openings.
Never override or “cheat” any of the electrical or mechanical interlock devices.
Never place this device where people might step on or trip on the power cord.
This device should not be placed in a room unless proper ventilation is provided.
Please contact your local Authorized dealer for further information.
Emergency Power Off
If any of the following conditions occur, turn off the device immediately and disconnect the power
cable(s) from the electrical outlet(s). Contact an authorized Xerox Service Representative to correct the
problem:
• The device emits unusual odors or makes unusual noises.
• The power cable is damaged or frayed.
• A wall panel circuit breaker, fuse, or other safety device has been tripped.
• Liquid is spilled into the machine.
• The machine is exposed to water.
• Any part of the device is damaged.
Disconnect Device
The power cable is the disconnect device for this device. It is attached to the back of the machine as a
plug-in device. To remove all electrical power from the device, disconnect the power cable from the
electrical outlet.
Ozone Safety Information
This device will produce ozone during normal operation. The ozone produced is heavier than air and is
dependent on copy volume. Providing the correct environmental parameters as specified in the Xerox
installation procedure will ensure that the concentration levels meet safe limits.
If you need additional information about ozone, please request the Xerox publication Ozone by calling
1-800-828-6571 in the United States and Canada. In other markets please contact your authorized
local dealer or Service Provider.
Xerox WorkCentre 5735/5740/5745/5755/5765/5775/5790
Safety and Regulations
295
Operational Safety Information
Maintenance Information
WARNING: Do not use aerosol cleaners. Aerosol cleaners can be explosive or flammable when
used on electromechanical equipment.
•
Any operator device maintenance procedures will be described in the user documentation
supplied with the device.
Do not carry out any maintenance on this device which is not described in the customer
documentation.
Use supplies and cleaning materials only as directed in the user documentation.
Do not remove covers or guards that are fastened with screws. There are no parts behind these
covers that you can maintain or service.
•
•
•
Consumables Information
•
•
•
Store all consumables in accordance with the instructions given on the package or container.
Keep all consumables away from the reach of children.
Never throw toner, toner cartridges or toner containers into an open flame.
Product Safety Certification
This device is certified by the following Agency using the Safety standards listed.
Agency
Standard
Underwriters Laboratories Inc.
UL60950-1 1st Edition (USA/Canada)
IEC/EN60950-1 1st Edition
This device has been manufactured under a registered ISO9001 Quality system.
296
Xerox WorkCentre 5735/5740/5745/5755/5765/5775/5790
Safety and Regulations
Basic Regulations
Basic Regulations
Xerox has tested this device to electromagnetic emission and immunity standards. These standards are
designed to mitigate interference caused or received by this device in a typical office environment.
United States (FCC Regulations)
This device has been tested and found to comply with the limits for a Class A digital device, pursuant to
Part 15 of the FCC Rules. These limits are designed to provide reasonable protection against harmful
interference in a commercial environment. This device generates, uses, and can radiate radio frequency
energy. If it is not installed and used in accordance with these instructions, it may cause harmful
interference to radio communications. Operation of this device in a residential area is likely to cause
harmful interference in which case the user will be required to correct the interference at his/her own
expense.
If this device does cause harmful interference to radio or television reception, which can be determined
by turning the device off and on, the user is encouraged to try to correct the interference by one or
more of the following measures:
• Reorient or relocate the receiver.
• Increase the separation between the device and receiver.
• Connect the device into an outlet on a circuit different from that to which the receiver is
connected.
• Consult the dealer or an experienced radio/television technician for help.
Any changes or modifications not expressly approved by Xerox could void the user's authority to
operate the device. To ensure compliance with Part 15 of the FCC rules, use shielded interface cables.
Canada (Regulations)
This Class A digital apparatus complies with Canadian ICES-003.
Cet appareil numérique de la classe A est conforme à la norme NMB-003 du Canada.
Xerox WorkCentre 5735/5740/5745/5755/5765/5775/5790
Safety and Regulations
297
Basic Regulations
European Union
WARNING: This is a Class A product. In a domestic environment this device may cause radio
interference in which case the user may be required to take adequate measures.
The CE mark applied to this device symbolizes Xerox’s declaration of conformity with the
following applicable Directives of the European Union as of the dates indicated:
•
•
•
December 12, 2006: Low Voltage Directive 2006/95/EC. Approximation of the laws of the
member states related to low voltage equipment.
December 15, 2004: Electromagnetic Compatibility Directive 2004/108/EC. Approximation of the
laws of the member states related to electromagnetic compatibility.
March 9, 1999: Radio & Telecommunications Terminal Equipment Directive 1999/5/EC.
This device, if used properly in accordance with the user's instructions, is neither dangerous for the
consumer nor for the environment.
To ensure compliance with European Union regulations, use shielded interface cables.
A signed copy of the Declaration of Conformity for this device can be obtained from Xerox.
Turkey RoHS Regulation
In compliance with Article 7 (d). We hereby certify
"It is compliant with the EEE Regulation."
"EEE yönetmeliğine uygundur"
298
Xerox WorkCentre 5735/5740/5745/5755/5765/5775/5790
Safety and Regulations
Copy Regulations
Copy Regulations
United States
Congress, by statute, has forbidden the reproduction of the following subjects under certain
circumstances. Penalties of fine or imprisonment may be imposed on those guilty of making such
reproductions.
1.
2.
3.
4.
Obligations or Securities of the United States Government, such as:
• Certificates of Indebtedness
• National Bank Currency
• Coupons from Bonds
• Federal Reserve Bank Notes
• Silver Certificates
• Gold Certificates
• United States Bonds
• Treasury Notes
• Federal Reserve Notes
• Fractional Notes
• Certificates of Deposit
• Paper Money
• Bonds and Obligations of certain agencies of the government, such as FHA, etc.
• Bonds (U.S. Savings Bonds may be photographed only for publicity purposes in connection
with the campaign for the sale of such bonds.)
• Internal Revenue Stamps. If it is necessary to reproduce a legal document on which there is a
canceled revenue stamp, this may be done provided the reproduction of the document is
performed for lawful purposes.
• Postage Stamps, canceled or uncanceled. For philatelic purposes, Postage Stamps may be
photographed, provided the reproduction is in black and white and is less than 75% or more
than 150% of the linear dimensions of the original.
• Postal Money Orders.
• Bills, Checks, or Draft of money drawn by or upon authorized officers of the United States.
• Stamps and other representatives of value, of whatever denomination, which have been or
may be issued under any Act of Congress.
Adjusted Compensation Certificates for Veterans of the World Wars.
Obligations or Securities of any Foreign Government, Bank, or Corporation.
Copyrighted materials, unless permission of the copyright owner has been obtained or the
reproduction falls within the “fair use” or library reproduction rights provisions of the copyright
law.
Further information of these provisions may be obtained from the Copyright Office, Library of
Congress, Washington, D.C. 20559. Ask for Circular R21.5.
Xerox WorkCentre 5735/5740/5745/5755/5765/5775/5790
Safety and Regulations
299
Copy Regulations
5.
Certificate of Citizenship or Naturalization. Foreign Naturalization Certificates may be
photographed.
6. Passports. Foreign Passports may be photographed.
7. Immigration papers.
8. Draft Registration Cards.
9. Selective Service Induction papers that bear any of the following Registrant’s information:
• Earnings or Income
• Court Record
• Physical or mental condition
• Dependency Status
• Previous military service
Exception: United States military discharge certificates may be photographed.
10. Badges, Identification Cards, Passes, or Insignia carried by military personnel, or by members of
the various Federal Departments, such as FBI, Treasure, etc. (Unless photograph is ordered by the
head of such department or bureau.)
Reproducing the following is also prohibited in certain states:
• Automobile Licenses
• Drivers’ Licenses
• Automobile Certificates of Title
The above list is not all inclusive, and no liability is assumed for its completeness or accuracy. In case of
doubt, consult your attorney.
300
Xerox WorkCentre 5735/5740/5745/5755/5765/5775/5790
Safety and Regulations
Copy Regulations
Canada
Parliament, by stature, has forbidden the reproduction of the following subjects under certain
circumstances. Penalties of fine or imprisonment may be imposed on those guilty of making such
reproductions.
1.
2.
3.
4.
5.
6.
7.
8.
9.
Current bank notes or current paper money.
Obligations or securities of a government or bank.
Exchequer bill paper or revenue paper.
The public seal of Canada or of a province, or the seal of a public body or authority in Canada, or
of a court of law.
Proclamations, orders, regulations or appointments, or notices thereof (with intent to falsely cause
same to purport to have been printed by the Queens Printer for Canada, or the equivalent printer
for a province).
Marks, brands, seals, wrappers or designs used by or on behalf of the Government of Canada or of
a province, the government of a state other than Canada or a department, board, Commission or
agency established by the Government of Canada or of a province or of a government of a state
other than Canada.
Impressed or adhesive stamps used for the purpose of revenue by the Government of Canada or
of a province or by the government of a state other than Canada.
Documents, registers or records kept by public officials charged with the duty of making or issuing
certified copies thereof, where the copy falsely purports to be a certified copy thereof.
Copyrighted material or trademarks of any manner or kind without the consent of the copyright
or trademark owner.
The above list is provided for your convenience and assistance, but it is not all-inclusive, and no liability
is assumed for its completeness or accuracy. In case of doubt, consult your solicitor.
Other Countries
Copying certain documents may be illegal in your country. Penalties of fine or imprisonment may be
imposed on those found guilty of making such reproductions:
• Currency notes
• Bank notes and cheques
• Bank and government bonds and securities
• Passports and identification cards
• Copyright material or trademarks without the consent of the owner
• Postage stamps and other negotiable instruments
This list is not inclusive and no liability is assumed for either its completeness or accuracy. In case of
doubt, contact your legal counsel.
Xerox WorkCentre 5735/5740/5745/5755/5765/5775/5790
Safety and Regulations
301
Fax Regulations
Fax Regulations
United States
Fax Send Header Requirements
The Telephone Consumer Protection Act of 1991 makes it unlawful for any person to use a computer or
other electronic device, including a fax machine, to send any message unless such message clearly
contains in a margin at the top or bottom of each transmitted page or on the first page of the
transmission, the date and time it is sent and an identification of the business or other entity, or other
individual sending the message and the telephone number of the sending machine or such business,
other entity or individual. The telephone number provided may not be a 900 number or any other
number for which charges exceed local or long distance transmission charges. In order to program this
information into your machine, refer to the customer documentation and follow the steps provided.
Data Coupler Information
This device complies with Part 68 of the FCC rules and the requirements adopted by the Administrative
Council for Terminal Attachments (ACTA). On the cover of this device is a label that contains, among
other information, a device identifier in the format US:AAAEQ##TXXXX. If requested, this number
must be provided to the Telephone Company. A plug and jack used to connect this device to the
premises wiring and telephone network must comply with the applicable FCC Part 68 rules and
requirements adopted by the ACTA. A compliant telephone cord and modular plug is provided with this
device. It is designed to be connected to a compatible modular jack that is also compliant. See
installation instructions for details.
You may safely connect the machine to the following standard modular jack: USOC RJ-11C using the
compliant telephone line cord (with modular plugs) provided with the installation kit. See installation
instructions for details.
The Ringer Equivalence Number (REN) is used to determine the number of devices that may be
connected to a telephone line. Excessive RENs on a telephone line may result in the devices not ringing
in response to an incoming call. In most but not all areas, the sum of RENs should not exceed five (5.0).
To be certain of the number of devices that may be connected to a line, as determined by the total
RENs, contact the local Telephone Company. For products approved after July 23, 2001, the REN for
this device is part of the device identifier that has the format US:AAAEQ##TXXXX. The digits
represented by ## are the REN without a decimal point (e.g., 03 is a REN of 0.3). For earlier products,
the REN is separately shown on the label.
302
Xerox WorkCentre 5735/5740/5745/5755/5765/5775/5790
Safety and Regulations
Fax Regulations
To order the correct service from the local telephone company, you may also have to quote the codes
listed below:
• Facility Interface Code (FIC) = 02LS2
• Service Order Code (SOC) = 9.0Y
WARNING: Ask your local telephone company for the modular jack type installed on your line.
Connecting this machine to an unauthorized jack can damage telephone company equipment.
You, not Xerox, assume all responsibility and/or liability for any damage caused by the connection
of this machine to an unauthorized jack.
If this Xerox device causes harm to the telephone network, the Telephone Company will notify you in
advance that temporary discontinuance of service may be required. But if advance notice is not
practical, the Telephone Company will notify the customer as soon as possible. Also, you will be advised
of your right to file a complaint with the FCC if you believe it is necessary.
The Telephone Company may make changes in its facilities, equipment, operations or procedures that
could affect the operation of the device. If this happens, the Telephone Company will provide advance
notice in order for you to make necessary modifications to maintain uninterrupted service.
If trouble is experienced with this Xerox device, for repair or warranty information, please contact the
appropriate service center; details of which are displayed either on the machine or contained within
the User Guide. If the device is causing harm to the telephone network, the Telephone Company may
request that you disconnect the device until the problem is resolved.
Repairs to the machine should be made only by a Xerox Service Representative or an authorized Xerox
Service provider. This applies at any time during or after the service warranty period. If unauthorized
repair is performed, the remainder of the warranty period is null and void.
This device must not be used on party lines. Connection to party line service is subject to state tariffs.
Contact the state public utility commission, public service commission or corporation commission for
information.
If your office has specially wired alarm equipment connected to the telephone line, make sure that the
installation of this Xerox device does not disable your alarm equipment.
If you have questions about what will disable alarm equipment, consult your Telephone Company or a
qualified installer.
Xerox WorkCentre 5735/5740/5745/5755/5765/5775/5790
Safety and Regulations
303
Fax Regulations
Canada
Note: The Industry Canada label identifies certified equipment. This certification means that the
device meets certain telecommunications network protective, operational and safety
requirements as prescribed in the appropriate Terminal Equipment Technical Requirements
document(s). The Department does not guarantee the equipment will operate to the user’s
satisfaction.
Before installing this device, users must make sure that it is permissible to be connected to the facilities
of the local telecommunications company. The device must also be installed using an acceptable
method of connection. The customer should be aware that compliance with the above conditions may
not prevent degradation of service in some situations.
Repairs to certified equipment should be coordinated by a representative designated by the supplier.
Any repairs or alterations made by the user to this device, or device malfunctions, may give the
telecommunications company cause to request the user to disconnect the device.
Users should make sure for their own protection that the electrical ground connections of the power
utility, telephone lines and internal metallic water pipe systems, if present, are connected together.
This precaution may be particularly important in rural areas.
CAUTION: Users should not attempt to make such connections themselves, but should contact
the appropriate electric inspection authority, or electrician, as appropriate.
The Ringer Equivalence Number (REN) assigned to each terminal device provides an indication of the
maximum number of terminals allowed to be connected to a telephone interface. The termination on
an interface may consist of any combination of devices subject only to the requirement that the sum
of the Ringer Equivalent Numbers of all of the devices does not exceed 5. For the Canadian REN value,
please see the label on the device.
Europe
Radio Equipment & Telecommunications Terminal Equipment Directive
The Facsimile has been approved in accordance with the Council Decision 1999/5/EC for pan-European
single terminal connection to the public switched telephone network (PSTN). However, due to
differences between the individual PSTNs provided in different countries, the approval does not, of
itself, give an unconditional assurance of successful operation on every PSTN network terminal point.
In the event of a problem you should contact your authorized local dealer in the first instance.
This device has been tested to and is compliant with ES 203 021-1, -2, -3, a specification for terminal
equipment for use on analogue-switched telephone networks in the European Economic Area. This
device provides a user-adjustable setting of the country code. Refer to the customer documentation for
this procedure. Country codes should be set prior to connecting this device to the network.
Note: Although this device can use either loop disconnect (pulse) or DTMF (tone) signaling, it is
recommended that it is set to use DTMF signaling. DTMF signaling provides reliable and faster call
setup. Modification of this device, connection to external control software or to external control
apparatus not authorized by Xerox, will invalidate its certification.
304
Xerox WorkCentre 5735/5740/5745/5755/5765/5775/5790
Safety and Regulations
Material Safety Data
South Africa
This modem must be used in conjunction with an approved surge protection device.
Material Safety Data
For Material Safety Data information regarding your printer, go to:
North America: www.xerox.com/msds
European Union: www.xerox.com/environment_europe
For the Customer Support Center phone numbers, go to www.xerox.com/office/worldcontacts.
Product Recycling and Disposal
USA & Canada
Xerox operates a worldwide equipment take back and reuse/recycle program. Contact your Xerox sales
representative (1-800-ASK-XEROX) to determine whether this Xerox device is part of the program. For
more information about Xerox environmental programs, visit www.xerox.com/environment.html.
If you are managing the disposal of your Xerox device, please note that the device may contain lead,
mercury, Perchlorate, and other materials whose disposal may be regulated due to environmental
considerations. The presence of these materials is fully consistent with global regulations applicable at
the time that the device was placed on the market. For recycling and disposal information, contact
your local authorities. In the United States, you may also refer to the Electronic Industries Alliance web
site: http://www.eiae.org/.
Xerox WorkCentre 5735/5740/5745/5755/5765/5775/5790
Safety and Regulations
305
Energy Program Compliance
European Union
WEEE Directive 2002/96/EC
Some equipment may be used in both a domestic/household and a professional/business application.
Professional/Business Environment
Application of this symbol on your device is confirmation that you must dispose of this
device in compliance with agreed national procedures. In accordance with European
legislation, end of life electrical and electronic equipment subject to disposal must be
managed within agreed procedures.
Domestic/Household Environment
Application of this symbol on your device is confirmation that you should not dispose of
the device in the normal household waste stream. In accordance with European
legislation, end of life electrical and electronic equipment subject to disposal must be
segregated from household waste. Private households within EU member states may
return used electrical and electronic equipment to designated collection facilities free of
charge. Please contact your local disposal authority for information. In some member
states, when you purchase new device, your local retailer may be required to take back your
old device free of charge. Please ask you retailer for information. Prior to disposal, please
contact your local dealer or Xerox representative for end of life takeback information.
Energy Program Compliance
All Markets
ENERGY STAR
As an ENERGY STAR® partner, Xerox Corporation has determined that this device meets the ENERGY
STAR guidelines for energy efficiency.
The ENERGY STAR and ENERGY STAR MARK are registered United States trademarks.
The ENERGY STAR Office Equipment Program is a team effort between U.S., European
Union and Japanese governments and the office equipment industry to promote
energy-efficient copiers, printers, fax, multifunction devices, personal computers, and
monitors. Reducing device energy consumption helps combat smog, acid rain and longterm changes to the climate by decreasing the emissions that result from generating electricity. Xerox
ENERGY STAR equipment is preset at the factory, to switch to Power Save Mode after a preset time
following the last copy/print out. A more detailed description of this feature can be found in the User
Guide.
306
Xerox WorkCentre 5735/5740/5745/5755/5765/5775/5790
Safety and Regulations
EH&S Contact Information
Canada
Environmental Choice
Terra Choice of Canada has verified that this device conforms to all applicable
Environmental Choice EcoLogo requirements for minimized impact to the environment.
As a participant in the Environmental Choice program, Xerox Corporation has
determined that this device meets the Environmental Choice guidelines for energy
efficiency. Environment Canada established the Environmental Choice program in 1988
to help consumers identify environmentally responsible products and services. Copier,
printer, digital press and fax products must meet energy efficiency and emissions criteria, and exhibit
compatibility with recycled supplies.
EH&S Contact Information
For more information on Environment, Health, and Safety in relation to this Xerox device and supplies,
please contact the following customer help lines:
USA: 1-800 828-6571
Canada: 1-800 828-6571
Europe: +44 1707 353 434
Device safety information is also available on the Xerox website:
www.xerox.com/about-xerox/environment
Xerox WorkCentre 5735/5740/5745/5755/5765/5775/5790
Safety and Regulations
307
EH&S Contact Information
308
Xerox WorkCentre 5735/5740/5745/5755/5765/5775/5790
Safety and Regulations
Index
Basic Server Fax, 18
Basic Workflow Scanning, 21
Batch Send, 69, 259
Bates Stamp, 52
Baud Rate, 77
Billing Information, 202, 238
Black Impressions, 202
Blank Inserts, 51
Book Copying, 46
Book Faxing, 76
Booklet, 41
Booklet Creation, 49, 148
Booklet Layout, 154
BPS (Bits Per Second), 77
Build Job, 57, 83, 126, 132, 175
Bypass Tray, 219
Numerics
2-Sided, 69, 86, 95, 117, 147, 166
2-Sided Copying, 40
A
Access, 25
Accessing Tools, 244
Accounting
Settings, 267
Acknowledgement Report, 100, 133
Active Jobs, 204, 233
Add File Destinations, 125
Address Book, 67, 71, 96, 167, 207
Group Entry, 73
Individual Entry, 72
Administration Settings, 244
Advanced Office Finisher, 42
Advanced Options, 157
Advanced Paper Selection, 147
Advanced Settings, 132
Alerts, 202
All Services, 135, 137
All Services Default, 246
Annotations, 52
Assistance, 4, 30
Audio Tones Setting, 246
C
B
Background Suppression, 45, 74, 97, 119, 168,
194
Basic Copying, 15
Basic E-mail, 22
Basic E-mailing, 164
Basic Fax from PC, 20
Basic Faxing, 17, 66
Basic Internet Fax, 19
Basic Office Finisher, 42
Basic Options, 92, 103
Basic Printing, 16
Basic Safety Regulations, 297
Basic Scan to Home Options, 138
C Fold, 42
Call for Service, 31
Calling for Help, 4
Canada (Regulations), 297
Caring for your Device, 276
Chain Dial, 72
Characters, 88
Cleaning Tasks, 27
Cleaning the Device, 277
Clear All (AC) button, 135, 137
Clear All button, 10
Collation, 40
Color Output, 117
Comment, 52
Completed Jobs, 234
Compression Capability, 133
Confirmation Report, 77, 133
Constant Velocity Transport Glass, 278
Consumables, 27
Consumables Safety Information, 296
Contacting Xerox, 31
Contrast, 45, 89, 98
Control Panel, 10
Copier/Printer Models, 6
Copier/Printer/Scanner Model, 7
Copy, 15
Inserts, 51
Paper Supply, 39
Copy Options, 38
Copy Output, 40
Copy Regulations, 299
Xerox WorkCentre 5735/5740/5745/5755/5765/5775/5790
User Guide
309
Index
Copy To, 94
Copying an ID Card, 195
Copying Books, 46
Copying Templates, 127
Counters, 202, 238
Cover Letter, 70
Covers, 50, 150
Creating a Private Folder, 134
Creating Booklet, 49
Creating Booklets, 148
Creating Templates, 127
Current Faults, 30, 237, 282
Current Messages, 30
Custom Original Size, 75, 90, 99, 122, 132
Customer Replaceable Units, 27, 276
Customer Replaceable Units (CRUs), 238
Customer Support, 271
D
Date, 52
Date & Time Setting, 246
Default Settings, 244
Delay Send, 78, 91
Delete Mailbox Documents, 79
Deleting Jobs, 234
Deleting Templates, 127
Destination Services, 129
Device Administration, 244
Device Cleaning, 27, 277
Device Components, 5
Device Faults, 237
Device Overview, 5
Device Safety, 294
Device Settings, 245
Device Web Pages, 201
Dialing Characters, 68, 88
Dialing Options, 67, 85
Directory, 167
Document Feeder, 14
Document Glass, 14, 278
Document Glass cleaning, 27
Document Loading, 14
Document Management, 125
Document Management Fields, 131
Documentation, 30
Double-Sided, 69, 86, 95, 117, 147, 166
Draft Copy, 58
Duplexing, 40, 69, 86, 95, 117, 147, 166
Duplicate Filenames, 125
310
E
Echo test, 270
Edge Erase, 48, 123, 132, 172
Edit Image Enhancement, 132
Electrical Supply, 293
E-mail, 22, 162, 164
Address Book, 167
From, 165
Image Options, 168
Message, 164
Output Color, 166
Reply To, 165
Scan Presets, 167
Subject, 166
Embedded Fax, 17, 64, 66
Embedded Fax Settings, 258
Embedded Web Pages, 201
Energy Program Compliance, 306
Energy Saver, 12
ENERGY STAR, 306
Enlarge/reduce, 38
Entering a Fax Number, 67
Server Fax, 85
Entry Screen Default Setting, 246
Erasing the Image, 123, 132
European Union, 298
Exceptions, 150
F
Fault Clearance
Troubleshooting, 283
Fault History, 237
Fault Logs, 282
Fault Messages, 282
Fault messages will not clear
Troubleshooting Tips, 287
Faults, 30, 237
Faults Information, 237
Fax, 17, 64, 66
Fax Confirmation Report, 77
Fax Dialing Options, 67
Fax Directory, 85
Fax Feature Defaults, 258
Fax from PC, 20, 65
Fax Mailboxes, 79
Fax Numbers, 67
Server Fax, 85
Fax Regulations, 302
Fax Setup, 258
Xerox WorkCentre 5735/5740/5745/5755/5765/5775/5790
User Guide
Index
Faxing from Books, 76
FCC Regulations, 297
Feature Defaults
Fax, 258
Feeding Documents, 14
File Format, 99, 124, 173
File Name, 124, 173
File Size, 98, 120, 132, 170
File Storage, 114
Filename Duplication, 125
Filing Destination, 129
Filing Destinations, 125
Filing Options, 133
Filing Policy, 129
Finishers, 5
Finishing, 148
Finishing Devices, 42
Fix Image Quality, 271
Folded Booklets, 41
Folding, 148
Forced 4800, 78, 106
From, 94, 165
Further Assistance, 30, 31, 288
Fuser Module, 276
G
General Care, 276
Group Fax Number, 73
H
Hardware Options, 237
Health & Safety Contact Information, 307
Held Jobs, 26, 234, 235
Help, 4, 30
High Volume Finisher, 42
History of Faults, 30
Hole Punch Waste, 27, 277
Hole Punched, 40
Hole Punching, 148
Home Template, 137
I
ID Card Copy, 192
Background Suppression, 194
If File Already Exists, 125
Image Count, 202
Image Enhancement, 168
Background Suppression, 45
Contrast, 45
Image Erase, 123, 132
Image Options, 74, 88, 97, 119, 132, 153, 168
Image Overwrite Setup, 268
Image Quality
ID Card, 193
Lighten/Darken, 44
Original Type, 44
Screen, 45
Sharpness, 44
Image Quality Problems, 271
Image Quality Test Patterns, 270
Image Settings, 133
Image Shift, 47
Impression Counters, 238
Impressions Count, 202
Individual Fax Number, 72
Information, 236
Information Pages, 30, 203, 236
Inserts, 51, 150
Internet Fax, 19, 65, 92
Internet Services, 201
Address Book, 207
Billing, 202
Jobs, 204
Print, 205
Properties, 208
Saved Jobs, 204
Scan, 206
Status, 202
Interrupt Printing button, 10
Invert Image, 48
J
Job Building, 57
Job Deletion Setting, 268
Job List, 233
Job Log, 133
Job Progress, 234
Job Status, 233
Job Type, 145
Jobs, 204
Active Jobs, 204
Saved Jobs, 204
Jobs List
Active Jobs, 233
Completed Jobs, 234
Delete, 234
Xerox WorkCentre 5735/5740/5745/5755/5765/5775/5790
User Guide
311
Index
Held Jobs, 234, 235
Managing Jobs, 234
Promote, 234
Releasing Jobs, 234
L
LAN Fax, 20, 65
Language button, 10
Layout Adjustment
Book Copying, 46
Edge Erase, 48
Image Shift, 47
Invert Image, 48
Original Size, 46
Layout/Watermark, 154
Leaflets, 42
Lighten/Darken, 44, 74, 88, 97, 119, 168
List of Jobs, 233
Loading Documents, 14
Loading Paper, 13
Loading the Bypass Tray, 220
Loading Tray 5, 222
Loading Tray 6 (Inserter), 223
Loading Trays 1 and 2, 216
Loading Trays 3 and 4, 218
Local Polling, 81
Local Templates, 116
Locating the serial number, 288
Log In / Out, 25
Logs, 282
M
Machine Administration, 244
Machine Defaults, 244
Machine Faults, 237
Machine Hardware Options, 237
Machine Parts, 5
Machine Settings, 245
Machine Software Versions, 237
Machine Status, 236
Machine Status button, 10
Machine Web Pages, 201
Mailbox Polling, 81
Mailboxes, 79
Mailboxes for Scanning, 134
Maintenance, 27, 276
Maintenance Safety Information, 296
Making Copies, 15
312
Managing Folders, 186
Managing Jobs, 234
Manual Dialing, 67, 85
Material Safety Data, 305
Measurements Setting, 247
Media Storage and Handling, 227
Media Types, 225
Message, 164
Messages, 282
Meter Reading, 238
Mirror Image, 48
Mixed Size Originals, 75, 122
Modifying Templates, 127
Multi-Page TIFF, 99, 124, 173
Multiple Images, 154
N
Naming the File, 124, 173
Negative Image, 48
Network Connectivity Test, 270
Network Scanning, 21, 114
Network Templates, 116
New Recipient, 93, 164
New Templates, 127
Number of Prints, 238
Numeric Keypad, 10
O
Off, 11
On, 11
On Demand Image Overwrite Setting, 268
Operational Safety Information, 293
Options, 5, 6, 7, 92, 103
Copy, 38
Orientation of Originals, 122, 132, 171
Orientation of Pre-printed Media, 224
Original Orientation, 122, 132, 171
Original Size, 46, 75, 90, 99, 122, 132, 171
Original Type, 44, 69, 87, 96, 117, 166
Output Areas, 5
Output Color, 95, 117, 166
Output Destination, 149
Output Devices, 42
Output Format
Booklet Creation, 49
Covers, 50
Output Option Settings, 251
Output Options
Xerox WorkCentre 5735/5740/5745/5755/5765/5775/5790
User Guide
Index
Booklet, 41
Output options, 40
Overview, 5
Copy, 15
E-mail, 22, 162
Fax, 17, 64
Fax from PC, 20, 65
ID Card Copy, 192
Internet Fax, 19, 65
Print, 16, 142
Reprint Saved Jobs, 180
Reprinting Saved Jobs, 24
Saving Jobs, 23
Server Fax, 18, 64
Workflow Scanning, 21, 114
Overwrite Settings, 125
Ozone Filter, 276
P
Page Layout, 154
Page Numbers, 52
Paper, 146
Paper and Media Overview, 214
Paper Loading, 13
Paper Size Preference Setting, 247, 248
Paper Storage and Handling, 227
Paper Supply, 39
Paper Tray Management Settings, 247
Paper Tray Status, 202, 236
Paper Trays
1 and 2, 215
3 and 4, 217
5, 221
6 (Inserter), 223
Bypass, 219
Loading the Bypass Tray, 220
Loading Tray 5, 222
Loading Tray 6, 223
Loading Trays 1 and 2, 216
Loading Trays 3 and 4, 218
Trays, 214
Paper Types, 225
Paper/Output, 145
PDF, 99, 124, 173
PDF/A, 124, 173
Polling, 81
Polling a Mailbox, 81
Power Down, 12
Power Off, 11
Power On, 11
Power Outlet Electrical Safety, 293
Pre-printed Media, 224
Pre-Programmed Settings, 59, 60
Print, 16, 142, 205
Advanced Options, 157
Advanced Paper Selection, 147
Booklet Creation, 148
Finishing Options, 148
Image Options, 153
Layout/Watermark, 154
Paper Selection, 146
Special Pages, 150
Print Mailbox Documents, 79
Print Options
Paper/Output, 145
Print Reports, 236
Printing a document, 16
Printing User Guides, 236
Private Folders, 134
Problems, 237
Product Recycling and Disposal, 305
Product Safety Certification, 296
Productivity, 26
Promoting Jobs, 26, 234
Proof Copy, 58
Properties, 208
Q
Quality/File Size, 98, 120, 132, 170
Quick Restart, 12
R
Radio Equipment & Telecommunications
Terminal Equipment Directive, 304
Recipient, 93, 164
Reduce/enlarge, 38
Reduce/Split, 75
Refresh Templates, 121
Releasing Jobs, 234
Remote Mailbox, 79
Remote Polling, 81
Replaceable Units, 27, 276
Reply To, 165
Reports, 30, 77, 100, 133, 236
Repositories, 114
Reprint Saved Jobs, 24, 180
Reprinting Saved Jobs, 184
Xerox WorkCentre 5735/5740/5745/5755/5765/5775/5790
User Guide
313
Index
Reset Software, 271
Resolution, 70, 87, 98, 120, 132, 169
Retrieve Saved Settings, 60
S
Safety Contact Information, 307
Safety Labels and Symbols, 292
Sample Set, 58
Save and Reprint Jobs, 180
Save Current Settings, 59
Saved Job Folders, 186
Saved Jobs, 204
Saving a Job, 181
Saving Energy, 12
Saving Jobs for reprint, 23
Saving Programing, 59
Scan, 206
Scan Presets, 118, 167
Scan to Home, 137
Scan to Home Options, 138
Scan to Mailbox, 134
Scanning Books, 46
Screen, 45
Secure Faxes, 108
Secure Polling, 81
Security Settings, 268
Selecting a Template, 116
Send Header Text, 78
Send to Mailbox, 79
Sending a Fax, 17, 66
Sending a fax from PC, 20
Sending an E-mail, 22
Separating Transparencies, 55
Server Fax, 18, 64
Service Settings, 255
Services, 6
Services and Options, 6
Services Default, 246
Services Home, Job Status button, 10
Setting
Accounting, 267
Audio Tones, 246
Date & Time, 246
Embedded Fax, 258
Job Deletion, 268
Measurements, 247
On Demand Image Overwrite, 268
Output Options, 251
Paper Size Preference, 247, 248
314
Paper Tray Management, 247
Print Quality Problems, 269
Security, 268
Timers, 250
Settings, 244, 245
Setup Accounting, 267
Sharpness, 44, 88, 97, 119, 168
Shifting the Image, 47
Size of Original, 75
Size of Originals, 46, 90, 99, 122, 132
SMart eSolutions, 203
Software Reset, 271
Software Versions, 237
Special Pages, 150
Speed Dialing, 67, 68
Standard Size Required, 248
Staple Cartridges, 27, 277
Stapled, 40
Stapled Booklets, 41
Stapling, 148
Start button, 10
Starting Rate, 77
Status Information, 202, 236
Stop button, 10
Storage and Handling, 227
Store in Mailbox, 79
Stored Addresses, 96
Stored Fax Numbers, 67
Server Fax, 85
Subject, 95, 166
Supplies Information, 238
Support, 271
Support Center, 4
Suppress Background, 45
Suppressing Background, 97, 119, 168
Switch Off, 11
Switch On, 11
T
Template
Image Settings, 133
Template Creation, 127
Template Deletion, 127
Template Options, 129
Templates, 114, 116
Test Patterns, 270
TIFF, 99, 124, 173
Timers Settings, 250
Toner Cartridge, 276
Xerox WorkCentre 5735/5740/5745/5755/5765/5775/5790
User Guide
Index
Tools Pathway, 244
Touch Screen, 10
Transmission Report, 77
Transparency Separators, 55, 147
Tray 5, 221
Tray 6 (Inserter), 223
Tray Management Settings, 247
Tray Status, 236
Trays 1 and 2, 215
Trays 3 and 4, 217
Tri-Folded, 42
Troubleshooting Settings, 269
Troubleshooting Tips, 284
Turkey RoHS Regulation, 298
Type of Original, 96, 166
Type of Originals, 44
Types of Media, 225
Types of Original, 69, 87, 117
U
United States (FCC Regulations), 297
Update Templates
Template Update, 121
Usage Information, 238
User Guide, 30
User Guides, 236
Using Saved Settings, 60
W
Waste Toner Bottle, 276
Watermark, 156
WEEE Directive 2002/96/EC, 306
Workflow Scanning, 21, 114
Templates, 127
Workflow Scanning Options, 115
Workflow Scanning Templates, 114
X
Xerographic Module, 276
Xerox Customer Support, 271
Xerox Support Center, 4
XPS, 124, 173
Z
Z Fold, 42
Xerox WorkCentre 5735/5740/5745/5755/5765/5775/5790
User Guide
315