1
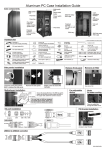
Installation Guide
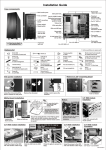
Case component
140mm fan
Multi-media port
Reset switch button
Power switch button
Patented tool-less 5.25”
device mounting
120mm fan
Power LED
Rubberized grommets
for liquid cooling
system’s tubing
VGA card
pillar
Removable HDD module
with 140mm fan
HDD LED
Patented tool-less
PCI add-on card holder
5.25”
mounting
bracket
with air filter
Patented tool-less PSU
mounting bracket
Remove six
thumb screws.
Slide panel backward of the case.
Hardware list
(18)
Bracket(1)
for power supply mounting
Thumb screw(1)
Mounting bracket
for SSI CEB/EEB M/B
for work with stand-off
(3)
Box(1)
for spare parts
Thumb screw(24)
for HDD
Shorter vision thumb screw(9)
for mother board mount
Rubber ring(24)
for HDD
Longer vision thumb screw(3)
for mother board mount
(5)
for PSU mounting
1
for cable management
Hex wrench for M/B(1)
stand-off
Thumb screw(7)
for PCI card holder
PCI card holder-S(2)
PCI card holder-L(5)
USB3.0 to USB2.0
convertor (1)
PCI bracket (1)
Remove the mounting bezel
!
!
!
Note: For area where hard to
reach use the long
thumb screw
for SSI CEB/EEB
The oval hole on M/B tray
designed for special server
boards, please use nut to
hold the copper bolt in place.
Press the right and left side of the
bezel to remove.
Secure the stand-off bolts on the M/B tray which match
with the M/B fix points,place the M/B on the copper bolt,
fasten with the thumb screws to secure.
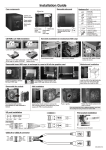
Front panel cable installation guide
ODD installation
GROUND
PWR
WHITE
GRAY
GROUND
Reset
PLED-
WHITE
BLUE
WHITE
NC
GREEN
PLED+
POWER SW
RESET SW
POWER
LED
IDE_LED- WHITE H.D.D LED
IDE_LED+ ORANGE
1. Pull the front panel to remove it.
2. Release the 5.25" bezel
3. Press plastic handle to release the mounting bracket.
Push the ODD into the 5.25” rack,
close the bracket to secure the
ODD
Speaker
+5V
BLACK
NC
NC
RED
SPEAKER
Hard disk installation for the front HDD cage
Install the screws to the HDD with
anti-vibration rubber rings.
Slide the HDD into the front HDD cage
Close the gate to secure the HDD.
C50.A77F0.00E-1
PCI Add-on card installation
PCI bracket installation
1
2
For access to rear I/O port.
Push the card into the PCI slot, close the
aluminum latch to secure the card.
Open the aluminum latch to
remove the PCI slot bracket.
Finish.
VGA Card Pillar Installation Guide
2
1
3
4
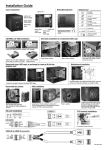
PSU installation
Cable management note
Place the PSU on the stand, and
push again the rear panel.
Place the PSU bracket into
according slot as shown.
Use cable clamp to tidy up
the cables.
Lock the PSU bracket to secure
the PSU.
* Remove clamp, use
tweezers to release the
cable clamp
I/O port installation
E-SATA
Connector
USB
USB
MIC EAR
HD AUDIO
USB3.0
BLUE 10
BLACK PUEPLE 8
YELLOW 6
BROWN 4
RED 2
9
7
5
3
1
GREEN
KEY
ORANGE
N.C.
GND+H.S. TUBE
4
5
1
9
SATA
USB3.0 to USB2.0 convertor
VCC
RED
D- WHITE
D+ GREEN
GND BLACK
RED
WHITE
GREEN
BLACK
KEY
VCC
DD+
GND
C50.A77F0.00E-2