1
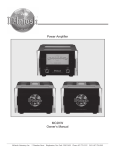
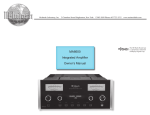
ENGLISH HK 990 Integrated Amplifier Owner’s Manual Table of Contents Important Safety Instructions 2 Safety Instructions 1. Read these instructions. 3 Introduction and Features 2. Keep these instructions. 4 Front Panel Controls and Functions 5 Rear Panel Connections 7 Remote Control 3. Heed all warnings. 4. Follow all instructions. 9 Remote Control Function List 5. Do not use this apparatus near water. 10 Setup Instructions 6. Clean only with a dry cloth. 10 7. Do not block any ventilation openings. Install in accordance with the manufacturer’s instructions. Input Setup 11 Speaker Setup 12 EzSet and EQ Setup 12 Level Setup 13 Operating Instructions 13 Listening 13 Recording 13 Troubleshooting 14 Specifications 8. Do not install near any heat sources such as radiators, heat registers, stoves or other apparatus (including amplifiers) that produce heat. 9. Do not defeat the safety purpose of the polarized or grounding-type plug. A polarized plug has two blades with one wider than the other. A grounding-type plug has two blades and a third grounding prong. The wide blade or the third prong is provided for your safety. If the provided plug does not fit into your outlet, consult an electrician for replacement of the obsolete outlet. 10. Protect the power cord from being walked on or pinched, particularly at plugs, convenience receptacles and the point where they exit from the apparatus. 11. Only use attachments/accessories specified by the manufacturer. DECLARATION OF CONFORMITY 12. Use only with the cart, stand, tripod, bracket or table specified by the manufacturer or sold with the apparatus. When a cart is used, use caution when moving the cart/apparatus combination to avoid injury from tip-over. 13. Unplug this apparatus during lightning storms or when unused for long periods of time. We, Harman Consumer Group International 2, route de Tours F-72500 Château-du-Loir France declare in own responsibility, that the product described in this owners manual is in compliance with technical standards: EN 55013:2001 + A1:2003 EN 55020:2002 + A1:2003 EN 61000-3-2:2000 EN 61000-3-3:1995 + A1:2001 EN 60065:2002 Jurjen Amsterdam Harman Consumer Group International 09/08 2 Table of Contents 14. Refer all servicing to qualified service personnel. Servicing is required when the apparatus has been damaged in any way, such as power supply cord or plug is damaged, liquid has been spilled or objects have fallen into the apparatus, the apparatus has been exposed to rain or moisture, does not operate normally, or has been dropped. 15. Do not expose this apparatus to dripping or splashing and ensure that no objects filled with liquids, such as vases, are placed on the apparatus. 16. To completely disconnect this apparatus from the AC Mains, disconnect the power supply cord plug from the AC receptacle. 17. The mains plug of the power supply cord shall remain readily operable. 18. Do not expose batteries to excessive heat such as sunshine, fire or the like. The lightning flash with arrowhead symbol, within an equilateral triangle, is intended to alert the user to the presence of uninsulated “dangerous voltage” within the product’s enclosure that may be of sufficient magnitude to constitute a risk of electric shock to persons. The exclamation point within an equilateral triangle is intended to alert the user to the presence of important operating and maintenance (servicing) instructions in the literature accompanying the product. WARNING: To reduce the risk of fire or electric shock, do not expose this apparatus to rain or moisture. Congratulations on your choice of the Harman Kardon HK 990 Integrated Amplifier. In order to obtain the best performance from this integrated amplifier, please be sure to read this owner's manual and use your integrated amplifier only in accordance with its instructions. The special features, of this unit include: In terms of raw power, the HK 990 is the most muscular amplifier ever to carry the harman/kardon® name, more than capable of driving the most demanding loudspeaker loads without breaking a sweat. But the HK 990’s awesome power is nothing if not highly refined, extending beyond watts and amps. With a choice of discrete optical or coaxial inputs or an analogonly signal path, as well as fourth-generation Real-Time Linear Smoothing (RLS IV), 2.2-channel EzSet/EQ room optimization, dual subwoofer outputs and an audiophile-quality phono preamp section, the HK 990 offers a combination of features you will find irresistible. Others, of course, may simply hunger for all that power. We understand completely. • High Current Capability provides the instantaneous current necessary to precisely drive and control nearly any loudspeaker system • Ultrawide-bandwidth amplifier design for improved transient accuracy and phase linearity • Low negative feedback for further improved dynamic accuracy • Use of discrete electronic circuitry to provide the highest performance level • Dual-path technology allows for pure analog or pure digital audio processing within the same product • EzSet/EQ room optimization for quick and accurate system setup, optimized for two channels and two subwoofers • Symmetric (balanced) XLR analog inputs offer lower noise levels and higher Signal-to-Noise performance • RLS IV digital-to-analog conversion technology, with dual conversion using two stereo AD1955 high-grade DACs in Dual Mono configuration • The HRS link allows Harman Kardon CD players to lock themselves to the external clock of the amplifier for a jitter-free connection, similar to having the CD playback inside the amplifier • Dual differential input stages with their own high-voltage supply, resulting in high gain and low noise as well as high channel separation • Dual-line dot-matrix display • Record out available in both digital and analog domains (two analog outputs and one coaxial digital output) • A/B speaker switching • IR remote extension jacks for control of the amplifier when placed in a cabinet • Harman Kardon system remote for control of compatible Harman Kardon CD players and tuners Accessory list • Owners Manual • Remote Control + 4 AAA batteries • EzSet Microphone • Power cord • Cascoded predriver stage considerably reduces high-frequency distortion, allowing crystalclear high frequencies, free from any harsh sound • Thermal Tracking Mechanism using ThermalTrak™ output stage transistors that include internal temperature sensors to bias the current of the output stage in real time • Sophisticated electronic protection circuitry guards the amplifier from short-circuit or from damaged speakers and wires, without impairing sound quality, by using current limiting or output relays • DC servo to ensure that the DC level of the amplifier output will stay within a contained limit at any condition • Multiple protection circuits will switch the amplifier off in case overcurrent, overvoltage, overtemperature or DC protection is detected • Dual toroidal transformers and up to 15.000μF of supply filtering per channel for high channel separation and tight bass control, even with low-impedance loads Introduction 3 ENGLISH Introduction Controls and Functions E � 1 2 3 4 5 6 D 7 8 0 Power Indicator: This LED will illuminate in amber when the unit is in the Standby mode to signal that the unit is ready to be turned on. When the unit is in operation, the indicator will turn white. 4 Input Source Selector: Select input source for listening by pressing one of the ”Source” buttons repeatedly to scroll through all the Inputs either forwards or backwards, until the display shows the desired source. 1 System Power Control: Press this button to turn on the HK 990; press it again to turn the unit off (to Standby). Entering Standby also saves all Setup parameters. 5 Input Setup Button: Press this Button to enter/exit the Input Setup Mode. Here you can select the physical connection for each source (Analog/Digital etc.) as well as Gain, Bass/Treble etc. Refer to the Setup section of this manual. 2 Speaker 1/2 Selectors: Press to select speaker pair 1 or 2, or both, or neither (headphone output only). 3 Record Out Selector: First press shows the record source presently selected in the display. Pressing on the the Source selectors 4 within a few seconds after pressing 3 changes the record source. Exit this function by pressing 3 again, or wait for a few seconds until exit takes place automatically. 6 Speaker Setup Selector: Press this Button to enter the Speaker Setup Menu, where you can switch subwoofers on and off, select crossover frequency, run automatic speaker setup (EzSet/EQ) etc. Refer to the Setup section of this manual. 7 Up/Down Arrow Buttons: Press to scroll through various options for adjustment in a menu. 8 Left/Right Arrow Buttons: Press to increase/decrease a parameter or to select between parameters after selecting a menu for adjustment with the Up/Down Arrow Buttons. 4 Controls and functions C B 9 A 9 Level Settings Button: Press to enter/exit the Balance left/right adjustment for the speakers as well as subwoofer level. A Headphone Jack/Setup Microphone Input: Plug in headphones if desired. With both ”Speaker 1” and ”2” selectors in the Off position, output is supplied only to headphones. When using the automatic loudspeaker setup and calibration system (EzSet/EQ), plug the microphone in here. B Volume Control: Turn to raise or lower output volume. C Remote Sensor Window: The sensor behind this window receives infrared signals from the remote control. Aim the remote at this area and do not block or cover it unless an external remote sensor is installed. Enter Button: Press to select a parameter for adjustment and to confirm. E Main Information Display: This display delivers messages and status indications to help you operate the amplifier. �� � � � � � � � � � � � � � � � � � � � � 0 Right Loudspeaker output, System 2. E Left Loudspeaker output, System 2. 1 Right Loudspeaker output, System 1. F Left Loudspeaker output, System 1. 2 RS-232 connector for possible future PC update. Update Switch. G Power lead AC input. 3 Input jacks for one or two subwoofer signals from external surround processor. 4 Output jacks for two subwoofers. 5 Digital coaxial output jack for digital recording. Also permits digital recording of analog sources. 6 Preamplifier output jacks. 7 Analog output jacks for tape recording. 8 Analog output jacks for CD Recorder analog recording. 9 AUX input jacks, suitable for analog signals from video games, video recorders etc. A TV input jacks for analog sound input from your TV. B TAPE input jacks for analog tape replay. C CDR input jacks, for CD Recorder analog replay. D Balanced analog inputs (XLR), for use with all signal sources that output balanced signals. Available via the CD Input function only, as an alternative to the unbalanced RCA jacks (Input J). Pin configuration for the XLR Inputs: Pin 1 is Ground, Pin 2 is Plus/Hot, Pin 3 is Minus/Cold. � �� � � H TUNER analog Input jacks. I PROCESSOR Analog Inputs. These Inputs go directly to the power amplifier section of the HK 990, bypassing the Volume and Tone Control. Here you can connect the Front Channel Pre Out L+R signals from an external surround processor, to benefit from the superior power of the HK 990 and control volume from the processor. NOTE: Only use the Processor Input with a device that has its own volume control! J CD analog Input jacks. You can select either this Input or the Balanced Input as analog Input in the CD Input Setup Mode. K Phono Input for record player with Moving Magnet (high output and high impedance) or High-Output Moving Coil cartridge. L Phono Input for record player with Moving Coil (low output and low impedance) cartridge. M If your record player has a separate Ground wire, attach it here to avoid hum noise. ENGLISH Connections � � N Connect the trigger Input (if available) on one or two subwoofers to these trigger ON/ OFF output jacks. When you switch ON the HK 990, it sends a trigger signal, which switches ON the subwoofer. When switching OFF the HK 990, the subwoofer also switches OFF. O HRS (High-Resolution Synchronization) Input. Use the included HRS-cable to connect the HD 990 CD player (or other similarly equipped player) for optimum sound quality. P Optical Digital Inputs (TOS-Link). Connect any digital device with Optical Digital Output to one of these Inputs. Push the Optical Jack through the hinged door that covers the Input until it clicks into place. Q Coaxial Digital Inputs. Connect any digital device with Coaxial Digital Output to one of these Inputs. Usually, Coaxial Digital transmission is preferred to Optical, given a choice. R Remote IN. To control your HK 990 with an external infrared remote sensor, connect the wire from the remote sensor here. S Remote OUT. Connect other Harman Kardon devices (you may also experiment with other brands) that you wish to control with the HK 990 Remote Control to this Output. Connections 5 Connections Connecting Other Components 1. Make sure your amplifier and other components are turned off. 2. Connect each component's Output/Play jacks to the corresponding Input jacks on the back of your amplifier and, if available, the component’s Input/Record jacks to the Output jacks of the HK 990. Use the white, black or gray plugs to connect Left channel jacks; use the red plugs for Right channel jacks. Wired Remote Control To control your amplifier with an external infrared remote sensor, connect the wire from the remote sensor to the REMOTE IN jack on the back panel. Or, if another stereo component has a built-in infrared remote sensor and a Remote Output jack, it may be possible to connect this jack to the REMOTE IN jack of your amplifier. All Harman Kardon products with »Remote In« and »Remote Out« jacks are compatible with one another, except for the Citation 22, 24 and 25. Other manufacturers' remote sensors and components may not be compatible, but it will not hurt to experiment. A second wire may be used to connect your amplifier's REMOTE OUT jack to the Remote Input of another stereo component. Continue this process to include additional components (if compatible). Connecting Speakers 1. For best performance, use high quality s peaker cables. However, ordinary copper wire can be used if the gauge meets the following requirements: Wire Length Up to 2.5 meter Up to 4 meter Up to 6 meter Above 6 meter Min. Diameter 1 mm 1.25 mm 1.6 mm 2-2.5 mm 2. Avoid rolling excess wire with or near signal interconnects. 6 Connections IMPORTANT: When connecting two pairs of speakers, determine the impedance of each pair by looking on the back of the speakers, in your owner's manual, or by contacting your dealer or manufacturer. You can listen to two pairs of speakers at the same time ONLY if the impedance of EACH speaker is NOT LESS THAN 8 Ohms. WARNING: Do not play sets of speakers simultaneously except as recommended above. Amplifier may overheat. AC Power Plug the cord into a 230 VAC wall socket. Power indicator will light up to indicate power ON. To completely disconnect the power input, the main plug must be disconnected from the mains. Independent Remote Control The system remote of the HK 990 can control the amplifier and compatible Tuners, CD Players and CD Recorders. The remote In jack of units without an integrated IR receiver must be connected to the amplifier's remote control output jack so that the system remote control can operate them. Important Notes: • To remote control a tuner, CD Recorder or CD Player, the appropriate input (”TUNER”, ”CDR” or ”CD”) must have been selected with the source buttons of the remote control (selecting on the front panel is not sufficient). • Note that DVD players cannot be controlled by the remote. Operating Conditions The control unit operates effectively within a distance of 7 meters and an angle of 30° from the amplifier. Using the control near fluorescent lights may shorten this range, as will any dust or dirt that accumulates on the front of the remote control or the remote sensor area of the amplifier. Also avoid blocking the line of sight between amplifier and remote. Install the four supplied AAA batteries in the remote as shown. Be certain to follow the (+) and (–) polarity indicators that are on the top of the battery compartment. Instructions for users on removal and disposal of used batteries. Specification of included battery types. These symbols shown on the product, the packaging or in the manual or separate information sheet mean that the product itself, as well as the batteries included or built into the product, should never be thrown away with general household waste. Take them to applicable collection points, where proper treatment, recycling and recovery takes place, in accordance with national or local legislation, or European Directives 2002/96/EC and 2006/66/EC. Correct handling of the product and batteries to be disposed helps saving resources and prevents possible negative effects on the environment or human health. The batteries included with your equipment may be Alkaline, Carbon Zink/Manganese or Lithium (button cells) type. All types should be disposed of according to the above instructions. To remove the batteries from your equipment or remote control, reverse the procedure described for inserting batteries in the Owners Manual. For products with a built-in battery that lasts for the lifetime of the product, removal may not be possible for the user. In this case, recycling or recovery centers handle the dismantling of the product and the removal of the battery. If, for any reason, it becomes necessary to replace such a battery, this procedure must be performed by authorized service centers. ENGLISH Remote Control HK 990 Remote Control functions (Please refer to the illustration of the Remote Control on the next page). Device ON/OFF: These two Buttons switch ON and OFF a (Harman Kardon) device selected with the MODE Button or selected by pressing its System On source Button (in both cases, the System ON Device Button lights up). System OFF: Switches the entire system off. (The HK 990 and other Harman Kardon products that have a Remote Sensor or are connected to the Remote Jacks on the HK 990 back panel). System ON: This group of 9 Buttons switches the HK 990 ON, as well as the (Harman Kardon) device written on the Button that you press (AMP, CD, TUNER, CD Recorder, TAPE). Also switches the remote’s frequencies to control the device indicated on the active Button and selects this device to be Input on the HK 990. Please note that while a number of remote functions are switched to control the device selected, some of the amplifier’s main functions always remain active, such as Volume. Please refer to the Remote Control Function List for information on which functions can be remote controlled for each type of device and which buttons always control the HK 990. MODE: Scrolls through the nine System On Buttons, each Button lighting up in turn. This feature allows you to control the device you select, without changing the Input of the HK 990. Note that a number of Remote Functions are always active for the HK 990 no matter which device you select with the Mode Button. Refer to the Remote Control Function List. Info/RDS: Selects information for a CD player, such as CD-Text if available on the CD. Selects RDS function for a tuner. When you replace weak batteries, replace all at the same time. When the remote is to be unused for an e xtended period, remove the batteries to prevent damage from corrosion. Time: Selects time information for a CD player or a CD recorder. Display: Switches the display brightness of the HK 990 and other HK units in steps of Full brightness, Reduced brightness and Display Off. Numeric Buttons (0-9): Used to enter track numbers on CD or CDR units or to enter preset numbers/frequency digits on a Tuner. You may begin play of a CD with the Numeric Buttons by entering the digits of the track directly. Press “5” to initiate play from track 5. Press “1” immediately followed by “4” to initiate play from track 14 and “2” immediately followed by “7” to initiate play from track 27. Remote Control 7 Remote Control Band: Switches between frequency bands on a Tuner. FM Mode: Switches between Stereo and Mono on a Tuner. Auto: Switches between Automatic and Manual tuning on a Tuner. Mem: For memorizing a radio station in the Preset Memory of a Tuner. Clear: Clears the memory of a CD/CDR or clears a preset from Tuner station list. Check: Press this button to check the order of tracks programmed into a CD player’s memory. Prog: Press this button to begin the process of programming a CD player to play the tracks of a disc in a specific order. Speaker Setup: Press to enter the HK 990 Speaker Setup functions. See below for explanation of the Speaker Setup process. Input Setup: Press to enter the HK 990 Input Setup functions. See below for explanation of the Input Setup process. Arrow Buttons (› ‹ ): This round button is used to navigate within the menus of the HK 990. EQ Preset: Press to enter the HK 990 Equalizer Preset functions. See below for explanation of the EQ Presets. Level Settings: Press to enter the HK 990 Level Setting functions. See below for explanation of the Level Setting process. Enter: Press to confirm a selection within a HK 990 setup procedure or to switch between selections. See under each Setup process for further explanations. Scroll +/-: When listening to a Tuner, press + to tune to higher frequency stations and – to tune to lower frequency stations. Also see the Owners Manual for your harman/kardon tuner. Volume +/-: Press to adjust the HK 990 volume up or down. Select: When listening to a tuner, press this button to alternate between Auto Tune, Manual Tune or Preset Tune. Pause: When playing a CD, press this button to momentarily pause the disc. Press again to resume play. 8 Remote Control Mute: Press this button to momentarily silence the HK 990. “Muted” flashes in the front panel display. Press again to re-activate sound output. ‹‹ and ›› (Search Buttons): Press one of these buttons to search fast forward or backward on a CD or Tape. You can hear intermittent sounds from the CD while searching. Normal playback resumes when you release the button. |‹‹ and ››| (Skip Buttons): Press one of these buttons to move to the next track or to the previous track on a CD or Tape. Repeatedly pressing one of the buttons skips more tracks. On a CD, pressing Skip Forward while playing the last track skips to track 1, and pressing Skip Back while playing track 1 skips to the last track. Stop: Press this button to stop play of a CD or Tape. Play: Press this button to start playback of a CD or Tape. If the CD drawer is open, the drawer closes and play begins. Pressing the Play Button again pauses play momentarily, same as the Pause Button. +10 and -10: When playing a CD, press the +10 Button to skip 10 tracks forward and the -10 Button to skip 10 tracks backward from the track you are playing. More presses again skips 10 more tracks. If there are less than 10 tracks to the end or start of the CD, the last or first track is played. Folder + and Folder - : When playing a CD with MP3 files, these buttons move to the next or the previous folder with MP3 material. Repeat: When playing a CD, pressing this button once repeats the current track, shown as “Rep 1” in the CD player’s display. Pressing once more repeats the entire CD, shown as “Rep All” in the CD player’s display. Third press exits repeat play. Repeat A-B: When playing a CD, press once to establish a starting point (shown as “Rep A” in the CD player’s display) and a second time to establish an end point (shown as Rep A-B in the CD player’s display). The music between these two points is repeated as a loop until you press the button a third time, returning to normal play. Open/Close: Opens the CD drawer when it is closed and closes it when it is open. The drawer may also be closed by pressing Play. Random: When playing a CD, press this button to play all tracks in random order. Button name HK 990 CD player TUNER CDR Tape TV, Processor, Phono, AUX Device ON (Selected device ON)OnOnOnOnOn Device OFF (Selected device OFF)OffOffOffOffOff System OFF (All devices OFF)OffOffOffOffOffOff AMPAmp selectAmp selectAmp selectAmp selectAmp selectAmp select Processor Processor Input Select Processor Input Select Processor Input Select Processor Input Select Processor Input Select Processor Input Select CD CD Input Select CD Input Select CD Input Select CD Input Select CD Input Select CD Input Select Tuner Tuner Input Select Tuner Input Select Tuner Input Select Tuner Input Select Tuner Input Select Tuner Input Select Phono Phono Input Select Phono Input Select Phono Input Select Phono Input Select Phono Input Select Phono Input Select TV TV Input Select TV Input Select TV Input Select TV Input Select TV Input Select TV Input Select Tape Tape Input Select Tape Input Select Tape Input Select Tape Input Select Tape Input Select Tape Input Select AuxAux Input SelectAux Input SelectAux Input SelectAux Input SelectAux Input SelectAux Input Select CDR CDR Input Select CDR Input Select CDR Input Select CDR Input Select CDR Input Select CDR Input Select MODE (no remote signal)Switch between DevicesSwitch between DevicesSwitch between DevicesSwitch between DevicesSwitch between DevicesSwitch between Devices Info/RDS - Info/RDS Info/RDS - - Time - Time - Time - Display Display Display Display Display Display Display Band - -Band - - FM Mode - -FM Mode - - Auto - -Auto - - 0-9 - Track Select Preset Select Track Select - Mem - - Mem - - Clear - Clear Clear Clear - Check - Check - Check - Prog - Prog - Prog - Speaker SetupSpeaker SetupSpeaker SetupSpeaker SetupSpeaker SetupSpeaker SetupSpeaker Setup Input Setup Input Setup Input Setup Input Setup Input Setup Input Setup Input Setup Menu navigation Menu navigation Menu navigation Menu navigation Menu navigation Menu navigation › ‹ EQ PresetEQ PresetEQ PresetEQ PresetEQ PresetEQ PresetEQ Preset Enter Enter Enter Enter Enter Enter Enter Level SettingsLevel SettingsLevel SettingsLevel SettingsLevel SettingsLevel SettingsLevel Settings Scroll + (repeating button) - -Scroll + - - Vol + (repeating button) Vol + Vol + Vol + Vol + Vol + Vol + Scroll - (repeating button) - -Scroll - - - Vol - (repeating button) Vol - Vol - Vol - Vol - Vol - Vol Select - -Select - - Pause - Pause - Pause - Mute Mute Mute Mute Mute Mute Mute -Search Back -Search BackSearch Back << (repeating button) -Search Fwd -Search FwdSearch Fwd >> (repeating button) -Skip Back -Skip BackSkip Back |<< (repeating button) Stop -Stop -StopStop - Play - Play Play > -Skip Fwd -Skip FwdSkip Fwd >>| (repeating button) +10 (repeating button) - +10 - - - Folder + (repeating button) -Folder + - - - Repeat - Repeat - Repeat - Open / Close -Open / Close -Open / Close - -10 (repeating button) - -10 - - - Folder - (repeating button) -Folder - - - - Rep A-B - Rep A-B - Rep A-B - Random - Random - Random - - This Function List shows all functions of the HK 990 and external devices that can be controlled by the HK 990 remote. Remote Function List 9 ENGLISH Remote Function List Setup Instructions When first powered on, here are the factory settings of the HK 990 stereo integrated amplifier: Input Setup (Front panel and remote control) • Source listen: CD Each Input of the HK 990 can be configured to match the system and your personal taste. In the following you can read a description of the Input Setup settings in detail, followed by the options available for each Input. Pressing the Input Setup Button on the Front panel or the remote control enters and exits the Input Setup menu. • Source record: CD • Processor input: analog unbalanced • CD input: analog unbalanced • Tuner input: analog unbalanced • Tape input: analog unbalanced Note that the selection and navigation through the setup menus is made using the Arrow Buttons Up, Down, Left and Right and the ENTER Button. • TV input: digital coaxial 2 Input Type • Phono (turntable) input: analog MM (moving magnet) Each Input can be configured to the following connections on the rear panel: • Aux input: analog unbalanced • CDR input: digital coaxial 1 CD • Unbalanced Analog • Balanced Analog • Coaxial 1 • Coaxial 2 • Optical 1 Digital • Optical 2 • HRS-Link TUNER • Unbalanced Analog • Coaxial 1 • Coaxial 2 Digital • Optical 1 • Optical 2 HK 990 – Setup Speaker 1 & 2 (Front panel only) When pressing the buttons Speaker 1 or Speaker 2, you will first see the current status setting, then pressing one more time within 5s on Speaker 1 and/or Speaker 2 will change the settings ON or OFF. Up to two speaker pairs can be connected and amplified at the same time. NOTE the minimum load warning above. Source < and > (Front panel only) PHONO • Moving Magnet Analog • Moving Coil Analog TV • Unbalanced Analog • Coaxial 1 • Coaxial 2 Digital • Optical 1 • Optical 2 AUX • Unbalanced Analog • Coaxial 1 • Coaxial 2 Digital • Optical 1 • Optical 2 CDR • Unbalanced Analog • Coaxial 1 • Coaxial 2 Digital • Optical 1 • Optical 2 TAPE • Unbalanced Analog • Coaxial 1 • Coaxial 2 Digital • Optical 1 • Optical 2 The Source Buttons can be used in 2 ways: • Directly, giving access to the Playback Source, switched with immediate effect. • After having entered the Record Out mode to select the Source to be routed to the Record path. Record Out (Front panel only) When pressing the Record Out Button, you will have access to the selection of the Source you would like to get directed to the Record Outputs. Scroll through the list of record sources with the < and > Buttons: CD, TUNER, AUX, CD-R, TAPE, TV and PHONO until the desired source appears in the display. Whether the source is Analog or Digital, the HK 990 will deliver the Record signal in both domains simultaneously through both the Analog (CD-R and Tape) and the Digital (Coaxial) Outputs. This means that any Analog Input can be recorded digitally without addition of an external Analog/Digital converter. PROCESSOR • Unbalanced Analog 10 Setup Instructions The physical rear panel connection that you have associated with each Input in the Input Setup Procedure also determines the recording signal source when you select that device in the Record Out menu. Audio mode The HK 990 can handle Analog as well as Digital signals. It can process any Input in the Digital Domain to equalize the signal and tailor the sound to the loudspeakers and room acoustics, once either the EzSet/EQ or the Manual Bass Management has been set up (see below). You choose the method and the processing according to your preference within the Input Setup menu. The five Audio Modes are as follows: 1. Direct Path: Selection of the Direct Path is an Analog-Input only option. It bypasses all digital processing (ADC, DSP and DAC) to reduce the signal path to an absolute minimum, consisting of volume control only. Being an Analog-only option, if you select an Input to be associated with a Digital source, the Direct Path setting is not available. 2. DSP Path: Selecting the DSP Path opens access to the Tone Control circuits. In this mode, the Analog signals are routed to the A/D Converter, the Digital Sound Processor and D/A Converter path prior to Volume adjustment. 3. EQ1 LF (Low Frequency correction): This Mode should be selected once the EzSet/EQ Setup has been carried out (see below). If selected before the EzSet/EQ Setup, it will simply provide the same result as the DSP Path, being a flat response with access to the Tone Controls. The EQ1 LF Mode is the first Preset available after the EzSet/EQ Calibration has been carried out. This Preset processes the subwoofer channels only, correcting the acoustics of the room in the low frequency range while keeping the response curve of the main speakers unchanged. 4. EQ2 LF+MF (Low and Mid Frequency correction): This Mode should be selected once the EzSet/EQ Setup has been carried out (see below). If selected before the EzSet/EQ Setup, it will simply provide the same result as the DSP Path, being a flat response with access to Tone Controls. The EQ2 LF + MF mode is the second Preset available after the EzSet/EQ Calibration has been carried out. This Preset is active for the low and mid frequency responses of both the main speakers and the subwoofers when it calibrates the system to the room. As a result, both the subwoofer and main speaker response curves are modified to accommodate the system response to the room. The response curve of the main speakers is corrected up to 1kHz and kept unaffected above this frequency, leaving the rest of the audio spectrum unaffected. 5. EQ3 LF + MF + HF (Low, Mid and High Frequency correction): This Mode should be selected once the EzSet/EQ Setup has been carried out (see below). If selected before the EzSet/EQ Setup, it will simply provide the same result as the DSP Path, being a flat response with access to Tone Controls. The EQ3 LF + MF + HF mode is the third Preset available after the EzSet/EQ Calibration has been carried out. This Preset optimises not only the main speaker and subwoofer responses to accommodate the room acoustics, but also corrects the high frequency response of the speaker at the listening position by correcting off-axis response. Please observe that all the five Audio Modes described above can be selected independently for all Inputs. Gain The level of different sources may vary. To avoid annoying level changes when switching between Inputs, Gain Adjustment from -6 dB to +6 dB is an option for each Input. The Processor Input has a different range (-24 dB to +6 dB), to accommodate the output levels of most Processors. Bass and Treble Bass and Treble adjustment is only accessible when the Audio Mode is not Direct (i.e. is set to DSP, EQ 1, EQ 2 or EQ 3). When in this mode, you can adjust the Bass and Treble from -10 to +10 dB below 100 Hz and above 10 kHz. Speaker Setup •Automatic mode: When pressing the Speaker Setup Button, a Menu opens to offer a choice between Manual mode or EzSet/EQ Setup. Below is a description of both options. I. “Connect mic and place it at listening position”: following this message, connect the supplied measuring microphone to the front panel jack shared with headphones. Place it in your listening position, at correct height, then press ENTER. In order to read the complete message on the Display, press the > Arrow Button on the Remote. Manual Mode If you know your system and your room well and simply want to manage the low frequency response of your system without correcting the frequency response of subwoofers and main speakers, select the Manual Mode. This is a basic Bass Manager Setup. Once Manual Mode has been selected, follow the steps below: 1. “Subwoofer 1 ON / OFF”: Select ON if a subwoofer is connected to the SUB 1 Output, 2. “Subwoofer 2 ON / OFF”: Select ON if a subwoofer is connected to the SUB 2 Output, 3. “Crossover Frequency”: If either SUB1 or SUB2 is ON, you can select the crossover frequency, where the main speakers’ lower frequency limit and the subwoofer’s upper frequency limit is placed. The setting goes from 40 to 200 Hz in 10 Hz steps. 4. Save and Exit: To save the steps 1 to 3, press Enter after each step. EzSet/E Q Mode If you want to benefit from the HK 990’s advanced, automatic frequency correction and setup system, select EzSet/EQ Mode. The process is described in detail below. Setup process The Setup process consists of the following steps: 1. “Subwoofer 1 ON/OFF”: select ON if a subwoofer is connected to the SUB 1 Output, 2. “Subwoofer 2 ON/OFF”: select ON if a subwoofer is connected to the SUB 2 Output, 3. “Crossover Frequency Automatic/Manual” (Only if at least one Subwoofer is connected to the HK 990): select whether you want to manually set a crossover frequency of your choice, or let the HK 990's algorithm measure your Main Speaker limitations automatically. •Manual mode: “Crossover Frequency”: select which crossover frequency you want for the system, between 40 and 200 Hz in 10 Hz steps. When the frequency is adjusted, you will be asked to follow the same steps as below in the Automatic mode. II. The system generates two loud, brief frequency sweeps through the speakers. If you are not comfortable with loud noise, use ear plugs or have someone else perform the calibration. The volume of the sweeps is pre-determined. You can control this level by simply adjusting the volume with the Volume Button on the front panel, or with the Volume Buttons on the Remote Control. Please note that if you set the volume too low, the calibration does not function, and setting it too loud may damage your loudspeakers. After performing the calibration, the volume reverts to the level that you used previously. When the sweeps have been done, you may get an error message “Mic or speaker not detected” in the Display. In this case, check the connection to the microphone and/or increase the volume slightly, then press ENTER again. If no error is found, the system will bring you to step 3. If you still get an error message, you have to switch off the amplifier to exit from the calibration menu. III. Once the sweeps are performed without error, the Display will show “Filter Design, please wait…”. During this process, the filter parameters are computed and written into the DSP Flash memory. When this is done, the system goes to step 4. IV. “Place mic at 60cm in front of the left speaker” appears in the Display. Position the microphone as prompted, preferably at normal listening height (you may use a photo tripod, there is a threaded hole at the bottom of the microphone for this purpose), then press ENTER. A new sweep will be generated. If unsuccessful, you will be asked to check the distance or the volume of the system with this message in the Display: “Wrong distance or level, please check and press ENTER”. If successful, you will go to step 5. Setup Instructions 11 ENGLISH Setup Instructions Setup Instructions V. “Place mic at 60cm in front of the right speaker” appears in the Display. Again, position the microphone as prompted, then press ENTER. A new sweep will be generated. If unsuccessful, you will be asked to check the distance or the volume of the system with this message in the Display: “Wrong distance or level, please check and press ENTER”. If successful, you will go to step 6 if at least one Subwoofer is connected, or to step 7 in a pure 2.0 system. VI. There are two possibilities at this stage, depending on the number of subwoofers selected in Step 1 of the Setup Process: • One Subwoofer: The Display shows this message: “Place mic at listening position, press ENTER”. Having done this, two sweeps are generated. If successful, you will jump to step 7. If not, the following message is shown: “Sub not connected or incorrect level, please check and press ENTER”. Check the connection and/or adjust the subwoofer level and press ENTER again. When successful, you will go to step 7. • Two Subwoofers: The Display shows this message: “Place mic at 1st listening position, press ENTER”. Place the microphone 90cm to the left of your listening position. After pressing Enter, four sweeps are generated. Then you will be asked to “Place mic at 2nd listening position, press ENTER”. Now place the microphone 90cm to the right of your listening position. After pressing Enter, two sweeps are generated. If successful you will jump to step 7. If not, the following message is shown: “Sub 1 or 2 not connected or incorrect level, please check and press ENTER”. Check the connections and/or adjust the subwoofer levels and press ENTER again. When successful, you will go to step 7. VII.The Setup procedure is now complete, and the Display shows this message: “EQ setup completed, unplug microphone, press ENTER to save EQ Setup”. Press ENTER as prompted. The Display shows: “Saving system equalization”. Now the HK 990 goes back to the previous playback mode, and you can test the results of the Setup process by going through the various options, pressing the EQ Preset Button repeatedly. (See below). 12 Setup Instructions EzSet/EQ description Level settings During the Automatic EzSet/EQ process, several frequency sweeps were made. Here is a brief explanation of their use. The Level Settings Menu permits adjusting the levels of the different activated speakers and subwoofer(s) of the system. Depending on what was adjusted during the Speaker Setup process, SUB1 and/or SUB2 may or may not be activated. Far Field The first sweeps that occur during step 2 are used to calibrate the speaker system (adjust relative levels and delay, determine the crossover frequency if Manual Crossover Frequency was not selected earlier). Also, the low frequency response of the speakers is equalized by applying a correction curve (with a range of 20 Hz to 1Khz). This is the curve that is stored during the “Filter Design” phase. Near Field The next sweeps measured in front of each speaker (steps 4 and 5) serve to correct the onaxis response of the main speakers. By applying sweeps to each speaker, a correction curve above 1Khz is generated for each speaker. The curves are stored after step 7. BassQ If at least one Subwoofer is connected, the final steps of the EzSet/EQ process adjust the low frequency response of the system, taking into consideration the acoustics of the room. The system can correct up to two subwoofers in its processing loop. Using two subwoofers offers the advantage of a more linear low frequency characteristic, limiting the node effects usually found in this frequency range. The curves are stored after Step 7. EQ Preset The HK 990 provides direct access to the three set of Filters via the Remote Control through the “EQ Preset” button. Use this button to toggle between these three modes: 1. BassQ (EQ1 LF) 2. BassQ + Far Field (EQ2 LF + MF) 3. BassQ + Far Field + Near Field (EQ3 LF + MF + HF) It will also toggle through the Direct and DSP paths, thus allowing 5 possible settings. Note that the EQ Preset Button is in fact a short-cut Button for the Audio Mode function of the Input Setup described above. The EzSet/EQ measurements are stored in a flash memory, and are not lost even if the amplifier is disconnected from the AC mains. The Level Settings Menu adjustments are: 1. to adjust the Balance between Left and Right speakers up to 12 dB for each side, 2. to adjust the Subwoofer 1 level between + and – 6 dB (when ON), 3. to adjust the Subwoofer 2 level between + and – 6 dB (when ON). Listening to your CD player, tape deck, tuner or other source 1. Press the Power switch 1 to turn on the amplifier. The power indicator lights white and the protection circuitry checks for short circuit or other problems for a few seconds before sound output. 2. Press ”Speaker 1” to hear loudspeakers connected to the rear Speakers 1 terminals. Press ”Speaker 2” to hear loudspeakers connected to the rear Speakers 2 terminals. Press both to hear both speaker pairs at once. To listen to headphones only, press to turn off any active speaker pair. 3. Select desired source for listening by pressing the front panel Source up or down 4 repeatedly until the name of the source is shown in the Main Information Display or by pressing the desired System On button on the remote control. Please take the time to first associate physical Input jacks to source names, then press the Power Button to place the amplifier in Standby to have it save your preferences. 4. Begin playing the desired source. 5. Adjust the Volume control to the desired level. With the Input Setup, you may adjust Bass and Treble as well as Balance if you have not already done this during the Setup process. With the EQ Preset you can select one, two or three stages of Equalization, if you did already perform the EzSet/EQ Setup automated adjusting process as described above. have connected a cd player to the HK 990 with a digital cable, its signal is available from the analog recording outputs as well as the digital outputs. NOTE: The record output signal is taken directly from the program source and is unaffected by the Volume, Bass, Treble or Balance controls. Making a recording Important Notes: You may record any source to tape or to CD-R or to both simultaneously. You may also connect a second tape deck to the CDR inputs and outputs to record from tape to tape (in either direction). • ”Record Source” can be selected on the front panel only, not from the remote control. To select the desired source for recording (this can be a different source than the one being listened to), press the Record Out Button, followed by the Source Selector up or down button on the front panel repeatedly until the indicator for the name of the source to be recorded is shown in the Main Information Display. All Input Signals, digital or analog, are available for recording in both digital and analog form. This means that if you wish to copy a vinyl record to a digital recorder, you simply start vinyl play, select Phono as Record Source and begin recording on your digital recorder. The built-in analog/digital converters transform the analog Phono signal to digital form. The reverse is also possible: if you • 3-head cassette decks with monitoring function can be connected to ”Tape” or ”CDR” connectors too, but their monitoring function cannot be used. • Always turn the HK 990 to Standby with the Power Button before unplugging the Power Cord (or before switching off an external multi-plug). This saves your current setup in the memory, in addition to safely switching off the power amplifier section of the HK 990. Troubleshooting This unit is designed for trouble-free operation; most problems users encounter are due to operating errors. So if you have a problem, first check this list for a possible solution. If the problem persists, consult your authorized H armanKardon service center. If the problem is... No lights illuminate when power cord is plugged into AC outlet. No sound is heard. Sound is not heard from the speaker system on one side. When listening to stereo sound, the left and right sounds are reversed. Intermittent or continuous buzzing or hissing. The remote control and front panel controls don't appear to work. Humming noise when listening to LP Howl or ringing when listening to LP. Low sound level when listening to LP. LP sound is distorted and too loud. Make sure that... • The unit is plugged into a live outlet. • Speaker switches corresponding to the desired speakers are pressed. • Correct source button has been pressed. • Volume is turned up. • Speaker wires are connected properly. • Hook-up wires to source component are connected properly. • The speaker wires and connection wires are connected correctly. • Set the balance setting to 0 • The speaker wires are connected correctly. • The wires between components are connected correctly. • The unit is away from fluorescent lights, TV, motors and other electrical appliances. • Disconnect the AC line cord from the wall socket, wait 5 minutes and then re-connect it. • Ground wire from record player has been connected to ground terminal on amplifier. • Cable from record player is away from power cords and speaker cables. • Record player is not to close to speakers. • Record player is on stable surface. • Cable from record player is connected to the Phono jacks. • The MM Input has not inadvertently been used with an MC phono cartrigde • The MC Input has not inadvertently been used with an MM or MC High Output cartridge. Operating Instructions 13 ENGLISH Operating Instructions Specifications NOMINAL Continuous Average Power Per Channel (FTC) 8 Ohms: 150 Watts@<0.03%THD 20 Hz – 20 kHz, both channels driven 4 Ohms: 300 Watts@<0.3%THD Dynamic Power (IHF, 1 kHz Tone Burst) 8 Ohms: 220 Watts 4 Ohms: 440 Watts High instantaneous current capability (HCC) ±200 Amps Power Bandwidth @ Half-Rated output, 8Ω 20 Hz - 100 kHz Frequency response @ 1W (+0/-3dB) 5 Hz - 120 kHz Damping factor (20Hz-20k Hz) >200 Signal-to-noise Ratio (Reference rated power output, A-WTD) Tuner/CD 100 dB Phono (MC): 75 dB Input sensitivity/Impedance Tuner/CD 350 mV/43k Ohms Phono (MM): 10 mV/47k Ohms Phono (MC): 1 mV/100 Ohms Overload Tuner/CD 2.8V Phono (MM): 85 mV Phono (MC): 8.5 mV Tone control range, Bass @ 100 Hz/Treble @ 10 kHz ±10 dB/±10 dB Power supplyAC 230V, 50 Hz Power consumption 1000 W Standby power consumption 1W Dimensions (Width x Height x Depth) 440 x 160 x 444 mm Depth includes Volume Button and Loudspeaker Terminals Weight 24 kg 250 Crossways Park Drive, Woodbury, New York 11797 www.harmankardon.com Harman Consumer Group International: 2, Route de Tours, 72500 Château-du-Loir, France © 2009 Harman Kardon, Incorporated Part no. 8509 9012 0000 Rev. B