1
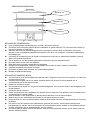
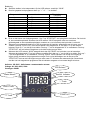
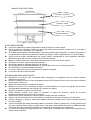
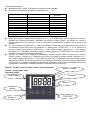
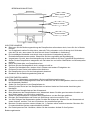
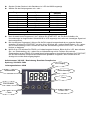
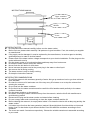
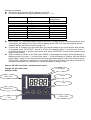
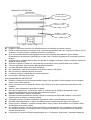
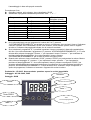
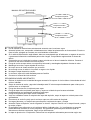
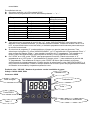
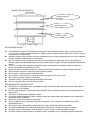
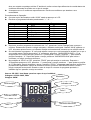
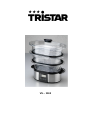
VS – 3905
GEBRUIKERSHANDLEIDING
Bovenste pan
Middelste pan
Onderste pan
BELANGRIJKE OPMERKINGEN
◆ Lees de aanwijzingen aandachtig door voordat u de stomer gebruikt.
◆ Controleer voor het eerste gebruik dat alle onderdelen in goede staat zijn. Zo niet neem dan contact op
met uw leverancier of producent.
◆ Wanneer het netsnoer is beschadigd dient het vervangen te worden door de fabrikant, zijn service
agenten of een vergelijkbaar gekwalificeerd persoon om risico’s te vermijden. Controleer regelmatig op
beschadigingen.
◆ Controleer of de spanning van de stomer overeenkomt met die van uw elektrische installatie. Gebruik
alleen een geaard stopcontact.
◆ Zet de stomer op een horizontaal oppervlak en houd hem weg van warmtebronnen.
◆ Houd de stomer uit de buurt van kinderen.
◆ Raak de mantel nooit aan voordat deze is afgekoeld.
◆ Dompel het motorgedeelte, netsnoer of de stekker nooit onder in water of andere vloeistoffen.
◆ Verwijder het deksel niet tijdens het koken.
◆ De stomer is alleen maar bestemd voor huishoudelijk gebruik.
◆ Bewaar de gebruiksaanwijzing.
BELANGRIJKE AANBEVELINGEN
◆ Vul het reservoir met de benodigde hoeveelheid water. Zorg dat u niet boven het maximum- of onder het
minimumniveau komt.
◆ Verwijder het mengsel van olie en water ongeveer iedere 35 minuten uit de opvangbak om te
voorkomen dat het in het reservoir loopt.
◆ Plaats het voedsel in de pan.
◆ Doe het deksel op de pan en zorg ervoor dat de handgrepen van het deksel exact in de handgrepen van
de pan passen.
◆ Zet de pan op het reservoir.
◆ Wees voorzichtig met het verwijderen van de pan van het reservoir of het afnemen van het deksel om te
voorkomen dat u zichzelf brandt.
◆ Haal de stekker uit het stopcontact en laat de stomer afkoelen voor het schoonmaken.
◆ Gebruik sop en een zachte doek om de pan en het deksel schoon te maken.
◆ Leeg het reservoir voor het schoonmaken. Maak de binnenzijde met een vochtige doek schoon en droog
de stomer.
◆ Het is beter om het voedsel in de onderste pan (gemerkt #1) te doen. Grote stukken dienen eerst
kleingesneden te worden. Het is tevens beter om verschillende soorten voedsel in verschillende pannen
te doen, afhankelijk van de eigenschappen van het voedsel.
◆ Het deksel past op iedere van de drie pannen. Kies de meest geschikte pannen om de stomer naar uw
wensen samen te stellen.
Bediening
◆ Steek de stekker in het stopcontact. Op het LCD scherm verschijnt: “00:00”.
◆ Kies het gepaste kookprogramma door op “ + ” of “ – ” te drukken.
Programma Nr.
1
2
3
4
5
6
7
8
0
◆
◆
◆
Voedsel
Rijst
Kip
Vis
Eieren
Garnalen
Groenten
Fruit
Anderen
Schermweergave uit
Tijds indicatie
(minuten)
33
30
26
23
21
35
20
Handmatig
Druk na het kiezen van kookprogramma 1 t/m 7 op “START/UIT” om te beginnen met koken. De klok telt
af, de controlelamp brandt. Wanneer het LCD scherm “00:00” aangeeft, klinkt vier maal een
geluidssignaal en de controlelamp knippert constant om u te informeren dat het koken is voltooid.
Wanneer u programma 8 kiest kunt u zelf de gewenste tijd instellen, afhankelijk van de keuze van uw
voedsel. Druk op "START/UIT" toets na het kiezen van programma “8”; de linker “0” op het scherm
knippert. Druk op “+” om de tijd in te stellen. Druk op "-" om de knipperende "0" te veranderen. Druk op
"START/UIT" om het koken te beginnen en de klok begint terug te tellen.
Wanneer het LCD scherm “00:00” aangeeft druk dan op “PROG” om het koken voor te bewerken.
Wanneer de knipperende "0” op het scherm verschijnt, druk dan op “+” om de tijd in te stellen. Druk op "" om de knipperende "0" te veranderen. Druk op “PROG” na het instellen van de tijd om toegang te
krijgen tot de procedure die programma's toewijst. Druk na het beëindigen van de keuze op de
“START/UIT" toets en de kok begint terug te tellen naar “0”. Wanneer de resterende tijd overeenkomt
met die van het toegewezen programma zal de indicator aangaan en het toestel begint te koken.
Artikelnr: VS-3905. Artikelnaam: roestvaststalen stomer.
Voltage: AC 220~240V, 50Hz
Vermogen: 800W
Water Niveau
LCD Scherm
Aan/Uit Indicator
“-“ Toets
PROG Toets
“+” Toets
START/UIT
MANUEL D’INSTRUCTIONS
Conteneur supérieur
Conteneur central
Conteneur inférieur
NOTES IMPORTANTES
◆ Lisez avec attention le manuel d’instructions avant d’utiliser le cuiseur vapeur.
◆ Avant la première utilisation, vérifiez que toutes les pièces sont en bonne condition. Si ce n’est pas le
cas, contactez votre revendeur ou le fabricant.
◆ Si le câble d’alimentation est endommagé, il doit être remplacé par le fabricant, son agent d’entretien ou
une personne similairement qualifiée pour éviter tout danger. Vérifiez régulièrement s’il y a des dégats.
◆ Vérifiez que la tension d’alimentation du cuiseur vapeur corresponde à votre installation électrique.
Branchez la prise dans la prise murale avec la terre à proximité.
◆ Mettez le cuiseur vapeur sur une surface horizontale et loin des sources de chaleur.
◆ Conservez le cuiseur vapeur éloigné des enfants.
◆ Ne touchez jamais le carénage avant qu’il ait refroidi.
◆ Ne plongez jamais le câble d’alimentation ou la prise dans l’eau ou un quelconque liquide.
◆ Ne retirez pas le couvercle pendant la cuisson.
◆ Le cuiseur vapeur est conçu uniquement pour cuisiner en famille.
◆ Conservez ce manuel d’instructions.
RECOMMANDATIONS IMPORTANTES
◆ Remplissez le réservoir avec la quantité d’eau nécessaire. Ne dépassez pas les niveaux indiqués
maximum et minimum.
◆ Retirez le mélange d’huile et d’eau du plateau toutes les 35 minutes environ pour éviter que le mélange
n’entre dans le réservoir.
◆ Mettez les aliments dans le conteneur à vapeur.
◆ Mettez le couvercle sur le conteneur à vapeur et faites attention à ce que les poignées du couvercle
correspondent parfaitement aux poignées du conteneur à vapeur.
◆ Placez le conteneur à vapeur sur le réservoir.
◆ Faites attention lorsque vous retirez le conteneur à vapeur du réservoir, retirez le couvercle
précautionneusement pour éviter de vous brûler.
◆ Débranchez la prise et laissez le cuiseur vapeur refroidir avant de le nettoyer.
◆ Utilisez une eau savonneuse et un tissu doux pour nettoyer le conteneur à vapeur et le couvercle.
◆ Avant de nettoyer le réservoir, videz l’eau restante. Nettoyez l’intérieur avec un tissu humide et séchez
le cuiseur vapeur.
◆ Il est recommandé de mettre les aliments dans le conteneur inférieur (marqué N°1) et les gros blocs de
nourriture deraient être coupés en petits blocs. Il est aussi recommandé de placer les différents types
d’aliments dans des conteneurs différents en fonction de la composition de ces aliments.
◆ Le couvercle correspond respectivement aux 3 conteneurs. Choisissez les conteneurs et assemblez en
fonction de vos besoins.
Procédures d’utilisation
◆ Branchez la prise, “00:00” s’affichera sur l’écran à cristaux liquides.
◆ Choisissez le programme de caisson en appuyant sur “ + ” ou “ – ”.
N° de Programme
1
2
3
4
5
6
7
8
0
◆
◆
◆
Aliment
Riz
Poulet
Poisson
Oeufs
Crevettes
Légumes
Fruits
Autres
Désactive l’affichage
Temps de référence
(minutes)
33
30
26
23
21
35
20
manuel
Après avoir choisi le programme de cuisson de 1 à 7, sur “START/OFF” pour commencer la cuisson,
pendant que l’horloge décompte, l’indicateur est allumé. Lorsque “00:00” est affiché sur l’écran à
cristaux liquides, un son sera joué 4 fois et l indicateur clignottera pour indiquer que la cuisson est
terminée.
Si vous choisissez le programme “8”, vous pouvez régler le temps dont vous avez besoin en fonction de
vos aliments. Après avoir choisi le programme “8”, appuyez sur “START/OFF”, le “0” de gauche sur
l’écran à cristaux liquids clignotte. Appuyez sur “+” pour régler le temps. Appuyez sur “–” pour changer
la position du “0” clignottant. Après avoir réglé le temps, appuyez sur “START/OFF” pour commencer la
cuisson et l’horloge commencera le décompte.
Appuyez sur “PROG” pour arranger au préalable la cuisson lorsque “00:00” est affiché sur l’écran à
cristaux liquides. Lorsque le “0” clignottant est affiché sur l’écran à cristaux liquides, appuyez sur “+”
pour régler le temps, appuyez sur “–” pour régler la position du “0” clignottant. Après avoir réglé le temps,
appuyez sur “PROG ” à nouveau pour choisir le programme à éxécuter. Après avoir choisi, appuyez sur
“START/OFF” et l’horloge commencera à décompter. Lorsque le reste du temps correspond à la durée
du programme à executer, l’indicateur s’allume et l’appareil débute la cuisson.
Objet N°: VS-3905. Nom de l’Objet: cuiseur vapeur inoxidable
Tension: AC 220~240V, 50Hz
Puissance: 800W
Niveau d’Eau
Ecran à Cristaux
Indicateur
Bouton “-“
Bouton
Bouton “+”
START/OFF
BEDIENUNGSANLEITUNG
Oberer Aufsatz
Mittlerer Aufsatz
Unterer Aufsatz
WICHTIGE HINWEISE
◆ Bitte lesen Sie die Bedienungsanleitung des Dampfkochers aufmerksam durch, bevor Sie ihn in Betrieb
nehmen.
◆ Vor Erstgebrauch stellen Sie bitte sicher, dass alle Teile vorhanden und in Ordnung sind. Sollte das
nicht der Fall sein, dann setzen Sie sich bitte mit Ihrem Fachhändler in Verbindung.
◆ Ein beschädigtes Netzkabel muss durch einen autorisierten Kundendienst oder eine
Elektrofachwerkstatt ersetzt werden. Überprüfen Sie bitte regelmäßig auf Beschädigung.
◆ Vergewissern Sie sich, dass Ihre Netzspannung mit dem Aufdruck auf dem Typenschild übereinstimmt.
◆ Stellen Sie den Dampfkocher waagerecht auf und halten ihn von heißen Oberflächen und Wärmequellen
entfernt.
◆ Halten Sie Kinder bitte vom Dampfkocher fern.
◆ Berühren Sie das Gerätegehäuse nicht, solange es heiß ist.
◆ Tauchen Sie Netzkabel oder -stecker nicht in Wasser oder andere Flüssigkeiten ein.
◆ Entfernen Sie den Deckel nicht während des Kochens.
◆ Der Dampfkocher ist nur für den Heimgebrauch bestimmt.
◆ Bewahren Sie die Bedienungsanleitung bitte auf.
WICHTIGE EMPFEHLUNGEN
◆ Füllen Sie den Wassertank innerhalb der Höchst- und Mindestmarkierungen.
◆ Entfernen Sie das Öl/Wassergemisch etwa alle 35 Minuten aus dem Auffangbecken, damit es nicht in
den Wassertank überläuft.
◆ Geben Sie Ihre Speisen in den Dampfaufsatz ein.
◆ Setzen Sie den Deckel auf den Dampfaufsatz und achten hierbei auf die korrekte Ausrichtung der
Handgriffe.
◆ Setzen Sie den Dampfaufsatz auf den Wassertank.
◆ Beim Abnehmen des Dampfaufsatzes vom Wassertank lassen Sie bitte ganz besondere Vorsicht mit
dem Deckel walten, um sich nicht zu verbrühen.
◆ Ziehen Sie den Netzstecker und lassen den Dampfkocher vor dem Reinigen abkühlen.
◆ Reinigen Sie Dampfaufsatz und Deckel mit Seifenlauge und einem weichen Tuch.
◆ Vor dem Reinigen des Wassertanks gießen Sie bitte das Wasser ab. Wischen Sie den Wassertank mit
einem feuchten, weichen Tuch aus und trocknen ihn anschließend gut ab.
◆ Benutzen Sie stets erst den unteren Aufsatz (Nr. 1), Speisen sollten zerkleinert werden. Benutzen Sie
für unterschiedliche Speisen unterschiedliche Aufsätze.
◆ Der Deckel passt auf alle 3 Aufsätze, wählen Sie den korrekten Aufsatz für Ihre Speisen.
Bedienungshinweise
◆
◆
◆
◆
◆
Stecken Sie den Stecker in die Steckdose, im LCD wird 00:00 angezeigt.
Wählen Sie das Kochprogramm mit + oder –.
Programm
Speisen
1
2
3
4
5
6
7
8
0
Reis
Hühnchen
Fisch
Eier
Garnelen
Gemüse
Früchte
Sonstiges
Ausschalten
Zubereitungszeit
(Minuten)
33
30
26
23
21
35
20
manuell
Nach Auswahl eines Programms 1 bis 7 drücken Sie START/OFF, die Zeit läuft rückwärts, die
Kontrollanzeige ist eingeschaltet. Sobald 00:00 im LCD angezeigt wird, ertönt ein viermaliges Signal und
die Anzeige blinkt.
Bei Auswahl des Programms 8 können Sie die Zeit manuell entsprechend der zu garenden Speisen
einstellen. Drücken Sie START/OFF, die linke 0 im LCD blinkt. Mit + stellen Sie die Zeit ein, mit – gehen
Sie zur Nulleinstellung zurück. Drücken Sie nach der Zeiteinstellung erneut START/OFF, um mit dem
Kochen zu beginnen.
Mit 00:00 im LCD drücken Sie PROG zur Vorbereitung des Kochens. Blinkt die 0 im LCD, dann drücken
Sie + zur Zeiteinstellung, mit – gehen Sie zur Nulleinstellung zurück. Drücken Sie nach der
Zeiteinstellung erneut PROG zur Auswahl des Kochprogramms. Anschließend drücken Sie START/OFF,
die Zeit läuft rückwärts. Entspricht die Restzeit dem gewählten Programm, dann schaltet sich die
Anzeige ein und der Kochvorgang beginnt.
Artikelnummer: VS-3905. Bezeichnung: Rostfreier Dampfkocher
Speisung: 220-240V~ 50Hz
LCD Display
Leistungsaufnahme: 800W
Wasserstand
Kontrollanzeige
- Taste
PROGRAMM
+ Taste
START/OFF
INSTRUCTIONS MANUAL
Upper container
Middle
Lower
IMPORTANT NOTES
◆ Do read instructions manual carefully before use the steam cooker
◆ Before first use, please check carefully if all parts are in good condition. If not, do contact your supplier
or manufacturer
◆ If the supply cord is damaged, it must be replaced by the manufacturer, its service agent or similarly
qualified persons in order to avoid a hazard.
◆ Please check if the steam cooker voltage corresponds to your electric installation. Put the plug onto the
socket with earth near by
◆ Put the steam cooker on a horizontal surface and keep away from heat source
◆ Do keep the steam cooker away from children
◆ Never touch the hull before it cools down
◆ Never immerse the power cord or the power plug in the water or other liquid
◆ Not remove the lid during cooking
◆ The steam cooker is only for family cooking
◆ Do keep the instructions manual
IMPORTANT RECOMMENDATIONS
◆ Do refill the reservoir with necessary quantity of water. Not go up maximum level or go down minimum
level indicated.
◆ Do clear the mixture of oil and water out of the tray every 35 minutes or so to stop the mixture from
entering the reservoir.
◆ Do put food into the steam container
◆ Do put the lid on the steam container and be careful the lid’s handles match perfectly to the steam
container’ handles
◆ Put the steam container on the reservoir
◆ Be careful in taking the steam container away from the reservoir, take the lid off with carefulness to
avoid burning yourself
◆ Disconnect the plug and let steam cooker cool down before cleaning
◆ Do use a soapy water and a smooth rag to clean the steam container and the lid
◆ Before cleaning the reservoir, do empty water inside it. Do clean the interior with a damp rag and dry the
steam cooker
◆ It is better to put food into the lower container (marked 1#) and big block food should be cut into small
blocks. And it is also better to put different kinds of food into different containers according to food
character.
◆ The cover can match 3 containers respectively. Choose the suitable containers to assemble according
to your need.
Operation procedures
◆ Connect the plug and then “00:00” displays on the LCD
◆ Choose the appointed cooking programs by pressing “ + ” or “ – ”
Program No.
1
2
3
4
5
6
7
8
0
◆
◆
◆
Food
Rice
Chicken
Fish
Eggs
Prawns
Vegetables
Fruits
Others
Turn off displaying
Refer
time(minutes)
33
30
26
23
21
35
20
manual
After choose 1 to 7 cooking programs, press “START/OFF” to begin to cook, in the meanwhile the clock
counts down, the indicator is on. When “00:00” displays on the LCD, four times sound speak and the
indicator flashes continually tell that cooking is ok.
If choose the “8” program, you can set the time you need according to your food requires. After choose
“8” programs, press “START/OFF”, the left “0” of the LCD is flashing. press “+” to set the time. Press “–”
to change the flashing “0” position. After set the time, press “START/OFF” to start cooking and the clock
begins to count down.
On the condition of “00:00” on the LCD, press “PROG” to prearrange the cooking. While the flashing “0”
displays on the LCD, press “+” to set the time, press “–” to set the flashing “0” position. After set the time,
press “PROG ” again to enter the procedure choosing appointed programs. After finish choosing, press
“START/OFF” and then the clock begin to count down. When the rest of time is the same as the time of
the appointed program, the indicator turns on and the appliance begins to cook.
Item no: VS-3905 Item Name: stainless steam cooker
Voltage: AC 220~240V, 50Hz
Wattage: 800W
Water Line
LCD Display
Power
“-“ Key
PROG Key
“+” Key
START/OFF
MANUALE DI ISTRUZIONI
Contenitore superiore
Contenitore centrale
Contenitore inferiore
NOTE IMPORTANTI
◆ Leggere il manuale di istruzioni con attenzione prima di utilizzare la pentola a vapore
◆ Prima di usare la pentola per la prima volta, verificare attentamente che tutti i componenti siano in buone
condizioni. In caso contrario, contattare il fornitore il produttore
◆ Se il cavo di alimentazione è danneggiato, deve essere sostituito dal produttore, da un addetto
all’assistenza o da personale qualificato per evitare rischi. Verificare regolarmente l’eventuale presenza
di danni
◆ Verificare che il voltaggio della pentola corrisponda al voltaggio domestico. Inserire la spina in una presa
dotata di messa a terra
◆ Collocare la pentola a vapore su una superficie orizzontale e tenere lontano dalle fonti di calore
◆ Tenere la pentola a vapore lontano dalla portata dei bambini
◆ Lasciare raffreddare prima di toccare la struttura
◆ Non immergere il cavo di alimentazione o la spina in acqua o altri liquidi
◆ Non rimuovere il coperchio durante la cottura
◆ La pentola a vapore è destinata solo all’uso domestico
◆ Conservare il manuale di istruzioni
RACCOMANDAZIONI IMPORTANTI
◆ Riempire il serbatoio con la corretta quantità d’acqua. Non superare il livello massimo e non scendere
oltre il livello minimo indicato.
◆ Pulire la miscela di olio e acqua dal vassoio ogni 35 minuti circa per evitare che la miscela entri nel
serbatoio.
◆ Inserire il cibo nell’apposito contenitore a vapore.
◆ Collocare il coperchio sul contenitore a vapore e verificare che le maniglie del coperchio siano
agganciate perfettamente alle maniglie del contenitore a vapore.
◆ Inserire il contenitore a vapore nel serbatoio.
◆ Prestare la massima attenzione quando si estrae il contenitore a vapore dal serbatoio, rimuovere il
coperchio con cautela per evitare bruciature.
◆ Scollegare la presa e lasciare raffreddare la pentola a vapore prima di effettuare la pulizia.
◆ Utilizzare acqua saponata e un panno morbido per pulire il contenitore del vapore e il coperchio.
◆ Prima di pulire il serbatoio, svuotare l’acqua residua. Pulire l’interno del serbatoio con un panno umido
ed asciugare la pentola a vapore.
◆ Si consiglia di inserire i cibi nel contenitore inferiore (contrassegnato 1#) e di tagliare in piccoli pezzi i
cibi di grandi dimensioni. Si consiglia inoltre di collocare cibi diversi in contenitori diversi in base alle
relative caratteristiche.
◆ Il coperchio può essere utilizzato rispettivamente con i 3 contenitori. Selezionare i contenitori adatti per
l’assemblaggio in base alle proprie necessità.
Procedura per l’uso
◆ Collegare la spina, sullo schermo viene visualizzato “00:00”
◆ Selezionare il programma desiderato premendo i tasti “ + ” o “ – ”
Programma No.
1
2
3
4
5
6
7
8
0
◆
◆
◆
Cibo
Riso
Pollo
Pesce
Uova
Gamberi
Verdure
Frutta
Altro
Per spegnere lo schermo
Tempo di
riferimento (minuti)
33
30
26
23
21
35
20
manuale
Una volta selezionato uno dei programmi di cottura dall’1 al 7, premere
“ACCENSIONE/SPEGNIMENTO” per avviare la cottura, nel frattempo viene avviato il timer e l'indicatore
è acceso. Quando viene visualizzato “00:00” sullo schermo, viene emesso quattro volte un segnale
acustico e l’indicatore lampeggia ad indicare che la cottura è terminate.
Se si seleziona il programma “8”, è possibile impostare il tempo necessario in base alle caratteristiche
del cibo. Una volta selezionato il programma “8”, premere “ACCENSIONE/SPEGNIMENTO”, lo “0” sulla
sinistra dello schermo lampeggia. Premere “+” per impostare il tempo. Premere “–” per modificare la
posizione della cifra lampeggiante. Una volta impostato il tempo, premere
“ACCENSIONE/SPEGNIMENTO” per avviare la cottura e avviare il timer.
Quando sullo schermo viene visualizzato “00:00”, premere “PROG” per preimpostare la cottura. Mentre
sullo schermo lampeggia “0”, premere “+” per impostare il tempo, premere “–” per impostare la
posizione di lampeggiamento “0”. Una volta impostato il tempo, premere nuovamente “PROG ” per
accedere alla procedura che consente di selezionare il programma. Una volta effettuata la selezione,
premere “ACCENSIONE/SPEGNIMENTO” e viene attivato il timer. Quando il tempo corrisponde a
quello del programma, l’indicatore si accende e l’apparecchio avvia la cottura.
Prodotto No.: VS-3905. Nome prodotto: pentola a vapore in acciaio inossidabile
Voltagggio: AC 220~240V, 50Hz
Schermo
Vattaggio: 800W
Livello
Indicatore di accensione
Tasto “-“
Tasto PROG
Tasto
accensione/spegnimento
Tasto “+”
MANUAL DE INSTRUCCIONES
Recipiente superior
Recipiente medio
Recipiente inferior
NOTAS INPORTANTES
◆ Lea el manual de instrucciones atentamente antes de usar la cocina a vapor
◆ Antes del primer uso, compruebe cuidadosamente si todas las piezas están en buen estado. Si este no
fuera el caso, póngase en contacto con su distribuidor o fabricante
◆ Si el cable de alimentación está dañado, debe ser reemplazado por el fabricante, su agente de servicio
o personas similarmente cualificadas para evitar riesgos. Compruébelo regularmente en busca de
daños.
◆ Compruebe que el voltaje de la cocina a vapor coincida con el de su instalación eléctrica. Conecte el
enchufe a una toma cercana con toma de tierra
◆ Ponga la cocina a vapor sobre una superficie horizontal y manténgala alejada de fuentes de calor
◆ Mantenga la cocina a vapor alejada de los niños
◆ No toque nunca el chasis antes de que se enfríe
◆ No sumerja nunca el cable ni el enchufe en agua u otro líquido
◆ No saque la tapa durante la cocción
◆ La cocina a vapor sólo está diseñada para uso familiar
◆ Conserve el manual de instrucciones
RECOMENDACIONES IMPORTANTES
◆ Rellene el depósito con la cantidad de agua necesaria. No supere el nivel máximo ni descienda del nivel
mínimo indicado.
◆ Saque la mezcla de aceite y agua de la bandeja cada 35 minutos aproximadamente para evitar que la
mezcla entre en el depósito.
◆ Ponga los alimentos en el recipiente para vapor
◆ Ponga la tapa sobre recipiente para vapor y vaya con cuidado de que las asas coincidan
completamente con las asas del recipiente para vapor
◆ Ponga el recipiente para vapor sobre el depósito
◆ Vaya con cuidado al sacar el recipiente de vapor del depósito, saque la tapa con cuidado para evitar
quemaduras
◆ Desconecte el enchufe y deje que la cocina a vapor se enfríe antes de limpiarla
◆ Use agua jabonosa y un trapo suave para limpiar el recipiente de vapor y la tapa
◆ Antes de limpiar el depósito, vacíe el agua de su interior. Limpie el interior con un trapo húmedo y seque
la cocina a vapor
◆ Es preferible poner alimentos en el recipiente inferior (indicado núm. 1) y los alimentos en grandes
piezas deberían cortarse en trozos pequeños. Es igualmente preferible poner distintos tipos de
alimentos en distintos recipientes, según el tipo de alimentos.
◆ La tapa se ajusta a los 3 recipientes. Seleccione los recipientes adecuados para montar según sus
necesidades.
Procedimiento de uso
◆ Conecte el enchufe y el LCD mostrará “00:00”
◆ Seleccione los programas de cocción adecuados pulsando “ + ” o “ – ”
Programa núm.
1
2
3
4
5
6
7
8
0
◆
◆
◆
Alimento
Arroz
Pollo
Pescado
Huevos
Gambas
Verduras
Fruta
Otros
Apagar pantalla
Tiempo de
referencia (minutos)
33
30
26
23
21
35
20
manual
Tras seleccionar el programa de cocción de 1 a 7, pulse “INICIO/APAGADO” para empezar a cocer.
Mientras el reloj contará hacia atrás, y el indicador estará encendido. Cuando se muestre “00:00” en el
LCD, se escuchará cuatro veces una señal y el indicador parpadeará continuamente para mostrar que
la cocción ha terminado.
Si selecciona el programa “8”, puede establecer el tiempo que precise para sus alimentos. Tras
seleccionar el programa “8”, pulse “INICIO/APAGADO”, y el “0” izquierdo del LCD parpadeará. Pulse “+”
para configurar el tiempo. Pulse “–” para cambiar la posición del “0” parpadeante. Tras establecer el
tiempo, pulse “INICIO/APAGADO” para empezar a cocinar y el reloj empezará la cuenta atrás.
Con “00:00” en el LCD, pulse “PROG” para preprogramar la cocción. Cuando se muestre el “0”
parpadeando en el LCD, pulse “+” para establecer el tiempo, pulse “–” para establecer la posición del
“0” parpadeando. Tras establecer el tiempo, pulse “PROG” de Nuevo para introducir el proceso,
seleccionando el programa adecuado. Cuando termine de seleccionarlo, pulse “INICIO/APAGADO” y el
reloj iniciará la cuenta atrás. Cuando el tiempo restante sea el mismo que el del programa seleccionado,
el indicador se encenderá y el aparato empezará a cocer.
Producto núm.: VS-3905. Nombre de producto: cocina inoxidable de vapor
Voltaje: CA 220~240V, 50Hz
Pantalla LCD
Consumo: 800W
Nivel de agua
Indicador de
Tecla “-“
Tecla PROG
Tecla “+”
TECLA INICIO /APAGADO
MANUAL DE INSTRUÇÕES
Contêiner superior
susuperior
Contêiner do meio
Contêiner inferior
NOTAS IMPORTANTES
◆
◆
◆
◆
◆
◆
◆
◆
◆
◆
◆
Leia realmente o manual cuidadosamente antes de usar a panela elétrica a vapor. Antes do primeiro
uso, por favor verifique cuidadosamente se todas as partes estão em boas condições. Se não, contacte
o distribuidor ou o fabricante.
Antes do primeiro uso, por favor verifique cuidadosamente se todas as partes estão em boas condições.
Se não, contacte o distribuidor ou o fabricante
Se o fio eléctrico estiver danificado, êle deve ser substituído pelo fabricante, serviço autorizado ou
pessoas igualmente qualificadas para que seja evitado algum estrago. Verifique regularmente possíveis
danos.
Por favor, verifique se a voltagem da panela a vapor corresponde à instalação eléctrica. Coloque o
plugue na tomada com aterramento perto.
Coloque a panela eléctrica a vapor em superfície horizontal e conserve-a longe de fontes de calor.
Deixe sempre a panela a vapor longe das crianças miúdas.
Nunca toque o a parte externa antes de esfriar.
Nunca molhe o fio eléctrico ou o pino de tomada na água ou em outro líquido.
Não remova a tampa durante o cozimento.
A panela a vapor é usada só para a alimentação da famíia.
Por favor, guarde bem o manual de instruções.
RECOMENDAÇÕES IMPORTANTES
◆ Recarregue o reservatório com quantidade de água necessária. Não coloque acima do nível máximo
ou abaixo do nível indicado.
◆ Retire a mistura de éleo e água da bandeja cada 35 minutos para interromper a entrada da mistura no
reservatório.
◆ Coloque a comida dentro da panela a vapor.
◆ Coloque a tampa da panela a vapor e tenha cuidado que as presilhas das tampas sirvam exatamente
nas presilhas dos contêiners.
◆ Coloque o contêiner a vapor no reservatório.
◆ Tenha cuidado levar o contêiner a vapor do reservatório ; tire a tampa com cuidado para evitar
queimaduras em si.
◆ Desconecte o pino da tomada e deixe a panela a vapor esfriar bem antes da limpeza.
◆ Use água ensaboada e uma esponja macia para a limpeza do contêiner a vapor e da tampa.
◆ Antes de limpar o reservatório, vá a esvaziá-lo. Limpe o interior e seque a panela a vapor..
◆ É melhor colocar comida dentro do contêiner inferior (marcado 1#) e um pedaço grande de alimento
◆
deve ser cortado em pedaços miúdos. E também é melhor colocar tipos diferentes de comida dentro de
contêiners diferentes de acôrdo com o tipo de comida.
A tampa serve nos 3 contêiners respectivamente. Escolha os contêiners que atendem a sua
necessidade.
Procedimentos de Operação
◆ Conectar o pino da tomada e então “00:00” estará a aparecer no LCD
◆ Escolher os programas indicados pressionando “ + ” or “ – ”
Programa No.
1
2
3
4
5
6
7
8
0
◆
◆
◆
Alimento
Arroz
Galinha
Peixe
Ovos
Pitus(tipo de camarão)
Vegetais
Frutas
Outros
Desligar o Mostrador
Tempo (minutos)
33
30
26
23
21
35
20
manual
Depois de escolher programas de cozimento de 1 à 7, pressionar “Iniciar/ Desligar”para começar a
cozinhar. Entrementes quando o relógio retrocede, o indicador está ligado. Quando “00:00” aparece no
LCD, há quatro apitos sonoros e o indicador flameja continuadamente avisando que a refeição está ok.
Se você escolher o programa “8” você pode ajustar o tempo que você necessita de acôrdo com o que a
sua comida requer. Depois de escolher “8” programas, pressione “INICIAR/DESLIGAR”,o “0” da
esquerda do LCD iestá a flamejar; pressione “+” para ajustar o tempo. Pressione “–” para mudar a
posição flamejante “0”. Depois de ajustar o tempo, pressione “INICIAR/DESLIGAr”para iniciar o
cozimento e o relógio começa a decrescer.
Na condição de “00:00” no LCD, pressione “PROG” para pré arranjar o cozimento. Enquanto o
“0”flamejante aparece no LCD, pressione “+” para ajustar o tempo; pressione “–”para ajustar a posição
do “0” flamejante. Depois de ajustar o tempo, pressione “PROG ” novamente para entrar na escolha dos
procedimentos apontados. Depois de terminar a escôlha, pressione ÏNICIAR/DESLIGAR”e então o
relógio começará a retroceder. Quando o resto do tempo é o mesmo do programa apontado, o
indicador liga e o aparelho começa a cozinhar.
Item no: VS-3905. Item Nome: panela a vapor de aço inoxidável
Voltagem: AC 220~240V, 50Hz
Mostrador
Vatagem: 800W
Nível da água
Indicador de
Tecla“-“
Tecla de PROG
Tecla “+”
INICIAR/DESLIGAR
Aanwijzingen ter bescherming van het milieu
Dit product mag aan het einde van zijn levensduur niet bij het normale huisafval worden gedeponeerd, maar dient bij een speciaal inzamelpunt voor het
hergebruik van elektrische en elektronische apparaten te worden aangeboden. Het symbool op artikel, gebruiksaanwijzing en verpakking attendeert u hier
op. De gebruikte grondstoffen zijn geschikt voor hergebruik. Met het hergebruik van gebruikte apparaten of grondstoffen levert u een belangrijke bijdrage
voor de bescherming van ons milieu. Informeer bij uw lokale overheid naar het bedoelde inzamelpunt.
Renseignements pour la protection de l’environnement
Ce produit ne devrait pas être mis dans les déchets ménager à la fin de son existence mais doit être remis à une point de ralliement pour des produits
électroménager et électronique. Ce symbole sur article, mode d’emploi et boite vous indique ce recyclage. Les matières de cet article sont appropriées
pour recyclage. Par le recyclage des appareils ou de ses matières premières vous contribuez à la protection de notre environnement.
Renseignez-vous auprès les autorités locales pour cet endroit de rassemblement.
Hinweise zum Umweltschutz
Dieses Produkt darf am Ende seiner Lebensdauer nicht über den normalen Haushaltsabfall entsorgt werden, sondern muss an einem Sammelpunkt für das
Recycling von elektrischen und elektronischen Geräten abgegeben werden. Das Symbol auf dem Produkt, der Gebrauchsanleitung oder der Verpackung
weist darauf hin. Die Werkstoffe sind gemäß ihrer Kennzeichnung wieder verwertbar. Mit der Wiederverwendung, der stofflichen Verwertung oder anderen
Formen der Verwertung von Altgeräten leisten Sie einen wichtigen Beitrag zum Schutze unserer Umwelt. Bitte erfragen Sie bei der Gemeindeverwaltung
die zuständige Entsorgungsstelle.
Guidelines for protection of the environment
This appliance should not be put into the domestic garbage at the end of its useful life, but must be disposed of at a central point for recycling of electric
and electronic domestic appliances. This symbol on appliance, instruction manual and packaging puts your attention to this important issue. The materials
used in this appliance can be recycled. By recycling used domestic appliances you contribute an important push to the protection of our environment. Ask
your local authorities for information regarding the point of recollection..
Avvertenza per la tutela dell’ambiente
Come indicato dal simbolo riportato sul prodotto, sulle istruzioni per l'uso oppure sull'imballaggio, una volta terminata la vita utile di questo prodotto, non
smaltirlo nei normali rifiuti domestici, bensì portarlo ad un centro di raccolta per il riciclaggio di apparecchi elettrici ed elettronici. I materiali sono riutilizzabili
in conformità alla loro marcatura. Con il riutilizzo, il ricupero dei materiali oppure altre forme del ricupero di apparecchi vecchi si contribuisce in modo
importante alla tutela del nostro ambiente. Richiedete all’amministrazione comunale i dati relativi al punto di smaltimento competente.
Indicações para a protecção ambiental
Este produto não pode ser deitado no lixo doméstico normal no final da sua vida útil, tendo de ser colocado num ponto de recolha selectiva para
reciclagem de aparelhos eléctricos e electrónicos. O símbolo apresentado no produto, o manual de instruções ou a embalagem avisam sobre esta
situação. Os materiais são reutilizáveis de acordo com a sua identificação. Através da reutilização, do aproveitamento de materiais ou de outras formas de
aproveitamento de aparelhos antigos, irá contribuir significativamente para proteger o ambiente. Informe-se no seu município para saber qual o ponto de
eliminação de resíduos responsável.
Indicaciones para la protección del medio ambiente
Este producto no debe desecharse con la basura normal una vez finalizada su vida útil, sino que debe depositarse en un punto de recogida selectiva para
el reciclaje de aparatos eléctricos y electrónicos, tal como advierte el símbolo que aparece en el producto, en las instrucciones de uso o en el embalaje.
Los materiales se pueden reutilizar según su clasificación. Al reutilizar los aparatos antiguos, ya sea de forma material o de cualquier otra forma,
contribuye de manera importante a la protección de nuestro medio ambiente. Infórmese en su ayuntamiento sobre los puntos de eliminación de residuos
correspondientes.