1
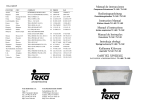
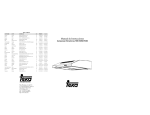
TEKA GROUP Manual de instrucciones COUNTRY CITY COMPANY CC PHONE Austria Belgium Chile China Czech Republic France Greece Hungary Indonesia Malaysia Wien Zellik Santiago de Chile Shangai Brno Paris Athens Budapest Jakarta Kuala Lumpur Mexico Poland Portugal Russia Singapore Thailand The Netherlands Turkey U.K. U.S.A. Venezuela Mexico D.F. Pruszkóv Ilhavo Moscow Singapore Bangkok Zoetermeer Istanbul Abingdon Tampa Caracas KÜPPERBUSCH BES.M.B.H. 43 1-86680-0 B.V.B.A. KÜPPERBUSCH S.P.R.L. 32 2466-8740 TEKA CHILE S.A. 56 2-273.19.45 TEKA CHINA LTD. 86 21-6236-2375 TEKA – CZ, S.R.O. 42 05-4921-0478 TEKA FRANCE S.A.R.L. 33 1-5836-4830 TEKA HELLAS A.E. 30 210-9760283 TEKA HUNGARY KFT. 36 1-354-21-10 P.T. TEKA BUANA 62 21-39052-74 TEKA KÜCHENTECHNIK (MALAYSIA) SDN. BHD. 60 3-762.01.600 TEKA MEXICANA S.A. DE C.V. 52 555-762.04.90 TEKA POLSKA SP. ZO.O 48 22-738.32.80 TEKA PORTUGUESA LTDA. 351 234-32.95.00 TEKA RUS LLC 7 095-737-4689 TEKA SINGAPORE PTE. LTD. 65 6-73-42415 TEKA (TAILAND) CO. LTD. 66 2-5164954 TEKA B.V. 31 79-345.15.89 TEKA TEKNIK MUTFAK A.S. 90 212-274.61.04 TEKA PRODUCTS (UK) LTD. 44 1235-86.19.16 TEKA USA, INC. 1 800-419-9344 TEKA ANDINA, S.A. 58 212-291.28.21 KÜCHENTECHNIK Teka Industrial, S.A. Teka Küchentechnik GmbH Cajo, 17 39011 Santander (Spain) Tel.: 34-942-35 50 50 Fax: 34-942-34 76 94 http://www.teka.net Sechsheldener Str. 122 35708 Haiger (Germany) Telefon: 49-2771-8141-0 Telefax: 49-2771-8141-10 http://www.teka.net FAX 1-86680-72 2466-7687 2-273.10-88 21-6236-2379 05-4921-0479 1-5836-4831 210-9712725 1-354-21-15 21-39052-79 3-762.0-626 555-762.05.17 22-738.32-89 234-32.54.57 095-737-4690 6-73-46881 2-9021484 79-345.15.84 212-274.56.86 1235-83.51.07 813-228-8604 212-291.28.25 Campanas Extractoras TL1-62 / TL1-92 Bedieningsanleitung Dunstabzugshauben TL1-62 / TL1-92 Instruction Manual Kitchen Hoods TL1-62 / TL1-92 Manuel d’instructions Hottes aspirantes TL1-62 / TL1-92 Manual de Instruções Exaustores TL1-62 / TL1-92 Instrukcja obsùugi Wyci¹g kuchenny TL1-62 / TL1-92 Kullanma Kilavuzu Aspiratör TL1-62 / TL1-92 TL1-62 / TL1-92 English Dear customer, We congratulate you on your choice. We are sure that this modern, functional and practical article, constructed from highest quality materials, will fully meet your requirements. Please read all the sections of this INSTRUCTION MANUAL before using the extractor for the first time to be able to obtain its full performance and to avoid any breakdowns that could arise from its misuse, also allowing small problems to be overcome. Keep this manual. It will always provide useful information on the extractor and will help other people to use it. Safety Instructions --------------------------------------------------* Before using the extractor for the first time, you must observe the installation and connection instructions. * Never pull the cable to unplug the * Before connecting the extractor to the mains, check that both the voltage and the frequency conform to that shown on the characteristics label of the extractor located inside it. * In the hoods with pin, this must be accesible, or settle a cut switch to omnipolar, with minimum separation between contacts of 3 mm * The room must be provided with appropriate ventilation if the extractor is going to be used at the same time as other food processing equipment not using electrical power. * We recommend the use of gloves and caution when cleaning the inside of the extractor. * Your extractor is designed for domestic use and only for expelling and purifying gases arising from food preparation. Its use for any other purpose must be at your own responsibility and may be dangerous. * You should contact the nearest Qualified Technical Assistance Service for any repairs always using original spare parts. Repairs and modifications carried out by others could damage the apparatus or cause it to malfunction, and risking your safety. The manufacturer cannot be held liable for inappropriate use of the apparatus. extractor. * Do not switch on the extractor if the electricity cable is worn or has cuts or if there are signs of deterioration around the control panel. * If the extractor stops working or functions abnormally, unplug it from the mains and advise the technical service. * Do not leave gas burning without a pan above it under the hood. * Do not allow grease to accumulate in any part of the extractor, especially in the filter as this COULD PRODUCE A FIRE RISK * Do not flambé food under the hood. * Before installing the extractor consult local rules and regulations in force with respect to current standards on air and fumes. Description of the apparatus (Fig. 1) --------------------------------------------------A Motor controls that allow to select three speeds or to disconnect anyone of them. B Lights switch independent of the motors. C Light switch independent of the motors. D Lighting by means of halogen lamps E Filters located over cooking area, easily removed for cleaning. F Frame and filter support. G-H Anti return tabs to be located in the outlet, locating their ends in the holes provided (Fig. 2). Descrição do aparelho (Fig. 1) --------------------------------------------------A Controlo do motor, o qual permite seleccionar três velocidades ou desligar qualquer uma delas. B Interruptor de luz independente do funcionamento dos motores. C Indicador de funcionamento dos motores. D A iluminação é feita através de lâmpadas halogéneas. E Filtros situados sobre a zona de cozedura, facilmente extraíveis para serem lavados. F Corpo e suporte do filtro. G-H Alhetas anti-retorno que serão colocadas na boca de saída, situando os extremos nos orifícios dispostos para tal (Fig. 2). Instruções de uso --------------------------------------------------Premindo o comando que indica a figura 1 poderá controlar as funções do exaustor. Para conseguir uma aspiração mais eficaz, recomendamo-lhes pôr em funcionamento o exautor alguns minutos antes de cozinhar (entre 3 e 5 minutos) para que o fluxo de ar seja contínuo e estável no momento de aspirar os fumos. Limpeza do filtro Para extrair os filtros dos seus alojamentos, aja sobre os dispositivos de fixação. Proceda à sua limpeza, quer introduzindo-os na máquina de lavar loiça, (ver observações) ou deixando-os mergulhados em água quente o tempo necessário para facilitar a eliminação de gorduras, ou se preferir mediante o uso de sprays específicos (protegendo as partes não metálicas). Finalizada a limpeza, proceda à sua secagem. Observações: A limpeza na máquina de lavar loiça com detergentes agressivos pode escurecer a superfície metálica sem afectar a sua capacidade de retenção de gorduras. Atenção: A limpeza de filtros deve ser realizada uma vez por mês, no mínimo, dependendo da utilização do exaustor. Deve levar-se em consideração que ao cozinhar há deposição de gorduras no exaustor e no filtro, mesmo quando aquele não estiver em funcionamento. Limpeza do corpo do exaustor Recomenda-se a utilização de água com sabão, aproximadamente a 40ºC. Utilizar-seá um pano humedecido nessa água para a limpeza do exaustor, incidindo especialmente nas fendas. Posteriormente, enxugar-se-á perfeitamente com um pano seco que não desprenda pêlos. Atenção: Do mesmo modo, mantenha o exaustor a funcionar uns minutos depois de cozinhar para o arrasto total de fumos e odores para o exterior. * Não usar nunca esfregões metálicos nem utilizar produtos abrasivos que possam estragar a superfície. * Não raspe a superfície com objectos duros, tais como facas, tesouras, etc. Limpeza e manutenção --------------------------------------------------- Filtro de carvão activo Antes de efectuar qualquer operação de limpeza e manutenção, certifique-se de que o aparelho está desligado da rede. Para realizar trabalhos de limpeza e manutenção, cumpra com as Instruções de Segurança. * Para instalar os filtros de carvão activo, pressione os pontos de fixação em cada lado do motor e rode no sentido dos ponteiros do relógio. * Os filtros de carvão activo têm duração de 3 a 6 meses dependendo das condições particulares de utilização. * Os filtros de carvão activo não podem ser lavados nem regenerados. Uma vez deteriorados, têm de ser substituídos. * Para substituir os filtros pelos novos, retire os antigos na ordem inversa à instalação. Português Estimado cliente: Parabéns pela sua escolha. Temos a certeza de que este aparelho, moderno, funcional e prático, construído com materiais de primeira qualidade, satisfará plenamente as suas necessidades. Leia todas as secções deste MANUAL DE INSTRUÇÕES antes de utilizar o exaustor pela primeira vez, a fim de obter o máximo rendimento do aparelho e evitar avarias que possam decorrer de um uso incorrecto. A leitura permitir-lhe-á também resolver pequenos problemas. Guarde este manual. Ele proporcionar-lhe-á informação útil sobre o seu exaustor a qualquer momento e facilitará igualmente o uso do mesmo a outras pessoas. Instruções de Segurança --------------------------------------------------- * Antes da primeira utilização, devem ser tidas em conta as instruções de instalação e ligação. * Para desligar o exaustor, puxe a ficha. Não puxe nunca o cabo. * Não ponha em funcionamento o exaustor se o cabo de alimentação eléctrica estiver deteriorado ou com cortes, ou se o aparelho mostrar indícios de deteriorações visíveis na zona dos comandos. * Se o exaustor deixar de funcionar, ou o fizer de forma anormal, desligue-o da rede e entre em contacto com o Serviço de Assistência Técnica. * Nunca deixe queimadores de gás acesos sem nenhum recipiente em cima deles. * Não permita a acumulação de gordura em nenhuma parte do exaustor, especialmente no filtro, PROVOCA RISCO DE INCÊNDIO. * Não fazer fogo debaixo do exaustor. * Antes de instalar este exaustor, consulte os Regulamentos e disposições locais em vigor com respeito à norma em vigor de ar e fumos. * Antes de ligar o exaustor à rede eléctrica, verifique se a tensão e a frequência da rede são as mesmas que as indicadas na etiqueta de características do exaustor, situada na parte interior do mesmo. * O desligamento da rede de alimentação deve ser realizado por meio de um interruptor de corte omnipolar, com uma separação mínima entre contactos de 3 mm. e que deve estar incorporado na instalação fixa. * A conexão à instalação eléctrica deve ser realizada mediante um cabo flexível. Não está permitido realizá-la mediante um cabo rígido. * O ar evacuado não deve chegar a uma conduta que seja utilizada para a evacuação de fumos de aparelhos alimentados por uma energia diferente da eléctrica. * A dependência deve contar com uma ventilação adequada, quando se utilizar o exaustor simultaneamente com outros aparelhos alimentados por energia diferente da eléctrica. * Recomendamos a utilização de luvas e tomar todo o tipo de precauções ao limpar o interior do exaustor. * O seu exaustor destina-se ao uso doméstico e somente para a extracção e purificação dos gases procedentes da preparação de alimentos. A utilização para outros usos é da sua responsabilidade e pode ser perigosa. * Para qualquer conserto, dirija-se ao Serviço de Assistência Técnica qualificado mais próximo, usando sempre sobresselentes originais. Os consertos ou alterações realizados por outro pessoal podem provocar danos ao aparelho ou um mau funcionamento, pondo em perigo a sua segurança. O fabricante não é responsável pelos danos originados pelo uso inadequado do aparelho. Instructions for use --------------------------------------------------By pressing the button shown in the figure 1, you will be able to control the functions of the extractor Two achieve better extraction, we recommend switching on the extractor a few minutes before starting to cook (3 - 5 minutes) so that the air flow is continuous and stable when extracting the fumes. Likewise, keep the extractor switched on for a few minutes when cooking is complete to allow all fumes and odours to be expelled. Cleaning and maintenance --------------------------------------------------Before carrying out any cleaning or maintenance activities, ensure that the extractor is disconnected from the mains. To carry out cleaning and maintenance, follow the Safety Instructions. Filter cleaning To withdraw the filters from their locations release the anchoring points. Clean the filter, either by putting it in the dishwasher (see notes) or leaving it standing in hot water to simplify the removal of grease or, if wished, by means of special sprays (protecting the non metallic parts). Once clean, leave it to dry. Notes: cleaning in the dishwasher with aggressive detergents may blacken the surface of metallic parts, without this affecting its gas retaining properties. N.B. The filter must be cleaned at least once a month depending on how often the extractor is used. It must be remembered that grease is deposited in the extractor when cooking, whether it is switched on or not. Cleaning of the extractor body The use of warm (40ºC approx.) soapy water is recommended. A cloth moistened in this water is used for cleaning the extractor, paying special attention to the grids. Afterwards, dry it using a lint-free cloth. Note: * Never use metallic scouring pads or abrasive products that could damage the surface. * Do not use scrapers with metallic surfaces such as knives, scissors etc. Activated charcoal filter * To install the charcoal filter press the anchor points onto each side of the motor and turn clockwise. * The carbon filters last from three to six months depending on the particular conditions of use. * The activated carbon filters can neither be washed nor regenerated. Once they are exhausted, they must be changed. * To replace used filters with new ones, withdraw the old ones in the reverse order to that of installation. Changing Bulbs * It is important that the mains are disconnected, and ensure the bulbs that are to be replaced are not hot. * Remove the light lens to expose the extractable lamps. * The maximum bulbs power is 20W. Tecnical Information (Fig. 3) --------------------------------------------------Dimensions Width = 550 mm Depth = 310 mm Height = 190 mm Dimensions for fitting Width = 505 mm Depth = 292 mm Electrical characteristics: REFER TO RATING PLATE English Installation --------------------------------------------------- In order to fix the cooker hood to the kitchen unit you can choose one of these three possibilities: a) To the upper part of the furniture, using figure 4 where the position of the holes denominated “A” is indicated. This fixation will be made from the inside part of the cooker hood, after disassembling the filters. b) To the lower part of the furniture, using figure 4 where the position of the holes denominated “B” is indicated. It is necessary to dismantle previously the frame, taking out the 4 screws that are fixed to the lateral sides of the body hood. This fixation will be made from the inside part of the cooker hood, after disassembling the filters. In order to assemble the frame again once the hood is installed, you will proceed in the inverse way. c) To the internal laterals of the furniture through floating holes denominated “C”, wich exist in each side of the body hood. This fixation will be made from the inside part of the cooker hood, after disassembling the filters. The lower part of the extractor must be installed a minimum height of 60 cm above the hob for electric cookers and 65 cm for gas cookers. (If the installation instructions of a gas cooker indicate a greater distance this must be observed. When the extractor is working at the same time as other non-electrical cooking equipment, the outlet air pressure must not exceed 4 Pa (4 x 10⁻⁵ bar). To achieve optimum performance the length of the outlet hose should not exceed 4 meters, or include more than two 90º angles (elbows) Although venting to the outside is recommended, activated carbon filters may be used, which allow the gas to be returned to the kitchen through the outlet pipe. If something does not work --------------------------------------------------- Before seeking technical assistance carry out the following checks first: Special U.K. Requirements --------------------------------------------------- Special Australia Requirements --------------------------------------------------- OVER * This appliance is not intended for use by young children or infirm persons without supervision. Height above gas hob: 75 mm minimum. NEVER PLACE THE COOKER HOOD AN EYE-LEVEL GRILL. This appliance must be connectec competent person, using fixed wiring DOUBLE POLE SWITCHED FUSED OUTLET. by a via a SPUR Electrical connection --------------------------------------------------- * Young children should be supervised to ensure that they do not play with the appliance. We recommend that the appliance is connected by a qualified electrician, who is a member of the N.I.C.E.I.C. and who will comply with the I.E.E. and local regulations. Should the colour of the wires in the mains lead for the appliance not correspond with the coloured markings identifying the terminal in your spur box proced as follow: * The wire which is coloured blur must be connected to the marked N (Neutral) or coloured Black. * The wire which is coloured brown must be connected to the marked L (Live) or couloured Red * Where avialable (see installation), the wire which is coloured yellow/green must be connected to the market or coloured Yellow/Green. If the cooker hood is installed for use above a gas appliance then the provision vor ventilation must be in accordance with the Gas Safety (Installation & Use) Regulations 1984 and the relevant Building Regulations. Detailed recommendations are contained in the following British Standard Codes of Practice BS6172, BS5440 and BS6891 Current Edition. This apparatus has the marked CEE in conformity with Standard 2002/92/EC of the European Parliament and the Council about remainers of electrical en electronic apparatuses. The correct elimination of this product avoids negative consequences for the market and the health. TEKA INDUSTRIAL, S.A. reserves the right to make corrections in its appliances wherever it considers these necessary or useful, without harming their essential features. Symbol (In the product or in the documents that are included with it), indicates that it’s not possible to be treated like domestic remainder. It’s necessary to give it in a collection point to recycle electrical and electronic apparatuses. Get rid of it in accordance with the environmental norms for remainders elimination. In order to obtain detailed information about the treatment, recovery or recycling of this product, put yourself in contact with the city council, with the elimination service of urban remainder or with the store where you acquired the product.