1
Register your product and get support at
www.philips.com/welcome
DTP2130
EN User manual
3
FR Mode d’emploi
73
CS 3ŏtUXĈNDSURXçLYDWHOH
IT
Manuale utente
91
DE Benutzerhandbuch
37
NL Gebruiksaanwijzing
109
ES Manual del usuario
55
/$6(5
&$87,21
USE OF CONTROLS OR ADJUSTMENTS OR
PERFORMANCE OF PROCEDURES OTHER
THAN THOSE SPECIFIED HEREIN MAY RESULT
IN HAZARDOUS RADIATION EXPOSURE.
&$87,21
VISIBLE AND INVISIBLE LASER RADIATION
WHEN OPEN AND INTERLOCK DEFEATED.
DO NOT STARE INTO BEAM.
/2&$7,21
INSIDE, NEAR THE DECK MECHANISM.
,WDOLD
',&+,$5$=,21(',&21)250,7$·
Si dichiara che l’apparecchio DTP2130, Philips
risponde alle prescrizioni dell’art. 2 comma 1 del
D.M. 28 Agosto 1995 n.548.
Fatto a Eindhoven
Philips Consumer Lifestyles
Philips, Glaslaan 25616 JB Eindhoven,
The Netherlands
ć(6.$5(38%/,.$
9îVWUDKD7HQWRSŏtVWURMSUDFXMHVODVHURYîP
SDSUVNHP3ŏLQHVSUiYQpPDQLSXODFLVSŏtVWURMHP
YUR]SRUXVWtPWRQiYRGHPPţůHGRMtWN
QHEH]SHĈQpPXR]iŏHQt3URWRSŏtVWURM]DFKRGX
QHRWHYtUHMWHDQLQHVQtPHMWHMHKRNU\W\-DNRXNROL
RSUDYXYçG\VYĖŏWHVSHFLDOL]RYDQpPXVHUYLVX
1HEH]SHĈt3ŏLVHMPXWtNU\WţDRGMLåWĖQt
EH]SHĈQRVWQtFKVStQDĈţKUR]tQHEH]SHĈt
QHYLGLWHOQpKRODVHURYpKR]iŏHQt
&KUDŀWHVHSŏHGSŏtPîP]iVDKHPODVHURYpKR
paprsku.
3RNXGE\VWH]MDNpKRNROLGţYRGXSŏtVWURM
GHPRQWRYDOLYçG\QHMGŏtYHY\WiKQĖWHVtřRYRX
]iVWUĈNX
3ŏtVWURMFKUDŀWHSŏHGMDNRXNROLYOKNRVWtLSŏHG
NDSNDPLYRG\
6SHFLÀNDFHODVHUX
7\S3RORYRGLĈRYîODVHU,Q*D$,3'9'
$,*D$V&'
9OQRYiGpONDQP'9'QP&'
9îVWXSQtYîNRQP:'9'P:
9&'&'
,PSRUWDQW
Safety and important notice
Trademark notice
4
4
4
2
Your product
Feature highlights
Product overview
5
5
5
3
Connect
Connect TV antenna
Connect video cables
Connect audio cables
Route audio to other devices
&RQQHFW86%ÁDVKGULYH
Connect power
8
8
8
9
4
Get started
Prepare the remote control
Navigate the menu
Find the correct viewing channel
First time setup
Use the Home menu
Select menu display language
9
9
9
9
9
9
9
5
Watch TV
Use on-screen guide
Use the program edit table
10
10
10
/LVWHQWRUDGLR
Use on-screen guide
Use the program edit table
10
11
11
7
11
11
11
11
12
13
13
Play
Play a disc
Play from USB device
Play video
Play music
Play photo
Special features
$GMXVWV\VWHPVHWWLQJ
General settings
'9'86%VHWWLQJV
795DGLRVHWWLQJV
13
13
14
15
$GGLWLRQDOLQIRUPDWLRQ
Update software
Care
16
16
16
6SHFLÀFDWLRQV
16
11 Troubleshooting
1
(1
3
(QJOLVK
Contents
,PSRUWDQW
6DIHW\DQGLPSRUWDQWQRWLFH
Warning
Risk of overheating! Never install the product in a
FRQÀQHGVSDFH$OZD\VOHDYHDVSDFHRIDWOHDVWLQFKHV
around the product for ventilation. Ensure curtains or
other objects never cover the ventilation slots on the
product.
Never place the product, remote control or batteries
QHDUQDNHGÁDPHVRURWKHUKHDWVRXUFHVLQFOXGLQJGLUHFW
sunlight.
Only use this product indoors. Keep this product away
IURPZDWHUPRLVWXUHDQGOLTXLGÀOOHGREMHFWV
Never place this product on other electrical equipment.
Keep away from this product during lightning storms.
Where the mains plug or an appliance coupler is used as
the disconnect device, the disconnect device shall remain
readily operable.
Visible and invisible laser radiation when open. Avoid
exposure to beam.
Your product contains batteries covered by the
(XURSHDQ'LUHFWLYH(&ZKLFKFDQQRWEH
disposed with normal household waste.
Please inform yourself about the local rules on
separate collection of batteries because correct
disposal helps to prevent negative consequences for
the environmental and human health.
Copyright notice
This item incorporates copy protection technology
that is protected by U.S. patents and other
intellectual property rights of Rovi Corporation.
Reverse engineering and disassembly are
prohibited.
'LVSRVDORI\RXUROGSURGXFWDQG
batteries
This product complies with the radio interference
requirements of the European Community.
Your product is designed and manufactured with
high quality materials and components, which can
be recycled and reused.
When this crossed-out wheeled bin symbol is
attached to a product it means that the product
LVFRYHUHGE\WKH(XURSHDQ'LUHFWLYH
EC. Please inform yourself about the local separate
collection system for electrical and electronic
products.
Please act according to your local rules and do not
dispose of your old products with your normal
household waste.
Correct disposal of your old product helps to
prevent potential negative consequences for the
environment and human health.
4
(1
Trademark notice
2IÀFLDO'LY;®&HUWLÀHGSURGXFW3OD\VDOOYHUVLRQV
of DivX®YLGHRLQFOXGLQJ'LY;®ZLWKVWDQGDUG
playback of DivX®PHGLDÀOHV
DVB is a registered trademark of the DVB Digital
9LGHR%URDGFDVWLQJ3URMHFWWR
3URGXFWRYHUYLHZ
All other registered and unregistered trademarks
are the property of their respective owners.
/DVHUVSHFLÀFDWLRQ
7\SH6HPLFRQGXFWRUODVHU,Q*D$,3'9'
$,*D$V&'
:DYHOHQJWKQP'9'QP&'
2XWSXW3RZHUP:'9'P:
9&'&'
(QJOLVK
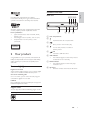
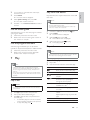
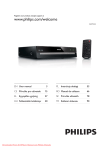
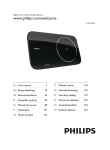
Main unit
h gfe
Manufactured under license from Dolby
Laboratories. Dolby, Pro Logic and the double-D
symbol are trademarks of Dolby Laboratories.
a
b c
d
a Disc compartment
b
2SHQFORVHWKHGLVFFRPSDUWPHQW
Start, pause or resume disc play.
Turn on this product or switch to
standby mode.
c
d
CLASS 1
LASER PRODUCT
e
2 Your product
Congratulations on your purchase, and welcome to
3KLOLSV7RIXOO\EHQHÀWIURPWKHVXSSRUWWKDW3KLOLSV
RIIHUVUHJLVWHU\RXUSURGXFWDWZZZSKLOLSVFRP
welcome.
)HDWXUHKLJKOLJKWV
Digital TV and radio
With a built-in digital receiver, you can enjoy digital
radio and TV without additional set-top box.
jack
&RQQHFWD86%ÁDVKGULYH
f 21LQGLFDWRU
The indicator lights on when this product
is switched on from standby.
g 3/$<LQGLFDWRU
7KHLQGLFDWRUOLJKWVRQZKHQGLVFSOD\
79UDGLRLVRQ
h ,5VHQVRU
Point the remote control at the IR sensor.
2QVFUHHQ79UDGLRJXLGH
2QD79VFUHHQ\RXFDQYLHZ79UDGLRSURJUDP
schedule for digital TV and radio.
86%OLQN
3OXJD86%ÁDVKGULYHWRWKH86%MDFNWRHQMR\WKH
03:0$-3(*'LY;ÀOHV
Region codes
You can play discs with the following region codes.
DVD region code
Countries
Europe
(1
5
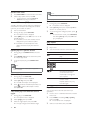
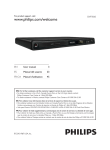
f 2.
&RQÀUPDQHQWU\RUVHOHFWLRQ
'LVSOD\WKH79UDGLRFKDQQHOOLVW
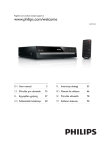
Remote control
g
%$&.
Return to the previous display menu.
h
TV VOL
P
TV VOL
HOME
INFO
OK
BACK
OPTIONS
1
2
3
4
5
6
7
8
AUDIO
SUBTITLE
9
TITLE/TTX REPEAT
0
A-B
6NLSWRWKHSUHYLRXVQH[WWLWOHFKDSWHU
or track.
Start, pause or resume disc play.
i
P
GUIDE
DISC MENU
j Numeric buttons
Select an item to play.
6HOHFWD79UDGLRFKDQQHO
Enter values.
k 68%7,7/(
Select a subtitle language.
l 7,7/(77;
For DVD, display the title menu.
For digital TV, display teletext
information.
m 5(3($7
6HOHFWRUWXUQRIIUHSHDWVKXIÁHSOD\
n
2SHQFORVHWKHGLVFFRPSDUWPHQW
o 3
)RUGLJLWDO79UDGLRVHOHFWWKHSUHYLRXV
next channel.
p *8,'(
)RUGLJLWDO79UDGLRWXUQRQRURIIWKH
program list.
q ,1)2
Display play information.
r 237,216
Access the options menu.
s
a
Turn on this product or switch to
standby mode.
0XWHYROXPHDSSOLFDEOHRQO\WRFHUWDLQ
3KLOLSVEUDQG79V
u ',6&0(18
$FFHVVH[LWWKHGLVFPHQXRUGLVSOD\WKH
86%ÀOHEURZVHU
b
c 7992/
$GMXVWYROXPHDSSOLFDEOHRQO\WRFHUWDLQ
3KLOLSVEUDQG79V
d +20(
Access the home menu.
e
6
Stop play.
t $8',2
Select an audio language.
(1
Navigate the menus.
For
, search backward or forward.
v $%
Mark a section for repeat play, or turn off
repeat mode.
w Color buttons
For teletext mode only, select tasks or
options.
7RURXWHWKHGLJLWDOVLJQDOIURPWKLVSURGXFWWR
DQRWKHUGHYLFHVXFKDV79
(QJOLVK
3 Connect
Make the following connections to use this product.
%DVLFFRQQHFWLRQV
TV antenna
Video
Audio
2SWLRQDOFRQQHFWLRQV
Route audio to other devices:
Analog stereo system
86%ÁDVKGULYH
Note
Refer to the type plate at the back or bottom of the
SURGXFWIRULGHQWLÀFDWLRQDQGVXSSO\UDWLQJV
Before you make or change any connections, ensure that
all the devices are disconnected from the power outlet.
1
Tip
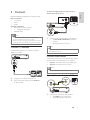
Connect TV antenna
Connect this product to a TV antenna to receive
digital TV and radio.
&RQQHFWDQ5)DQWHQQDFDEOHQRWVXSSOLHGWR
the 5)/2237+528*+ jack on this
product.
the antenna input on the TV.
The antenna input jack on the TV might be labeled ANT,
ANTENNA IN or RF IN.
&RQQHFWYLGHRFDEOHV
Connect this product to TV to view disc play. Select
the best video connection that TV can support.
2SWLRQ&RQQHFWWRWKHYLGHR&9%6MDFN
2SWLRQ Connect to the scart jack.
Note
You must connect this product directly to a TV.
2SWLRQ&RQQHFWWRWKHYLGHR&9%6MDFN
1
2
Unplug the TV antenna from the TV.
Then connect the antenna to the 5),1 jack
on this product.
VIDEO IN
1
Connect the composite video cable to:
the &9%6 jack on this product.
the video input jack on the TV.
(1
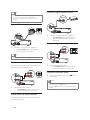
&RQQHFWWRGLJLWDODPSOLÀHUUHFHLYHU
Tip
7KHYLGHRLQSXWMDFNRQWKH79PD\EHODEHOHGDV$9
IN, VIDEO IN, COMPOSITE or BASEBAND.
DIGITAL IN
This type of connection provides standard picture
quality.
2SWLRQ&RQQHFWWRWKHVFDUWMDFN
1
&RQQHFWDFRD[LDOFDEOHQRWVXSSOLHGWR
the &2$;,$/ jack on this product.
WKH&2$;,$/',*,7$/LQSXWMDFNRQ
the device.
Connect analogue stereo system
1
AUDIO IN
&RQQHFWDVFDUWFDEOHQRWVXSSOLHGWR
the 796&$57 jack on this product.
the scart input jack on the TV.
AUDIO L
Tip
This type of connection provides good picture quality.
AUDIO R
Connect audio cables
Connect the audio from this product to the TV to
allow sound output through the TV.
AUDIO IN
AUDIO L
AUDIO R
1
Connect the audio cables to:
the $8',2/5 jacks on this product.
the audio input jacks on the device.
&RQQHFW86%ÁDVKGULYH
1
&RQQHFWD86%ÁDVKGULYHWRWKH
this product.
jack on
Note
7KLVSURGXFWFDQRQO\SOD\YLHZ03'LY;RU-3(*ÀOHV
WKDWDUHVWRUHGRQD86%ÁDVKGULYH
1
Connect the audio cables to:
the $8',2/5 jacks on this product.
the audio input jacks on the TV.
5RXWHDXGLRWRRWKHUGHYLFHV
Route the audio from this product to other devices
to enhance audio play.
8
(1
Press the +20( button to access the content and play
WKHÀOHV
1
2
Caution
Risk of product damage! Ensure that the power supply
voltage corresponds to the voltage printed on the back
of the unit.
Before connecting the AC power cord, ensure you have
completed all other connections.
Note
The type plate is located on the back of the product.
1
Connect the AC power cable to the wall
socket.
» The product is ready to be set up for use.
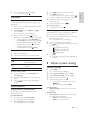
4 Get started
)LUVWWLPHVHWXS
:KHQ\RXWXUQRQWKLVSURGXFWIRUWKHÀUVWWLPH
follow the instructions on the TV screen to install TV
and radio channels.
1 Press to turn on the product.
» 2QWKH79VFUHHQWKHÀUVWWLPHLQVWDOODWLRQ
message is displayed.
2
3
4
5
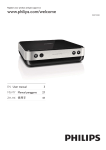
Prepare the remote control
1
2
Open the battery compartment.
Insert 2 AAA batteries with correct polarity
DVLQGLFDWHG
Close the battery compartment.
3
1
If you are not going to use the remote control for a long
time, remove the batteries.
Do not use old and new or different types of batteries
in combination.
Batteries contain chemical substances, so they should be
disposed of properly.
1DYLJDWHWKHPHQX
When the on-screen menu is displayed, press
the buttons on the remote control to navigate.
$FWLRQ
Button
Move up or down
5
3
4
6
7
8
9
0
2
&RQÀUPDVHOHFWLRQ
Enter numbers
Press +20(.
» The home menu is displayed.
[DVD] - Select disc mode.
>/LYH79@ - Select TV mode.
>86%@ - Select USB mode.
>'9%75DGLR@ - Select radio mode.
>6\VWHP6HWWLQJ@ - Access the setup
menu.
6HOHFWPHQXGLVSOD\ODQJXDJH
1
Press +20(.
» The home menu is displayed.
2
Select >6\VWHP6HWWLQJ@ > >*HQHUDO6HWWLQJ@
> >/DQJXDJH6HWXS@ > >26'/DQJXDJH@, then
press 2..
Press
to select a language, then press 2..
Move left or right
2.
1
Select [Yes] and press 2. to proceed.
Select [Country] and press 2., then select
the country of your residence and press 2..
Select >/DQJXDJH@ and press 2., then select a
language and press 2..
Select [Next] and press 2. to start to search.
» Automatic channel search screen is
displayed, and the product begins to search
TV and radio channels.
» When the search completes, the available
TV and radio channels are stored.
8VHWKH+RPHPHQX
Note
1
Press to turn on this product.
Turn on the TV and switch to the correct
YLGHRLQFKDQQHOUHIHUWRWKH79XVHUPDQXDO
RQKRZWRVHOHFWWKHFRUUHFWFKDQQHO
3
(1
9
(QJOLVK
)LQGWKHFRUUHFWYLHZLQJFKDQQHO
Connect power
5 Watch TV
Note
Before you start, ensure that you have connected
properly the TV antenna to this product, and completed
WKHÀUVWWLPHLQVWDOODWLRQ
1
2
3
Press to turn on this product.
Turn on the TV, and select the video input
channel on the TV.
Press +20(.
» The home menu is displayed.
4
Select >/LYH79@, then press 2..
» The TV mode is turned on.
5
Press 3 or the Numeric buttons to select a
channel.
8VHRQVFUHHQJXLGH
With this feature, you can view the program
schedule and program details.
1 In the TV mode, press *8,'(.
» The program list is displayed.
2
3
To view the program schedule for a channel,
select the channel and press .
To view the details of a program, select the
program and press .
Use the program edit table
With the program edit table, you can set favorite
channels, or adjust channel sequence or delete
channels.
1 In the TV mode, press +20(.
» The home menu is displayed.
2
Select >6\VWHP6HWWLQJ@ > >795DGLR6HWWLQJ@
> [Program] > [TV Program], then press 2..
» The program table is displayed.
6HWIDYRULWHFKDQQHOV
Create a shortlist of favorite programs to access
quickly.
1 Go to the program edit table.
2 In the >)$9@ column select a channel, then
press 2..
» A heart-shaped symbol is displayed in the
>)$9@ column to indicate the channel is
marked as a favorite.
3
Repeat the step 2 to mark more programs as a
favorite.
10
(1
4
To delete a favorite program, select
the related heart-shaped symbol and
press 2..
Press +20( to save and exit the menu.
9LHZIDYRULWHFKDQQHOV
1 Make sure that you have set favorite channels.
2 In the TV mode, press 237,216.
» The options menu is displayed.
3
Select >)$9@, then press 2. to enable the
favorite channels list.
» >)DY2Q@IDYRULWHRQLVGLVSOD\HG
4
Press 3 to select a channel among the
favorite channels.
7RGLVDEOHWKHIDYRULWHFKDQQHOVOLVW
1 In the options menu, select >)$9@, then press
2. again.
» >)DY2II@IDYRULWHRIILVGLVSOD\HG
$GMXVWFKDQQHOVHTXHQFH
1 Go to the program edit table.
2 In the >0RYH@ column select a channel, then
press 2..
» $QXSGRZQV\PEROLVGLVSOD\HG
3
4
5
Press
to move the channel up or down.
Repeat the steps 2-3 to move more channels.
Press +20( to save and exit the menu.
Delete a channel
1 Go to the program edit table.
2 In the [Del] column select a channel, then
press 2..
» An “X” is displayed to indicate that the
channel is selected for deletion.
3
4
Repeat the step 2 to select more channels for
deletion.
Press +20(WRFRQÀUPGHOHWLRQ
» The channel is deleted.
/LVWHQWRUDGLR
Note
Before you start, ensure that you have connected
properly the TV antenna to this product, and completed
WKHÀUVWWLPHLQVWDOODWLRQ
1
Press
to turn on this product.
3
Turn on the TV, and select the video input
channel on the TV.
Press +20(.
» The home menu is displayed.
4
Select >'9%75DGLR@, then press 2..
» The radio mode is turned on.
5
Press 3 or the Numeric buttons to select a
channel.
3OD\IURP86%GHYLFH
3OD\YLHZ03'LY;RU-3(*ÀOHVVWRUHGRQWKH86%
ÁDVKGULYH
Note
,IWKHGHYLFHGRHVQRWÀWLQWRWKH86%MDFNFRQQHFWLW
through a USB extension cable.
,I\RXFRQQHFWDPXOWLSOH86%FDUGGHYLFHUHDGHURQO\
one card or device can be accessed.
8VHRQVFUHHQJXLGH
With this feature, you can view the program schedule
and program details.
1 Switch this product to the radio mode.
2 Refer to the “Use on-screen guide” section in
the “Watch TV” chapter.
1
2
&RQQHFWD86%ÁDVKGULYHWRWKH
Press +20(.
» The home menu is displayed.
3
Select >86%@, then press 2..
» The contents menu is displayed.
4
6HOHFWDÀOHWKHQSUHVV
» To stop play, press .
Use the program edit table
With the program edit table, you can set favorite
channels, or adjust channel sequence or delete channels.
1 Switch this product to the radio mode.
2 Refer to the “Use the program edit table”
section in the “Watch TV” chapter.
jack.
to play.
3OD\YLGHR
Note
Some operations may not work with some discs. See the
information accompanying the disc for details.
7 Play
Note
DVDs and DVD players are designed with regional
restrictions. Ensure that the DVD video you play is for
WKHVDPHUHJLRQ]RQHDVWKLVSURGXFWLQGLFDWHGRQLWV
ERWWRP
7KLVSURGXFWVXSSRUWVWKHÀOHIRUPDWV03-3(*'LY;
7RSOD\'9'5'9'5RU'9'5:WKHGLVFPXVWEH
ÀQDOL]HG
&RQWUROYLGHRSOD\
1 Play a title.
2 Use the remote control to control the play.
Button
Stop disc play.
,
,
Play a disc
Caution
Do not place any objects other than discs into the disc
compartment.
1
2
3
Press to open the disc compartment.
Insert a disc with its label facing up.
Press to close the disc compartment and
start disc play.
To view disc play, turn on the TV to the
correct viewing channel for this product.
To stop disc play, press .
$FWLRQ
Start, pause or resume disc play.
$8',2
68%7,7/(
5(3($7
,1)2
237,216
6NLSWRDSUHYLRXVQH[WWLWOHRU
chapter.
Search fast-backward or fastforward. Press repeatedly to
change the search speed.
Select an audio language or channel
available on a disc.
Select a subtitle language available
on a disc.
6HOHFWRUWXUQRIIUHSHDWUDQGRP
mode.
Repeat options may vary from disc
type.
Display the disc play information.
Access the options menu.
(1
11
(QJOLVK
2
$FFHVV'9'PHQX
1 Press ',6&0(18 to access the disc root menu.
2 Select a play option, then press 2..
7KH3%&SOD\EDFNFRQWUROIHDWXUHLVDYDLODEOHIRU
9&'69&'7KHIHDWXUHFDQGLVSOD\WKHFRQWHQWV
menu for you to select an option.
1 ,QVHUWD9&'69&'
2 During disc play, press 237,216.
» The options menu is displayed.
Select [PBC], then press 2. to turn on or off
the PBC feature.
» If the PBC turns on, the contents menu is
displayed for you to select an option.
» If the PBC turns off, it skips the menu
GLVSOD\DQGVWDUWVWRSOD\IURPWKHÀUVW
track.
5HSHDWSOD\IRUDVSHFLÀFVHFWLRQ
1 During play, press 5(3($7$% at the start
2
3
Applicable only to discs that contain multi-angle scenes.
In some menus, press the Numeric
buttons to input your selection.
$FFHVV9&'PHQX3%&
3
Note
=RRPLQRXW
1 During play, press 237,216.
» The options menu is displayed.
2
Select >=RRP@, then press repeatedly 2. to
zoom in or out the picture.
To pan through the enlarged picture, press
.
To cancel zoom mode, press 237,216,
and select >=RRP@, then press 2. until
[x 1] is displayed.
3
Play music
Control a track
1 Play a track.
2 Use the remote control to control the play.
Button
point.
Press 5(3($7$% again to set the end point.
» Repeat play starts.
$FWLRQ
Start, pause or resume disc
play.
Stop disc play.
To cancel repeat play, press 5(3($7$%
again.
6NLSWRDSUHYLRXVQH[WWUDFN
,
Select an item to play.
Note
The marked section for repeat play is only possible
ZLWKLQDWUDFNWLWOH
,
6HOHFWWLWOHFKDSWHU
1 During play, press 237,216.
» The options menu is displayed.
2
Select [Go To], then press 2..
» The title and chapter bar is displayed.
3
Press
WRVHOHFWWKHWLWOHFKDSWHUÀHOGDQG
press
WRVHOHFWDWLWOHFKDSWHUQXPEHU
then press 2..
9LHZYLGHRSOD\IURPGLIIHUHQWFDPHUD
angles
1 During play, press 237,216.
» The options menu is displayed.
2
3
12
Select >$QJOH@, then press 2..
Select an angle option, then press 2..
» The play changes to the selected angle.
(1
5(3($7
Searches fast-backward
or fast-forward. Press
repeatedly to change the
search speed.
6HOHFWRUWXUQRIIUHSHDW
random mode.
Repeat options may vary
from disc type.
Play MP3 music
<RXFDQSOD\03DXGLRÀOHVÀOHVZLWKPS
H[WHQVLRQ
1 ,QVHUWDGLVFRUD86%ÁDVKGULYHWKDWFRQWDLQV
MP3 music.
2 Press +20(, and select >86%@ or [DVD],
then press 2..
» The contents menu is displayed.
3
Select a music folder, then press 2..
6HOHFWDÀOHWRSOD\WKHQSUHVV2..
To stop play, press .
3
4
Play photo
Play photo as slideshow
<RXFDQSOD\-3(*SKRWRVÀOHVZLWKMSHJRUMSJ
H[WHQVLRQV
1 ,QVHUWDGLVFRUD86%ÁDVKGULYHWKDWFRQWDLQV
the JPEG photos.
2 Press +20(, and select [DVD] or >86%@ ,
then press 2..
» The contents menu is displayed.
3
Select a photo, then press
to start
slideshow, or press 2. to display a photo only.
During slideshow, press 237,216 and
select >$QJOH@, then press repeatedly 2.
to select different slideshow play modes.
During slideshow, press to view the
photos in thumbnail view.
To exit slideshow, press %$&..
Control photo play
1 Play a photo slideshow.
2 Use the remote control to control the play.
Button
6
To clear the program
During play, press twice
1
6SHFLDOIHDWXUHV
3URJUDPIDYRULWHFKDSWHUVWUDFNV
You can play the contents of the disc in the
sequence you want.
)RU'9'9&'&'
1 During disc play, press 237,216.
» The options menu is displayed.
.
9LHZÀOHVE\W\SH
:LWKWKLVIHDWXUH\RXFDQDUUDQJHÀOHVLQGLIIHUHQW
W\SHVRQDGLVFRUD86%ÁDVKGULYHIRUYLHZ
1 ,QVHUWDGLVFRUD86%ÁDVKGULYHWKDWFRQWDLQV
GLIIHUHQWW\SHVRIÀOHV
» The contents menu is displayed.
2
3
4
$FWLRQ
Rotate a photo antiFORFNZLVHFORFNZLVH
5RWDWHDSKRWRKRUL]RQWDOO\
vertically.
Stop a play.
7R]RRPLQRXWDSKRWR
1 During a slideshow, press 237,216, and
select >=RRP@.
2 Press repeatedly 2. to zoom in or out the
photo.
3 Press
to pan through the enlarged
photo.
2
5
Press
to select a sequence number.
Press
to select the
´7LWOHµµ&KDSWHUµµ7UDFNµÀHOGDQGSUHVV
WRVHOHFWDWLWOHFKDSWHUWUDFNWKHQSUHVV2..
Repeat the steps 3-4 to program more
FKDSWHUVWUDFNV
To play the program, press
.
,IQRÀOHLVGLVSOD\HGRSHQDIROGHU
Press
to select a logo at the bottom of the
contents menu.
GLVSOD\-3(*ÀOHVRQO\
GLVSOD\PXVLFÀOHVRQO\
GLVSOD\YLGHRÀOHVRQO\
GLVSOD\DOOÀOHV
Press 2..
» 2QO\ÀOHVRIWKHW\SH\RXKDYHVHOHFWHGDUH
displayed.
$GMXVWV\VWHPVHWWLQJ
General settings
1
Press +20(.
» The home menu is displayed.
2
3
4
5
Select >6\VWHP6HWWLQJ@, then press 2..
Select >*HQHUDO6HWWLQJ@, then press 2..
Select an option, then press .
Select a setting, then press 2..
To return to the previous menu, press
%$&..
To exit the menu, press +20(.
>/DQJXDJH6HWXS@
>26'/DQJXDJH@ - Select an on-screen menu
language.
>'LVSOD\6HWXS@
>796WDQGDUG@ - If the video does not appear
correctly, change the setting.
>176&@ - For NTSC-system TV.
>3$/@ - For PAL-system TV.
Select [Program], then press 2..
» The program menu is displayed.
(1
13
(QJOLVK
4
[Display Type] - Select a display format
with which you want the picture to appear
on the TV.
>3DQ6FDQ@ - For 4:3 screen TV:
full-height display with the trimmed sides.
>/HWWHU%R[@ - For 4:3 screen TV:
wide screen display with black bars on
the top and bottom.
>:LGH6FUHHQ@ - For wide-screen
TV: display picture at ratio 16:9.
>3UHIHUHQFH@
[Password] - Set or change the password for
locked programs and discs.
1. In the >2OG3,1@ÀHOGSUHVVWKHNumeric
buttons to enter the last set password or the
default password “0000”.
2. In the >1HZ3,1@ÀHOGHQWHUWKHQHZSDVVZRUG
3. In the >&RQÀUP1HZ3,1@ÀHOGHQWHUWKHQHZ
password again.
4. Select >2.@, then press 2..
>)DFWRU\VHWWLQJ@ - Reset this product to the
factory settings.
1. In the >(QWHU3,1@ÀHOGHQWHUWKHODVWVHW
password or the default password “0000”.
2. Select >2.@, then press 2..
>6\VWHP,QIR@ - Display the software version of
this product.
'9'86%VHWWLQJV
Note
Before you can access >'9'86%6HWWLQJ@, you must
switch to [DVD] or >86%@ mode.
1
Press +20(.
» The home menu is displayed.
2
3
4
5
Select >6\VWHP6HWWLQJ@, then press 2..
Select >'9'86%6HWWLQJ@, then press 2..
Select an option, then press .
Select a setting, then press 2..
To return to the previous menu, press
%$&..
To exit the menu, press +20(.
>/DQJXDJH6HWXS@
[Menu] - Select a language for a disc menu.
>$XGLR@ - Select an audio language for disc play.
>6XEWLWOH@ - Select a subtitle language for disc play.
14
(1
>'LY;6XEWLWOH@ - Select a character set that
supports the DivX subtitle.
>6WDQGDUG@ - English, Irish, Danish,
Estonian, Finnish, French, German, Italian,
Portuguese, Luxembourgish, Norwegian
%RNPnODQG1\QRUVN6SDQLVK6ZHGLVK
Turkish
[Cyrillic] - Belarusian, Bulgarian,
Ukrainian, Macedonian, Russian, Serbian
>&HQWUDO(XURSH@ - Polish, Czech, Slovak,
Albanian, Hungarian, Slovene, Croatian,
6HUELDQ/DWLQVFULSW5RPDQLDQ
[Greek] - Greek
Note
(QVXUHWKDWWKHVXEWLWOHÀOHKDVWKHH[DFWVDPHÀOHQDPH
DVWKHPRYLHÀOH,IIRUH[DPSOHWKHÀOHQDPHRIWKH
PRYLHLV¶0RYLHDYL·WKHQ\RXQHHGWRQDPHWKHWH[WÀOH
‘Movie.sub’ or ‘Movie.srt’.
>$XGLR6HWXS@
[Digital out] - This setting is only required if
you have connected the digital output jack
&2$;,$/RIWKLVSURGXFWWRDQDPSOLÀHU
receiver for audio output.
[PCM] - Select this setting if the
connected device does not support
multi-channel format. All audio signals are
downmixed to two-channel audio.
>5$:@ - Select this setting if the
connected device supports multi-channel
format.
>2II@ - Disable the digital audio output.
Select this setting if the analog audio jacks
of this product is connected to a TV or
stereo system.
[Downmix] - This setting is only required if
you have connected the analog output jacks of
this product to a TV or stereo system.
>6WHUHR@ - Select this setting if the
connected device can only output stereo
audio through two speakers.
>/757@ - Select this setting if the
connected device can decode Dolby Pro
Logic signals to deliver surround sound
through two speakers.
>&XVWRP6HWXS@
[Parental Control] - Restrict access to discs
that are unsuitable for children. This option
works only on discs recorded with ratings.
Note
Rated discs above the level you set require a password
to be played.
The ratings are country-dependent. To allow all discs to
[By Name] - Sort the channels by the
channel names in the alphabetical order.
>%\6HUYLFH,'@ - Sort the channels
according to the service type of the
channels.
>$XWRPDWLF6HDUFK@ - Search and store
DXWRPDWLFDOO\DOOWKHDYDLODEOH79UDGLR
channels. This option overwrites all preset
channels.
play, select the “8” level for discs.
Some discs have ratings printed on them but are not
recorded with ratings. This function has no effect on
such discs.
>'LY;®92'@ - Display the DivX® registration
code.
1. Select >$XWRPDWLF6HDUFK@, then press 2..
2. Select >2.@ and press 2. to start auto search.
Tip
Use this product’s DivX registration code when you rent
RUSXUFKDVHYLGHRIURPZZZGLY[FRPYRG
The DivX videos rented or purchased through the DivX®
92'9LGHR2Q'HPDQGVHUYLFHFDQEHSOD\HGRQO\RQ
the device to which it is registered.
>$QJOH0DUN@ - Turn on or off angle mark
display.
TV/Radio settings
Note
Before you can access >795DGLR6HWWLQJ@, you must
switch to >/LYH79@ or >'9%75DGLR@ mode.
1
Press +20(.
» The home menu is displayed.
2
3
4
5
Select >6\VWHP6HWWLQJ@, then press 2..
Select >795DGLR6HWWLQJ@, then press 2..
Select an option, then press .
Select a setting, then press 2..
To return to the previous menu, press
%$&..
To exit the menu, press +20(.
[Program]
[TV Program] - Set favorite TV channels or
GHOHWH79FKDQQHOVVHH´:DWFK79µ!´8VH
WKHSURJUDPHGLWWDEOHµ
[Radio Program] - Set favorite radio channels
RUGHOHWHUDGLRFKDQQHOVVHH´/LVWHQWRUDGLRµ
!´8VHWKHSURJUDPHGLWWDEOHµ
>6RUW@$UUDQJHWKH79UDGLRFKDQQHOVLQ
some sequence.
>$XWR@ - Sort the channels according to
the automatic search.
>0DQXDO6HDUFK@ - Search and store manually
the available channels. This option adds
new channels without changing the current
channels list.
1. Select >0DQXDO6HDUFK@, then press 2..
2. Select a channel frequency in the channel list,
then press 2. to start search.
>$XWR&KDQQHO8SGDWH@ - Update
automatically the channels.
>2QZLWKQRWLÀFDWLRQ@ - Enable
the automatic channel update with
QRWLÀFDWLRQ
>2QZLWKRXWQRWLÀFDWLRQ@ - Enable
the automatic channel update without
QRWLÀFDWLRQ
>2II@ - Disable the automatic channel
update.
[Parental Control]
>&KDQQHO/RFN@ - Enable or disable the
selected channels for restricted viewing.
[Yes] - Enable the channel lock.
[No] - Disable the channel lock. To
activate this setting, enter “0000” or the
last set password.
>3DUHQWDO6HWWLQJ@ - Lock channels for
restricted viewing.
1. Select >3DUHQWDO6HWWLQJ@, then press 2..
2. Press the Numeric buttons to enter “0000” or
the last set password.
3. Select a program name, then press 2. to lock.
>6\VWHP6HWWLQJ@
[Country] - Select the country of your
residence.
>VW$XGLR/DQJXDJH@6HOHFWWKHÀUVW
preferred audio language to watch TV.
>QG$XGLR/DQJXDJH@ - Select the second
preferred audio language to watch TV.
(1
15
(QJOLVK
1. Select a rating and press 2..
2. Press the Numeric buttons to enter “0000” or
the last set password.
>6XEWLWOH/DQJXDJH@ - Select a subtitle language
to watch TV.
>7LPH2IIVHW$GMXVWPHQW@ - Select to adjust
automatically or manually the GMT time offset.
>7LPH=RQH@ - Select a GMT time offset if you
have set >7LPH2IIVHW$GMXVWPHQW@ to manual.
>$FWLYH$QWHQQD@ - Enable the antenna power
if an external antenna is connected.
$GGLWLRQDOLQIRUPDWLRQ
8SGDWHVRIWZDUH
For software updates, check the current software
version of this product to compare with the latest
VRIWZDUHLIDYDLODEOHDWWKH3KLOLSVZHEVLWH
Caution
Power supply must not be interrupted during software
upgrade.
1
2
Press +20(.
Select >6\VWHP6HWWLQJ@ > >*HQHUDO6HWWLQJ@ >
>3UHIHUHQFH@ > >6\VWHP,QIR@, then press 2..
» The current software version of this
product is displayed.
3
Write down the version number and the
model name, then press +20( to exit the
menu.
9LVLWZZZSKLOLSVFRPVXSSRUWWRFKHFNIRU
the latest software version. Use this version
number for this product as a reference.
Refer to the upgrade instructions on the
website for more information.
4
5
Note
Disconnect the power cord for a few seconds and
connect again to turn on the product.
Care
Caution
Never use solvents such as benzene, thinner, cleaners
available commercially, or anti-static sprays intended
for discs.
Clean discs
:LSHWKHGLVFZLWKDPLFURÀEUHFOHDQLQJFORWKIURP
the centre to the edge in a straight line movement.
16
(1
6SHFLILFDWLRQV
Note
6SHFLÀFDWLRQDQGGHVLJQDUHVXEMHFWWRFKDQJHZLWKRXW
notice
Playback media
'9'9LGHR9LGHR&'69&'$XGLR&'
&'5&'5:'9'55:'9'55:
Picture CD, MP3-CD
86%
&RPSDWLELOLW\86%'LUHFW
&ODVVVXSSRUW80686%0DVV6WRUDJH&ODVV
TV standard
Number of lines:
3$/+]
176&+]
3OD\EDFN0XOWLVWDQGDUG3$/176&
9LGHRSHUIRUPDQFH
Video DAC: 10 bits, 108 MHz
9LGHRRXWSXW9SSaRKP
9LGHRIRUPDW
Digital compression:
03(*'9'69&'
MPEG 1: VCD
Horizontal resolution:
'9'SL[HOV+]SL[HOV
+]
9&'SL[HOV+]SL[HOV
+]
Vertical resolution:
'9'SL[HOV+]SL[HOV
+]
9&'OLQHV+]OLQHV+]
$XGLRIRUPDW
'LJLWDO'9'
03(*$&3&0&RPSUHVVHGGLJLWDO
ELWVIVN+]
03,62NESV
& variable bit rate fs, 32, 44.1, 48 kHz
Analog sound stereo
Dolby surround compatible downmix from
Dolby Digital multi-channel sound
$XGLRSHUIRUPDQFH
DA converter: 24 bits, 192 kHz
Frequency response: 20 Hz - 20 kHz
Signal-Noise Ratio : > 90 dB
'\QDPLFUDQJH#N+]'9%7PRGH!G%
'\QDPLFUDQJH#N+]'9'PRGH!G%
&URVVWDON'9%7PRGH!G%
&URVVWDON'9'PRGH!G%
'LVWRUWLRQQRLVH'9%7PRGH!G%
'LVWRUWLRQQRLVH'9'PRGH!G%
Tuner/Reception/Transmission
TV system: PAL
$HULDO,QSXW2KPFRD[LDO,(&
Connections
Antenna input
Passive RF loopthrough output
SCART output
9LGHRRXWSXW&LQFK\HOORZ
$XGLRRXWSXW&LQFKZKLWHUHG
Digital output:
63',)FRD[LDO,(&IRU&''$
LPCM
,(&IRU03(*'ROE\'LJLWDO
86%LQSXWIURQWSDQHO
&RQYHQLHQFH
Radio
(OHFWURQLFSURJUDPJXLGHGD\V
Teletext
Main Unit
'LPHQVLRQVZ[K[G[[PP
Net Weight: 1.4 kg
Power
3RZHUVXSSO\UDWLQJ9+]
Power consumption: 15 W
Power consumption in standby mode: < 1 W
$FFHVVRULHVVXSSOLHG
Remote control and batteries
AV cables
User Manual
Quick Start Guide
/DVHUVSHFLÀFDWLRQ
7\SH6HPLFRQGXFWRUODVHU,Q*D$,3'9'
$,*D$V&'
:DYHOHQJWKQP'9'QP&'
2XWSXW3RZHUP:'9'P:
9&'&'
11 Troubleshooting
Warning
Risk of electric shock. Never remove the casing of the
product.
To keep the warranty valid, never try to repair the
product yourself.
If you have problems using this product, check the
following points before you request service. If you
still have a problem, register your product and get
VXSSRUWDWZZZSKLOLSVFRPZHOFRPH
If you contact Philips, you will be asked for the model
and serial number of your product. The model
number and serial number are on the back of your
product. Write the numbers here:
Model No. __________________________
Serial No. ___________________________
Main unit
The buttons on this product do not work.
Disconnect this product from the power
outlet for a few minutes, then connect again.
No reaction to the remote control.
Connect this product to the power outlet.
Point the remote control at the IR sensor
located on the front panel of this product.
Insert the batteries correctly.
Insert new batteries in the remote control.
Picture
No picture.
See the TVs user manual on how to select
the correct input on the TV. Change the TV
channel until you see the Philips screen.
No picture.
See the TVs user manual on how to select
the correct input on the TV. Change the TV
channel until you see the Philips screen.
Check that the TV antenna is properly
connected to this product.
6RXQG
1RDXGLRRXWSXWIURPWKH79
Ensure that the audio cables are connected to
the audio input of the TV.
Assign the audio input of the TV to the
corresponding video input. See the TV user
manual for details.
1RDXGLRRXWSXWIURPWKHORXGVSHDNHUVRIWKH
DXGLRGHYLFHVWHUHRV\VWHPDPSOLÀHUUHFHLYHU
Ensure that the audio cables are connected to
the audio input of the audio device.
Turn on the audio device to its correct audio
input source.
1RVRXQGGXULQJ'LY;YLGHRSOD\EDFN
The audio codec may not be supported by this
product.
(1
(QJOLVK
Play
The disc cannot be played.
The disc is badly scratched, deformed, or dirty.
Replace or clean the disc.
8VHWKHFRUUHFWGLVFIRUPDWRUÀOHIRUPDW
'LY;YLGHRÀOHVFDQQRWEHSOD\HG
(QVXUHWKDWWKH'LY;YLGHRÀOHLVFRPSOHWH
(QVXUHWKDWWKHÀOHQDPHH[WHQVLRQLVFRUUHFW
7KHDVSHFWUDWLRRIWKHVFUHHQLVQRWDOLJQHGZLWK
the TV display setting.
7KHDVSHFWUDWLRLVÀ[HGRQWKHGLVF
'LY;VXEWLWOHVDUHQRWGLVSOD\HGFRUUHFWO\
(QVXUHWKDWWKHVXEWLWOHÀOHQDPHLVWKH
VDPHDVWKHPRYLHÀOHQDPH7KHÀOHQDPH
extension can be .sub, txt, srt, ssa or smi.
Select the correct character set.
Press +20(.
Select >6\VWHP6HWWLQJ@ > >'9'86%
6HWWLQJ@ > >/DQJXDJH6HWXS@ >
>'LY;6XEWLWOH@ in the menu.
Select the character set that supports the
subtitle.
7KHFRQWHQWVRIWKH86%ÁDVKGULYHFDQQRWEHUHDG
7KH86%ÁDVKGULYHIRUPDWLVQRWFRPSDWLEOH
with this product.
7KHGULYHLVIRUPDWWHGZLWKDÀOHV\VWHPZKLFK
LVQRWVXSSRUWHGE\WKLVXQLWHJ17)6
This product supports MSC USB device only.
18
(1
.RQLQNOLMNH3KLOLSV(OHFWURQLFV19
$OOULJKWVUHVHUYHG
DTP2130_31_UM_V2.0_1017