1
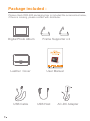
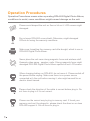
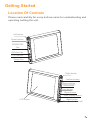
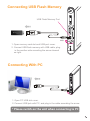
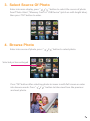
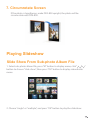
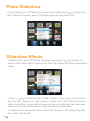
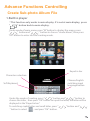
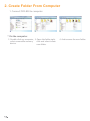
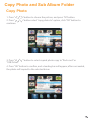
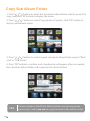
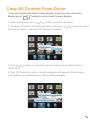
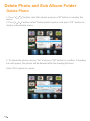
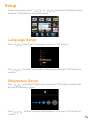
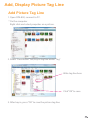
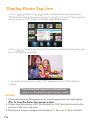
DPA-800
Digital Photo Album
User Manual
1. Gallary
2. Create Album
3. Settings
4. Copy, Delete 5. Photo Tag Line
Please read this manual before operating DPA-800, and keep it for future reference.
For information and support, www.lenco.eu
Thank you for purchasing DPA-800
DPA-800 is a new model of digital photo viewer. It is built-in with 8 Inc,
800x600 resolution LCD screen. You can browse with . JPG file format
picture. Also with built-in FLASH dodges saves. Including manage folders
and files with “Create, Move, Delete”. It is user friendly for everyone.
DPA-800 is a high technology product, and designed for family used.
Please read this manual and familiar with the controlling on the functions
before using DPA-800.
Table Of Content
Package included :
IMPORTANT
Safety Precautions
Operation Procedures
Getting Started
Location Of Controls
Others Accessories
Plug In Memory Card
Connecting USB Flash Memory
Connecting With PC
Viewing Photos
1. Turn On DPA-800
2. Main Menu
3. Select Source Of Photo
4. Browsing Photo
5. Zoom In
6. Browsing Sub Album
7. Circumrotate Screen
Playing Slideshow
Slideshow From Sub-photo Album File
Photo Slideshow
Slideshow Effects
Advance Functions Controlling
Create Sub-photo Album File
Copy Photo and Sub Album Folder
Delete Photo and Sub Album Folder
Setup
Add Picture Tag Line
2
Package included :
Please check DPA-800 packaging box is included the accessories below,
if there is missing, please contact with distributer.
Digital Photo Album
Leather Cover
USB Cable
Frame Supporter x 2
User Manual
USB Host
AC-DC Adapter
IMPORTANT
Safety Precautions
Please follow the following safety precautions when using DPA-800 Digital
Photo Album. This will reduce the risk of fire, electric shock, product
damage and personal injury.
STOP using when any liquid or foreign object went into DPA-800 Digital
Photo Album. At the same time, please turn it off and unplug all the
power, and do not con inue to use the photo frame to prevent fire or
electric shock hazard.
Do not using beside flammable or explosive gas. To prevent detonation.
Avoid metal or explosive object went in memory slot or power charging
port. To prevent fire and electric shock hazard.
Avoid using wet hand to operating the unit, to prevent damage or electric
shock hazard.
Do not the cover the unit when it’s in charging , will caused machine heat,
and become distortion or fire.
The longer time using on DPA-800 Digital Photo Album will caused heat,
and will break down. Turn the unit to stand by mode for few minutes for
cooling down, if feel the unit is hot.
Do not placing the DPA-800 Digital Photo Album in high temperature
places, example inside a airtight car, direct sunlight, or temperature
varia ion places.Temperature too high or too low might damage the unit.
Operation Procedures
Operation Procedures means when operating DPA-800 Digital Photo Album,
conditions to avoid, some conditions might caused damage on the unit.
Please avoid droped the unit on floor or hit on it. LCD screen might
damaged.
Do not open DPA-800 cover shield. Otherwise, might damaged
GPhoto or losing the warranty conditions.
Format
Make sure formatting the memory card after bought, which to use in
DPA-800 Digital Photo Album.
Never place the unit near strong magnetic force and wireless staff.
Example video game , speaker, radio. Strong magnetic force might
damaged DPA-800 Digital Photo Album spoiled or lost LCD screen.
When charging battery on DPA-800, do not move it. Please switch off
the power before unplug. Make sure there is no power source
connected wi h the unit before moving it, else might caused fire or
electric shock hazard.
Please check the direction of the cable is correct before plug in. Do
not force to plug in if it’s not correct.
Please use the correct way to plug in memory card. If found your
memory card can’t be pluged in, please check the direc ion or does
DPA-800 support it. Do not force to plug in.
Getting Started
Location Of Controls
Please read carefully for every buttons name for understanding and
operating /setting the unit.
Left button
Power button
SD/MMC/MS
Slot
USB Host Port
PC’s USB Port
Power Port
Right button
Confirm button
Return button
Back button
Next button
Menu button
Main Display button
LCD Screen
Right button
(When rotated vertical)
Others Accessories
Using DPA-800 Digital Photo Album might need :-
Memory Card and
USB flash memory
Computer
Plug In Memory Card
Memory Card Slot
1. Open Memory Card Slot Cover
2. Plug in the memory card with label side face down.
If found hard to plug in the memory card, please check the direction is
correct. Please don’t force to plug in, it might caused damage on the
memory card and memory slot.
Connecting USB Flash Memory
USB Flash Memory Port
1. Open memory card slot and USB port cover.
2. Connect USB flash memory with USB cable, plug
in the another side according the arrow showed
on right.
Connecting With PC
1. Open PC USB slot cover.
2. Connect USB jack with PC, and plug in the cable according the arrow.
* Please switch on the unit when connecting to PC
Viewing Photos
*Please conf irm that you pluged in a memory card or USB f lash
memory which contained “*.jpg” picture.
Or already in DPA-800 Digital Photo Album driver.
1. Turn on DPA-800
Push up the button, and on animation will appear on the screen and it is on.
2. Main Menu
After DPA-800 turned on, there is a main menu on the screen like below.
There is no photo in sub album
Another album in sub album
Battery status
Sub album
Photo
Settings
Location album
(Selected with blue highlight)
USB flash memory
Memory Card
(If pluged in showed with colours)
(Grey colour means unpluged)
3. Select Source Of Photo
Enter into main display, press “
” button to select the source of photo
from“Photo Alum” ,“Memory Card” or “USB Device” (pitch on with bright blue),
then press “OK” button to enter.
4. Browse Photo
Enter into source of photo, press “
” button to select photo.
Selected picture enlarged
Press “OK” button after selecting photo to zoom in with full screen or enter
into browse mode. Press “
” button to take view from the previous
and next photo.
5. Zoom In
Under browse mode, press “OK” button to zoom in, the photo will be zoom in
one time as press “OK” button one time, it can up to 3 times.
Press “
” button or “
left or right.
” button to move the view area to up, down,
6. Browsing Sub Album
Choose the sub album and press “OK ” button.
Selected sub album
enlarged
Press “
” button back to previous level menu. Or press“
to main display.
Return button
” button
Main display
button
7. Circumrotate Screen
If the photo is lengthways, make DPA-800 upright, the photo will be
circumrotate with DPA-800.
Playing Slideshow
Slide Show From Sub-photo Album File
1. Select sub-photo album file, press “M” button to display menu, click “
”
button to choose “slide show”, then press “OK” button to display subordinate
menu.
2. Choose “single” or “multiple”, and press “OK” button to play the slideshow.
Photo Slideshow
1. Select photo, press “M” button to display menu, then press “
” button to
click “slide show” option, press “OK” button again to play slide show.
Slideshow Effects
1. Select photo, press “M” button to display menu, press “
” button to
choose “slider show effect” option, then click “OK” button to display subordinate
menu.
2. Press “
” button to select “ fade / shutter / cross comb / mask / brick /
dissolve / bar / expansion / silk / random ” mode, press “OK” button to choose
slider show effect, automatic back previous menu, it will play slide show next
time according the mode which is selected at the previous time.
3. If want to turn off specific effect, select “off” and press “OK” button, the slide
show effect will be off.
Advance Functions Controlling
Create Sub-photo Album File
1.Built in player
* This function only works in main display. If is not at main display, press
“
” button back to main display.
Under mode of main menu, press “M” button to display the menu, press
“
” buttonand “
” button to choose “create album”, then press
“OK” button to enter into the creating mode.
Keyed in bar
Characters selection
Soft Keyboard
Chinese/English
switching input
language button
Under the mode of creating, press “
” button and “
” button to
choose the letter , then press “OK” button to input the letter, the letter will be
displayed in the “Keyed in bar”.
To switching capital letter and small letter, press “
” button and “
” button to select
, and press “Ok” button.
2. Create Folder From Computer
1. Connect DPA-800 to computer
* On the computer
2. Double click my computer, 3. Open the folder,right
select removable memory
click and select create
device.
new folder.
4. And rename the new folder.
Copy Photo and Sub Album Folder
Copy Photo
1. Press “
” button to choose the picture, and press “M” button.
2. Press “
continue.
” button select “copy photo to” option, click “OK” button to
3. Press “
“USB Driver”.
” button to select copied photo copy to “flash card” or
4. Press “OK” button to confirm, and a loading bar will appear, after succeeded,
the photo will copied to the selected driver.
Copy Sub Album Folder
1. Press “
” button to select the sub photo album folder which you wish to
copy, and press “M” button to display the menu.
2. Press “
” button to select “copy photo to” option, click “OK” button to
display subordinate menu.
3. Press “
” button to select copied sub photo album folder copy to “flash
card” or “USB Driver”.
4. Press “OK” button to confirm, and a loading bar will appear, after succeeded,
the sub photo album folder will copied to the selected driver.
TIPS
Picture, Folder or Sub Photo Album Folder only can copy from
port to port, and it can not do copy function in the built in driver.
Copy All Content From Driver
* Only can use this function in main display. If you are not in the main
display press “
” button to return back to main display.
1. Under main menu, press “
” button to choose the driver.
2. And press “M” button to display the menu, then press “
“Copy all to” option, and press “Ok” button to confirm.
3. Press “
“USB Driver”.
” button to select
” button to select the copied content copy to “flash card” or
4. Press “OK” button to confirm, and a loading bar will appear, all the content
will copied to your selected driver after loading complete.
Delete Photo and Sub Album Folder
Delete Photo
1. Press “
” button select the photo, and press “M” button to display the
menu.
2. Press “
” button select “Delete photo” option, and press “OK” button to
display subordinate menu.
3. To delete the photo, choose “Yes” and press “OK” button to confirm. A loading
bar will appear, the photo will be deleted after the loading finished.
Select “No” option to cancel.
Delete Sub Album Folder
1. Press “
” button to choose the sub album, and press “M” button to display
the menu.
2. Press “
” button to select “Delete album folder” option, and press “OK”
button to display subordinate menu.
3. Choose “Yes” to delete the folder and press “OK” button to confirm. And a
loading bar will appear, the folder will be deleted after loaded.
Select ”No” option to cancel.
Delete All Content From Driver
* This function only able to use in main display. Press “
return back to main display.
1. Under main menu, press “
” button to
” button to select the driver .
2. Press “M” button to display the menu, and press “
” to choose “Delete
all” option, and press “OK” button to display subordinate menu.
3. To delete all the contents, select “Yes” option and press “OK” button to
confirm. A loading bar will appear, after finished, all contents will deleted.
Select “No” to cancel.
Setup
Under main menu, press “
” or “
and press “M” button to diplay the menu.
”and select “Setting” option,
Language Setup
Press “
” and select “Language”, and press “OK” button.
Englis h
Italia
Deu s ch
Franç ais
Españ ol
Portu guês
Nede rlands
Press “
confirm.
” to select your prefered language, and press “OK” button to
Brightness Setup
Press “
” and select “Brightness”, and press “OK” button to enter into
display of brightness setup .
Press “
confirm.
” button to adjust the brightness, and press “OK” button to
Contrast Setting
Press “
” button to select “Contrast” option, and press “OK” button to display
the contrast setup.
Press “
” button to adjust the contrast, and press “OK” button to confirm.
Slideshow Speed
Press “
” button to select “Slideshow speed” option, and press “OK” button
to display the menu.
Press “
” button to select “Fast” , “Normal” or “Slow”, and press “OK” button
to confirm.
Version
Press “
the version.
” button to select “Version” option, and press “OK” button to check
Add, Display Picture Tag Line
Add Picture Tag Line
1. Open DPA-800, connect to PC.
* On the computer
Right click and select propeties on a picture.
2. Select “Describtion” tab, key in tag line under “Tag”
Write tag line here
Click “OK” to save
3. After key in, press “OK” to save the picture tag line.
Display Photo Tag Line
1. Press “
” button or “
” button to select the photo, then press
“M” button to display the menu. And press “
” to select “Photo tag line”
option, and press “OK” button to display subordinate menu.
2. Press “
” button and select “On” option to display photo tag line, and
press “OK” button to confirm.
3. To disable photo tag line, select “Off” option and press “OK” button to
confirm.
* Please download compression software from
www.vso-software.fr/products/image_resizer/
Remark :
1. Please charging up the power when need longer time for copying the
2. Please turn the device to 90 °(Horizontal) or 180° (Vertical) to rotate the
picture in the correctly way.
3. There are 2 ways to navigate the buttons, A : Press or B : Press & Hold.