1
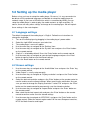
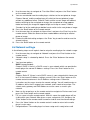
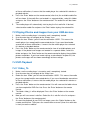
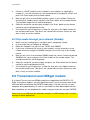
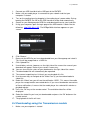
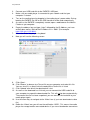
EM7075 - hdMEDIA STREAM High-Definition
Media Player
2 | ENGLISH
EM7075 - hdMEDIA STREAM High-Definition
Media Player
Warnings and points of attention
Repairing of the product should be done by qualified Eminent staff!
Table of contents
1.0 Introduction ........................................................................................................... 3
1.1 Functions and features ...................................................................................... 3
1.2 Packing contents ............................................................................................... 3
2.0 Explanation of the media player ............................................................................. 4
3.0 Explanation of the remote control .......................................................................... 5
4.0 Connecting the media player ................................................................................. 5
4.1 Connecting to your television using HDMI (Recommended) .............................. 5
4.2 Connecting to your television using composite .................................................. 6
4.3 Audio Connections ............................................................................................ 6
4.4 Connecting to your network ............................................................................... 6
5.0 Setting up the media player ................................................................................... 7
5.1 Language settings ............................................................................................. 7
5.2 Screen settings .................................................................................................. 7
5.3 Setting up sound................................................................................................ 8
5.4 Music settings.................................................................................................... 8
5.5 Photo settings.................................................................................................... 8
5.6 Network settings ................................................................................................ 9
6.0 Connecting a USB device .................................................................................... 10
7.0 Playing Media ...................................................................................................... 10
7.1 Playing video from your USB devices .............................................................. 10
7.2 Playing Music and other audio from your USB device ...................................... 10
7.3 Playing Photos and images from your USB devices ........................................ 11
7.4 DVD Playback ................................................................................................. 11
7.4.1 Video_Ts ...................................................................................................... 11
7.4.2 ISO ............................................................................................................... 12
8.0 Play Media through your network......................................................................... 12
8.1 Create a UPnP server...................................................................................... 12
8.2 Play media though your network (UPnP) ......................................................... 13
8.3 Play media through your network (Samba) ...................................................... 14
9.0 Transmission and NZBget module ....................................................................... 14
9.1 Setting up your hard disk for the Transmission and NZBget modules .............. 15
9.2 Setting up the NZBget module ......................................................................... 16
9.3 Downloading using the NZBget module ........................................................... 16
3 | ENGLISH
9.4 Downloading using the Transmission module .................................................. 17
10.0 Frequently asked questions ............................................................................... 19
11.0 Service and support ........................................................................................... 20
12.0 Warranty conditions ........................................................................................... 20
13.0 Declaration of Conformity .................................................................................. 20
1.0 Introduction
Congratulations with the purchase of this high-quality Eminent product! This product
has undergone extensive testing by Eminent’s technical experts. Should you
experience any problems with this product, you are covered by a five-year Eminent
warranty. Please keep this manual and the receipt in a safe place.
Register your product now on www.eminent-online.com and receive product updates!
1.1 Functions and features
The Eminent EM7075 hdMEDIA STREAM is a HD media player which enables you to
watch en listen to your movies, music and photos on your television while enjoying
them in crystal clear image and sound. If you have a High Definition LCD or Plasma
television, you can even use the media player’s HDMI connection to view your movies
in High Definition resolutions!
Thanks to the powerful imaging processor of the media player, you are even able to
play Full HD material. If you connect the hdMEDIA STREAM to your home cinema set,
then you have the ultimate cinema experience.
Use the USB 2.0 connection of the media player to connect a USB memory stick or
USB hard disk so you can quickly and easily make use of your media. Make use of the
media player’s network connection in order to retrieve (multi) media of your network
and play this media on the media player.
1.2 Packing contents
The following parts need to be present in the packing:
•
•
•
•
•
•
EM7075 hdMEDIA STREAM
Power supply
HDMI cable
Optical cable
Remote control
Users Manual
4 | ENGLISH
2.0 Explanation of the media player
The media player has the following connections on the casing:
Back side:
Front side:
1.
2.
3.
4.
5.
6.
7.
8.
9.
Connection for the power supply.
Composite connection for video (cinch).
Composite connection for audio (cinch).
HDMI connection.
Optical connection.
Network connection.
IR connection.
USB 2.0 connection.
Indication LED’s.
5 | ENGLISH
3.0 Explanation of the remote control
In this chapter, we will explain the remote control. The picture below displays the
different buttons and we will explain which functions these buttons have.
1.
2.
3.
4.
5.
6.
7.
Use this button to return to the main menu.
Use this button to power on and power off
the media player.
Navigation keys used to browse the
different menus.
Use this button to return to the previous
step in the media player’s menu.
Use this button to enable/disable subtitles.
Control buttons, used when playing media.
Use this button to safely remove attached
USB devices from the media player.
4.0 Connecting the media player
The media player can be connected to your television using two methods:
Connecting by using HDMI or by using the composite cable. You can also connect the
audio using different methods. Also, you can connect the media player to your
network. In the following steps we will explain how to connect the media player.
Note: Make sure your media player and television are both turned off before
connecting your cables. This way you can prevent damage to your media player and
television.
4.1 Connecting to your television using HDMI
(Recommended)
The best image quality can be obtained by connecting the media player to your
television using a HDMI cable. Of course, your television needs to be equipped with a
HDMI connection or a DVI connection. (In the latter situation, the television can be
6 | ENGLISH
connected to the media player using a DVI cable in combination with a DVI/HDMI
adapter plug. This cable can be sold separately).
1.
2.
Connect the HDMI cable to the HDMI output of the media player.
Connect the other side of the HDMI cable to an available HDMI input of your
television.
4.2 Connecting to your television using composite
1.
2.
Connect the yellow plug to the yellow cinch connection on the EM7075.
Now you can connect the yellow plug on the other side of the cable to the yellow
cinch connection on your television.
4.3 Audio Connections
There are different ways to enjoy the sound the EM7075 produces. You can connect
the red and white plugs of the ‘composite’ cable to your television or receiver to create
a ‘2.0’ audio-effect. If your television has HDMI audio support, you can make use of
the HDMI cable order to receive both image and sound on your television.
The optimal way to play sound is by using the media player’s SPDIF or optical output.
If your receiver is equipped with a optical (TOSLINK) input, then you can enjoy the
media player’s digital sound during movie and music play.
1.
2.
Connect the optical cable to the optical output of the media player.
Connect the other side of the optical cable to the corresponding input of your
Dolby Digital receiver.
4.4 Connecting to your network
The media player also has the capability to be connected to your network by using the
media player’s network connection. Doing so, you can retrieve media from your
network or your NAS (For example: The EM4071 or EM4072) and play these media
files through the media player on you television.
1.
2.
Connect a network cable to the media player’s network connection.
Connect the other side of the connection cable to a network connection of your
router, modem or switch.
In order to use the media player’s networking capabilities you have to setup the media
player for network usage. These steps can be found in chapter 5.6
7 | ENGLISH
5.0 Setting up the media player
Before using, you have to setup the media player. Of course, it is very convenient to
be able to use the preferred language, and be able to setup the media player for
network usage. If you have a HD television which is connected by HDMI, you can
setup the media player in order to play the media contents on high resolution. Of
course, there are many other settings to change on the media player. We will explain
these settings in the next chapters.
5.1 Language settings
The default language of the media player is English. Follow these instructions to
change the language.
1. Turn on the media player by plugging in the media player’s power cable.
2. Select the right HDMI source on your television.
3. The media player’s menu will appear.
4. Use the arrow keys to navigate to the ‘Settings’ icon.
5. Use the arrow keys to navigate to the ‘System‘ icon and press the ‘Enter’ button
on the remote control.
6. ‘English’ is selected by default. Press the ‘Enter’ button on the remote control.
7. Use the arrow keys to navigate to your desired language and press the ‘Enter’
button to confirm and to save the altered settings.
8. Press the ‘Back’ button on the remote control.
5.2 Screen settings
1.
2.
3.
4.
5.
6.
7.
Use the arrow keys to navigate to the ‘Audio/Video’ icon and press the ‘Enter’ key
on the remote control.
Video Output’ is usually setup correctly.
Use the arrow keys to navigate to ‘Display resolution’ and press the ‘Enter’ button
on the remote control.
Select the desired resolution and press the ‘Enter’ button on the remote control to
confirm and to save the altered settings. When receiving the notification ‘Are you
sure you want to change the Display resolution?’ select ‘OK’ and press the ‘Enter’
button on the remote control to permanently save the altered resolution.
Use the arrow keys to navigate to ‘Aspect Ratio’ and press the ‘Enter’ button on
the remote control.
Now select the desired aspect ratio and press the ‘Enter’ button on the remote
control to confirm and to save the altered settings.
Use the arrow key to navigate to ‘NTSC/PAL’ and press the ‘Enter’ button on the
remote control. Select the correct region code: PAL for most European countries,
NTSC for North-America and Japan.
8 | ENGLISH
5.3 Setting up sound
1.
2.
3.
Use the arrow keys to navigate to ‘Audio output’ and press the ‘Enter’ key on the
remote control.
Select the desired audio settings. Choose ‘Stereo’ or choose ‘Digital’ (Choose
’Digital’ if you are using the optical connection of the media player) and press the
‘Enter’ button on the remote control to confirm and to save the altered settings.
Press the ‘Back’ button on the remote control.
5.4 Music settings
1.
2.
3.
Use the arrow keys to navigate to the ‘Music’ icon and press the ‘Enter’ key on
the remote control.
Select the desired setting (Do you want all the music repeated, select ‘Repeat
all’. Do you want to randomly play your music, then select ‘Shuffle’. Try the
settings yourself to figure out which setting best suits you) As soon you have
found the desired setting, press the ‘Enter’ button on the remote control to
confirm and to save the altered settings.
Press the ‘Back’ button on the remote control.
5.5 Photo settings
1.
2.
3.
4.
5.
6.
7.
Use the arrow keys to navigate to the ‘Photos’ icon and press the ‘Enter’ button
on the remote control.
‘Slideshow sequence’ is selected by default. Press the ‘Enter’ button on the
remote control.
Select the manner how to display the photos or images. (Select ‘Shuffle’ if you do
not want to let the photos or images appear in a fixed order. Select ‘Repeat all’ to
randomly show the photos or pictures again once they have been shown. Select
‘Repeat and shuffle’ if you want all available photos and images being repeated
randomly).
As you have found the desired setting, press the ‘Enter’ button on the remote
control to confirm and to save the altered settings.
Use the arrow keys to navigate to ‘Photo Scaling’ and press the ‘Enter’ button on
the remote control.
You can now select the manner how to display the photos or images. You can
choose between ‘Keep as original’ where the photos and images will be
displayed as they originally are. Choose ‘Fit to screen’ and the photos and
images will be stretched to fit the television’s resolution. Choose ‘Display in full
screen’ and the photos and images will be stretched to fit on full screen
regardless of the photos and images original size or resolution. Choose the
desired setting and press the ‘Enter’ button to confirm and to save the altered
settings.
Press the ‘Back’ button on the remote control.
9 | ENGLISH
8.
9.
10.
11.
12.
13.
Use the arrow keys to navigate to ‘Transition Effect’ and press the ‘Enter’ button
on the remote control.
You can now decide how the media player switches to the next photo or image.
Choose ‘Normal’ and the media player will switch to the next photo or image
without any additional effect. Choose ‘Fade’ and the current image will fade out
before switching to the next photo or image, the new photo or image appears
faded and slowly the image will appear bright and sharp on screen. Choose
‘Random’ to let the media player decide how to switch to the next photo or image.
Press the ‘Back’ button on the remote control.
Use the arrow keys to navigate to ‘Interval time’ and press the ‘Enter’ key on the
remote control. Select the amount of time needed before switching to another
photo or image.
Choose the desired setting and press the ‘Enter’ key to confirm and to save the
altered settings.
Press the ‘Back’ button on the remote control.
5.6 Network settings
In the following steps we will explain how to setup the media player for network usage.
1. Use the arrow keys to navigate to ‘Network’ and press the ‘Enter’ button on the
remote control.
2. ‘Network setup’ is selected by default. Press the ‘Enter’ button on the remote
control.
3. You have two options:
DHCP (recommended)
Choose ‘DHCP’ if there is a DHCP server in your network which can provide the
media player the correct IP-Address settings. Press the ‘Enter’ button on the
remote control.
Static
Choose ‘Static IP’ if there is not a DHCP server in your network which forces you
to fill in the correct IP-Address settings yourself. Press the ‘Enter’ button on the
remote control to advance in the IP-Address settings menu. Follow the
instructions on the screen to enter the correct settings. You will need to enter an
IP-address within the IP range of your network, and it needs to be unique. The
subnet mask, gateway and DNS addresses are the same as used in your
network.
4. Now use the arrow keys on the remote control to navigate to ‘Device name’ and
press the ‘Enter’ button on the remote control.
5. Fill in a name using the remote control. With this name the media player will be
visible within your network. After given a name, navigate to ‘OK’ and press the
‘Enter’ button on the remote control to confirm and to save the altered settings.
6. Press the ’Home’ button on the remote control in order to return to the media
player’s main menu.
7. Congratulations! The media player has been setup and is ready to be used!
10 | ENGLISH
6.0 Connecting a USB device
You can use the full potential of the media player when connecting a USB hard disk or
USB memory stick filled with (HD) media, to the media player’s USB 2.0 port. The
moment a USB hard disk or USB memory stick is connected, the media player will
detect this device automatically and you can begin to enjoy your media player. We will
explain how to connect a USB hard disk or USB memory stick in the following steps.
1.
2.
Make sure the media player is turned on and is completely started.
Connect the USB cable of your USB hard disk to the media player’s USB port.
Connect the other side of the USB cable to the USB port on the USB hard disk.
Or connect your USB memory stick to the USB port of the media player.
7.0 Playing Media
Now you have finished setting up the media player and (eventually) you have
connected a USB hard disk or USB memory stick, you can play the available media.
We will explain how to view and/or play the different media types.
7.1 Playing video from your USB devices
1.
2.
3.
4.
5.
6.
7.
Make sure the media player is turned on and is completely started.
Use the arrow keys to navigate to the ‘Video’ icon.
Below the ‘Video’ icon you will see the notification ‘USB1’. This means the media
player has recognized the connected device. If you see a blue border around one
of these notifications, it means that the media player has selected this device as
playback device.
Press the ‘Enter’ key on the remote control. The available video files will be
displayed. If the video files are located in a separate folder, select this folder and
press the ‘Enter’ button on the remote control.
Select the video file you want to play and press the ‘Enter’ button on the remote
control.
The selected video file will automatically begin playing.
If the video file you are playing has subtitles, press the ‘Option’ button on the
remote control once. Then, press the second icon onscreen (three lines with dots
in front) to see the subtitles.
7.2 Playing Music and other audio from your USB device
1.
2.
3.
Make sure the media player is turned on and is completely started.
Use the arrow keys to navigate to the ‘Music’ icon.
Below the icon ‘Music’, you will see the notification ‘USB1’. This means the media
player has recognized the connected device. If you see a blue border around one
11 | ENGLISH
4.
5.
of these notifications, it means that the media player has selected this device as
playback device.
Press the ‘Enter’ button on the remote control, after that, the available audio files
will be shown. If the audio files are located in a separate folder, select this folder
and press the ‘Enter’ button on the remote control. The audio files will be shown
now.
The media player will automatically start to play the first audio file. If desired,
select another audio file and press the ‘Enter’ button to play the selected file.
7.3 Playing Photos and images from your USB devices
1.
2.
3.
4.
Make sure the media player is turned on and is completely started.
Use the arrow keys to navigate to the ‘Photos’ icon.
Below the icon ‘Photos’ you will see the notification ‘USB1’. This means the
media player has recognized the connected device. If you see a blue border
around one of these notifications, it means that the media player has selected
this device as playback device.
Press the ‘Enter’ button on the remote control to view all available photos and
images. If the photos and images are located in a separate folder, select this
folder and press the ‘Enter’ button on the remote control to display the available
photos and folders. If you have made settings as described in chapter 5.5, the
photos and images will be shown accordingly to these settings.
7.4 DVD Playback
7.4.1 Video_Ts
1.
2.
3.
4.
5.
6.
7.
Make sure the media player is turned on and is completely started.
Use the arrow keys to navigate to the ‘Video’ icon.
Below the icon ‘Video’ you will see the notification ‘USB1’. This means the media
player has recognized the connected device. If you see a blue border around one
of these notifications, it means that the media player has selected this device as
playback device.
Press the ‘Enter’ button on the remote control. You will now see the folder where
you have copied the DVD files into. Press the ‘Enter’ button on the remote
control.
The folder ‘video_ts’ will be displayed. Press the ‘Enter’ button on the remote
control.
Now you will see several .vob files. Select the first .vob file in the list and press
the ‘Enter’ button on the remote control.
As soon the playback of your DVD has begun, press the ‘Option’ button on the
remote control once. Then press the second icon onscreen (three lines with dots
in front) to see the subtitles.
12 | ENGLISH
7.4.2 ISO
1.
2.
3.
4.
5.
6.
Make sure the media player is turned on and is completely started.
Use the arrow keys to navigate to the ‘Video’ icon.
Below the icon ‘Video’ you will the notification ‘USB1’. This means the media
player has recognized the connected device. If you see a blue border around one
of these notifications, it means that the media player has selected this device as
playback device.
Press the ‘Enter’ button on the remote control. Je will now see the folder where
you have copied the DVD ISO into. Press the ‘Enter’ button on the remote
control.
The name of the ISO file will be displayed. Press the ‘Enter’ button on the remote
control.
As soon the playback of your DVD ISO had begun, press the ‘Option’ button on
the remote control once. Then press the second icon onscreen (three lines with
dots in front) to see the subtitles.
8.0 Play Media through your network
Once your media player is connected to your network, and you have made the correct
network settings, you can play media files through your network. If you want to share
media files on your computer in order to let the media player play these files, you have
to setup your computer as a UPnP server. We will explain how to setup your computer
as a UPnP server in the following steps.
8.1 Create a UPnP server
Your computer does not share media by default. You will have to install a UPnP media
server on your computer to add this functionality. If you are using Windows XP or
Windows Vista, you can use the built-in UPnP media service of Windows Media
Player 11. If you enable this option, your media player can access the music library on
your computer. Follow the steps below to enable this option:
1.
2.
3.
4.
Click ‘Start’.
Click ‘Programs’.
Click ‘Windows Media Player ‘.
Click ‘Tools’, then click ‘Options’. The following screen will be displayed:
13 | ENGLISH
5.
6.
7.
Go to the ‘Library’ tab in the left upper corner of the options window.
Now click ‘Configure sharing…’.
Check the “Share my media” checkbox and click OK.
8.
9.
10.
11.
12.
13.
A list with detected devices will appear within a few seconds.
Click the name of your media player.
Click ‘Allow’.
Click ‘Ok’.
Click ‘Ok’.
All files in the media library of Windows Media Player will be shared with your
media player from now on. The media library will be accessible using the remote
control and display of the media player.
Caution: Steps above are taken with Windows Media Player 11, available for
download at http://www.microsoft.com/windows/windowsmedia/player/.
Tip: Multiple other programs that turn your computer into a UPnP media server are
available for download on the internet, like tversity (www.tversity.com) or
Twonkymedia (www.twonkyvision.de).
8.2 Play media though your network (UPnP)
1.
2.
3.
Make sure the media player is turned on and is completely started.
Use the arrow keys to navigate to ‘Network’.
Below the ‘Network’ icon you will see: ’UPNP’ and ‘SAMBA’.
14 | ENGLISH
4.
5.
6.
7.
If there is a UPNP (media) server available in your network, as explained in
chapter 8.1, use the arrow keys on the remote control to navigate to ‘UPNP’ and
press the ‘Enter’ button on the remote control.
Now you will see a list of available (media) servers in your network. Select the
desired UPnP (media) server and press the ‘Enter’ button on the remote control.
The available media files will now be displayed.
Select the media file you want play and press the ‘Enter’ button on the remote
control to start the playback of the file.
If the media file you are playing is a video file, then press the ‘Option’ button on
the remote control once. Then press the second icon onscreen (three lines with
dots in front) to see the subtitles.
8.3 Play media through your network (Samba)
1.
2.
3.
4.
5.
6.
7.
Make sure your media player is turned on and is completely started.
Use the arrow keys to navigate to ‘Network’.
Below the ‘Network’ icon you will see: ’UPNP’ and ‘SAMBA’.
If you have a Samba or file server in your network, use the arrow keys on the
remote control to navigate to ‘SAMBA’ and press the ‘Enter’ key on the remote
control.
Now you will see a list of available SAMBA and/or file servers. Select the desired
SAMBA or file server and press the ‘Enter’ button on the remote control. The
available media files will be displayed.
Select the media file you want to play and press the ‘Enter’ button on the remote
control to start the playback of the file.
If the media file you are playing is a video file, then press the ‘Option’ button on
the remote control once. Then press the second icon onscreen (three lines with
dots in front) to see the subtitles.
9.0 Transmission and NZBget module
A so called Transmission and NZBget module are supplied on the EM7075’s CDROM. Using these modules, you can download movies, music and much more to the
USB hard disk connected to the EM7075 media player. Your do not have use your
computer during downloading. As soon as the media has been downloaded and has
been unpacked, you can playback this media using your television and your EM7075.
Note: Only use a USB hard disk with these modules. A USB memory stick is not fast
enough for these applications.
15 | ENGLISH
9.1 Setting up your hard disk for the Transmission and
NZBget modules
In the following chapter we will explain which steps are necessary to make use of the
Transmission and NZBget modules.
1.
2.
3.
4.
5.
6.
7.
8.
9.
10.
11.
12.
13.
14.
15.
16.
Make sure you computer is started and you have connected your USB hard disk
to your computer.
Insert the supplied CD-ROM in your CD-ROM or DVD player of your computer.
Browse to your CD-ROM station and right click your CD-ROM station and choose
‘Explore’.
Open de folder called ‘Software’.
Right click ‘Software.img’ file and choose ‘Copy’.
Browse to your USB hard disk and right click your USB hard disk and choose
‘Open’.
Right click in an empty part of your screen and choose ‘Paste’.
Make sure the EM7075 media player is turned off by disconnecting the power
cable.
Make sure the EM7075 is connected to your network.
Connect the USB hard disk to the USB port of the EM7075. Turn on the media
player by plugging in the power cable of the EM7075. During booting the
EM7075, the file on the hard disk will be ‘read’ and will be started.
When the EM7075 has finished booting, use the arrow keys to navigate to
‘Settings’.
Then use the arrow keys to navigate to ‘Network’.
‘Network Setup’ is selected. Press the ‘OK’ button on the remote control.
Choose ‘Static IP’. You can now see the current IP-Address. Write down this IPAddress.
Open a web browser on your computer and type the IP-Address your have
written down in the address bar: For example: http://192.168.1.125 and press the
‘Enter’ key on your keyboard. If correct, the NZBget Web interface will appear on
your screen. Now close this window.
Open a web browser such as Mozilla Firefox on your computer and type the IPAddress your have written down in the address bar following in the address bar:,
followed by: ‘9091’. For example: http://192.168.1.125:9091 . You will no see the
Transmission interface on you screen. Now close this windows again.
Hint: Preferably, format the hard disk using the NTFS file system.
Note: When using Transmission, do not use Internet Explorer, you can use Mozilla
Firefox, Opera or Safari for example.
16 | ENGLISH
9.2 Setting up the NZBget module
Before you can start downloading with NZBget, you will need to configure a few
settings. You will need your provider details such as the name of your newsserver,
username and login (if used). Follow the steps below to configure NZBget:
1.
2.
3.
4.
5.
6.
7.
8.
9.
10.
11.
12.
13.
14.
15.
16.
17.
18.
Make sure your USB hard disk is connected to your computer and that your
computer is started.
Browse using the explorer to your USB hard disk and right click your USB hard
disk station and choose Ópen’.
The NZBGET folder is a hidden folder. Therefore, we need to display the hidden
folders.
In the explore-window click ‘Tools’, then ‘File Options’.
Click ‘View’.
Now scroll down the entire list and click ‘Show hidden files and folders’.
Click ‘OK’.
Now the ‘.NZBGET’ folder has become visible.
Double-click this folder to open it.
Select the ‘nzbget.conf’ file with the right mouse button.
Now choose ‘open’ , choose ‘Select the program from a list’ and click ‘OK’.
Choose ‘Wordpad’ from the list, uncheck the box ‘always use this program to
open this file type’ and click ‘OK’.
The file will now be opened.
Go to ‘News-Servers’, then go to ‘server1.host=’.
Fill in the name of your News Server.
Then go to ‘server1.username’ and fill in the username needed for your News
Server.
Then go to ‘server1.password’ and fill in the password needed for your News
Server.
Close the file to save the altered settings.
Note! If you are not sure about the name of your News Server or Username and
Password, the required data is known by your ISP (Internet Service Provider).
Note! If you are using a News Server without a Username and Password, make sure
you do not fill in anything behind ‘server1.username and server1.password’. If there
are any dots present, remove them!
9.3 Downloading using the NZBget module
Now you have altered the correct settings, you can begin downloading. Use the
following steps.
17 | ENGLISH
1.
2.
3.
4.
5.
6.
7.
8.
9.
10.
11.
12.
13.
14.
15.
16.
17.
Connect you USB hard disk to the USB port of the EM7075.
Make sure you media player is connected to your network and that your
computer is started.
Turn on the media player by plugging in the media player’s power cable. During
booting the EM7075, the file on the USB hard disk will be read automatically.
Search on your Newsgroup for NZB files and download these to your hard disk.
Using your computer, open the login page of the NZB module. It looks like the
following: http://192.168.1.125 .The NZBget Web interface appears on your
screen.
Click ‘Browse’.
Browse to the NZB file you have downloaded from your Newsgroup and select it.
This file will be recognized as a .NZB file.
Click ‘Upload File’.
It could take a minute, however, on the right side of the screen the name of your
download will appear. Refresh your screen if necessary.
You can also view the status of your download on the right side of the screen.
The downloaded file will automatically be unpacked.
The moment unpacking has finished, you can playback this file.
Use the arrow keys to navigate to the ‘Video’ icon (if you have downloaded a
video file).
Below the ‘Video’ icon you will see the notification ‘USB1’. This means the media
player has recognized the connected device. If you see a blue border around one
of these notifications, it means that the media player has selected this device as
playback device.
Press the ‘OK’ key on the remote control. The available video files will be
displayed.
Select the video file you have just downloaded and press the ‘OK’ button on the
remote control.
The playback of the file will start.
9.4 Downloading using the Transmission module
1.
Make sure you computer is started.
18 | ENGLISH
2.
3.
4.
5.
6.
7.
8.
Connect your USB hard disk to the EM7075’s USB port.
Make sure you media player is connected to your network and that your
computer is started.
Turn on the media player by plugging in the media player’s power cable. During
booting the EM7075, the file on the USB hard disk will be read automatically.
As soon as the EM7075 is completely started, open a web browser like Mozilla
Firefox on you computer.
Empty the address bar and type: ‘http://’ followed by the IP-Address you have
written down earlier. Behind the IP-Address fill in: ‘9091’ (For example:
http://192.168.1.125:9091).
Press the ‘Enter’ key on your keyboard.
Now you will see the following screen:
9. Click ‘Open’.
10. Click ‘Browse’ to browse to a Torrent file on your computer and select this file.
You can also fill in a direct link to the website the Torrent file is listed.
11. Click ‘Upload’ after which the download will start.
12. As soon as the download has finished, you can connect the USB hard disk to
your computer to unpack the downloaded file. This will not be done automatically.
The moment the file has been unpacked, you can connect the hard disk to your
media player again.
13. Use the arrow keys to navigate to the ‘Video’ icon (if you have downloaded a video
file).
14. Below the ‘Video’ icon you will see the notification ‘USB1’. This means the media
player has recognized the connected device. If you see a blue border around one
19 | ENGLISH
of these notifications, it means that the media player has selected this device as
playback device.
15. Press the ‘OK’ key on the remote control. The available video files will be
displayed.
16. Select the video file you have just unpacked and press the ‘OK’ button on the
remote control.
17. The playback of the file will start.
Left at the bottom of the screen you can see a little ‘sprocket’. Click this sprocket to go
the settings page of Transmission. Here you can alter settings like your maximum
download speed. There is no limit to this download speed by default, so your network
and internet connection may experience a sluggish performance. For this reason we
recommend you to set a maximum to this download speed.
Note: If you want to download a large Torrent file, it can take a while before anything
will happen on your screen. Do not interrupt this procedure and be patience!
10.0 Frequently asked questions
Q:
A:
Q:
A:
Q:
A:
I have connected the media player to my television using a HDMI cable, but I am
not able to see an image. How can I solve this problem?
Most likely, your television is not set to the correct HDMI source yet. If your
television is equipped with multiple HDMI inputs, you have to follow all available
HDMI sources until you see the media player’s menu.
In order to play HD contents using a USB hard disk or USB memory stick, you
will need a lot of free disk space. Is there a limit to the size of the disk the media
player can handle?
No, there is no limitation to the size of the hard disk or memory stick. Do note that
FAT32 formatted hard drives (and memory sticks) have a file size limit of 4 GB.
The following file systems are supported: FAT, FAT32, NTFS, HFS+, EXT2 and
EXT3.
Which formats does the media player support?
The media player supports the following formats:
Video: XviD (SD/HD), MPEG-1, MPEG-1/2(MP@HL), MPEG-4.2 (ASP@L5,
720P, 1Pt. GMC) WMV9 (MP@HL), H.264 (BP@L3, [email protected], [email protected] &
L4.1), VC-1 (MP@HL, AP@L3), MKV, AVI, VOB, ISO, IFO, DVR-MS, ASF
(WMV), MOV (MP4 codec), DAT (VCD/SVCD).
Audio: WMA, WMA Pro, AAC (MPEG 4), AC3 (Dolby), MP1/2/3, WAV, PCM,
LPCM,FLAC.
Images: GIF (without animation), BMP (geen CMYK), JPEG, TIF/TIFF (only
single page file), PNG
20 | ENGLISH
Subtitles: SRT, SUB (VobSub, Subviewer), SMI, SSA, ASS, MKV (VobSub,
SRT) subtitle
Playlists: PLS, WPL, M3U
Q:
A:
I am playing a file which has digital sound. My television is connected to the
media player using a DVI adapter plug, but I do not hear any sound. How is this
possible?
Perhaps the media player is not set to digital sound, or, you are not using the
optical connection of the media player. You have to set the media player to digital
sound, and in case of a DVI adapter plug, you have to use the optical connection
of the media player in order to hear the digital sound.
11.0 Service and support
This users manual has been carefully written by Eminent’s technical experts.
If you have problems installing or using the product, please fill out the support form at
the website www.eminent-online.com/support.
12.0 Warranty conditions
The five-year Eminent warranty applies to all Eminent products unless mentioned
otherwise before or during the moment of purchase. When having bought a secondhand Eminent product the remaining period of warranty is measured from the moment
of purchase by the product’s first owner. The Eminent warranty applies to all Eminent
products and parts inextricably connected to and/or mounted on the main product.
Power supply adapters, batteries, antennas and all other products not integrated in or
directly connected to the main product and/or products of which, without reasonable
doubt, can be assumed that wear and tear show a different pattern than the main
product are not covered by the Eminent warranty. Products are not covered by the
Eminent warranty when subjected to incorrect/improper use, external influences
and/or when opened by parties other than Eminent.
13.0 Declaration of Conformity
To ensure your safety and compliance of the product with the directives and laws
created by the European Commission you can obtain a copy of the Declaration of
Conformity concerning your product by sending an e-mail message to: [email protected]. You can also send a letter to:
Eminent Computer Supplies
P.O. Box 276
6160 AG Geleen
The Netherlands
21 | ENGLISH
Clearly state ‘Declaration of Conformity’ and the article code of the product of which
you would like to obtain a copy of the Declaration of Conformity.
EM7075 | 09-2009